
U niversal T uning E ditor
53
Universal Tuning Editor Ηπ INSTRUMENTS Aaron Andrew Hunt
Transcript of U niversal T uning E ditor
Universal Tuning Editor
Ηπ INSTRUMENTS
Aaron Andrew Hunt
Ηπ INSTRUMENTS hpi.zentral.zone · Universal Tuning Editor · documentation v12 24.Feb.2022
Changes from Previous Documentation 5 Current Version, v12 — 24. Feb 2022 5 ...................................................................
Previous Versions 5 ............................................................................................
Introduction 9 Features List 9 .................................................................................................
User Interface Basics 11 ......................................................................................
Maximising the Detail View 12 ..............................................................................
Maximising the Tuning List 13 ..............................................................................
Toolbar 13 .......................................................................................................
Bug Reporting & Feedback 14 ...............................................................................
Feature Requests 14 ..........................................................................................
File Handling 15 Preferences 15 ..................................................................................................
Auto store unsaved projects internally 15 ...............................................................
Restore external projects at next session 15 ...........................................................
Prompt to handle each open project 15 ..................................................................
Discarding a Project 16 .......................................................................................
Importing projects from CSE 16 ............................................................................
1. MIDI Settings 17 Input Sources & Output Destinations 17 ..................................................................
Rescanning MIDI 17 ............................................................................................
Synthesizer Settings 17 .......................................................................................
MIDI Instrument Input 18 .....................................................................................
Selecting MIDI Output Channels 18 .........................................................................
Working with Devices 18 .....................................................................................
2. Instruments 19 uInstruments 19 ................................................................................................
Instrument Definition Files (.uinst) 19 ....................................................................
The Structure of a uInstrument 19 .........................................................................
uVersions & uOptions 20 .....................................................................................
MIDI Notes & Channels 20 ....................................................................................
Altering Default uInstruments 20 ...........................................................................
1
Ηπ INSTRUMENTS hpi.zentral.zone · Universal Tuning Editor · documentation v12 24.Feb.2022
Creating a New uInstrument 20 .............................................................................
3. Tones 21 Reference Tone 21 .............................................................................................
Tonic 21 ..........................................................................................................
4. Scales 22 Tunings vs. Scales 22 ..........................................................................................
Supported Tuning Files 22 ...................................................................................
Importing a Scale 24 ..........................................................................................
Caveats About Importing Scala .scl Files 25 .............................................................
Mapping a Scale 25 ............................................................................................
Mapping from All Keys 25 ....................................................................................
Mapping from Selected Keys 26 ............................................................................
Mapping from Octave & Key 26 .............................................................................
Applying a Pattern (Repeat Map) 26 ......................................................................
Tuning Equal Divisions 26 ....................................................................................
Exporting Scales 27 ...........................................................................................
5. Tuning List 28 Input, Tuning, & Output Columns 28 .......................................................................
Units ¢ 28 ........................................................................................................
About Period Numbers 28 ....................................................................................
Tuning Entries 29 ..............................................................................................
Comments 29 ....................................................................................................
Column Width Adjustments 29 ..............................................................................
6. Editing Tunings by Selection 30 Selection Basics 30 ............................................................................................
Selecting an Entire Instrument Period 30 .................................................................
Transpose 30 ....................................................................................................
Repeat 31 ........................................................................................................
Reverse Order 31 ..............................................................................................
Tune Scale 31 ...................................................................................................
Tune Equal Division 31 ........................................................................................
Tune Equal Steps 31 ...........................................................................................
Convert to Ratio 31 ...........................................................................................
2
Ηπ INSTRUMENTS hpi.zentral.zone · Universal Tuning Editor · documentation v12 24.Feb.2022
Convert to Decimal 32 ........................................................................................
Convert to Units 32 ............................................................................................
Convert to Hz 32 ...............................................................................................
Reduce ET Notation 32 .......................................................................................
Reduce Ratios 32 ...............................................................................................
Reduce Entry 33 ................................................................................................
Set Period 33 ....................................................................................................
Period Up / Down 33 ...........................................................................................
7. Patterns 34 Showing the Patterns List 34 ................................................................................
Adding a new Pattern 34 .....................................................................................
Editing a Pattern 35 ...........................................................................................
Chords 35 ........................................................................................................
Chord Rotation (Inversion) 36 ...............................................................................
Subsets 37 .......................................................................................................
Repeat Maps 38 ................................................................................................
Importing Shapes from TPXE 38 ............................................................................
8. Devices 39 Setting a Default Device 39 ..................................................................................
MIDI Interface Requirements 39 ............................................................................
9. Display Options 40 Tuning List 40 ...................................................................................................
Text on keys 40 .................................................................................................
Animate Instrument 40 .......................................................................................
Key Colors & MIDI Data 41 ...................................................................................
Setting Key Colors 41 .........................................................................................
Setting Key MIDI Channels & Notes 41 .....................................................................
Saving & Loading Key Data 41 ..............................................................................
10. The Lumatone Isomorphic Keyboard 42 The Lumatone uInstrument Model 42 ......................................................................
The Lumatone Device 43 .....................................................................................
Importing & Exporting .ltn Files 43 ........................................................................
Editing Key Data (Notes, Channels, & LED Colors) 43 .................................................
3
Ηπ INSTRUMENTS hpi.zentral.zone · Universal Tuning Editor · documentation v12 24.Feb.2022
Mapping Scales to the Keyboard 44 .......................................................................
The Lumatone Window 45 ....................................................................................
Confirming MIDI I/O 45 ........................................................................................
Send/Program 46 ...............................................................................................
Get/Query 46 ...................................................................................................
Assign Preset 47 ................................................................................................
Responding to Lumatone Preset Switching 47 ...........................................................
Ongoing Development 47 .....................................................................................
APPENDIX: uInstrument (.uinst) Short Guide 48 Positions: Left & Top 48 ......................................................................................
Names & Descriptions 48 .....................................................................................
Shapes 48 ........................................................................................................
Colors 49 .........................................................................................................
Structure 49 .....................................................................................................
Display Names 49 ..............................................................................................
MIDI Notes & Channels 49 ....................................................................................
Versions 50 ......................................................................................................
Options 50 .......................................................................................................
Navigation 50 ...................................................................................................
Default Patterns 50 ...........................................................................................
Default Tuning 50 ..............................................................................................
LED Colors 51 ...................................................................................................
Credits 52
4
Ηπ INSTRUMENTS hpi.zentral.zone · Universal Tuning Editor · documentation v12 24.Feb.2022
Changes from Previous Documentation Here are lists of changes for each version of this documentation.
Current Version, v12 — 24. Feb 2022 • Documentation updated with release of UTE v2.0.8
• Chapter 10: added Responding to Lumatone Preset Switching
Previous Versions v11 — 1. May 2021 • Documentation updated with release of UTE v1.9.7
• Chapter 6: added headings for Selection Basics and Selecting an Entire Instrument Period
• Chapter 9: expanded text covering Key Colors and MIDI Data assignments.
• Chapter 10: added new chapter about UTE features for the Lumatone Isomorphic Keyboard.
• Appendix: Added section on <LEDColors> and edited some items for clarity.
v10 — 25. May 2020 • Documentation updated with release of UTE v1.7.4
• File Handling: Added info on discarding UTE project files.
• Chapter 3: Fixed a typo: (4,12) means 3 halfsteps up from Tonic, not 4. Clarified how Tonic
is reckoned when placed below the Reference Tone.
• Chapter 5: Added more information under About Period Numbers.
• Chapter 6: Improved description of transposing by Units.
• Appendix: Reordered some topics for clarity.
v9 — 8. May 2020 • Documentation updated with release of UTE v1.7.0
• Introduction: updated features list, Roadmap description, and Toolbar list.
• File Handling: Added info on UTE project files and importing files from CSE.
• Chapter 1: added info about selecting output channels for MIDI output
• Chapter 4: Added info on applying a Repeat Map to a scale mapping
• Chapter 7: Added new chapter on Patterns (and moved Chapters 7 and 8 to 8 and 9).
Please report typos or problems with this text via email to [email protected]
5
Ηπ INSTRUMENTS hpi.zentral.zone · Universal Tuning Editor · documentation v12 24.Feb.2022
• Chapter 9: Attempted to improve the explanation of what a Device is in UTE.
• Appendix: Added info on new tags for <DisplayX>, <DisplayY>, <DefaultPatterns> and
<DefaultTuning> in .uinst files.
v8 — 23. March 2020 • Documentation updated with release of UTE v1.6.0
• Introduction: updated features list and Roadmap description.
• Chapter 6: Added info on Convert to Hz menu item. Under Transpose added an example of
transposing by Units.
• Chapter 9: Added section on the new features Key Colors & MIDI Data.
• Chapter 8: Added a list of supported Devices and a notice about requests for new Devices.
• Appendix: Added the Mac and Windows file paths for locating example .uinst files.
v7 — 15. January 2020 • Documentation updated with release of UTE v1.5.0
• Chapter 8: All device-specific information has been moved out of this documentation into
the documentation for each supported device.
v6 — 27. April 2019 • Documentation updated with release of UTE v1.4.0
• Chapter 4: Exporting Scales added description of the new .scl from selected notes options
• Chapter 6: added description of the new Repeat function.
• Changed how entries in this section are handled in the table of contents.
v5 — 8. April 2019 • Documentation updated with release of UTE v1.3.7
• Chapter 6: fixed typo under Tune Equal Steps.
v4 — 27. March 2019 • Documentation updated with release of UTE v1.3.5
• Introduction: updated Features List and Version Roadmap.
• Chapter 2: added new sections Altering Default uInstruments and Creating New
uInstruments.
• Chapter 5: added sections Comments and Column Width Adjustments.
6
Ηπ INSTRUMENTS hpi.zentral.zone · Universal Tuning Editor · documentation v12 24.Feb.2022
• Chapter 6: added sections Tune Equal Steps, Reduce ET Notation, Reduce Ratios, and
Reduce Entries.
• Chapter 9: updated Display Window image.
v3 — 2. March 2019 • Chapter 3: updated Tones Window images and definition of Tonic to reflect changes.
• Chapter 4: updated Scales Window images and text about how scales are mapped to keys.
Added new formats to Export chart
• Chapter 5: removed text about the ø character in Tuning Entries because use of this
character is not supported in UTE due to the paradigm change from octave-based entries to
period-based entries. Added section on Units column.
• Chapter 6: added Convert to Ratio, Convert to Decimal and Convert to Units new
Selection menu item function descriptions.
• Chapter 9: updated Display Window images and description.
• Appendix: edited some .uinst tag descriptions for clarity.
v2 — 15. February 2019 • Introduction: Updated text and added new features to features list, and added a section
outlining the toolbar buttons.
• Chapter 1: Added section on rescanning MIDI (Windows-only necessity), and a section
explaining the new MIDI Instrument Input functionality.
• Chapter 4: rewrote text on the topic of Mapping to reflect new feature set of the Scales
window. Added sections on Tuning Equal Divisions, and Exporting Scales.
• Chapter 6: Added chapter for Editing Tunings by Selection to explain the options in the
newly added Selection menu.
• Chapter 9: Added short chapter Display Options.
• Chapter 8: Devices – this chapter was previously chapter 6.
v1.3 — 28. January 2019 • Chapter 9: Added information about MIDI Interface requirements, added a diagram and LCD
image for TBX2 Firmware Update Startup, and a Troubleshooting section for MIDI problems.
• Moved this section out of the introduction and gave it chapter heading status.
• Added publication date to page header.
7

Ηπ INSTRUMENTS hpi.zentral.zone · Universal Tuning Editor · documentation v12 24.Feb.2022
v1.2 — 3. October 2018 • Chapter 9: Added information on updating TBX2 firmware.
v1 — January 2018 • Initial release
8

Ηπ INSTRUMENTS hpi.zentral.zone · Universal Tuning Editor · documentation v12 24.Feb.2022
Introduction Universal Tuning Editor (UTE, for Mac OSX and Windows) is the result of over a decade of experience developing tuning hardware and software through H-Pi Instruments. UTE combines the strongest features of existing H-Pi software in a newly conceived codebase, improving the shortcomings of existing software and expanding possibilities for the future. A revolutionary idea behind UTE is to approach tunings according to any arbitrary geometry of any MIDI keyboard instrument imaginable. This is done by implementing XML instrument definition files which users can write themselves.
UTE provides a translator for the many different file formats now used for tuning. In this respect it does what CSE has been doing for some time now, only better. With UTE also comes a new concept: the .utuning file, a universal container for any existing type of tuning file.
UTE was developed along with TBX2 (now TBX2b), a hardware device capable of storing over 8000 tunings. TBX2b receives input from a MIDI controller and sends microtonal output to a MIDI synthesizer. UTE allows TBX2b owners to upload tunings, update firmware, manage presets and parameters, and so on. Other supported devices include our FLASH synthesizer, TBX1, Tonal Plexus TPX keyboards, Linnstrument and the Lumatone keyboard. Support for other devices can be added at any time by request.
Features List • user-definable instrument geometry • internal synthesizer microtonal output
• Mac version supports soundfonts, Windows version depends on system • import tunings in any existing tuning format • export tunings in a variety of tuning formats • map tunings automatically to keyboard keys • user-programmable patterns for chords, subsets, and repeated keys • user-definable reference tone and tonic • tune any key to any pitch using flexible tuning entries • play MIDI in from any instrument to hear the pitches you define • animated graphic instrument responds to incoming MIDI • create equal division tunings (octave or non-octave) • create equal steps ascending or descending of any size • transpose tones up or down by any tuning entry • set or alter period placement of any tone • convert between ratios, decimals, and logarithmic units (like cents) • Copy / Paste and Paste Into Selection options • native filetypes:
• .ute - for projects
9
Ηπ INSTRUMENTS hpi.zentral.zone · Universal Tuning Editor · documentation v12 24.Feb.2022
• .uinst - for instrument definitions • .utuning - a container for tuning files in any format • .ubootsyx, .uboothex - for firmware files • .udevicebackup - for device data backup files
• TBX2/b: • upload tunings to memory • send firmware updates • program any of 40 presets • program global parameters • program any of 10 USR datasets • backup and restore memory
• TBX1 and Tonal Plexus TPX microtonal keyboards: • upload tunings to the device
• Lumatone keyboard: • program, send and receive key Colors and MIDI Channel / Note key
assignments to and from the keyboard • import and export .ltn files • save configurations as presets
• Linnstrument: • program key Colors to the device
• FLASH synthesizer: • program tunings and patches • real time patch experimentation • send firmware updates
• automatic and menu-option bug reporting • import files from CSE
10
Ηπ INSTRUMENTS hpi.zentral.zone · Universal Tuning Editor · documentation v12 24.Feb.2022
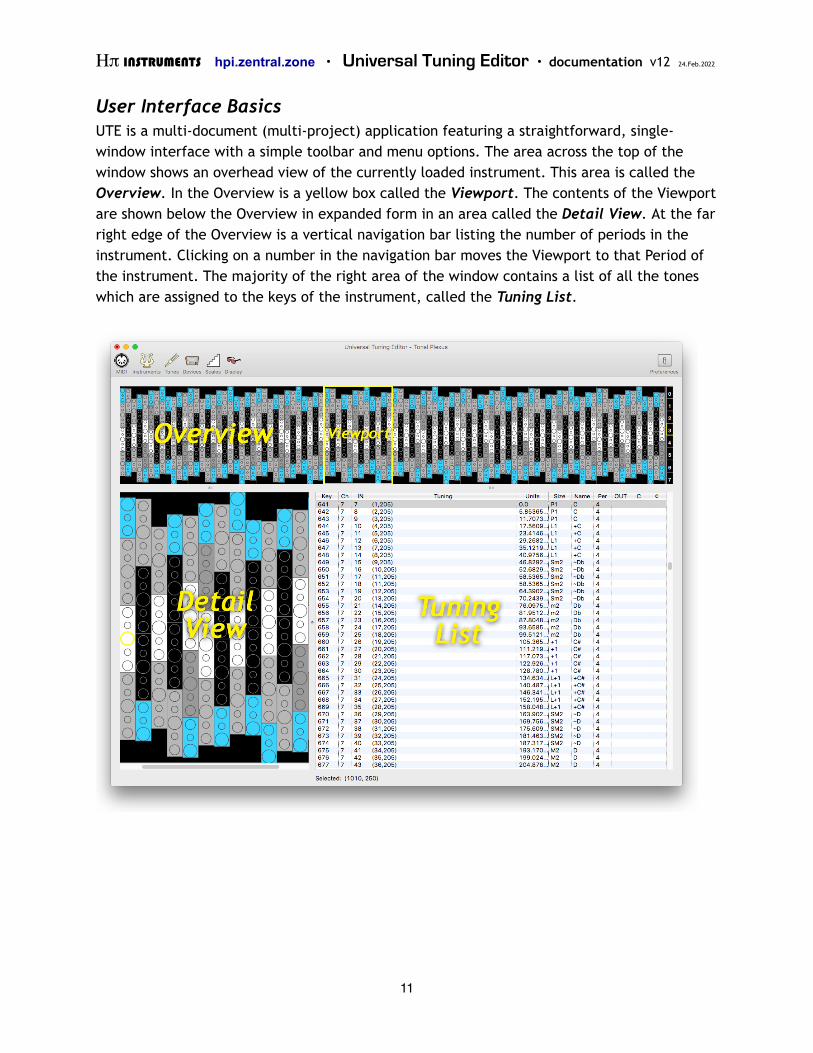
User Interface Basics UTE is a multi-document (multi-project) application featuring a straightforward, single-window interface with a simple toolbar and menu options. The area across the top of the window shows an overhead view of the currently loaded instrument. This area is called the Overview. In the Overview is a yellow box called the Viewport. The contents of the Viewport are shown below the Overview in expanded form in an area called the Detail View. At the far right edge of the Overview is a vertical navigation bar listing the number of periods in the instrument. Clicking on a number in the navigation bar moves the Viewport to that Period of the instrument. The majority of the right area of the window contains a list of all the tones which are assigned to the keys of the instrument, called the Tuning List.
11
Ηπ INSTRUMENTS hpi.zentral.zone · Universal Tuning Editor · documentation v12 24.Feb.2022
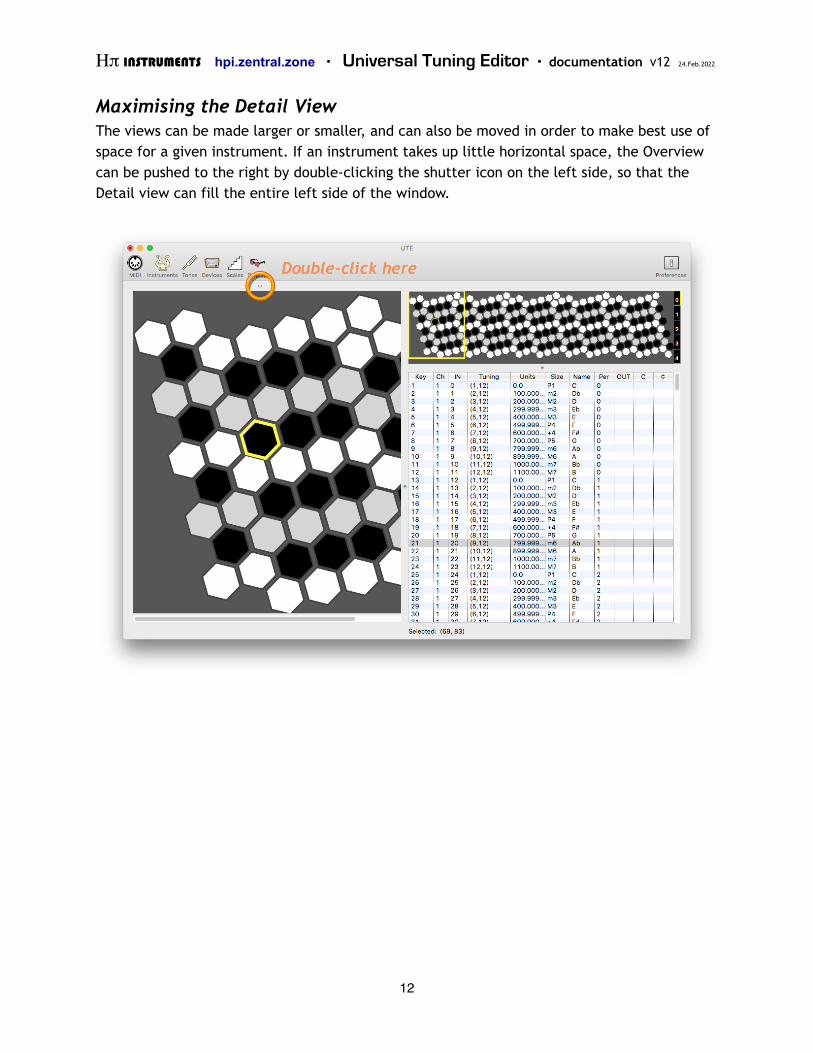
Maximising the Detail View The views can be made larger or smaller, and can also be moved in order to make best use of space for a given instrument. If an instrument takes up little horizontal space, the Overview can be pushed to the right by double-clicking the shutter icon on the left side, so that the Detail view can fill the entire left side of the window.
12
Ηπ INSTRUMENTS hpi.zentral.zone · Universal Tuning Editor · documentation v12 24.Feb.2022
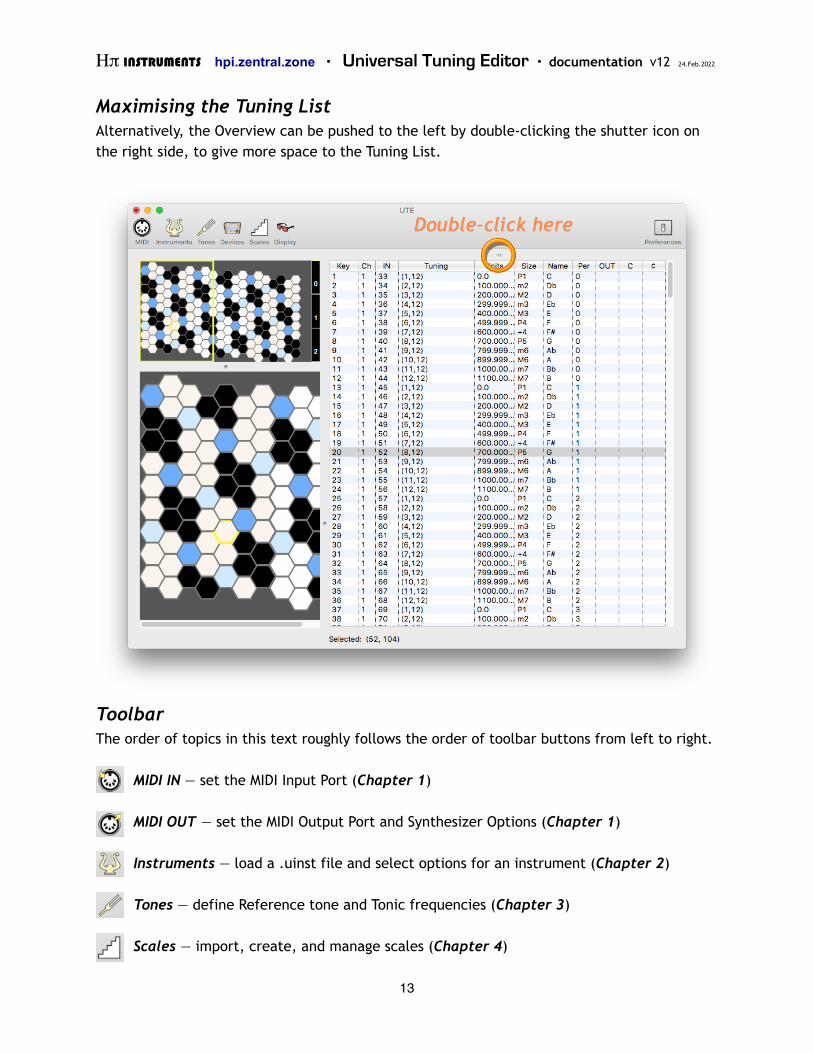
Maximising the Tuning List Alternatively, the Overview can be pushed to the left by double-clicking the shutter icon on the right side, to give more space to the Tuning List.
Toolbar The order of topics in this text roughly follows the order of toolbar buttons from left to right.
MIDI IN — set the MIDI Input Port (Chapter 1)
MIDI OUT — set the MIDI Output Port and Synthesizer Options (Chapter 1)
Instruments — load a .uinst file and select options for an instrument (Chapter 2)
Tones — define Reference tone and Tonic frequencies (Chapter 3)
Scales — import, create, and manage scales (Chapter 4)
13
Ηπ INSTRUMENTS hpi.zentral.zone · Universal Tuning Editor · documentation v12 24.Feb.2022
Patterns — use default, create new, import Shapes files from TPXE (Chapter 7)
Devices — select a device or perform a function for the selected device (Chapter 8)
Display — decide how aspects of the interface should look and respond (Chapter 9)
Preferences — select global options to be applied to new projects
Bug Reporting & Feedback Please report any problems you may experience with UTE directly by using the menu item Report a Bug. Before doing so, please also check the UTE reports webpage, which lists all known issues and feature requests. Feedback which is not about bugs may be sent by email directly or using the menu item Send an Email.
Feature Requests If the software does not do something you would like it to do, and you are willing to pay for the feature you want, use the menu item Request a Feature to describe the feature and make an initial offer to pay for it. A professional wage for programming is not expected. 20 € is an acceptable starting point (adding any feature requires several hours of work). If your idea makes sense and your offer is reasonable, then a payment schedule is agreed upon and a testing stage begins. Once testing is done and the feature is verified as working, a new version of the software is released including the new feature(s).
Please report bugs as described, and support will proceed via email to resolve the issue.
Not all features are possible or will be considered relevant for the majority of users. A minimum offer of 20 € is standard for all Feature Requests.
14
Ηπ INSTRUMENTS hpi.zentral.zone · Universal Tuning Editor · documentation v12 24.Feb.2022
File Handling This section explains options for loading and saving project files, and for importing files from other applications. MacOS users and Windows users have slightly different expectations about how files are supposed to be handled, and UTE does not follow either OS-convention strictly, but provides a compromise between platforms.
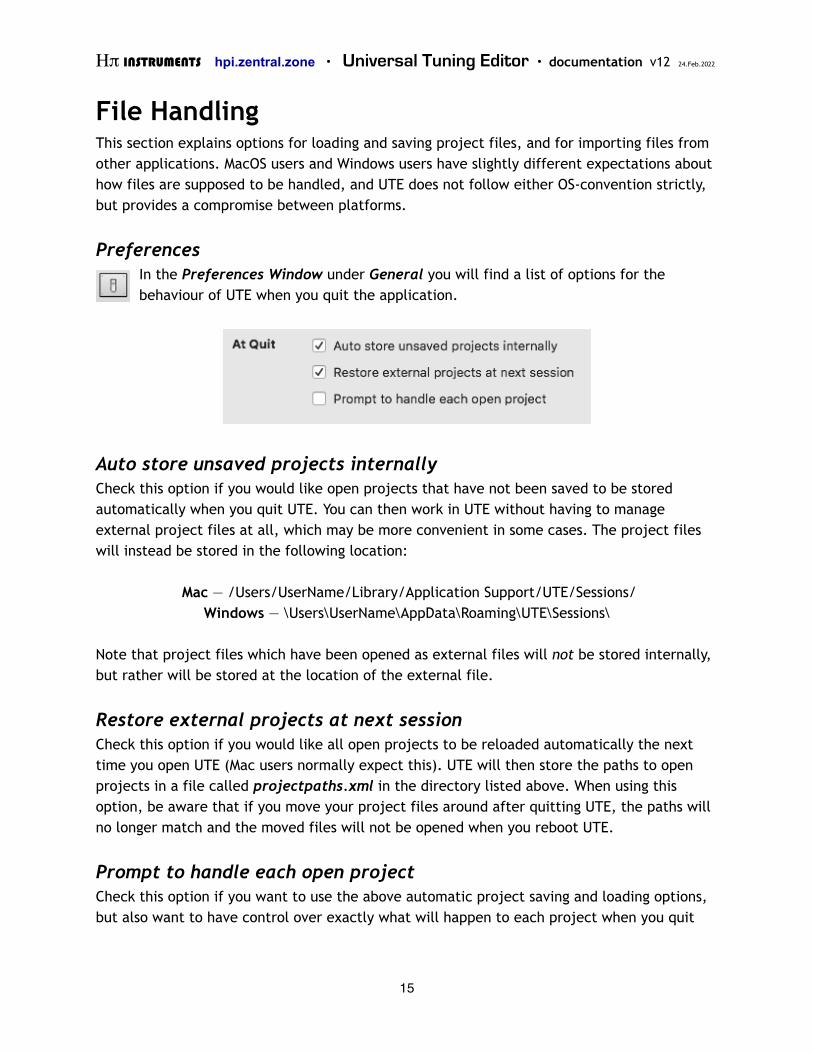
Preferences In the Preferences Window under General you will find a list of options for the behaviour of UTE when you quit the application.
Auto store unsaved projects internally Check this option if you would like open projects that have not been saved to be stored automatically when you quit UTE. You can then work in UTE without having to manage external project files at all, which may be more convenient in some cases. The project files will instead be stored in the following location:
Mac — /Users/UserName/Library/Application Support/UTE/Sessions/ Windows — \Users\UserName\AppData\Roaming\UTE\Sessions\
Note that project files which have been opened as external files will not be stored internally, but rather will be stored at the location of the external file.
Restore external projects at next session Check this option if you would like all open projects to be reloaded automatically the next time you open UTE (Mac users normally expect this). UTE will then store the paths to open projects in a file called projectpaths.xml in the directory listed above. When using this option, be aware that if you move your project files around after quitting UTE, the paths will no longer match and the moved files will not be opened when you reboot UTE.
Prompt to handle each open project Check this option if you want to use the above automatic project saving and loading options, but also want to have control over exactly what will happen to each project when you quit
15
Ηπ INSTRUMENTS hpi.zentral.zone · Universal Tuning Editor · documentation v12 24.Feb.2022
UTE. A dialog will then appear for each window asking you what you want to do with that project.
Discarding a Project When using the automatic options described above, UTE gives you options to save projects internally or externally. If you want to discard the file, select the option Save Externally, cancel that operation, and then close the window.
Importing projects from CSE UTE can import Custom Scale Editor (CSE) .cse project files using the menu item File > Import .cse File
The implementation is currently rudimentary, and you should be aware of the following limitations.
• Only the first layer of the .cse file will be imported
• Tuning Entries in the .cse file having forced octave notation will not be parsed correctly
• Tuning Entries in the .cse file using Constants, Formulas, Algorithms, or linked entries will be invalid.
• The Key and Hz settings of the .cse file may not transfer correctly to UTE
If you would like the .cse import functionality to be improved in some specific way, or you would like an import function for some other project file type, see Feature Requests above. Keep in mind, there are already import functions for almost all scale file formats (see Chapter 4).
16
Ηπ INSTRUMENTS hpi.zentral.zone · Universal Tuning Editor · documentation v12 24.Feb.2022
1. MIDI Settings UTE communicates with MIDI devices, so an important first step when using the software is to properly set up MIDI connections.
Input Sources & Output Destinations All available MIDI inputs and outputs are shown in the MIDI window, which can be opened by selecting the menu item MIDI > Input / Output (Command+M) or by clicking the MIDI icon in the toolbar and selecting MIDI Input / Output from the popup menu. On Mac, UTE creates one virtual input port and one output port which can be used to route MIDI to and from other software. It is however recommended to use Apple’s native IAC Bus for this because the connections will persist from one session to the next without having to reselect the port upon each use. To set up the IAC Bus ports, open Utilities > Audio MIDI Setup, go to Window > Show MIDI Setup, and follow the instructions provided by Apple using the Help menu.
Rescanning MIDI Mac users do not need to rescan MIDI ports when connecting and disconnecting MIDI gear, as the device list gets updated in real time. Windows users need to open the MIDI window and click the Rescan button (also available in many Device windows) whenever a device is connected or disconnected.
Synthesizer Settings Once an Instrument is loaded, access to the internal synthesizer appears in the MIDI popup menu. Selecting this option opens the Synthesizer Options window. On Mac, options to select a Soundfont, and set Pitch Cents Offset, Reverb, and Volume are included. Note that the Pitch Cents Offset value should be changed only when a given Soundfont is pitched at some other level than A = 440.0 Hz, otherwise output will not be correct according to the values set to your Reference Tone and Tonic (see Chapter 3, Tones for more information). On Windows, only the Patch, Volume and Panning can be selected.
Windows users who want to use virtual MIDI ports must install a driver for them such as LoopBe1 or MIDIYoke.
For internal microtonal output on Windows, it is best to route MIDI Out to a third-party synthesizer due to the unacceptable latency of the built-in Windows MIDI synthesizer.
17
Ηπ INSTRUMENTS hpi.zentral.zone · Universal Tuning Editor · documentation v12 24.Feb.2022
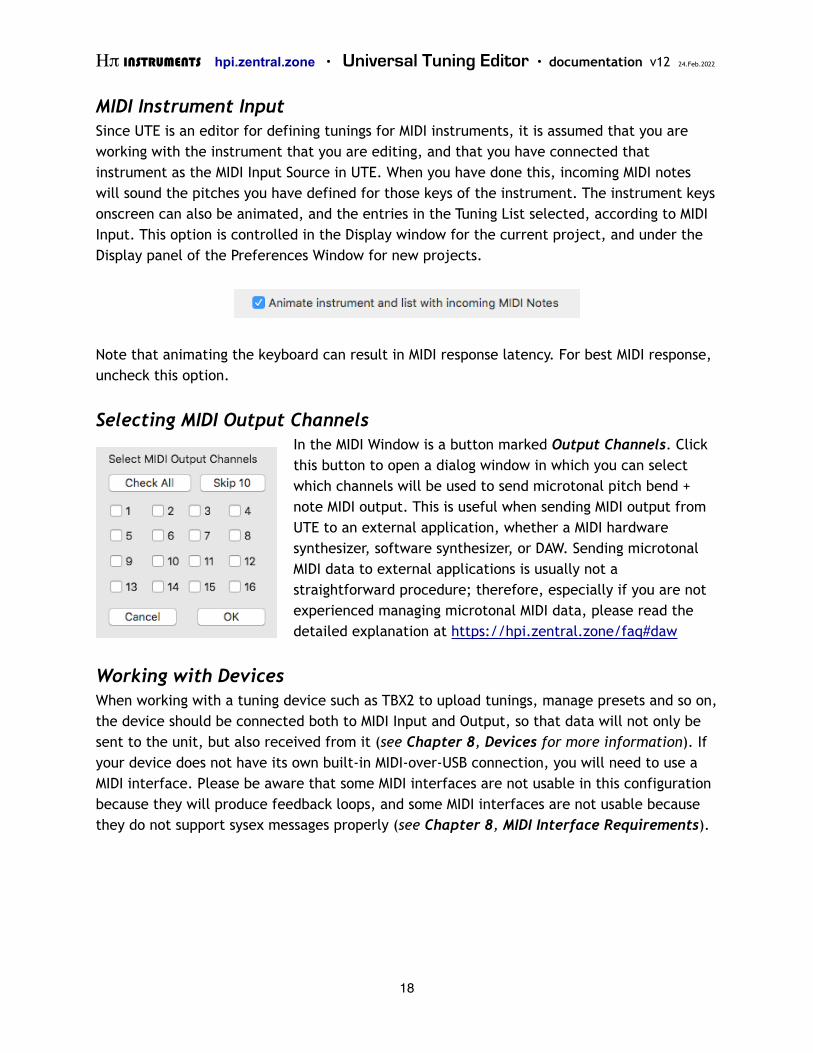
MIDI Instrument Input Since UTE is an editor for defining tunings for MIDI instruments, it is assumed that you are working with the instrument that you are editing, and that you have connected that instrument as the MIDI Input Source in UTE. When you have done this, incoming MIDI notes will sound the pitches you have defined for those keys of the instrument. The instrument keys onscreen can also be animated, and the entries in the Tuning List selected, according to MIDI Input. This option is controlled in the Display window for the current project, and under the Display panel of the Preferences Window for new projects.
Note that animating the keyboard can result in MIDI response latency. For best MIDI response, uncheck this option.
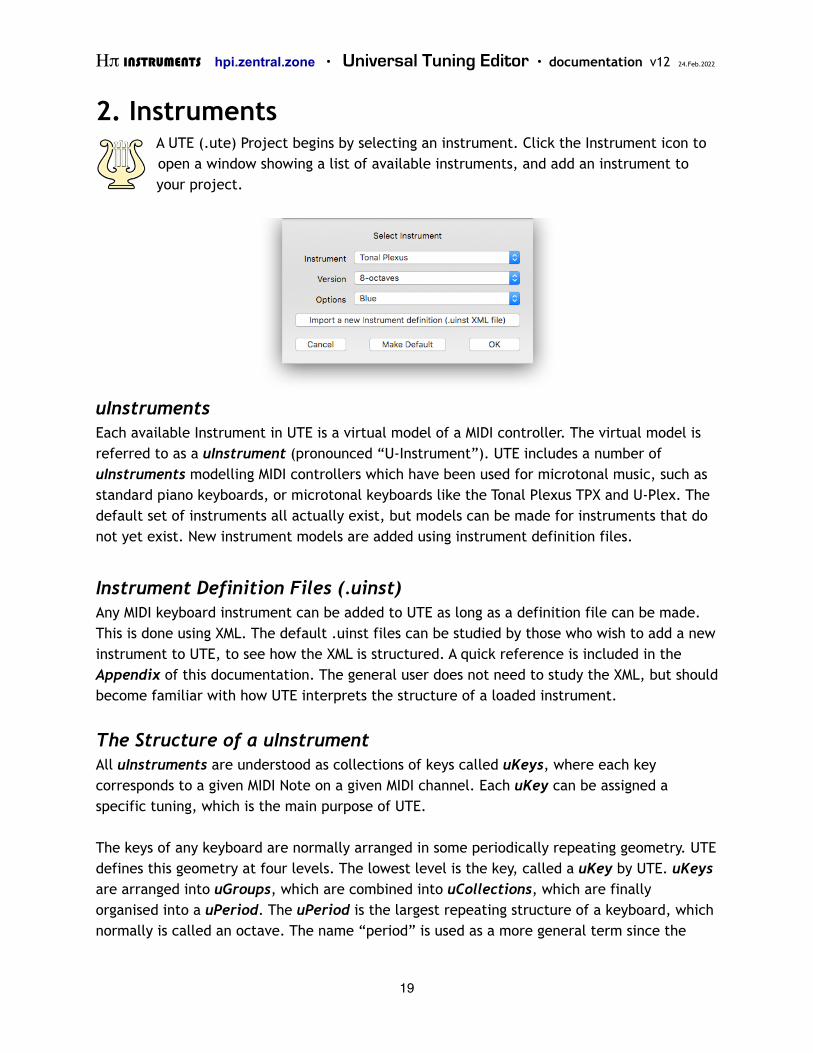
Selecting MIDI Output Channels In the MIDI Window is a button marked Output Channels. Click this button to open a dialog window in which you can select which channels will be used to send microtonal pitch bend + note MIDI output. This is useful when sending MIDI output from UTE to an external application, whether a MIDI hardware synthesizer, software synthesizer, or DAW. Sending microtonal MIDI data to external applications is usually not a straightforward procedure; therefore, especially if you are not experienced managing microtonal MIDI data, please read the detailed explanation at https://hpi.zentral.zone/faq#daw
Working with Devices When working with a tuning device such as TBX2 to upload tunings, manage presets and so on, the device should be connected both to MIDI Input and Output, so that data will not only be sent to the unit, but also received from it (see Chapter 8, Devices for more information). If your device does not have its own built-in MIDI-over-USB connection, you will need to use a MIDI interface. Please be aware that some MIDI interfaces are not usable in this configuration because they will produce feedback loops, and some MIDI interfaces are not usable because they do not support sysex messages properly (see Chapter 8, MIDI Interface Requirements).
18
Ηπ INSTRUMENTS hpi.zentral.zone · Universal Tuning Editor · documentation v12 24.Feb.2022
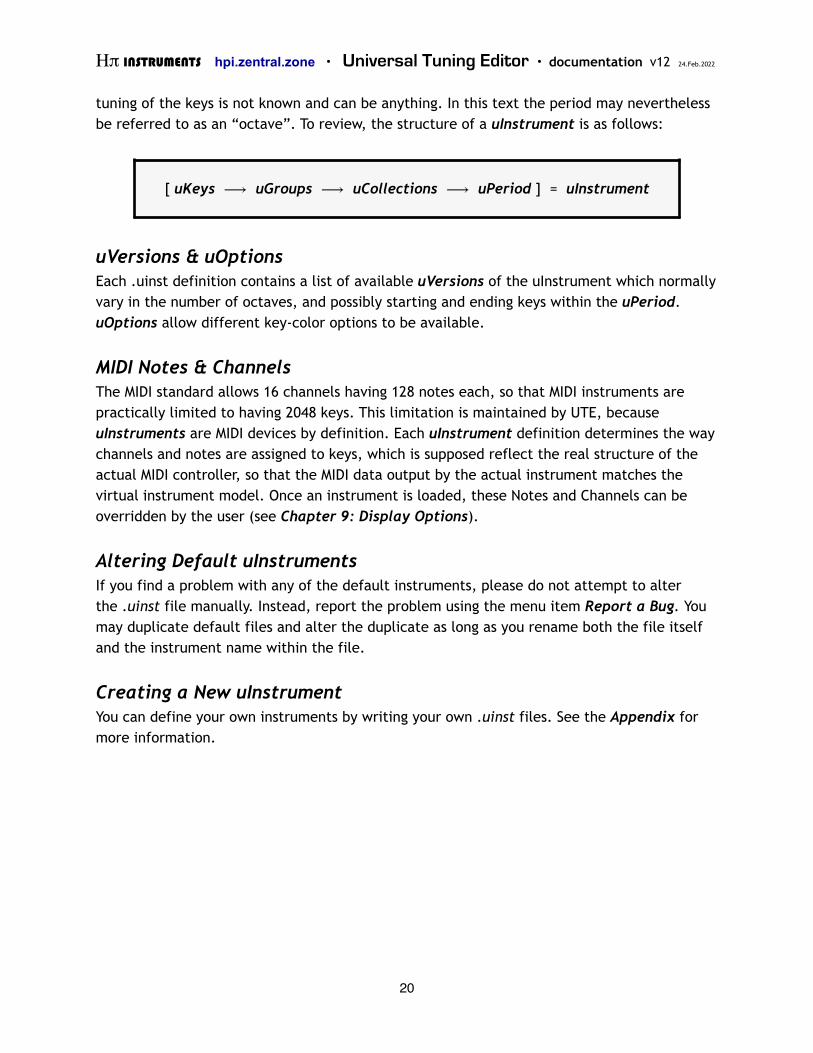
2. Instruments A UTE (.ute) Project begins by selecting an instrument. Click the Instrument icon to open a window showing a list of available instruments, and add an instrument to your project.
uInstruments Each available Instrument in UTE is a virtual model of a MIDI controller. The virtual model is referred to as a uInstrument (pronounced “U-Instrument”). UTE includes a number of uInstruments modelling MIDI controllers which have been used for microtonal music, such as standard piano keyboards, or microtonal keyboards like the Tonal Plexus TPX and U-Plex. The default set of instruments all actually exist, but models can be made for instruments that do not yet exist. New instrument models are added using instrument definition files.
Instrument Definition Files (.uinst) Any MIDI keyboard instrument can be added to UTE as long as a definition file can be made. This is done using XML. The default .uinst files can be studied by those who wish to add a new instrument to UTE, to see how the XML is structured. A quick reference is included in the Appendix of this documentation. The general user does not need to study the XML, but should become familiar with how UTE interprets the structure of a loaded instrument.
The Structure of a uInstrument All uInstruments are understood as collections of keys called uKeys, where each key corresponds to a given MIDI Note on a given MIDI channel. Each uKey can be assigned a specific tuning, which is the main purpose of UTE.
The keys of any keyboard are normally arranged in some periodically repeating geometry. UTE defines this geometry at four levels. The lowest level is the key, called a uKey by UTE. uKeys are arranged into uGroups, which are combined into uCollections, which are finally organised into a uPeriod. The uPeriod is the largest repeating structure of a keyboard, which normally is called an octave. The name “period” is used as a more general term since the
19
Ηπ INSTRUMENTS hpi.zentral.zone · Universal Tuning Editor · documentation v12 24.Feb.2022
tuning of the keys is not known and can be anything. In this text the period may nevertheless be referred to as an “octave”. To review, the structure of a uInstrument is as follows:
uVersions & uOptions Each .uinst definition contains a list of available uVersions of the uInstrument which normally vary in the number of octaves, and possibly starting and ending keys within the uPeriod. uOptions allow different key-color options to be available.
MIDI Notes & Channels The MIDI standard allows 16 channels having 128 notes each, so that MIDI instruments are practically limited to having 2048 keys. This limitation is maintained by UTE, because uInstruments are MIDI devices by definition. Each uInstrument definition determines the way channels and notes are assigned to keys, which is supposed reflect the real structure of the actual MIDI controller, so that the MIDI data output by the actual instrument matches the virtual instrument model. Once an instrument is loaded, these Notes and Channels can be overridden by the user (see Chapter 9: Display Options).
Altering Default uInstruments If you find a problem with any of the default instruments, please do not attempt to alter the .uinst file manually. Instead, report the problem using the menu item Report a Bug. You may duplicate default files and alter the duplicate as long as you rename both the file itself and the instrument name within the file.
Creating a New uInstrument You can define your own instruments by writing your own .uinst files. See the Appendix for more information.
[ uKeys ⟶ uGroups ⟶ uCollections ⟶ uPeriod ] = uInstrument
20
Ηπ INSTRUMENTS hpi.zentral.zone · Universal Tuning Editor · documentation v12 24.Feb.2022
3. Tones UTE uses two primary tones to define all tunings: a Reference Tone, and a Tonic. In the simplest case, these two tones are the same, but they need not be the same,
because they do have different purposes.
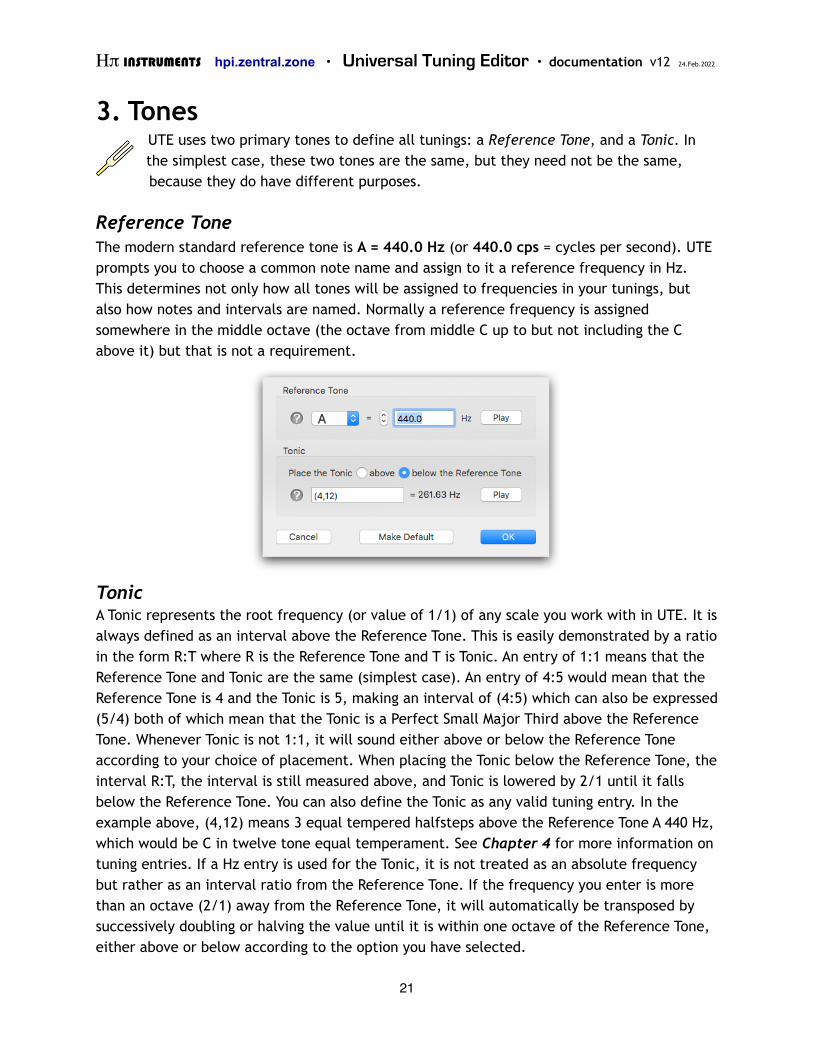
Reference Tone The modern standard reference tone is A = 440.0 Hz (or 440.0 cps = cycles per second). UTE prompts you to choose a common note name and assign to it a reference frequency in Hz. This determines not only how all tones will be assigned to frequencies in your tunings, but also how notes and intervals are named. Normally a reference frequency is assigned somewhere in the middle octave (the octave from middle C up to but not including the C above it) but that is not a requirement.
Tonic A Tonic represents the root frequency (or value of 1/1) of any scale you work with in UTE. It is always defined as an interval above the Reference Tone. This is easily demonstrated by a ratio in the form R:T where R is the Reference Tone and T is Tonic. An entry of 1:1 means that the Reference Tone and Tonic are the same (simplest case). An entry of 4:5 would mean that the Reference Tone is 4 and the Tonic is 5, making an interval of (4:5) which can also be expressed (5/4) both of which mean that the Tonic is a Perfect Small Major Third above the Reference Tone. Whenever Tonic is not 1:1, it will sound either above or below the Reference Tone according to your choice of placement. When placing the Tonic below the Reference Tone, the interval R:T, the interval is still measured above, and Tonic is lowered by 2/1 until it falls below the Reference Tone. You can also define the Tonic as any valid tuning entry. In the example above, (4,12) means 3 equal tempered halfsteps above the Reference Tone A 440 Hz, which would be C in twelve tone equal temperament. See Chapter 4 for more information on tuning entries. If a Hz entry is used for the Tonic, it is not treated as an absolute frequency but rather as an interval ratio from the Reference Tone. If the frequency you enter is more than an octave (2/1) away from the Reference Tone, it will automatically be transposed by successively doubling or halving the value until it is within one octave of the Reference Tone, either above or below according to the option you have selected.
21
Ηπ INSTRUMENTS hpi.zentral.zone · Universal Tuning Editor · documentation v12 24.Feb.2022
4. Scales A scale is an arrangement of any number of tones in ascending order. The word “tuning” is sometimes used interchangeably with “scale”, which sometimes makes sense, for example when discussing tuning files, some of which contain scale
information, and some of which do not, but in each case the imported data can be treated as a scale. One of the main functions of UTE is the importing of tuning files and assigning tones of scales to instrument keys — a process called “mapping”.
Tunings vs. Scales The word “tuning” is a general term meaning any set of tones used to make music. A scale is normally a smaller set of organised tones from which a larger set of tones called a tuning may be derived. A tuning does not not necessarily include a scale and it doesn’t have to be organised in any conventional way; it can be a collection of tones in any order with no discernible subsets. This distinction between scale and tuning is useful when getting to know different tuning file types.
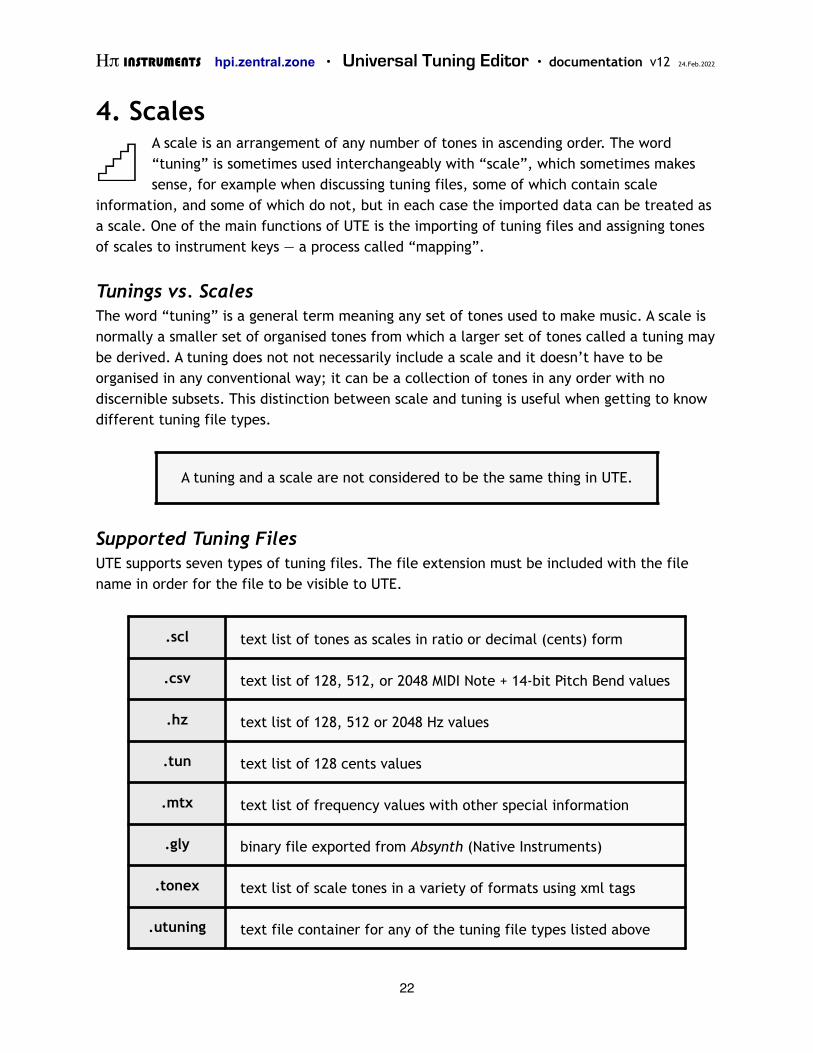
Supported Tuning Files UTE supports seven types of tuning files. The file extension must be included with the file name in order for the file to be visible to UTE.
A tuning and a scale are not considered to be the same thing in UTE.
.scl text list of tones as scales in ratio or decimal (cents) form
.csv text list of 128, 512, or 2048 MIDI Note + 14-bit Pitch Bend values
.hz text list of 128, 512 or 2048 Hz values
.tun text list of 128 cents values
.mtx text list of frequency values with other special information
.gly binary file exported from Absynth (Native Instruments)
.tonex text list of scale tones in a variety of formats using xml tags
.utuning text file container for any of the tuning file types listed above
22
Ηπ INSTRUMENTS hpi.zentral.zone · Universal Tuning Editor · documentation v12 24.Feb.2022
.scl The Scala format is by far the most widely used and widely available tuning files. It is a list of any number of tones expressed either as ratios or cents values. For more details on this format and how to use it, see http://www.huygens-fokker.org/scala/scl_format.html
.csv This is a file format used by H-Pi Instruments Custom Scale Editor (CSE), Tonal Plexus Editor (TPXE), and H-Pi Lo-Fi Microstudio (HPLF) software. These files consist of comma-separated lists of MIDI bytes as MIDI NOTE, PITCH BEND MSB, PITCH BEND LSB. In a .csv file, there is no information concerning a scale as such. The files may list 128, 512, or 2048 values. A list of 128 values is a tuning for one MIDI channel. A file listing 512 values covers 4 MIDI channels of 128 notes each. The 512 tone files are used by CSE for Tuning Box TBX1 hardware, which supports tunings in four layers, one layer per MIDI channel. 2048 values covers all 16 MIDI channels, used by TPXE for Tonal Plexus keyboards, where each physical octave of the keyboard is mapped to two MIDI channels.
.hz This file format was introduced by H-Pi Instruments H-Pi Lo-Fi Microstudio (HPLF), also supported by CSE and TPXE as an export format. They are text files consisting of a simple list of frequency values in Hz. The numbers of tones listed in the file correspond to the same options listed above for .csv files; that is, 128, 512, or 2048.
.tun These files are also known as VAZ-Anamark, and can exist in a few different varieties, but the majority consist of a list 128 cents values. The cents values are given in reference to the lowest MIDI note 0, and this form of the file contains no scale information as such. More information on this format can be found at http://www.mark-henning.de.
.mtx These files are created by Max Magic Microtuner software. Details on this format can be found at http://digilander.libero.it/microtuner/MicrotunerFormat.pdf.
.gly These files are created by Native Instruments Absynth software, and the format is also exported by Scala (by Manuel Op de Coul), and CSE. Because .gly is a binary file, there are no public details on the file type, and it is impossible to make the file as text or to view the file contents as text, except in a hex editor. The file data itself is an encrypted list of 128 Hz values, one value per MIDI note.
23
Ηπ INSTRUMENTS hpi.zentral.zone · Universal Tuning Editor · documentation v12 24.Feb.2022
.tonex This is a filetype supported by other applications such as CSE, microsynth, and others, which uses xml tags to specify different aspects of a tuning. UTE supports simple .tonex files which list tones in scale order using tuning entries.
.utuning This is an experimental filetype introduced by UTE, which uses xml tags to contain data from any other type of tuning file, in order to be able to manage any type of tuning file in a single format.
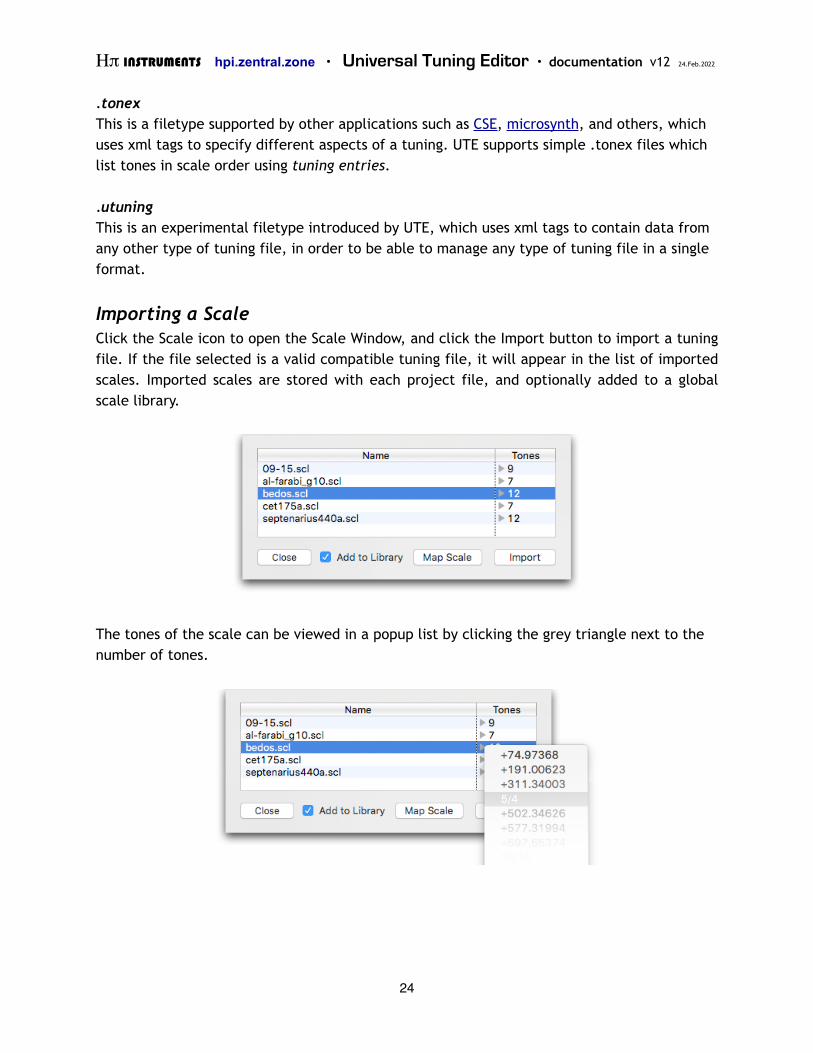
Importing a Scale Click the Scale icon to open the Scale Window, and click the Import button to import a tuning file. If the file selected is a valid compatible tuning file, it will appear in the list of imported scales. Imported scales are stored with each project file, and optionally added to a global scale library.
The tones of the scale can be viewed in a popup list by clicking the grey triangle next to the number of tones.
24

Ηπ INSTRUMENTS hpi.zentral.zone · Universal Tuning Editor · documentation v12 24.Feb.2022
Caveats About Importing Scala .scl Files The Scala .scl file format allows many kinds of tonal structures to be represented, not only scales. For this reason, some Scala files will be rejected, because they do not represent proper scales. Here are some rules for preparing Scala files as scale files to import into UTE.
1. Tones should be in low to high order with the last tone (period) being the largest value. 2. Files containing tones out of order will likely produce incorrect results. 3. Files containing a period (final) value of less than 1 will likely produce incorrect results. 4. Do not use negative cents values. Files containing negative cents must include a positive
period (final) value, or the negative cents cannot be properly converted.
Mapping a Scale The Scale Window allows you to map a scale after importing it. Double-click a scale, or select the scale and click the Map Scale button to map the scale to the loaded uInstrument. Mapping is done according to the Reference Tone and Tonic you have chosen in the Tones Window. Select a key of the uInstrument on which to place the Tonic (1/1) of the scale. The tones of the scale are then assigned to the remaining keys of the instrument according to the order of MIDI Channels and Notes as defined in the instrument’s definition file. Mapping the Tonic can be done in several ways, each of which is explained below.
Mapping from All Keys If you prefer working from an overview of the instrument, you can select a key from a list of all the available keys on the instrument to assign to the Tonic frequency. The key number is listed, followed by the assigned MIDI channel and MIDI Note number for the key.
25
Ηπ INSTRUMENTS hpi.zentral.zone · Universal Tuning Editor · documentation v12 24.Feb.2022
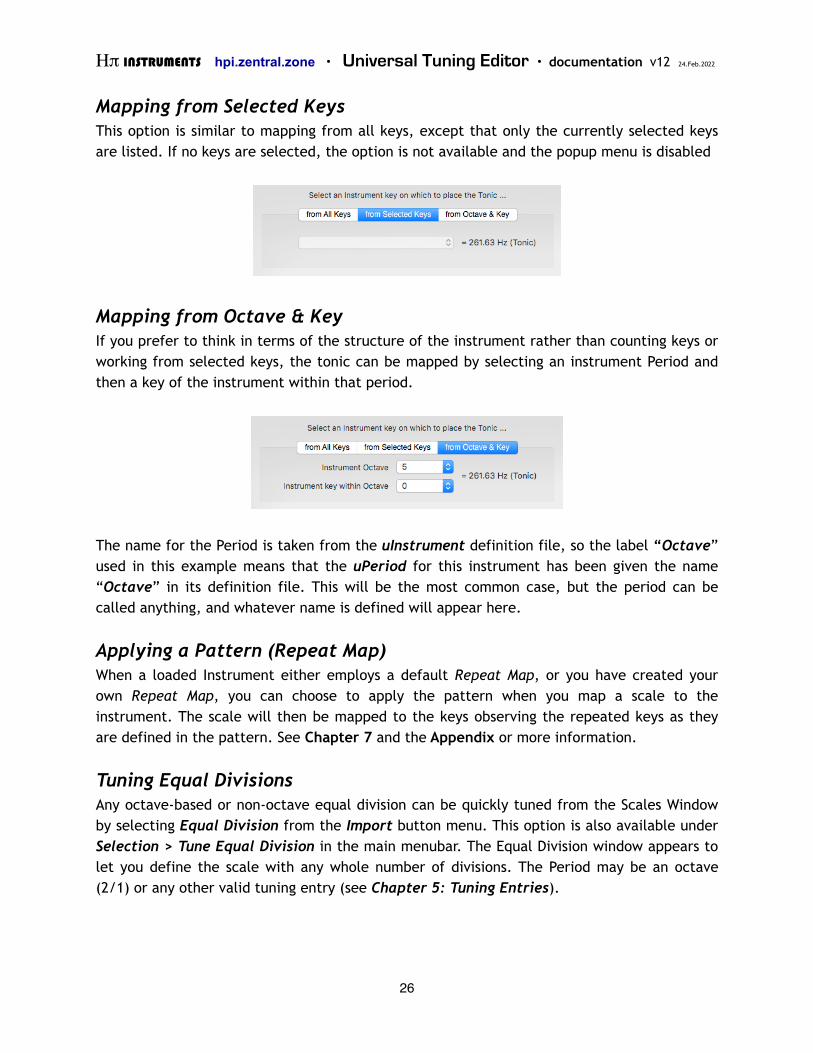
Mapping from Selected Keys This option is similar to mapping from all keys, except that only the currently selected keys are listed. If no keys are selected, the option is not available and the popup menu is disabled
Mapping from Octave & Key If you prefer to think in terms of the structure of the instrument rather than counting keys or working from selected keys, the tonic can be mapped by selecting an instrument Period and then a key of the instrument within that period.
The name for the Period is taken from the uInstrument definition file, so the label “Octave” used in this example means that the uPeriod for this instrument has been given the name “Octave” in its definition file. This will be the most common case, but the period can be called anything, and whatever name is defined will appear here.
Applying a Pattern (Repeat Map) When a loaded Instrument either employs a default Repeat Map, or you have created your own Repeat Map, you can choose to apply the pattern when you map a scale to the instrument. The scale will then be mapped to the keys observing the repeated keys as they are defined in the pattern. See Chapter 7 and the Appendix or more information.
Tuning Equal Divisions Any octave-based or non-octave equal division can be quickly tuned from the Scales Window by selecting Equal Division from the Import button menu. This option is also available under Selection > Tune Equal Division in the main menubar. The Equal Division window appears to let you define the scale with any whole number of divisions. The Period may be an octave (2/1) or any other valid tuning entry (see Chapter 5: Tuning Entries).
26
Ηπ INSTRUMENTS hpi.zentral.zone · Universal Tuning Editor · documentation v12 24.Feb.2022
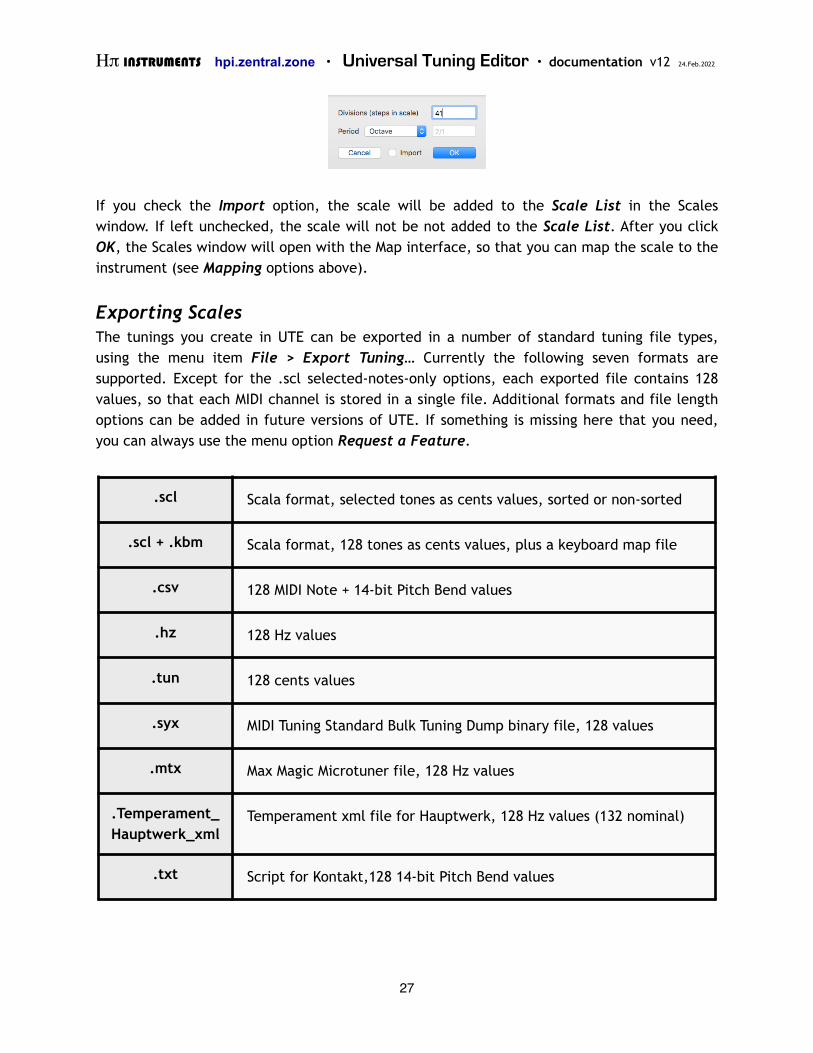
If you check the Import option, the scale will be added to the Scale List in the Scales window. If left unchecked, the scale will not be not added to the Scale List. After you click OK, the Scales window will open with the Map interface, so that you can map the scale to the instrument (see Mapping options above).
Exporting Scales The tunings you create in UTE can be exported in a number of standard tuning file types, using the menu item File > Export Tuning… Currently the following seven formats are supported. Except for the .scl selected-notes-only options, each exported file contains 128 values, so that each MIDI channel is stored in a single file. Additional formats and file length options can be added in future versions of UTE. If something is missing here that you need, you can always use the menu option Request a Feature.
.scl Scala format, selected tones as cents values, sorted or non-sorted
.scl + .kbm Scala format, 128 tones as cents values, plus a keyboard map file
.csv 128 MIDI Note + 14-bit Pitch Bend values
.hz 128 Hz values
.tun 128 cents values
.syx MIDI Tuning Standard Bulk Tuning Dump binary file, 128 values
.mtx Max Magic Microtuner file, 128 Hz values
.Temperament_Hauptwerk_xml
Temperament xml file for Hauptwerk, 128 Hz values (132 nominal)
.txt Script for Kontakt,128 14-bit Pitch Bend values
27
Ηπ INSTRUMENTS hpi.zentral.zone · Universal Tuning Editor · documentation v12 24.Feb.2022
5. Tuning List The Tuning List shows each key with all of its associated information and allows you to navigate a uInstrument somewhat in the manner of a spreadsheet. From left to right, there are roughly three “stages” of columns in the List. On the left side are Input Columns, in the middle are Tuning Columns, and on the right side are Output Columns.
Input, Tuning, & Output Columns Input Columns include the ordinal number and period number of the key, and its MIDI input channel and note as defined by the uInstrument. Tuning Columns include the tuning entry, the interval size in Units (normally cents, see blelow), the period number, and pitch and interval names. The Output Columns list the resulting MIDI note and its offset in cents from standard 12-tone equal temperament.
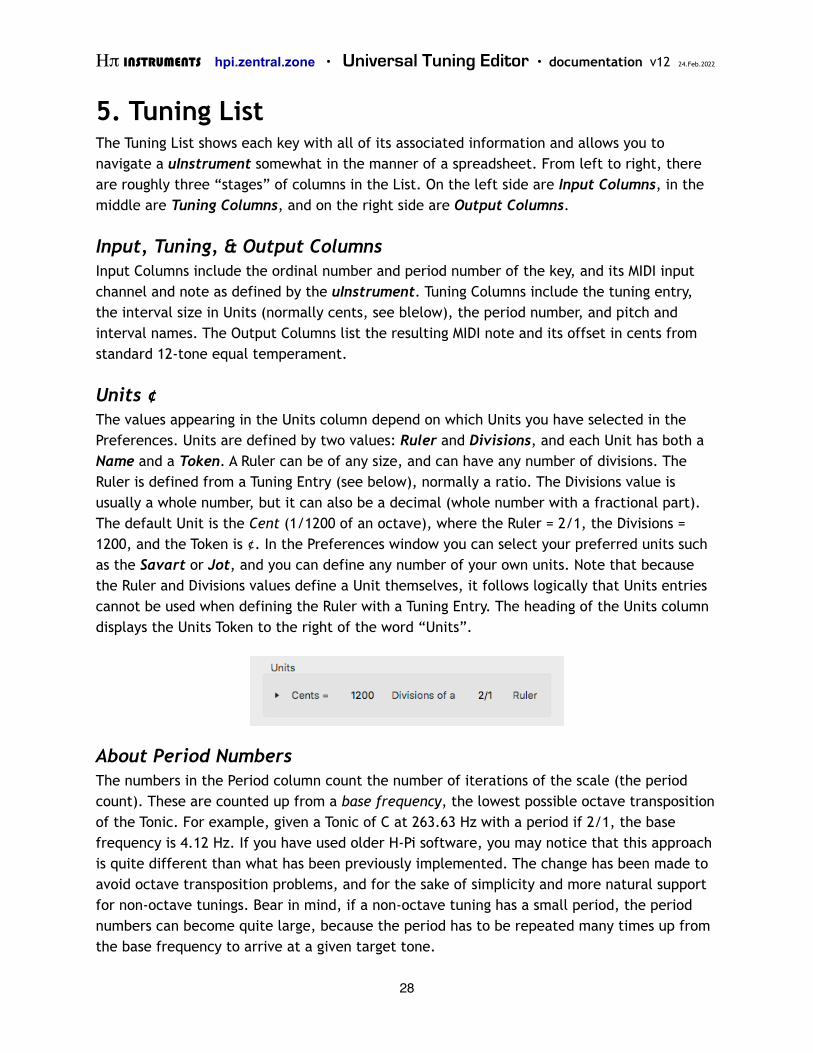
Units ¢ The values appearing in the Units column depend on which Units you have selected in the Preferences. Units are defined by two values: Ruler and Divisions, and each Unit has both a Name and a Token. A Ruler can be of any size, and can have any number of divisions. The Ruler is defined from a Tuning Entry (see below), normally a ratio. The Divisions value is usually a whole number, but it can also be a decimal (whole number with a fractional part). The default Unit is the Cent (1/1200 of an octave), where the Ruler = 2/1, the Divisions = 1200, and the Token is ¢. In the Preferences window you can select your preferred units such as the Savart or Jot, and you can define any number of your own units. Note that because the Ruler and Divisions values define a Unit themselves, it follows logically that Units entries cannot be used when defining the Ruler with a Tuning Entry. The heading of the Units column displays the Units Token to the right of the word “Units”.
About Period Numbers The numbers in the Period column count the number of iterations of the scale (the period count). These are counted up from a base frequency, the lowest possible octave transposition of the Tonic. For example, given a Tonic of C at 263.63 Hz with a period if 2/1, the base frequency is 4.12 Hz. If you have used older H-Pi software, you may notice that this approach is quite different than what has been previously implemented. The change has been made to avoid octave transposition problems, and for the sake of simplicity and more natural support for non-octave tunings. Bear in mind, if a non-octave tuning has a small period, the period numbers can become quite large, because the period has to be repeated many times up from the base frequency to arrive at a given target tone.
28
Ηπ INSTRUMENTS hpi.zentral.zone · Universal Tuning Editor · documentation v12 24.Feb.2022
Tuning Entries A tuning entry in UTE is an expression which represents a tone in different ways using math. Examples of valid tuning entries are shown below. Parentheses must be used when there are 2 terms and some operator, as shown in the last three examples.
• 1.2365256341287 ... decimal values
• 2:3 ... interval ratios a:b, where a < b
• 3/2 ... tone ratios a/b, where a > b
• 2,12 ... a degree of an equal division of an octave, first degree = 1 (or 0 by Preference)
• 3^7 ... exponents, such as 3 to the 7th power
• +35.2 ... an interval up, in cents (or other units, by Preference)
• -4.3 ... an interval down, in cents (or other units, by Preference)
• f=261.6255653 ... Hz values, within an available range of 7.9430 to 12911.4169 Hz
• (1.232)*(2:3) ... is 1.232 transposed up by 2:3
• (4/3)/(1.112) ... is 4/3 transposed down by 1.112
• (5/4)+3.1 ... is 5/4 transposed up by 3.1 cents
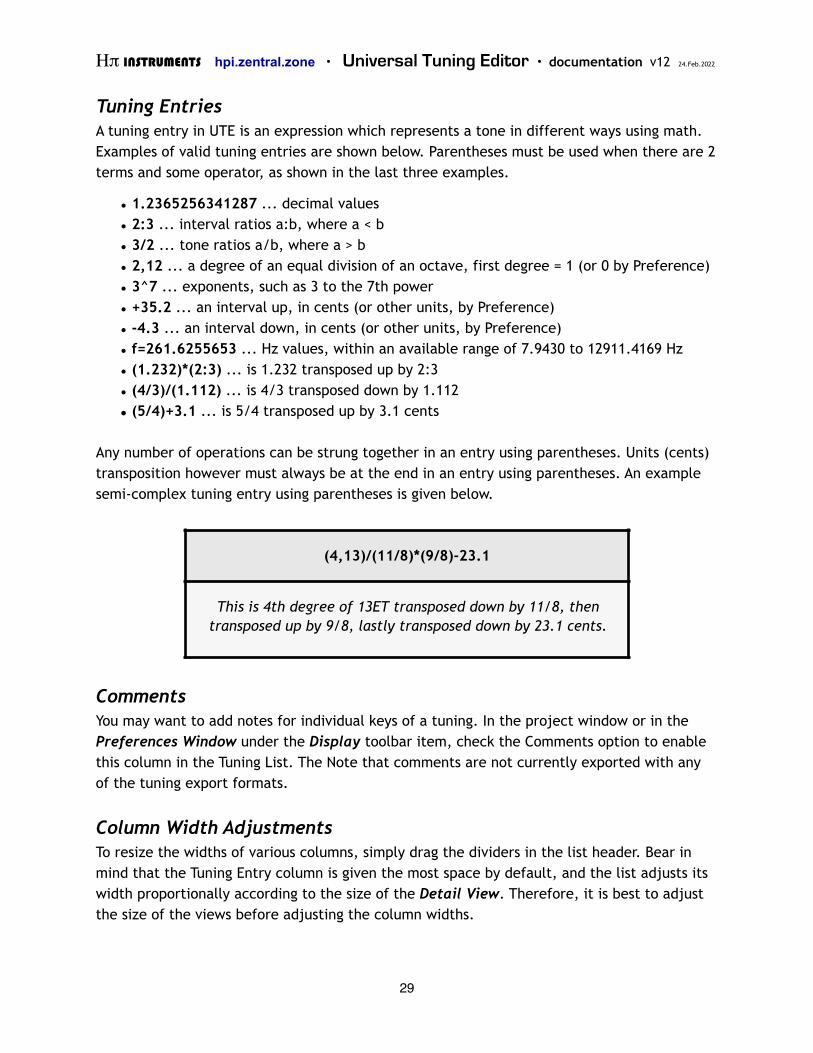
Any number of operations can be strung together in an entry using parentheses. Units (cents) transposition however must always be at the end in an entry using parentheses. An example semi-complex tuning entry using parentheses is given below.
Comments You may want to add notes for individual keys of a tuning. In the project window or in the Preferences Window under the Display toolbar item, check the Comments option to enable this column in the Tuning List. The Note that comments are not currently exported with any of the tuning export formats.
Column Width Adjustments To resize the widths of various columns, simply drag the dividers in the list header. Bear in mind that the Tuning Entry column is given the most space by default, and the list adjusts its width proportionally according to the size of the Detail View. Therefore, it is best to adjust the size of the views before adjusting the column widths.
(4,13)/(11/8)*(9/8)-23.1
This is 4th degree of 13ET transposed down by 11/8, then transposed up by 9/8, lastly transposed down by 23.1 cents.
29
Ηπ INSTRUMENTS hpi.zentral.zone · Universal Tuning Editor · documentation v12 24.Feb.2022
6. Editing Tunings by Selection When you have selected keys of an Instrument, rows in the Tuning List are highlighted and the Selection menu becomes available. With the items in this menu you can edit the tuning entries assigned to the selected keys at once.
Selection Basics Clicking on a key will select that key. To select any number of keys arbitrarily, click keys while holding down the Option key. To select a group of sequentially numbered keys, hold down the Shift key when you click.
Selecting an Entire Instrument Period To quickly select all the keys in a given Instrument period, simply Right-Click on a period number at the right of the overview. Shift-Click a period number to select more than one period at a time, and use Option-Click to release the current selection.
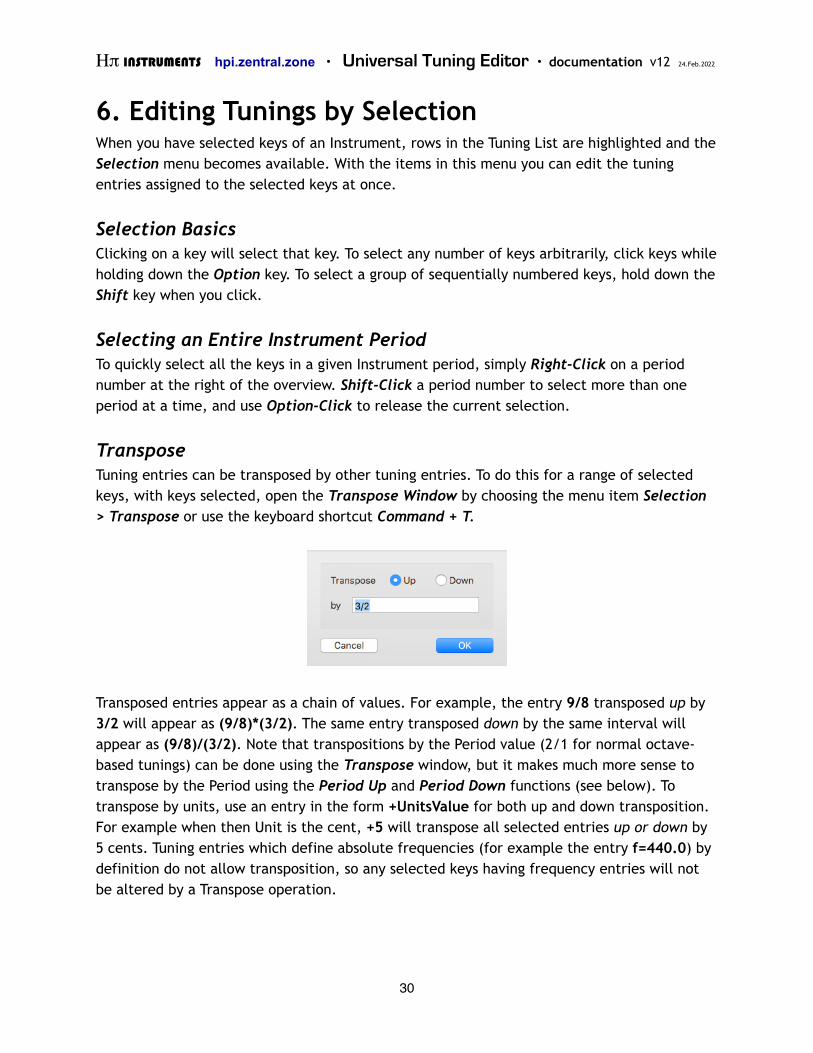
Transpose Tuning entries can be transposed by other tuning entries. To do this for a range of selected keys, with keys selected, open the Transpose Window by choosing the menu item Selection > Transpose or use the keyboard shortcut Command + T.
Transposed entries appear as a chain of values. For example, the entry 9/8 transposed up by 3/2 will appear as (9/8)*(3/2). The same entry transposed down by the same interval will appear as (9/8)/(3/2). Note that transpositions by the Period value (2/1 for normal octave-based tunings) can be done using the Transpose window, but it makes much more sense to transpose by the Period using the Period Up and Period Down functions (see below). To transpose by units, use an entry in the form +UnitsValue for both up and down transposition. For example when then Unit is the cent, +5 will transpose all selected entries up or down by 5 cents. Tuning entries which define absolute frequencies (for example the entry f=440.0) by definition do not allow transposition, so any selected keys having frequency entries will not be altered by a Transpose operation.
30
Ηπ INSTRUMENTS hpi.zentral.zone · Universal Tuning Editor · documentation v12 24.Feb.2022
Repeat A reasonable way to design a uInstrument tuning is to make one structure and then repeat it across the instrument. This function lets you do that, in either or both directions, tuning all keys without gaps, or tuning keys only in a selected pattern. Period values of the newly tuned keys can be updated or left unchanged as needed.
Reverse Order Added at customer request, with this function you can quickly create “left handed” versions of any tuning. The order of the tuning entries assigned to the instrument keys is reversed.
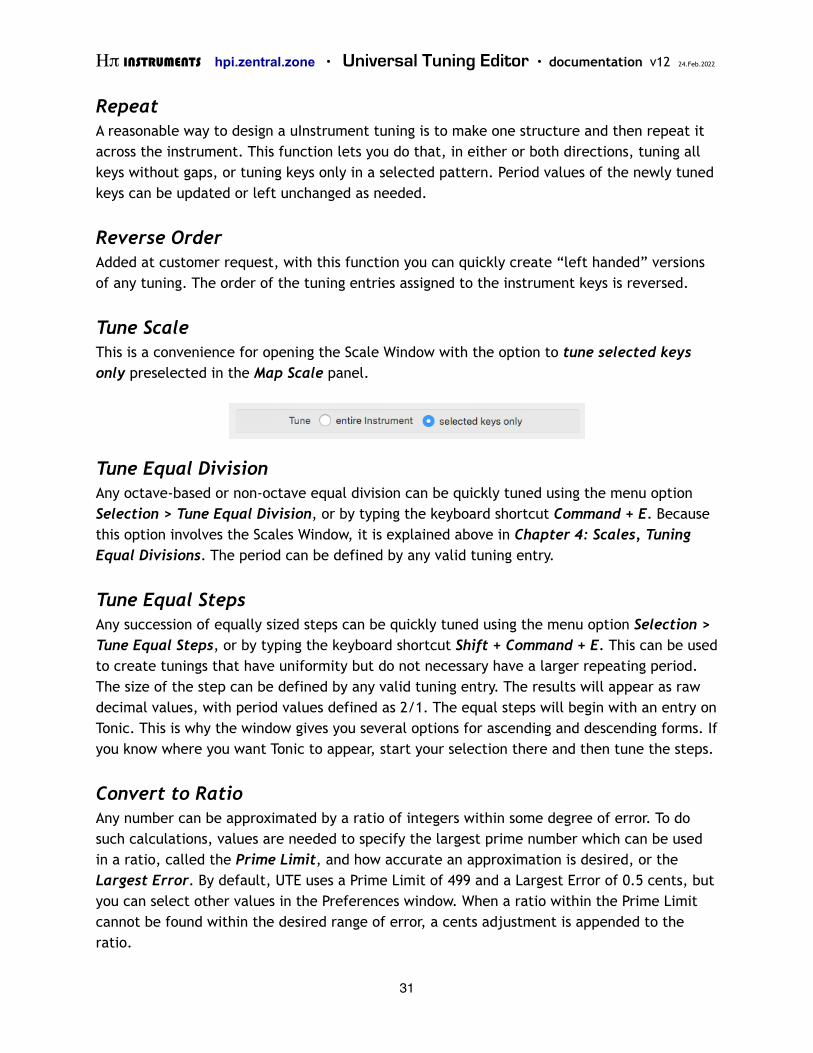
Tune Scale This is a convenience for opening the Scale Window with the option to tune selected keys only preselected in the Map Scale panel.
Tune Equal Division Any octave-based or non-octave equal division can be quickly tuned using the menu option Selection > Tune Equal Division, or by typing the keyboard shortcut Command + E. Because this option involves the Scales Window, it is explained above in Chapter 4: Scales, Tuning Equal Divisions. The period can be defined by any valid tuning entry.
Tune Equal Steps Any succession of equally sized steps can be quickly tuned using the menu option Selection > Tune Equal Steps, or by typing the keyboard shortcut Shift + Command + E. This can be used to create tunings that have uniformity but do not necessary have a larger repeating period. The size of the step can be defined by any valid tuning entry. The results will appear as raw decimal values, with period values defined as 2/1. The equal steps will begin with an entry on Tonic. This is why the window gives you several options for ascending and descending forms. If you know where you want Tonic to appear, start your selection there and then tune the steps.
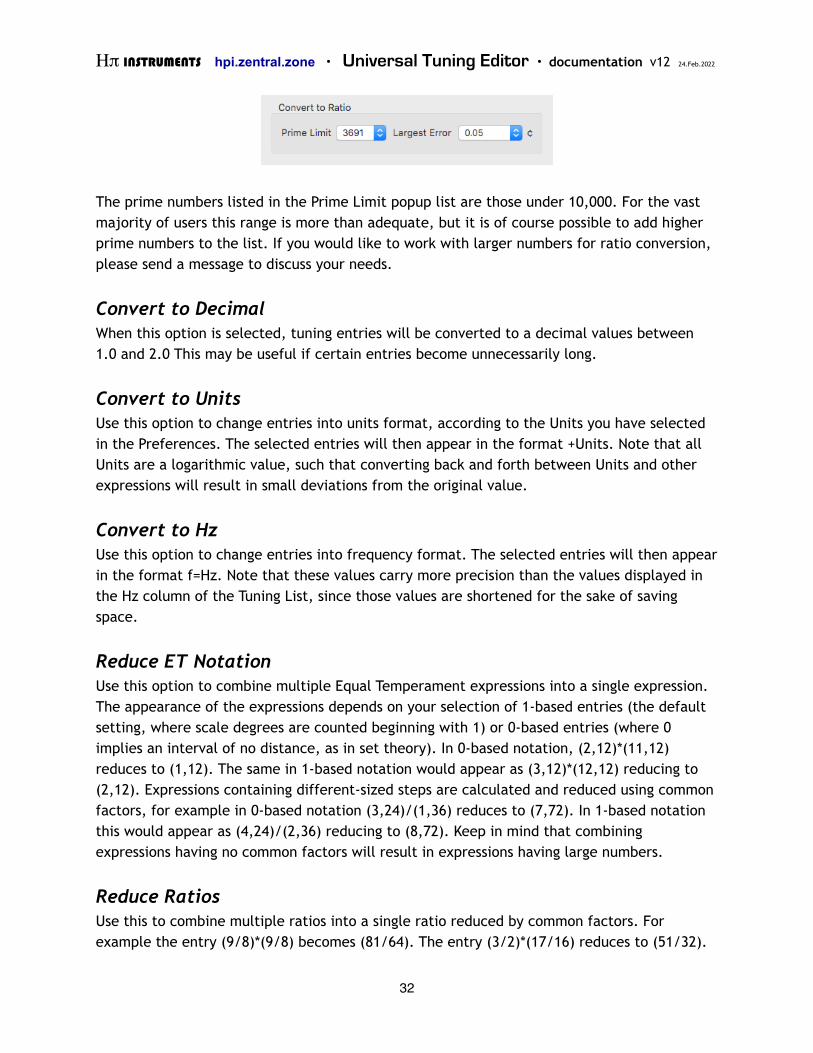
Convert to Ratio Any number can be approximated by a ratio of integers within some degree of error. To do such calculations, values are needed to specify the largest prime number which can be used in a ratio, called the Prime Limit, and how accurate an approximation is desired, or the Largest Error. By default, UTE uses a Prime Limit of 499 and a Largest Error of 0.5 cents, but you can select other values in the Preferences window. When a ratio within the Prime Limit cannot be found within the desired range of error, a cents adjustment is appended to the ratio.
31
Ηπ INSTRUMENTS hpi.zentral.zone · Universal Tuning Editor · documentation v12 24.Feb.2022
The prime numbers listed in the Prime Limit popup list are those under 10,000. For the vast majority of users this range is more than adequate, but it is of course possible to add higher prime numbers to the list. If you would like to work with larger numbers for ratio conversion, please send a message to discuss your needs.
Convert to Decimal When this option is selected, tuning entries will be converted to a decimal values between 1.0 and 2.0 This may be useful if certain entries become unnecessarily long.
Convert to Units Use this option to change entries into units format, according to the Units you have selected in the Preferences. The selected entries will then appear in the format +Units. Note that all Units are a logarithmic value, such that converting back and forth between Units and other expressions will result in small deviations from the original value.
Convert to Hz Use this option to change entries into frequency format. The selected entries will then appear in the format f=Hz. Note that these values carry more precision than the values displayed in the Hz column of the Tuning List, since those values are shortened for the sake of saving space.
Reduce ET Notation Use this option to combine multiple Equal Temperament expressions into a single expression. The appearance of the expressions depends on your selection of 1-based entries (the default setting, where scale degrees are counted beginning with 1) or 0-based entries (where 0 implies an interval of no distance, as in set theory). In 0-based notation, (2,12)*(11,12) reduces to (1,12). The same in 1-based notation would appear as (3,12)*(12,12) reducing to (2,12). Expressions containing different-sized steps are calculated and reduced using common factors, for example in 0-based notation (3,24)/(1,36) reduces to (7,72). In 1-based notation this would appear as (4,24)/(2,36) reducing to (8,72). Keep in mind that combining expressions having no common factors will result in expressions having large numbers.
Reduce Ratios Use this to combine multiple ratios into a single ratio reduced by common factors. For example the entry (9/8)*(9/8) becomes (81/64). The entry (3/2)*(17/16) reduces to (51/32).
32
Ηπ INSTRUMENTS hpi.zentral.zone · Universal Tuning Editor · documentation v12 24.Feb.2022
Keep in mind that combining ratios may result in numbers which are quite large. On the other hand, UTE makes an effort to reduce by common divisors, so that ratios are expresses in simplest terms.
Reduce Entry This option combines Reduce ET Notation with Reduce Ratios, resulting in an entry that is as compact as possible without converting the form of the original expression.
Set Period The menu item Selection > Set Period, keyboard shortcut Command + P, allows setting the tone height of a selected entries according to the Period value which has been assigned according to a given tuning. The Period of a tuning is defined in a Scale (see Chapter 4: Scales) and is normally an octave (2/1) but may be any value (non-octave tuning). If no period has been defined, a default value of 2/1 is assumed.
Period Up / Down To quickly transpose a pitch up or down in pitch height according to the given Period value, use the menu item Selection > Period Up, and Selection > Period Down. Keyboard shortcuts
use the up and down arrow keys Command + ↑ and Command + ↓.
33
Ηπ INSTRUMENTS hpi.zentral.zone · Universal Tuning Editor · documentation v12 24.Feb.2022
7. Patterns When working with an instrument, you may want to explore chord structures or scale
subsets. The keys of a uInstrument may also be organised in such a way as to either require or suggest the use of repeated keys in whatever tuning is mapped to the
instrument. In UTE, Patterns of three types — Chord, Subset, and Repeat Map — exist to handle these functions.
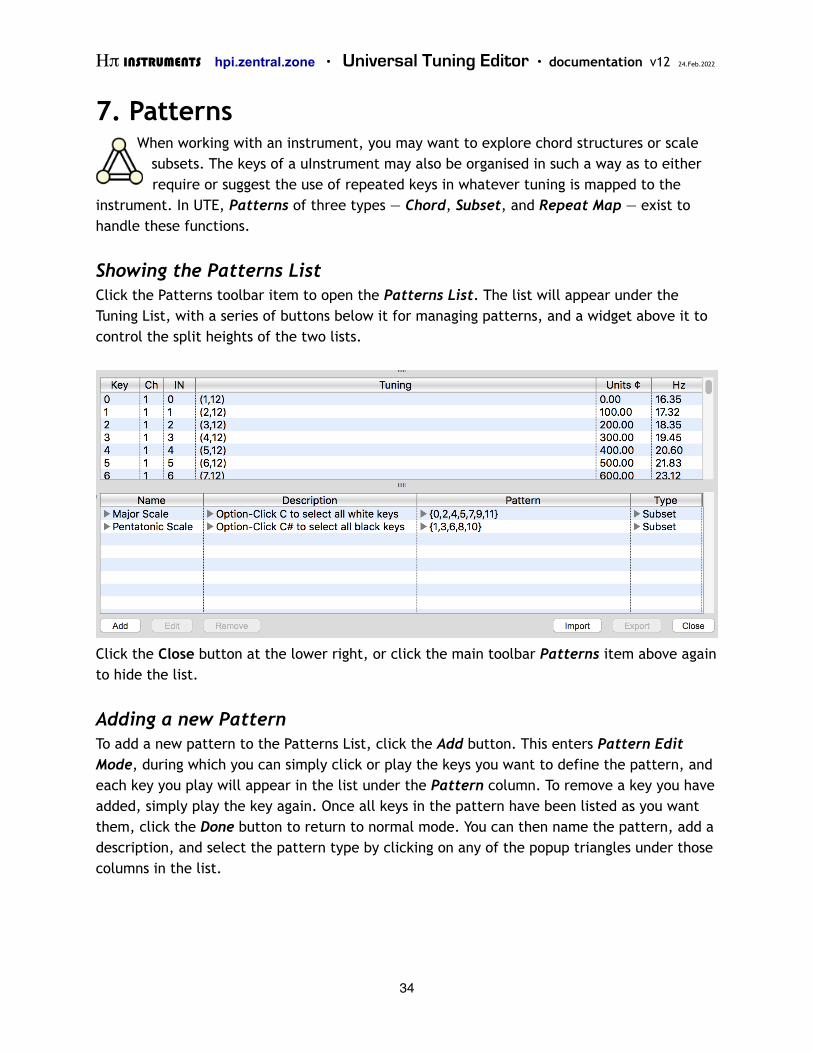
Showing the Patterns List Click the Patterns toolbar item to open the Patterns List. The list will appear under the Tuning List, with a series of buttons below it for managing patterns, and a widget above it to control the split heights of the two lists.
Click the Close button at the lower right, or click the main toolbar Patterns item above again to hide the list.
Adding a new Pattern To add a new pattern to the Patterns List, click the Add button. This enters Pattern Edit Mode, during which you can simply click or play the keys you want to define the pattern, and each key you play will appear in the list under the Pattern column. To remove a key you have added, simply play the key again. Once all keys in the pattern have been listed as you want them, click the Done button to return to normal mode. You can then name the pattern, add a description, and select the pattern type by clicking on any of the popup triangles under those columns in the list.
34
Ηπ INSTRUMENTS hpi.zentral.zone · Universal Tuning Editor · documentation v12 24.Feb.2022
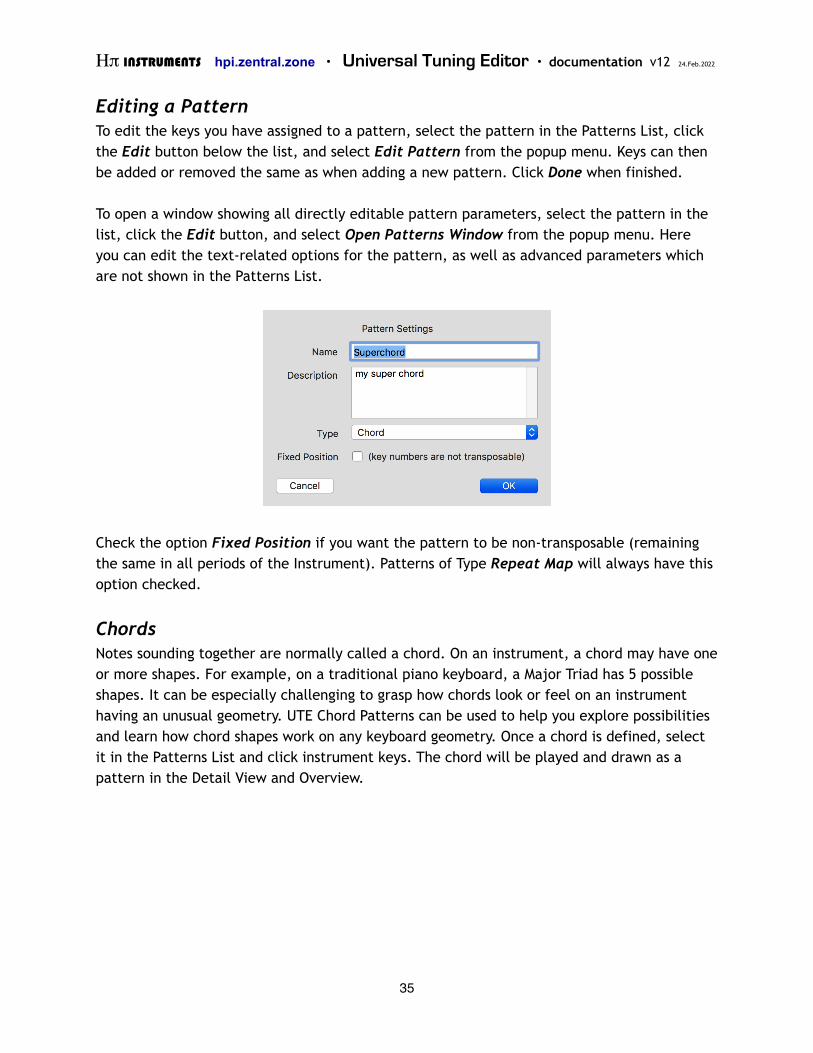
Editing a Pattern To edit the keys you have assigned to a pattern, select the pattern in the Patterns List, click the Edit button below the list, and select Edit Pattern from the popup menu. Keys can then be added or removed the same as when adding a new pattern. Click Done when finished.
To open a window showing all directly editable pattern parameters, select the pattern in the list, click the Edit button, and select Open Patterns Window from the popup menu. Here you can edit the text-related options for the pattern, as well as advanced parameters which are not shown in the Patterns List.
Check the option Fixed Position if you want the pattern to be non-transposable (remaining the same in all periods of the Instrument). Patterns of Type Repeat Map will always have this option checked.
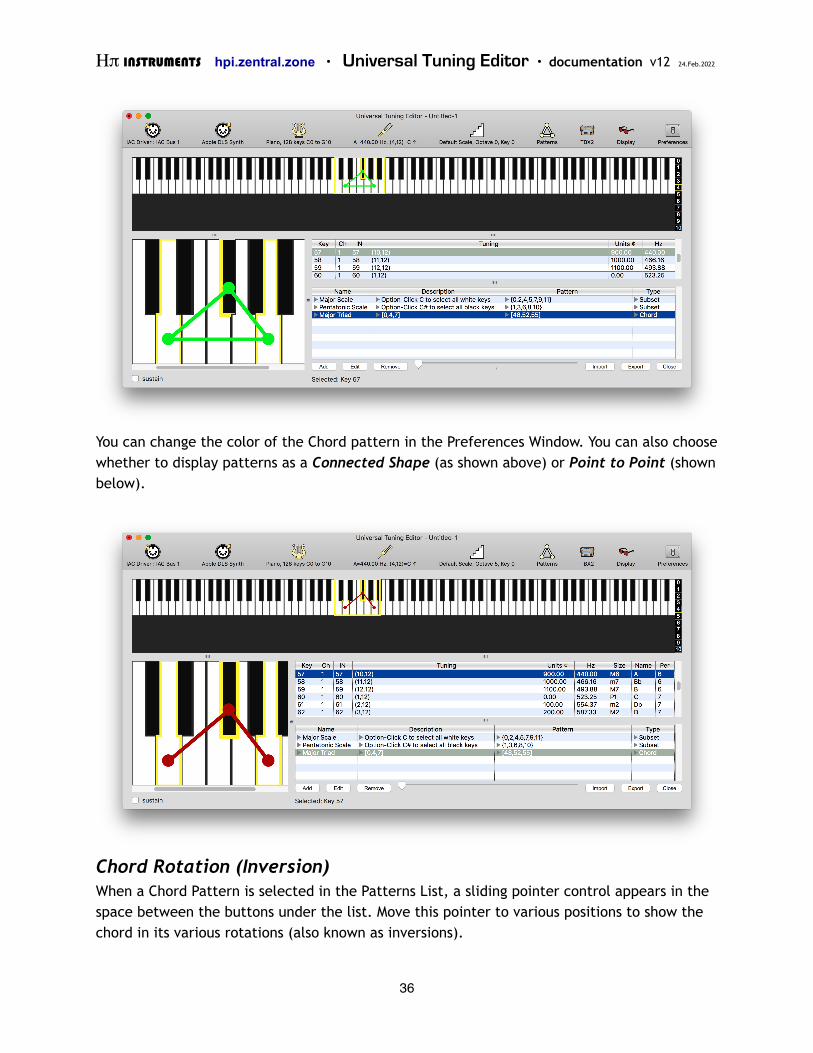
Chords Notes sounding together are normally called a chord. On an instrument, a chord may have one or more shapes. For example, on a traditional piano keyboard, a Major Triad has 5 possible shapes. It can be especially challenging to grasp how chords look or feel on an instrument having an unusual geometry. UTE Chord Patterns can be used to help you explore possibilities and learn how chord shapes work on any keyboard geometry. Once a chord is defined, select it in the Patterns List and click instrument keys. The chord will be played and drawn as a pattern in the Detail View and Overview.
35
Ηπ INSTRUMENTS hpi.zentral.zone · Universal Tuning Editor · documentation v12 24.Feb.2022
You can change the color of the Chord pattern in the Preferences Window. You can also choose whether to display patterns as a Connected Shape (as shown above) or Point to Point (shown below).
Chord Rotation (Inversion) When a Chord Pattern is selected in the Patterns List, a sliding pointer control appears in the space between the buttons under the list. Move this pointer to various positions to show the chord in its various rotations (also known as inversions).
36
Ηπ INSTRUMENTS hpi.zentral.zone · Universal Tuning Editor · documentation v12 24.Feb.2022
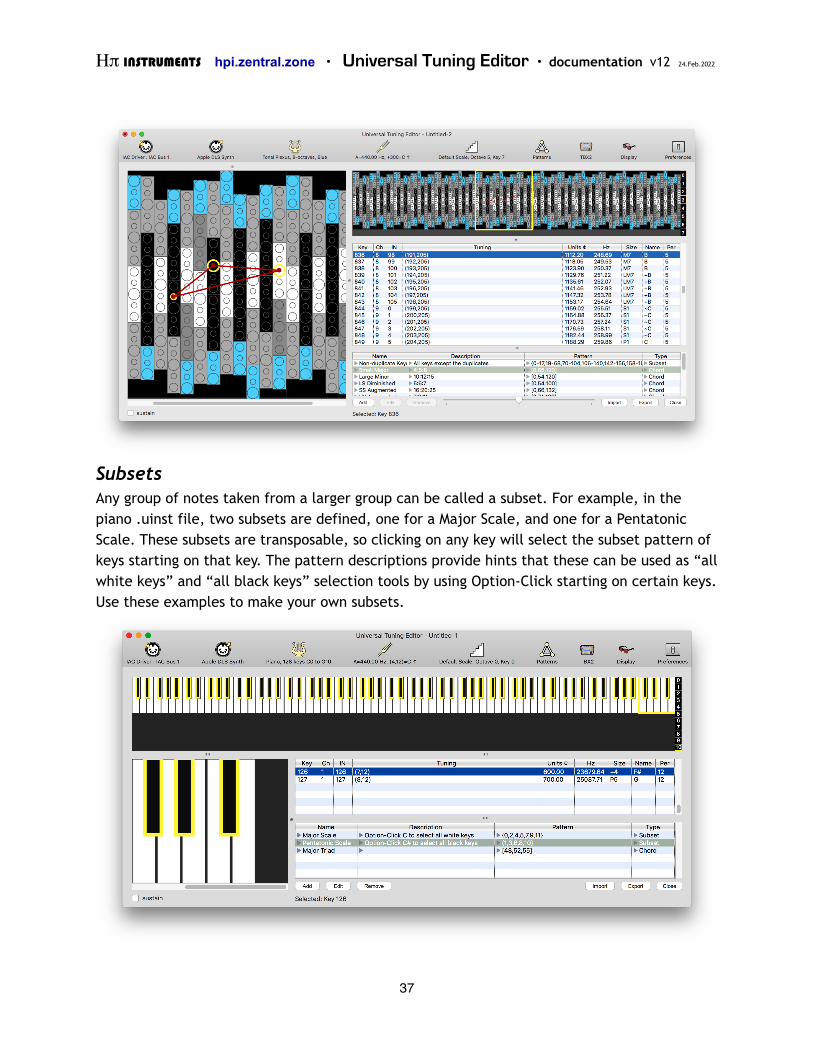
Subsets Any group of notes taken from a larger group can be called a subset. For example, in the piano .uinst file, two subsets are defined, one for a Major Scale, and one for a Pentatonic Scale. These subsets are transposable, so clicking on any key will select the subset pattern of keys starting on that key. The pattern descriptions provide hints that these can be used as “all white keys” and “all black keys” selection tools by using Option-Click starting on certain keys. Use these examples to make your own subsets.
37
Ηπ INSTRUMENTS hpi.zentral.zone · Universal Tuning Editor · documentation v12 24.Feb.2022
Repeat Maps A pattern of this type lists the keys of an instrument within one period where tones are to be repeated when mapping a tuning to the keys of the instrument (instead of always moving consecutively from one tone to the next in the scale to be mapped). A Repeat Map may be applied to a scale map in the Scale Window (see Chapter 4), saving you the trouble of going through more time-consuming procedures in order to tune an instrument according to its geometry. See the Appendix for information about including and applying a Repeat Map in the <DefaultPatterns> and <DefaultTuning> sections of a .uinst definition file.
Importing Shapes from TPXE Tonal Plexus Editor (TPXE) included functions for what are called in that application Shapes. TPXE Shapes are the forerunner of Patterns in UTE. TPXE included a set of Default Shapes for Tonal Plexus keyboards, spanning a wide range of sonorities in Just Intonation. These have been added to the TPX keyboard .uinst definition file. TPXE also allowed users to make their own Shapes and export them in text files. These user-created files can be imported into UTE using the Import button below the Patterns List. Obviously, this should be done when a Tonal Plexus keyboard has been loaded as the current uInstrument.
38
Ηπ INSTRUMENTS hpi.zentral.zone · Universal Tuning Editor · documentation v12 24.Feb.2022
8. Devices A Device is something which can be controlled and programmed by UTE. It is important to note that the selected device is not the same as the MIDI input or output selection,
though you may also send or receive MIDI data from a Device. Generally speaking, the Device is the destination for programming tunings.
If a device is made by a third-party manufacturer, support for that device should be self-explanatory. In cases where a device has special features, such as for the Lumatone keyboard, a dedicated chapter is included in this documentation for that device. For devices made by H-Pi Instruments, instructions for using the device with UTE is found in the documentation for that device. Below is a list of several currently supported devices.
• FLASH synthesizer • TBX2/b • TBX1
• TPX Tonal Plexus microtonal keyboard • LinnStrument • Lumatone Isomorphic Keyboard
Support for more devices may be added at any time. If you need support for a particular device, use the menu item Request a Feature (see Introduction — Feature Requests).
Setting a Default Device When using UTE for the first time, the default device will be TBX2. You can change this by clicking on the Devices toolbar item which will be showing the TBX2 icon and selecting the menu item Select Other Device. In the Devices window, select the device you want to use, and click the Make Default button.
MIDI Interface Requirements Some devices (such as TBX2, but not TBX2b) require a MIDI interface to connect to UTE. To make sure you have an interface which meets the specific requirements for your device, please see the documentation for that device.
A Device is a destination for tunings or other programmable data, as distinct from MIDI input / output selections.
39
Ηπ INSTRUMENTS hpi.zentral.zone · Universal Tuning Editor · documentation v12 24.Feb.2022
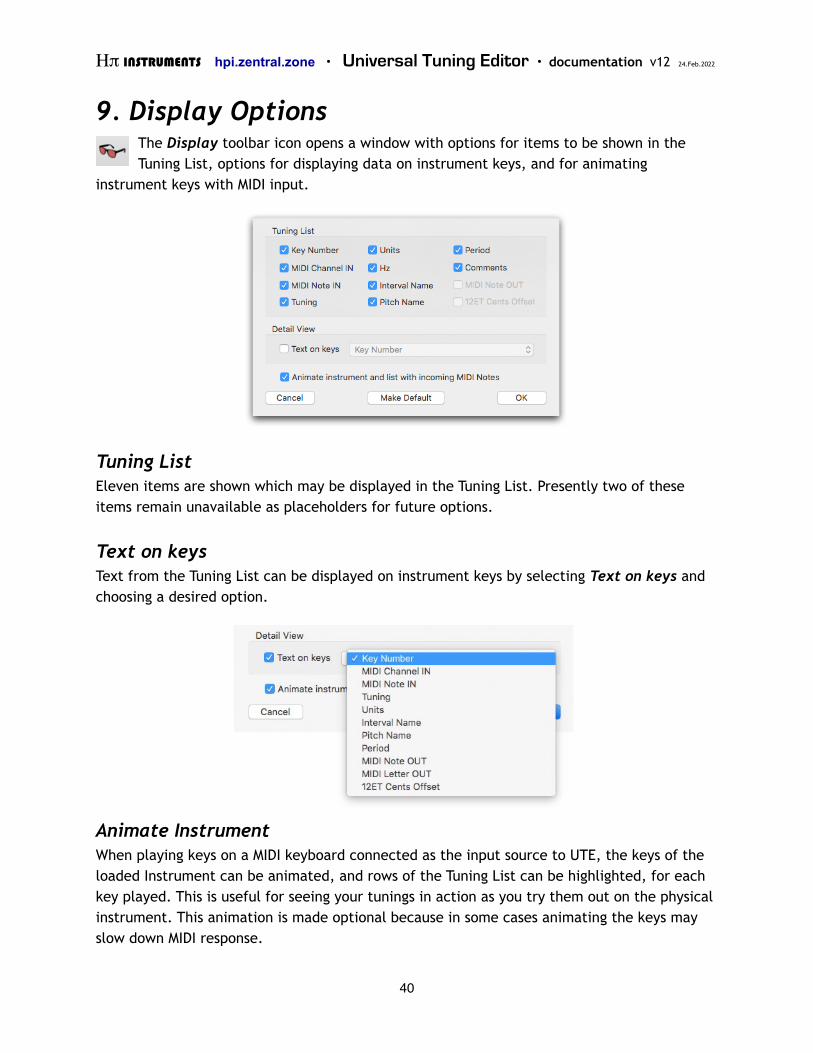
9. Display Options The Display toolbar icon opens a window with options for items to be shown in the Tuning List, options for displaying data on instrument keys, and for animating
instrument keys with MIDI input.
Tuning List Eleven items are shown which may be displayed in the Tuning List. Presently two of these items remain unavailable as placeholders for future options.
Text on keys Text from the Tuning List can be displayed on instrument keys by selecting Text on keys and choosing a desired option.
Animate Instrument When playing keys on a MIDI keyboard connected as the input source to UTE, the keys of the loaded Instrument can be animated, and rows of the Tuning List can be highlighted, for each key played. This is useful for seeing your tunings in action as you try them out on the physical instrument. This animation is made optional because in some cases animating the keys may slow down MIDI response.
40
Ηπ INSTRUMENTS hpi.zentral.zone · Universal Tuning Editor · documentation v12 24.Feb.2022
Key Colors & MIDI Data Some keyboards, such as the Linnstrument and Lumatone keyboards, allow you to program the keys to illuminate different colored LEDs. UTE allows you to design color layouts for a uInstrument model including the tag <LEDColors>, regardless of whether or not a corresponding hardware device actually exists (see the Appendix for more about XML tags in uInstrument definitions). If the device actually does exist, you can select that keyboard under the Devices toolbar item and then use the dedicated functions for that device send Key Data to the keyboard.
Setting Key Colors To define the color of an individual key, Right-Click (or Control-Click) on any key. If the instrument supports arbitrary RGB colors, such as the Lumatone keyboard, you will be able to choose a menu item Select Color … and a Color-Picker window will open allowing you to select colors and manage desired colors. For instruments which only allow a limited set of predefined colors, such as the Linnstrument, the menu will show a list of named colors. For designing your own instruments supporting colored keys, see the Appendix. To set parameters for multiple keys at once, holding down the Option key for any pattern of keys, or the Shift key for sequential groups of keys, when right-clicking, and your selections will apply to all the selected keys.
Once a key color has been defined within one instrument period, it can be copied to all other periods of the instrument. To do this, Right-Click (or Control-Click) on the key and select the menu item Repeat Color Across Instrument.
Setting Key MIDI Channels & Notes Some keyboards allow you to define which MIDI Note on which MIDI Channel is output when each key is pressed. Such customisations conflict with the Channel and Note values assigned in .uinst definitions, so UTE lets you change the data for keys to override the instrument definition, using the same popup interface described above for color assignments, working individually key by key, or in groups using the Option or Shift keys. The resulting altered Channels and Notes will appear in the Tuning List in the corresponding columns.
Saving & Loading Key Data Key Colors and MIDI Data assignments are saved with .ute projects, and can also be saved and loaded as external .xml files, using the menu under the Display toolbar item. The .xml files can then be applied to any existing .ute file, regardless of which .uinst is loaded. Some Devices such as the Lumatone keyboards also allow importing and exporting their own file format (Lumatone users: see the Chapter The Lumatone Isomorphic Keyboard).
41
Ηπ INSTRUMENTS hpi.zentral.zone · Universal Tuning Editor · documentation v12 24.Feb.2022
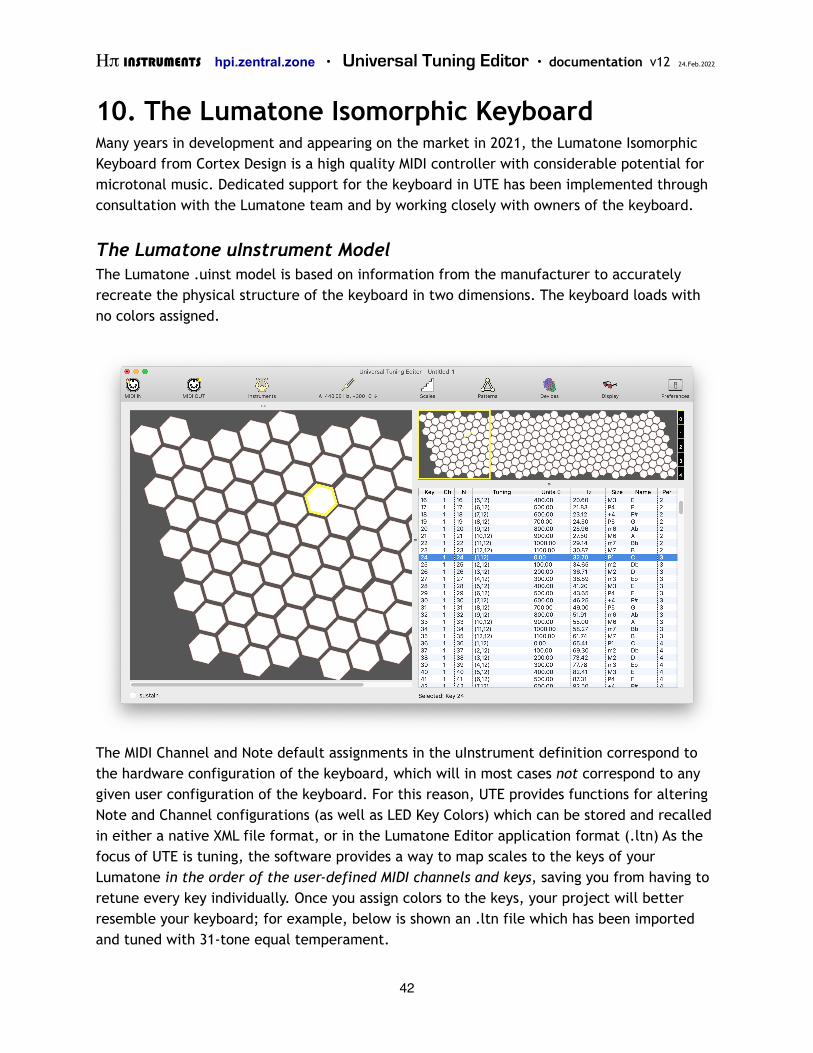
10. The Lumatone Isomorphic Keyboard Many years in development and appearing on the market in 2021, the Lumatone Isomorphic Keyboard from Cortex Design is a high quality MIDI controller with considerable potential for microtonal music. Dedicated support for the keyboard in UTE has been implemented through consultation with the Lumatone team and by working closely with owners of the keyboard.
The Lumatone uInstrument Model The Lumatone .uinst model is based on information from the manufacturer to accurately recreate the physical structure of the keyboard in two dimensions. The keyboard loads with no colors assigned.
The MIDI Channel and Note default assignments in the uInstrument definition correspond to the hardware configuration of the keyboard, which will in most cases not correspond to any given user configuration of the keyboard. For this reason, UTE provides functions for altering Note and Channel configurations (as well as LED Key Colors) which can be stored and recalled in either a native XML file format, or in the Lumatone Editor application format (.ltn) As the focus of UTE is tuning, the software provides a way to map scales to the keys of your Lumatone in the order of the user-defined MIDI channels and keys, saving you from having to retune every key individually. Once you assign colors to the keys, your project will better resemble your keyboard; for example, below is shown an .ltn file which has been imported and tuned with 31-tone equal temperament.
42
Ηπ INSTRUMENTS hpi.zentral.zone · Universal Tuning Editor · documentation v12 24.Feb.2022
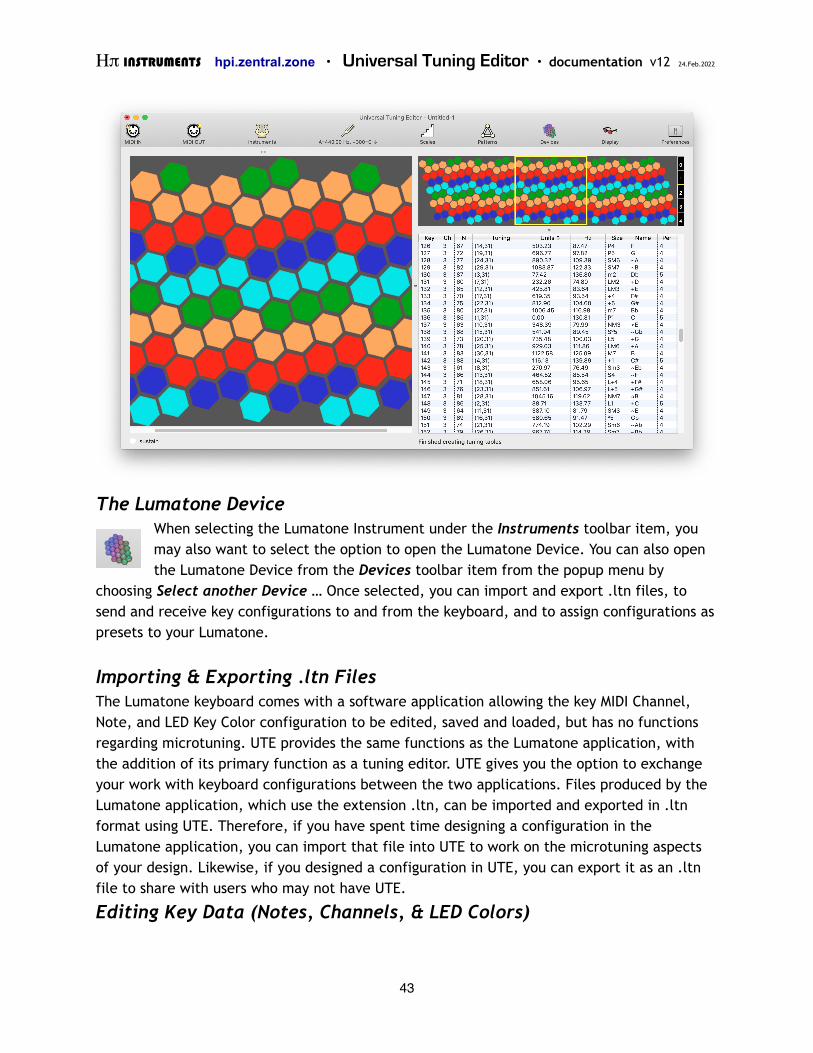
The Lumatone Device
When selecting the Lumatone Instrument under the Instruments toolbar item, you may also want to select the option to open the Lumatone Device. You can also open the Lumatone Device from the Devices toolbar item from the popup menu by
choosing Select another Device … Once selected, you can import and export .ltn files, to send and receive key configurations to and from the keyboard, and to assign configurations as presets to your Lumatone.
Importing & Exporting .ltn Files The Lumatone keyboard comes with a software application allowing the key MIDI Channel, Note, and LED Key Color configuration to be edited, saved and loaded, but has no functions regarding microtuning. UTE provides the same functions as the Lumatone application, with the addition of its primary function as a tuning editor. UTE gives you the option to exchange your work with keyboard configurations between the two applications. Files produced by the Lumatone application, which use the extension .ltn, can be imported and exported in .ltn format using UTE. Therefore, if you have spent time designing a configuration in the Lumatone application, you can import that file into UTE to work on the microtuning aspects of your design. Likewise, if you designed a configuration in UTE, you can export it as an .ltn file to share with users who may not have UTE.
Editing Key Data (Notes, Channels, & LED Colors)
43
Ηπ INSTRUMENTS hpi.zentral.zone · Universal Tuning Editor · documentation v12 24.Feb.2022
To assign colors, MIDI Channels, and MIDI Notes to keyboard keys, follow the instructions given in Chapter 9: Display.
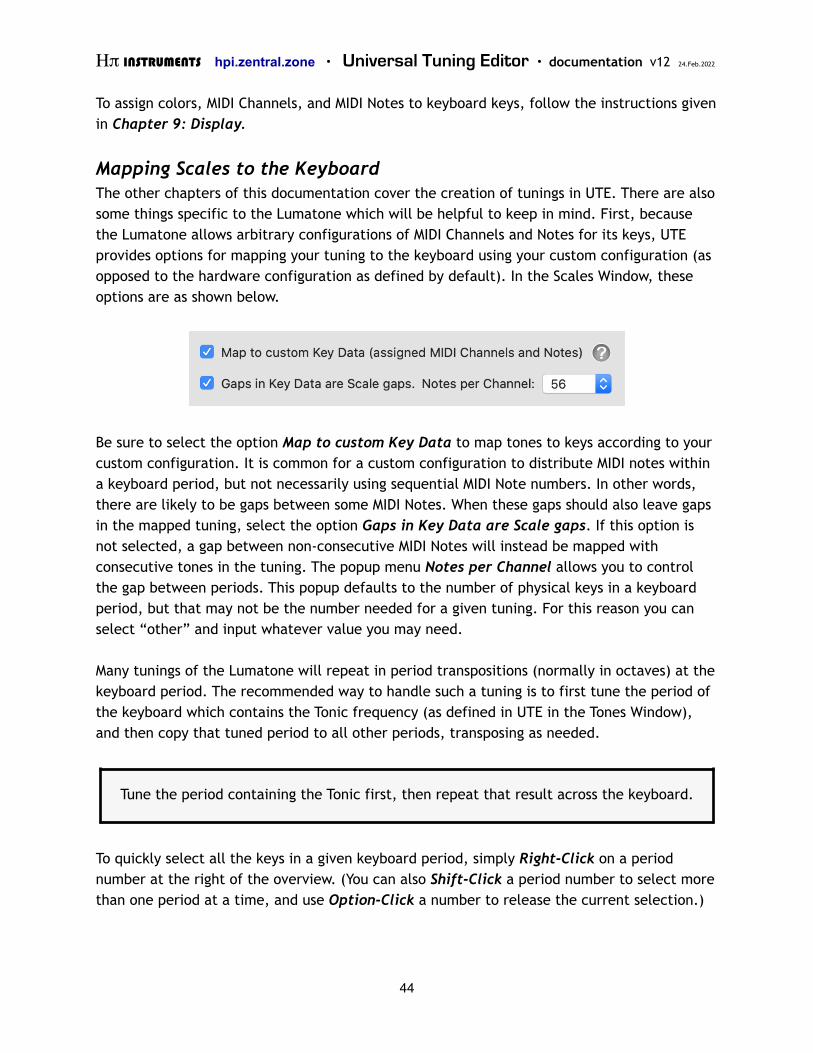
Mapping Scales to the Keyboard The other chapters of this documentation cover the creation of tunings in UTE. There are also some things specific to the Lumatone which will be helpful to keep in mind. First, because the Lumatone allows arbitrary configurations of MIDI Channels and Notes for its keys, UTE provides options for mapping your tuning to the keyboard using your custom configuration (as opposed to the hardware configuration as defined by default). In the Scales Window, these options are as shown below.
Be sure to select the option Map to custom Key Data to map tones to keys according to your custom configuration. It is common for a custom configuration to distribute MIDI notes within a keyboard period, but not necessarily using sequential MIDI Note numbers. In other words, there are likely to be gaps between some MIDI Notes. When these gaps should also leave gaps in the mapped tuning, select the option Gaps in Key Data are Scale gaps. If this option is not selected, a gap between non-consecutive MIDI Notes will instead be mapped with consecutive tones in the tuning. The popup menu Notes per Channel allows you to control the gap between periods. This popup defaults to the number of physical keys in a keyboard period, but that may not be the number needed for a given tuning. For this reason you can select “other” and input whatever value you may need.
Many tunings of the Lumatone will repeat in period transpositions (normally in octaves) at the keyboard period. The recommended way to handle such a tuning is to first tune the period of the keyboard which contains the Tonic frequency (as defined in UTE in the Tones Window), and then copy that tuned period to all other periods, transposing as needed.
To quickly select all the keys in a given keyboard period, simply Right-Click on a period number at the right of the overview. (You can also Shift-Click a period number to select more than one period at a time, and use Option-Click a number to release the current selection.)
Tune the period containing the Tonic first, then repeat that result across the keyboard.
44
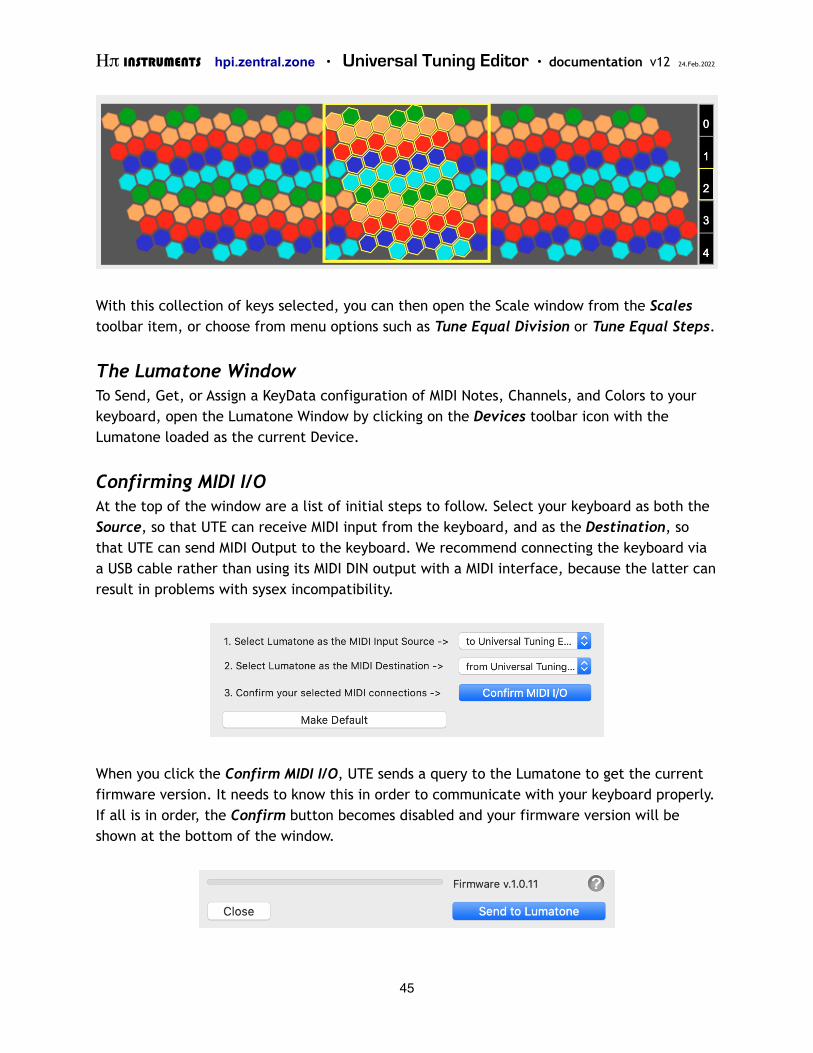
Ηπ INSTRUMENTS hpi.zentral.zone · Universal Tuning Editor · documentation v12 24.Feb.2022
With this collection of keys selected, you can then open the Scale window from the Scales toolbar item, or choose from menu options such as Tune Equal Division or Tune Equal Steps.
The Lumatone Window To Send, Get, or Assign a KeyData configuration of MIDI Notes, Channels, and Colors to your keyboard, open the Lumatone Window by clicking on the Devices toolbar icon with the Lumatone loaded as the current Device.
Confirming MIDI I/O At the top of the window are a list of initial steps to follow. Select your keyboard as both the Source, so that UTE can receive MIDI input from the keyboard, and as the Destination, so that UTE can send MIDI Output to the keyboard. We recommend connecting the keyboard via a USB cable rather than using its MIDI DIN output with a MIDI interface, because the latter can result in problems with sysex incompatibility.
When you click the Confirm MIDI I/O, UTE sends a query to the Lumatone to get the current firmware version. It needs to know this in order to communicate with your keyboard properly. If all is in order, the Confirm button becomes disabled and your firmware version will be shown at the bottom of the window.
45
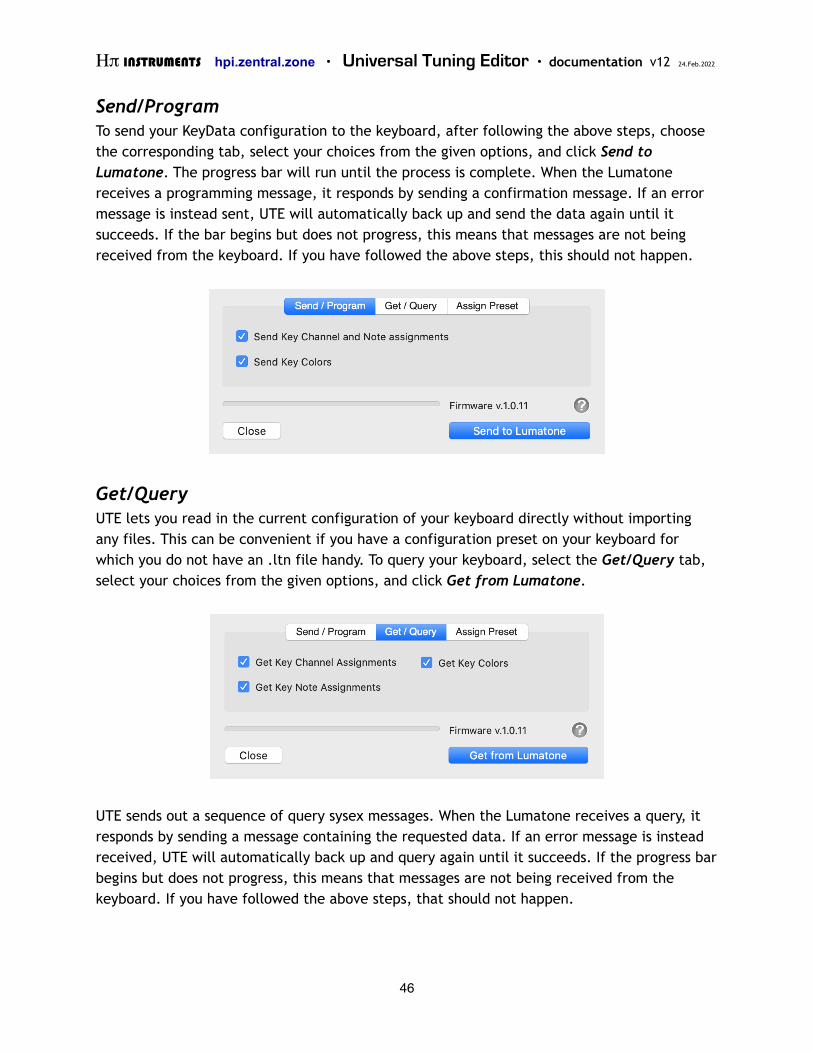
Ηπ INSTRUMENTS hpi.zentral.zone · Universal Tuning Editor · documentation v12 24.Feb.2022
Send/Program To send your KeyData configuration to the keyboard, after following the above steps, choose the corresponding tab, select your choices from the given options, and click Send to Lumatone. The progress bar will run until the process is complete. When the Lumatone receives a programming message, it responds by sending a confirmation message. If an error message is instead sent, UTE will automatically back up and send the data again until it succeeds. If the bar begins but does not progress, this means that messages are not being received from the keyboard. If you have followed the above steps, this should not happen.
Get/Query UTE lets you read in the current configuration of your keyboard directly without importing any files. This can be convenient if you have a configuration preset on your keyboard for which you do not have an .ltn file handy. To query your keyboard, select the Get/Query tab, select your choices from the given options, and click Get from Lumatone.
UTE sends out a sequence of query sysex messages. When the Lumatone receives a query, it responds by sending a message containing the requested data. If an error message is instead received, UTE will automatically back up and query again until it succeeds. If the progress bar begins but does not progress, this means that messages are not being received from the keyboard. If you have followed the above steps, that should not happen.
46
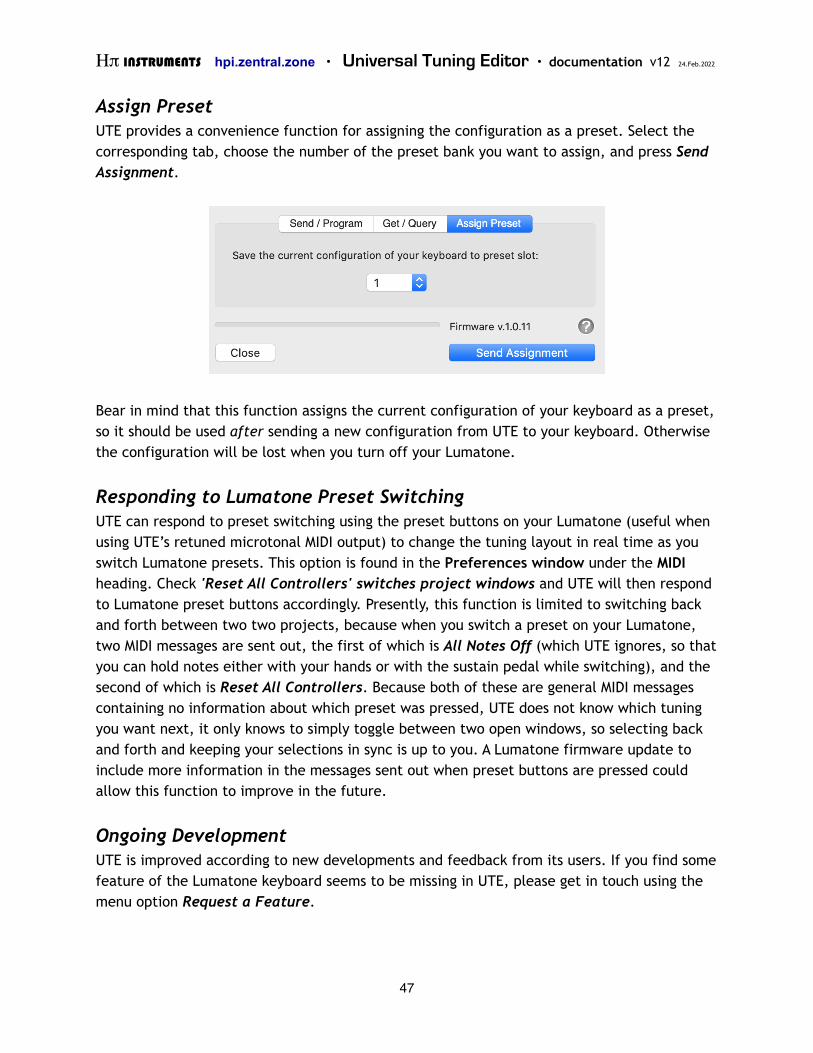
Ηπ INSTRUMENTS hpi.zentral.zone · Universal Tuning Editor · documentation v12 24.Feb.2022
Assign Preset UTE provides a convenience function for assigning the configuration as a preset. Select the corresponding tab, choose the number of the preset bank you want to assign, and press Send Assignment.
Bear in mind that this function assigns the current configuration of your keyboard as a preset, so it should be used after sending a new configuration from UTE to your keyboard. Otherwise the configuration will be lost when you turn off your Lumatone.
Responding to Lumatone Preset Switching UTE can respond to preset switching using the preset buttons on your Lumatone (useful when using UTE’s retuned microtonal MIDI output) to change the tuning layout in real time as you switch Lumatone presets. This option is found in the Preferences window under the MIDI heading. Check 'Reset All Controllers' switches project windows and UTE will then respond to Lumatone preset buttons accordingly. Presently, this function is limited to switching back and forth between two two projects, because when you switch a preset on your Lumatone, two MIDI messages are sent out, the first of which is All Notes Off (which UTE ignores, so that you can hold notes either with your hands or with the sustain pedal while switching), and the second of which is Reset All Controllers. Because both of these are general MIDI messages containing no information about which preset was pressed, UTE does not know which tuning you want next, it only knows to simply toggle between two open windows, so selecting back and forth and keeping your selections in sync is up to you. A Lumatone firmware update to include more information in the messages sent out when preset buttons are pressed could allow this function to improve in the future.
Ongoing Development UTE is improved according to new developments and feedback from its users. If you find some feature of the Lumatone keyboard seems to be missing in UTE, please get in touch using the menu option Request a Feature.
47
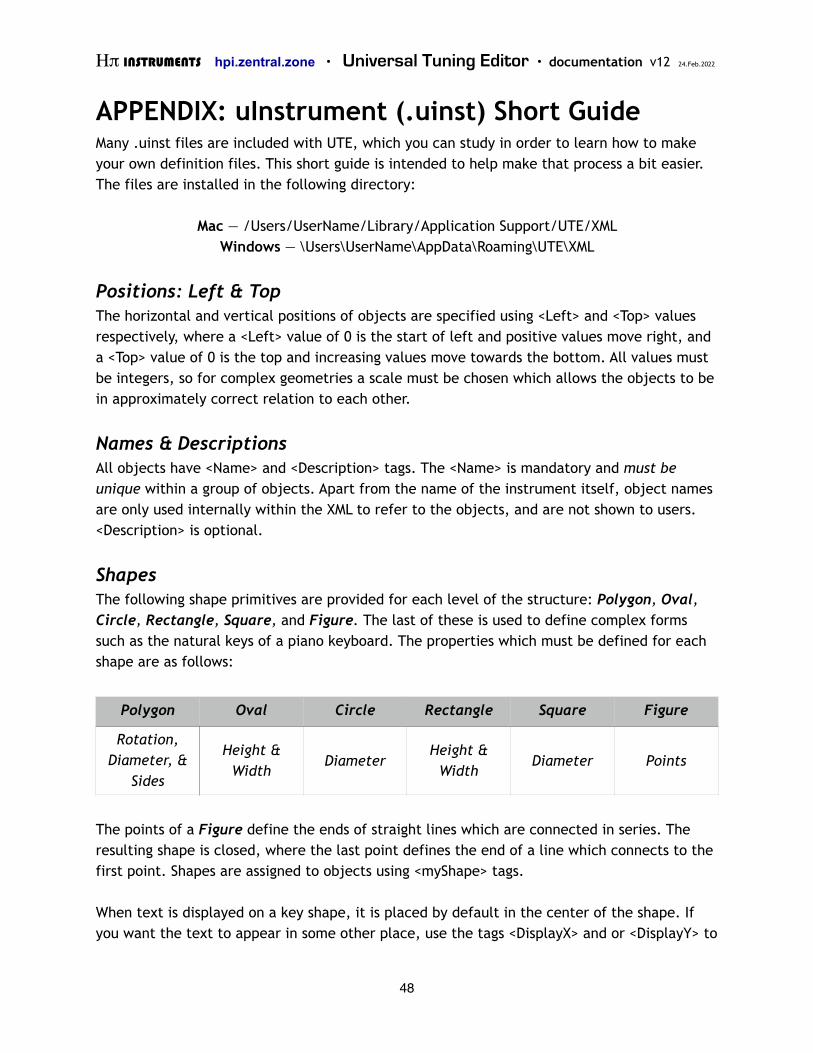
Ηπ INSTRUMENTS hpi.zentral.zone · Universal Tuning Editor · documentation v12 24.Feb.2022
APPENDIX: uInstrument (.uinst) Short Guide Many .uinst files are included with UTE, which you can study in order to learn how to make your own definition files. This short guide is intended to help make that process a bit easier. The files are installed in the following directory:
Mac — /Users/UserName/Library/Application Support/UTE/XML Windows — \Users\UserName\AppData\Roaming\UTE\XML
Positions: Left & Top The horizontal and vertical positions of objects are specified using <Left> and <Top> values respectively, where a <Left> value of 0 is the start of left and positive values move right, and a <Top> value of 0 is the top and increasing values move towards the bottom. All values must be integers, so for complex geometries a scale must be chosen which allows the objects to be in approximately correct relation to each other.
Names & Descriptions All objects have <Name> and <Description> tags. The <Name> is mandatory and must be unique within a group of objects. Apart from the name of the instrument itself, object names are only used internally within the XML to refer to the objects, and are not shown to users. <Description> is optional.
Shapes The following shape primitives are provided for each level of the structure: Polygon, Oval, Circle, Rectangle, Square, and Figure. The last of these is used to define complex forms such as the natural keys of a piano keyboard. The properties which must be defined for each shape are as follows:
The points of a Figure define the ends of straight lines which are connected in series. The resulting shape is closed, where the last point defines the end of a line which connects to the first point. Shapes are assigned to objects using <myShape> tags.
When text is displayed on a key shape, it is placed by default in the center of the shape. If you want the text to appear in some other place, use the tags <DisplayX> and or <DisplayY> to
Polygon Oval Circle Rectangle Square Figure
Rotation, Diameter, &
Sides
Height & Width
DiameterHeight &
WidthDiameter Points
48
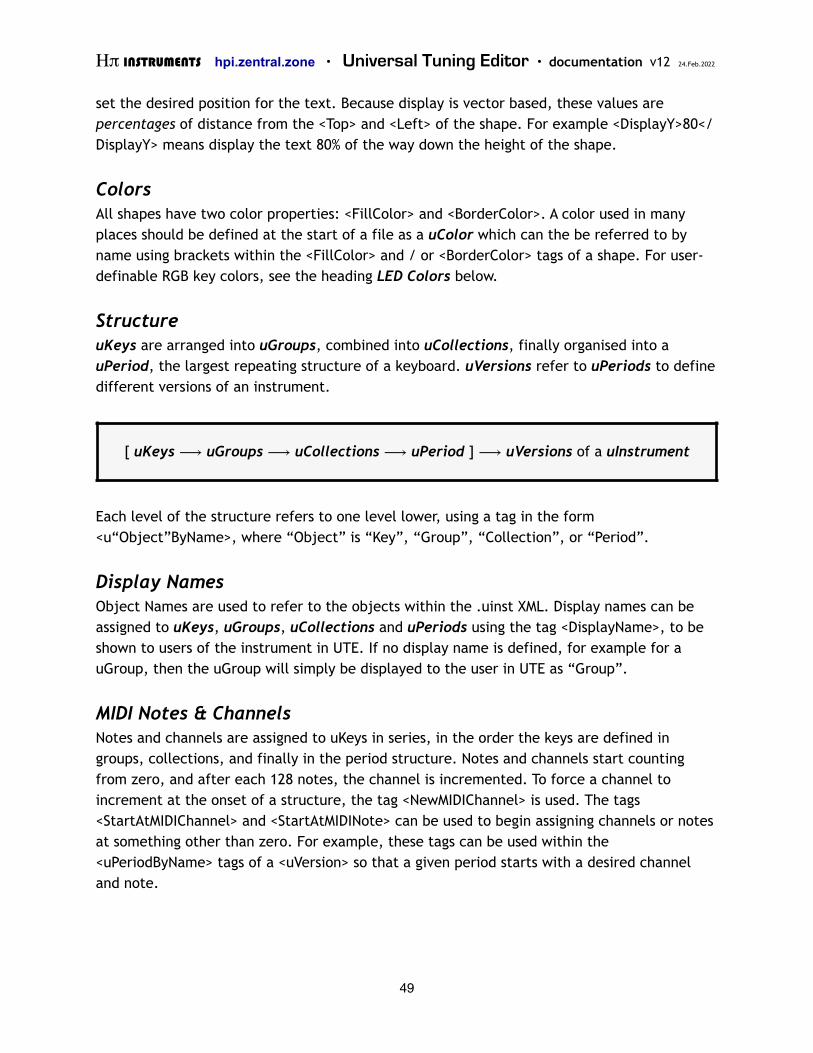
Ηπ INSTRUMENTS hpi.zentral.zone · Universal Tuning Editor · documentation v12 24.Feb.2022
set the desired position for the text. Because display is vector based, these values are percentages of distance from the <Top> and <Left> of the shape. For example <DisplayY>80</DisplayY> means display the text 80% of the way down the height of the shape.
Colors All shapes have two color properties: <FillColor> and <BorderColor>. A color used in many places should be defined at the start of a file as a uColor which can the be referred to by name using brackets within the <FillColor> and / or <BorderColor> tags of a shape. For user-definable RGB key colors, see the heading LED Colors below.
Structure uKeys are arranged into uGroups, combined into uCollections, finally organised into a uPeriod, the largest repeating structure of a keyboard. uVersions refer to uPeriods to define different versions of an instrument.
Each level of the structure refers to one level lower, using a tag in the form <u“Object”ByName>, where “Object” is “Key”, “Group”, “Collection”, or “Period”.
Display Names Object Names are used to refer to the objects within the .uinst XML. Display names can be assigned to uKeys, uGroups, uCollections and uPeriods using the tag <DisplayName>, to be shown to users of the instrument in UTE. If no display name is defined, for example for a uGroup, then the uGroup will simply be displayed to the user in UTE as “Group”.
MIDI Notes & Channels Notes and channels are assigned to uKeys in series, in the order the keys are defined in groups, collections, and finally in the period structure. Notes and channels start counting from zero, and after each 128 notes, the channel is incremented. To force a channel to increment at the onset of a structure, the tag <NewMIDIChannel> is used. The tags <StartAtMIDIChannel> and <StartAtMIDINote> can be used to begin assigning channels or notes at something other than zero. For example, these tags can be used within the <uPeriodByName> tags of a <uVersion> so that a given period starts with a desired channel and note.
[ uKeys ⟶ uGroups ⟶ uCollections ⟶ uPeriod ] ⟶ uVersions of a uInstrument
49
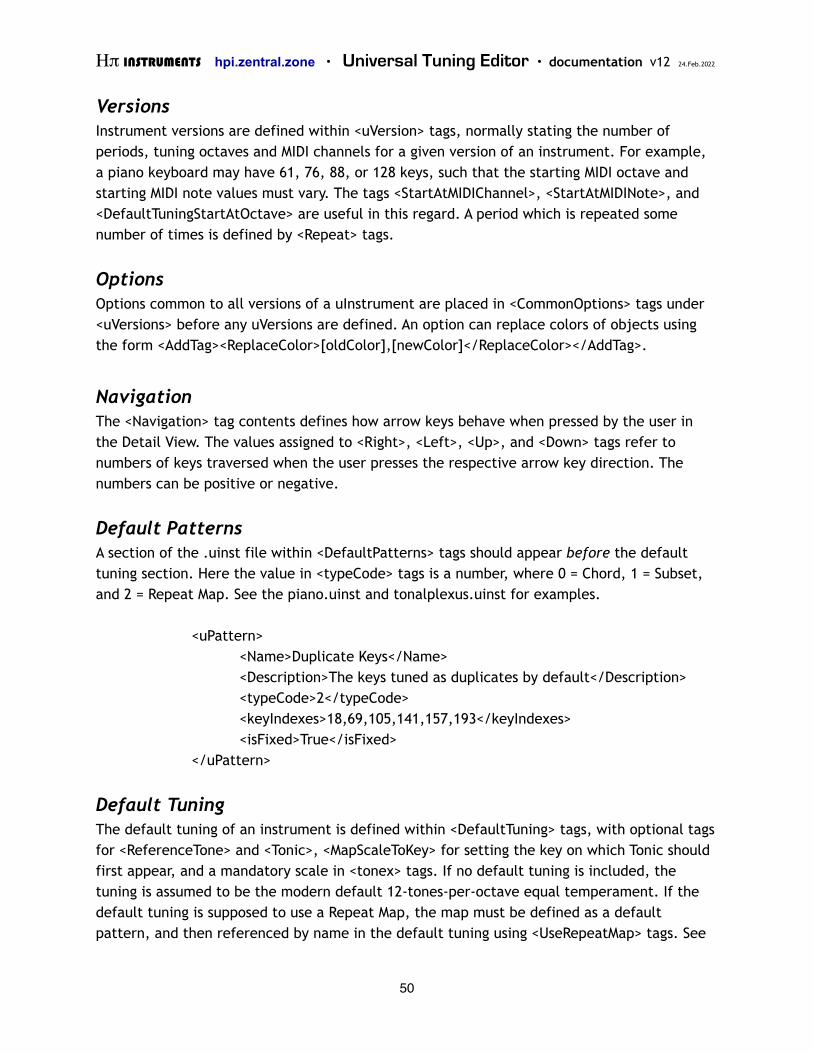
Ηπ INSTRUMENTS hpi.zentral.zone · Universal Tuning Editor · documentation v12 24.Feb.2022
Versions Instrument versions are defined within <uVersion> tags, normally stating the number of periods, tuning octaves and MIDI channels for a given version of an instrument. For example, a piano keyboard may have 61, 76, 88, or 128 keys, such that the starting MIDI octave and starting MIDI note values must vary. The tags <StartAtMIDIChannel>, <StartAtMIDINote>, and <DefaultTuningStartAtOctave> are useful in this regard. A period which is repeated some number of times is defined by <Repeat> tags.
Options Options common to all versions of a uInstrument are placed in <CommonOptions> tags under <uVersions> before any uVersions are defined. An option can replace colors of objects using the form <AddTag><ReplaceColor>[oldColor],[newColor]</ReplaceColor></AddTag>.
Navigation The <Navigation> tag contents defines how arrow keys behave when pressed by the user in the Detail View. The values assigned to <Right>, <Left>, <Up>, and <Down> tags refer to numbers of keys traversed when the user presses the respective arrow key direction. The numbers can be positive or negative.
Default Patterns A section of the .uinst file within <DefaultPatterns> tags should appear before the default tuning section. Here the value in <typeCode> tags is a number, where 0 = Chord, 1 = Subset, and 2 = Repeat Map. See the piano.uinst and tonalplexus.uinst for examples.
<uPattern> <Name>Duplicate Keys</Name> <Description>The keys tuned as duplicates by default</Description> <typeCode>2</typeCode> <keyIndexes>18,69,105,141,157,193</keyIndexes> <isFixed>True</isFixed> </uPattern>
Default Tuning The default tuning of an instrument is defined within <DefaultTuning> tags, with optional tags for <ReferenceTone> and <Tonic>, <MapScaleToKey> for setting the key on which Tonic should first appear, and a mandatory scale in <tonex> tags. If no default tuning is included, the tuning is assumed to be the modern default 12-tones-per-octave equal temperament. If the default tuning is supposed to use a Repeat Map, the map must be defined as a default pattern, and then referenced by name in the default tuning using <UseRepeatMap> tags. See
50
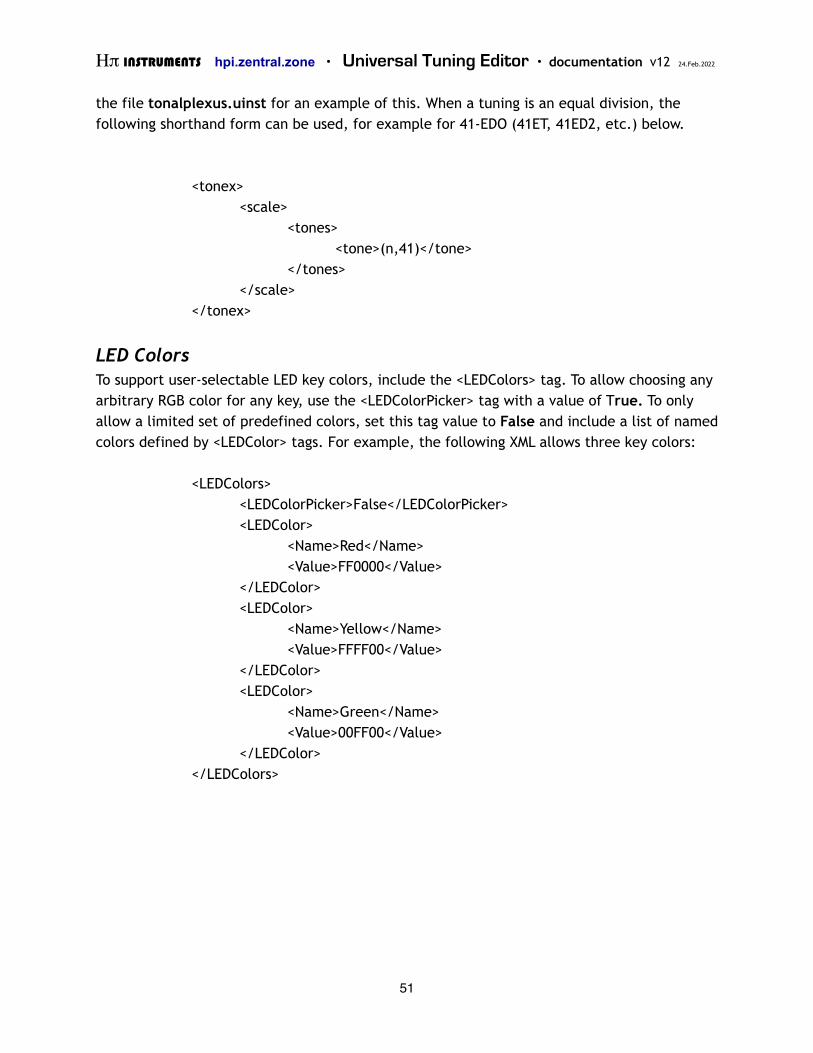
Ηπ INSTRUMENTS hpi.zentral.zone · Universal Tuning Editor · documentation v12 24.Feb.2022
the file tonalplexus.uinst for an example of this. When a tuning is an equal division, the following shorthand form can be used, for example for 41-EDO (41ET, 41ED2, etc.) below.
<tonex> <scale> <tones> <tone>(n,41)</tone> </tones> </scale> </tonex>
LED Colors To support user-selectable LED key colors, include the <LEDColors> tag. To allow choosing any arbitrary RGB color for any key, use the <LEDColorPicker> tag with a value of True. To only allow a limited set of predefined colors, set this tag value to False and include a list of named colors defined by <LEDColor> tags. For example, the following XML allows three key colors:
<LEDColors> <LEDColorPicker>False</LEDColorPicker> <LEDColor> <Name>Red</Name> <Value>FF0000</Value> </LEDColor> <LEDColor> <Name>Yellow</Name> <Value>FFFF00</Value> </LEDColor> <LEDColor> <Name>Green</Name> <Value>00FF00</Value> </LEDColor> </LEDColors>
51
Ηπ INSTRUMENTS hpi.zentral.zone · Universal Tuning Editor · documentation v12 24.Feb.2022
Credits All versions of UTE are designed and programmed by Aaron Andrew Hunt, using Xojo and MBS Plugins on a Mac.
This documentation is written by Aaron Andrew Hunt.
Thank you for supporting H-Pi Instruments and UTE.
©2021 H-Pi Instruments · FOR THE FUTURE OF MUSIC
52

![The second term is equal to E U;T h E U0 hX 0 f^ (U+ T^U0) i E U00 hX f^ 0 0(U+ T^U00) ii = E U;T hX ; 0 f^ f^ 0E U0 [˜ (U+ T^U0)] E U00 [˜ 0(U+ T^U00)] i = X ; 0 f^ f^ 0E U [˜](https://static.fdocument.org/doc/165x107/5fe5c11270cbbb18821dcc13/the-second-term-is-equal-to-e-ut-h-e-u0-hx-0-f-u-tu0-i-e-u00-hx-f-0-0u.jpg)


![&Z Ì ] & } u dZ /E/E'](https://static.fdocument.org/doc/165x107/629d9bc2687b3969ab0e8d75/ampz-amp-u-dz-ee.jpg)