
HP LaserJet M9040/M9050 MFPh10032. · Ağa bağlanmak için: Varsayılan olarak, DHCP kullanılarak...
40
HP LaserJet M9040/M9050 MFP EN Getting Started Guide Read me First Δ EL RU Başlangıç Kılavuzu Önce Beni Oku TR
Transcript of HP LaserJet M9040/M9050 MFPh10032. · Ağa bağlanmak için: Varsayılan olarak, DHCP kullanılarak...
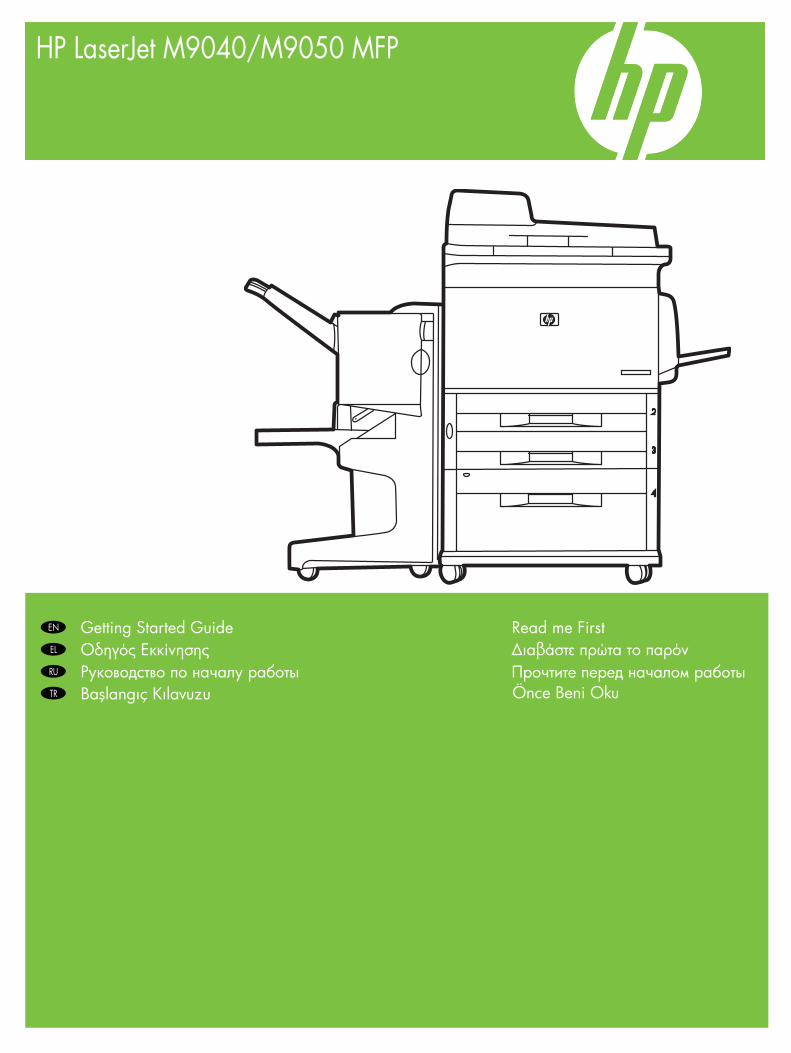
HP LaserJet M9040/M9050 MFP
EN Getting Started Guide Read me First Δ EL
RU
Başlangıç Kılavuzu Önce Beni OkuTR
Copyright and License© 2008 Copyright Hewlett-Packard Development Company, L.P.
Reproduction, adaptation or translation without prior written permission is prohibited, except as allowed under the copyright laws.
The information contained herein is subject to change without notice.
The only warranties for HP products and services are set forth in the express warranty statements accompanying such products and services. Nothing herein should be construed as constituting an additional warranty. HP shall not be liable for technical or editorial errors or omissions contained herein.
Part number: CC395-90921
Edition 1, 4/2008
FCC RegulationsThis equipment has been tested and found to comply with the limits for a Class B digital device, pursuant to Part 15 of the FCC rules. These limits are designed to provide reasonable protection against harmful interference in a residential installation. This equipment generates, uses, and can radiate radio-frequency energy. If this equipment is not installed and used in accordance with the instructions, it may cause harmful interference to radio communications. However, there is no guarantee that interference will not occur in a particular installation. If this equipment does cause harmful interference to radio or television reception, which can be determined by turning the equipment off and on, correct the interference by one or more of the following measures:
• Reorient or relocate the receiving antenna.
• Increase separation between equipment and receiver.
• Connect equipment to an outlet on a circuit different from that to which the receiver is located.
• Consult your dealer or an experienced radio/TV technician.
Any changes or modifications to the product that are not expressly approved by HP could void the user’s authority to operate this equipment. Use of a shielded interface cable is required to comply with the Class B limits of Part 15 of FCC rules. For more regulatory information, see the electronic user guide. Hewlett-Packard shall not be liable for any direct, indirect, incidental, consequential, or other damage alleged in connection with the furnishing or use of this information.
Trademark Credits Windows® is a U.S. registered trademark of Microsoft Corporation.
EN
EN
EN
EN
EN
EN
EN
EN
1
Overview
Unpack the Device
Setup the Device
Install Windows software
Device location
Install Mac software
Set up embedded digital send
In-box documentation
µ µµ
µ µ
µ
µ Windows
µ Mac
EL
EL
EL
EL
EL
EL
EL
EL
Windows
Mac
RU
RU
RU
RU
RU
RU
RU
RU
Genel Bakış
Katıştırılmış dijital göndermeyi ayarlama
Ürünle birlikte verilen belgeler
Aygıt konumu
Aygıtı Ambalajından Çıkarma
Aygıtı Kurma
Windows yazılımını yükleme
Mac yazılımını yükleme
TR
TR
TR
TR
TR
TR
TR
TR
EN
EN
2
Getting Started GuideWall Poster • Control Panel information • Device featuresSoftware/Customer information CD • User Guide • Install Notes • Hp Jet Direct • Embedded Web Server • Software DriversHP Digital Sending Software 4.X CD • Trial version of DSS Advanced Features
In-box documentation µ µ
• • Δ CD µ/ • • µ • Hp Jet Direct • µµ µ Web • µµ µCD µ HP Digital Sending Software 4.X • µ µ DSS
EL
EL
• • Software/Customer information CD • • • Hp Jet Direct • Web- • HP Digital Sending Software 4.X CD • DSS Advanced Features
RU
RU
Ürünle birlikte verilen belgeler
Başlangıç KılavuzuDuvar Posteri • Kontrol Paneli bilgileri • Aygıtın özellikleriYazılım/Müşteri bilgileri CD’si • Kullanım Kılavuzu • Yükleme Notları • Hp Jet Direct • Katıştırılmış Web Sunucusu • Yazılım SürücüleriHP Digital Sending Software 4.X CD’si • DSS Advanced Features deneme sürümü
TR
TR
1
EN
EN
3
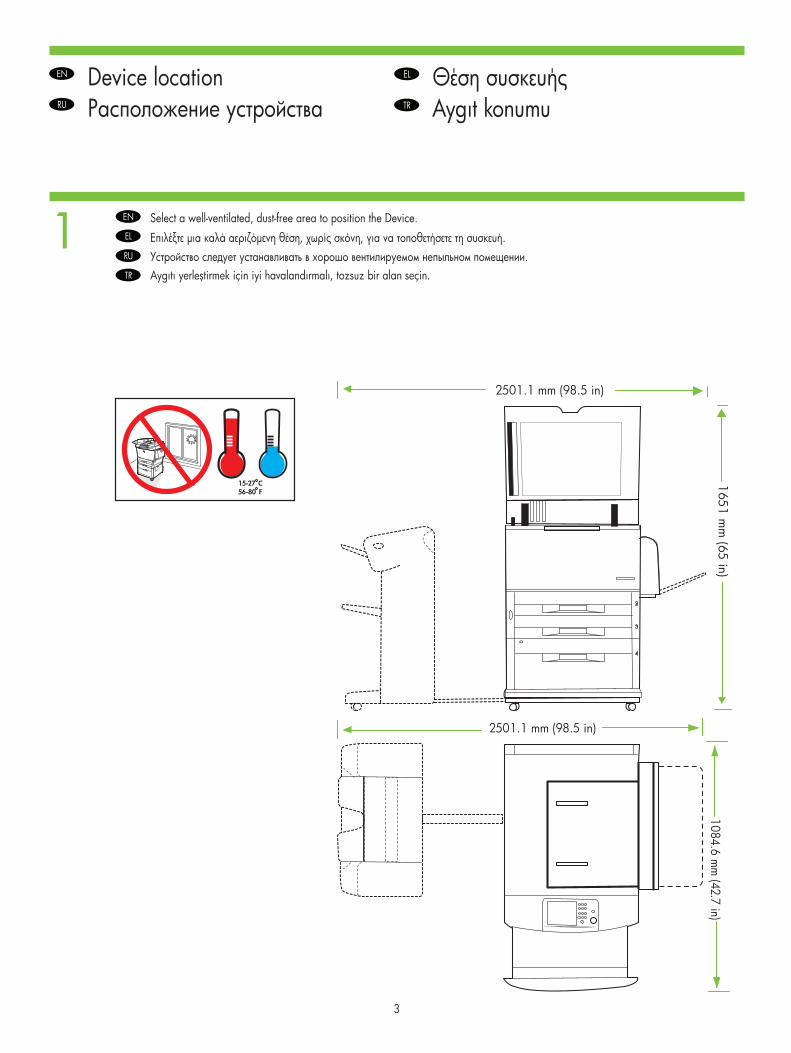
Device location
Select a well-ventilated, dust-free area to position the Device.
µ µ , , .
EL
EL
.
RU
RU
Aygıt konumu
Aygıtı yerleştirmek için iyi havalandırmalı, tozsuz bir alan seçin.
TR
TR
2 EN
EN
4
110-volt models • 110 to 127 volts • 50/60 HzCurrent: • 15 Amps
220-volt models • 220 to 240 volts • 50/60 HzCurrent: • 8 Amps
Power/Current specifications. /µ.
110 volt • 110 127 volt • 50/60 Hzµ: • 15 Amps
220 volt • 220 240 volt • 50/60 Hzµ: • 8 Amps
EL
EL
T
110 • 110 127 • 50/60 : • 15
220 • 220 240 • 50/60 : • 8
RU
RU
Güç/Akım özellikleri.
110 volt ile çalışan modeller • 110 ila 127 volt • 50/60 HzAkım: • 15 Amp
220 volt ile çalışan modeller • 220 ila 240 volt • 50/60 HzAkım: • 8 Amp
TR
TR
3
EN
EN
5
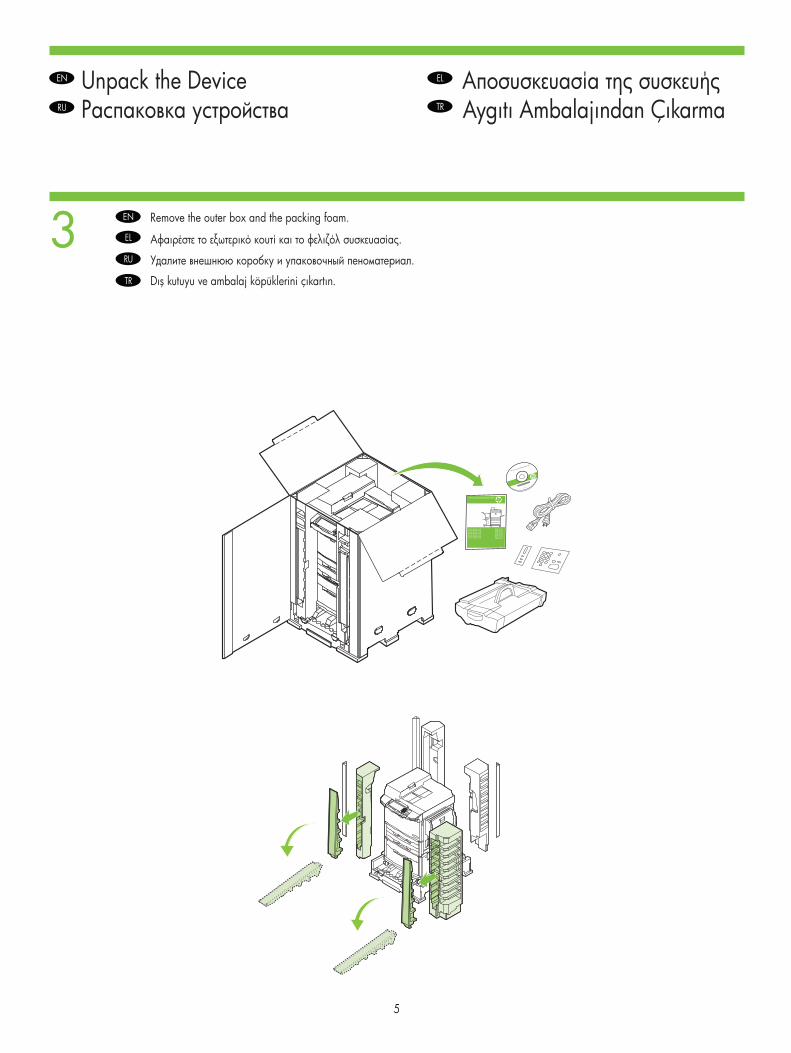
Unpack the Device
Remove the outer box and the packing foam.
.
EL
EL
.
RU
RU
Aygıtı Ambalajından Çıkarma
Dış kutuyu ve ambalaj köpüklerini çıkartın.
TR
TR
4
5
EN
EN
6
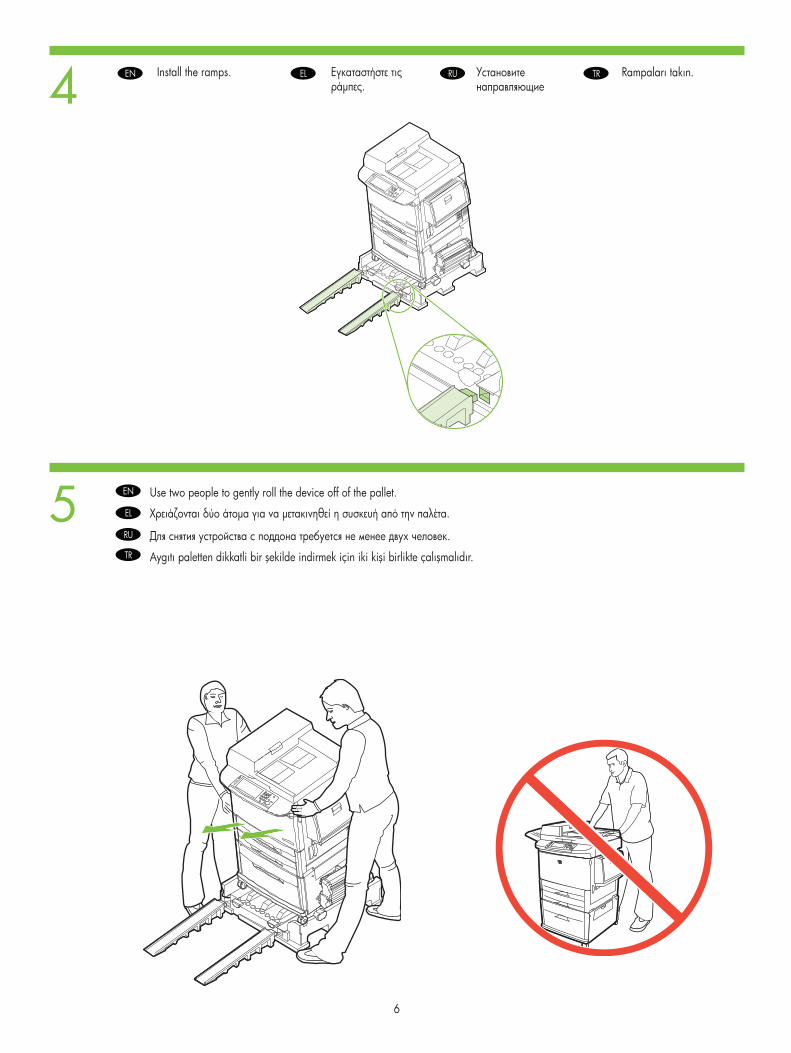
Install the ramps.
Use two people to gently roll the device off of the pallet.
µ.
µ µ .
EL
EL
.
RU
RU
Rampaları takın.
Aygıtı paletten dikkatli bir şekilde indirmek için iki kişi birlikte çalışmalıdır.
TR
TR
6
7
EN
EN
7
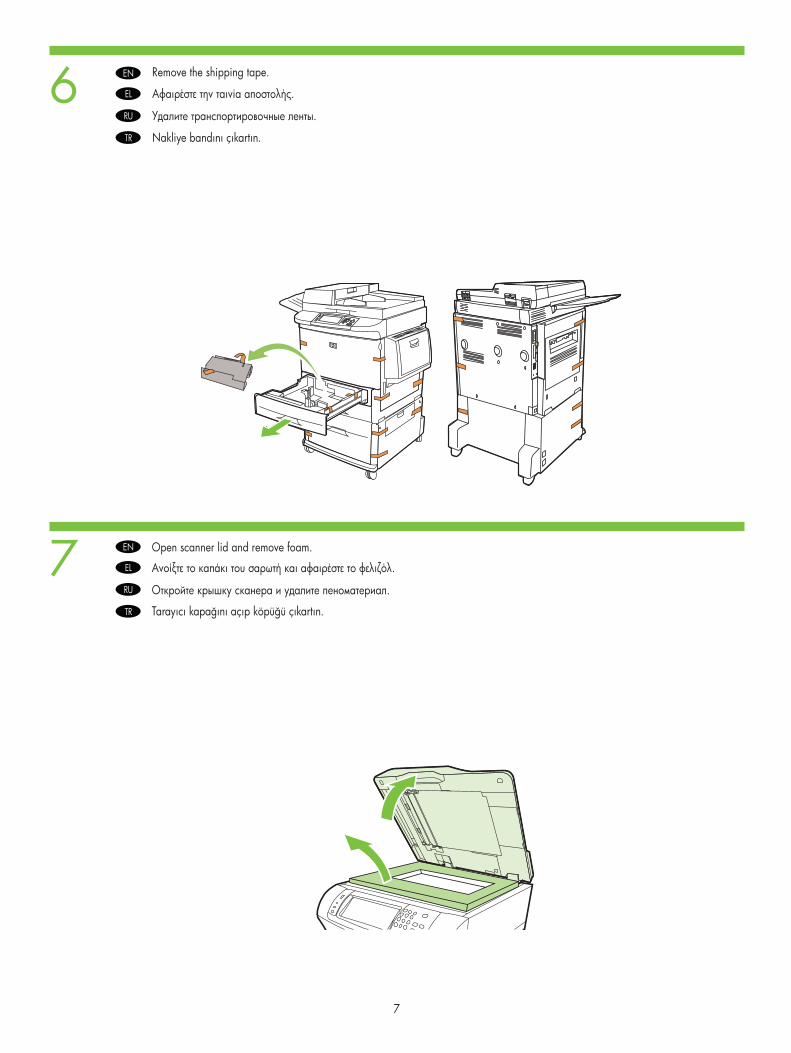
Remove the shipping tape.
Open scanner lid and remove foam.
.
.
EL
EL
.
.
RU
RU
Nakliye bandını çıkartın.
Tarayıcı kapağını açıp köpüğü çıkartın.
TR
TR
10
8
9
EN
EN
EN
8
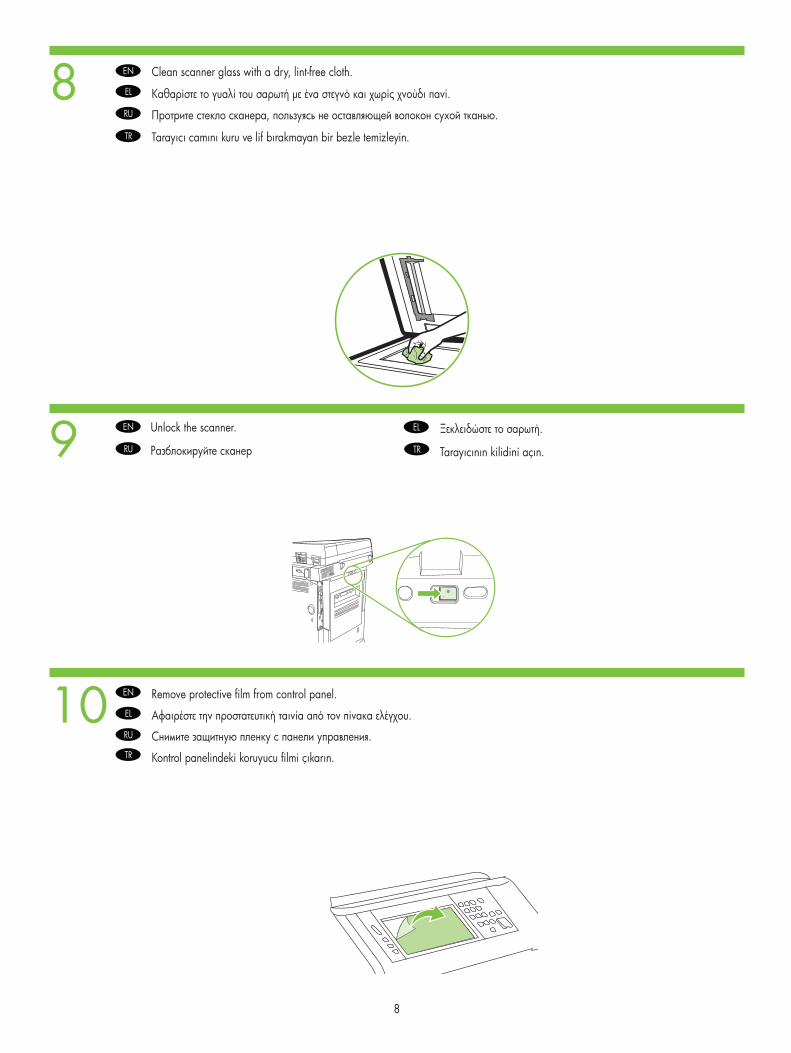
Clean scanner glass with a dry, lint-free cloth.
Unlock the scanner.
Remove protective film from control panel.
µ .
.
.
EL
EL
EL
, .
.
RU
RU
RU
Tarayıcı camını kuru ve lif bırakmayan bir bezle temizleyin.
Tarayıcının kilidini açın.
Kontrol panelindeki koruyucu filmi çıkarın.
TR
TR
TR

11 EN
EN
EN
EN
EN
9
3,000 - sheet stacker/stapler.
Multifunction finisher.
3,000 sheet stacker.
Install the optional output device. Specific installation guides are shipped with each of the optional output devices.
8-bin mailbox.
µ 3.000 .
8 .
µ / 3.000 .
µ µ .
. µ µ .
EL
EL
EL
EL
EL
/ 3000 .
.
3000 .
8 .
. .
RU
RU
RU
RU
RU
3.000 sayfalık yığınlayıcı/zımbalayıcı.
Çok işlevli son işlemci.
3.000 sayfalık yığınlayıcı.
8 bölmeli posta kutusu.
İsteğe bağlı çıkış aygıtını takın. Her bir isteğe bağlı çıkış aygıtıyla birlikte aygıta özel takma kılavuzları da gelmektedir.TR
TR
TR
TR
TR
12
EN
EN
10
Set up the Device
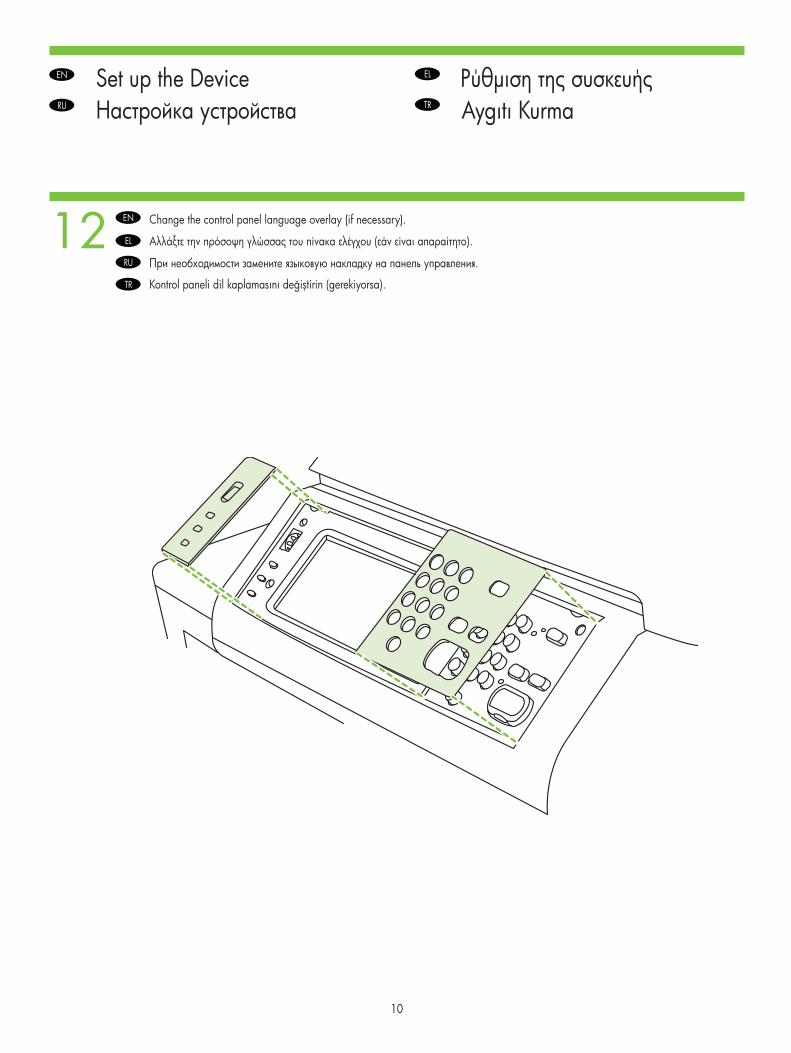
Change the control panel language overlay (if necessary).
µ
( ).
EL
EL
.
RU
RU
Aygıtı Kurma
Kontrol paneli dil kaplamasını değiştirin (gerekiyorsa).
TR
TR
13
1 2
3 4
5 6
EN
11
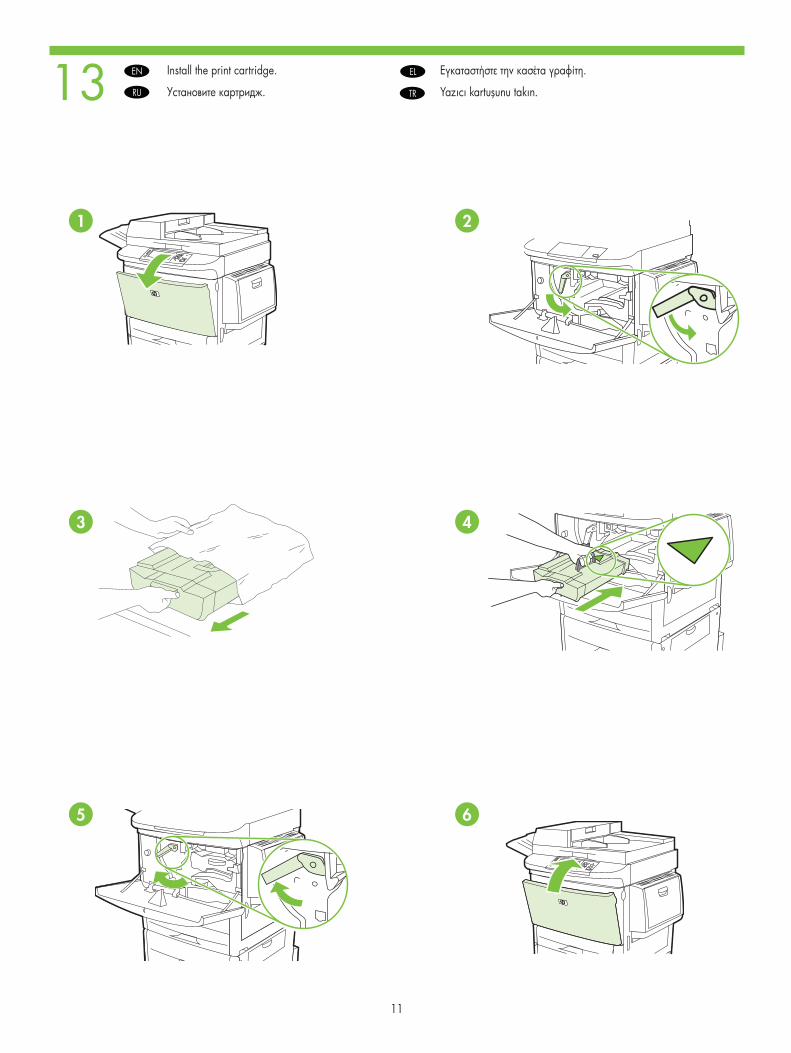
Install the print cartridge. .EL
.RU Yazıcı kartuşunu takın.TR
14 EN
EN
EN
12
Do not connect a USB cable until prompted during software installation.
NOTE: Connection required for Device network features and utilities.
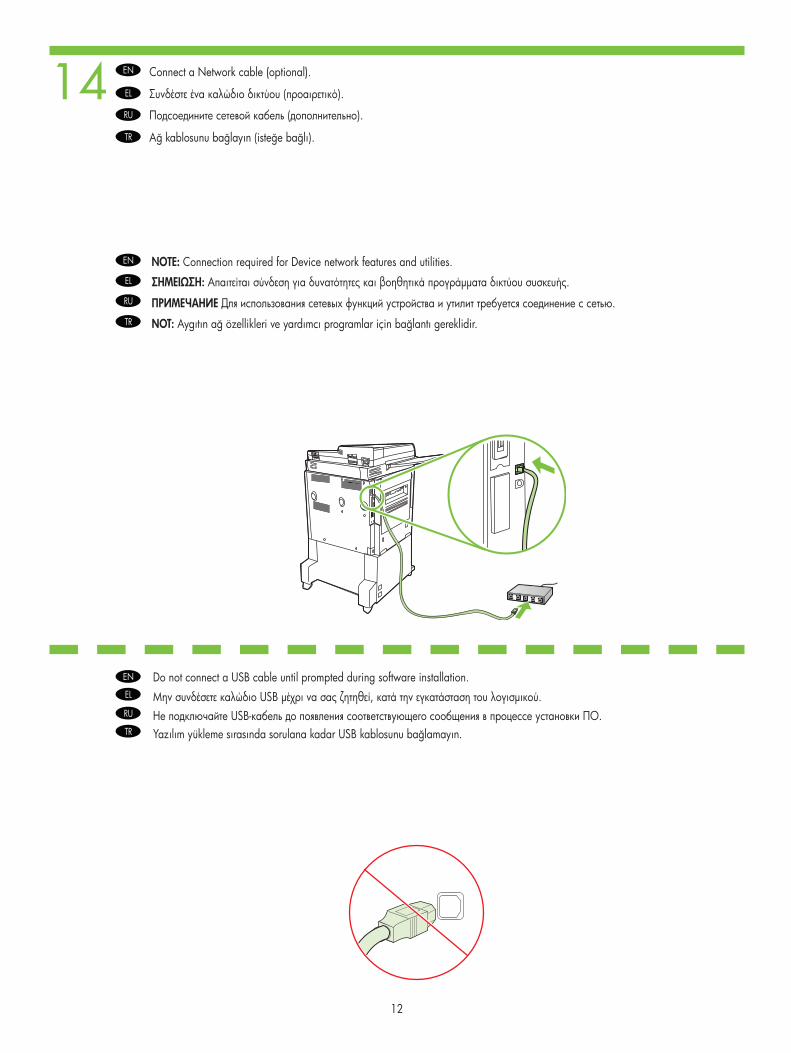
Connect a Network cable (optional).
: µµ .
().
USB µ , µ.
EL
EL
EL
.
().
USB- .
RU
RU
RU
NOT: Aygıtın ağ özellikleri ve yardımcı programlar için bağlantı gereklidir.
Ağ kablosunu bağlayın (isteğe bağlı).
Yazılım yükleme sırasında sorulana kadar USB kablosunu bağlamayın.
TR
TR
TR
15
16
1 2
3
EN
EN
13
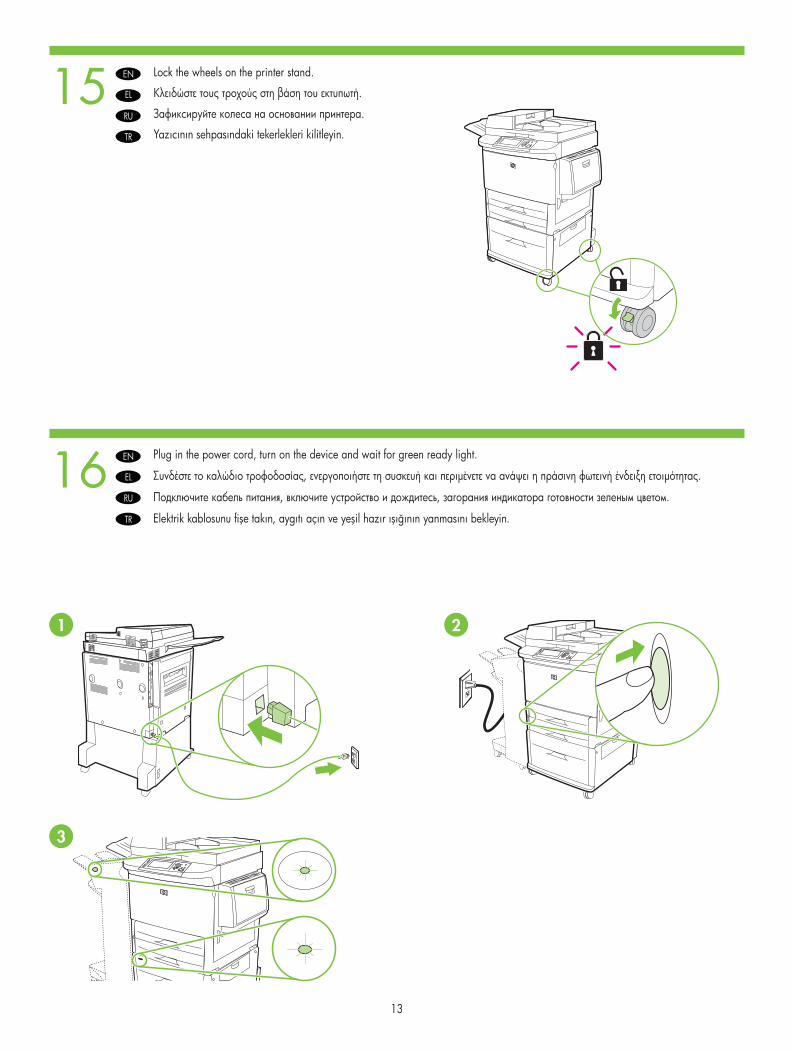
Lock the wheels on the printer stand.
Plug in the power cord, turn on the device and wait for green ready light.
.
, µ µ.
EL
EL
.
, , .
RU
RU
Yazıcının sehpasındaki tekerlekleri kilitleyin.
Elektrik kablosunu fişe takın, aygıtı açın ve yeşil hazır ışığının yanmasını bekleyin.
TR
TR
17
18
EN
EN
14
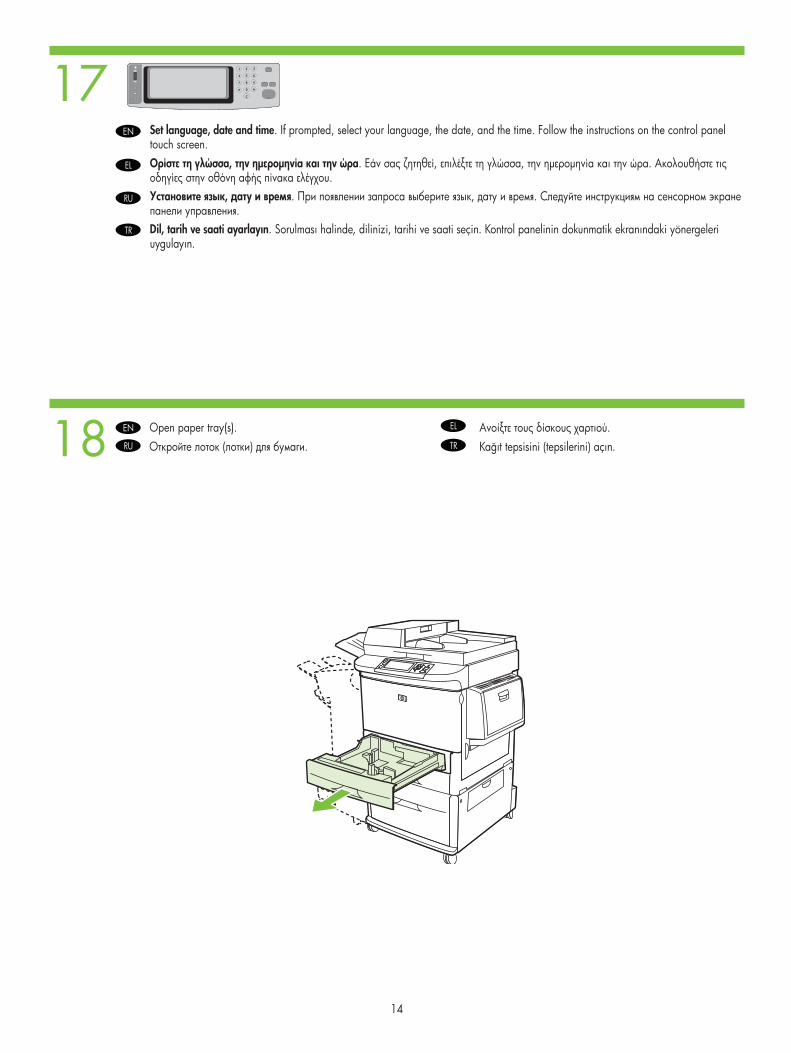
Open paper tray(s).
Set language, date and time. If prompted, select your language, the date, and the time. Follow the instructions on the control panel touch screen.
.
, µµ . , , µµ . .
EL
EL
() .
, . , . .
RU
RU Kağıt tepsisini (tepsilerini) açın.
Dil, tarih ve saati ayarlayın. Sorulması halinde, dilinizi, tarihi ve saati seçin. Kontrol panelinin dokunmatik ekranındaki yönergeleri uygulayın.
TR
TR
19
20
21
EN
EN
EN
15
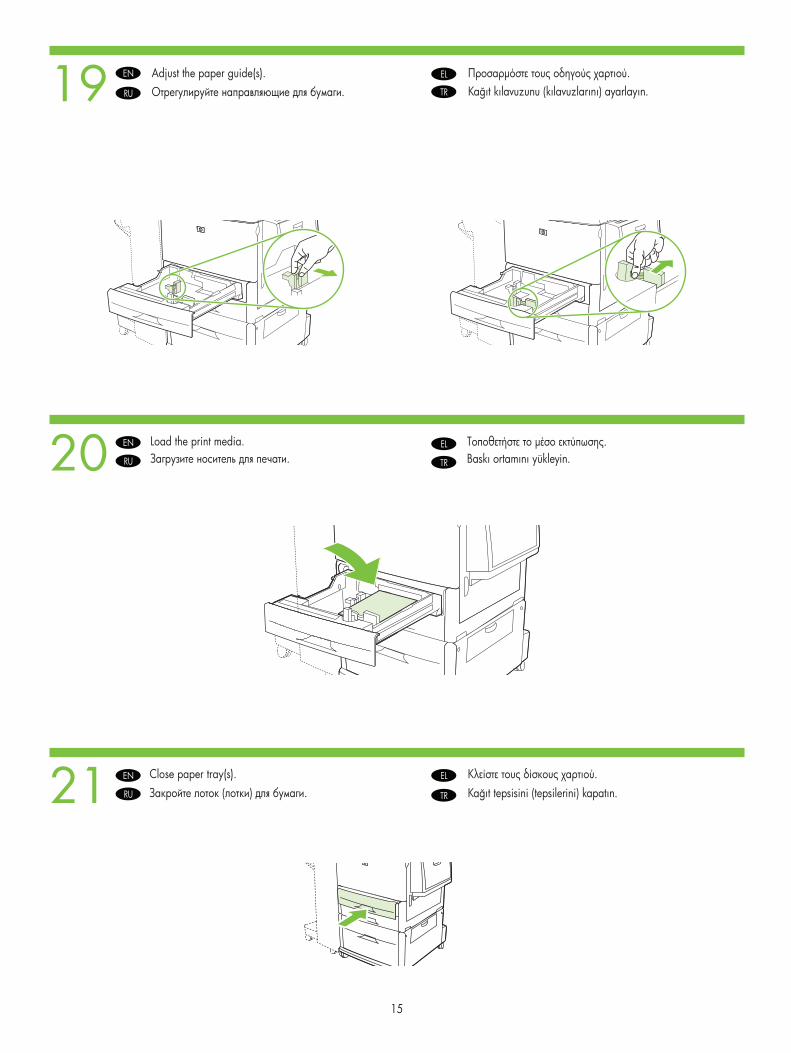
Load the print media.
Close paper tray(s).
Adjust the paper guide(s).
µ .
.
µ . EL
EL
EL
.
() .
. RU
RU
RU
Baskı ortamını yükleyin.
Kağıt tepsisini (tepsilerini) kapatın.
Kağıt kılavuzunu (kılavuzlarını) ayarlayın. TR
TR
TR
22EN
16
To connect to a network: By default, an IP Address will automatically be assigned using DHCP. To assign a static IP address for a network connection, do the following: On the control panel touch Administration. Scroll to and touch Initial Setup, and then touch Networking and I/O. Touch Embedded Jetdirect, and touch TCP/IP. Touch IPV4 Settings, touch Config Method, and then touch Manual. Touch Save. Touch Manual Settings, touch IP Address, type in the assigned IP address. Touch OK, and then touch Save.
: , µ µ IP µ DHCP. µ IP µ , : , Administration (Δ). µ Initial Setup ( µ) , , Networking and I/O (Δ /). Embedded Jetdirect (µµ Jetdirect) TCP/IP. IPV4 Settings (µ IPV4), Config Method ( µ µ) , , Manual ( µ). Save (). Manual Settings ( µ µ), IP Address (Δ IP), . OK Save ().
EL
: IP- DHCP. IP-, . . , /. Jetdirect, TCP/IP. IPV4, , . . , IP-, IP-. OK, — .
RU
Ağa bağlanmak için: Varsayılan olarak, DHCP kullanılarak otomatik olarak bir IP Adresi atanır. Bir ağ bağlantısı için statik IP adresi atamak istiyorsanız, aşağıdakileri uygulayın: Kontrol panelinde Yönetim seçeneğine dokunun. İlk Kurulum seçeneğine gidin ve dokunun; ardından Ağ ve G/Ç seçeneğine dokunun. Katıştırılmış Jetdirect ve ardından TCP/IP’ye dokunun. IPV4 Ayarları’na, Yapılandırma Yöntemi’ne ve sonra da El ile’ye dokunun. Kaydet’e dokunun. El ile Ayarlar’a, IP Adresi’ne dokunun ve atanan IP adresini yazın. OK’e ve ardından Kaydet’e dokunun.
TR
23
EN
17
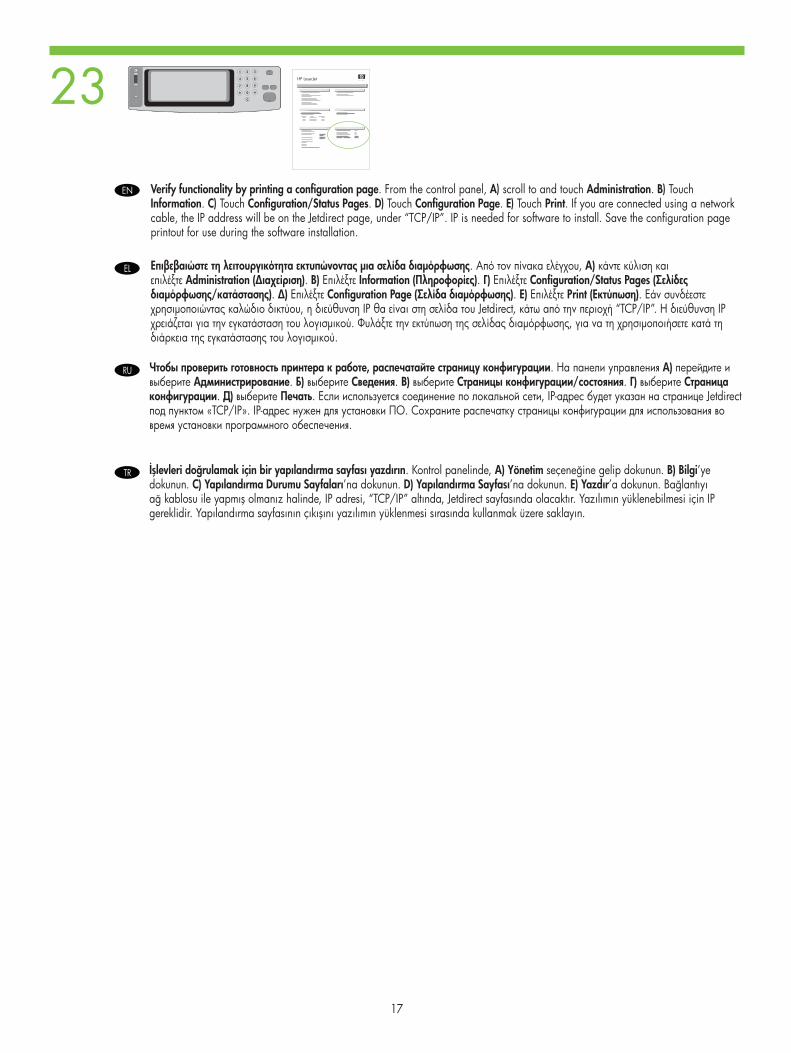
Verify functionality by printing a configuration page. From the control panel, A) scroll to and touch Administration. B) Touch Information. C) Touch Configuration/Status Pages. D) Touch Configuration Page. E) Touch Print. If you are connected using a network cable, the IP address will be on the Jetdirect page, under “TCP/IP”. IP is needed for software to install. Save the configuration page printout for use during the software installation.
µ µ. , A) Administration (Δ). B) Information (). ) Configuration/Status Pages ( µ/). Δ) Configuration Page ( µ). E) Print (). µ , IP Jetdirect, “TCP/IP”. IP µ. µ, µ µ.
EL
, . ) . ) . ) /. ) . ) . , IP- Jetdirect «TCP/IP». IP- . .
RU
İşlevleri doğrulamak için bir yapılandırma sayfası yazdırın. Kontrol panelinde, A) Yönetim seçeneğine gelip dokunun. B) Bilgi’ye dokunun. C) Yapılandırma Durumu Sayfaları’na dokunun. D) Yapılandırma Sayfası’na dokunun. E) Yazdır’a dokunun. Bağlantıyı ağ kablosu ile yapmış olmanız halinde, IP adresi, “TCP/IP” altında, Jetdirect sayfasında olacaktır. Yazılımın yüklenebilmesi için IP gereklidir. Yapılandırma sayfasının çıkışını yazılımın yüklenmesi sırasında kullanmak üzere saklayın.
TR
24
EN
EN
18
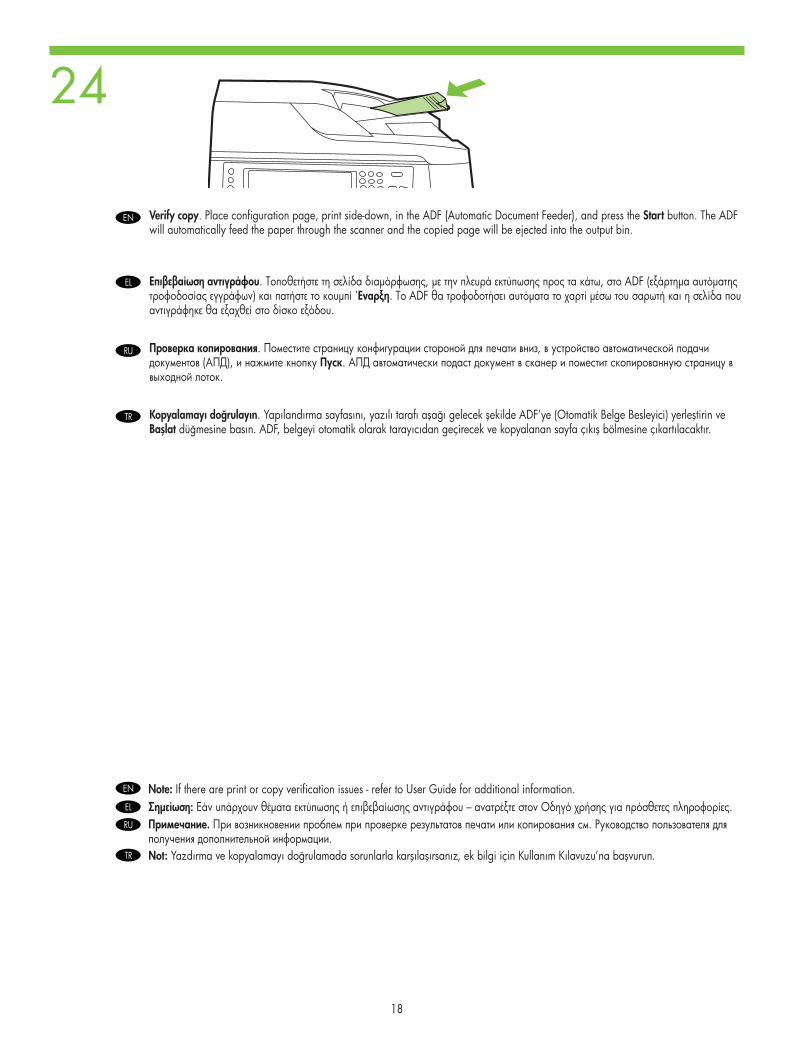
Verify copy. Place configuration page, print side-down, in the ADF (Automatic Document Feeder), and press the Start button. The ADF will automatically feed the paper through the scanner and the copied page will be ejected into the output bin.
Note: If there are print or copy verification issues - refer to User Guide for additional information.µ: µ – .
. µ, µ , ADF (µ µ ) µ . ADF µ µ .
EL
EL
. . .
. , (), . .
RU
RU
Not: Yazdırma ve kopyalamayı doğrulamada sorunlarla karşılaşırsanız, ek bilgi için Kullanım Kılavuzu’na başvurun.
Kopyalamayı doğrulayın. Yapılandırma sayfasını, yazılı tarafı aşağı gelecek şekilde ADF’ye (Otomatik Belge Besleyici) yerleştirin ve Başlat düğmesine basın. ADF, belgeyi otomatik olarak tarayıcıdan geçirecek ve kopyalanan sayfa çıkış bölmesine çıkartılacaktır.
TR
TR
EN
EN
EN
19
Install software
Go to step 25.
Mac: Go to step 27.
µ
µ 25.
Mac: µ 27.
EL
EL
EL
.
25.
Mac. 27.
RU
RU
RU
Yazılım yükleme
25. adıma geçin.
Mac: 27. adıma geçin.
TR
TR
TR
25EN
EN
EN
EN
20
Note: Do not connect a USB cable until prompted during the software installation.
Note: HP does not reccomend using USB hubs or USB cables longer than 2 meters (6.5 ft).
Note: The USB connections does not support the device network features and utilities.
Go to step 26.
µ: USB µ , µ.
µ: USB µµ .
µ: HP µ USB USB µ µ µ 2 µ (6,5 ft).
µ 26.
EL
EL
EL
EL
. USB- .
. USB- .
. HP USB- USB- 2 .
26.
RU
RU
RU
RU
Not: Yazılım yükleme sırasında sorulana kadar USB kablosunu bağlamayın.
Not: USB bağlantıları, aygıtın ağ özelliklerini ve yardımcı programları desteklemez.
Not: HP, USB hub’larının ya da 2 metreden (6,5 ft) uzun USB kablolarının kullanılmasını tavsiye etmemektedir.
26. adıma geçin.
TR
TR
TR
TR
26
EN
EN
21
Install software . A) Insert the Software CD that came with the printer. B) At the welcome screen, click install. The print driver selection screen appears. C) Select the print driver to be installed. D) Follow the on screen instructions. E) At the end of the driver install, click Finish . F) From the Next Steps screen, select additional options if desired. G) Select Exit to close installer. If prompted, restart the computer. Note: If the welcome screen does not appear, click Start and then click Run . Type X: SETUP, where X corresponds to the CD-ROM drive letter, and then click OK .
Go to step 34.
µ . A) CD µ µ µ . B) , Install (). µµ . ) µµ . Δ) . E) µµ , µ Finish () . ) Next Steps (µ µ), , . ) Exit (), µµ . , . µ: µ , µ µ . X: SETUP, X µµ µ CD-ROM µ OK .
µ 34.
EL
EL
34.
. ) - , . ) «». . ) . ) . ) . ) «» . ) «», . . . , , . : SETUP, «X» -, OK .
RU
RU
Yazılımı yükleyin . A) Yazıcıyla birlikte verilen Yazılım CD’sini takın. B) Hoş geldiniz ekranında, Yükle düğmesini tıklatın. Yazıcı sürücüsü seçim ekranı açılır. C) Yüklenecek yazıcı sürücüsünü seçin. D) Ekrandaki yönergeleri uygulayın. E) Sürücü yükleme işlemi tamamlandıktan sonra Son ’u tıklatın. F) Sonraki Adımlar ekranından, isterseniz diğer seçenekleri belirleyin. G) Yükleme programını kapatmak için Çıkış’ı seçin. İstenirse bilgisayarı yeniden başlatın. Not: Hoş geldiniz ekranı görüntülenmezse Başlat ’ı ve ardından Çalıştır ’ı tıklatın. X:\SETUP (burada X, CD-ROM sürücüsü harfini göstermektedir) yazın ve ardından Tamam düğmesini tıklatın.
34. adıma geçin.
TR
TR
27
EN
EN
EN
EN
22
Note: Do not connect a USB cable until CD installation is complete.
Install Mac software
Note: The USB connection does not support the MFP network features and utilities.
Note: HP does not recommend using USB hubs or USB cables longer than 2 meters (6.5 ft).
µ Mac
µ: USB µ CD.
µ: USB µµ MFP.
µ: HP µ USB USB µ µ µ 2 µ (6,5 ft).
EL
EL
EL
EL
Mac
. USB-, .
. USB- .
. HP USB- USB- 2 .
RU
RU
RU
RU
Mac yazılımını yükleme
Not: CD’den yükleme işlemi tamamlanana kadar USB kablosunu bağlamayın.
Not: USB bağlantısı, MFP ağ özelliklerini ve yardımcı programları desteklemez.
Not: HP, USB hub’larının ya da 2 metreden (6,5 ft) uzun USB kablolarının kullanılmasını tavsiye etmemektedir.
TR
TR
TR
TR
28
29
EN
EN
EN
23
Note: If the Macintosh does not automatically find and setup the printer please go to step 32.
Place the CD in the CD-ROM drive and run the installer. Complete an “easy” install.
From Apple System Preferences (available from under the Apple pull-down menu or in the dock), click on the Print & Fax icon, then click on the Printing tab at the top of the window.
CD µ CD-ROM µµ . Easy Install ( ).
µ: Macintosh µ , µ µ 32.
Apple System Preferences (µ µ Apple) (µ µ µ Apple µ), Print & Fax ( & ) Printing () µ .
EL
EL
EL
- - . «Easy Install» ( ).
. Macintosh 32.
Apple System Preferences ( ) ( Apple ), Print & Fax ( ), Printing () .
RU
RU
RU
CD’yi CD-ROM sürücüsüne takın ve yükleme programını çalıştırın. “Kolay” yükleme işlemini uygulayın.
Not: Macintosh, yazıcıyı otomatik olarak bulup sürücüyü yüklemezse, lütfen 32. adıma geçin.
Apple System Preferences (Apple Sistem Tercihleri) (Apple aşağı açılır menüsünde veya ekrandaki kısayollarda bulunmaktadır), Print & Fax (Yazıcı ve Faks) simgesini tıklatın ve ardından pencerenin en üst kısmındaki Printing (Yazdırma) sekmesini tıklatın.
TR
TR
TR

30
31
EN
EN
24
To add your new printer, and create a new printer queue, click the ‘+’ icon to launch the Printer Browser. By default, the Printer Browser shows printers that are connected via USB, Bonjour, Appletalk networking or shared through another Mac.
From the Printer Browser window, select the HP printer from the Printer Name section. For Mac OS X v10.4: If HP software is installed, the printer software should be automatically configured. Make sure that the HP LaserJet M9040 MFP/M9050 MFP model name is selected in the Print Using pull down list. Note: Mac OS X v10.2 and v10.3 might require you to manually select the printer model from the Printer Model drop-down list.
µ µ , ‘+’, Printer Browser ( ). , Printer Browser ( ) µ USB, Bonjour, Appletalk µ Mac.
EL
Printer Browser ( ), HP Printer Name (µ ). Mac OS X v10.4: µ HP, µ µ µ. µ µ HP LaserJet M9040 MFP/M9050 MFP µ µ Print Using ( µ ). µ: Mac OS X v10.2 v10.3 µ µ µ µ µ Printer Model ( ).
EL
«+» Printer Browser ( ). , USB-, Bonjour Appletalk Mac.
RU
Printer Browser ( ) HP . Mac OS X v10.4: HP , . , HP LaserJet M9040 MFP/M9050 MFP Print Using ( ). . Mac OS X v10.2 v10.3 .
RU
Yeni yazıcınızı eklemek ve yeni bir yazıcı kuyruğu oluşturmak için, ‘+’ simgesini tıklatarak Printer Browser’ı (Yazıcı Tarayıcısı) başlatın. Printer Browser’da (Yazıcı Tarayıcısı) varsayılan olarak, USB, Bonjour, Appletalk ağ bağlantıları veya paylaşıma açık başka bir Mac üzerinden bağlı olan yazıcılar gösterilir.
TR
Printer Browser (Yazıcı Tarayıcısı) penceresinde, Printer Name (Yazıcı Adı) kısmından HP yazıcısını seçin. Mac OS X v10.4 için: HP yazılımı yüklü ise, yazıcı yazılımı otomatik olarak yapılandırılmış olmalıdır. Print Using (Kullanılacak Yazıcı) açılan listesinde HP LaserJet M9040 MFP/M9050 MFP model adının seçili olduğundan emin olun. Not: Mac OS X v10.2 ve v10.3, yazıcı modelini Printer Model (Yazıcı Modeli) açılan listesinden elle seçmenizi gerektirebilir.
TR
32
33
34
EN
EN
EN
25
Click Add to create a printer queue. You may be prompted to manually configure the installable options.
Under Model Name, select your device and click Add.
Test the software installation. Print a page from any program to make sure that the software is correctly installed. Note: If the installation failed, reinstall the software or see the troubleshooting section in the User Guide.
Model Name (µ µ), µ Add ().
Δµ µ. µ µµ, µ µ. µ: , µ µ .
EL
EL
EL
µ Add (), µ µ . µ µ µ µ µ .
Model Name ( ), Add ().
. , , . . , , “ ” .
RU
RU
RU
Add () . .
Model Name (Model Adı) altında aygıtınızı seçip Add (Ekle) düğmesini tıklatın.
Yazılım yüklemesini test edin. Yazılımın doğru yüklendiğinden emin olmak için herhangi bir programdan bir sayfa yazdırın. Not: Yükleme başarısız olduysa, yazılımı yeniden yükleyin veya Kullanım Kılavuzu’ndaki sorun giderme bölümüne bakın.
TR
TR
TR
Bir yazıcı kuyruğu oluşturmak için Add (Ekle) düğmesini tıklatın. Yüklenebilir seçenekleri el ile yapılandırmanız istenebilir.
35EN
26
Use Scan Setup Wizard to set up Send to Folder. A) Open the embedded Web server by opening a Web browser and typing the product IP address or hostname in the URL window. The IP address can be found on the Configuration Page you printed in Step 23. B) Click the Digital Sending tab. C) In the left column, click Send to Folder. D) On the Send to Folder page, click the Enable Scan Setup Wizard checkbox. E) Click the Apply button. F) Insert the Printing System CD into your computer. G) At the Welcome screen, click Scan Setup Wizard. H) Follow the steps in the setup tool. A network folder connected to your device will be created. You are now ready to scan documents to the folder you created. If you have done this step, you don’t have to use the Embedded Web Server to set up folders unless you desire some advanced features.
µ Scan Setup Wizard ( ), µ Send to Folder ( ). A) µµ µ Web, µµ Web IP µ URL. IP µ µ 23. B) Digital Sending ( ). ) , Send to Folder ( ). Δ) Send to Folder ( ), Enable Scan Setup Wizard ( ). E) µ Apply (µ). ) CD Printing System (µ ) . ) , Scan Setup Wizard ( ). H) µ . µ µ . µ µ. µ, µ µµ µ Web , µ µ µ .
EL
« » « ». ) Web- ( Web- IP- URL-). IP- , 23. ) . ) . ) « » . ) . ) - «Printing System CD» -. ) « ». ) . . . , Web- , , .
RU
Klasöre Gönder özelliğini ayarlamak için Tarama Kurulum Sihirbazı’nı kullanın. A) Bir Web tarayıcısı açıp URL penceresine ürünün IP adresini veya ana bilgisayar adını yazarak katıştırılmış Web sunucusunu açın. IP adresi, 23. Adımda yazdırdığınız Yapılandırma Sayfası’nda yer almaktadır. B) Dijital Gönderme sekmesini tıklatın. C) Sol sütunda, Klasöre Gönder’i tıklatın. D) Klasöre Gönder sayfasında, Tarama Kurulum Sihirbazını Etkinleştir’i tıklatın. E) Uygula düğmesini tıklatın. F) Yazdırma Sistemi CD’sini bilgisayarınıza takın. G) Hoş geldiniz ekranında, Tarama Kurulum Sihirbazı’nı tıklatın. H) Kurulum aracındaki adımları uygulayın. Aygıtınıza bağlı bir ağ klasörü oluşturulacaktır. Artık, belgeleri oluşturduğunuz klasöre taramaya hazır durumdasınız. Bu adımı tamamlamış olmanız halinde, bazı gelişmiş özellikleri kullanmayı istemediğiniz sürece klasörleri ayarlamak için Katıştırılmış Web Sunucusu’nu kullanmanıza gerek yoktur.
TR
36
EN
EN
27
Set up the embedded digital send features
Set up Send to Folder. A) To set up a Shared folder on your computer or network drive, right click on the folder you would like to share. Click Sharing and Security… and follow the instructions there. B) Open the embedded Web server by opening a Web browser and typing the product IP address or hostname in the URL window. The IP address can be found on the Configuration Page you printed in Step 23. C) Click the Digital Sending tab. D) In the left column, click Send to Folder. E) Click the Enable Send to Folder checkbox. F) In the Predefined Folder area, click Add and select the Shared folder. G) Click OK. H) In the Folder Path field, enter \\MyComputerName\SharedFolderName. (To find your computer name, right click My Computer in the Windows Start menu and click Properties. Click the Computer Name tab. Copy the full computer name. Your domain name, which will be used in the next step, can also be found here.) I) In the Access Credentials list box, select Use Public Credentials. Enter your Windows domain, user name, and password. J) Click Test Folder Access and then click the Apply button.
µ Send to Folder ( ). A) µ Shared () µ , . Sharing and Security… ( ) . ) µµ µ Web, µµ Web IP µ URL. IP µ µ 23. ) Digital Sending ( ). Δ) , Send to Folder ( ). E) Enable Send to Folder ( ). ) Predefined Folder (µ ), µ Add () Shared (). ) µ OK. H) Folder Path (Δµ ), \\µ_\µ__. ( µ , µ µ “” Windows “”. “µ ”. µ . µ µ , µ µ µ, .) ) Access Credentials (Δ ), Use Public Credentials ( µ ). µ Windows, µ . ) Test Folder Access (Δµ ) µ Apply (µ).
µ µµ EL
EL
. ) , . … . ) Web- ( Web- IP- URL-). IP- , 23. ) « ». ) . ) . ) . ) OK. ) \\\. ( , «» Windows «». . . , ) ) . Windows, . ) .
RU
RU
Katıştırılmış dijital gönderme özelliklerini ayarlamaTR

37EN
28
Set up E-mail Settings. A) Open the embedded Web server by opening a Web browser and typing the product IP address or hostname in the URL window. The IP address can be found on the Configuration Page you printed in Step 23. B) Click the Digital Sending tab and complete the information under General Settings: name, e-mail address, phone number, and location. C) Click OK. D) On the left navigation menu, select Send to E-mail. E) To find the SMTP Gateway, click the Find Gateways button. If a gateway is found, select it and click OK. Note: If no gateway is located, or if more than one is located, contact your network administrator or Internet service provider (ISP) to obtain the gateway information, and determine if you need to enter an account name and password for SMTP authentication. F) Type in the default ‘From’ e-mail address and display name. G) Click the Apply button.
µ E-mail. A) µµ µ Web, µµ Web IP µ URL. IP µ µ 23. B) Digital Sending ( ) µ General Settings: name, e-mail address, phone number, and location ( µ: µ, µ, µ ). ) µ OK. Δ) µ , Send to E-mail ( E-mail). E) SMTP, µ Find Gateways ( ). µ , OK. µ: µ µ , µ Δ (ISP) µ µ SMTP. ) µ µ ‘’ µ . ) µ Apply (µ).
EL
. ) Web- ( Web- IP- URL-). IP- , 23. ) « » :. , , . ) OK. ) , , . ) SMTP . B OK. . , - (ISP) SMTP. ) , . ) .
RU
Klasöre Gönder Özelliğini Ayarlayın. A) Bilgisayarınızda veya ağ sürücünüzde bir Paylaşılan klasör ayarlamak için, paylaşmak istediğiniz klasörü sağ tıklatın. Paylaşım ve Güvenlik…’i tıklatıp ekrandaki yönergeleri uygulayın. B) Bir Web tarayıcısı açıp URL penceresine ürünün IP adresini veya ana bilgisayar adını yazarak katıştırılmış Web sunucusunu açın. IP adresi, 23. Adımda yazdırdığınız Yapılandırma Sayfası’nda yer almaktadır. C) Dijital Gönderme sekmesini tıklatın. D) Sol sütunda, Klasöre Gönder’i tıklatın. E) Klasöre Göndermeyi Etkinleştir onay kutusunu tıklatın. F) Önceden Tanımlanmış Klasör alanında, Ekle’yi tıklatıp Paylaşılan klasörü seçin. G) Tamam düğmesini tıklatın. H) Klasör Yolu alanına \\BilgisayarımınAdı\PlaylaşılanKlasörünAdı girin. (Bilgisayarınızın adını bulmak için, Windows Başlat menüsünden Bilgisayarım’ı sağ tıklatıp Özellikler’i tıklatın. Bilgisayar Adı sekmesini tıklatın. Bilgisayar adını komple kopyalayın. Bir sonraki adımda kullanacağınız etki alanı adınız da burada yer almaktadır.) I) Erişim Kimlik Bilgileri liste kutusunda, Genel Kimlik Bilgilerini Kullan’ı seçin. Windows etki alanınızı, kullanıcı adınızı ve parolanızı girin. J) Klasör Erişimini Sına’yı tıklatın ve ardından Uygula düğmesini tıklatın.
TR
E-posta Ayarlarını Yapılandırın. A) Bir Web tarayıcısı açıp URL penceresine ürünün IP adresini veya ana bilgisayar adını yazarak katıştırılmış Web sunucusunu açın. IP adresi, 23. Adımda yazdırdığınız Yapılandırma Sayfası’nda yer almaktadır. B) Dijital Gönderme sekmesini tıklatın ve Genel Ayarlar altındaki ad, e-posta adresi, telefon numarası ve konum bilgilerini doldurun. C) Tamam düğmesini tıklatın. D) Sol gezinme menüsünde E-posta’ya Gönder’i seçin. E) SMTP Ağ Geçidini bulmak için Ağ Geçidi Bul düğmesini tıklatın. Bir ağ geçidi bulunursa, seçip Tamam’ı tıklatın. Not: Ağ geçidi bulunmazsa veya birden fazla bulunursa, ağ geçidi bilgilerini almak ve SMTP kimlik doğrulaması için hesap adı ve parola girmeniz gerekip gerekmediğini öğrenmek için ağ yöneticinize veya Internet servis sağlayıcınıza (ISP) başvurun. F) Varsayılan ‘Gönderen’ e-posta adresini ve görünen adını yazın. G) Uygula düğmesini tıklatın.
TR
38EN
29
Register your device. Register at http://www.register.hp.com. This is the quickest and easiest way for you to register to receive the following information: technical support updates, enhanced support options, ideas for and ways to use your new HP device, and news about emerging technologies.
Δ . Δ http://www.register.hp.com. µ : µµ , µ , HP µ .
EL
. http://www.register.hp.com. : , , HP .
RU
Aygıtınızın kaydını yaptırın. http://www.register.hp.com adresinden kayıt yaptırın. Bu, aşağıdaki bilgileri almak amacıyla kaydolmak için en hızlı ve en kolay yöntemdir: teknik destek güncelleştirmeleri, gelişmiş destek seçenekleri, yeni HP aygıtınızı kullanmaya ilişkin fikirler ve yöntemler, yeni teknoloji hakkında haberler.
TR
EN
EN EN EN
EN EN EN
EN EN
30
Troubleshooting
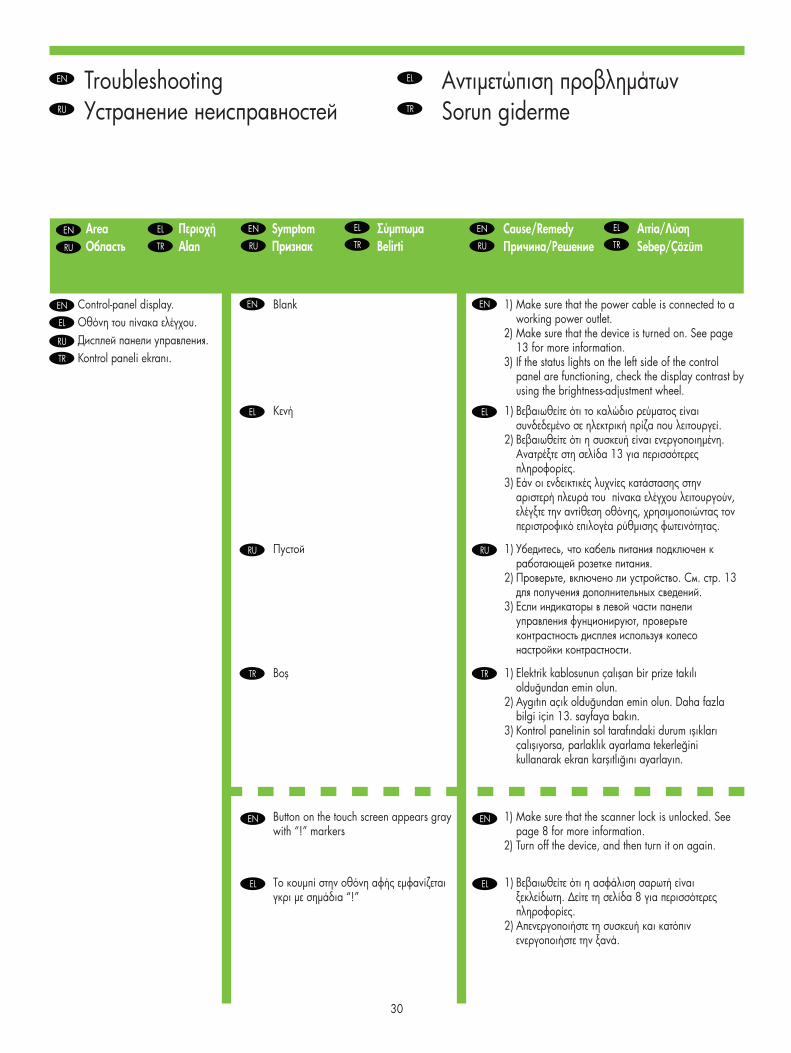
Area Symptom
Control-panel display. Blank 1) Make sure that the power cable is connected to a working power outlet.
2) Make sure that the device is turned on. See page 13 for more information.
3) If the status lights on the left side of the control panel are functioning, check the display contrast by using the brightness-adjustment wheel.
Cause/Remedy
Button on the touch screen appears gray with “!” markers
1) Make sure that the scanner lock is unlocked. See page 8 for more information.
2) Turn off the device, and then turn it on again.
µ µ
µµ
.
1) µ µ .
2) µ. 13 .
3) , , µ µ .
/
EL
EL EL EL
EL
EL EL
µ µ µ µ “!”
1) . Δ 8 .
2) .
EL EL
.
1) , .
2) , . . . 13 .
3) , .
/
RU
RU RU RU
RU
RU RU
Boş
Sorun giderme
Alan Belirti
Kontrol paneli ekranı.
1) Elektrik kablosunun çalışan bir prize takılı olduğundan emin olun.
2) Aygıtın açık olduğundan emin olun. Daha fazla bilgi için 13. sayfaya bakın.
3) Kontrol panelinin sol tarafındaki durum ışıkları çalışıyorsa, parlaklık ayarlama tekerleğini kullanarak ekran karşıtlığını ayarlayın.
Sebep/Çözüm
TR
TR TR TR
TR
TR TR
EN EN
EN EN
31
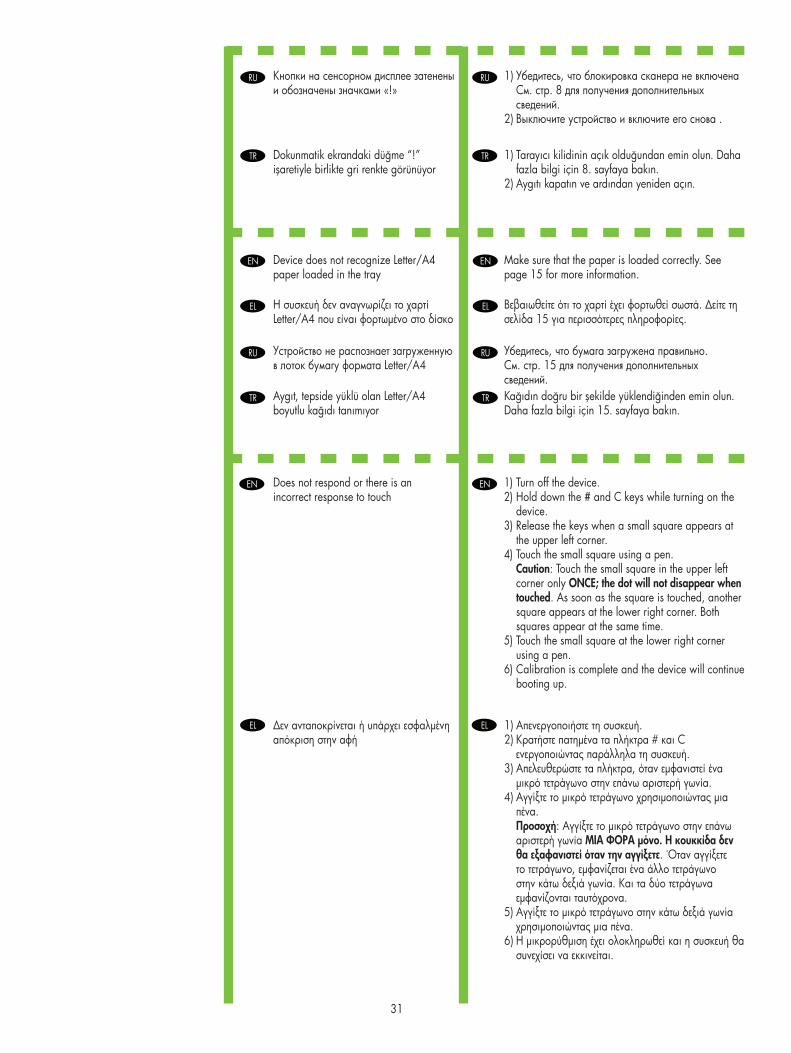
Device does not recognize Letter/A4 paper loaded in the tray
Make sure that the paper is loaded correctly. See page 15 for more information.
Does not respond or there is an incorrect response to touch
1) Turn off the device.2) Hold down the # and C keys while turning on the
device.3) Release the keys when a small square appears at
the upper left corner.4) Touch the small square using a pen.
Caution: Touch the small square in the upper left corner only ONCE; the dot will not disappear when touched. As soon as the square is touched, another square appears at the lower right corner. Both squares appear at the same time.
5) Touch the small square at the lower right corner using a pen.
6) Calibration is complete and the device will continue booting up.
Letter/A4 µ
. Δ 15 .
EL EL
Δ µ
1) .2) µ # C
.3) , µ
µ .4) µ µ µ
. : µ µ. . , µ . µ .
5) µ µ µ .
6) µµ .
EL EL
«!»
1) , . . 8 .
2) .
RU RU
Letter/A4
, . . . 15 .
RU RU
Dokunmatik ekrandaki düğme “!” işaretiyle birlikte gri renkte görünüyor
1) Tarayıcı kilidinin açık olduğundan emin olun. Daha fazla bilgi için 8. sayfaya bakın.
2) Aygıtı kapatın ve ardından yeniden açın.
TR TR
Aygıt, tepside yüklü olan Letter/A4 boyutlu kağıdı tanımıyor
Kağıdın doğru bir şekilde yüklendiğinden emin olun. Daha fazla bilgi için 15. sayfaya bakın.
TR TR
EN EN EN
32
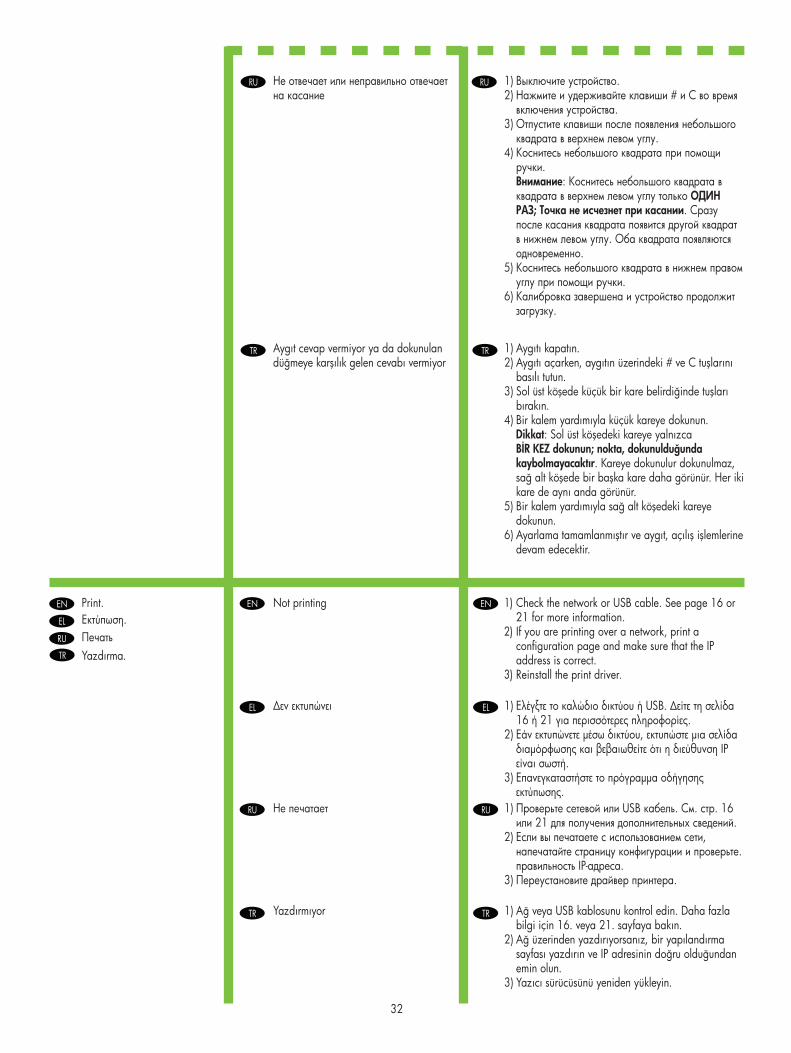
Print. Not printing 1) Check the network or USB cable. See page 16 or 21 for more information.
2) If you are printing over a network, print a configuration page and make sure that the IP address is correct.
3) Reinstall the print driver.
.
Δ 1) USB. Δ 16 21 .
2) µ , µ µ IP .
3) µµ .
EL
EL
EL
1) .2) # C
.3)
.4)
. : ; . . .
5) .
6) .
RU RU
1) USB . . . 16 21 .
2) , . IP-.
3) .
RU
RU
RU
Aygıt cevap vermiyor ya da dokunulan düğmeye karşılık gelen cevabı vermiyor
1) Aygıtı kapatın.2) Aygıtı açarken, aygıtın üzerindeki # ve C tuşlarını
basılı tutun.3) Sol üst köşede küçük bir kare belirdiğinde tuşları
bırakın.4) Bir kalem yardımıyla küçük kareye dokunun.
Dikkat: Sol üst köşedeki kareye yalnızca BİR KEZ dokunun; nokta, dokunulduğunda kaybolmayacaktır. Kareye dokunulur dokunulmaz, sağ alt köşede bir başka kare daha görünür. Her iki kare de aynı anda görünür.
5) Bir kalem yardımıyla sağ alt köşedeki kareye dokunun.
6) Ayarlama tamamlanmıştır ve aygıt, açılış işlemlerine devam edecektir.
TR TR
Yazdırma.
Yazdırmıyor 1) Ağ veya USB kablosunu kontrol edin. Daha fazla bilgi için 16. veya 21. sayfaya bakın.
2) Ağ üzerinden yazdırıyorsanız, bir yapılandırma sayfası yazdırın ve IP adresinin doğru olduğundan emin olun.
3) Yazıcı sürücüsünü yeniden yükleyin.
TR
TR
TR
EN EN
EN EN EN
33
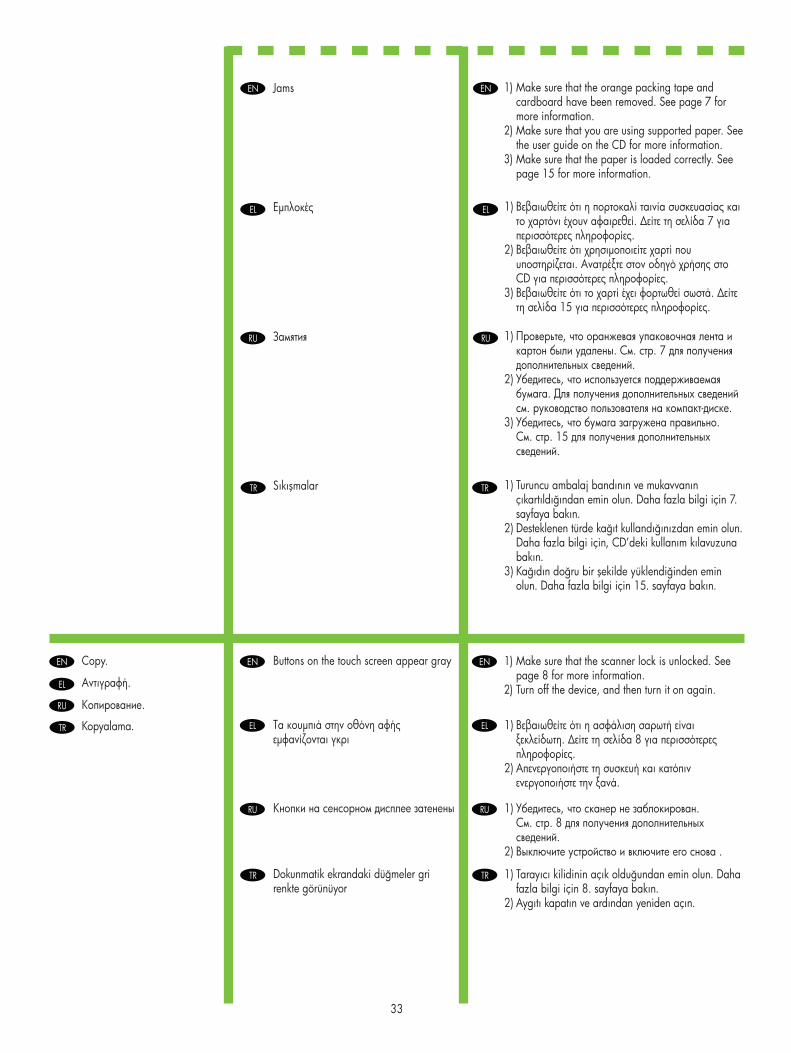
Jams 1) Make sure that the orange packing tape and cardboard have been removed. See page 7 for more information.
2) Make sure that you are using supported paper. See the user guide on the CD for more information.
3) Make sure that the paper is loaded correctly. See page 15 for more information.
Buttons on the touch screen appear grayCopy. 1) Make sure that the scanner lock is unlocked. See page 8 for more information.
2) Turn off the device, and then turn it on again.
µ 1) . Δ 7 .
2) µ . CD .
3) . Δ 15 .
EL EL
µ µ
.
1) . Δ 8 .
2) .
EL
EL EL
1) , . . . 7 .
2) , . . -.
3) , . . . 15 .
RU RU
.
1) , . . . 8 .
2) .
RU
RU RU
Sıkışmalar 1) Turuncu ambalaj bandının ve mukavvanın çıkartıldığından emin olun. Daha fazla bilgi için 7. sayfaya bakın.
2) Desteklenen türde kağıt kullandığınızdan emin olun. Daha fazla bilgi için, CD’deki kullanım kılavuzuna bakın.
3) Kağıdın doğru bir şekilde yüklendiğinden emin olun. Daha fazla bilgi için 15. sayfaya bakın.
TR TR
Dokunmatik ekrandaki düğmeler gri renkte görünüyor
Kopyalama.
1) Tarayıcı kilidinin açık olduğundan emin olun. Daha fazla bilgi için 8. sayfaya bakın.
2) Aygıtı kapatın ve ardından yeniden açın.
TR
TR TR
EN EN EN
EN EN
34
Digital sending tab in the embedded Web server (EWS) does not appear
E-mail Gateway Not Responding appears on the control-panel display when attempting to send an e-mail
E-mail. An administrative password might be configured. Select Log On in the upper right corner of the EWS.
1) The SMTP gateway address might be incorrect. Contact you TR administrator to obtain the correct address.
2) IF you are using an Internet Service Provider (ISP) for e-mail, contact your ISP provider for the hostname of your SMTP gateway (request the fully qualified domain name (FQDN), not the IP address).
3) Make sure that the entered SMTP authentication user name and password are correct. Note: Not all SMTP gateways require a user name and password.
Digital sending ( ) µµ µ Web (EWS) µ
µ µµ E-mail Gateway Not Responding ( E-mail ) , e-mail
E-mail.
µ . Log On () EWS.
1) SMTP µ. µ .
2) µ Δ (ISP) e-mail, µ ISP , µ µ SMTP ( µ µ µ (FQDN) IP).
3) µ SMTP . µ: Δ SMTP µ .
EL
EL EL
EL EL
« » Web-.
. Web-.
RU
RU RU
1) SMTP .
2) (ISP) , SMTP ( (FQDN), IP-).
3) , SMTP. . SMTP .
RU RU
Katıştırılmış Web sunucusundaki (EWS) dijital gönderme sekmesi görünmüyor
E-posta.
Bir yönetici parolası gerekebilir. EWS’nin sağ üst köşesindeki Oturum Aç’ı seçin.
TR
TR TR
EN EN
EN EN
35
The “from” address cannot be changed in Send to E-mail
The “Prevent Device User from changing the e-mail address” feature in the EWS might be selected, or “Device Authentication” is enabled.
You want to scan and send-to-email in black and white TIFF format
Use the EWS to change the default image file format by selecting Digital Sending, Send to E-mail, and Advanced.
“” µ Send to E-mail ( E-mail)
“Prevent Device User from changing the e-mail address” ( e-mail ) EWS µ “Device Authentication” ( ) µ.
EL EL
email µ µ TIFF
µ EWS µ µ , Digital Sending ( ), Send to E-mail ( E-mail) Advanced ( µ).
EL EL
«»
« . » Web-, « »
RU RU
- TIFF
Web- - , , .
RU RU
E-posta göndermeye çalışıldığında, kontrol paneli ekranında E-posta Ağ Geçidi Yanıt Vermiyor mesajı görüntüleniyor
1) SMTP ağ geçidi adresi yanlış olabilir. Doğru adresi edinmek için BT yöneticinize başvurun.
2) E-posta için bir Internet Servis Sağlayıcısı (ISP) kullanıyorsanız, SMTP ağ geçidinizin ana bilgisayar adı için ISP sağlayıcınıza başvurun (IP adresini değil, tam etki alanı adını (FQDN) isteyin).
3) Girilen SMTP kimlik denetimi kullanıcı adının ve parolasının doğru olduğundan emin olun. Not: Her SMTP ağ geçidi, bir kullanıcı adı ve parola istemez.
TR TR
“Gönderen” adresi, E-posta’ya gönder’de değiştirilemiyor
EWS’deki “Prevent Device User from changing the e-mail address” (Aygıt Kullanıcısının e-posta adresini değiştirmesini engelle) özelliği seçilmiş olabilir ya da “Device Authentication” (Aygıt Kimlik Denetimi) etkinleştirilmiştir.
TR TR
Siyah beyaz TIFF biçiminde tarama yapıp e-posta ile göndermek istiyorsunuz
EWS’de Dijital Gönderme, E-posta’ya gönder ve Gelişmiş seçeneği yardımıyla varsayılan resim dosyası biçimini değiştirin.
TR TR
EN EN
EN EN
EN EN EN
36
You want to change the file type or the color setting for e-mail attachments
On the control-panel e-mail feature, select More Options to change the image file format before sending the e-mail.
A “job failed” message is received with a document is scanned and sent to e-mail
1) Send a test e-mail to make sure that the e-mail address is correct.
2) Make sure that the scanned document does not exceed your SMTP gateway’s maximum allowable attachment size. If it does, use the EWS to change the size by selecting Digital Sending and Send to E-mail.
All symptomsOther. See the user guide on the CD for more information.
µ µ µµ e-mail
e-mail , More Options ( ) µ , e-mail.
EL EL
µ µµ “job failed” ( ) e-mail
1) µ e-mail, e-mail .
2) µ µ µ µµ SMTP . µ , µ EWS µ Digital Sending ( ) Send to E-mail ( E-mail).
EL EL
µµ CD .
.EL
EL EL
. .
RU RU
« »
1) . .
2) , , SMTP-. , Web- . .
RU RU
. -.
.RU
RU RU
E-posta ekleri için dosya biçimini veya renk ayarlarını değiştirmek isteyebilirsiniz
E-posta göndermeden önce resim dosyası biçimini değiştirmek için kontrol panelindeki e-posta özelliğinden Ek Seçenekler’i seçin.
TR TR
Bir belge taranıp e-postaya gönderildiğinde “iş başarısız oldu” mesajı alındı
1) E-posta adresinin doğru olduğundan emin olmak için bir deneme e-postası gönderin.
2) Taranan belgenin, SMTP ağ geçidinizin izin verilen maksimum ek boyutunu aşmadığından emin olun. Aşması halinde, EWS’deki Dijital Gönderme ve E-posta’ya Gönder’i seçerek boyutu değiştirin.
TR TR
Tüm belirtiler Daha fazla bilgi için, CD’deki kullanım kılavuzuna bakın.
Diğer.TR
TR TR
37

© 2008 Hewlett-Packard Development Company, L.P
.
www.hp.com
*CC395-90921**CC395-90921*CC395-90921


![İnce bir LATEX2ε Elkitabı - ptep-online.com · Önsöz LATEX [1] yüksek baskı kalitesinde bilimsel ve matematiksel dokümanlar hazırlamaya çok uygun bir dizgi programıdır.](https://static.fdocument.org/doc/165x107/5c4accc193f3c3143645745e/ince-bir-latex2-elkitabi-ptep-oensoez-latex-1-yueksek-baski-kalitesinde.jpg)