
EN FR IT DE TR - Medavalmedaval.ie/wp-content/device-data/manuals/Microlife-OXY-300-Manual.pdfCE...
2
OXY 300 IB OXY 300 S-V10-1 2916 Guarantee Card Name of Purchaser / Nom de l'acheteur / Nome del rivenditore / Name des Käufers / Alıcının adı / Nombre del comprador / Nome do comprador / Naam koper / Ονοματεπώνυμο αγοραστή / Serial Number / Numéro de série / Numero di serie / Serien-Nr. / Seri numarası / Número de serie / Número de série / Serienummer / Αριθμός σειράς / Date of Purchase / Date d'achat / Data d’acquisto / Kaufdatum / Satın alma tarihi / Fecha de compra / Data da compra / Datum van aankoop / Ημερομηνία αγοράς / Specialist Dealer / Revendeur / Categoria rivenditore / Fachhändler / Uzman satıcı / Vendedor especial- izado / Revendedor autorizado / Specialist Dealer / Εξειδικευμένος αντιπρόσωποςa / Beijing Choice Electronic Technology Co., Ltd. Room 4104, No. A12, Yuquan Road, Haidian District, 100143 Beijing, People's Republic of China Shanghai International Holding Corp. GmbH (EUROPE) Eiffestrasse 80, 20537 Hamburg / Germany 0123 9 1 4 2 3 6 5 7 8 10 1 2 3 4 5 6 اﺳﻢ اﻟﻤﺸﺘﺮي رﻗﻢ اﻟﺘﺴﻠﺴﻞ ﺗﺎرﻳﺦ اﻟﺸﺮاء اﻟﺘﺎﺟﺮ اﻟﻤﺨﺘﺺDear Customer, This Microlife fingertip pulse oximeter is a portable non- invasive device intended for spot-checking of the oxygen saturation of arterial hemoglobin (SpO 2 ) and pulse rate of adults and pediatric patients. It is suitable for private use (at home, or on the go) as well as for use in the medical sector (hospitals, hospital-type facilities). It has been clinically proven to be of high precision during repeatability. Please read through these instructions carefully so that you understand all functions and safety information. We want you to be happy with your Microlife product. If you have any questions, problems or want to order spare parts please contact your local Microlife-Customer Service. Your dealer or pharmacy will be able to give you the address of the Microlife dealer in your country. Alterna- tively, visit the internet at www.microlife.com where you will find a wealth of invaluable information on our products. Retain instructions in a safe place for future reference. Stay healthy – Microlife AG! 1. Explanation of symbols Batteries and electronic devices must be disposed of in accordance with the locally appli- cable regulations, not with domestic waste. Read the instructions carefully before using this device. Type BF applied part 2. Important Safety Instructions • This device may only be used for the purposes described in these instructions. The manufacturer cannot be held liable for damage caused by incorrect application. • Never immerse this device in water or other liquids. For cleaning please follow the instruc- tions in the «Cleaning and Disinfecting» section. • Do not use this device if you think it is damaged or notice anything unusual. • Never open this device. • This device comprises sensitive components and must be treated with caution. Observe the storage and operating conditions described in the «Technical Specifications» section. • Protect it from: - water and moisture - extreme temperatures - impact and dropping - contamination and dust - direct sunlight - heat and cold • The function of this device may be compromised when used close to strong electromagnetic fields such as mobile phones or radio installations and we recommend a distance of at least 1 m (according to 60601-1-2 table 5). In cases where you suspect this to be unavoidable, please verify if the device is working properly before use. • Do not use the device in an MRI or CT environment. • This device is not intended for continuous monitoring. • This device does not have an alarm function and is there- fore not suitable for evaluating medical results. Do not use this device in situations where alarms are required. • Do not sterilize this device using autoclaving or ethylene oxide sterilizing. This device is not intended for sterilization. • If the device is not going to be used for a prolonged period the batteries should be removed. Ensure that children do not use this device unsu- pervised; some parts are small enough to be swal- lowed. Be aware of the risk of strangulation in case this device is supplied with cables or tubes. Use of this device is not intended as a substitute for a consultation with your doctor. 3. General Description Oxygen saturation indicates the percentage of hemo- globin in arterial blood that is loaded with oxygen. This is a very important parameter for the respiratory circulation system. Many respiratory diseases can result in lower oxygen saturation within human blood. Following factors can reduce oxygen saturation: Auto- matic regulation of organ dysfunction caused by anes- thesia, intensive postoperative trauma, injuries caused by some medical examinations. These situations may result in light-headedness, asthenia and vomiting. Therefore, it is very important to know the oxygen saturation of a patient so that doctors can detect problems in a timely manner. 4. Measurement Principles Principle of this fingertip pulse oximeter: A mathematical formula is established making use of Lambert Beer Law according to spectrum absorption characteristics of deoxy- genated hemoglobin (Hb) and oxyhemoglobin (HbO 2 ) in red and near-infrared zones. Operation principle of this device: Photoelectric oxyhemoglobin inspection technology is adopted in accordance with capacity pulse scanning and recording technology, so that two beams of different wavelength of lights (660 nm red and 905 nm near infrared light) can be focused onto a human nail tip through a clamping finger- type sensor. A measured signal obtained by a photosen- sitive element, will be shown on the display through process in electronic circuits and microprocessor. Diagram of Operation Principle AT: 1. Red and infrared-ray emission tube. 2. Red and infrared-ray receipt tube. 5. Directions for Use 1. Insert the batteries as described in the «Inserting the batteries 7» section. 2. Insert one finger (nail side up; index or middle finger is recommended) into the finger opening of the device. Be sure to fully insert the finger so that the sensors are completely covered by the finger. 3. Release the device allowing it to clamp down on the finger. 4. Press the ON/OFF button 1 to turn the device on. 5. Do not shake your finger during the test. It is recommended that you do not move your body whilst taking a reading. 6. Your measurement values will appear on the screen after a few seconds. 7. Remove your finger from the device. The display will indicate «Finger Out». 8. The device will automatically switch off after approx. 8 seconds after the finger is removed from the device. ) The height of the bar graph 5 is an indication of the pulse and signal strength. The bar should be greater than 30 % for a proper reading. ) The device must be able to measure the pulse properly to obtain an accurate SpO 2 measurement. Verify that nothing is hindering the pulse measure- ment before relying on the SpO 2 measurement. ) The maximum application time at a single site should be less than 30 minutes, in order to ensure correct sensor alignment and skin integrity. Inaccurate measurements may occur if: • The patient suffers from significant levels of dysfunc- tional hemoglobin (such as carboxyhemoglobin or methemoglobin). • Intravascular dyes such as indocyanine green or methylene blue have been injected into the patient. • Used in the presence of high ambient light (e.g. direct sunlight). Shield the sensor area with a surgical towel if necessary. • There is excessive patient movement. • The patient experiences venous pulsations. • The patient has hypotension, severe vasoconstriction, severe anemia, or hypothermia. • The patient is in cardiac arrest or is in shock. • Fingernail polish or false fingernails are applied. 6. Inserting the batteries 7 After you have unpacked your device, first insert the batteries. The battery compartment is on the bottom of the device. Remove the battery cover by sliding it in the direc- tion shown. Insert the batteries (2 x 1.5 V, size AAA), thereby observing the indicated polarity. ) Replace the batteries when the low power indi- cator 6 appears on the display. Always replace both batteries at the same time. 7. Adjusting Display Mode and Brightness Display Mode When the device is switched on, shortly press the ON/OFF button 1 to switch to another display mode to select your desired display mode 9. There are 6 different display modes. The default setting is mode 1. Brightness Press and hold the ON/OFF button 1 for longer than one second to adjust the brightness of the device. The display will show «Br 1-10». There are 10 levels of brightness. The default setting is level 4. 8. Using the Lanyard 8 1. Thread the thinner end of the lanyard through the hanging hole at the rear end of the device. 2. Thread the thicker end of the lanyard through the threaded end before pulling it tightly. 9. Malfunctions and Actions to take 10. Cleaning and Disinfecting Use an alcohol swab or cotton tissue moistened with alcohol (70% Isopropyl) to clean the silicone that touches the finger inside of the device. Also clean the finger being tested using alcohol before and after each test. Allow the device to dry thoroughly before use. Never use abrasive cleaning agents, thinners or benzene for cleaning and never immerse the device in water or other cleaning liquids. 11. Guarantee This device is covered by a 2 year guarantee from the date of purchase. The guarantee is valid only on presen- tation of the guarantee card completed by the dealer (see back) confirming date of purchase or the receipt. • Batteries and parts that become worn with use are not included. • Opening or altering the device invalidates the guarantee. • The guarantee does not cover damage caused by improper handling, accidents or non-compliance with the operating instructions. 12. Technical Specifications Technical alterations reserved. Pulse Oximeter EN 1 ON/OFF button 2 Oxygen saturation (value as percentage) 3 Pulse rate (value in beats per minute) 4 Pulse wave (plethysmographic wave) 5 Pulse bar 6 Low battery indicator 7 Inserting the batteries 8 Attaching the lanyard 9 Display modes AT Operation principle Keep dry Manufacturer Date of manufacture No SpO 2 alarm Low battery indicator Serial number Protected against dripping water Authorized representative in the European community Oxygen saturation (value as percentage) Pulse rate (value in beats per minute) Operating conditions: 5 - 40 °C / 41 - 104 °F Storage conditions: -20 - +55 °C / -4 - +131 °F CE Marking of Conformity 2 % SpO PR bpm 0123 Descrip- tion Symptom/Possible causes Solutions SpO 2 or pulse rate do not display normally. 1. Finger is not inserted correctly. 2. Patient SpO 2 value is too low to be measured. 3. There is excessive illumination. 1. Retry inserting the finger. 2. & 3. Measure more times. If you deter- mine the product is working correctly, consult your doctor. SpO 2 or pulse rate is shown unstable. 1. Finger might not be inserted deep enough. 2. Excessive patient movement. 1. Retry inserting the finger. 2. Sit calmly and retry. The device cannot be powered on. 1. No batteries or low battery power. 2. Batteries are not installed correctly. 3. The device may be damaged. 1. Replace the batteries. 2. Remove and reinstall the batteries. 3. Contact your local Microlife-Customer Service. The display suddenly switches off. 1. The device is auto- matically powered off, when no signal was detected after 8 seconds. 2. The battery power is too low to operate. 1. Normal. 2. Replace the batteries. «Error 3» The red emission LED is damaged. Check the red emission LED. «Error 4» The infrared emission LED is damaged. Check the infrared emis- sion LED. «Error 6» The screen has failed. Contact your local Micro- life-Customer Service. «Error 7» The emission LED or reception diode is damaged. Contact your local Micro- life-Customer Service. Type: Fingertip Pulse Oximeter OXY 300 Display: OLED display SpO 2 : Measurement range: 70 ~ 100 % Accuracy: 70 ~ 100 % : ±2 % Resolution: 1 % Pulse rate: Measurement range: 30 ~ 250 bpm Accuracy: 30 ~ 99 bpm: ±2 bpm; 100 ~ 250 bpm: ±2 % Resolution: 1 bpm Operating conditions: 5 - 40 °C / 41 - 104 °F ≤ 80 % relative maximum humidity Storage conditions: -20 - +55 °C / -4 - +131 °F ≤ 93 % relative maximum humidity Automatic switch-off: Automatically shut down in 8 seconds, when no or low signal is detected. Battery: 2 x 1.5 V alkaline batteries; size AAA Battery lifetime: approx. 30 hours (using new batteries) Weight: 56 g (including batteries) Dimensions: 58 x 32 x 34 mm IP Class: IPX1 Reference to standards: EN ISO10993-1/-5/-10; IEC 60601-1; EN 60601-1-2; EN ISO9919; EN 62304; EN 60601-1-6; CE0123 Expected service life: 5 years (when used 15 times/day; 20 minutes for each measurement) Cher client, Cet Microlife oxymètre de pouls est un appareil portatif et non-invasif pour vérifier le taux de saturation en oxygène dans le sang, (hémoglobine SpO 2 ) et la pulsation cardiaque chez les adultes et les enfants. Il est adapté à une utilisa- tion dans le cercle privé (domicile, déplacement) mais aussi pour une utilisation médicale (hôpital, établissement de soin). Il a été cliniquement prouvé que cet appareil délivre une mesure très précise et d'une grande répétitivité. Veuillez lire attentivement ces instructions afin de comprendre toutes les fonctions et informations de sécurité. Nous souhaitons que cet appareil Microlife vous apporte la plus grande satisfaction possible. Si vous avez des ques- tions, des problèmes ou désirez commander des pièces détachées, veuillez contacter votre Service Clients Microlife local. Adressez-vous à votre revendeur ou à la pharmacie où vous avez acheté l'appareil pour avoir les coordonnées du représentant Microlife de votre pays. Vous pouvez aussi visiter notre site Internet à l'adresse www.microlife.fr, où vous trouverez de nombreuses et précieuses informations sur nos produits. Veuillez lire attentivement ce mode d'emploi et le conserver en un lieu sûr. Restez en bonne santé avec Microlife AG! 1. Significations des symboles Les piles et appareils électroniques doivent être éliminés en conformité avec les prescriptions locales, séparément des ordures ménagères. Veuillez lire attentivement les instructions avant d'utiliser ce produit. Partie appliquée du type BF 2. Importantes précautions d'emploi • Cet appareil est réservé aux applications décrites dans ce manuel. Le fabricant ne peut être tenu pour respon- sable de dommages provoqués par une application incorrecte. • Ne jamais plonger cet appareil dans l'eau ou un autre liquide. Pour le nettoyage, se référer aux instruc- tions de la section «Nettoyage et désinfection». • N'utilisez pas l'appareil si vous pensez qu'il est endom- magé ou remarquez quelque chose de particulier. • N'ouvrez jamais l'appareil. • Cet appareil comprend des éléments sensibles et doit être traité avec précaution. Respectez les conditions de stockage et d'emploi indiquées à la section «Carac- téristiques techniques»! • Il convient de le protéger contre: - l'eau et l'humidité - des températures extrêmes - des chocs et chutes - les saletés et la poussière - des rayons solaires directs - la chaleur et le froid • Le fonctionnement de l’appareil risque d’être altéré dans le cas d’une utilisation proche d’un champs électromagnétique tels que les téléphones mobiles ou des postes de radio ainsi nous recommandons de respecter une distance de 1 mètre (selon 60601-1-2 table 5). Dans le cas où ces conditions ne peuvent être respectées, merci de vérifier que l’appareil fonc- tionne correctement avant toute mesure. • Ne pas utiliser l'appareil dans un environnement IRM ou CT. • Cet appareil n'est pas destiné à la surveillance continue. • Cet appareil ne dispose pas d'une fonction d' alarme et ne convient pas à l'évaluation des résultats médicaux. Ne pas utiliser cet appareil dans des situations où les alarmes sont nécessaires. • Ne pas stériliser cet appareil à l'aide d'autoclavage ou la stérilisation de l'oxyde d'éthylène. Cet appareil n'est pas prévu pour la stérilisation. • Si vous comptez ne pas utiliser l'appareil pendant une période prolongée, prenez soin de retirer les piles. Ne laissez jamais les enfants utiliser l'appareil sans surveillance. Certaines de ses parties sont si petites qu'elles peuvent être avalées. Possible risque d’étranglement dans le cas où l’appareil est fourni avec des câbles ou des tuyaux. L'utilisation de cet appareil ne dispense pas d'une consultation médicale. 3. Description générale La saturation en oxygène indique le pourcentage d'hémo- globine dans le sang artériel qui est chargé avec de l'oxygène. C'est un paramètre très important pour la circu- lation des voies respiratoires. Beaucoup de maladies respiratoires peuvent entraîner une baisse la saturation en oxygène dans le sang humain. Les facteurs suivants peuvent réduire la saturation en oxygène: Régulation automatique de dysfonctionnement des organes causés par une anesthésie, un traumatisme postopératoire intensif, les blessures causées par certains examens médicaux. Ces situations peuvent entraîner des étourdissements, asthénies et des vomissements. Il est donc très important de connaître la saturation en oxygène d'un patient de telle sorte que les médecins peuvent détecter les problèmes rapidement. 4. Principes de mesure Principe de cet oxymètre de pouls: Une formule mathé- matique est établie en faisant usage de la loi de Lambert Beer selon le spectre d'absorption caractéristique d'hémo- globine désoxygénée (Hb) et oxyhémoglobine (HbO 2 ) dans les zones rouges et proche de l' infrarouge. Principe de fonctionnement de ce dispositif: La techno- logie d'inspection de l'oxyhémoglobine photoélectrique est utilisée conformément à la capacité de numérisation des impulsions et l'enregistrement de la technologie, de sorte que les deux faisceaux de longueur d'onde différentes de la lumière (660 nm rouge et 905 nm lumière proche infra- rouge) peuvent être concentrées sur un bout d'ongle humain grâce à un capteur digital. Un signal mesuré obtenu par un élément photosensible, sera affiché sur l'écran par le biais de circuits électroniques et microprocesseur. Principe de fonctionnement du diagramme AT: 1. Rouge et émission de rayons infrarouges. 2. Rouge et réception de rayons infrarouge. 5. Instructions d'utilisation 1. Insérez les piles comme décrit dans la section «Insertion des piles 7». 2. Insérez un doigt (ongle côté supérieur; index ou le majeur est recommandé) dans l'ouverture prévu à cet effet du dispositif. Assurez-vous d' insérer complète- ment le doigt de sorte que le capteur soit complètement couvert par le doigt. 3. Relâchez le dispositif qui lui permet de serrer sur le doigt. 4. Appuyez sur le bouton ON/OFF 1 pour allumer l'appareil. 5. Ne pas bouger le doigt pendant le test. Il est aussi recommandé de ne pas bouger le corps pendant la mesure. 6. Vos valeurs de mesure seront affichées sur l'écran après quelques secondes. 7. Retirer le doigt de l'appareil. L'écran affichera «Finger Out» (Doigt dehors). 8. L'appareil s'éteint automatiquement après 8 secondes environ après que le doigt soit retiré de l'appareil. ) La hauteur du graphe 5 est une indication de la pulsation et la force du signal. La barre doit être supérieure de 30% pour une lecture adéquate. ) L'appareil doit être en mesure de mesurer la pulsa- tion correctement afin d'obtenir un résultat en SpO 2 précis. Vérifiez que rien ne fait obstacle à la mesure du pouls avant de confirmer la mesure SpO 2 . ) Le temps maximal d'épandage sur un seul site devrait être moins de 30 minutes, afin d'assurer l'intégrité de capteur, l'alignement et la peau. Des mesures inexactes peuvent se produire si: • Le patient souffre d'un niveau significatif de dysfonc- tionnements liés hémoglobine (telles que la carboxyhé- moglobine ou méthémoglobine). • Des colorants intravasculaires tels que le vert indocyanine ou le bleu de méthylène ont été injectés dans le patient. • Utilisé en présence de lumière ambiante élevée (par exemple directe lumière du soleil). Protéger la zone de détection avec une serviette chirurgicale si nécessaire. • Il y a un mouvement excessif du patient. • Les expériences des patients des pulsations veineuses. • Le patient a une hypotension, une vasoconstriction sévère, anémie sévère, ou d'hypothermie. • Le patient est en arrêt cardiaque ou est en état de choc. • Vernis à ongle ou de faux ongles sont appliqués. 6. Insertion des piles 7 Après avoir déballé votre appareil, insérez d'abord les piles. Le compartiment à piles se trouve sur le dessous de l'appareil. Enlever le capot à pile en le faisant glisser dans la direction indiquée. Insérez les piles (2 x 1,5 V, format AAA) en respectant les indications de polarité. ) Remplacer les piles quand l'indicateur piles usées 6 apparaît à l'écran. Remplacez toujours les deux batteries en même temps. 7. Réglage du mode d'affichage et de la luminosité Mode d'affichage Lorsque l'appareil est allumé, appuyez brièvement sur le bouton ON/OFF 1 pour passer à un autre mode d'affichage pour sélectionner votre mode d'affichage souhaité 9. Il y a 6 modes d'affichage différent. Le réglage par défaut est le mode 1. Luminosité Appuyez et maintenez le bouton ON/OFF 1 pendant plus d'une seconde pour régler la luminosité du dispositif. L'écran affiche «Br 1-10». Il y a 10 niveaux de luminosité. Le réglage par défaut est le niveau 4. 8. Utilisation de la lanière 8 1. Enfilez l' extrémité la plus mince de la lanière à travers le trou, à l'extrémité arrière de l'appareil. 2. Enfiler l' extrémité la plus épaisse de la lanière à travers l' extrémité filetée avant de la tirer fermement. 9. Dépannage et actions à prendre 10. Nettoyage et désinfection Utiliser un chiffon doux ou un chiffon en coton imbibé d'alcool (70% isopropyl) pour nettoyer le silicone qui touche le doigt à l'intérieur de l'appareil. Nettoyer également le doigt mis à l'essai avec de l'alcool avant et après chaque essai. Laissez l'appareil sécher complètement avant utilisation. Ne jamais utiliser d'agent abrasif, diluant ou benzène et ne jamais plonger l'appareil dans l'eau ou un autre liquide. 11. Garantie Cet appareil est assorti d'une garantie de 2 ans à compter de la date d'achat. La garantie est seulement valable sur présentation de la carte de garantie dûment remplie par le revendeur (voir verso) avec la mention de la date d'achat ou le justificatif d'achat. • Les piles et les pièces d'usure ne sont pas couverts. • Le fait d'ouvrir ou de modifier l'appareil invalide la garantie. • La garantie ne couvre pas les dommages causés par une mauvaise manipulation, les accidents ou le non respect des consignes d'utilisation. 12. Caractéristiques techniques Sous réserve de modifications techniques. Oxymètre de pouls FR 1 Bouton ON/OFF (marche/arrêt) 2 Taux de saturation en oxygène (en pourcentage) 3 Fréquence du pouls (valeur en battements par minute) 4 Onde du pouls (onde pléthysmographique) 5 Barre de pulsation 6 Signal d'usure de la pile 7 Insertion des piles 8 Attaché du cordon 9 Mode d'affichage AT Mode opératoire A conserver dans un endroit sec Fabricant Date de fabrication Pas d'alarme SpO 2 Signal d'usure de la pile Numéro de série Protéger contre les projections d'eau Représentation autorisée dans la communauté européenne Taux de saturation en oxygène (en pourcentage) Fréquence du pouls (valeur en battements par minute) Conditions d’utilisation: 5 - 40 °C / 41 - 104 °F Conditions de stockage: -20 - +55 °C / -4 - +131 °F Marquage CE conforme 2 % SpO PR bpm 0123 Descrip- tion Symptômes/Causes possibles Solutions SpO 2 ou pulsation ne s'affiche pas norma- lement. 1. Doigt n'est pas inséré correctement. 2. La valeur SpO 2 du patient est trop faible pour être mesurée. 3. L'éclairage est trop fort. 1. Reinsérer le doigt. 2. & 3. Répétez les mesures. Si le produit fonctionne correctement, consultez votre médecin. L'affichage du SpO 2 ou la pulsation est instable. 1. Le doigt ne doit pas être assez inséré profondément. 2. Le patient bouge de trop. 1. Reinsérer le doigt. 2. Assis calmement et réessayer. L'appareil ne s'allume pas. 1. Pas de piles ou piles faibles. 2. Les piles ne sont pas installées correctement. 3. L'appareil pourrait être endommagé. 1. Remplacer les piles. 2. Enlever et réins- taller les piles. 3. Contacter le SAV Microlife local. L'écran s'éteint soudaine- ment. 1. L'appareil s'éteint automatiquement quand aucun signal a été détecté après 8 secondes. 2. La pile est presque déchargée pour pouvoir être utilisée. 1. Normal. 2. Remplacer les piles. «Error 3» L'émission rouge de la LED est endommagée. Vérifier l'émission du rouge. «Error 4» L'émission de l'infra rouge est endommagé. Vérifier l'émission de l'infra-rouge. «Error 6» L'écran ne réagit plus. Contacter le SAV Microlife local. «Error 7» L'émission LED ou la réception de diode est endommagée. Contacter le SAV Microlife local. Type: Oxymètre de pouls OXY 300 Affichage: Écran OLED SpO 2 : Etendue de mesure: 70 ~ 100 % Précision: 70 ~ 100 % : ±2 % Résolution: 1 % Fréquence des batte- ments de coeur: Etendue de mesure: 30 ~ 250 bpm Précision: 30 ~ 99 bpm: ±2 bpm; 100 ~ 250 bpm: ±2 % Résolution: 1 bpm Conditions d’utilisation: 5 - 40 °C / 41 - 104 °F Humidité relative ≤ 80 % max. Conditions de stockage: -20 - +55 °C / -4 - +131 °F Humidité relative ≤ 93 % max. Extinction automatique: Extinction automatique en 8 secondes quand aucun signal ou faible signal est détecté. Pile: 2 x piles alcalines de 1,5 V; format AAA Durée de vie des piles: env. 30 heures (avec des piles neuves) Poids: 56 g (piles incluses) Dimensions: 58 x 32 x 34 mm Classe IP: IPX1 Référence aux normes: EN ISO10993-1/-5/-10; IEC 60601-1; EN 60601-1-2; EN ISO9919; EN 62304; EN 60601-1-6; CE0123 Espérance de fonctionnement: 5 ans (lorsque utilisé 15 fois/jour; 20 minutes pour chaque mesure) Gentile cliente, Questo Microlife pulsossimetro da dito è un dispositivo portatile non invasivo destinato al controllo saltuario della saturazione dell'ossigeno dell'emoglobina arteriosa (SpO 2 ) e della frequenza cardiaca in pazienti adulti e pediatrici. È adatto per uso domiciliare (a casa o fuori), nonché per l'impiego nel settore medico (ospedali, strutture ospeda- liere). La sua elevata precisione è stata clinicamente testata. Si prega di leggere attentamente queste istruzioni per comprendere tutte le funzioni e informazioni di sicurezza. Desideriamo sia soddisfatto/a del prodotto Microlife acqui- stato. In caso di domande, problemi o per ordinare parti di ricambio, contattare il proprio rivenditore di fiducia o il locale servizio clienti di Microlife. In alternativa è possibile visitare il sito www.microlife.com che offre moltissime informazioni utili sui nostri prodotti. Conservare questo manuale in un luogo sicuro per ogni ulteriore consultazione. Rimanete in salute – Microlife AG! 1. Spiegazione dei simboli Le batterie e gli strumenti elettronici devono essere smaltiti in conformità alle disposizioni locali e non come i rifiuti domestici. Leggere attentamente le istruzioni prima di usare il dispositivo. Parte applicata tipo BF 2. Importanti misure precauzionali • Questo dispositivo deve essere usato esclusivamente come descritto in questo manuale. Il produttore non può essere ritenuto responsabile di danni causati da un'applicazione non corretta. • Non immergere mai questo dispositivo in acqua o altri liquidi. Per la pulizia seguire quanto indicato nella sezione «Pulizia e disinfezione» di questo manuale. • Non usare il dispositivo se si ritiene che sia danneggiato o se si nota qualcosa di strano. • Non aprire mai il dispositivo. • Questo dispositivo è costruito con componenti delicati e deve essere trattato con attenzione. Osservare le condizioni di stoccaggio e funzionamento descritte nel capitolo «Specifiche tecniche»! • Proteggere il dispositivo da: - acqua e umidità - temperature estreme - urti e cadute - contaminazione e polvere - luce solare diretta - caldo e freddo • La funzionalità di questo dispositivo può essere compro- messa se usato vicino a forti campi elettromagnetici, come telefoni cellulari o installazioni radio. Si racco- manda di mantenere una distanza minima di 1 m (secondo la 60601-1-2 tavola 5). Nei casi in cui sia impos- sibile mantenere la distanza raccomandata, verificare che il dispositivo funzioni correttamente prima dell'uso. • Non utilizzare il dispositivo in un ambiente RMN o TAC. • Questo dispositivo non è destinato per il monitoraggio continuo. • Questo dispositivo non dispone di una funzione di allarme e quindi non è adatto per la valutazione dei risultati medici. Non utilizzare il dispositivo in situazioni in cui sono richiesti allarmi. • Non sterilizzare questo dispositivo tramite autoclave o ossido di etilene. Questo dispositivo non è destinato per la sterilizzazione. • Rimuovere le batterie se il dispositivo non viene usato per un periodo prolungato. Assicurarsi che i bambini non utilizzino il disposi- tivo senza la supervisione di un adulto. Alcune parti sono piccole e potrebbero essere ingerite. Prestare attenzione al rischio di strangolamento in presenza di cavi o tubi. L’utilizzo di questo dispositivo non sostituisce la consultazione dal proprio medico. 3. Descrizione generale La saturazione di ossigeno indica la percentuale di emoglobina nel sangue arterioso che contiene ossigeno. Questo è un parametro molto importante per il sistema respiratorio. Molte malattie respiratorie possono causare bassa saturazione di ossigeno nel sangue. I seguenti fattori possono ridurre la saturazione di ossigeno: Automatica regolazione di disfunzioni orga- niche causate da anestesia, traumi intensivi post-opera- tori, danni causati da alcuni esami medici. Queste situa- zioni possono provocare vertigini, astenia e vomito. Pertanto, è molto importante conoscere la saturazione di ossigeno del paziente così che i medici possano rilevare i problemi in modo tempestivo. 4. Principi di misurazione Principio di questo pulsossimetro da dito: È stata defi- nita una formula matematica prendendo spunto dalla legge di Lambert Beer sulle caratteristiche di assorbimento dello spettro di luce rossa ed infrarossa dell'emoglobina desos- sigenata (Hb) e dell'ossiemoglobina (HbO 2 ). Principio di funzionamento di questo dispositivo: La tecnologia dell'ispezione foto elettrica dell' ossiemoglobina è stata adottata in conformità con la capacità di scansione della frequenza cardiaca e della tecnologia di registra- zione, in modo che due fasci di luce di diversa lunghezza d'onda (rossa 660 nm e infrarossa 905 nm) possono essere focalizzati sulla punta di un dito attraverso un sensore da dito. Una misurazione ottenuta attraverso un elemento fotosensibile sarà mostrata sul display attraverso un processo di circuiti elettronici e un microprocessore. Schema del principio di funzionamento AT: 1. Sonda generatrice di luce rossa ed infrarossa. 2. Fotocellula ricevente di luce rossa ed infrarossa. 5. Indicazioni per l’uso 1. Inserire le batterie come descritto nella sezione «Inserimento delle batterie 7». 2. Inserire un dito (unghia verso alto; è consigliato il dito indice o medio) nell'apertura del dispositivo. Assicu- rarsi di inserire il dito fino in fondo in modo che i sensori siano completamente coperti dal dito. 3. Rilasciare il dispositivo permettendo così di coprire il dito. 4. Premere il tasto ON/OFF 1 per accendere il dispositivo. 5. Non agitare il dito durante la misurazione. È raccoman- dato non muovere il corpo, mentre si fa la misurazione. 6. I valori di misurazione appariranno sullo schermo dopo pochi secondi. 7. Togliere il dito dal dispositivo. Il display indicherà «Finger Out» (dito fuori). 8. Il dispositivo si spegne automaticamente dopo circa 8 secondi, dopo che il dito viene rimosso dal dispositivo. ) L'altezza del grafico a barre 5 è un'indicazione della frequenza cardiaca e della forza del segnale. La barra deve essere superiore al 30% per una lettura corretta. ) Il dispositivo deve essere in grado di misurare correttamente le frequenza cardiaca per otte- nere una misurazione accurata della SpO 2 . Veri- ficare che nulla ostacola la misurazione della frequenza cardiaca prima di fare affidamento sulla misurazione SpO 2 . ) Il tempo massimo di applicazione in un singolo sito dovrebbe essere inferiore a 30 minuti, al fine di garantire l'allineamento corretto del sensore e l'integrità cutanea. Misurazioni non accurate possono verificarsi se: • Il paziente soffre di livelli significativi di emoglobina disfunzionale (come carbossiemoglobina e metae- moglobina). • Al paziente sono stati iniettati coloranti intravascolari come indocianina verde o metilene blu. • Utilizzato in presenza di luce ambientale elevata (ad es. luce diretta del sole). Schermare l'area del sensore con un asciugamano chirurgico se necessario. • Il paziente si muove eccessivamente. • Il paziente sente pulsazioni venose. • Il paziente è ipotenso, ha gravi vasocostrizioni, anemia, o ipotermia. • Il paziente è in arresto cardiaco o è in stato di shock. • Sono applicate unghia finte o smalto. 6. Inserimento delle batterie 7 Dopo aver estratto il dispositivo dall’imballaggio inserire prima le batterie. Il vano batterie si trova sul fondo del dispositivo. Aprire il coperchio del vano batteria facen- dolo scorrere nella direzione indicata. Inserire le batterie (2 x 1,5 V, tipo AAA) osservando la polarità indicata. ) Sostituire le batterie quando appare l'indicatore di batterie quasi scariche 6 sul display. Sostituire sempre entrambe le batterie nello stesso momento. 7. Regolazione della modalità di visualizza- zione e della luminosità Modalità di visualizzazione Quando il dispositivo è acceso, premere brevemente il tasto ON/OFF 1 per passare ad un'altra modalità di visualizzazione e per selezionare la modalità di visualizza- zione desiderata 9. Ci sono 6 differenti modalità di visua- lizzazione. L'impostazione predefinita è la modalità 1. Luminosità Premere e tenere premuto il tasto ON/OFF 1 per più di un secondo per regolare la luminosità del dispositivo. Il display visualizza «Br 1-10». Ci sono 10 livelli di lumino- sità. L'impostazione predefinita è il livello 4. 8. Utilizzo del cordino 8 1. Infilare l'estremità sottile del cordino attraverso il foro situato nella parte posteriore del dispositivo. 2. Far passare l'estremità più spessa del cordino attra- verso l'estremità filettata prima di tirare saldamente. 9. Malfunzionamenti e azioni da intraprendere 10. Pulizia e disinfezione Utilizzare un panno o del cotone imbevuti di alcool (70% isopropilico) per pulire il silicone a contatto con il dito all'interno del dispositivo. Pulire anche il dito che si utiliz- zerà con alcool prima e dopo ogni test. Lasciare asciugare completamente il dispositivo prima dell'uso. Non utilizzare detergenti abrasivi, solventi o benzene per la pulizia e non immergere mai il dispositivo in acqua o altri liquidi detergenti. 11. Garanzia Questo dispositivo è coperto da una garanzia di 2 anni dalla data di acquisto. La garanzia è valida solo presen- tando l’apposito tagliando (vedi retro) compilato con nome del rivenditore, la data d’acquisto e lo scontrino fiscale. • Batterie e componenti usurabili non sono compresi nella garanzia. • L'apertura o la manomissione del dispositivo invalidano la garanzia. • La garanzia non copre danni causati da trattamento improprio, incidenti o inosservanza delle istruzioni per l'uso. 12. Specifiche tecniche Con riserva di apportare modifiche tecniche. Pulsossimetro IT 1 Tasto ON/OFF 2 Saturazione di ossigeno (valore in percentuale) 3 Frequenza cardiaca (valore in battiti al minuto) 4 Onda delle pulsazioni (onda pletismografica) 5 Barra della frequenza cardiaca 6 Indicatore di batterie quasi scariche 7 Inserimento delle batterie 8 Installazione del cordino 9 Modalità di visualizzazione AT Principio di funzionamento Conservare in luogo asciutto Produttore Data di produzione Nessun allarme SpO 2 Indicatore di batterie quasi scariche Numero serie Protetto contro il gocciolamento d'acqua Rappresentante autorizzato nella Comunità Europea Saturazione di ossigeno (valore in percentuale) Frequenza cardiaca (valore in battiti al minuto) Condizioni di esercizio: 5 - 40 °C / 41 - 104 °F Condizioni di stoccaggio: -20 - +55 °C / -4 - +131 °F Marchio di conformità CE 2 % SpO PR bpm 0123 Descri- zione Sintomo/Possibili cause Soluzioni SpO 2 o la frequenza cardiaca non sono visualiz- zate corretta- mente. 1. Il dito non è inserito correttamente. 2. Il valore SpO 2 del paziente è troppo basso per essere misurato. 3. C'è una eccessiva illu- minazione. 1. Riprovare ad inserire il dito. 2. e 3. Misurare più volte. Se si presume che il prodotto funziona corretta- mente, consultare il proprio medico. La visua- lizzazione della SpO 2 e della frequenza cardiaca non è stabile. 1. Il dito potrebbe non essere inserito abba- stanza in profondità. 2. Movimento eccessivo del paziente. 1. Riprovare ad inserire il dito. 2. Stare seduti tranquil- lamente e riprovare. Il disposi- tivo non si accende. 1. Nessuna batteria o batterie scarica. 2. Le batterie non sono inserite correttamente. 3. Il dispositivo potrebbe essere danneggiato. 1. Sostituire le batterie. 2. Rimuovere e reinstal- lare le batterie. 3. Contattare il locale Servizio Clienti Microlife. Il display si spegne improvvi- samente. 1. Il dispositivo si spegne automaticamente dopo 8 secondi, quando nessun segnale viene rilevato. 2. La carica della batteria è troppo bassa per funzionare. 1. Normale. 2. Sostituire le batterie. «Error 3» Il LED di emissione del rosso è danneggiato. Controllare il LED di emissione del rosso. «Error 4» Il LED di emissione dell'infrarosso è danneg- giato. Controllare il LED di emissione dell'infra- rosso. «Error 6» La visualizzazione non è riuscita. Contattare il locale Servizio Clienti Microlife. «Error 7» Il LED di emissione o il diodo di ricezione sono danneggiati. Contattare il locale Servizio Clienti Microlife. Tipo: Pulsossimetro da dito OXY 300 Display: OLED display SpO 2 : Range di misurazione: 70 ~ 100 % Precisione: 70 ~ 100 % : ±2 % Risoluzione: 1 % Frequenza cardiaca: Range di misurazione: 30 ~ 250 bpm Precisione: 30 ~ 99 bpm: ±2 bpm; 100 ~ 250 bpm: ±2 % Risoluzione: 1 bpm Condizioni di esercizio: 5 - 40 °C / 41 - 104 °F ≤ 80 % umidità relativa massima Condizioni di stoccaggio: -20 - +55 °C / -4 - +131 °F ≤ 93 % umidità relativa massima Spegnimento automatico: Spegnimento automatico dopo 8 secondi, quando non viene rilevato alcun un segnale. Batteria: 2 x batterie alcaline da 1,5 Volt; tipo AAA Durata batterie: circa 30 ore (usando batterie nuove) Peso: 56 g (comprese batterie) Dimensioni: 58 x 32 x 34 mm Classe IP: IPX1 Riferimento agli standard: EN ISO10993-1/-5/-10; IEC 60601-1; EN 60601-1-2; EN ISO9919; EN 62304; EN 60601-1-6; CE0123 Aspettativa di vita del prodotto in uso: 5 anni (quando usato 15 volte/giorno; 20 minuti per misurazione) Sehr geehrter Kunde, Dieses tragbare Microlife Finger-Pulsoximeter dient der nichtinvasiven Messung der arteriellen Sauerstoffsättigung (SpO 2 ) und Pulsfrequenz von Erwachsenen und Kindern. Es ist für den Privatgebrauch (zu Hause oder unterwegs) sowie für den medizinischen Bereich (Krankenhäuser, medizinische Einrichtungen) geeignet. Klinische Studien haben gezeigt, dass die Messungen sehr genau sind. Bitte lesen Sie diese Anleitung vollständig durch, um alle Funktionen und Sicherheitshinweise zu verstehen. Wir möchten, dass Sie mit diesem Microlife-Produkt zufrieden sind. Wenden Sie sich bei Fragen, Problemen oder Ersatz- teilbedarf jederzeit gerne an den lokalen Microlife-Service. Ihr Händler oder Apotheker kann Ihnen die Adresse der Microlife-Landesvertretung mitteilen. Eine Vielzahl nützli- cher Informationen zu unseren Produkten finden Sie auch im Internet unter www.microlife.com. Bewahren Sie die Anleitung an einem sicheren Ort auf. Wir wünschen Ihnen alles Gute für Ihre Gesundheit – Microlife AG! 1. Zeichenerklärung Batterien und elektronische Geräte dürfen nicht in den Hausmüll, sondern müssen entsprechend den örtlichen Vorschriften entsorgt werden. Vor Verwendung Bedienungsanleitung genau studieren. Anwendungsteil des Typs BF 2. Sicherheitshinweise • Dieses Gerät darf nur für den in dieser Anleitung beschriebenen Zweck verwendet werden. Der Hersteller ist nicht für Schäden haftbar, die aus unsachgemässer Handhabung resultieren. • Tauchen Sie das Gerät weder in Wasser noch in andere Flüssigkeiten. Für die Reinigung und Desinfektion folgen Sie bitte den Anweisungen im Kapitel «Reinigung und Desinfektion». • Benutzen Sie das Gerät nicht, wenn Sie einen Schaden erkennen oder Ihnen etwas Ungewöhnliches auffällt. • Öffnen Sie niemals das Gerät. • Dieses Gerät besteht aus sensiblen Bauteilen und muss vorsichtig behandelt werden. Beachten Sie die Lager- und Betriebsanweisungen im Kapitel «Technische Daten». • Schützen Sie das Gerät vor: - Wasser und Feuchtigkeit - extremen Temperaturen - Stössen und Herunterfallen - Schmutz und Staub - starker Sonneneinstrahlung - Hitze und Kälte • Die Funktion dieses Gerätes kann durch starke elek- tromagnetische Felder wie z.B. Mobiltelefone oder Funkanlagen beeinträchtigt werden. Wir empfehlen einen Mindestabstand von 1 m (gemäss 60601-1-2 Tabelle 5). Falls Sie den Mindestabstand nicht einhalten können, überprüfen Sie die ordnungsge- mässe Funktion des Gerätes bevor Sie es benutzen. • Verwenden Sie das Gerät nicht in der Umgebung vom MRI oder CT-Anlagen. • Dieses Gerät ist nicht für die kontinuierliche Überwa- chung vorgesehen. • Dieses Gerät verfügt über keine Alarmfunktion und eignet sich daher nicht zur Bewertung medizinischer Ergebnisse. Verwenden Sie das Gerät nicht in Situa- tionen, in denen Alarme benötigt werden. • Sterilisieren Sie dieses Gerät nicht mittels Dampfste- rilisation oder Ethylenoxid. Dieses Gerät darf nicht sterilisiert werden. • Entfernen Sie die Batterien, wenn das Gerät für längere Zeit nicht benutzt wird. Sorgen Sie dafür, dass Kinder das Gerät nicht unbeaufsichtigt benutzen; einige Teile sind so klein, dass sie verschluckt werden könnten. Beachten Sie das Strangulierungsrisiko sollte dieses Gerät mit Kabeln oder Schläuchen ausgestattet sein. Die Benutzung dieses Geräts ist kein Ersatz für einen Arztbesuch. 3. Allgemeine Beschreibung Die Sauerstoffsättigung zeigt an, wie viel Prozent des Hämoglobins im arteriellen Blut mit Sauerstoff geladen ist. Dies ist ein sehr wichtiger Indikator im Atemkreislauf. Verschiedene Atemwegserkrankungen können zu einer niedrigeren Sauerstoffsättigung im Blut führen. Folgende Faktoren können die Sauerstoffsättigung senken: Automatische Regulierung einer Organfehlfunktion ausgelöst durch eine Narkose, schweres postoperatives Trauma, Verletzungen nach gewissen medizinischen Unter- suchungen. Diese Situationen können zu Benommenheit, Kraftlosigkeit und Übelkeit führen. Aus diesem Grund ist es wichtig, die Blutsauerstoffwerte eines Patienten zu messen, damit Ärzte Probleme rechtzeitig erkennen können. 4. Messprinzip Das Prinzip dieses Finger-Pulsoximeters: Eine mathe- matische Formel wird basierend auf dem Lambert-Beer- Gesetz anhand der spektrumabsorbierenden Charakteristik des desoxydiertem Hämoglobins (Hb) und Oxyhämoglobins (HbO 2 ) in Glut- und Nahinfrarotzonen berechnet. Betriebsprinzip dieses Gerätes: Bei der fotoelektrischen Oxyhämoglobin-Messmethode scannen zwei Lichtstrahlen mit unterschiedlichen Wellenlängen (660 nm Glut und 905 nm Nahinfrarotlicht) aus einem Fingerspitzensensor den Fingerpuls. Die Strahlen können durch die Fingerna- gelspitze eines Menschen dringen. Das Signal wird mit einem fotosensitiven Element gemessen und im Display angezeigt. Abbildung zur Funktionsweise AT: 1. Rot und Infrarotsender. 2. Rot und Infrarotempfänger. 5. Gebrauchsanweisung 1. Legen Sie die Batterien ein wie im Kapitel «Einlegen der Batterien 7» beschrieben. 2. Legen Sie einen Finger (Nagelseite nach oben; Zeigefinger oder Mittelfinger wird empfohlen) in die Fingeröffnung des Gerätes. Achten Sie darauf, dass der Finger vollständing in die Fingeröffnung des Gerätes eingelegt ist, damit die Sensoren vollständig vom Finger bedeckt werden. 3. Lassen Sie das Gerät los, damit der Finger richtig eingeschlossen wird. 4. Drücken Sie die Ein-/Aus-Taste 1, um das Gerät einzuschalten. 5. Bewegen Sie den Finger während der Messung nicht. Es wird empfohlen, sich während der Messung nicht zu bewegen. 6. Ihr Messergebnis wird nach ein paar Sekunden auf dem Display angezeigt. 7. Entfernen Sie den Finger vom Gerät. Das Display zeigt «Finger Out» an. 8. Das Gerät schaltet sich nach ca. 8 Sekunden automa- tisch ab, sobald der Finger vom Gerät entfernt wurde. ) Die Höhe des Balkens 5 gibt die Puls- und Signalstärke an. Der Balken sollte grösser als 30% sein, um eine verlässliche Messung durch- führen zu können. ) Das Gerät muss den Puls richtig messen können, um ein exaktes Sauerstoffsättigungser- gebnis anzugeben. Stellen Sie sicher, dass die Pulsmessung nicht gestört wird, bevor Sie sich auf das Messergebnis verlassen. ) Verwenden Sie das Gerät nicht länger als 30 Minuten am gleichen Messort, um die korrekte Platzierung des Sensors zu gewähr- leisten und um die Integrität der Haut zu schützen. Fehlerhafte Messergebnisse können auftreten, wenn: • Der Patient erheblich unter dysfunktionalen Hämoglo- binen leidet (zum Beispiel Carboxyhämoglobin oder Methämoglobin). • Dem Patienten intravaskuläre Farbstoffe, wie z.B. Indocyanin-Grün oder Methylenblau, injiziert wurden. • Das Gerät grösserer Lichteinstrahlung ausgesetzt ist. Bedecken Sie den Sensor in diesem Fall mit einem Tuch. • Der Patient sich übermässig bewegt. • Der Patient Venenpulsationen wahrnimmt. • Der Patient unter Hypotonie, Verengung der Blutge- fässe, erheblicher Blutarmut oder Unterkühlung leidet. • Der Patient einen Herzstillstand hat oder im Schock- zustand ist. • Nagellack aufgetragen oder künstliche Fingernägel angebracht sind. 6. Einlegen der Batterien 7 Nachdem Sie das Gerät ausgepackt haben, legen Sie die Batterien ein. Das Batteriefach befindet sich auf der Geräteunterseite. Entfernen Sie die Batteriefachabde- ckung, indem Sie die Abdeckung in die angezeigte Rich- tung schieben. Legen Sie die Batterien (2 x 1,5 V, Grösse AAA) ein und achten Sie dabei auf die angezeigte Polarität. ) Tauschen Sie die Batterien aus, wenn die Anzeige für Batterie niedrig 6 auf dem Display angezeigt wird. Ersetzen Sie immer beide Batterien zur gleichen Zeit. 7. Anzeigemodus und Helligkeit anpassen Anzeigemodus Drücken Sie kurz die Ein-/Aus-Taste 1, um den Anzei- gemodus zu wechseln und zu Ihrem gewünschten Anzeigemodus 9 zu gelangen. Es gibt 6 verschiedene Anzeigemodi; die Standardeinstellung ist Modus 1. Helligkeit Drücken Sie die Ein-/Aus-Taste 1 länger als eine Sekunde, um die Helligkeit des Gerätes einzustellen. Das Gerät zeigt «Br 1-10» an. Es gibt 10 Helligkeits- stufen; die Standardeinstellung ist Stufe 4. 8. Verwendung des Umhängebandes 8 1. Fädeln Sie das dünnere Ende des Umhängebandes durch das dafür vorgesehene Loch am Gerät. 2. Fädeln Sie das dickere Ende durch das zuvor befes- tigte dünnere Ende und ziehen Sie es fest. 9. Fehlfunktionen und Massnahmen 10. Reinigung und Desinfektion Reinigen Sie die gummierte Innenfläche des Gerätes mit einem Alkoholtupfer oder mit einem Alkohol (70% Isop- ropanol) befeuchteten Baumwolltuch. Reinigen Sie auch den Finger vor und nach jeder Anwendung. Lassen Sie das Gerät vor Verwendung gründlich trocknen. Verwenden Sie keine aggressiven Reinigungs- mittel, Lösungsmittel oder Benzol zum Reinigen und tauchen Sie das Gerät niemals in Wasser oder andere Reinigungsflüssigkeiten. 11. Garantie Für dieses Gerät gewähren wir 2 Jahre Garantie ab Kaufdatum. Die Garantie gilt nur bei Vorlage einer vom Händler ausgefüllten Garantiekarte (siehe letzte Seite) mit Kaufdatum oder des Kassenbelegs. • Batterien und Verschleissteile sind von der Garantie ausgeschlossen. • Wurde das Gerät durch den Benutzer geöffnet oder verändert, erlischt der Garantieanspruch. • Die Garantie erstreckt sich nicht auf Schäden, die auf unsachgemässe Handhabung, Unfälle oder Nichtbe- achtung der Gebrauchsanleitung zurückzuführen sind. 12. Technische Daten Technische Änderungen vorbehalten. Pulsoximeter DE 1 Ein-/Aus-Taste 2 Sauerstoffsättigung (Wert in Prozent) 3 Pulsfrequenz (Schläge pro Minute) 4 Pulswelle (Plethysmografische Welle) 5 Pulsbalken 6 Batterie niedrig 7 Einlegen der Batterien 8 Umhängeband anbringen 9 Anzeigemodi AT Messprinzip Vor Nässe schützen Hersteller Herstellungsdatum Kein Sauerstoffsättigungsalarm Batterie niedrig Seriennummer Geschützt gegen Tropfwasser EU-Repräsentant Sauerstoffsättigung (Wert in Prozent) Pulsfrequenz (Schläge pro Minute) Betriebsbedingungen: 5 - 40 °C / 41 - 104 °F Aufbewahrungsbedingungen: -20 - +55 °C / -4 - +131 °F CE-Kennzeichnung 2 % SpO PR bpm 0123 Bezeich- nung Problem/Mögliche Ursache Lösungen SpO 2 oder Pulsfre- quenz wird nicht normal ange- zeigt. 1. Finger ist nicht korrekt im Gerät. 2. Sauerstoffsättigung des Patienten ist zu gering. 3. Übermässige Belichtung. 1. Finger nochmal richtig einlegen. 2. & 3. Messen Sie mehrmals. Funktio- niert das Gerät korrekt, suchen Sie Ihren Arzt auf. SpO 2 oder Pulsfre- quenz variiert stark. 1. Der Finger könnte nicht weit genug im Gerät stecken. 2. Der Patient bewegt sich zu stark. 1. Finger nochmal richtig einlegen. 2. Ruhig sitzen und erneut probieren. Das Gerät kann nicht einge- schaltet werden. 1. Keine oder leere Batte- rien im Gerät. 2. Batterien sind nicht richtig eingelegt. 3. Das Gerät könnte beschädigt sein. 1. Batterien austau- schen. 2. Batterien entfernen und neu einsetzen. 3. Kontaktieren Sie Ihren lokalen Micro- life Kundenservice. Das Display ist plötz- lich ausge- schaltet. 1. Das Gerät schaltet sich automatisch aus, wenn es innerhalb von 8 Sekunden kein Signal empfängt. 2. Batterien sind zu schwach für den Betrieb. 1. Normal. 2. Batterien austau- schen. «Error 3» Rotlichtsender ist beschä- digt. Rotlichtsender über- prüfen. «Error 4» Infrarotlichtsender ist beschädigt. Infrarotlichtsender überprüfen. «Error 6» Das Display ist defekt. Kontaktieren Sie Ihren lokalen Microlife Kundenservice. «Error 7» Empfängerdiode ist beschädigt. Kontaktieren Sie Ihren lokalen Microlife Kundenservice. Typ: Fingertip Pulsoximeter OXY 300 Anzeige: OLED Display Sauerstoffsättigung: Messbereich: 70 ~ 100 % Genauigkeit: 70 ~ 100 % : ±2 % Messauflösung: 1 % Pulsschlag: Messbereich: 30 ~ 250 bpm Genauigkeit: 30 ~ 99 bpm: ±2 bpm; 100 ~ 250 bpm: ±2 % Messauflösung: 1 bpm Betriebs- bedingungen: 5 - 40 °C / 41 - 104 °F ≤ 80 % relative maximale Luftfeuchtigkeit Aufbewahrungs- bedingungen: -20 - +55 °C / -4 - +131 °F ≤ 93 % relative maximale Luftfeuchtigkeit Automatische Ausschaltung: Automatische Ausschaltung nach 8 Sekunden, bei keinem oder schwa- chem Signal. Batterie: 2 x 1,5 V Alkaline-Batterien, Grösse AAA Batterie-Lebens- dauer: ca. 30 Stunden (mit neuen Batterien) Gewicht: 56 g (mit Batterien) Grösse: 58 x 32 x 34 mm IP Klasse: IPX1 Verweis auf Normen: EN ISO10993-1/-5/-10; IEC 60601-1; EN 60601-1-2; EN ISO9919; EN 62304; EN 60601-1-6; CE0123 Durchschnittliche Lebensdauer: 5 Jahre (wenn das Gerät 15 Mal täglich während 20 Minuten verwendet wurde) Sayın Müşterimiz, Parmak tipi pulse oksimetre Microlife çocuklarda ve yetişkinlerde, non-invazif olarak oksijen saturasyonunu (SpO 2 ) ve kalp atış hızını tespit eden taşınabilir bir cihazdır. Özel kullanım (evde veya dışarda) ve medikal sektör(hastane, klinik, vs.) tarafından kullanıma uygundur. Yüksek hassaslığı Klinik olarak test edilmiştir. Tüm işlevleri ve güvenlik bilgisini anlayabilmeniz için, lütfen, bu talimatları dikkatle okuyun. Dileğimiz, Microlife ürünü- nüzden memnun kalmanızdır. Sorularınız, sorunlarınız ve yedek parça siparişleriniz için, lütfen, yerel Microlife-Müşteri Servisi ile görüşün. Ülkenizdeki Microlife bayisinin adresini satıcınızdan ya da eczanenizden öğrenebilirsiniz. İkinci bir yol olarak, ürünlerimiz hakkında geniş bilgi edinebileceğiniz www.microlife.com internet adresini de ziyaret edebilirsiniz. İleride başvurmak amacıyla kullanım talimatlarını güvenli bir yerde saklayın. Sağlıkla kalın – Microlife AG! 1. Simge Tanımlamaları Piller ve elektronik ürünler, çöpe atılmamalı; ancak, yürürlükteki yönetmeliklere uygun olarak elden çıkarılmalıdır. Aygıtı kullanmadan önce, talimatları dikkatle okuyun. BF tipi ekipman 2. Önemli Güvenlik Talimatları • Bu ürün, sadece bu broşürde açıklanan amaçlar çerçevesinde kullanılabilir. İmalatçı, yanlış uygula- madan kaynaklanan zarar ziyan için sorumlu tutulamaz. • Bu aygıtı kesinlikle suya ya da diğer sıvılara batır- mayın. Temizlik için, lütfen, «Temizlik ve Dezenfek- tasyon» bölümündeki talimatları uygulayın. • Hasar gördüğünü düşünüyorsanız ya da herhangi bir anormal durum sezdiyseniz, aygıtı kullanmayın. • Aygıtı kesinlikle açmayın. • Aygıt, hassas parçalara sahiptir ve dikkatli biçimde kullanılmalıdır. «Teknik Özellikler» bölümünde açık- lanan saklama ve çalıştırma koşullarını göz önünde bulundurun! • Aşağıdaki durumlara maruz kalmasına engel olun: - su ve nem - aşırı sıcaklıklar - darbe ve düşürülme - kir ve toz - doğrudan güneş ışığı - sıcak ve soğuk • Cihaz, cep telefonu veya radyo istasyonları gibi güçlü elektromanyetik alanlara yakın kullanıldığında düzgün çalışmayabilir ve bu durumdan kaçınamaya- cağınızda en az 1 metre uzaklığı korumanızı öneririz (60601-1-2 tablo 5'e göre), lütfen cihazı kullanmadan önce doğru çalışıp çalışmadığını kontrol ediniz. • Cihazı MRI veya CT çevresinde kullanmayınız. • Bu cihaz süreki bir görüntüleme için uygun değildir. • Alarm fonksiyonu olmadığı için medikal sonuçları değerlendirme de kullanılamaz. Alarmın gerekli olduğu durumlarda bu cihazı kullanmayınız. • Isıyla veya etilen oksit sterilizasyon kullanarak bu aygıtın sterilize değil. Bu cihaz sterilizasyon için tasarlanmamıştır. • Aygıtın uzun bir süre kullanılmaması durumunda, pillerin çıkarılması gerekir. Çocukların denetimsiz bir şekilde ürünü kullanma- larına izin vermeyin; bazı parçalar, yutulabilecek kadar küçüktür. Aygıtın kablo veya borularının olması nedeni ile yaratabileceği boğulma riskinin farkında olun. Bu aygıtın kullanılması, doktorunuzla yapılan bir konsültasyon anlamına gelmez. 3. Genel Tanım Oksijen saturasyonu oksijen ile dolu olan kandaki hemog- lobin yüzdesini belirtir. Solunum dolaşım sistemii için çok önemli bir parametredir. Birçok solunum hastalığı kandaki oksijen saturasyonunun düşmesi ile başla. Aşağıdaki faktörler oksijen saturasyonunun düşmesine sebep olur: Aneztezi sonucu organ fonksiyon bozukluğu, yoğun postoperatif travma, tıbbi muayene esnasında oluşan sakatlıklar. Bu durumlar sersemlik, halsizlik ve kusma ile sonuçlanabilir. Bunun için hastanın oksijen saturasyonunu bilmek, problemin zamanında çözülmesi için çok önemlidir. 4. Ölçme Prensibi Pulse oksimetre prensibi: Lambert Beer yasasını kullanarak spektrum emme özelliklerine göre oksijensiz hemoglobin (Hb) ve oksihemoglobin arasında kırmızı ve yakın kızılötesi bölgelerde (HbO 2 ) matematiksel bir formül oluşturulmuştur. Cihazın çalışma prensibi: Pulse tarama ve kaydetme teknoljisine uygun olarak Fotoelektrik oksihemoglobin inceleme teknolojisi benimsenmiştir, bu sayede iki farklı dalga bıyundaki (660 nm kırmızı ve 905 nm infrared) ışık, parmak tipi bir sensörle tırnak ucuna odaklanabiliriyor. Mikroişlemci ve elektronik devreler ile elde edilen sonuç ekranda gösterilir. Çalışma prensibi diyagramı AT: 1. Kırmızı ve infrared emisyon tüneli. 2. Kırmızı ve infrared algılama tüneli. 5. Kullanım Talimatları 1. «Pillerin yerleştirilmesi 7» bölümünde açıklandığı gibi pilleri takın. 2. Bir parmağınızı sokunuz (tırnak yukarıda olacak şekilde; işaret veya orta parmak önerilmektedir. Parma- ğınızı tam olarak yerleştirdiğinizden emin olunuz. 3. Cihazı bırakarak parmağına tam olarak oturtunuz. 4. AÇ/KAPA düğmesi 1 basarak cihazı açın. 5. Test süresince parmağınızı oynatmayınız. Vücu- dunuzu da oynatmamanız önerilir. 6. Ölçüm değerleri birkaç saniye sonra ekranda görünür. 7. Parmağınızı cihazdan çıkartın. Ekranda «Finger Out» ibaresi çıkacaktır. 8. Aygıt otomatik olarak parmak aygıttan kaldırıldıktan sonra yaklaşık 8 saniye sonra geçer. ) Bar grafiği 5 ritim sinyalinin kuvvetini göster- mektedir. Düzgün bir okuma için %30' un üzerinde olmalıdır. ) Düzgün bir SpO 2 okuması alabilmek için cihaz uygun şekilde çalışıyor olmalıdır. SpO 2 ölçümüne engel olmadığından emin olunuz. ) Doğru sensör algılaması ve deri bütünlüğü için cihazı 30 dakikalık en fazla ile kullanınız. Aşağıdaki durumlarda yanlış ölçüm olabilir: • Yüksek seviyerde işlevsiz hemoglobin (karboksihe- moglobin veya methemoglobin). • İndosiyanin yeşil veya metilen mavi gibi damar içi enjekteler. • Yüksek ışık altında (direk güneş ışıığı gibi). Bu durumda sensörleri cerrahi bir havlu ile örtünüz. • Fazla hasta hareketi. • Hasta venöz nabız yaşıyorsa. • Hastada hipotansiyon, vazokonstriksiyon, anemi veya hipotermi var ise. • Hasta kalp durması veya şok içinde ise. • Tırnakta tırnak cilası var ise. 6. Pillerin yerleştirilmesi 7 Aygıtın ambalajını açtıktan sonra, ilk önce pilleri yerleştirin. Pil bölmesi, aygıtın alt tarafındadır. Pil kapağını gösterilen yönde kaydırarak açın. Pilleri (2 x AAA 1.5 V boyutunda) yerleştirin; bunu yaparken kutupların gösterildiği gibi doğru konumda bulunmasına dikkat edin. ) Ekrenda düşük pil 6 göstergesi çıktığında pilleri değiştiriniz. Her zaman aynı anda her iki pilleri değiştirin. 7. Ekran Modunu ve Parlaklığı Ayarlama Ekran modu Cihaz çalışır durumda iken AÇ/KAPA düğmesi 1 basarak diğer ekran moduna 9 geçebilirsiniz. 6 Farklı ekran modu bulunmaktadır. Varsayılan mod 1'dir. Parlaklık AÇ/KAPA düğmesi 1 bir saniyeden fazla basılı tutarak ekran parlaklığını ayarlayınız. Ekranda «Br 1-10» görü- necektir. 10 Parlaklık modu bulunmaktadır; Varsayılan ayar 4'dür. 8. Kordonun Kullanılması 8 1. Kordonun ince tarafını cihazın askı deliğinden geçirin. 2. Kordonun kalın tarafını askı deliğinden geçirilen ince uçtan geçirerek sıkıca çekiniz. 9. Arızalar ve Yapılacak İşlemler 10. Temizlik ve Dezenfektasyon Alkollü bez ya da alkolle (%70 izopropil) nemlendirilmiş pamuklu bez kullanın cihazın içinde parmak dokunuyor silikon temizlemek için. Parmak da temiz önce ve sonra her bir test alkol kullanarak test ediliyor. Cihazın kullan- madan önce iyice kurumasını bekleyin. Temizlik için kesinlikle aşındırıcı temizlik maddeleri, incelticiler ya da benzen kullanmayın ve aygıtı su ya da diğer temizlik sıvılarına kesinlikle batırmayın. 11. Garanti Kapsamı Bu aygıt, satın alındığı tarihten itibaren 2 yıl garanti kapsamındadır. Garanti, sadece satıcınız (arkaya bakınız) tarafından doldurulan ve satın alma ya da fatura tarihini teyit eden garanti belgesinin mevcudiyeti ile geçerlilik kazanır. • Yıpranmış pillerle ve parçalarla kullanımı garanti kapsamında değildir. • Aygıtın açılması ya da üzerinde değişiklik yapılması, garantiyi geçersiz kılar. • Garanti, yanlış kullanımdan, kazalar ve çalıştırma talimatlarına uygun davranılmamaktan kaynaklanan zarar ziyanı kapsamaz. 12. Teknik Özellikler Teknik özelliklerin değiştirilmesi hakkı saklıdır. Pulse Oksimetre TR 1 AÇ/KAPA Düğmesi 2 Oksijen saturasyonu (yüzde olarak) 3 Kalp atış hızı (atış/dakika) 4 Nabız dalga (Pletismografik dalga) 5 Bar grafiği 6 Düşük Pil Göstergesi 7 Pillerin yerleştirilmesi 8 Kordonun bağlanması 9 Ekran modları AT Çalışma prensibi Kuru tutun Üretici Üretim tarihi SpO 2 Alarmsız Düşük Pil Göstergesi Seri numarası Su kaçağına karşı korumalı Avrupa yetkili temsilcisi Oksijen saturasyonu (yüzde olarak) Kalp atış hızı (atış/dakika) Çalışma koşulları: 5 - 40 °C / 41 - 104 °F Saklama koşulları: -20 - +55 °C / -4 - +131 °F CE uygunluk işareti 2 % SpO PR bpm 0123 Açık- lama Olası Nedenler Çözüm SpO 2 veya nabız düzgün görüntü- lenmiyor. 1. Parmak doğru bir şekilde yerleştirilme- miştir. 2. Hastanın SpO 2 'si gösterilemeyecek kadar düşüktür. 3. Fazla ışıktan uzak durunuz. 1. Parmağınız tekrar yerleştirmeyi deneyin. 2. & 3. Cihazın doğru çalıştığında doktoru- nuza başvurunuz. SpO 2 seviyesi dengesiz. 1. Parmağınızın tam derin olarak yerleşti- rilmemiştir. 2. Fazla hasta hare- keti. 1. Parmağınız tekrar yerleştirmeyi deneyin. 2. Sakin olarak tekrar ölçüm yapınız. Cihaz çalış- mıyor. 1. Düşür pil veya piller takılı değil. 2. Piller doğru yerleşti- rilmemiştir. 3. Cihaz hasar görmüş olabilir. 1. Pilleri değiştiriniz. 2. Pilleri çıkartarak yeniden yerleştiriniz. 3. Microlife müşteri servisi ile irtibata geçiniz. Ekran birden kapa- nıyor. 1. 8 saniye sonunda cihaz simyal yakala- yamadığında otomatik olarak kapanır. 2. Pil seviyesi cihazı çalıştırmayacak kadar düşüktür. 1. Normal. 2. Pilleri değiştiriniz. «Error 3» Kırmızı emisyon LED hasarlı. Kırmızı LED kontrol ediniz. «Error 4» Infrared emisyon LED hasarlı. Infrared LED kontrol ediniz. «Error 6» Ekran hatası. Microlife müşteri servisi ile irtibata geçiniz. «Error 7» Emisyon LED veya alıcı diyot hatalı. Microlife müşteri servisi ile irtibata geçiniz. Tür: Parmak tipi pulse oksimetre OXY 300 Ekran: OLED Ekran SpO 2 : Ölçüm aralığı: 70 ~ 100 % Doğruluk: 70 ~ 100 % : ±2 % Çözünürlük: 1 % Nabız Sayısı: Ölçüm aralığı: 30 ~ 250 bpm Doğruluk: 30 ~ 99 bpm: ±2 bpm; 100 ~ 250 bpm: ±2 % Çözünürlük: 1 bpm Çalışma koşulları: 5 - 40 °C / 41 - 104 °F %≤ 80 maksimum bağıl nem Saklama koşulları: -20 - +55 °C / -4 - +131 °F %≤ 93 maksimum bağıl nem Otomatik kapanma: Az veya hiç sinyal algılanmadığında cihaz 8 saniye sonra otomatik olarak kapanır. Pil: 2 x 1.5 V alkalin piller; boyut AAA Pil ömrü: yaklaşık 30 saat (yeni pillerle) Ağırlık: 56 g (piller dahil) Boyutlar: 58 x 32 x 34 mm IP sınıfı: IPX1 İlgili standartlar: EN ISO10993-1/-5/-10; IEC 60601-1; EN 60601-1-2; EN ISO9919; EN 62304; EN 60601-1-6; CE0123 Beklenen servis ömrü: 5 yıl (ne zaman 15 kez kullanılan/ gün; her ölçüm için 20 dakika) Microlife OXY 300 Distributor Europe / Middle-East / Africa Microlife AG Espenstrasse 139 9443 Widnau / Switzerland Tel. +41 / 71 727 70 30 Fax +41 / 71 727 70 39 Email [email protected] www.microlife.com Asia Microlife Corporation. 9F, 431, RuiGang Road, NeiHu Taipei, 11492, Taiwan, R.O.C. Tel. +886 2 8797-1288 Fax +886 2 8797-1283 Email [email protected] www.microlife.com North / Central / South America Microlife USA, Inc. 1617 Gulf to Bay Blvd., 2nd Floor Ste A Clearwater, FL 33755 / USA Tel. +1 727 442 5353 Fax +1 727 442 5377 Email [email protected] www.microlife.com EN FR IT DE TR ES PT NL GR AR
Transcript of EN FR IT DE TR - Medavalmedaval.ie/wp-content/device-data/manuals/Microlife-OXY-300-Manual.pdfCE...
OXY 300IB OXY 300 S-V10-1 2916
Guarantee CardName of Purchaser / Nom de l'acheteur / Nome del rivenditore / Name des Käufers / Alıcının adı / Nombre del comprador / Nome do comprador / Naam koper / Ονοματεπώνυμο αγοραστή /
Serial Number / Numéro de série / Numero di serie / Serien-Nr. / Seri numarası / Número de serie / Número de série / Serienummer / Αριθμός σειράς /
Date of Purchase / Date d'achat / Data d’acquisto / Kaufdatum / Satın alma tarihi / Fecha de compra / Data da compra / Datum van aankoop / Ημερομηνία αγοράς /
Specialist Dealer / Revendeur / Categoria rivenditore / Fachhändler / Uzman satıcı / Vendedor especial-izado / Revendedor autorizado / Specialist Dealer / Εξειδικευμένος αντιπρόσωποςa /
Beijing Choice Electronic Technology Co., Ltd.Room 4104, No. A12, Yuquan Road, Haidian District, 100143 Beijing, People's Republic of ChinaShanghai International Holding Corp. GmbH (EUROPE)Eiffestrasse 80, 20537 Hamburg / Germany
0123
9
14
2 3 6
5
7
8
10
1 2 3
4 5 6
المشتري اسم
التسلسل رقم
الشراء تاريخ
المختص التاجر
Dear Customer,This Microlife fingertip pulse oximeter is a portable non-invasive device intended for spot-checking of the oxygen saturation of arterial hemoglobin (SpO2) and pulse rate of adults and pediatric patients. It is suitable for private use (at home, or on the go) as well as for use in the medical sector (hospitals, hospital-type facilities). It has been clinically proven to be of high precision during repeatability.Please read through these instructions carefully so that you understand all functions and safety information. We want you to be happy with your Microlife product. If you have any questions, problems or want to order spare parts please contact your local Microlife-Customer Service. Your dealer or pharmacy will be able to give you the address of the Microlife dealer in your country. Alterna-tively, visit the internet at www.microlife.com where you will find a wealth of invaluable information on our products.Retain instructions in a safe place for future reference. Stay healthy – Microlife AG!
1. Explanation of symbolsBatteries and electronic devices must be disposed of in accordance with the locally appli-cable regulations, not with domestic waste. Read the instructions carefully before using this device.
Type BF applied part
2. Important Safety Instructions• This device may only be used for the purposes described
in these instructions. The manufacturer cannot be held liable for damage caused by incorrect application.
• Never immerse this device in water or other liquids. For cleaning please follow the instruc-tions in the «Cleaning and Disinfecting» section.
• Do not use this device if you think it is damaged or notice anything unusual.
• Never open this device.• This device comprises sensitive components and
must be treated with caution. Observe the storage and operating conditions described in the «Technical Specifications» section.
• Protect it from:- water and moisture- extreme temperatures- impact and dropping- contamination and dust- direct sunlight- heat and cold
• The function of this device may be compromised when used close to strong electromagnetic fields such as mobile phones or radio installations and we recommend a distance of at least 1 m (according to 60601-1-2 table 5). In cases where you suspect this to be unavoidable, please verify if the device is working properly before use.
• Do not use the device in an MRI or CT environment.• This device is not intended for continuous monitoring.• This device does not have an alarm function and is there-
fore not suitable for evaluating medical results. Do not use this device in situations where alarms are required.
• Do not sterilize this device using autoclaving or ethylene oxide sterilizing. This device is not intended for sterilization.
• If the device is not going to be used for a prolonged period the batteries should be removed.
Ensure that children do not use this device unsu-pervised; some parts are small enough to be swal-lowed. Be aware of the risk of strangulation in case this device is supplied with cables or tubes.
! Use of this device is not intended as a substitute for a consultation with your doctor.
3. General DescriptionOxygen saturation indicates the percentage of hemo-globin in arterial blood that is loaded with oxygen. This is a very important parameter for the respiratory circulation system. Many respiratory diseases can result in lower oxygen saturation within human blood.Following factors can reduce oxygen saturation: Auto-matic regulation of organ dysfunction caused by anes-thesia, intensive postoperative trauma, injuries caused by some medical examinations. These situations may result in light-headedness, asthenia and vomiting. Therefore, it is very important to know the oxygen saturation of a patient so that doctors can detect problems in a timely manner.
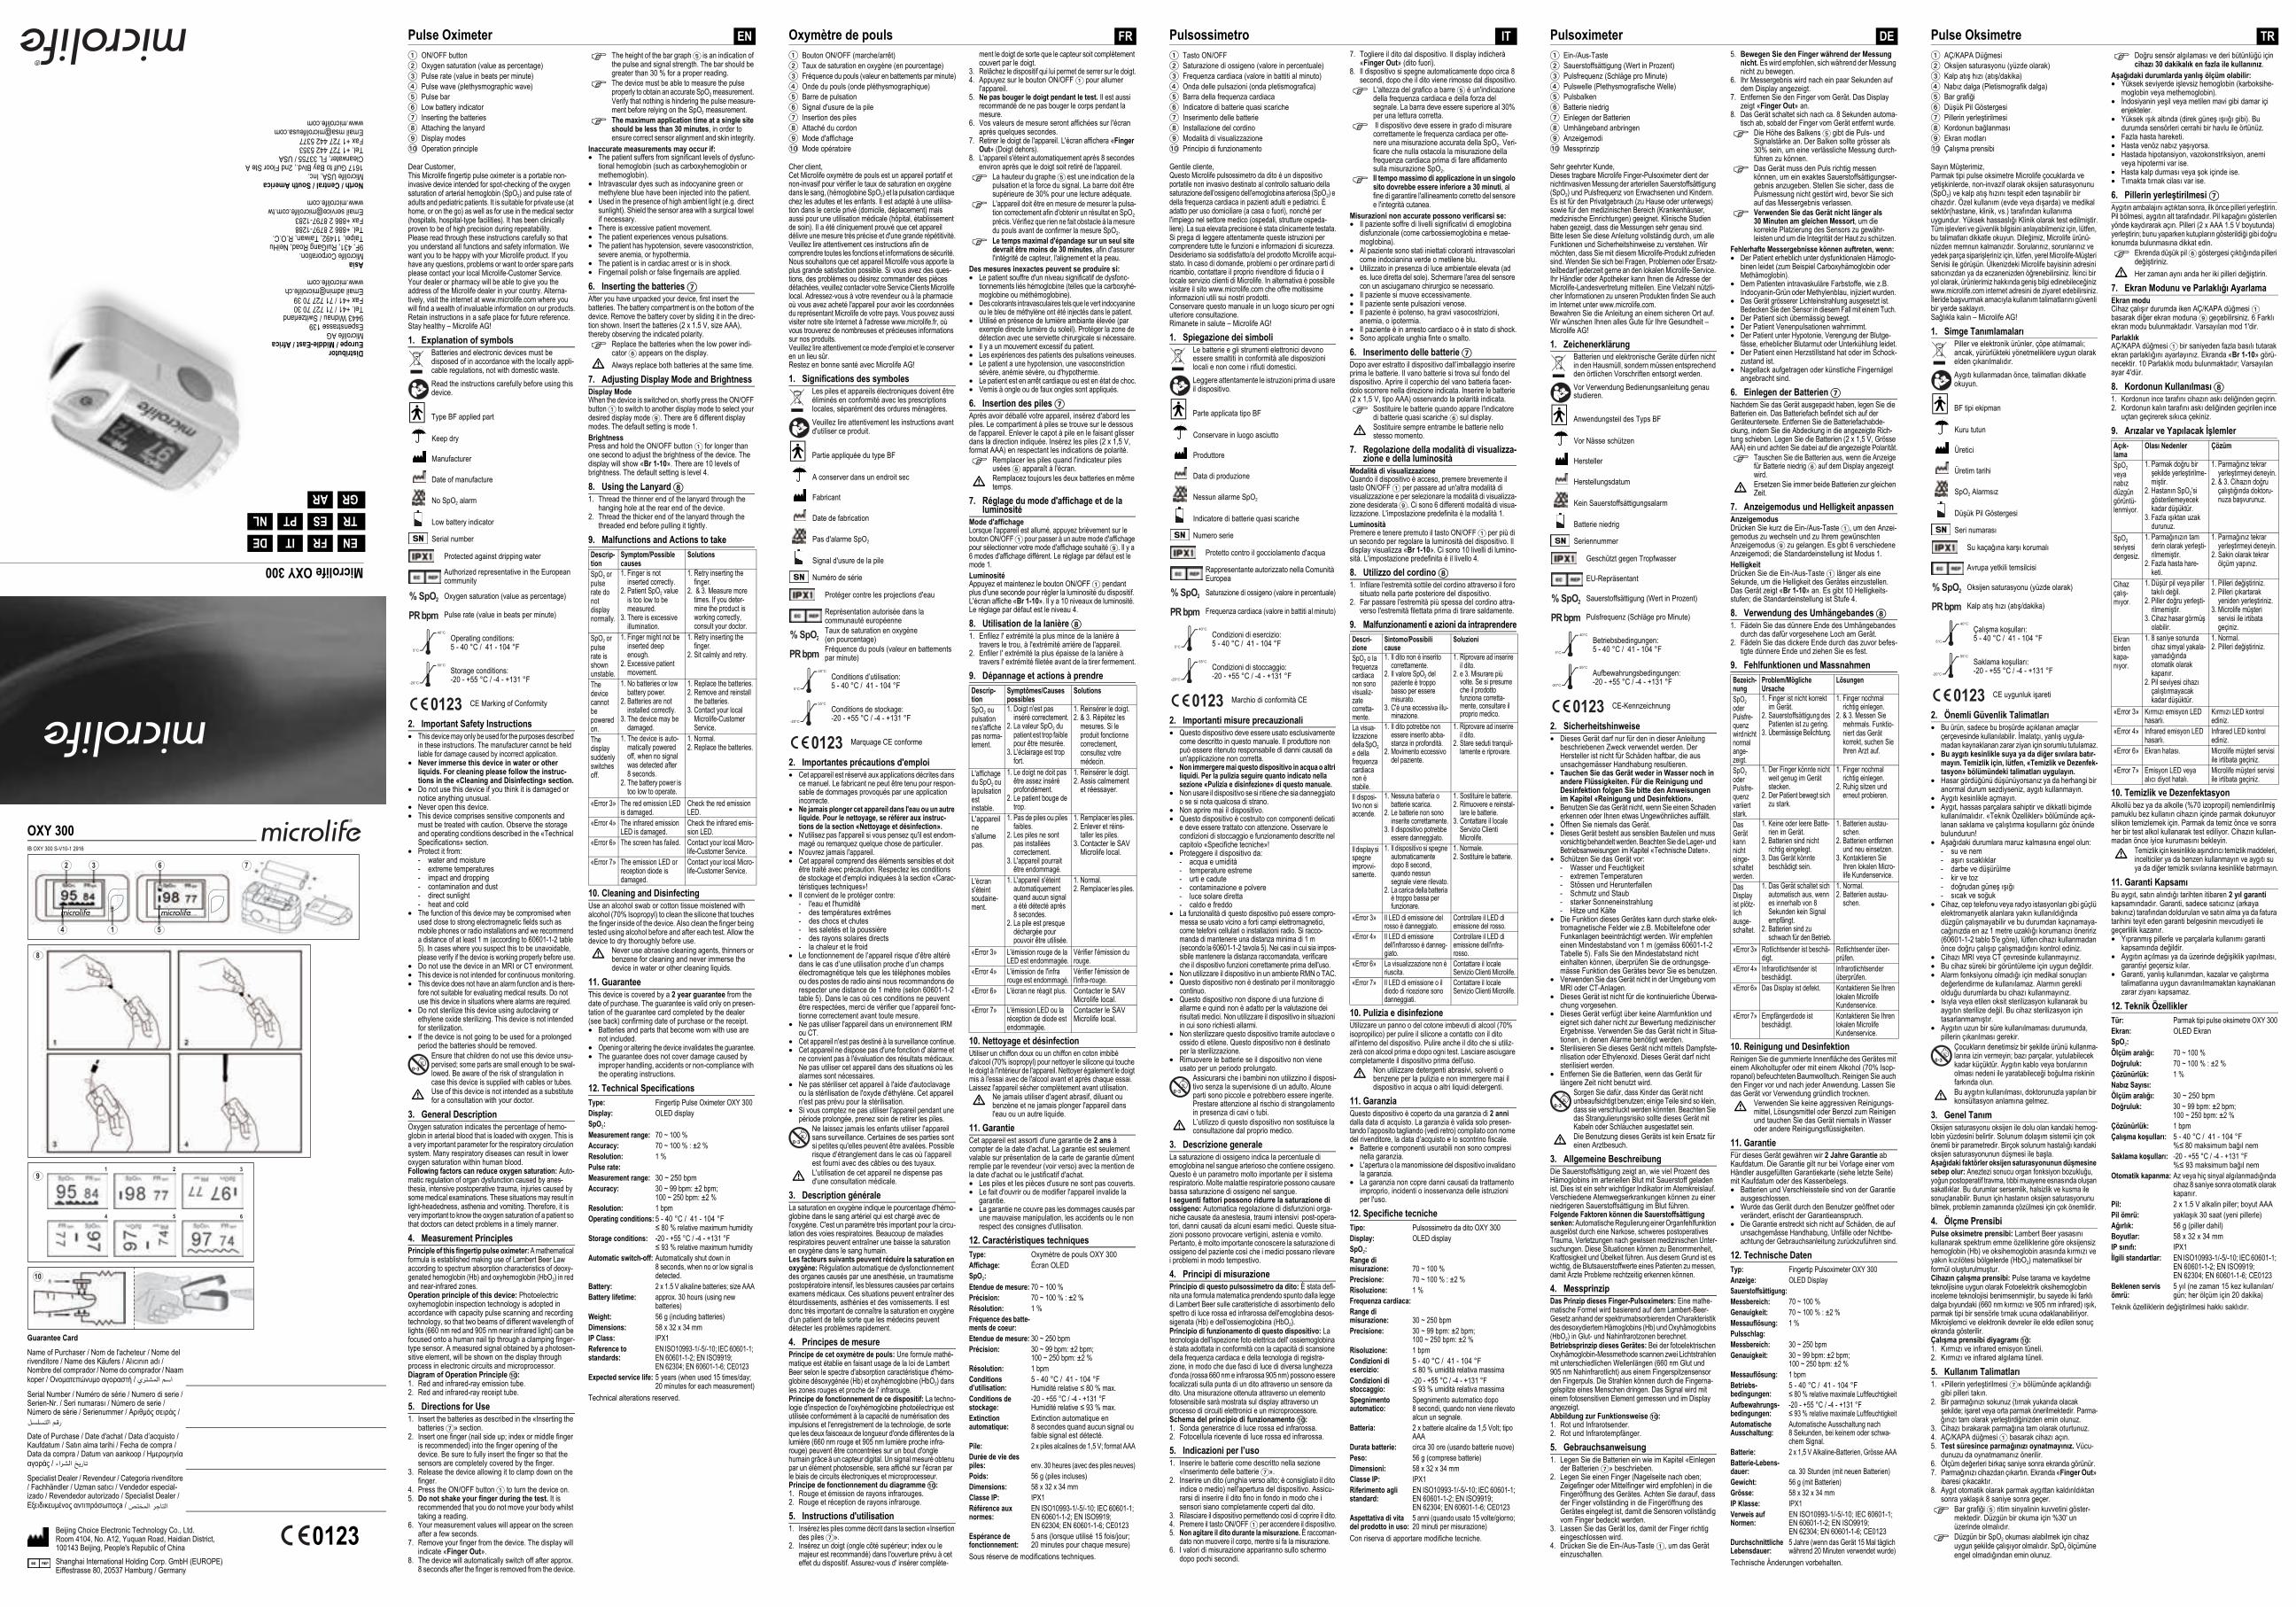
4. Measurement PrinciplesPrinciple of this fingertip pulse oximeter: A mathematical formula is established making use of Lambert Beer Law according to spectrum absorption characteristics of deoxy-genated hemoglobin (Hb) and oxyhemoglobin (HbO2) in red and near-infrared zones. Operation principle of this device: Photoelectric oxyhemoglobin inspection technology is adopted in accordance with capacity pulse scanning and recording technology, so that two beams of different wavelength of lights (660 nm red and 905 nm near infrared light) can be focused onto a human nail tip through a clamping finger-type sensor. A measured signal obtained by a photosen-sitive element, will be shown on the display through process in electronic circuits and microprocessor.Diagram of Operation Principle AT:1. Red and infrared-ray emission tube.2. Red and infrared-ray receipt tube.
5. Directions for Use1. Insert the batteries as described in the «Inserting the
batteries 7» section.2. Insert one finger (nail side up; index or middle finger
is recommended) into the finger opening of the device. Be sure to fully insert the finger so that the sensors are completely covered by the finger.
3. Release the device allowing it to clamp down on the finger.
4. Press the ON/OFF button 1 to turn the device on.5. Do not shake your finger during the test. It is
recommended that you do not move your body whilst taking a reading.
6. Your measurement values will appear on the screen after a few seconds.
7. Remove your finger from the device. The display will indicate «Finger Out».
8. The device will automatically switch off after approx. 8 seconds after the finger is removed from the device.
) The height of the bar graph 5 is an indication of the pulse and signal strength. The bar should be greater than 30 % for a proper reading.
) The device must be able to measure the pulse properly to obtain an accurate SpO2 measurement. Verify that nothing is hindering the pulse measure-ment before relying on the SpO2 measurement.
) The maximum application time at a single site should be less than 30 minutes, in order to ensure correct sensor alignment and skin integrity.
Inaccurate measurements may occur if:• The patient suffers from significant levels of dysfunc-
tional hemoglobin (such as carboxyhemoglobin or methemoglobin).
• Intravascular dyes such as indocyanine green or methylene blue have been injected into the patient.
• Used in the presence of high ambient light (e.g. direct sunlight). Shield the sensor area with a surgical towel if necessary.
• There is excessive patient movement.• The patient experiences venous pulsations.• The patient has hypotension, severe vasoconstriction,
severe anemia, or hypothermia.• The patient is in cardiac arrest or is in shock.• Fingernail polish or false fingernails are applied.
6. Inserting the batteries 7After you have unpacked your device, first insert the batteries. The battery compartment is on the bottom of the device. Remove the battery cover by sliding it in the direc-tion shown. Insert the batteries (2 x 1.5 V, size AAA), thereby observing the indicated polarity.
) Replace the batteries when the low power indi-cator 6 appears on the display.
! Always replace both batteries at the same time.
7. Adjusting Display Mode and BrightnessDisplay ModeWhen the device is switched on, shortly press the ON/OFF button 1 to switch to another display mode to select your desired display mode 9. There are 6 different display modes. The default setting is mode 1.BrightnessPress and hold the ON/OFF button 1 for longer than one second to adjust the brightness of the device. The display will show «Br 1-10». There are 10 levels of brightness. The default setting is level 4.
8. Using the Lanyard 81. Thread the thinner end of the lanyard through the
hanging hole at the rear end of the device.2. Thread the thicker end of the lanyard through the
threaded end before pulling it tightly.
9. Malfunctions and Actions to take
10. Cleaning and DisinfectingUse an alcohol swab or cotton tissue moistened with alcohol (70% Isopropyl) to clean the silicone that touches the finger inside of the device. Also clean the finger being tested using alcohol before and after each test. Allow the device to dry thoroughly before use.
! Never use abrasive cleaning agents, thinners or benzene for cleaning and never immerse the device in water or other cleaning liquids.
11. GuaranteeThis device is covered by a 2 year guarantee from the date of purchase. The guarantee is valid only on presen-tation of the guarantee card completed by the dealer (see back) confirming date of purchase or the receipt.• Batteries and parts that become worn with use are
not included.• Opening or altering the device invalidates the guarantee.• The guarantee does not cover damage caused by
improper handling, accidents or non-compliance with the operating instructions.
12. Technical Specifications
Technical alterations reserved.
Pulse Oximeter EN1 ON/OFF button2 Oxygen saturation (value as percentage)3 Pulse rate (value in beats per minute)4 Pulse wave (plethysmographic wave)5 Pulse bar6 Low battery indicator7 Inserting the batteries8 Attaching the lanyard9 Display modesAT Operation principle
Keep dry
Manufacturer
Date of manufacture
No SpO2 alarm
Low battery indicator
Serial number
Protected against dripping water
Authorized representative in the European community
Oxygen saturation (value as percentage)
Pulse rate (value in beats per minute)
Operating conditions:5 - 40 °C / 41 - 104 °F
Storage conditions:-20 - +55 °C / -4 - +131 °F
CE Marking of Conformity
2% SpOPR bpm
0123
Descrip-tion
Symptom/Possible causes
Solutions
SpO2 or pulse rate do not display normally.
1. Finger is not inserted correctly.
2. Patient SpO2 value is too low to be measured.
3. There is excessive illumination.
1. Retry inserting the finger.
2. & 3. Measure more times. If you deter-mine the product is working correctly, consult your doctor.
SpO2 or pulse rate is shown unstable.
1. Finger might not be inserted deep enough.
2. Excessive patient movement.
1. Retry inserting the finger.
2. Sit calmly and retry.
The device cannot be powered on.
1. No batteries or low battery power.
2. Batteries are not installed correctly.
3. The device may be damaged.
1. Replace the batteries.2. Remove and reinstall
the batteries.3. Contact your local
Microlife-CustomerService.
The display suddenly switches off.
1. The device is auto-matically powered off, when no signal was detected after 8 seconds.
2. The battery power is too low to operate.
1. Normal.2. Replace the batteries.
«Error 3» The red emission LED is damaged.
Check the red emission LED.
«Error 4» The infrared emission LED is damaged.
Check the infrared emis-sion LED.
«Error 6» The screen has failed. Contact your local Micro-life-Customer Service.
«Error 7» The emission LED or reception diode is damaged.
Contact your local Micro-life-Customer Service.
Type: Fingertip Pulse Oximeter OXY 300Display: OLED displaySpO2:Measurement range: 70 ~ 100 % Accuracy: 70 ~ 100 % : ±2 %Resolution: 1 %Pulse rate:Measurement range: 30 ~ 250 bpmAccuracy: 30 ~ 99 bpm: ±2 bpm;
100 ~ 250 bpm: ±2 % Resolution: 1 bpmOperating conditions: 5 - 40 °C / 41 - 104 °F
≤ 80 % relative maximum humidityStorage conditions: -20 - +55 °C / -4 - +131 °F
≤ 93 % relative maximum humidityAutomatic switch-off: Automatically shut down in
8 seconds, when no or low signal is detected.
Battery: 2 x 1.5 V alkaline batteries; size AAABattery lifetime: approx. 30 hours (using new
batteries)Weight: 56 g (including batteries)Dimensions: 58 x 32 x 34 mmIP Class: IPX1Reference to standards:
EN ISO10993-1/-5/-10; IEC 60601-1; EN 60601-1-2; EN ISO9919; EN 62304; EN 60601-1-6; CE0123
Expected service life: 5 years (when used 15 times/day; 20 minutes for each measurement)
Cher client,Cet Microlife oxymètre de pouls est un appareil portatif et non-invasif pour vérifier le taux de saturation en oxygène dans le sang, (hémoglobine SpO2) et la pulsation cardiaque chez les adultes et les enfants. Il est adapté à une utilisa-tion dans le cercle privé (domicile, déplacement) mais aussi pour une utilisation médicale (hôpital, établissement de soin). Il a été cliniquement prouvé que cet appareil délivre une mesure très précise et d'une grande répétitivité.Veuillez lire attentivement ces instructions afin de comprendre toutes les fonctions et informations de sécurité. Nous souhaitons que cet appareil Microlife vous apporte la plus grande satisfaction possible. Si vous avez des ques-tions, des problèmes ou désirez commander des pièces détachées, veuillez contacter votre Service Clients Microlife local. Adressez-vous à votre revendeur ou à la pharmacie où vous avez acheté l'appareil pour avoir les coordonnées du représentant Microlife de votre pays. Vous pouvez aussi visiter notre site Internet à l'adresse www.microlife.fr, où vous trouverez de nombreuses et précieuses informations sur nos produits.Veuillez lire attentivement ce mode d'emploi et le conserver en un lieu sûr. Restez en bonne santé avec Microlife AG!
1. Significations des symbolesLes piles et appareils électroniques doivent être éliminés en conformité avec les prescriptions locales, séparément des ordures ménagères. Veuillez lire attentivement les instructions avant d'utiliser ce produit.
Partie appliquée du type BF
2. Importantes précautions d'emploi• Cet appareil est réservé aux applications décrites dans
ce manuel. Le fabricant ne peut être tenu pour respon-sable de dommages provoqués par une application incorrecte.
• Ne jamais plonger cet appareil dans l'eau ou un autre liquide. Pour le nettoyage, se référer aux instruc-tions de la section «Nettoyage et désinfection».
• N'utilisez pas l'appareil si vous pensez qu'il est endom-magé ou remarquez quelque chose de particulier.
• N'ouvrez jamais l'appareil.• Cet appareil comprend des éléments sensibles et doit
être traité avec précaution. Respectez les conditions de stockage et d'emploi indiquées à la section «Carac-téristiques techniques»!
• Il convient de le protéger contre:- l'eau et l'humidité- des températures extrêmes- des chocs et chutes- les saletés et la poussière- des rayons solaires directs- la chaleur et le froid
• Le fonctionnement de l’appareil risque d’être altéré dans le cas d’une utilisation proche d’un champs électromagnétique tels que les téléphones mobiles ou des postes de radio ainsi nous recommandons de respecter une distance de 1 mètre (selon 60601-1-2 table 5). Dans le cas où ces conditions ne peuvent être respectées, merci de vérifier que l’appareil fonc-tionne correctement avant toute mesure.
• Ne pas utiliser l'appareil dans un environnement IRM ou CT.
• Cet appareil n'est pas destiné à la surveillance continue.• Cet appareil ne dispose pas d'une fonction d' alarme et
ne convient pas à l'évaluation des résultats médicaux. Ne pas utiliser cet appareil dans des situations où les alarmes sont nécessaires.
• Ne pas stériliser cet appareil à l'aide d'autoclavageou la stérilisation de l'oxyde d'éthylène. Cet appareil n'est pas prévu pour la stérilisation.
• Si vous comptez ne pas utiliser l'appareil pendant une période prolongée, prenez soin de retirer les piles.
Ne laissez jamais les enfants utiliser l'appareil sans surveillance. Certaines de ses parties sont si petites qu'elles peuvent être avalées. Possible risque d’étranglement dans le cas où l’appareil est fourni avec des câbles ou des tuyaux.
! L'utilisation de cet appareil ne dispense pas d'une consultation médicale.
3. Description généraleLa saturation en oxygène indique le pourcentage d'hémo-globine dans le sang artériel qui est chargé avec de l'oxygène. C'est un paramètre très important pour la circu-lation des voies respiratoires. Beaucoup de maladies respiratoires peuvent entraîner une baisse la saturation en oxygène dans le sang humain.Les facteurs suivants peuvent réduire la saturation en oxygène: Régulation automatique de dysfonctionnement des organes causés par une anesthésie, un traumatisme postopératoire intensif, les blessures causées par certains examens médicaux. Ces situations peuvent entraîner des étourdissements, asthénies et des vomissements. Il est donc très important de connaître la saturation en oxygène d'un patient de telle sorte que les médecins peuvent détecter les problèmes rapidement.
4. Principes de mesurePrincipe de cet oxymètre de pouls: Une formule mathé-matique est établie en faisant usage de la loi de Lambert Beer selon le spectre d'absorption caractéristique d'hémo-globine désoxygénée (Hb) et oxyhémoglobine (HbO2) dans les zones rouges et proche de l' infrarouge.Principe de fonctionnement de ce dispositif: La techno-logie d'inspection de l'oxyhémoglobine photoélectrique est utilisée conformément à la capacité de numérisation des impulsions et l'enregistrement de la technologie, de sorte que les deux faisceaux de longueur d'onde différentes de la lumière (660 nm rouge et 905 nm lumière proche infra-rouge) peuvent être concentrées sur un bout d'ongle humain grâce à un capteur digital. Un signal mesuré obtenu par un élément photosensible, sera affiché sur l'écran par le biais de circuits électroniques et microprocesseur.Principe de fonctionnement du diagramme AT:1. Rouge et émission de rayons infrarouges.2. Rouge et réception de rayons infrarouge.
5. Instructions d'utilisation1. Insérez les piles comme décrit dans la section «Insertion
des piles 7».2. Insérez un doigt (ongle côté supérieur; index ou le
majeur est recommandé) dans l'ouverture prévu à cet effet du dispositif. Assurez-vous d' insérer complète-
ment le doigt de sorte que le capteur soit complètement couvert par le doigt.
3. Relâchez le dispositif qui lui permet de serrer sur le doigt.4. Appuyez sur le bouton ON/OFF 1 pour allumer
l'appareil.5. Ne pas bouger le doigt pendant le test. Il est aussi
recommandé de ne pas bouger le corps pendant la mesure.
6. Vos valeurs de mesure seront affichées sur l'écran après quelques secondes.
7. Retirer le doigt de l'appareil. L'écran affichera «Finger Out» (Doigt dehors).
8. L'appareil s'éteint automatiquement après 8 secondes environ après que le doigt soit retiré de l'appareil.
) La hauteur du graphe 5 est une indication de la pulsation et la force du signal. La barre doit être supérieure de 30% pour une lecture adéquate.
) L'appareil doit être en mesure de mesurer la pulsa-tion correctement afin d'obtenir un résultat en SpO2 précis. Vérifiez que rien ne fait obstacle à la mesure du pouls avant de confirmer la mesure SpO2.
) Le temps maximal d'épandage sur un seul site devrait être moins de 30 minutes, afin d'assurer l'intégrité de capteur, l'alignement et la peau.
Des mesures inexactes peuvent se produire si:• Le patient souffre d'un niveau significatif de dysfonc-
tionnements liés hémoglobine (telles que la carboxyhé-moglobine ou méthémoglobine).
• Des colorants intravasculaires tels que le vert indocyanine ou le bleu de méthylène ont été injectés dans le patient.
• Utilisé en présence de lumière ambiante élevée (par exemple directe lumière du soleil). Protéger la zone de détection avec une serviette chirurgicale si nécessaire.
• Il y a un mouvement excessif du patient.• Les expériences des patients des pulsations veineuses.• Le patient a une hypotension, une vasoconstriction
sévère, anémie sévère, ou d'hypothermie.• Le patient est en arrêt cardiaque ou est en état de choc.• Vernis à ongle ou de faux ongles sont appliqués.
6. Insertion des piles 7Après avoir déballé votre appareil, insérez d'abord les piles. Le compartiment à piles se trouve sur le dessous de l'appareil. Enlever le capot à pile en le faisant glisser dans la direction indiquée. Insérez les piles (2 x 1,5 V, format AAA) en respectant les indications de polarité.
) Remplacer les piles quand l'indicateur piles usées 6 apparaît à l'écran.
! Remplacez toujours les deux batteries en mêmetemps.
7. Réglage du mode d'affichage et de la luminosité
Mode d'affichageLorsque l'appareil est allumé, appuyez brièvement sur le bouton ON/OFF 1 pour passer à un autre mode d'affichage pour sélectionner votre mode d'affichage souhaité 9. Il y a 6 modes d'affichage différent. Le réglage par défaut est le mode 1.LuminositéAppuyez et maintenez le bouton ON/OFF 1 pendant plus d'une seconde pour régler la luminosité du dispositif. L'écran affiche «Br 1-10». Il y a 10 niveaux de luminosité. Le réglage par défaut est le niveau 4.
8. Utilisation de la lanière 81. Enfilez l' extrémité la plus mince de la lanière à
travers le trou, à l'extrémité arrière de l'appareil.2. Enfiler l' extrémité la plus épaisse de la lanière à
travers l' extrémité filetée avant de la tirer fermement.
9. Dépannage et actions à prendre
10. Nettoyage et désinfectionUtiliser un chiffon doux ou un chiffon en coton imbibé d'alcool (70% isopropyl) pour nettoyer le silicone qui touche le doigt à l'intérieur de l'appareil. Nettoyer également le doigt mis à l'essai avec de l'alcool avant et après chaque essai. Laissez l'appareil sécher complètement avant utilisation.
! Ne jamais utiliser d'agent abrasif, diluant ou benzène et ne jamais plonger l'appareil dans l'eau ou un autre liquide.
11. GarantieCet appareil est assorti d'une garantie de 2 ans à compter de la date d'achat. La garantie est seulement valable sur présentation de la carte de garantie dûment remplie par le revendeur (voir verso) avec la mention de la date d'achat ou le justificatif d'achat.• Les piles et les pièces d'usure ne sont pas couverts.• Le fait d'ouvrir ou de modifier l'appareil invalide la
garantie.• La garantie ne couvre pas les dommages causés par
une mauvaise manipulation, les accidents ou le non respect des consignes d'utilisation.
12. Caractéristiques techniques
Sous réserve de modifications techniques.
Oxymètre de pouls FR1 Bouton ON/OFF (marche/arrêt)2 Taux de saturation en oxygène (en pourcentage)3 Fréquence du pouls (valeur en battements par minute)4 Onde du pouls (onde pléthysmographique)5 Barre de pulsation6 Signal d'usure de la pile7 Insertion des piles8 Attaché du cordon9 Mode d'affichageAT Mode opératoire
A conserver dans un endroit sec
Fabricant
Date de fabrication
Pas d'alarme SpO2
Signal d'usure de la pile
Numéro de série
Protéger contre les projections d'eau
Représentation autorisée dans la communauté européenneTaux de saturation en oxygène (en pourcentage)Fréquence du pouls (valeur en battements par minute)
Conditions d’utilisation:5 - 40 °C / 41 - 104 °F
Conditions de stockage:-20 - +55 °C / -4 - +131 °F
Marquage CE conforme
2% SpOPR bpm
0123
Descrip-tion
Symptômes/Causes possibles
Solutions
SpO2 ou pulsation ne s'affiche pas norma-lement.
1. Doigt n'est pas inséré correctement.
2. La valeur SpO2 du patient est trop faible pour être mesurée.
3. L'éclairage est tropfort.
1. Reinsérer le doigt.2. & 3. Répétez les
mesures. Si le produit fonctionne correctement, consultez votre médecin.
L'affichage du SpO2 ou la pulsation est instable.
1. Le doigt ne doit pas être assez inséré profondément.
2. Le patient bouge de trop.
1. Reinsérer le doigt.2. Assis calmement
et réessayer.
L'appareil ne s'allume pas.
1. Pas de piles ou piles faibles.
2. Les piles ne sont pas installées correctement.
3. L'appareil pourrait être endommagé.
1. Remplacer les piles.2. Enlever et réins-
taller les piles.3. Contacter le SAV
Microlife local.
L'écran s'éteint soudaine-ment.
1. L'appareil s'éteint automatiquement quand aucun signal a été détecté après 8 secondes.
2. La pile est presque déchargée pour pouvoir être utilisée.
1. Normal.2. Remplacer les piles.
«Error 3» L'émission rouge de la LED est endommagée.
Vérifier l'émission du rouge.
«Error 4» L'émission de l'infra rouge est endommagé.
Vérifier l'émission de l'infra-rouge.
«Error 6» L'écran ne réagit plus. Contacter le SAV Microlife local.
«Error 7» L'émission LED ou la réception de diode est endommagée.
Contacter le SAV Microlife local.
Type: Oxymètre de pouls OXY 300Affichage: Écran OLEDSpO2:Etendue de mesure: 70 ~ 100 % Précision: 70 ~ 100 % : ±2 %Résolution: 1 %Fréquence des batte-ments de coeur:Etendue de mesure: 30 ~ 250 bpmPrécision: 30 ~ 99 bpm: ±2 bpm;
100 ~ 250 bpm: ±2 % Résolution: 1 bpmConditions d’utilisation:
5 - 40 °C / 41 - 104 °FHumidité relative ≤ 80 % max.
Conditions de stockage:
-20 - +55 °C / -4 - +131 °FHumidité relative ≤ 93 % max.
Extinction automatique:
Extinction automatique en 8 secondes quand aucun signal ou faible signal est détecté.
Pile: 2 x piles alcalines de 1,5 V; format AAADurée de vie des piles: env. 30 heures (avec des piles neuves)Poids: 56 g (piles incluses)Dimensions: 58 x 32 x 34 mmClasse IP: IPX1Référence aux normes:
EN ISO10993-1/-5/-10; IEC 60601-1; EN 60601-1-2; EN ISO9919; EN 62304; EN 60601-1-6; CE0123
Espérance de fonctionnement:
5 ans (lorsque utilisé 15 fois/jour; 20 minutes pour chaque mesure)
Gentile cliente,Questo Microlife pulsossimetro da dito è un dispositivo portatile non invasivo destinato al controllo saltuario della saturazione dell'ossigeno dell'emoglobina arteriosa (SpO2) e della frequenza cardiaca in pazienti adulti e pediatrici. È adatto per uso domiciliare (a casa o fuori), nonché per l'impiego nel settore medico (ospedali, strutture ospeda-liere). La sua elevata precisione è stata clinicamente testata.Si prega di leggere attentamente queste istruzioni per comprendere tutte le funzioni e informazioni di sicurezza. Desideriamo sia soddisfatto/a del prodotto Microlife acqui-stato. In caso di domande, problemi o per ordinare parti di ricambio, contattare il proprio rivenditore di fiducia o il locale servizio clienti di Microlife. In alternativa è possibile visitare il sito www.microlife.com che offre moltissime informazioni utili sui nostri prodotti.Conservare questo manuale in un luogo sicuro per ogni ulteriore consultazione. Rimanete in salute – Microlife AG!
1. Spiegazione dei simboliLe batterie e gli strumenti elettronici devono essere smaltiti in conformità alle disposizioni locali e non come i rifiuti domestici. Leggere attentamente le istruzioni prima di usare il dispositivo.
Parte applicata tipo BF
2. Importanti misure precauzionali• Questo dispositivo deve essere usato esclusivamente
come descritto in questo manuale. Il produttore non può essere ritenuto responsabile di danni causati da un'applicazione non corretta.
• Non immergere mai questo dispositivo in acqua o altri liquidi. Per la pulizia seguire quanto indicato nella sezione «Pulizia e disinfezione» di questo manuale.
• Non usare il dispositivo se si ritiene che sia danneggiato o se si nota qualcosa di strano.
• Non aprire mai il dispositivo.• Questo dispositivo è costruito con componenti delicati
e deve essere trattato con attenzione. Osservare le condizioni di stoccaggio e funzionamento descritte nel capitolo «Specifiche tecniche»!
• Proteggere il dispositivo da:- acqua e umidità- temperature estreme- urti e cadute- contaminazione e polvere- luce solare diretta- caldo e freddo
• La funzionalità di questo dispositivo può essere compro-messa se usato vicino a forti campi elettromagnetici, come telefoni cellulari o installazioni radio. Si racco-manda di mantenere una distanza minima di 1 m (secondo la 60601-1-2 tavola 5). Nei casi in cui sia impos-sibile mantenere la distanza raccomandata, verificare che il dispositivo funzioni correttamente prima dell'uso.
• Non utilizzare il dispositivo in un ambiente RMN o TAC.• Questo dispositivo non è destinato per il monitoraggio
continuo.• Questo dispositivo non dispone di una funzione di
allarme e quindi non è adatto per la valutazione dei risultati medici. Non utilizzare il dispositivo in situazioni in cui sono richiesti allarmi.
• Non sterilizzare questo dispositivo tramite autoclave o ossido di etilene. Questo dispositivo non è destinato per la sterilizzazione.
• Rimuovere le batterie se il dispositivo non viene usato per un periodo prolungato.
Assicurarsi che i bambini non utilizzino il disposi-tivo senza la supervisione di un adulto. Alcune parti sono piccole e potrebbero essere ingerite. Prestare attenzione al rischio di strangolamento in presenza di cavi o tubi.
! L’utilizzo di questo dispositivo non sostituisce la consultazione dal proprio medico.
3. Descrizione generale La saturazione di ossigeno indica la percentuale di emoglobina nel sangue arterioso che contiene ossigeno. Questo è un parametro molto importante per il sistema respiratorio. Molte malattie respiratorie possono causare bassa saturazione di ossigeno nel sangue.I seguenti fattori possono ridurre la saturazione di ossigeno: Automatica regolazione di disfunzioni orga-niche causate da anestesia, traumi intensivi post-opera-tori, danni causati da alcuni esami medici. Queste situa-zioni possono provocare vertigini, astenia e vomito. Pertanto, è molto importante conoscere la saturazione di ossigeno del paziente così che i medici possano rilevare i problemi in modo tempestivo.
4. Principi di misurazionePrincipio di questo pulsossimetro da dito: È stata defi-nita una formula matematica prendendo spunto dalla legge di Lambert Beer sulle caratteristiche di assorbimento dello spettro di luce rossa ed infrarossa dell'emoglobina desos-sigenata (Hb) e dell'ossiemoglobina (HbO2). Principio di funzionamento di questo dispositivo: La tecnologia dell'ispezione foto elettrica dell' ossiemoglobina è stata adottata in conformità con la capacità di scansione della frequenza cardiaca e della tecnologia di registra-zione, in modo che due fasci di luce di diversa lunghezza d'onda (rossa 660 nm e infrarossa 905 nm) possono essere focalizzati sulla punta di un dito attraverso un sensore da dito. Una misurazione ottenuta attraverso un elemento fotosensibile sarà mostrata sul display attraverso un processo di circuiti elettronici e un microprocessore.Schema del principio di funzionamento AT:1. Sonda generatrice di luce rossa ed infrarossa.2. Fotocellula ricevente di luce rossa ed infrarossa.
5. Indicazioni per l’uso1. Inserire le batterie come descritto nella sezione
«Inserimento delle batterie 7».2. Inserire un dito (unghia verso alto; è consigliato il dito
indice o medio) nell'apertura del dispositivo. Assicu-rarsi di inserire il dito fino in fondo in modo che i sensori siano completamente coperti dal dito.
3. Rilasciare il dispositivo permettendo così di coprire il dito.4. Premere il tasto ON/OFF 1 per accendere il dispositivo.5. Non agitare il dito durante la misurazione. È raccoman-
dato non muovere il corpo, mentre si fa la misurazione.6. I valori di misurazione appariranno sullo schermo
dopo pochi secondi.
7. Togliere il dito dal dispositivo. Il display indicherà «Finger Out» (dito fuori).
8. Il dispositivo si spegne automaticamente dopo circa 8 secondi, dopo che il dito viene rimosso dal dispositivo.
) L'altezza del grafico a barre 5 è un'indicazionedella frequenza cardiaca e della forza del segnale. La barra deve essere superiore al 30% per una lettura corretta.
) Il dispositivo deve essere in grado di misurare correttamente le frequenza cardiaca per otte-nere una misurazione accurata della SpO2. Veri-ficare che nulla ostacola la misurazione della frequenza cardiaca prima di fare affidamento sulla misurazione SpO2.
) Il tempo massimo di applicazione in un singolo sito dovrebbe essere inferiore a 30 minuti, al fine di garantire l'allineamento corretto del sensore e l'integrità cutanea.
Misurazioni non accurate possono verificarsi se:• Il paziente soffre di livelli significativi di emoglobina
disfunzionale (come carbossiemoglobina e metae-moglobina).
• Al paziente sono stati iniettati coloranti intravascolari come indocianina verde o metilene blu.
• Utilizzato in presenza di luce ambientale elevata (ad es. luce diretta del sole). Schermare l'area del sensore con un asciugamano chirurgico se necessario.
• Il paziente si muove eccessivamente.• Il paziente sente pulsazioni venose.• Il paziente è ipotenso, ha gravi vasocostrizioni,
anemia, o ipotermia.• Il paziente è in arresto cardiaco o è in stato di shock.• Sono applicate unghia finte o smalto.
6. Inserimento delle batterie 7Dopo aver estratto il dispositivo dall’imballaggio inserire prima le batterie. Il vano batterie si trova sul fondo del dispositivo. Aprire il coperchio del vano batteria facen-dolo scorrere nella direzione indicata. Inserire le batterie (2 x 1,5 V, tipo AAA) osservando la polarità indicata.
) Sostituire le batterie quando appare l'indicatore di batterie quasi scariche 6 sul display.
! Sostituire sempre entrambe le batterie nello stesso momento.
7. Regolazione della modalità di visualizza-zione e della luminosità
Modalità di visualizzazioneQuando il dispositivo è acceso, premere brevemente il tasto ON/OFF 1 per passare ad un'altra modalità di visualizzazione e per selezionare la modalità di visualizza-zione desiderata 9. Ci sono 6 differenti modalità di visua-lizzazione. L'impostazione predefinita è la modalità 1.LuminositàPremere e tenere premuto il tasto ON/OFF 1 per più di un secondo per regolare la luminosità del dispositivo. Il display visualizza «Br 1-10». Ci sono 10 livelli di lumino-sità. L'impostazione predefinita è il livello 4.
8. Utilizzo del cordino 81. Infilare l'estremità sottile del cordino attraverso il foro
situato nella parte posteriore del dispositivo.2. Far passare l'estremità più spessa del cordino attra-
verso l'estremità filettata prima di tirare saldamente.
9. Malfunzionamenti e azioni da intraprendere
10. Pulizia e disinfezioneUtilizzare un panno o del cotone imbevuti di alcool (70% isopropilico) per pulire il silicone a contatto con il dito all'interno del dispositivo. Pulire anche il dito che si utiliz-zerà con alcool prima e dopo ogni test. Lasciare asciugare completamente il dispositivo prima dell'uso.
! Non utilizzare detergenti abrasivi, solventi o benzene per la pulizia e non immergere mai il dispositivo in acqua o altri liquidi detergenti.
11. GaranziaQuesto dispositivo è coperto da una garanzia di 2 anni dalla data di acquisto. La garanzia è valida solo presen-tando l’apposito tagliando (vedi retro) compilato con nome del rivenditore, la data d’acquisto e lo scontrino fiscale.• Batterie e componenti usurabili non sono compresi
nella garanzia.• L'apertura o la manomissione del dispositivo invalidano
la garanzia.• La garanzia non copre danni causati da trattamento
improprio, incidenti o inosservanza delle istruzioni per l'uso.
12. Specifiche tecniche
Con riserva di apportare modifiche tecniche.
Pulsossimetro IT1 Tasto ON/OFF2 Saturazione di ossigeno (valore in percentuale)3 Frequenza cardiaca (valore in battiti al minuto)4 Onda delle pulsazioni (onda pletismografica)5 Barra della frequenza cardiaca6 Indicatore di batterie quasi scariche7 Inserimento delle batterie8 Installazione del cordino9 Modalità di visualizzazioneAT Principio di funzionamento
Conservare in luogo asciutto
Produttore
Data di produzione
Nessun allarme SpO2
Indicatore di batterie quasi scariche
Numero serie
Protetto contro il gocciolamento d'acqua
Rappresentante autorizzato nella Comunità Europea Saturazione di ossigeno (valore in percentuale)
Frequenza cardiaca (valore in battiti al minuto)
Condizioni di esercizio:5 - 40 °C / 41 - 104 °F
Condizioni di stoccaggio:-20 - +55 °C / -4 - +131 °F
Marchio di conformità CE
2% SpOPR bpm
0123
Descri-zione
Sintomo/Possibili cause
Soluzioni
SpO2 o la frequenza cardiaca non sono visualiz-zate corretta-mente.
1. Il dito non è inserito correttamente.
2. Il valore SpO2 del paziente è troppo basso per essere misurato.
3. C'è una eccessiva illu-minazione.
1. Riprovare ad inserire il dito.
2. e 3. Misurare più volte. Se si presume che il prodotto funziona corretta-mente, consultare il proprio medico.
La visua-lizzazione della SpO2 e della frequenza cardiaca non è stabile.
1. Il dito potrebbe non essere inserito abba-stanza in profondità.
2. Movimento eccessivo del paziente.
1. Riprovare ad inserire il dito.
2. Stare seduti tranquil-lamente e riprovare.
Il disposi-tivo non si accende.
1. Nessuna batteria o batterie scarica.
2. Le batterie non sono inserite correttamente.
3. Il dispositivo potrebbe essere danneggiato.
1. Sostituire le batterie.2. Rimuovere e reinstal-
lare le batterie.3. Contattare il locale
Servizio Clienti Microlife.
Il display si spegne improvvi-samente.
1. Il dispositivo si spegne automaticamente dopo 8 secondi, quando nessun segnale viene rilevato.
2. La carica della batteria è troppo bassa per funzionare.
1. Normale.2. Sostituire le batterie.
«Error 3» Il LED di emissione del rosso è danneggiato.
Controllare il LED di emissione del rosso.
«Error 4» Il LED di emissione dell'infrarosso è danneg-giato.
Controllare il LED di emissione dell'infra-rosso.
«Error 6» La visualizzazione non è riuscita.
Contattare il locale Servizio Clienti Microlife.
«Error 7» Il LED di emissione o il diodo di ricezione sono danneggiati.
Contattare il locale Servizio Clienti Microlife.
Tipo: Pulsossimetro da dito OXY 300Display: OLED displaySpO2:Range di misurazione: 70 ~ 100 % Precisione: 70 ~ 100 % : ±2 %Risoluzione: 1 %Frequenza cardiaca:Range di misurazione: 30 ~ 250 bpmPrecisione: 30 ~ 99 bpm: ±2 bpm;
100 ~ 250 bpm: ±2 % Risoluzione: 1 bpmCondizioni di esercizio:
5 - 40 °C / 41 - 104 °F≤ 80 % umidità relativa massima
Condizioni di stoccaggio:
-20 - +55 °C / -4 - +131 °F≤ 93 % umidità relativa massima
Spegnimento automatico:
Spegnimento automatico dopo 8 secondi, quando non viene rilevato alcun un segnale.
Batteria: 2 x batterie alcaline da 1,5 Volt; tipo AAA
Durata batterie: circa 30 ore (usando batterie nuove)Peso: 56 g (comprese batterie)Dimensioni: 58 x 32 x 34 mmClasse IP: IPX1Riferimento agli standard:
EN ISO10993-1/-5/-10; IEC 60601-1; EN 60601-1-2; EN ISO9919; EN 62304; EN 60601-1-6; CE0123
Aspettativa di vita del prodotto in uso:
5 anni (quando usato 15 volte/giorno; 20 minuti per misurazione)
Sehr geehrter Kunde,Dieses tragbare Microlife Finger-Pulsoximeter dient der nichtinvasiven Messung der arteriellen Sauerstoffsättigung (SpO2) und Pulsfrequenz von Erwachsenen und Kindern. Es ist für den Privatgebrauch (zu Hause oder unterwegs) sowie für den medizinischen Bereich (Krankenhäuser, medizinische Einrichtungen) geeignet. Klinische Studien haben gezeigt, dass die Messungen sehr genau sind. Bitte lesen Sie diese Anleitung vollständig durch, um alle Funktionen und Sicherheitshinweise zu verstehen. Wir möchten, dass Sie mit diesem Microlife-Produkt zufrieden sind. Wenden Sie sich bei Fragen, Problemen oder Ersatz-teilbedarf jederzeit gerne an den lokalen Microlife-Service. Ihr Händler oder Apotheker kann Ihnen die Adresse der Microlife-Landesvertretung mitteilen. Eine Vielzahl nützli-cher Informationen zu unseren Produkten finden Sie auch im Internet unter www.microlife.com.Bewahren Sie die Anleitung an einem sicheren Ort auf. Wir wünschen Ihnen alles Gute für Ihre Gesundheit – Microlife AG!
1. ZeichenerklärungBatterien und elektronische Geräte dürfen nicht in den Hausmüll, sondern müssen entsprechend den örtlichen Vorschriften entsorgt werden. Vor Verwendung Bedienungsanleitung genau studieren.
Anwendungsteil des Typs BF
2. Sicherheitshinweise• Dieses Gerät darf nur für den in dieser Anleitung
beschriebenen Zweck verwendet werden. Der Hersteller ist nicht für Schäden haftbar, die aus unsachgemässer Handhabung resultieren.
• Tauchen Sie das Gerät weder in Wasser noch in andere Flüssigkeiten. Für die Reinigung und Desinfektion folgen Sie bitte den Anweisungen im Kapitel «Reinigung und Desinfektion».
• Benutzen Sie das Gerät nicht, wenn Sie einen Schaden erkennen oder Ihnen etwas Ungewöhnliches auffällt.
• Öffnen Sie niemals das Gerät.• Dieses Gerät besteht aus sensiblen Bauteilen und muss
vorsichtig behandelt werden. Beachten Sie die Lager- und Betriebsanweisungen im Kapitel «Technische Daten».
• Schützen Sie das Gerät vor:- Wasser und Feuchtigkeit- extremen Temperaturen- Stössen und Herunterfallen- Schmutz und Staub- starker Sonneneinstrahlung- Hitze und Kälte
• Die Funktion dieses Gerätes kann durch starke elek-tromagnetische Felder wie z.B. Mobiltelefone oder Funkanlagen beeinträchtigt werden. Wir empfehlen einen Mindestabstand von 1 m (gemäss 60601-1-2 Tabelle 5). Falls Sie den Mindestabstand nicht einhalten können, überprüfen Sie die ordnungsge-mässe Funktion des Gerätes bevor Sie es benutzen.
• Verwenden Sie das Gerät nicht in der Umgebung vom MRI oder CT-Anlagen.
• Dieses Gerät ist nicht für die kontinuierliche Überwa-chung vorgesehen.
• Dieses Gerät verfügt über keine Alarmfunktion und eignet sich daher nicht zur Bewertung medizinischer Ergebnisse. Verwenden Sie das Gerät nicht in Situa-tionen, in denen Alarme benötigt werden.
• Sterilisieren Sie dieses Gerät nicht mittels Dampfste-rilisation oder Ethylenoxid. Dieses Gerät darf nicht sterilisiert werden.
• Entfernen Sie die Batterien, wenn das Gerät für längere Zeit nicht benutzt wird.
Sorgen Sie dafür, dass Kinder das Gerät nicht unbeaufsichtigt benutzen; einige Teile sind so klein, dass sie verschluckt werden könnten. Beachten Sie das Strangulierungsrisiko sollte dieses Gerät mit Kabeln oder Schläuchen ausgestattet sein.
! Die Benutzung dieses Geräts ist kein Ersatz für einen Arztbesuch.
3. Allgemeine BeschreibungDie Sauerstoffsättigung zeigt an, wie viel Prozent des Hämoglobins im arteriellen Blut mit Sauerstoff geladen ist. Dies ist ein sehr wichtiger Indikator im Atemkreislauf. Verschiedene Atemwegserkrankungen können zu einer niedrigeren Sauerstoffsättigung im Blut führen.Folgende Faktoren können die Sauerstoffsättigung senken: Automatische Regulierung einer Organfehlfunktion ausgelöst durch eine Narkose, schweres postoperatives Trauma, Verletzungen nach gewissen medizinischen Unter-suchungen. Diese Situationen können zu Benommenheit, Kraftlosigkeit und Übelkeit führen. Aus diesem Grund ist es wichtig, die Blutsauerstoffwerte eines Patienten zu messen, damit Ärzte Probleme rechtzeitig erkennen können.
4. MessprinzipDas Prinzip dieses Finger-Pulsoximeters: Eine mathe-matische Formel wird basierend auf dem Lambert-Beer-Gesetz anhand der spektrumabsorbierenden Charakteristik des desoxydiertem Hämoglobins (Hb) und Oxyhämoglobins (HbO2) in Glut- und Nahinfrarotzonen berechnet.Betriebsprinzip dieses Gerätes: Bei der fotoelektrischen Oxyhämoglobin-Messmethode scannen zwei Lichtstrahlen mit unterschiedlichen Wellenlängen (660 nm Glut und 905 nm Nahinfrarotlicht) aus einem Fingerspitzensensor den Fingerpuls. Die Strahlen können durch die Fingerna-gelspitze eines Menschen dringen. Das Signal wird mit einem fotosensitiven Element gemessen und im Display angezeigt. Abbildung zur Funktionsweise AT:1. Rot und Infrarotsender.2. Rot und Infrarotempfänger.
5. Gebrauchsanweisung1. Legen Sie die Batterien ein wie im Kapitel «Einlegen
der Batterien 7» beschrieben.2. Legen Sie einen Finger (Nagelseite nach oben;
Zeigefinger oder Mittelfinger wird empfohlen) in die Fingeröffnung des Gerätes. Achten Sie darauf, dass der Finger vollständing in die Fingeröffnung des Gerätes eingelegt ist, damit die Sensoren vollständig vom Finger bedeckt werden.
3. Lassen Sie das Gerät los, damit der Finger richtig eingeschlossen wird.
4. Drücken Sie die Ein-/Aus-Taste 1, um das Gerät einzuschalten.
5. Bewegen Sie den Finger während der Messung nicht. Es wird empfohlen, sich während der Messung nicht zu bewegen.
6. Ihr Messergebnis wird nach ein paar Sekunden auf dem Display angezeigt.
7. Entfernen Sie den Finger vom Gerät. Das Display zeigt «Finger Out» an.
8. Das Gerät schaltet sich nach ca. 8 Sekunden automa-tisch ab, sobald der Finger vom Gerät entfernt wurde.
) Die Höhe des Balkens 5 gibt die Puls- und Signalstärke an. Der Balken sollte grösser als 30% sein, um eine verlässliche Messung durch-führen zu können.
) Das Gerät muss den Puls richtig messen können, um ein exaktes Sauerstoffsättigungser-gebnis anzugeben. Stellen Sie sicher, dass die Pulsmessung nicht gestört wird, bevor Sie sich auf das Messergebnis verlassen.
) Verwenden Sie das Gerät nicht länger als 30 Minuten am gleichen Messort, um die korrekte Platzierung des Sensors zu gewähr-leisten und um die Integrität der Haut zu schützen.
Fehlerhafte Messergebnisse können auftreten, wenn:• Der Patient erheblich unter dysfunktionalen Hämoglo-
binen leidet (zum Beispiel Carboxyhämoglobin oder Methämoglobin).
• Dem Patienten intravaskuläre Farbstoffe, wie z.B. Indocyanin-Grün oder Methylenblau, injiziert wurden.
• Das Gerät grösserer Lichteinstrahlung ausgesetzt ist. Bedecken Sie den Sensor in diesem Fall mit einem Tuch.
• Der Patient sich übermässig bewegt.• Der Patient Venenpulsationen wahrnimmt.• Der Patient unter Hypotonie, Verengung der Blutge-
fässe, erheblicher Blutarmut oder Unterkühlung leidet.• Der Patient einen Herzstillstand hat oder im Schock-
zustand ist.• Nagellack aufgetragen oder künstliche Fingernägel
angebracht sind.
6. Einlegen der Batterien 7Nachdem Sie das Gerät ausgepackt haben, legen Sie die Batterien ein. Das Batteriefach befindet sich auf der Geräteunterseite. Entfernen Sie die Batteriefachabde-ckung, indem Sie die Abdeckung in die angezeigte Rich-tung schieben. Legen Sie die Batterien (2 x 1,5 V, Grösse AAA) ein und achten Sie dabei auf die angezeigte Polarität.
) Tauschen Sie die Batterien aus, wenn die Anzeige für Batterie niedrig 6 auf dem Display angezeigt wird.
! Ersetzen Sie immer beide Batterien zur gleichen Zeit.
7. Anzeigemodus und Helligkeit anpassenAnzeigemodusDrücken Sie kurz die Ein-/Aus-Taste 1, um den Anzei-gemodus zu wechseln und zu Ihrem gewünschten Anzeigemodus 9 zu gelangen. Es gibt 6 verschiedene Anzeigemodi; die Standardeinstellung ist Modus 1.HelligkeitDrücken Sie die Ein-/Aus-Taste 1 länger als eine Sekunde, um die Helligkeit des Gerätes einzustellen. Das Gerät zeigt «Br 1-10» an. Es gibt 10 Helligkeits-stufen; die Standardeinstellung ist Stufe 4.
8. Verwendung des Umhängebandes 81. Fädeln Sie das dünnere Ende des Umhängebandes
durch das dafür vorgesehene Loch am Gerät.2. Fädeln Sie das dickere Ende durch das zuvor befes-
tigte dünnere Ende und ziehen Sie es fest.
9. Fehlfunktionen und Massnahmen
10. Reinigung und DesinfektionReinigen Sie die gummierte Innenfläche des Gerätes mit einem Alkoholtupfer oder mit einem Alkohol (70% Isop-ropanol) befeuchteten Baumwolltuch. Reinigen Sie auch den Finger vor und nach jeder Anwendung. Lassen Sie das Gerät vor Verwendung gründlich trocknen.
! Verwenden Sie keine aggressiven Reinigungs-mittel, Lösungsmittel oder Benzol zum Reinigenund tauchen Sie das Gerät niemals in Wasser oder andere Reinigungsflüssigkeiten.
11. GarantieFür dieses Gerät gewähren wir 2 Jahre Garantie ab Kaufdatum. Die Garantie gilt nur bei Vorlage einer vom Händler ausgefüllten Garantiekarte (siehe letzte Seite) mit Kaufdatum oder des Kassenbelegs.• Batterien und Verschleissteile sind von der Garantie
ausgeschlossen.• Wurde das Gerät durch den Benutzer geöffnet oder
verändert, erlischt der Garantieanspruch.• Die Garantie erstreckt sich nicht auf Schäden, die auf
unsachgemässe Handhabung, Unfälle oder Nichtbe-achtung der Gebrauchsanleitung zurückzuführen sind.
12. Technische Daten
Technische Änderungen vorbehalten.
Pulsoximeter DE1 Ein-/Aus-Taste2 Sauerstoffsättigung (Wert in Prozent)3 Pulsfrequenz (Schläge pro Minute)4 Pulswelle (Plethysmografische Welle)5 Pulsbalken6 Batterie niedrig7 Einlegen der Batterien8 Umhängeband anbringen9 AnzeigemodiAT Messprinzip
Vor Nässe schützen
Hersteller
Herstellungsdatum
Kein Sauerstoffsättigungsalarm
Batterie niedrig
Seriennummer
Geschützt gegen Tropfwasser
EU-Repräsentant
Sauerstoffsättigung (Wert in Prozent)
Pulsfrequenz (Schläge pro Minute)
Betriebsbedingungen:5 - 40 °C / 41 - 104 °F
Aufbewahrungsbedingungen:-20 - +55 °C / -4 - +131 °F
CE-Kennzeichnung
2% SpOPR bpm
0123Bezeich-nung
Problem/Mögliche Ursache
Lösungen
SpO2 oder Pulsfre-quenz wird nicht normal ange-zeigt.
1. Finger ist nicht korrekt im Gerät.
2. Sauerstoffsättigung des Patienten ist zu gering.
3. Übermässige Belichtung.
1. Finger nochmal richtig einlegen.
2. & 3. Messen Sie mehrmals. Funktio-niert das Gerät korrekt, suchen Sie Ihren Arzt auf.
SpO2 oder Pulsfre-quenz variiert stark.
1. Der Finger könnte nicht weit genug im Gerät stecken.
2. Der Patient bewegt sich zu stark.
1. Finger nochmal richtig einlegen.
2. Ruhig sitzen und erneut probieren.
Das Gerät kann nicht einge-schaltet werden.
1. Keine oder leere Batte-rien im Gerät.
2. Batterien sind nicht richtig eingelegt.
3. Das Gerät könnte beschädigt sein.
1. Batterien austau-schen.
2. Batterien entfernen und neu einsetzen.
3. Kontaktieren Sie Ihren lokalen Micro-life Kundenservice.
Das Display ist plötz-lich ausge-schaltet.
1. Das Gerät schaltet sich automatisch aus, wenn es innerhalb von 8 Sekunden kein Signal empfängt.
2. Batterien sind zu schwach für den Betrieb.
1. Normal.2. Batterien austau-
schen.
«Error 3» Rotlichtsender ist beschä-digt.
Rotlichtsender über-prüfen.
«Error 4» Infrarotlichtsender ist beschädigt.
Infrarotlichtsender überprüfen.
«Error 6» Das Display ist defekt. Kontaktieren Sie Ihren lokalen Microlife Kundenservice.
«Error 7» Empfängerdiode ist beschädigt.
Kontaktieren Sie Ihren lokalen Microlife Kundenservice.
Typ: Fingertip Pulsoximeter OXY 300Anzeige: OLED DisplaySauerstoffsättigung:Messbereich: 70 ~ 100 % Genauigkeit: 70 ~ 100 % : ±2 %Messauflösung: 1 %Pulsschlag:Messbereich: 30 ~ 250 bpmGenauigkeit: 30 ~ 99 bpm: ±2 bpm;
100 ~ 250 bpm: ±2 % Messauflösung: 1 bpmBetriebs-bedingungen:
5 - 40 °C / 41 - 104 °F≤ 80 % relative maximale Luftfeuchtigkeit
Aufbewahrungs-bedingungen:
-20 - +55 °C / -4 - +131 °F≤ 93 % relative maximale Luftfeuchtigkeit
Automatische Ausschaltung:
Automatische Ausschaltung nach 8 Sekunden, bei keinem oder schwa-chem Signal.
Batterie: 2 x 1,5 V Alkaline-Batterien, Grösse AAABatterie-Lebens-dauer: ca. 30 Stunden (mit neuen Batterien)Gewicht: 56 g (mit Batterien)Grösse: 58 x 32 x 34 mmIP Klasse: IPX1Verweis auf Normen:
EN ISO10993-1/-5/-10; IEC 60601-1; EN 60601-1-2; EN ISO9919; EN 62304; EN 60601-1-6; CE0123
Durchschnittliche Lebensdauer:
5 Jahre (wenn das Gerät 15 Mal täglich während 20 Minuten verwendet wurde)
Sayın Müşterimiz,Parmak tipi pulse oksimetre Microlife çocuklarda ve yetişkinlerde, non-invazif olarak oksijen saturasyonunu (SpO2) ve kalp atış hızını tespit eden taşınabilir bir cihazdır. Özel kullanım (evde veya dışarda) ve medikal sektör(hastane, klinik, vs.) tarafından kullanıma uygundur. Yüksek hassaslığı Klinik olarak test edilmiştir.Tüm işlevleri ve güvenlik bilgisini anlayabilmeniz için, lütfen, bu talimatları dikkatle okuyun. Dileğimiz, Microlife ürünü-nüzden memnun kalmanızdır. Sorularınız, sorunlarınız ve yedek parça siparişleriniz için, lütfen, yerel Microlife-Müşteri Servisi ile görüşün. Ülkenizdeki Microlife bayisinin adresini satıcınızdan ya da eczanenizden öğrenebilirsiniz. İkinci bir yol olarak, ürünlerimiz hakkında geniş bilgi edinebileceğiniz www.microlife.com internet adresini de ziyaret edebilirsiniz.İleride başvurmak amacıyla kullanım talimatlarını güvenli bir yerde saklayın. Sağlıkla kalın – Microlife AG!
1. Simge TanımlamalarıPiller ve elektronik ürünler, çöpe atılmamalı; ancak, yürürlükteki yönetmeliklere uygun olarak elden çıkarılmalıdır.Aygıtı kullanmadan önce, talimatları dikkatle okuyun.
BF tipi ekipman
2. Önemli Güvenlik Talimatları• Bu ürün, sadece bu broşürde açıklanan amaçlar
çerçevesinde kullanılabilir. İmalatçı, yanlış uygula-madan kaynaklanan zarar ziyan için sorumlu tutulamaz.
• Bu aygıtı kesinlikle suya ya da diğer sıvılara batır-mayın. Temizlik için, lütfen, «Temizlik ve Dezenfek-tasyon» bölümündeki talimatları uygulayın.
• Hasar gördüğünü düşünüyorsanız ya da herhangi bir anormal durum sezdiyseniz, aygıtı kullanmayın.
• Aygıtı kesinlikle açmayın.• Aygıt, hassas parçalara sahiptir ve dikkatli biçimde
kullanılmalıdır. «Teknik Özellikler» bölümünde açık-lanan saklama ve çalıştırma koşullarını göz önünde bulundurun!
• Aşağıdaki durumlara maruz kalmasına engel olun:- su ve nem- aşırı sıcaklıklar- darbe ve düşürülme- kir ve toz- doğrudan güneş ışığı- sıcak ve soğuk
• Cihaz, cep telefonu veya radyo istasyonları gibi güçlü elektromanyetik alanlara yakın kullanıldığında düzgün çalışmayabilir ve bu durumdan kaçınamaya-cağınızda en az 1 metre uzaklığı korumanızı öneririz (60601-1-2 tablo 5'e göre), lütfen cihazı kullanmadan önce doğru çalışıp çalışmadığını kontrol ediniz.
• Cihazı MRI veya CT çevresinde kullanmayınız.• Bu cihaz süreki bir görüntüleme için uygun değildir.• Alarm fonksiyonu olmadığı için medikal sonuçları
değerlendirme de kullanılamaz. Alarmın gerekli olduğu durumlarda bu cihazı kullanmayınız.
• Isıyla veya etilen oksit sterilizasyon kullanarak bu aygıtın sterilize değil. Bu cihaz sterilizasyon için tasarlanmamıştır.
• Aygıtın uzun bir süre kullanılmaması durumunda, pillerin çıkarılması gerekir.
Çocukların denetimsiz bir şekilde ürünü kullanma-larına izin vermeyin; bazı parçalar, yutulabilecek kadar küçüktür. Aygıtın kablo veya borularının olması nedeni ile yaratabileceği boğulma riskinin farkında olun.
! Bu aygıtın kullanılması, doktorunuzla yapılan bir konsültasyon anlamına gelmez.
3. Genel TanımOksijen saturasyonu oksijen ile dolu olan kandaki hemog-lobin yüzdesini belirtir. Solunum dolaşım sistemii için çok önemli bir parametredir. Birçok solunum hastalığı kandaki oksijen saturasyonunun düşmesi ile başla.Aşağıdaki faktörler oksijen saturasyonunun düşmesine sebep olur: Aneztezi sonucu organ fonksiyon bozukluğu, yoğun postoperatif travma, tıbbi muayene esnasında oluşan sakatlıklar. Bu durumlar sersemlik, halsizlik ve kusma ile sonuçlanabilir. Bunun için hastanın oksijen saturasyonunu bilmek, problemin zamanında çözülmesi için çok önemlidir.
4. Ölçme PrensibiPulse oksimetre prensibi: Lambert Beer yasasını kullanarak spektrum emme özelliklerine göre oksijensiz hemoglobin (Hb) ve oksihemoglobin arasında kırmızı ve yakın kızılötesi bölgelerde (HbO2) matematiksel bir formül oluşturulmuştur.Cihazın çalışma prensibi: Pulse tarama ve kaydetme teknoljisine uygun olarak Fotoelektrik oksihemoglobin inceleme teknolojisi benimsenmiştir, bu sayede iki farklı dalga bıyundaki (660 nm kırmızı ve 905 nm infrared) ışık, parmak tipi bir sensörle tırnak ucuna odaklanabiliriyor. Mikroişlemci ve elektronik devreler ile elde edilen sonuç ekranda gösterilir.Çalışma prensibi diyagramı AT:1. Kırmızı ve infrared emisyon tüneli.2. Kırmızı ve infrared algılama tüneli.
5. Kullanım Talimatları1. «Pillerin yerleştirilmesi 7» bölümünde açıklandığı
gibi pilleri takın.2. Bir parmağınızı sokunuz (tırnak yukarıda olacak
şekilde; işaret veya orta parmak önerilmektedir. Parma-ğınızı tam olarak yerleştirdiğinizden emin olunuz.
3. Cihazı bırakarak parmağına tam olarak oturtunuz.4. AÇ/KAPA düğmesi 1 basarak cihazı açın.5. Test süresince parmağınızı oynatmayınız. Vücu-
dunuzu da oynatmamanız önerilir. 6. Ölçüm değerleri birkaç saniye sonra ekranda görünür.7. Parmağınızı cihazdan çıkartın. Ekranda «Finger Out»
ibaresi çıkacaktır.8. Aygıt otomatik olarak parmak aygıttan kaldırıldıktan
sonra yaklaşık 8 saniye sonra geçer.
) Bar grafiği 5 ritim sinyalinin kuvvetini göster-mektedir. Düzgün bir okuma için %30' un üzerinde olmalıdır.
) Düzgün bir SpO2 okuması alabilmek için cihaz uygun şekilde çalışıyor olmalıdır. SpO2 ölçümüne engel olmadığından emin olunuz.
) Doğru sensör algılaması ve deri bütünlüğü için cihazı 30 dakikalık en fazla ile kullanınız.
Aşağıdaki durumlarda yanlış ölçüm olabilir:• Yüksek seviyerde işlevsiz hemoglobin (karboksihe-
moglobin veya methemoglobin).• İndosiyanin yeşil veya metilen mavi gibi damar içi
enjekteler.• Yüksek ışık altında (direk güneş ışıığı gibi). Bu
durumda sensörleri cerrahi bir havlu ile örtünüz.• Fazla hasta hareketi.• Hasta venöz nabız yaşıyorsa.• Hastada hipotansiyon, vazokonstriksiyon, anemi
veya hipotermi var ise.• Hasta kalp durması veya şok içinde ise.• Tırnakta tırnak cilası var ise.
6. Pillerin yerleştirilmesi 7Aygıtın ambalajını açtıktan sonra, ilk önce pilleri yerleştirin. Pil bölmesi, aygıtın alt tarafındadır. Pil kapağını gösterilen yönde kaydırarak açın. Pilleri (2 x AAA 1.5 V boyutunda) yerleştirin; bunu yaparken kutupların gösterildiği gibi doğru konumda bulunmasına dikkat edin.
) Ekrenda düşük pil 6 göstergesi çıktığında pilleri değiştiriniz.
! Her zaman aynı anda her iki pilleri değiştirin.
7. Ekran Modunu ve Parlaklığı AyarlamaEkran modu Cihaz çalışır durumda iken AÇ/KAPA düğmesi 1 basarak diğer ekran moduna 9 geçebilirsiniz. 6 Farklı ekran modu bulunmaktadır. Varsayılan mod 1'dir. ParlaklıkAÇ/KAPA düğmesi 1 bir saniyeden fazla basılı tutarak ekran parlaklığını ayarlayınız. Ekranda «Br 1-10» görü-necektir. 10 Parlaklık modu bulunmaktadır; Varsayılan ayar 4'dür.
8. Kordonun Kullanılması 81. Kordonun ince tarafını cihazın askı deliğinden geçirin.2. Kordonun kalın tarafını askı deliğinden geçirilen ince
uçtan geçirerek sıkıca çekiniz.
9. Arızalar ve Yapılacak İşlemler
10. Temizlik ve DezenfektasyonAlkollü bez ya da alkolle (%70 izopropil) nemlendirilmiş pamuklu bez kullanın cihazın içinde parmak dokunuyor silikon temizlemek için. Parmak da temiz önce ve sonra her bir test alkol kullanarak test ediliyor. Cihazın kullan-madan önce iyice kurumasını bekleyin.
! Temizlik için kesinlikle aşındırıcı temizlik maddeleri, incelticiler ya da benzen kullanmayın ve aygıtı su ya da diğer temizlik sıvılarına kesinlikle batırmayın.
11. Garanti KapsamıBu aygıt, satın alındığı tarihten itibaren 2 yıl garanti kapsamındadır. Garanti, sadece satıcınız (arkaya bakınız) tarafından doldurulan ve satın alma ya da fatura tarihini teyit eden garanti belgesinin mevcudiyeti ile geçerlilik kazanır.• Yıpranmış pillerle ve parçalarla kullanımı garanti
kapsamında değildir.• Aygıtın açılması ya da üzerinde değişiklik yapılması,
garantiyi geçersiz kılar.• Garanti, yanlış kullanımdan, kazalar ve çalıştırma
talimatlarına uygun davranılmamaktan kaynaklanan zarar ziyanı kapsamaz.
12. Teknik Özellikler
Teknik özelliklerin değiştirilmesi hakkı saklıdır.
Pulse Oksimetre TR1 AÇ/KAPA Düğmesi2 Oksijen saturasyonu (yüzde olarak)3 Kalp atış hızı (atış/dakika)4 Nabız dalga (Pletismografik dalga)5 Bar grafiği6 Düşük Pil Göstergesi7 Pillerin yerleştirilmesi8 Kordonun bağlanması9 Ekran modlarıAT Çalışma prensibi
Kuru tutun
Üretici
Üretim tarihi
SpO2 Alarmsız
Düşük Pil Göstergesi
Seri numarası
Su kaçağına karşı korumalı
Avrupa yetkili temsilcisi
Oksijen saturasyonu (yüzde olarak)
Kalp atış hızı (atış/dakika)
Çalışma koşulları:5 - 40 °C / 41 - 104 °F
Saklama koşulları:-20 - +55 °C / -4 - +131 °F
CE uygunluk işareti
2% SpOPR bpm
0123
Açık-lama
Olası Nedenler Çözüm
SpO2 veya nabız düzgün görüntü-lenmiyor.
1. Parmak doğru bir şekilde yerleştirilme-miştir.
2. Hastanın SpO2'si gösterilemeyecek kadar düşüktür.
3. Fazla ışıktan uzak durunuz.
1. Parmağınız tekrar yerleştirmeyi deneyin.
2. & 3. Cihazın doğru çalıştığında doktoru-nuza başvurunuz.
SpO2 seviyesi dengesiz.
1. Parmağınızın tam derin olarak yerleşti-rilmemiştir.
2. Fazla hasta hare-keti.
1. Parmağınız tekrar yerleştirmeyi deneyin.
2. Sakin olarak tekrar ölçüm yapınız.
Cihaz çalış-mıyor.
1. Düşür pil veya piller takılı değil.
2. Piller doğru yerleşti-rilmemiştir.
3. Cihaz hasar görmüşolabilir.
1. Pilleri değiştiriniz. 2. Pilleri çıkartarak
yeniden yerleştiriniz.3. Microlife müşteri
servisi ile irtibata geçiniz.
Ekran birden kapa-nıyor.
1. 8 saniye sonunda cihaz simyal yakala-yamadığında otomatik olarak kapanır.
2. Pil seviyesi cihazı çalıştırmayacak kadar düşüktür.
1. Normal.2. Pilleri değiştiriniz.
«Error 3» Kırmızı emisyon LED hasarlı.
Kırmızı LED kontrol ediniz.
«Error 4» Infrared emisyon LED hasarlı.
Infrared LED kontrol ediniz.
«Error 6» Ekran hatası. Microlife müşteri servisi ile irtibata geçiniz.
«Error 7» Emisyon LED veya alıcı diyot hatalı.
Microlife müşteri servisi ile irtibata geçiniz.
Tür: Parmak tipi pulse oksimetre OXY 300Ekran: OLED EkranSpO2:Ölçüm aralığı: 70 ~ 100 % Doğruluk: 70 ~ 100 % : ±2 %Çözünürlük: 1 %Nabız Sayısı:Ölçüm aralığı: 30 ~ 250 bpmDoğruluk: 30 ~ 99 bpm: ±2 bpm;
100 ~ 250 bpm: ±2 % Çözünürlük: 1 bpmÇalışma koşulları: 5 - 40 °C / 41 - 104 °F
%≤ 80 maksimum bağıl nemSaklama koşulları: -20 - +55 °C / -4 - +131 °F
%≤ 93 maksimum bağıl nemOtomatik kapanma: Az veya hiç sinyal algılanmadığında
cihaz 8 saniye sonra otomatik olarak kapanır.
Pil: 2 x 1.5 V alkalin piller; boyut AAAPil ömrü: yaklaşık 30 saat (yeni pillerle)Ağırlık: 56 g (piller dahil)Boyutlar: 58 x 32 x 34 mmIP sınıfı: IPX1İlgili standartlar: EN ISO10993-1/-5/-10; IEC 60601-1;
EN 60601-1-2; EN ISO9919; EN 62304; EN 60601-1-6; CE0123
Beklenen servis ömrü:
5 yıl (ne zaman 15 kez kullanılan/gün; her ölçüm için 20 dakika)
Microlife OXY 300
DistributorEurope / Middle-East / AfricaMicrolife AGEspenstrasse 1399443 Widnau / SwitzerlandTel. +41 / 71 727 70 30Fax +41 / 71 727 70 39Email [email protected]
AsiaMicrolife Corporation.9F, 431, RuiGang Road, NeiHuTaipei, 11492, Taiwan, R.O.C.Tel. +886 2 8797-1288Fax +886 2 8797-1283Email [email protected]
North / Central / South AmericaMicrolife USA, Inc.1617 Gulf to Bay Blvd., 2nd Floor Ste AClearwater, FL 33755 / USATel. +1 727 442 5353Fax +1 727 442 5377Email [email protected]
ENFRITDETRESPTNLGRAR

Estimado cliente,Su Microlife oxímetro de pulso del dedo es un dispositivo portátil no invasivo intencionado para la medición rapida de la oxigenación de la sangre de la hemoglobina arterial (SpO2) y la frecuencia cardíaca (pulso) de adultos y pacientes pediátricos. Es conveniente para el uso privado (en casa o durante actividades), así como para su uso en el sector médico (hospitales, instalaciones de tipo hospita-lario). Ha sido clínicamente demostrado ser de alta preci-sión durante la repetibilidad.Lea estas instrucciones detenidamente. Esto le permitirá entender todas las funciones y la información sobre segu-ridad. Deseamos que quede satisfecho con su producto Microlife. Si tiene cualquier pregunta o problema o si desea pedir piezas de recambio, no dude en contactar con su servicio de atención al cliente de Microlife local. Su distri-buidor o farmacia podrá indicarle la dirección del distri-buidor de Microlife en su país. También puede visitarnos en Internet en www.microlife.com donde encontrará informa-ción útil sobre nuestros productos.Guarde estas instrucciones en un lugar seguro, ya que puede que desee consultarlas en el futuro. ¡Cuide su salud con Microlife AG!
1. Explicación de los símbolosLas baterías y los dispositivos electrónicos se deben eliminar según indique la normativa local pertinente y no se deben desechar junto con la basura doméstica. Lea atentamente las instrucciones antes de utilizar este dispositivo.
Pieza aplicada tipo BF
2. Instrucciones importantes de seguridad• Este dispositivo sólo se debe utilizar para los propósitos
descritos en estas instrucciones. El fabricante no se responsabiliza de ningún daño causado por un uso inadecuado.
• No sumerja este dispositivo en el agua o en ningún otro líquido. Si desea más información sobre la limpieza del dispositivo, consulte el apartado «Limpieza y desinfección».
• No utilice el dispositivo si cree que puede estar roto o detecta alguna anomalía.
• Nunca abra el dispositivo.• El dispositivo está integrado por componentes sensibles
y se debe tratar con cuidado. Respete las indicaciones de almacenamiento y funcionamiento que se describen en el apartado «Especificaciones técnicas».
• Proteja el dispositivo de:- Agua y humedad.- Temperaturas extremas.- Impactos y caídas.- Contaminación y polvo.- Luz directa del sol.- Calor y frío.
• La funcion de este dispositivo puede ser comprometida cuando es utilizado cerca de campos electromagneticos fuertes tales como telefonos moviles o estaciones de radio, se recomienda mantener al menos 1 m de distancia (según 60601-1-2 tabla 5). En casos donde usted sospecha esto es inevitable, por favor compruebe si el dispositivo funciona correctamente antes de su uso.
• No utilice el dispositivo en un entorno magnética o tomografía computarizada.
• Este dispositivo no está diseñado para la monitoriza-ción continua.
• Este dispositivo no tiene una función de alarma y por lo tanto no es adecuado para la evaluación de los resultados médicos. No utilice este dispositivo en situaciones en las que se requieren alarma.
• No esterilizar este dispositivo mediante autoclave o esterilización de óxido de etileno. Este dispositivo noestá diseñado para la esterilización.
• Si no va a utilizar el dispositivo durante un periodo largo de tiempo, extraiga las baterías.
Asegúrese de que los niños no utilicen el dispositivo sin supervisión, puesto que podrían tragarse algunas de las piezas más pequeñas. Tenga en cuenta el riesgo de estrangulamiento en caso de que este dispositivo se suministre con cables o tubos.
! Este dispositivo no puede utilizarse como un sustituto de una consulta con su médico.
3. Descripción generalLa saturación de oxígeno indica el porcentaje de la hemoglo-bina en la sangre arterial que se carga con oxígeno. Esto es un parámetro muy importante para la sistema de circulación respiratoria. Muchas enfermedades respiratorias pueden resultar en una saturación de oxígeno baja en la sangre humana.Siguientes factores pueden reducir la saturación de oxígeno: Regulación automática de la disfunción de órganos causada por la anestesia, trauma intenso posto-peratorio, lesiones causado por algunos exámenes médicos. Estas situaciones pueden dar lugar a mareos, astenia y vómitos. Por tanto, es muy importante conocer la saturación de oxígeno de un paciente de modo que los médicos pueden detectar problemas de manera oportuna.
4. Principios de mediciónPrincipio de este oxímetro de pulso de dedo: Una fórmula matemática se establece haciendo uso de la Ley Lambert Beer de acuerdo con las características de absorción del espectro de la hemoglobina desoxigenada (Hb) y oxihemog-lobina (HbO2) en las zonas de rojo y del infrarrojo cercano.Principio de funcionamiento de este dispositivo: La tecnología oxihemoglobina fotoeléctrico se adopta conforme con el escaneo del pulso y la tecnología de grabación, por lo que dos rayos de diferente ondas de luz (660 nm rojo y 905 nm cerca de luz infrarroja) se pueden enfocar en una punta de la uña humana a través de un sensor de cierre usando su dedo. Una señal medida obte-nida por un elemento fotosensible, se mostrará en la pantalla a través del proceso de circuitos electrónicos y microprocesadores que se muestran en la pantalla a través circuitos electrónicos y un microprocesado.Esquema de principio de la operación de AT:1. Tubo de emisión de rayos rojo y infrarrojo.2. Tubo de recepción de rayos rojo y infrarrojo.
5. Instrucciones de uso1. Inserte las pilas como se describe en la sección de
«Colocar las baterías 7».2. Introduzca un dedo (lado con uña hacia arriba; dedo
índice o medio se recomienda) en la abertura del dedo de el dispositivo. Asegúrese de introducir el dedo completamente de manera que los sensores están completamente cubiertos por el dedo.
3. Suelta el dispositivo al permitir que se coloque en el dedo.4. Pulse el botón ON/OFF 1 para activar el dispositivo.5. No sacude el dedo durante la prueba. Se recomienda
que no mueve su cuerpo mientras tomando una lectura.6. Los valores de medición aparecerá en la pantalla
después de unos segundos.7. Retire el dedo del dispositivo. La pantalla indicara
«Finger Out» (Dedo fuera).8. El dispositivo se apagará automáticamente después
de aprox. 8 segundos después de retirar el dedo del dispositivo.
) La altura de la gráfica de barras 5 es una indica-ción de el pulso y la intensidad de la señal. La barra debe estar más que 30% para una lectura correcta.
) El dispositivo debe ser capaz de medir el pulso adecuadamente para obtener una medición precisa de SpO2. Compruebe que nada interfiera con la medición del pulso antes de confiar en la medición de SpO2.
) El tiempo de aplicación máxima en un solo sitio debe ser menos de 30 minutos, para asegurar integridad de piel y alineación correcta del sensor.
Mediciones inexactas pueden ocurrir si:• El paciente sufre de niveles significativos de hemoglo-
bina disfuncional (como carbonxyhemoglobin o meta-hemoglobina).
• Colorantes intravasculares como el verde de indocia-nina o azul de metileno se han inyectado en el paciente.
• Se utiliza en presencia de luz ambiental (por ejemplo, luz directa de sol). Proteger el área del sensor con una toalla quirúrgica si necesario.
• Hay movimiento excesivo del paciente.• El paciente experimenta pulsaciones venosas.• El paciente tiene hipotensión, vasoconstricción
severa, anemia severa o hipotermia.• El paciente está en paro cardíaco o está en estado
de shock.• Se aplican uñas pintadas o falsas.
6. Colocar las baterías 7Después de desembalar el dispositivo, en primer lugar, inserte las baterías. El compartimento de las baterías está en la parte inferior del dispositivo. Retire la tapa de las baterías deslizándola como se muestra. Inserte las baterías (2 x 1,5 V, tamaño AAA) de acuerdo con las marcas de polaridad indicadas.
) Reemplace las baterías cuando el indicador de baterías baja 6 aparece en la pantalla.
! Siempre reemplace ambas baterías al mismo tiempo.
7. Ajustando el modo de display y brilloModo de displayCuando el dispositivo está encendido, pulse brevemente el botón ON/OFF 1 para cambiar a otro modo de display para seleccionar su modo deseado 9. Hay 6 diferente modos de display. La configuración predeter-minada es modo 1.BrilloMantenga pulsado el botón ON/OFF 1 durante más de un segundo para ajustar el brillo del dispositivo. La pantalla mostrará «Br 1-10». Hay 10 niveles de brillo. El ajuste predeterminado es el nivel 4.
8. Usando el acollador 81. Pase el extremo más delgado de el acollador a través
de el agujero colgando en el extremo posterior del dispositivo.
2. Pase el extremo más grueso de el acollador a través de el extremo roscado antes de tirar con fuerza.
9. Mensajes de error y soluciones
10. Limpieza y desinfecciónUso un tejido alcohol hisopo o algodón humedecido con alcohol (70% isopropílico) para limpiar la silicona que toque el dedo del interior del dispositivo. También limpie el dedo probando con alcohol antes y después de cada prueba. Permita que el dispositivo se seque completa-mente antes de usar.
! No utilice nunca productos de limpieza abrasivos, disolventes o benceno y no sumerja el dispositivo en agua ni en ningún líquido de limpieza.
11. GarantíaEste dispositivo tiene una garantía de 2 años a partir de la fecha de compra. La garantía sólo será válida con la tarjeta de garantía debidamente completada por el distri-buidor (véase la parte posterior de este folleto) y con la fecha o el recibo de compra.• Quedan excluidas las baterías y las piezas de desgaste.• La garantía no será válida si abre o manipula el dispo-
sitivo.• La garantía no cubre daños causados por el uso inade-
cuado, accidentes o por incumplimiento del manual de instrucciones.
12. Especificaciones técnicas
Reservado el derecho a realizar modificaciones técnicas.
Oximetro de pulso ES1 Botón ON/OFF (Encendido/Apagado)2 Saturación de oxígeno (valor como porcentaje)3 Frecuencia de pulso (valor en latidos por minuto)4 Onda de pulso (onda pletismográfica) 5 Indicador de pulso6 Indicador de batería baja7 Colocar las baterías8 Fijando el acollador9 Modos de pantallaAT Explicación de funcionamiento
Mantener en lugar seco
Fabricante
Fecha de manufactura
Alarma de falta de SpO2
Indicador de batería baja
Número de serie
Protegido contra gotas de agua
Representante autorizado en la Comunidad EuropeaSaturación de oxígeno (valor como porcentaje)
Frecuencia de pulso (valor en latidos por minuto)
Condiciones de funcionamiento:5 - 40 °C / 41 - 104 °F
Condiciones de almacenamiento:-20 - +55 °C / -4 - +131 °F
Marca de conformidad CE
2% SpOPR bpm
0123
Descrip-ción
Síntoma/Posible causas Soluciones
SpO2 o frecuencia del pulso no se mues-tran normal-mente.
1. El dedo no se ha inser-tado correctamente.
2. El valor de SpO2 delpaciente es demasiado bajo para ser medido.
3. Hay iluminación excesivo.
1. Inténte la inserción del dedo de nuevo.
2. & 3. Intente más medidas. Si deter-mina que el producto está funcionando correctamente, consulte a su médico.
SpO2 o frecuencia del pulso se muestra inestable.
1. El dedo no se ha inser-tado lo suficientemente profundo.
2. El exceso de movi-miento del paciente.
1. Inténte la inserción del dedo de nuevo.
2. Sentarse con calma y volver a intenta.
El dispo-sitivo no se puede encender.
1. No hay baterías o la energía de la batería esta baja.
2. Las baterías no están instaladas correcta-mente.
3. El dispositivo puede estar dañado.
1. Reemplace las bate-rías.
2. Retire y vuelva a instalar las batería.
3. Póngase en contacto con el Servicio al Cliente Microlife - local.
La pantalla se apaga de reprente.
1. El dispositivo automáti-camente se apaga, cuando no detecta señal después de 8 segundos.
2. La energía de la batería es demasiado baja para operar.
1. Normal.2. Reemplace las bate-
rías.
«Error 3» El LED de emisión roja esta dañado.
Verifique el LED de emisión roja.
«Error 4» El LED de emisión infra-rroja está dañada.
Verifique el LED de emisión infrarroja.
«Error 6» La pantalla ha fracasado. Póngase en contacto con el Servicio al Cliente Microlife - local.
«Error 7» El LED emisión o diodo de recepción esta dañado.
Póngase en contacto con el Servicio al Cliente Microlife - local.
Tipo: Oxímetro de pulso del dedo OXY 300Pantalla: Display OLEDSpO2:Nivel de medición: 70 ~ 100 % Precisión: 70 ~ 100 % : ±2 %Resolución: 1 %Frecuencia del pulso:Nivel de medición: 30 ~ 250 bpmPrecisión: 30 ~ 99 bpm: ±2 bpm;
100 ~ 250 bpm: ±2 % Resolución: 1 bpmCondiciones de funcionamiento:
5 - 40 °C / 41 - 104 °F≤ 80% de humedad relativa máxima
Condiciones de almacenamiento:
-20 - +55 °C / -4 - +131 °F≤ 93% de humedad relativa máxima
Desconexión automática:
El dispositivo automáticamente se apaga después de 8 segundos, cuando no hay o no detecta señal.
Batería: 2 baterías alcalinas 1,5 V; tamaño AAA
Duración de la batería:
aprox. 30 horas (usando baterías nuevas)
Peso: 56 g (incluyendo baterías)Tamaño: 58 x 32 x 34 mmClase IP: IPX1Referencia a los estándares:
EN ISO10993-1/-5/-10; IEC 60601-1; EN 60601-1-2; EN ISO9919; EN 62304; EN 60601-1-6; CE0123
Vida útil esperada: 5 años (cuando usado 15 veces/día; 20 minutos para cada medición)
Estimado cliente,O Fingertip Oxímetro de pulso da Microlife é um dispositivo não-invasivo portátil destinado a uma verificação pontual da saturação de oxigénio na hemoglobina arterial (SpO2) e frequência cardíaca em adultos e crianças. É adequado para uso pessoal (em casa, ou em movimento), assim como para utilização no sector médico (hospitais, instala-ções de tipo hospitalar). Tem sido clinicamente compro-vado ter uma elevada precisão durante a repetibilidade.Leia atentamente as instruções de funcionamento para se informar de todas as funções e informação de segurança. Esperamos que fique satisfeito com o seu produto Microlife. Se tiver alguma questão, problema ou se pretender enco-mendar peças sobresselentes, não hesite em contactar o seu distribuidor local da Microlife. A farmácia da sua zona poderá indicar a morada do distribuidor Microlife no seu país. Pode também visitar o site www.microlife.com onde encon-trará toda a informação útil sobre os produtos Microlife.Leia atentamente este manual de instruções antes de utilizar este dispositivo e guarde-o em local seguro. Mantenha-se saudável – Microlife AG!
1. Explicação dos símbolosAs pilhas e dispositivos eletrónicos têm de ser eliminados em conformidade com os regula-mentos locais aplicáveis, uma vez que não são considerados resíduos domésticos. Leia atentamente este manual de instruções antes de utilizar o dispositivo.
Peça aplicada tipo BF
2. Instruções de segurança importantes • Este dispositivo deve somente ser utilizado para os
fins descritos neste folheto. O fabricante não se responsabiliza por quaisquer danos causados pelo uso indevido deste dispositivo.
• Nunca mergulhe este dispositivo em água ou em qualquer outro líquido. Para efectuar a limpeza, siga as instruções descritas na secção «Limpeza e desinfeção».
• Não utilize este dispositivo se estiver danificado ouse detectar qualquer anomalia.
• Nunca abra o dispositivo.• O dispositivo é composto por componentes sensíveis
e deve ser manuseado com cuidado. Respeite as indicações de acondicionamento e funcionamento descritas na secção «Especificações técnicas»!
• Proteja o dispositivo de:- Água e humidade- Temperaturas extremas- Impactos e quedas- Contaminação e poeiras- Luz directa do sol- Calor e frio
• O funcionamento deste dispositivo pode ser comprome-tido quando usado junto a campos electromagnéticos fortes como telemóveis ou instalações de rádio, reco-mendamos, devido a esse motivo, uma distância de pelo menos 1 m (de acordo com 60601-1-2 tabela 5). Em casos em que esta situação seja inevitável, deve verificar se o dispositivo está a funcionar corretamente.
• Não utilize o dispositivo num ambiente de ressonância magnética ou tomografia computadorizada.
• O dispositivo não se destina a uma monitorização contínua.
• Este dispositivo não tem a função de alarme e portanto não é adequado a avaliar resultados médicos. Não utilize este dispositivo em situações que requerem uso de alarme.
• Não esterilize este dispositivo utilizando autoclave ou esterilização do óxido de etileno. Este dispositivo não se destina para a esterilização.
• Se o dispositivo não for utilizado durante um longo período de tempo, deverá retirar as pilhas.
Certifique-se de que não deixa o dispositivo ao alcance das crianças; algumas peças são muito pequenas e podem ser engolidas. Esteja atento ao risco de estrangulamento no caso deste dispositivo ser fornecido com cabos ou tubos.
! Este dispositivo não substitui a consulta do seu médico.
3. Descrição geralA saturação de oxigénio indica a percentagem de hemo-globina no sangue arterial, presente de oxigénio. Isto é um parâmetro muito importante para o sistema da circulação respiratória. Muitas doenças respiratórias podem resultar numa menor saturação de oxigénio presente no sangue.Estes fatores podem reduzir a saturação de oxigénio: Automática regulação da disfunção orgânica causada pela anestesia, trauma intensivo pós-operatório, lesões causadas por alguns exames médicos. Estas situações podem resultar em tonturas, astenia e vómitos. Portanto, é muito importante saber a saturação de oxigénio de um paciente para que os médicos possam detectar os problemas em tempo útil.
4. Medidas principaisPrincípio do Fingertip Oxímetro de pulso: A fórmula mate-mática é estabelecida utilizando a Lei de Beer-Lambert de acordo com as características de absorção do espectro da hemoglobina desoxigenada (Hb) e hemoglobina (HbO2) em comprimentos de onda diferentes, vermelho e infravermelho.Operação principal deste dispositivo: Tecnologia de inspeção da oxi-hemoglobina fotoelétrica é adoptada em conformidade com a capacidade de digitalização de pulso e tecnologia de gravação, de modo a que os dois feixes de luz de comprimento diferentes de onda (660 nm vermelho e 905 nm infravermelho) pode ser focada numa ponta da unha através de um sensor de aperto do dedo. Um sinal medido obtido por um elemento fotossensível, será apre-sentado no visor através de um processo em circuitos elec-trónicos e de um microprocessador.Esquema da operação principal AT:1. Tubo vermelho de emissão de raios infra-vermelhos.2. Tubo vermelho de recepção de raios infra-vermelhos.
5. Instruções de utilização1. Insira as pilhas conforme descrito na seção «Inserir
as pilhas 7».2. Insira o lado um dedo (unha para cima; dedo indicador
ou médio, recomendado) para dentro da abertura do dedo do dispositivo. Certifique-se de inserir totalmente o dedo para que os sensores estejam abrangidos completamente pelo dedo.
3. Solte o dispositivo de forma a ficar ajustado ao dedo.
4. Pressione o botão ON/OFF 1 para ligar o dispositivo.5. Não mexa o dedo durante o teste. É recomendado
que não mova o seu corpo enquanto o dispositivo realiza a leitura.
6. Os valores de medição serão demonstados no visor após alguns segundos.
7. Retire o dedo do dispositivo. O visor irá indicar «Finger Out» (Dedo fora).
8. O aparelho desliga automaticamente cerca de 8 segundos após o dedo ser removido do dispositivo.
) A altura do gráfico de barras 5 demonstra a indicação de pulso e sinal de força. A barra deve ser superior a 30% para uma leitura adequad.
) O dispositivo deve ser capaz de medir o pulso adequadamente para se obter uma medição exacta de SpO2. Verifique se nada está a impedir a medição de pulso antes de confiar na medição de SpO2.
) O tempo de aplicação máxima numa únicazona deve ser menos de 30 minutos, a fim de garantir o correto alinhamento do sensor e inte-gridade da pele.
Medidas imprecisas podem ocorrer se:• Paciente que tenha níveis significativos de disfunção
de hemoglobina (tais como carboxi-hemoglobina e metemoglobina).
• Corantes intravasculares, como indocianina verde ou azul de metileno que foram injectados no paciente.
• Utilização na presença de luz ambiente intensa (por exemplo, direta luz solar). Proteger a área do sensor com uma toalha se necessário.
• Movimento excessivo do paciente.• As experiências de pulsações venosas do paciente.• O paciente tem hipotensão, vasoconstrição grave,
anemia grave ou hipotermia.• O paciente está em paragem cardíaca ou em choque.• Unhas com verniz ou unhas falsas são aplicadas.
6. Inserir as pilhas 7Após ter desempacotado o dispositivo, comece por inserir as pilhas. O compartimento das pilhas está loca-lizado na parte inferior do dispositivo. Retire a tampa do compartimento das pilhas, deslizando-a para baixo. Insira as pilhas (2 x 1,5 V pilhas, tamanho AAA) e respeite a polaridade indicada.
) Substitua as pilhas quando o indicador de bateria fraca 6 aparecer no visor.
! Substitua sempre ambas as pilhas ao mesmo tempo.
7. Ajuste do modo de exibição e brilhoModo de exibiçãoQuando o dispositivo é ligado, prima a tecla ON/OFF botão 1 para selecionar outro modo de exibição selecio-nando o modo de exibição desejado 9. Há 6 diferentes modos de exibição. A configuração padrão é o modo 1.BrilhoPressione e segure o botão ON/OFF 1 por mais de um segundo para ajustar a luminosidade do dispositivo. No ecrã visualizará «Br 1-10». Há 10 níveis de brilho. A configuração padrão é o nível 4.
8. Utilização da corda 81. Passe a extremidade fina da corda através do furo na
extremidade traseira do dispositivo.2. Passe a extremidade mais grossa da corda pelo fio
antes de puxá-lo com força.
9. Falhas de funcionamento e soluções
10. Limpeza e desinfeçãoUtilize um algodão ou um toalhete embebido em álcool (70% isopropílico) para limpar o silicone onde coloca o dedo dentro do dispositivo. Também limpar o dedo a testar utilizando álcool antes e após cada teste. Deixe-o secar completamente antes de usar.
! Nunca utilize produtos de limpeza abrasivos, diluentes ou benzina para limpar o dispositivo e nunca o mergulhe em água ou em qualquer outro líquido para limpeza.
11. GarantiaEste dispositivo está abrangido por uma garantia de 2 anos a partir da data de compra. A garantia é válida apenas mediante a apresentação do cartão de garantia preenchido pelo revendedor (ver verso) que comprove a data de compra ou o talão de compra.• As pilhas e peças de desgaste não se encontram
abrangidas.• A garantia não é válida se o dispositivo for aberto ou
alterado.• A garantia não cobre os danos causados pelo uso
indevido, acidentes, ou por incumprimento do manual de instruções.
12. Especificações técnicas
O fabricante reserva-se o direito de proceder a alterações técnicas.
Oxímetro de pulso PT1 Botão ON/OFF2 Saturação de oxigénio (valor em percentagem)3 Frequência cardíaca (valor em batimentos por minuto)4 Onda da pulsação (onda pletismográfica)5 Faixa de pulso6 Indicador de pilha fraca7 Inserir as pilhas8 Ajuste da corda9 Modos de exibiçãoAT Operação principal
Manter seco
Fabricante
Data de fabrico
Sem alarme SpO2
Indicador de pilha fraca
Número de série
Proteção contra gotas de água
Representante autorizado na Comunidade EuropeiaSaturação de oxigénio (valor em percentagem)
Frequência cardíaca (valor em batimentos por minuto)
Condições de funcionamento:5 - 40 °C / 41 - 104 °F
Condições de acondicionamento:-20 - +55 °C / -4 - +131 °F
CE Marca de Conformidade
2% SpOPR bpm
0123
Descrição Sintoma/Possível causa
Soluções
SpO2 ou frequência cardíaca não funciona correta-mente.
1. O dedo não está inserido correta-mente.
2. Valor SpO2 dopaciente encontra-se muito baixo para ser medido.
3. Existe iluminaçãoexcessiva.
1. Tente inserir o dedo novamente.
2. & 3. Meça mais vezes. Se determinar que o produto funciona corre-tamente, consulte o seu médico.
SpO2 ou frequência cardíaca aparece instável.
1. O dedo pode não estar inserido até ao fundo.
2. Excessivos movi-mentos do paciente.
1. Tente inserir o dedo novamente.
2. Sente-se calmamente etente de novo.
O dispo-sitivo não liga.
1. Sem bateria ou bateria fraca.
2. As pilhas estão incorretamente inseridas.
3. O dispositivo podeestar danificado.
1. Substitua as pilhas.2. Retire e reinstale as
pilhas.3. Contacte Microlife-
Serviço ao Cliente perto de si.
O dispo-sitivo desliga-se.
1. O dispositivo desliga-se auto-maticamente, se não detetar sinal após 8 segundo.
2. As pilhas encon-tram-se fracas.
1. Normal.2. Substitua as pilhas.
«Error 3» A emissão LED vermelha encontra-se danificada.
Verifique a emissão LED vermelha.
«Error 4» A emissão LED infra-vermelho encontra-se danificada.
Verifique a emissão LED infravermelho.
«Error 6» Falha do visor. Contacte Microlife- Serviço ao Cliente perto de si.
«Error 7» A emissão LED ou recepção diodo está danificada.
Contacte Microlife- Serviço ao Cliente perto de si.
Tipo: Fingertip Oxímetro de pulso OXY 300Visor: Monitor OLEDSpO2:Gama de medição: 70 ~ 100 % Precisão: 70 ~ 100 % : ±2 %Resolução: 1 %Frequência da pulsação:Gama de medição: 30 ~ 250 bpmPrecisão: 30 ~ 99 bpm: ±2 bpm;
100 ~ 250 bpm: ±2 % Resolução: 1 bpmCondições de funcionamento:
5 - 40 °C / 41 - 104 °F≤ 80 % de humidade relativa máxima
Condições de acondicionamento:
-20 - +55 °C / -4 - +131 °F≤ 93 % de humidade relativa máxima
Desligar automático:
Desliga-se automaticamente após 8 segundos, quando não existe sinal ou o sinal detectado for baixo.
Pilha: Pilhas alcalinas 2 x 1,5 V; tamanho AAADuração da pilha: cerca 30 horas (usando pilhas novas)Peso: 56 g (incluindo pilhas)Dimensões: 58 x 32 x 34 mmClasse IP: IPX1Normas de referência:
EN ISO10993-1/-5/-10; IEC 60601-1; EN 60601-1-2; EN ISO9919; EN 62304; EN 60601-1-6; CE0123
Duração expetável de utilização:
5 anos (quando usada 15 vezes/dia; 20 minutos para cada medição)
Geachte klant,Deze Microlife fingertip pulse oximeter is een draagbaar, niet belastbaar apparaat die bedoeld is voor plaatselijke controles van de zuurstofsaturatie van arteriële hemoglo-bine (SpO2) en hartslag van volwassenen en pediatrische patiënten. Het is geschikt voor privé gebruik (thuis en onderweg), maar ook voor in de medische sector (zieken-huizen en huisartsen). Het apparaat is klinisch bewezen en wordt gebruikt met een hoge precieze tijdens het herhalen van de meting.Lees deze handleiding zorgvuldig door zodat u alle func-ties en veiligheidsinformatie begrijpt. Wij willen graag dat u tevreden bent over het apparaat. Mocht u vragen hebben of wanneer u reserveonderdelen wilt bestellen, neemt u dan contact op met uw Microlife importeur. De verkoper zal u het adres van de Microlife importeur in uw land geven. Natuurlijk kunt u ook de website www.microlife.nl raad-plegen, waar u waardevolle informatie kunt vinden over onze producten.Bewaar het instructieboekje op een veilige plaats voor nadere raadpleging. Blijf gezond – Microlife AG!
1. Uitleg van de symbolenBatterijen en elektronische instrumenten moeten volgens de plaatselijke regelgeving worden verwijderd, niet bij het huishoudelijke afval.Lees alvorens dit apparaat te gebruiken de instructies aandachtig door.
Geleverd onderdeel type BF
2. Belangrijke veiligheidsinstructies• Dit apparaat mag uitsluitend worden gebruikt voor
het doel zoals in de gebruiksaanwijzing beschreven. De fabrikant kan niet aansprakelijk worden gesteld voor schade veroorzaakt door onjuist gebruik.
• Dompel dit apparaat nooit in het water of andere vloeistoffen. Voor het reinigen dient u de instruc-ties uit de «Reinigen en desinfecteren» paragraaf op te volgen.
• Gebruik het apparaat niet wanneer u vermoedt dat het beschadigd is of wanneer u tijdens het gebruik iets ongebruikelijks constateert.
• Open het apparaat nooit.• Dit apparaat bevat gevoelige componenten en moet
met voorzichtigheid worden behandeld. Neem de bewaar- en bedieningscondities beschreven in de «Technische specificaties» paragraaf in acht!
• Bescherm het tegen:- water en vochtigheid- extreme temperaturen- schokken en laten vallen- vervuiling en stof- direct zonlicht- warmte en kou
• De werking van dit apparaat kan worden verstoord, wanneer het gebruikt wordt in de buurt van sterk elec-tromagnetische velden bijvoorbeeld rondom mobiele telefoons en radio installaties, wij adviseren dan ook een afstand van tenminste 1 meter (volgens 60601-1-2 tafel 5). In het geval dat het vermijden van sterk magne-tische velden niet mogelijk is, verifieer voor ingebruik-name eerst of het apparaat goed functioneert.
• Gebruik dit apparaat niet in MRI of CT zaken.• Dit apparaat is niet bedoel voor een doorlopende controle.• Dit apparaat heeft geen alarm functie en is niet bruikbaar
voor het evalueren van medische resultaten. Gebruik dit apparaat niet in situaties waar alarmen nodig zijn.
• Dit apparaat niet steriliseren met autoclaaf of steriliseren met ethyleen oxide. Dit apparaat is niet bedoeld voor sterilisatie.
• Wanneer het apparaat voor een langere tijd niet gebruikt gaat worden moeten de batterijen worden verwijderd.
Laat kinderen het apparaat alleen onder toezicht van een volwassene gebruiken. Kleine onder-delen kunnen worden ingeslikt. Wees alert op het gevaar van verstrengeling, indien het apparaat is voorzien van kabels of slangen.
! Het gebruik van dit apparaat is niet bedoeld als vervanging van uw huidige behandeling door uw arts.
3. Algemene omschrijvingZuurstofsaturatie geeft het percentage van hemoglobine in arterieel bloed dat geladen is met zuurstof. Dit is een heel belangrijke parameter voor de luchtwegen circulatie systeem in het menselijk bloed.De volgende factoren kan de zuurstofsaturatie verminderen: Automatische regulatie van organische stoornissen, veroorzaakt door anesthesie, intensieve postoperatieve trauma, verwondingen veroorzaakt door medische onderzoeken. Deze situaties kunnen resul-teren in een licht gevoel in het hoofd, asthenie en braken. Hierdoor is het heel belangrijk om de zuurstofsaturatie van een patient te weten zodat doktoren problemen tijdig kunne opsporen.
4. MeetprincipesPrincipe van de vingertip saturatiemeter: Een wiskundige formule volgens de Lambert-Beer wet wordt gebruikt om de eigenschappen van zuurstof binnen het absorbtiespectrum van hemoglobine (Hb) en oxyhemoglobine (HbO2) te meten met rood en infrarood licht.Werkingsprincipe van dit apparaat: Foto-elektrische meettechnologie om het oxyhemoglobine te meten, in samenwerking met hartslag scanning en registratie, twee lichtstralen met verschillende golflengten (660 nm rood en 905 nm bijna infrarood) worden gericht op de menselijke vingernagel via een sensor in de vingerclip-houder. Het door een lichtsensitief element gemeten signaal, wordt in het display weergeven via een proces door het elektronisch circuit en de microprocessor.Tabel van operatie principe AT:1. Rood en infrarood emissie kanaal.2. Rood en infrarood receptor kanaal.
5. Instructies voor gebruik1. Plaats de batterijen zoals beschreven in de sectie
«Plaatsen van de batterijen 7».2. Plaats één vinger (nagel naar boven, wijs- of middel-
vinger wordt aanbevolen) in de opening van het apparaat. Zorg ervoor dat de vinger geheel in het apparaat wordt geplaatst, zodat de sensoren volledig overdekt zijn door de vinger.
3. Laat het apparaat los, zodat het vastklem om de vinger.
4. Druk op de AAN/UIT knop 1 om het apparaat in te schakelen.
5. Schud niet met uw vinger gedurende de meting. Het wordt aanbevolen niet te bewegen tijdens een meting.
6. Uw meetwaarden verschijnen na enkele seconden op het scherm.
7. Haal uw vinger uit het apparaat. Het display zal aangeven «Finger Out».
8. Het apparaat schakelt automatisch uit na ca. 8 seconden nadat de vinger is verwijderd uit het apparaat.
) De hoogte van de pulse bar 5 is een indicatie van de pols en signaalsterkte. De hoogte van de Pulse bar dient tenminste 30% te zijn voor een goede meting.
) Het apparaat moet in staat zijn om de pols goed te meten om een accurate SpO2 meting te kunnen doen. Controleer daarom dat niets de meting van de pols heeft gehinderd, alvorens de SpO2 meting als betrouwbaar te achten.
) De maximale tijd van een meting op één plek is minder dan 30 minuten, dit is om de correcte werking van de sensor en integriteit van de huid te waarborgen.
Onnauwkeurige metingen kunnen onstaan wanneer:• De patient een significant niveau disfunctionerend
hemoglobine heeft (zoals bij carboxyhemoglobine of methemoglobine).
• Intravasculaire contrastvloeistof is geïnjecteerd bij de patiënt.
• Het gebruikt wordt in fel licht (bv. in direct zonlicht). Scherm, indien nodig, het gebied af met een doek.
• De patiënt overmatig veel beweegt.• De patiënt veneuze pulsaties ervaart.• De patient aan hypotensie, ernstig vaatlijden, anemia
of hypothermia (onderkoeling) lijdt.• De patiënt in shock is of een hartstilstand heeft.• Nagellak of kunstnagels aangebracht zijn.
6. Plaatsen van de batterijen 7Nadat u het apparaat heeft uitgepakt, plaatst u eerst de batterijen. Het batterijcompartiment bevindt zich aan de onderzijde van het apparaat. Verwijder het lipje tussen het batterijcompartiment door in de afgebeelde richting te trekken. Plaats de batterijen (2 x 1.5 V, grootte AAA), let hierbij op de aangegeven polariteit.
) Vervang de batterijen wanneer het lage batterij-spanning 6 symbool in het display verschijnt.
! Vervang dan altijd beide batterijen tegelijkertijd.
7. Aanpassen van display mode en helderheid
Display modeWanneer het apparaat is ingeschakeld, druk dan kort de AAN/UIT knop 1 in om andere display mode te selec-teren 9. Er zijn 6 verschillende display modes. Standaard is display mode 1 ingeschakeld.HelderheidDruk en houd de AAN/UIT knop 1 langer in dan één seconde om de helderheid aan te passen van het scherm. Het display laat «Br 1-10». Er zijn 10 niveaus van helder-heid. Standaard staat dit ingesteld op niveau 4.
8. Gebruik van de draagriem 81. Steek het dunne uiteinde van de draagriem door het
bevestigingsgaatje van het apparaat.2. Steek het dikkere gedeelte door de lus en trek het
stevig vast.
9. Problemen en mogelijke oplossingen
10. Reinigen en desinfecterenGebruik een alcohol swab of katoenen doek bevochtigd met alcohol (70% Isopropyl) om het siliconen aan de binnenzijde, waar de vinger geplaatst wordt, te reinigen. Ook het reinigen van de vinger wordt aanbevolen, voor en na elke meting. Laat het apparaat grondig droog zijn voor gebruik.
! Gebruik nooit agressieve reinigingsmiddelen, verdunningsproducten of benzeen bij het reinigen en dompel de thermometer nooit onder in water of welke andere vloeistof dan ook.
11. GarantieDit apparaat heeft een garantie van 2 jaar vanaf aankoopdatum. De garantie is alleen van toepassing bij overhandigen van een garantiekaart ingevuld door de distributeur (zie achterzijde) of met een bevestiging van de aankoopdatum of kassabon.• Batterijen en slijtageonderdelen zijn niet inbegrepen.• Opening van of wijzigingen aan het apparaat maken de
garantie ongeldig.• De garantie dekt geen schade veroorzaakt door onjuist
gebruik, ongevallen of het niet naleven van de instructies.
12. Technische specificaties
Technische wijzigingen voorbehouden.
Pulse Oximeter NL1 AAN/UIT knop2 Zuurstofsaturatie (waarde in percentage)3 Hartslag (slagen per minuut)4 Pulse wave (plethysmografische golf)5 Pulse bar6 Lage batterijspanning7 Plaatsen van de batterijen8 Bevestigen van de draagriem9 Scherm modusAT Meetprincipe
Droog houden
Fabrikant
Fabrikant gegevens
Geen SpO2 alarm
Lage batterijspanning
Serie nummer
Beschermd tegen druppelend water
Geautoriseerde vertegenwoordiger in Europa
Zuurstofsaturatie (waarde in percentage)
Hartslag (slagen per minuut)
Werkingscondities:5 - 40 °C / 41 - 104 °F
Bewaarcondities:-20 - +55 °C / -4 - +131 °F
CE Markering van Conformiteit
2% SpOPR bpm
0123
Beschrijving
Symptoom/Mogelijke oorzaak
Oplossingen
SpO2 of hartslag worden niet correct weerge-geven.
1. De vinger is niet correct geplaatst.
2. De SpO2 waardevan de patiënt is te laag om te meten.
3. Er is sprake van overmatige belich-ting.
1. Plaats uw vinger opnieuw in het appa-raat.
2. & 3. Meet meerdere keren. Wanneer u vast kunt stellen dat het apparaat goed werkt, neemt u contact op met een arts.
SpO2 of de hart-slag varieert sterk.
1. De vinger is niet diep genoeg geplaatst.
2. Overmatig bewegen van de patiënt.
1. Plaats uw vinger opnieuw in het appa-raat.
2. Blijf rustig zitten en probeer opnieuw.
Het apparaat kan niet worden inge-scha-keld.
1. Geen batterijen of lege batterijen.
2. Batterijen zijn niet goed geplaatst.
3. Het apparaat is beschadigd.
1. Vervang de batterijen.2. Verwijder de batterijen
en plaats nieuwe batterijen.
3. Neem contact op met de Microlife Klanten-service.
Het display schakelt plots uit.
1. Het apparaat is automatisch uitge-schakeld, dit gebeurt na 8 seconden wanneer er geen signaal wordt gede-tecteerd.
2. De batterijspanning is te laag.
1. Normaal.2. Vervang de batterijen.
«Error 3» De rood emissie LED is beschadigd.
Controleer of de rood emissie LED werkt.
«Error 4» De infrarood emissie LED is beschadigd
Controleer of de infra-rood emissie LED werkt.
«Error 6» Het display is defect. Neem contact op met de Microlife Klantenservice.
«Error 7» De emissie LED of diode is beschadigd
Neem contact op met de Microlife Klantenservice.
Type: Fingertip pulse oximeter OXY 300Scherm: OLED schermSpO2:Meetbereik: 70 ~ 100 % Nauwkeurigheid: 70 ~ 100 % : ±2 %Resolutie: 1 %Hartslagfrequentie:Meetbereik: 30 ~ 250 bpmNauwkeurigheid: 30 ~ 99 bpm: ±2 bpm;
100 ~ 250 bpm: ±2 % Resolutie: 1 bpmWerkingscondities: 5 - 40 °C / 41 - 104 °F
≤ 80 % maximale relatieve vochtigheidBewaarcondities: -20 - +55 °C / -4 - +131 °F
≤ 93 % maximale relatieve vochtigheidAutomatische uitschakeling:
Het apparaat is automatisch uitge-schakeld, dit gebeurt na 8 seconden wanneer er geen signaal wordt gede-tecteerd.
Batterij: 2 x 1,5V alkaline batterijen; type AAALevensduur batterij: ca. 30 uur (met nieuwe batterijen)Gewicht: 56 g (inclusief batterijen)Afmetingen: 58 x 32 x 34 mmIP Klasse: IPX1Verwijzing naar normen:
EN ISO10993-1/-5/-10; IEC 60601-1; EN 60601-1-2; EN ISO9919; EN 62304; EN 60601-1-6; CE0123
Verwachte levensduur:
5 jaar (bij een gebruik van 15 keer/dag; 20 minuten voor elke meting)
Αγαπητέ πελάτη,Αυτό το παλμικό οξύμετρο δακτύλου Microlife είναι μια φορητή μη επεμβατική συσκευή για τον δειγματοληπτικό έλεγχο του κορεσμού οξυγόνου της αρτηριακής αιμοσφαι-ρίνης (SpO2) και του παλμικού ρυθμού των ενήλικων και παιδιατρικών ασθενών. Είναι κατάλληλο για ατομική χρήση (στο σπίτι ή εκτός σπιτιού) καθώς και για χρήση στον ιατρικό τομέα (νοσοκομεία, εγκαταστάσεις νοσοκο-μειακού τύπου). Έχει αποδειχθεί κλινικά ότι είναι όργανο υψηλής ακρίβειας κατά την επαναληψιμότητα.Διαβάστε αυτές τις οδηγίες προσεκτικά, ώστε να εξοικει-ωθείτε με όλες τις λειτουργίες και τις πληροφορίες ασφαλείας. Στόχος μας είναι η ικανοποίησή σας από το προϊόν μας Microlife. Εάν έχετε οποιεσδήποτε απορίες ή προβλήματα ή εάν θέλετε να παραγγείλετε κάποιο ανταλλακτικό εξάρτημα, απευθυνθείτε στο τοπικό σας τμήμα εξυπηρέτησης πελατών της Microlife. Ο πωλητής σας ή το φαρμακείο της περιοχής σας θα σας ενημερώ-σουν σχετικά με την διεύθυνση του αντιπροσώπου Microlife στην χώρα σας. Εναλλακτικά, επισκεφθείτε την ιστοσελίδα μας στο διαδίκτυο στη διεύθυνση www.microlife.com, όπου μπορείτε να βρείτε πολλές χρήσιμες πληροφορίες σχετικά με τα προϊόντα μας.Κρατήστε σε ασφαλές μέρος τις οδηγίες χρήσης για μελλοντική παραπομπή. Μείνετε υγιείς – Microlife AG!
1. Επεξήγηση συμβόλωνΗ απόρριψη των μπαταριών και των ηλεκτρονικών οργάνων πρέπει να πραγματοποιείται σύμφωνα με τους ισχύοντες κανονισμούς, και όχι μαζί με τα οικιακά απορρίμματα.Διαβάστε προσεκτικά τις οδηγίες πριν χρησιμο-ποιήσετε αυτή τη συσκευή.
Τύπος BF εφαρμοσμένο τμήμα
2. Σημαντικές οδηγίες ασφαλείας• Το όργανο αυτό πρέπει να χρησιμοποιείται για το
σκοπό που περιγράφεται στο παρόν έντυπο οδηγιών. Ο κατασκευαστής δεν φέρει καμία ευθύνη για τυχόν ζημιά που προκαλείται από λανθασμένη χρήση.
• Ποτέ μην τοποθετείτε αυτό το όργανο σε νερό ή άλλα υγρά. Για τον καθαρισμό, ακολουθείτε τις οδηγίες στην ενότητα «Καθαρισμός και απολύμανση».
• Μη χρησιμοποιείτε το όργανο εάν θεωρείτε ότι έχει υποστεί ζημιά ή εάν παρατηρήσετε κάτι ασυνήθιστο.
• Ποτέ μην ανοίγετε το όργανο.• Αυτό το όργανο αποτελείται από ευαίσθητα εξαρτή-
ματα και πρέπει να το χειρίζεστε με προσοχή. Τηρείτε τις οδηγίες αποθήκευσης και λειτουργίας που περιγρά-φονται στην ενότητα «Τεχνικά χαρακτηριστικά»!
• Προστατεύστε το από:- νερό και υγρασία- ακραίες θερμοκρασίες- κρούση και πτώση- μόλυνση και σκόνη- άμεση έκθεση στον ήλιο- ζέστη και κρύο
• Η λειτουργία αυτής της συσκευής ενδέχεται να τεθεί σε κίνδυνο, όταν χρησιμοποιείται κοντά σε ισχυρά ηλεκτρομαγνητικά πεδία, όπως κινητά τηλέφωνα ή εγκαταστάσεις ραδιοεπικοινωνίας και προτείνουμε μια απόσταση τουλάχιστον 1 m (κατά το 60601-1-2 πίνακας 5). Σε περιπτώσεις που υποψιάζεστε ότι αυτό είναι αναπόφευκτο, βεβαιωθείτε εάν η συσκευή λειτουργεί σωστά πριν από τη χρήση.
• Μην χρησιμοποιείτε τη συσκευή σε περιβάλλονμαγνητικού ή αξονικού τομογράφου.
• Αυτή η συσκευή δεν προορίζεται για συνεχή παρακο-λούθηση.
• Αυτή η συσκευή δεν διαθέτει λειτουργία προειδοποίησης (συναγερμού) και ως εκ τούτου, δεν είναι κατάλληλη για την αξιολόγηση ιατρικών αποτελεσμάτων. Μην χρησιμο-ποιείτε τη συσκευή σε καταστάσεις όπου απαιτούνται προειδοποιήσεις.
• Μην αποστειρώνετε αυτήν την συσκευή χρησιμοποιώ-ντας κλίβανο ή αποστειρωτικό οξείδιο του αιθυλενίου. Αυτή η συσκευή δεν είναι κατάλληλη για αποστείρωση.
• Εάν δεν πρόκειται να χρησιμοποιήσετε το όργανο για μεγάλο χρονικό διάστημα, πρέπει να αφαιρείτετις μπαταρίες.
Βεβαιωθείτε ότι τα παιδιά δεν χρησιμοποιούν το όργανο χωρίς επίβλεψη, διότι ορισμένα μέρη του είναι αρκετά μικρά και υπάρχει κίνδυνος κατάποσης. Να είστε ενήμεροι για τον κίνδυνο στραγγαλισμού σε περίπτωση που αυτή η συσκευή τροφοδοτείται με καλώδια ή σωλήνες.
! Η χρήση της συσκευής δεν προορίζεται σαν υποκατάστατο των οδηγιών του γιατρού σας.
3. Γενική περιγραφήΟ κορεσμός οξυγόνου υποδεικνύει το ποσοστό της αιμο-σφαιρίνης στο αρτηριακό αίμα που είναι εμπλουτισμένο με οξυγόνο. Αυτή είναι μια πολύ σημαντική παράμετρος για το αναπνευστικό κυκλοφορικό σύστημα. Πολλές ασθέ-νειες του αναπνευστικού είναι δυνατόν να οδηγήσουν σε μειωμένο κορεσμό οξυγόνου στο ανθρώπινο αίμα.Οι ακόλουθοι παράγοντες μπορούν να μειώσουν τον κορεσμό οξυγόνου: Αυτόματη ρύθμιση της οργανικής δυσλειτουργίας που προκαλείται από αναισθησία, εντα-τικό μετεγχειρητικό τραύμα, τραυματισμοί που προκαλού-νται από ορισμένες ιατρικές εξετάσεις. Αυτές οι καταστά-σεις μπορούν να οδηγήσουν σε ζαλάδα, αδυναμία και εμετό. Ως εκ τούτου, είναι πολύ σημαντικό να γνωρίζουμε τον κορεσμό οξυγόνου του ασθενούς έτσι ώστε οι γιατροί να μπορούν να εντοπίσουν τυχόν προβλήματα έγκαιρα.
4. Βασική Αρχή μέτρησηςΒασική Αρχή αυτού του παλμικού οξύμετρου δακτύλου: Μια μαθηματική εξίσωση είναι εγκατεστημένη η οποία χρησιμοποιεί τον νόμο του Lambert-Beer ανάλογα με τα χαρακτηριστικά απορρόφησης φάσματος της αποξυγονωμένης αιμοσφαιρίνης (Hb) και της οξυαιμο-σφαιρίνης (HbO2) σε κόκκινες και εγγύς υπέρυθρες ζώνες.Βασική αρχή λειτουργίας αυτής της συσκευής: Φωτοη-λεκτρική τεχνολογία εντοπισμού οξυαιμοσφαιρίνης που εφαρμόζεται σύμφωνα με την ικανότητα σάρωσης παλμών και την τεχνολογία καταγραφής, ούτως ώστε οι δύο δέσμες διαφορετικού μήκους κύματος του φωτός (660 nm κόκκινο και 905 nm εγγύς υπέρυθρο φως) να μπορούν να εστιάσουν στην άκρη ενός ανθρώπινου νυχιού μέσω ενός αισθητήρα σύσφιξης δακτύλου. Ένα μετρούμενο σήμα που λαμβάνεται από ένα φωτοευαίσθητο στοιχείο θα εμφανιστεί στην οθόνη μέσω διεργασίας σε ηλεκτρονικά κυκλώματα και μικροεπε-ξεργαστή που εμφανίζεται στην οθόνη, μέσω ηλεκτρονικών κυκλωμάτων και ενός μικροεπεξεργαστή.Διάγραμμα Βάσης Λειτουργίας AT:1. Σωλήνας εκπομπής κόκκινων και υπέρυθρων ακτίνων.2. Σωλήνας λήψης κόκκινων και υπέρυθρων ακτίνων.
5. Οδηγίες χρήσης1. Τοποθετήστε τις μπαταρίες, όπως περιγράφεται
στην ενότητα «Τοποθέτηση των μπαταριών 7».2. Τοποθετήστε ένα δάχτυλο (με την πλευρά των νυχιών
επάνω, συνιστάται ο δείκτης ή το μεσαίο δάκτυλο) στην υποδοχή δακτύλου της συσκευής. Βεβαιωθείτε ότι έχετε εισαγάγει πλήρως το δάκτυλο, έτσι ώστε οι αισθητήρες να καλύπτονται πλήρως από αυτό.
3. Απελευθερώστε τη συσκευή επιτρέποντάς της να σφίξει το δάκτυλο.
4. Πατήστε το κουμπί ON/OFF 1 για να ενεργοποιήσετετη συσκευή.
5. Μην κουνάτε το δάκτυλό σας κατά τη διάρκεια της δοκιμής. Συνιστάται να μην κινείτε το σώμα σας κατά τη διάρκεια μιας μέτρησης.
6. Οι τιμές μέτρησης σας θα εμφανιστούν στην οθόνη7. μετά από λίγα δευτερόλεπτα.8. Αφαιρέστε το δάκτυλό σας από τη συσκευή. Η οθόνη
θα εμφανίσει την ένδειξη «Finger Out» (Απομάκρυνση δακτύλου).
9. Η συσκευή θα απενεργοποιηθεί αυτόματα περίπου 8 δευτερόλεπτα αφότου το δάκτυλο αφαιρεθεί από την υποδοχή.
) Το ύψος του ραβδογράμματος 5 είναι ένδειξη τηςισχύος του παλμού και του σήματος. Η ράβδος θα πρέπει να είναι μεγαλύτερη από 30% για μια σωστή μέτρηση.
) Η συσκευή πρέπει να είναι σε θέση να μετρήσει τον σφυγμό σωστά για να ληφθεί μια ακριβής μέτρηση SpO2. Βεβαιωθείτε ότι τίποτα δεν εμπο-δίζει τη μέτρηση των παλμών προτού βασιστείτε στη μέτρηση του SpO2.
) Η μέγιστη εφαρμογή σε ένα μεμονωμένο σημείοθα πρέπει να διαρκεί λιγότερο από 30 λεπτά, προκειμένου να εξασφαλιστεί η σωστή ευθυγράμ-μιση αισθητήρα και η ακεραιότητα του δέρματος.
Υπάρχει πιθανότητα να προκύψουν ανακριβείς μετρήσεις εάν:• Ο ασθενής πάσχει από σημαντικά επίπεδα δυσλειτουρ-
γικής αιμοσφαιρίνης (όπως ανθρακοξυαιμοσφαιρίνη ή μεθαιμοσφαιρίνη).
• Ενδαγγειακές χρωστικές ουσίες όπως πράσινο ινδοκυ-ανίνης ή μπλε μεθυλενίου έχουν εγχυθεί στον ασθενή.
• Χρησιμοποιείται με την παρουσία υψηλού φωτισμού περιβάλλοντος (π.χ. άμεσο ηλιακό φως). Θωρακίστε την περιοχή του αισθητήρα με μια χειρουργική πετσέτα αν είναι απαραίτητο.
• Υπερβολική κίνηση του ασθενούς.• Ο ασθενής έχει φλεβικούς παλμούς• Ο ασθενής έχει φλεβικούς παλμούς.• Ο ασθενής έχει υπόταση, οξεία αγγειοσυστολή, οξεία
αναιμία ή υποθερμία.• Ο ασθενής έχει υποστεί καρδιακή ανακοπή ή είναι σε
κατάσταση σοκ.• Το βερνίκι νυχιών ή τα ψεύτικα νύχια μπορούν να
προκαλέσουν ανακριβείς ενδείξεις.
6. Τοποθέτηση των μπαταριών 7Αφού αποσυσκευάσετε τη συσκευή, τοποθετήστε πρώτα τις μπαταρίες. Η θήκη των μπαταριών βρίσκεται στο κάτω μέρος της συσκευής. Αφαιρέστε το κάλυμμα της μπαταρίας σύροντάς το προς την κατεύθυνση που υποδεικνύεται. Εισάγετε τις μπαταρίες (2 x 1,5 V μπαταρίες, μεγέθους AAA) προσέχοντας την ενδεικνυόμενη πολικότητα.
) Αντικαταστήστε τις μπαταρίες όταν εμφανιστεί 6 η ένδειξη χαμηλής ισχύος στην οθόνη.
! Να αντικαθιστάτε πάντοτε τις δύο μπαταρίεςταυτόχρονα.
7. Ρύθμιση λειτουργίας οθόνης και φωτεινότητας
Λειτουργία ΟθόνηςΌταν η συσκευή είναι ενεργοποιημένη, πατήστε σύντομα το κουμπί ON/OFF 1 για να μεταβείτε σε άλλη λειτουργία οθόνης και για να επιλέξετε την επιθυμητή λειτουργία 9. Υπάρχουν 6 διαφορετικές λειτουργίες οθόνης. Η προεπι-λεγμένη ρύθμιση είναι η λειτουργία 1.ΦωτεινότηταΠατήστε παρατεταμένα το κουμπί ON/OFF 1 για περισσότερο από ένα δευτερόλεπτο για να ρυθμίσετε τη φωτεινότητα της συσκευής. Η οθόνη θα εμφανίσει την ένδειξη «Br 1-10». Υπάρχουν 10 επίπεδα φωτεινότητας. Η προεπιλεγμένη ρύθμιση είναι το επίπεδο 4.
8. Χρήση του ιμάντα 81. Περάστε το στενότερο άκρο του ιμάντα μέσα από την
υποδοχή που βρίσκεται στο οπίσθιο άκρο της συσκευής.
2. Περάστε το φαρδύτερο άκρο του ιμάντα μέσα από τοσπειροειδές άκρο προτού το τραβήξετε σφιχτά.
9. Δυσλειτουργία και Αντιμετώπιση
10. Καθαρισμός και απολύμανσηΧρησιμοποιείστε μαλακό πανί ή βαμβάκι εμποτισμένο με οινόπνευμα (70% ισοπροπυλική αλκοόλη) για να καθαρί-σετε την σιλικόνη η οποία έρχεται σε επαφή με το δάχτυλο στο εσωτερικό της συσκευής. Επίσης, καθαρίστε το δάχτυλο σας με οινόπνευμα πριν και μετά από κάθε δοκιμή.
! Αφήστε τη συσκευή να στεγνώσει καλά πριν τη χρήση. Ποτέ μη χρησιμοποιείτε λειαντικά καθα-ριστικά, διαλυτικά ή βενζίνη για τον καθαρισμό της συσκευής και ποτέ μην την βυθίζετε σε νερό ή άλλα υγρά καθαρισμού.
11. ΕγγύησηΤο όργανο αυτό καλύπτεται από 2 ετή εγγύηση που ισχύει από την ημερομηνία αγοράς. Η εγγύηση ισχύει μόνο κατά την προσκόμιση της κάρτας εγγύησης, η οποία έχει συμπληρωθεί από τον αντιπρόσωπο (ανατρέξτε στο οπισθόφυλλο) η οποία επιβεβαιώνει την ημερομηνία αγοράς ή την απόδειξη ταμειακής μηχανής.• Οι μπαταρίες και τα εξαρτήματα που υπόκεινται σε
φθορά δεν καλύπτονται.• Σε περίπτωση ανοίγματος ή τροποποίησης του
οργάνου, η εγγύηση ακυρώνεται.• Η εγγύηση δεν καλύπτει ζημιά που προκαλείται από
κακή χρήση, ατυχήματα ή μη συμμόρφωση στις οδηγίες χρήσης.
12. Τεχνικά χαρακτηριστικά
Παλμικό Οξύμετρο GR1 Πλήκτρο ON/OFF2 Κορεσμός οξυγόνου (τιμή ως ποσοστό)3 Παλμικός ρυθμός (τιμή σε παλμούς ανά λεπτό)4 Παλμικό κύμα (πληθυσμογραφικό κύμα)5 Ράβδος παλμών6 Ένδειξη αποφόρτισης μπαταρίας7 Τοποθέτηση των μπαταριών8 Τοποθέτηση ιμάντα9 Λειτουργίες οθόνηςAT Βασική αρχή λειτουργίας
Κρατήστε το στεγνό
Κατασκευαστής
Ημερομηνία κατασκευής
Χωρίς προειδοποίηση SpO2
Ένδειξη αποφόρτισης μπαταρίας
Σειριακός αριθμός
Με προστασία από σταγόνες νερού
Εξουσιοδοτημένος αντιπρόσωπος στην Ευρωπαϊκή ΚοινότηταΚορεσμός οξυγόνου (τιμή ως ποσοστό)
Παλμικός ρυθμός (τιμή σε παλμούς ανά λεπτό)
Συνθήκες λειτουργίας:5 - 40 °C / 41 - 104 °F
Συνθήκες αποθήκευσης:-20 - +55 °C / -4 - +131 °F
Σήμανση συμμόρφωσης CE
2% SpOPR bpm
0123
Περι-γραφή
Συμπτώματα/Πιθανές αιτίες
Λύσεις
Ο ρυθμός SpO2 ή ο παλμικός ρυθμός δεν εμφανίζο-νται κανο-νικά.
1. Το δάκτυλο δεν έχει τοποθετηθεί σωστά.
2. Η τιμή SpO2 τουασθενή είναι πολύχαμηλή για να μετρηθεί.
3. Υπάρχει υπερβολικός φωτισμός.
1. Προσπαθήστε να εισα-γάγετε ξανά το δάκτυλο.
2. & 3. Μετρήστε περισσό-τερες φορές. Εάν έχετε διαπιστώσει ότι τοπροϊόν λειτουργεί σωστά, συμβουλευ-τείτε τον γιατρό σας.
Ο ρυθμός SpO2 ή ο παλμικός ρυθμός παρουσιά-ζεται ασταθής.
1. Το δάκτυλο μπορεί να μην έχει τοποθετηθεί αρκετά βαθιά.
2. Υπερβολική κίνησητου ασθενούς.
1. Προσπαθήστε να εισα-γάγετε ξανά το δάκτυλο.
2. Καθίστε ήρεμα και προσπαθήστε ξανά.
Η συσκευή δεν μπορεί να τεθεί σε λειτουργία.
1. Δεν υπάρχει μπαταρία ή η μπαταρία έχει χαμηλή ισχύ.
2. Οι μπαταρίες δενέχουν τοποθετηθεί σωστά.
3. Η συσκευή μπορεί ναέχει υποστεί βλάβη.
1. Αντικαταστήστε τις μπαταρίες.
2. Αφαιρέστε και τοποθετήστε ξανά τιςμπαταρίες.
3. Επικοινωνήστε με την τοπική εξυπηρέτηση πελατών της Microlife.
Η οθόνη απενεργο-ποιείται ξαφνικά.
1. Η συσκευή τίθεται αυτόματα εκτός λειτουργίας, όταν δεν ανιχνεύεται σήμα μετά από 8 δευτερόλεπτα.
2. Η ισχύς της μπαταρίας είναι πολύ χαμηλή για να λειτουργήσει.
1. Κανονική2. Αντικαταστήστε τις
μπαταρίες.
«Error 3» Η κόκκινη λυχνία εκπο-μπής LED είναι κατε-στραμμένη.
Ελέγξτε την κόκκινη λυχνία εκπομπής LED.
«Error 4» Η λυχνία (LED) υπέρυ-θρων ακτίνων είναι κατεστραμμένη.
Ελέγξτε τη λυχνία(LED) υπέρυθρων ακτίνων.
«Error 6» Η οθόνη έχει κατα-στραφεί.
Επικοινωνήστε με την τοπική εξυπηρέτηση πελατών της Microlife.
«Error 7» Η λυχνία (LED) εκπομπής ή η δίοδος υποδοχής είναι κατεστραμμένα.
Επικοινωνήστε με την τοπική εξυπηρέτηση πελατών της Microlife.
Τύπος: Παλμικό Οξύμετρο Δακτύλου OXY 300
Οθόνη: Οθόνη OLEDΚορεσμός Οξυγόνου:Εύρος τιμών μέτρησης: 70 ~ 100 % Ακρίβεια: 70 ~ 100 % : ±2 %
Η εταιρεία διατηρεί το δικαίωμα για αλλαγή των τεχνικών χαρακτηριστικών.
Ανάλυση: 1 %Σφύξεις:Εύρος τιμών μέτρησης: 30 ~ 250 bpmΑκρίβεια: 30 ~ 99 bpm: ±2 bpm;
100 ~ 250 bpm: ±2 % Ανάλυση: 1 bpmΣυνθήκες λειτουργίας: 5 - 40 °C / 41 - 104 °F
≤ 80 % μέγιστη σχετική υγρασίαΣυνθήκες αποθήκευσης: -20 - +55 °C / -4 - +131 °F
≤ 93 % μέγιστη σχετική υγρασίαΑυτόματη ενεργοποίηση-απενεργοποίηση:
Κλείνει αυτόματα σε 8 δευτερό-λεπτα, όταν δεν υπάρχει σήμα ή ανιχνεύεται χαμηλό σήμα.
Μπαταρία: 2 x 1,5 V αλκαλικές μπαταρίες, μεγέθους AAA
Διάρκεια ζωής μπαταρίας:
περίπου 30 ώρες (με χρήση νέων μπαταριών)
Βάρος: 56 g (συμπ. των μπαταριών)Διαστάσεις: 58 x 32 x 34 mmIP Κατηγορία: IPX1Συμμόρφωση με πρότυπα:
EN ISO10993-1/-5/-10; IEC 60601-1; EN 60601-1-2; EN ISO9919; EN 62304; EN 60601-1-6; CE0123
Αναμενόμενη διάρκεια ζωής:
5 χρόνια (όταν χρησιμοποιείται 15 φορές/ημέρα; 20 λεπτά για κάθε μέτρηση)
AR123456789AT
SpO2
www.microlife.com
Microlife AG !
BF
SpO2
-CE
« »
5 2-1-60601
HbO2 Hb
:AT
7
1 ON/OFF
Finger Out»
5
SpO2SpO2
⑦
AAA6
1 ON/OFF
9
1 ON/OFFBr 10-1
8
SpO2SpO2
SpO2
«Error 3»LED
«Error 4»LED
«Error 6»
«Error 7»LED
OXY 300 OLED
:SpO2
:
bpm :;bpm bpm
bpmbpm
AAA alkaline V x
x xIPX1 IP
EN ISO10993-1/-5/-10; IEC 60601-1; EN 60601-1-2; EN ISO9919;
EN 62304; EN 60601-1-6; CE0123
2% SpOPR bpm
0123


![[XLS] · Web viewMice "preconditioned" with latrepirdine show a delayed symptom onset and a significant increase in life span. (1 μg/kg, intraperitoneal ).[3] Fruquintinib (HMPL-013)](https://static.fdocument.org/doc/165x107/5ac161e67f8b9a5a4e8d12a0/xls-viewmice-preconditioned-with-latrepirdine-show-a-delayed-symptom-onset-and.jpg)


![the Australian Pain Society JULY 2013 NEwSlEttEr · Pain Symptom Manage. 2013 Feb 1. pii: S0885-3924(12)00835-4. doi: 10.1016/j.jpainsymman.2012.10.231. [Epub ahead of print] The](https://static.fdocument.org/doc/165x107/5ecf892bef43e453bf24d5dc/the-australian-pain-society-july-2013-newsletter-pain-symptom-manage-2013-feb-1.jpg)