ROWER MACHINE R200 - Fitness Depot manual.pdf · parts list rower machine no. description quantity...
13
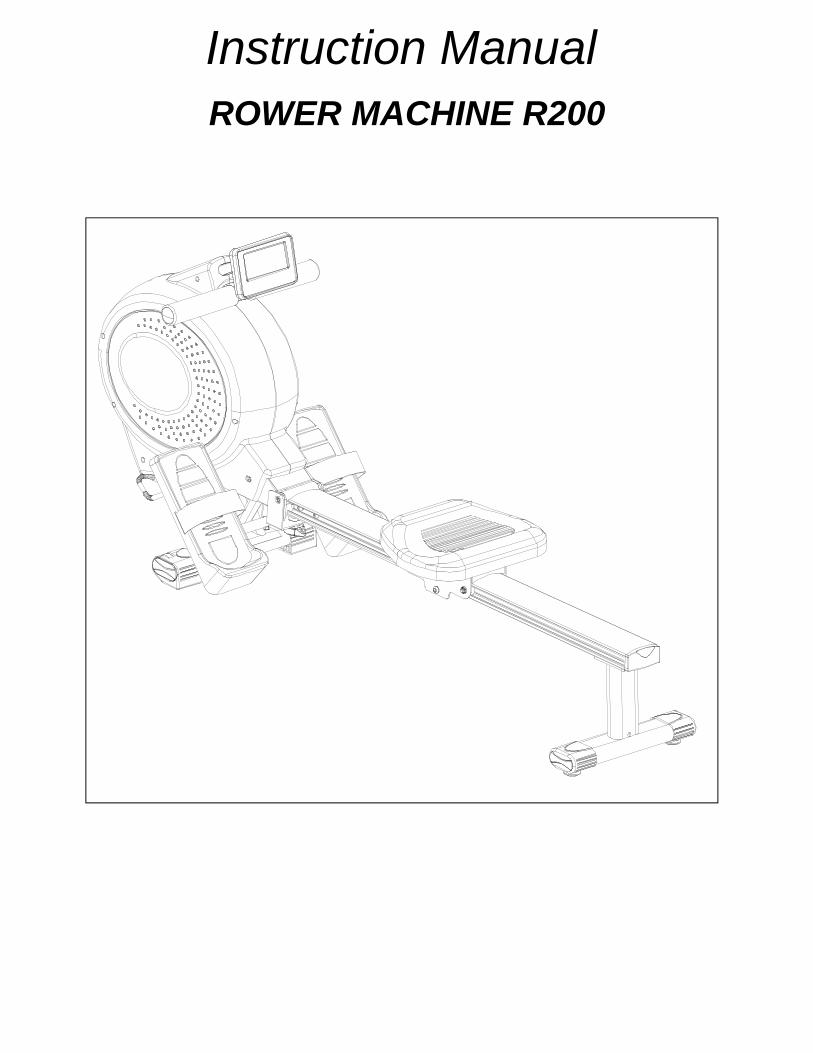
Instruction Manual ROWER MACHINE R200
-
Upload
vuongduong -
Category
Documents
-
view
219 -
download
0
Transcript of ROWER MACHINE R200 - Fitness Depot manual.pdf · parts list rower machine no. description quantity...
Instruction ManualROWER MACHINE R200
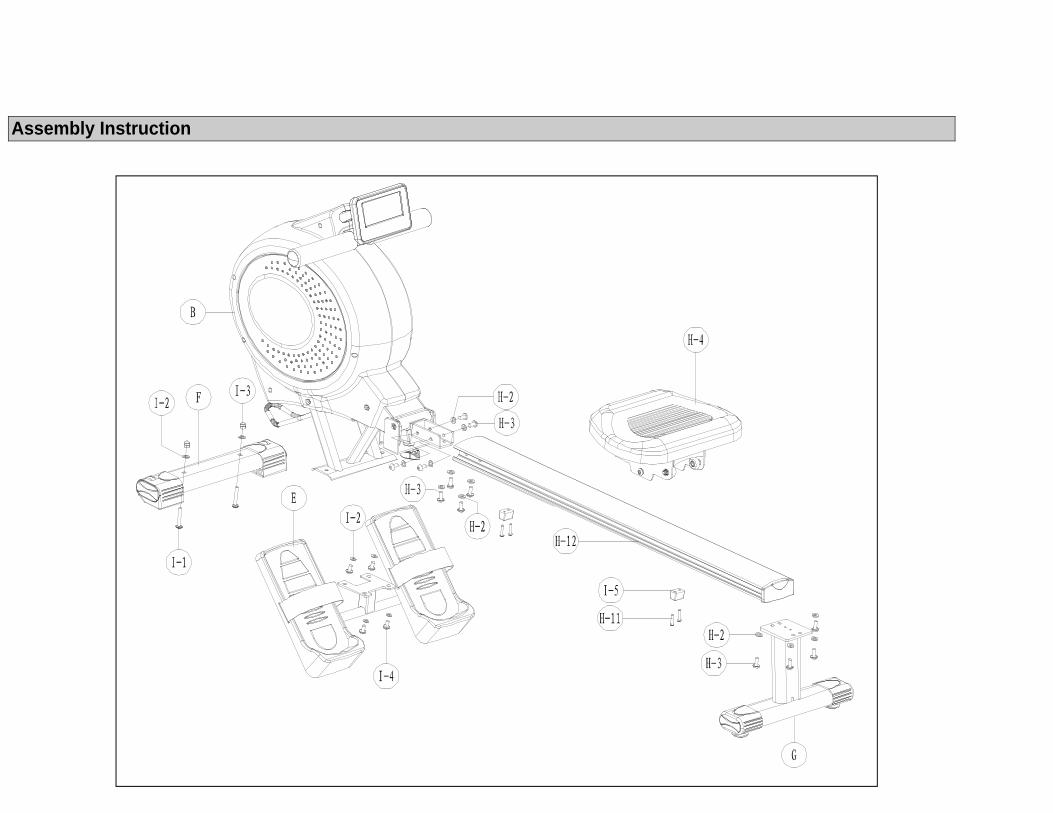
Assembly Instruction
- 3 -
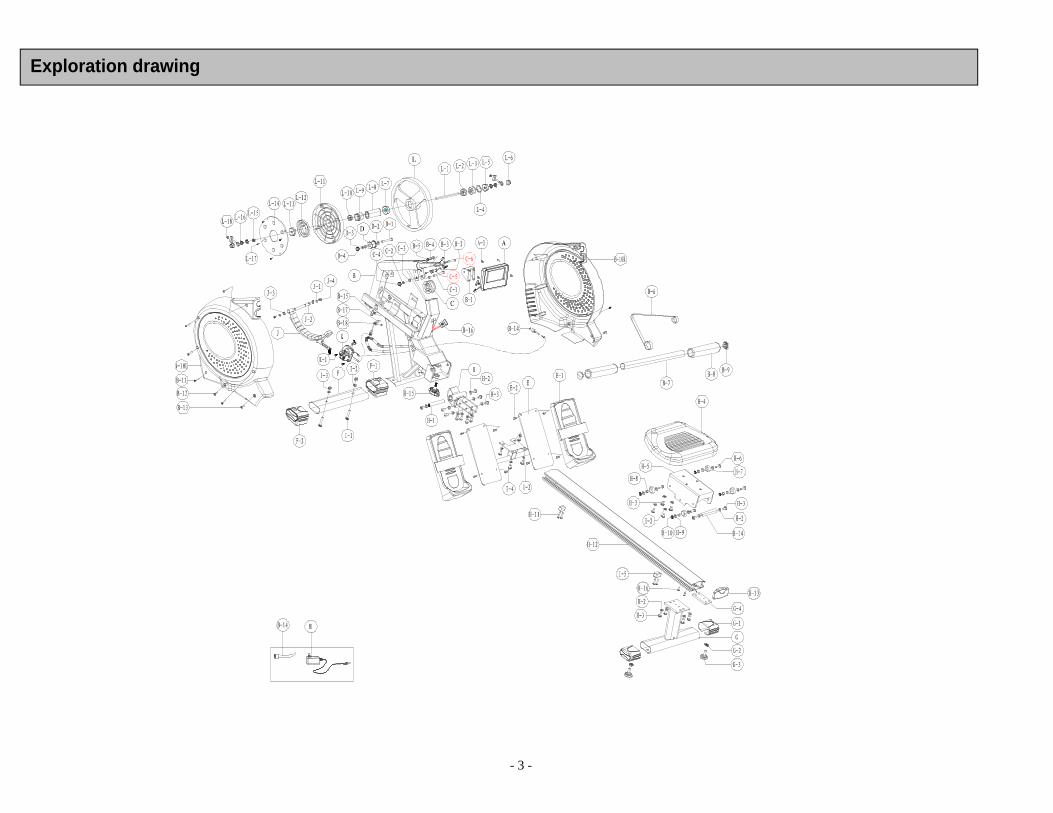
Exploration drawing
Parts List ROWER MACHINENo. Description Quantity
A COMPUTER 1 SET
A-1 SCREW FOR FIXING COMPUTER 4 PCS
B MAIN FRAME 1 SET
B-1 BRACKET FOR FIXING COMPUTER 1 PCS
B-2 SCREW M6xP1.0x57L 2 PCS
B-3 FIXING CAP 4 PCS
B-4 FLAT WASHER φ6xφ16x1t 2 PCS
B-5 NYLON NUT M6 2 PCS
B-6 STRAP 1 PCS
B-7 HANDLABAR 1 SET
B-8 HANDLEBAR FOAM 2 PCS
B-9 CAP 2 PCS
B-10 R LEFT COVER(LOWER) 1 PCS
B-10 L RIGHT COVER(LOWER) 1 PCS
B-11 SCREW M4x40L 5 PCS
B-12 SCREW M5x16L 2 PCS
B-13 SCREW M5x16L 2 PCS
B-14 DC WIRE 1 SET
B-15 UPPER COMPUTER CABLE 1 PCS
B-16 WIRELESS RECEIVER FOR PULSE 1 PCS
B-17 SENSOR BOX 1 PCS
B-18 SCREW M4x10L 1 PCS
C DRIVING PULLEY 1 SET
C-1 HEXAGON SCREW 3/8"x61mml 1 PCS
C-2 FLAT WASHERφ10xφ18x2t 3 PCS
C-3 BUSHING φ10xφ14x3mmL 2 PCS
C-4 NYLON NUT 3/8"x7t 1 PCS
C-5 STOPPER FOR STRAP 1 PCS
C-6 SCREW M4x10L 1 PCS
D SMALL PULLEY 1 PCS
D-1 HEXAGON SCREW 3/8"x61mml 1 PCS
D-2 BUSHINGφ10xφ14x3mmL 2 PCS
D-3 FLAT WASHERφ10xφ18x1t 3 PCS
D-4 NYLON NUT 3/8"x7t 1 PCS
E PEDAL HOLDER 1 SET
E-1 PEDAL 1 SET
E-2 SCREW M5xP0.8x12L 8 PCS
F FRONT STABILILZER 1 PCS
F-1 CAP FOR FRONT STABLILZER(LEFT) 1 PCS
F-2 CAP FOR FRONT STABLILZER(RIGHT) 1 PCS
G REAR STABILILZER 1 PCS
G-1 CAP FOR REAR STABLILZER 2 PCS
G-2 HEXAGON NUT 3/8"-16x3t 2 PCS
G-3 ADJUSTING CAP 2 PCS
G-4 METAL SHEET OF SLIDER 1 PCS
- 3 -
H HOLDER OF SLIDER 1 PCS
H-1 SPINDLE 1 PCS
H-2 FLAT WASHERφ8xφ16x2t 20 PCS
H-3 SCREW M8xP1.25x20L 20 PCS
H-4 SEAT 1 PCS
H-5 ROLLING SLIDER 1 SET
H-6 HEXAGON SCREW M6Xp1.0x30L 4 PCS
H-7 PU WHEELφ30x12W 4 PCS
H-8 BUSHING φ6.2*φ9.2*7L 4 PCS
H-9 FLAT WASHERφ6xφ12x1t 8 PCS
H-10 NYLON NUT M6 4 PCS
H-11 SCREW M5x35L 4 PCS
H-12 SLIPPERY RAIL 1 PCS
H-13 REAR COVER FOR SLIDER 1 PCS
H-14 ROLLER AXLE 1 PCS
H-15 ADJUSTMENT KNOB 1 PCS
H-16 SCREW M5x16L 2 PCS
I-1 CARRIAGE SCREW M8xP1.25x55L 2 PCS
I-2 FLAT WASHERφ8*φ19*2T 6 PCS
I-3 CAP NUT M8 2 PCS
I-4 SCREW M8xP1.25x20L 4 PCS
I-5 STOPPER FOR SILDER 2 PCS
J~J-4 MAGNETIC BRACKET 1 SET
K GEAR BOX 1 SET
K-1 HEXAGON SCREW M6xP1.0x10L 2 PCS
L~L-5,L-7~L-18 FLYWHEEL SET 1 SET
L-6 NUT PATTER 3/8"-26 2 PCS
M AC ADAPTOR 1 SET
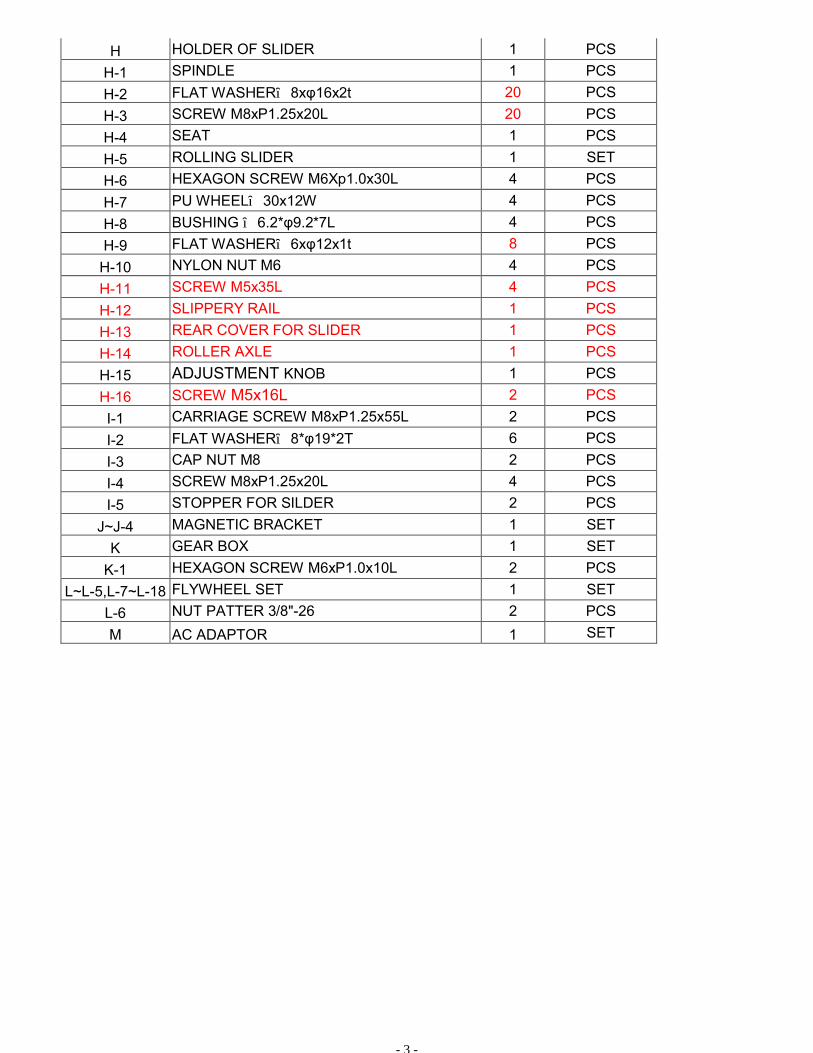
StepsFit the front stabilizer (F) and drive in M8xP1.25x55L two bolts (I-1) and M8 two flat washer (I-2)and two nut (I-3)
- 3 -
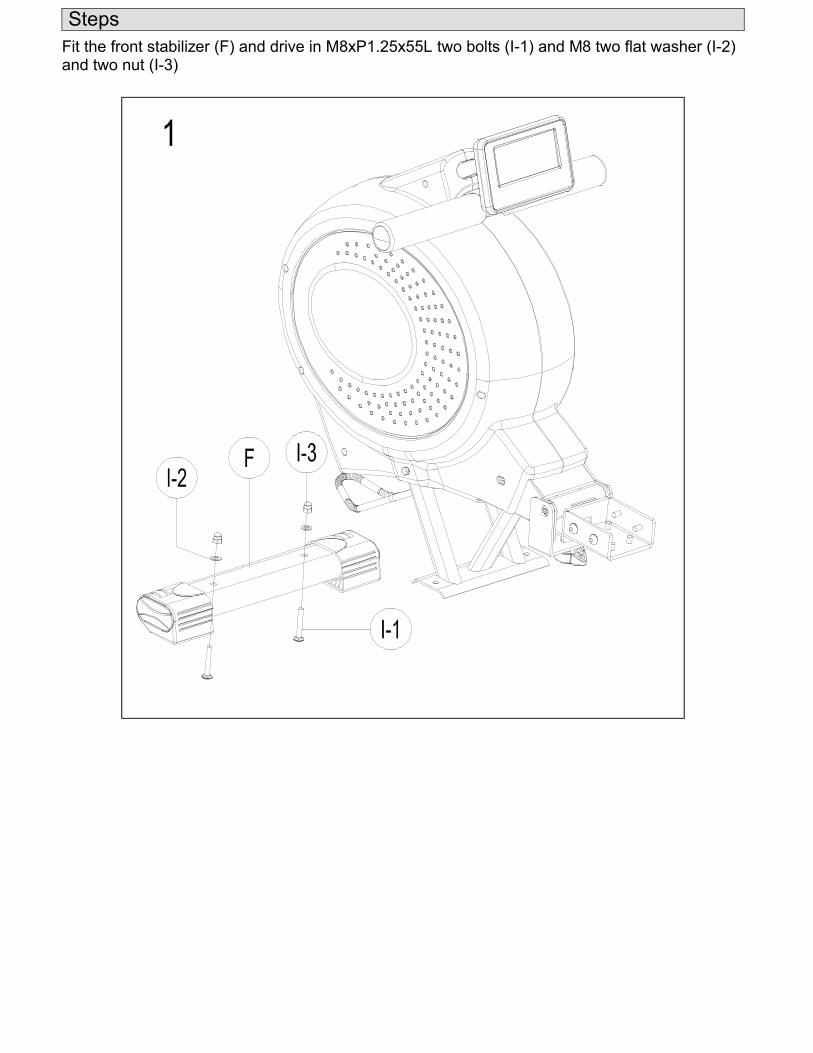
Steps 2
Fit paddle holder (E) to the frame (B) and drive by M8xP1.25x20L four screws (I-4) and M8 fourflat washer (I-2) b
B
- 4 -
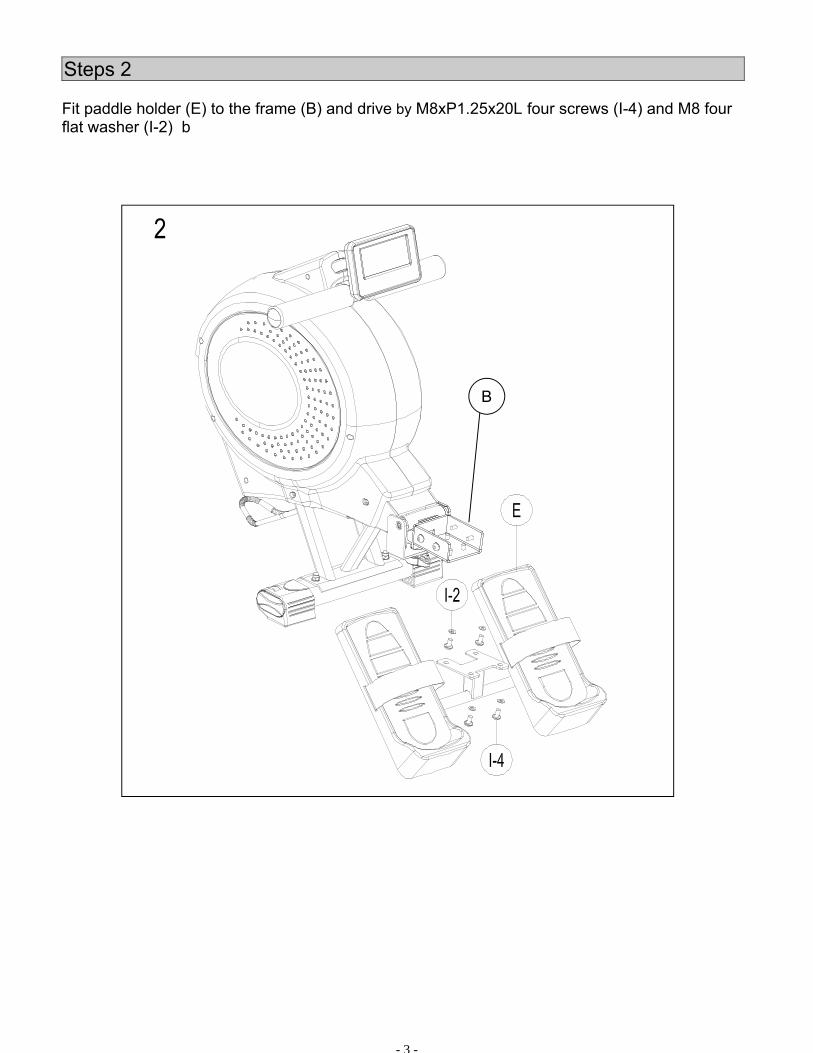
Steps 3
Insert the rear stabilizer (G), and then attach the rear stabilizer (G) with slippery rail (H-12) byM8xP1.25x20L Bolt (H-3) and Flat Washers (H-2).
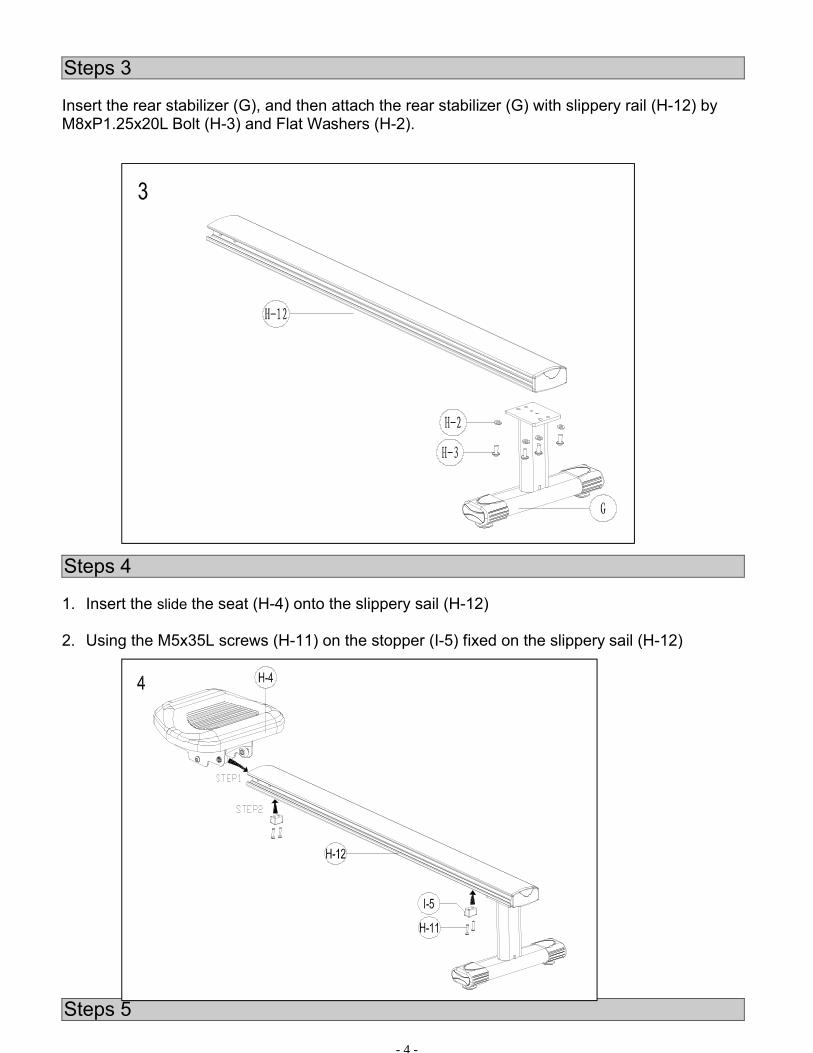
Steps 4
1. Insert the slide the seat (H-4) onto the slippery sail (H-12)
2. Using the M5x35L screws (H-11) on the stopper (I-5) fixed on the slippery sail (H-12)
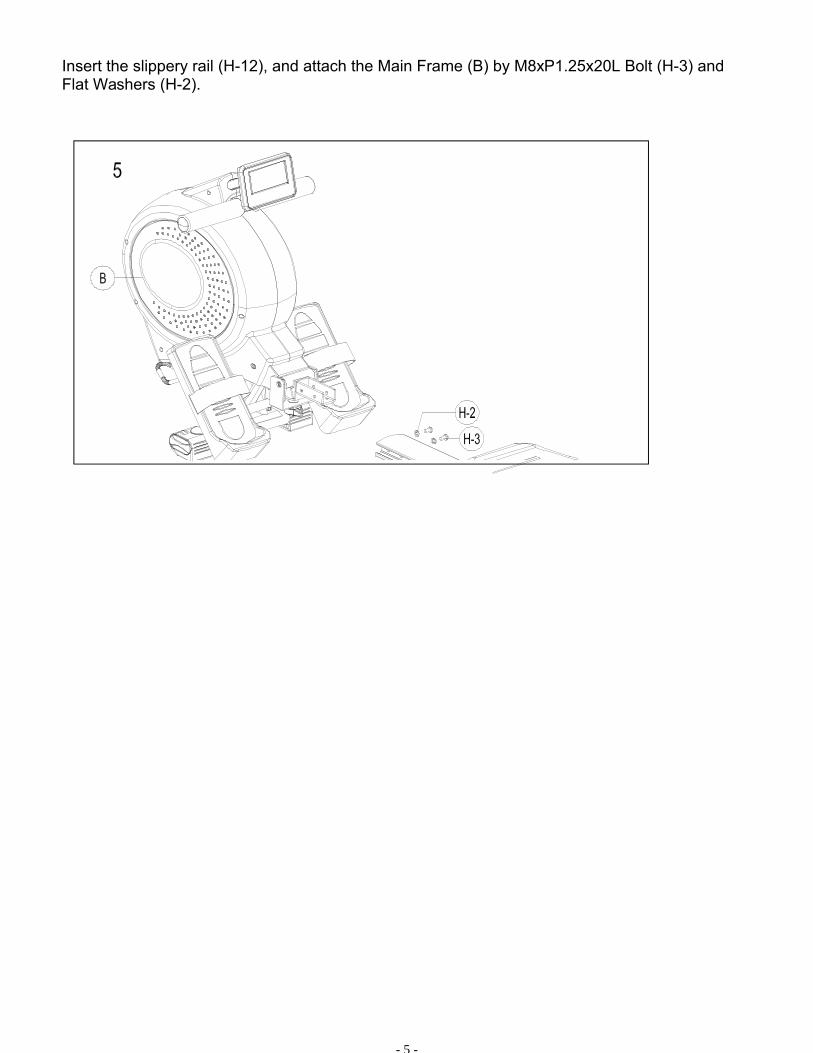
Steps 5
- 5 -
Insert the slippery rail (H-12), and attach the Main Frame (B) by M8xP1.25x20L Bolt (H-3) andFlat Washers (H-2).
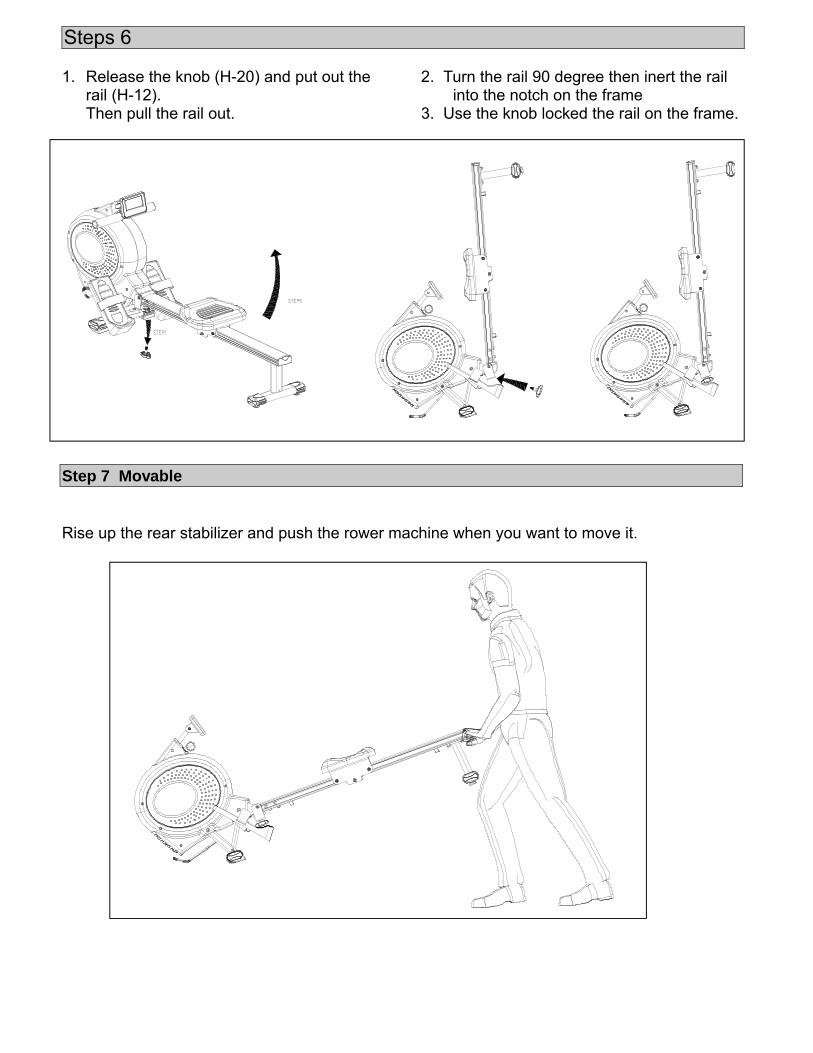
Steps 6
1. Release the knob (H-20) and put out therail (H-12).Then pull the rail out.
2. Turn the rail 90 degree then inert the railinto the notch on the frame
3. Use the knob locked the rail on the frame.
Rise up the rear stabilizer and push the rower machine when you want to move it.
Step 7 Movable
- 18 -
INSTRUCTION MANUAL OF SM5881-64
【FUNCTION BUTTONS】UP / DOWN: To press these two buttons through available selection. To adjust the function value upward and downward.ENTER: To confirm your selection. During training, press the button to scan each display function.START / STOP: To start and stop your selected workout program.RESET: To reset the computer back to the main menu.RECOVERY: To activate the RECOVERY PROGRAM that will automatically evaluate your fitness immediately
after your work out.
【FUNCTIONS】TIME: Preset target time by pressing UP and DOWN buttons (1min ~ 99 min), each increase/ decrease
setting is 1 minute.TIME/500M: Computer will display the time needed to row 500 meters according to current speed.DISTANCE: Preset target value by pressing UP and DOWN buttons ( 10meters ~ 9990meters), each increase /
decrease setting is 100 meters.CALORIES:STROKES: Preset target value by pressing UP and DOWN buttons (0~9999 strokes). each increase /
decrease setting is 10.TOTAL STROKES: Accumulates total strokes from 0 up to 9999.PULSE: To preset target value by pressing up/down/mode from 30 to 240, each increase/decrease setting is
1. The monitor will display user’s heart rate during training. The pulse measurement function isonly used by chest belt system; the frequency of chest belt accepted by the monitor is 5 KHz.
RECOVERY: After exercising for a period of time, keep holding on handgrips and press “RECOVERY”button. All function display will stop except “TIME” starts counting down from 00:60 to 00:00.Screen will display your heart rate recovery status with the F1,F2….to F6. F1 is the best, F6 isthe worst. User may keep exercising to improve the heart rate recovery status. (Press theRECOVERY button again to return the main display.)
CALENDAR: The monitor will display year, month, and day when monitor is in sleep mode.TEMPERATURE: The monitor will display current room temperature from 0� to 60� when the monitor is in sleep
mode.CLOCK: The monitor will display current clock when the monitor is in sleep mode.
【OPERATION】1. Power on
Plug in the adapter, the monitor starts to segment test with a long beep sound, then monitor will enter intocalendar/clock setting mode.
2. Set current dataPress UP/DOWN/ENTER buttons to set up current clock time, year, month and day. After you confirm it.Note : All preset data will be updated automatically after first setting till power off (adapter plug-out).
3. Entered the initial (standby) mode, the STOP/MANUAL/PROGRAM/H.R.C./RACE/USER will glitter to beselected, press UP/DOWN for function selection and ENTER for confirmation.
3-1. MANUALA. Enter into this function, “L1” will glitter on the monitor for resistance setting, you can preset the target
resistance from L1 to L16 by pressing UP/DOWN/ENTER button. After confirmed, you can preset targetvalue for TIME, DISTANCE, STROKES, CALORIES, PULSE in the same way.Note : As Time is set, the DISTANCE can’t be set, if you set the target time you wish to exercise, each
segment would contain the time length of target value divided by 16.As DISTANCE has been set, the TIME can’t be set, if you set the target distance you wish toexercise, each segment would contain the distance length of target value divided by 16.If you didn’t set the value of TIME or DISTANCE, each segment would contain the distancelength of 100M.
B. Press START button to start exercise, the STOP sign will disappear. All values start counting up or down.Press UP or DOWN button to adjust the resistance as you want and its figure will display on the matrix(level 1 ~ level 16).
C. When the any target value of you set count down to zero or you have pressed the STOP button, themonitor will stop and display the average figure of TIME/500M.
3-2. PROGRAM User can select the program profile from P1 to P12 by pressing UP/DOWN/ENTER button, after selected, user
can preset the exercise level from L1 to L16 by pressing UP/DOWN/ENTER button, also can adjust the level
- 18 -
during exercising.A. Enter into this function, press UP/DOWN to set the target profile from P1 to P12, and press ENTER for
confirmation. Then “L1” will glitter on the monitor, you can press UP/DOWN/ENTER button to set targetexercise level from L1 to L16. After level confirmed, you can preset the target value for TIME,DISTANCE, STROKES, CALORIES, PULSE in the same way.Note : As Time is set, the DISTANCE can’t be set, if you set the target time you wish to exercise, each
segment would contain the time length of target value divided by 16.As DISTANCE has been set, the TIME can’t be set, if you set the target distance you wish toexercise, each segment would contain the distance length of target value divided by 16.If you didn’t set the value of TIME or DISTANCE, each segment would contain the distance lengthof 100M.
B. Press START button to start exercise, the STOP sign will disappear. All values start counting up or down.Press UP or DOWN button to adjust the resistance as you want and its figure will display on the matrix(level 1 ~ level 16). During exercising, the value of TIME and TIME/500M will be scanned in 6 secondsautomatically.
C. When the any target value of you set count down to zero or you have pressed the STOP button, the monitor willstop and display the average figure of TIME/500M and SPM.3-3. H.R.C.
You can preset the target percentage for heart rate control in this function.A. Enter into this function, the monitor will glitter with “AGE 25”, press UP/DOWN/ENTER to set your age in
advance, after confirm, you can select the percentage of heart rate 55%, 75%, 90%, and TAG which bedisplayed in pulse area by pressing UP/DOWN/ENTER button for target heart rate setting. If thepercentage of heart rate doesn’t meet your demand, you can also preset your demanded heart rate valueby pressing UP/DOWN/ENTER button after TAG selected. After target heart rate confirmed, you maypreset the target value for TIME, DISTANCE, STROKES, CALORIES, and PULSE in the same way.Note : As Time is set, the DISTANCE can’t be set, if you set the target time you wish to exercise, each
segment would contain the time length of target value divided by 16. As DISTANCE has been set,the TIME can’t be set, if you set the target distance you wish to exercise, each segment wouldcontain the distance length of target value divided by 16. If you didn’t set the value of TIME orDISTANCE, each segment would contain the distance length of 100M.
B. Press START button to start exercise, the STOP sign will disappear. All values start counting upor down. During exercising, the value of TIME and TIME/500M, STROKES and TOTAL STROKES,CALORIES will be switched in each 6 seconds automatically. You may also press “ENTER” toshow TIME, SPM, DISTANCE, STROKES, and CALORIES in the main screen (middle).
C. When the any target value of you set count down to zero (the computer will remind you with beep sound)or you have pressed the STOP button, the monitor will stop and display your current heart rate.
Note : The computer will keep following your heart rate value and adjust the resistance automatically duringexercising, when your heart rate is lower than target value, the resistance will be increased onelevel up (L1, L2, L3…) by computer in each 30 seconds automatically till L16.When your heart rate reached target value, the resistance will be decreased one level downimmediately, if your heart rate keep over target value, the resistance will be decreased one leveldown (L16, L15, L14,..) by computer automatically in each 15 seconds.When your heart rate is over target value and resistance has downed to lowest (L1) or your heartrate keep lower than target value and resistance has reached highest (L16), the computer willremind you with beep sound.When your heart rate keep higher than target value over 30 seconds at lowest resistance (L1),they computer will STOP automatically, it’s protection system for heart rate control.
3-4. RACEA. Entered into the RACE and L1 will glitter, the TIME/500M display with 8:00. You can press UP or DOWN
to set difficult of L1 ~ L15 which you want to race with monitor immediately, then press ENTER toconfirm. Then you can set the target race distance by pressing UP/DOWN/MODE button.The difficult of L1 ~ L5 figure of the TIME/500M is as follows:L1 = 8:00 ; L2 = 7:30 ; L3 = 7:00 ; L4 = 6:30 ; L5 = 6:00L6 = 5:30 ; L7 = 5:00 ; L8 = 4:30 ; L9 = 4:00 ; L10 = 3:30L11 = 3:00 ; L12 = 2:30 ; L13 = 2:00 ; L14 = 1:30 ; L15 = 1:00
B. Press START button to start race and STOP sign will disappear. The U & PC will display in the matrix.The monitor will STOP when one has reached the distance of race which has been set before, then thematrix displays “PC WIN” or “USER WIN” and may display figure for the status of the SPM value duringall exercise after 6 seconds.
C. When the race is over, you can press the START to have a race once again, press reset to leave thestate of the race.
3-5. USER Entered into this function, you may set the favor program profile for training, press UP/DOWN/MODE button to
set up exercising graph you wish.A. After confirmed user function, you can see the first column glitter on the monitor, and press

- 18 -
UP/DOWN/MODE to set the level from 1 to 16, the each grid increase/decrease is 2 levels. Hold theENTER for 2 seconds to enter into initial (standby) mode, then you can preset target value for TIME,DISTANCE, STROKES, CALORIES, PULSE for setting.
B. Press START button to start exercise, the STOP sign will disappear. All values start counting up or down.You can press UP or DOWN button to adjust the resistance for each glittered program profile as yourwish (all profiles will glitter in sequence automatically). During exercising, the value of TIME andTIME/500M, STROKES and TOTAL STROKES and CALORIES will be switched in each 6 secondsautomatically. You may also press “ENTER” to show TIME, SPM, DISTANCE, STROKES, andCALORIES in the main screen (middle).
C. Press STOP button to stop the exercise, the monitor will stop and display your current heart rate on themain screen (middle) and TIME and TIME/500M will glitter in turn each 6 seconds.