MY08 xB Package Tray IssD - Toyota Parts - Genuine OEM … · · 2017-03-11SCION xB 2008 -...
11
SCION xB 2008 - PACKAGE TRAY Preparation Page 1 of 11 pages Issue: D 09/30/14 Part Number: 64009-12010 64009-12011 Kit Contents Item # Quantity Reqd. Description 1 1 Package Tray 2 1 Bracket (L) 3 1 Bracket (R) 4 1 Pattern Paper (for φ40 hole) 5 1 Pattern Paper (for φ6 hole) 6 1 Installation Manual Hardware Bag Contents Item # Quantity Reqd. Description 1 4 Grommet 2 4 Screw 3 2 Bolt 4 2 Nut 5 2 Hanger Additional Items Required For Installation Item # Quantity Reqd. Description Conflicts Subwoofer Enclosure Recommended Tools Safety Tools Vehicle Protection Blanket/tape, Protective Sheet Safety Glasses Special Tools Drill Fixture (LH) IADS# SXB08-019-01 Drill Fixture (RH) IADS# SXB08-019-02 Holesaw (40 mm) w/ Centering Pin IADS# SXB08-019-03 Installation Tools Screwdriver Phillips Ratchet Extension Socket 10mm Wrench 10mm Drill Bits & Stops 3mm, 6mm Hand Drill Deburring Tool Special Chemicals Masking Tape Packing Tape Marking pen If needed General Applicability All vehicles. Recommended Sequence of Application Item # Accessory 1 Quarter Garnish Net 2 Cargo Net 3 Package Tray *Mandatory Vehicle Service Parts (may be required for reassembly) Item # Quantity Reqd. Description Legend STOP: Damage to the vehicle may occur. Do not proceed until process has been complied with. OPERATOR SAFETY: Use caution to avoid risk of injury. CAUTION: A process that must be carefully observed in order to reduce the risk of damage to the accessory/vehicle. TOOLS & EQUIPMENT: Used in Figures calls out the specific tools and equipment recommended for this process. REVISION MARK: This mark highlights a change in installation with respect to previous issue. SAFETY TORQUE: This mark indicates that torque is related to safety.
-
Upload
nguyenmien -
Category
Documents
-
view
215 -
download
0
Transcript of MY08 xB Package Tray IssD - Toyota Parts - Genuine OEM … · · 2017-03-11SCION xB 2008 -...
SCION xB 2008 - PACKAGE TRAY Preparation
Page 1 of 11 pagesIssue: D 09/30/14
Part Number: 64009-12010 64009-12011
Kit Contents
Item # Quantity Reqd. Description 1 1 Package Tray 2 1 Bracket (L) 3 1 Bracket (R) 4 1 Pattern Paper (for φ40 hole) 5 1 Pattern Paper (for φ6 hole) 6 1 Installation Manual
Hardware Bag Contents Item # Quantity Reqd. Description 1 4 Grommet 2 4 Screw 3 2 Bolt 4 2 Nut 5 2 Hanger
Additional Items Required For Installation Item # Quantity Reqd. Description
Conflicts Subwoofer Enclosure
Recommended Tools Safety Tools Vehicle Protection Blanket/tape,
Protective Sheet Safety Glasses
Special Tools Drill Fixture (LH) IADS# SXB08-019-01 Drill Fixture (RH) IADS# SXB08-019-02 Holesaw (40 mm) w/ Centering Pin
IADS# SXB08-019-03
Installation Tools Screwdriver Phillips Ratchet Extension Socket 10mm Wrench 10mm Drill Bits & Stops 3mm, 6mm Hand Drill Deburring Tool
Special Chemicals
Masking Tape Packing Tape Marking pen If needed
General Applicability All vehicles.
Recommended Sequence of Application Item # Accessory 1 Quarter Garnish Net 2 Cargo Net 3 Package Tray
*Mandatory
Vehicle Service Parts (may be required for reassembly) Item # Quantity Reqd. Description
Legend STOP: Damage to the vehicle may occur. Do not
proceed until process has been complied with.
OPERATOR SAFETY: Use caution to avoid risk of injury.
CAUTION: A process that must be carefully observed in order to reduce the risk of damage to the accessory/vehicle.
TOOLS & EQUIPMENT: Used in Figures calls out the specific tools and equipment recommended for this process.
REVISION MARK: This mark highlights a change in installation with respect to previous issue. SAFETY TORQUE: This mark indicates that torque is related to safety.
SCION xB 2008 - PACKAGE TRAY Procedure
Page 2 of 11 pagesIssue: D 09/30/14
Care must be taken when installing this accessory to ensure damage does not occur to the vehicle. The installation of this accessory should follow approved guidelines to ensure a quality installation. These guidelines can be found in the "Accessory Installation Practices" document. This document covers such items as:-
Vehicle Protection (use of covers and blankets, cleaning chemicals, etc.). Safety (eye protection, rechecking torque procedure, etc.). Vehicle Disassembly/Reassembly (panel removal, part storage, etc.). Electrical Component Disassembly/Reassembly (battery disconnection, connector removal, etc.).
Please see your Toyota dealer for a copy of this document.
1. Remove Luggage Board
(a) Open the back door and fold the rear
seatback forward.
(b) Disengage the 2 locks and remove the
luggage board. (Fig. 1-1)
NOTE: Place removed parts on a protected
surface.
2. Remove Luggage Box (Center)
(a) Remove the luggage box (center). (Fig. 2-1)
NOTE: Place removed parts on a protected
surface.
Fig. 1-1
Lock
Unlock
Unlock
Luggage Board
Locks (x2)
Lock
Luggage Box (Center)
Fig. 2-1
SCION xB 2008 - PACKAGE TRAY Procedure
Page 3 of 11 pagesIssue: D 09/30/14
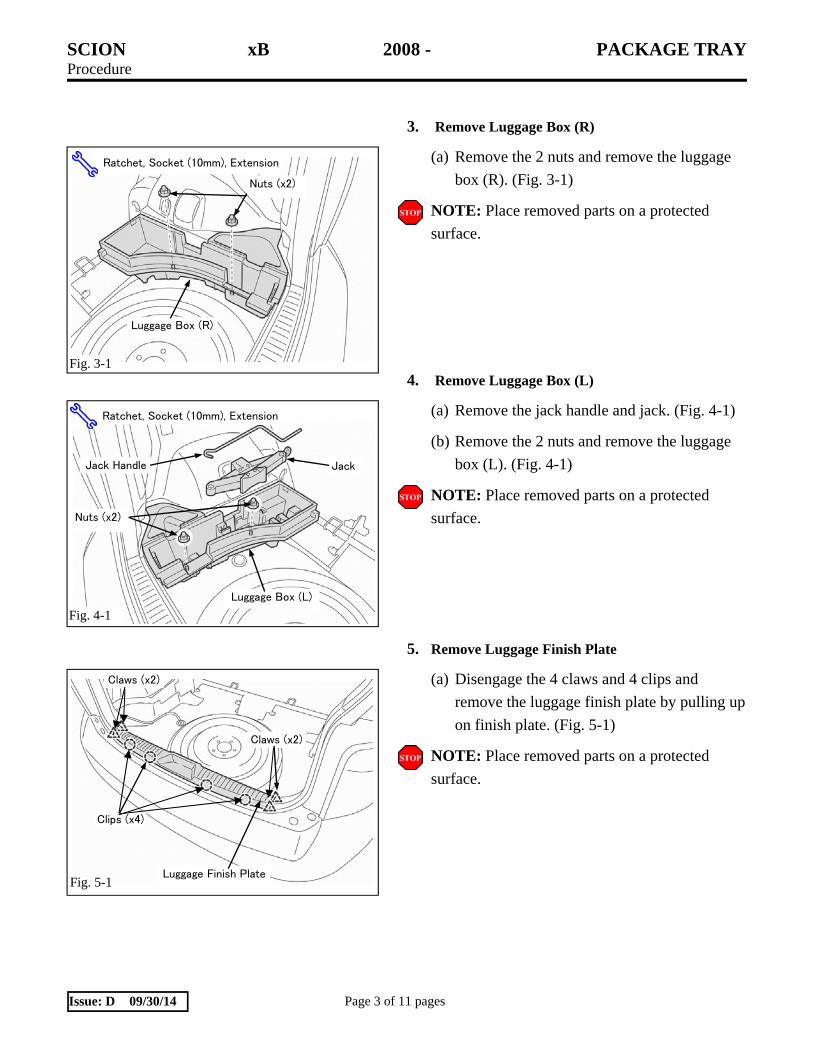
3. Remove Luggage Box (R)
(a) Remove the 2 nuts and remove the luggage
box (R). (Fig. 3-1)
NOTE: Place removed parts on a protected
surface.
4. Remove Luggage Box (L)
(a) Remove the jack handle and jack. (Fig. 4-1)
(b) Remove the 2 nuts and remove the luggage
box (L). (Fig. 4-1)
NOTE: Place removed parts on a protected
surface.
5. Remove Luggage Finish Plate
(a) Disengage the 4 claws and 4 clips and
remove the luggage finish plate by pulling up
on finish plate. (Fig. 5-1)
NOTE: Place removed parts on a protected
surface.
Fig. 3-1
Ratchet, Socket (10mm), Extension
Luggage Box (R)
Nuts (x2)
Ratchet, Socket (10mm), Extension
Fig. 4-1
Luggage Box (L)
Nuts (x2)
Jack Handle Jack
Fig. 5-1 Luggage Finish Plate
Clips (x4)
Claws (x2)
Claws (x2)
SCION xB 2008 - PACKAGE TRAY Procedure
Page 4 of 11 pagesIssue: D 09/30/14
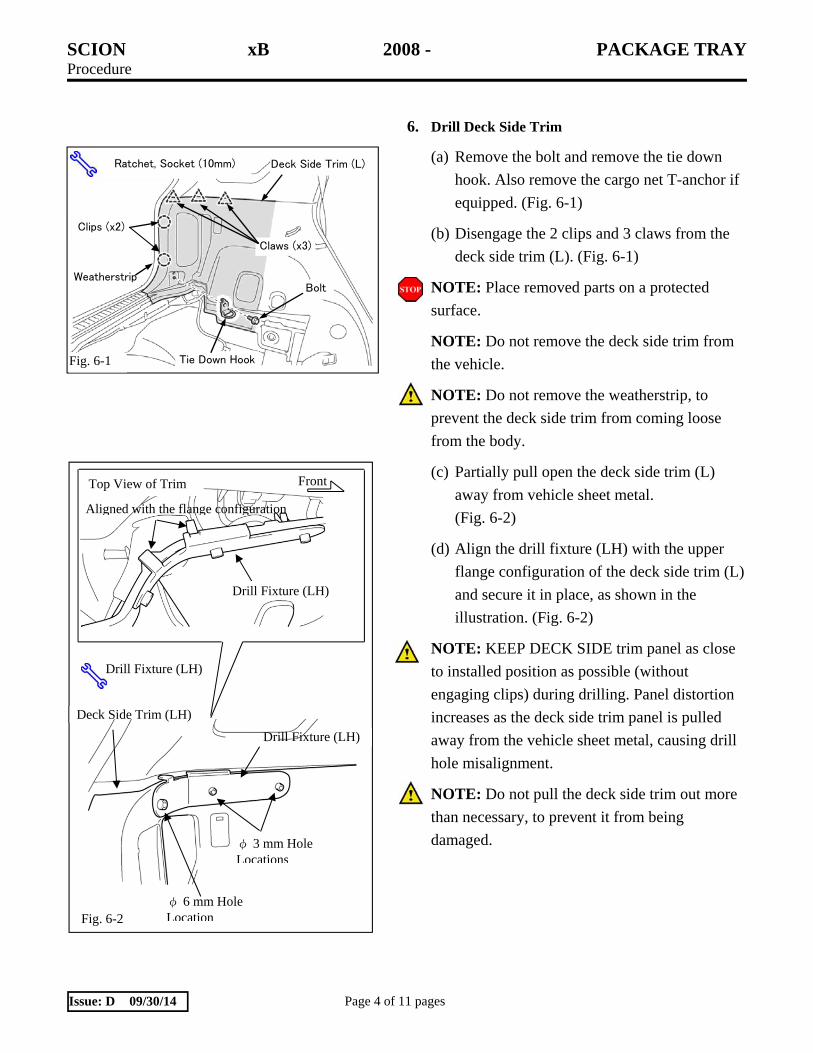
6. Drill Deck Side Trim
(a) Remove the bolt and remove the tie down
hook. Also remove the cargo net T-anchor if
equipped. (Fig. 6-1)
(b) Disengage the 2 clips and 3 claws from the
deck side trim (L). (Fig. 6-1)
NOTE: Place removed parts on a protected
surface.
NOTE: Do not remove the deck side trim from
the vehicle.
NOTE: Do not remove the weatherstrip, to
prevent the deck side trim from coming loose
from the body.
(c) Partially pull open the deck side trim (L)
away from vehicle sheet metal.
(Fig. 6-2)
(d) Align the drill fixture (LH) with the upper
flange configuration of the deck side trim (L)
and secure it in place, as shown in the
illustration. (Fig. 6-2)
NOTE: KEEP DECK SIDE trim panel as close
to installed position as possible (without
engaging clips) during drilling. Panel distortion
increases as the deck side trim panel is pulled
away from the vehicle sheet metal, causing drill
hole misalignment.
NOTE: Do not pull the deck side trim out more
than necessary, to prevent it from being
damaged.
Fig. 6-1
Ratchet, Socket (10mm)
Tie Down Hook
Deck Side Trim (L)
Clips (x2)
Claws (x3)
Weatherstrip Bolt
Top View of Trim Front
Aligned with the flange configuration
Drill Fixture (LH)
Drill Fixture (LH)
Deck Side Trim (LH)
Drill Fixture (LH)
φ 3 mm Hole Locations
φ 6 mm Hole LocationFig. 6-2

SCION xB 2008 - PACKAGE TRAY Procedure
Page 5 of 11 pagesIssue: D 09/30/14
(e) Fix the luggage room light harness onto the
vehicle sheet metal with a piece of packing
tape. Do not overlap the tape over the areas
to be drilled. (Fig. 6-3)
NOTE: The luggage room light harness is present only on the left side of the vehicle.
Eye protection must be worn during drilling
process.
(f) Install a drill stopper onto φ3 mm electric
drill bit as shown in the illustration with the
drill fixture secured. If needed, place tape or
use marker to indicate 30 mm depth on
40mm on hole saw. (Fig. 6-5a)
(g) Open the deck side trim (L) and drill a φ3
mm pilot hole in the 2 front hole locations of
the drill fixture using the electric drill.
(Fig. 6-4)
Packing Tape Deck Side Trim
( )
Packing Tape
Fig. 6-3
Luggage Room
Light Harness
Fig. 6-4
Drill, Drill Stop, φ3 Drill Bit
Drill 3 mm Hole
SCION xB 2008 - PACKAGE TRAY Procedure
Page 6 of 11 pagesIssue: D 09/30/14
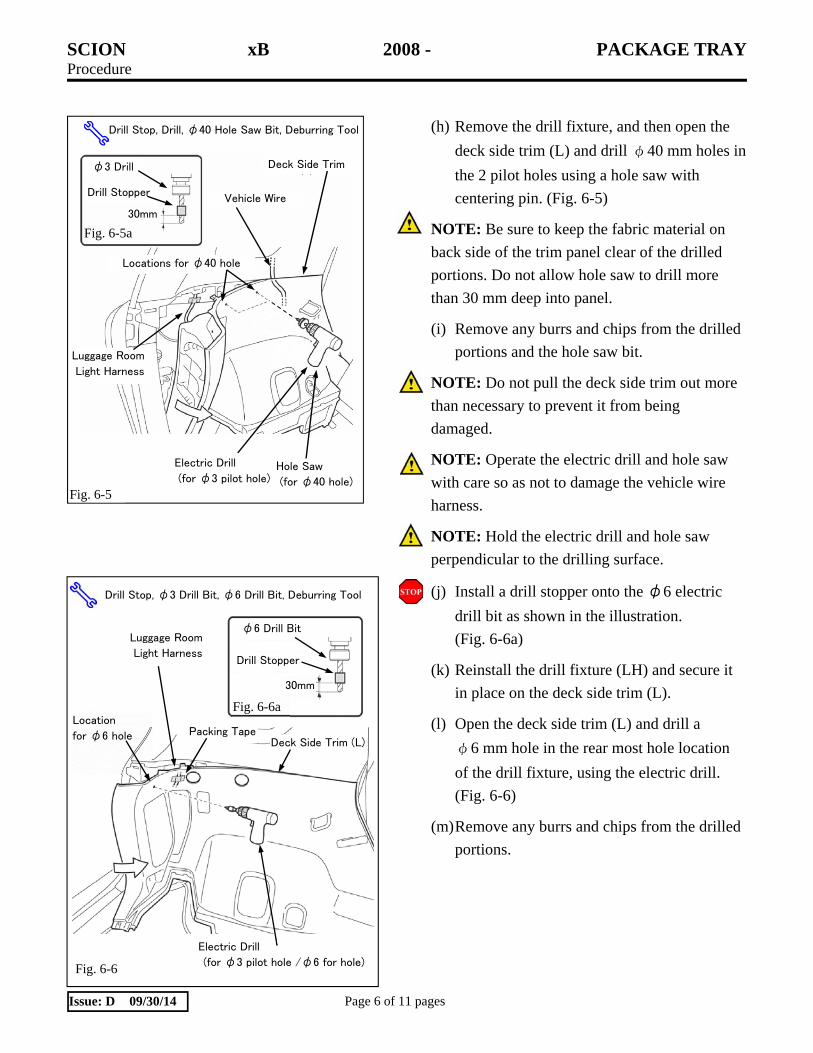
(h) Remove the drill fixture, and then open the
deck side trim (L) and drill φ40 mm holes in
the 2 pilot holes using a hole saw with
centering pin. (Fig. 6-5)
NOTE: Be sure to keep the fabric material on
back side of the trim panel clear of the drilled
portions. Do not allow hole saw to drill more
than 30 mm deep into panel.
(i) Remove any burrs and chips from the drilled
portions and the hole saw bit.
NOTE: Do not pull the deck side trim out more
than necessary to prevent it from being
damaged.
NOTE: Operate the electric drill and hole saw
with care so as not to damage the vehicle wire
harness.
NOTE: Hold the electric drill and hole saw
perpendicular to the drilling surface.
(j) Install a drill stopper onto the φ6 electric
drill bit as shown in the illustration.
(Fig. 6-6a)
(k) Reinstall the drill fixture (LH) and secure it
in place on the deck side trim (L).
(l) Open the deck side trim (L) and drill a
φ6 mm hole in the rear most hole location
of the drill fixture, using the electric drill.
(Fig. 6-6)
(m) Remove any burrs and chips from the drilled
portions.
Fig. 6-5
Deck Side Trim
( )
Vehicle Wire
Locations for φ40 hole
Hole Saw
(for φ40 hole)
Electric Drill
(for φ3 pilot hole)
φ3 Drill
Drill Stopper
30mm
Luggage Room
Light Harness
Drill Stop, Drill, φ40 Hole Saw Bit, Deburring Tool
Fig. 6-5a
Drill Stop, φ3 Drill Bit, φ6 Drill Bit, Deburring Tool
φ6 Drill Bit
Drill Stopper
30mm
Deck Side Trim (L)
Location
for φ6 hole
Luggage Room
Light Harness
Fig. 6-6a
Packing Tape
Fig. 6-6
Electric Drill
(for φ3 pilot hole /φ6 for hole)

SCION xB 2008 - PACKAGE TRAY Procedure
Page 7 of 11 pagesIssue: D 09/30/14
(n) Remove the piece of packing tape securing
the luggage room light harness. (Fig. 6-6)
NOTE: The luggage room light harness is
provided only on the left side of the vehicle.
NOTE: Do not open the deck side trim more than
necessary to prevent it from being damaged.
NOTE: Operate the electric drill with care so as not
to damage the luggage room light harness.
NOTE: Hold the electric drill perpendicular to the
drilling surface.
(o) Repeat Steps 6(a)-6(n) for RH side.
(p) Clean up the vehicle’s interior rear area.
7. Install Bracket
(a) Install the 2 grommets into the 2 holes in the
vehicle sheet metal as shown in the
illustration. (Fig. 7-1)
Deck Side Trim (L)Holes
Grommet Fig. 7-1
SCION xB 2008 - PACKAGE TRAY Procedure
Page 8 of 11 pagesIssue: D 09/30/14
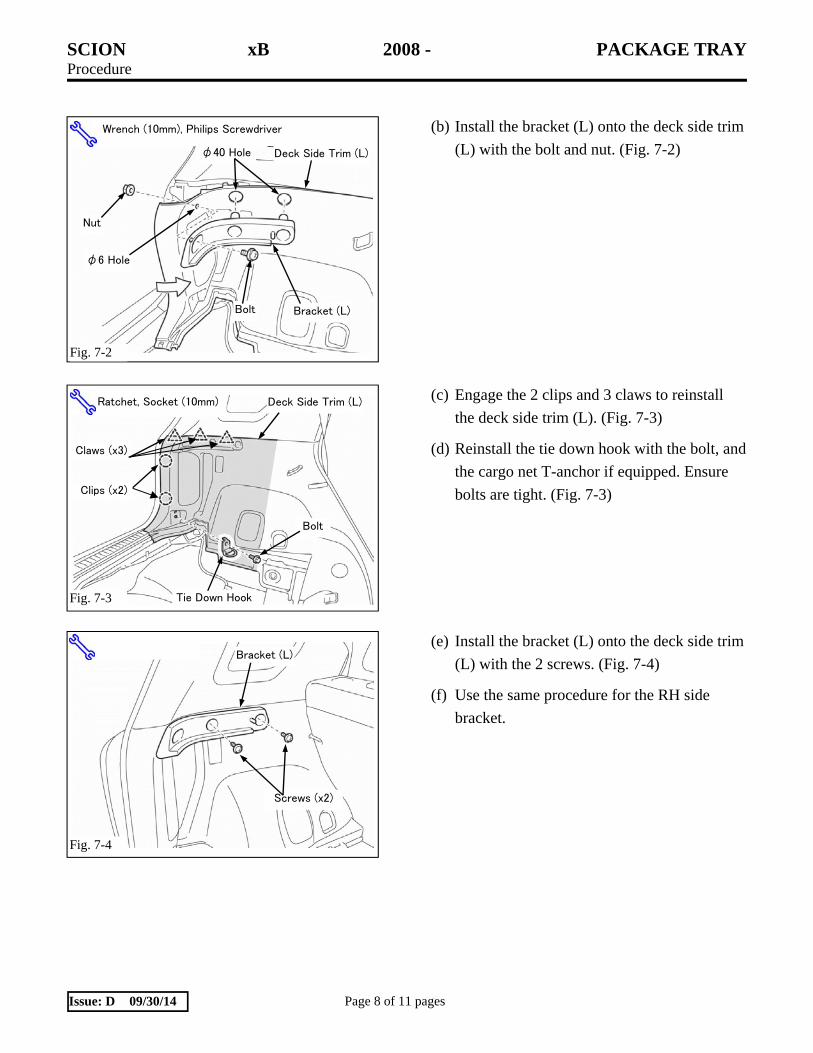
(b) Install the bracket (L) onto the deck side trim
(L) with the bolt and nut. (Fig. 7-2)
(c) Engage the 2 clips and 3 claws to reinstall
the deck side trim (L). (Fig. 7-3)
(d) Reinstall the tie down hook with the bolt, and
the cargo net T-anchor if equipped. Ensure
bolts are tight. (Fig. 7-3)
(e) Install the bracket (L) onto the deck side trim
(L) with the 2 screws. (Fig. 7-4)
(f) Use the same procedure for the RH side
bracket.
Fig. 7-2
Wrench (10mm), Philips Screwdriver
Deck Side Trim (L)
Bracket (L)Bolt
Nut
φ6 Hole
φ40 Hole
Bracket (L)
Screws (x2)
Fig. 7-4
Fig. 7-3
Ratchet, Socket (10mm)
Tie Down Hook
Deck Side Trim (L)
Clips (x2)
Claws (x3)
Bolt
SCION xB 2008 - PACKAGE TRAY Procedure
Page 9 of 11 pagesIssue: D 09/30/14
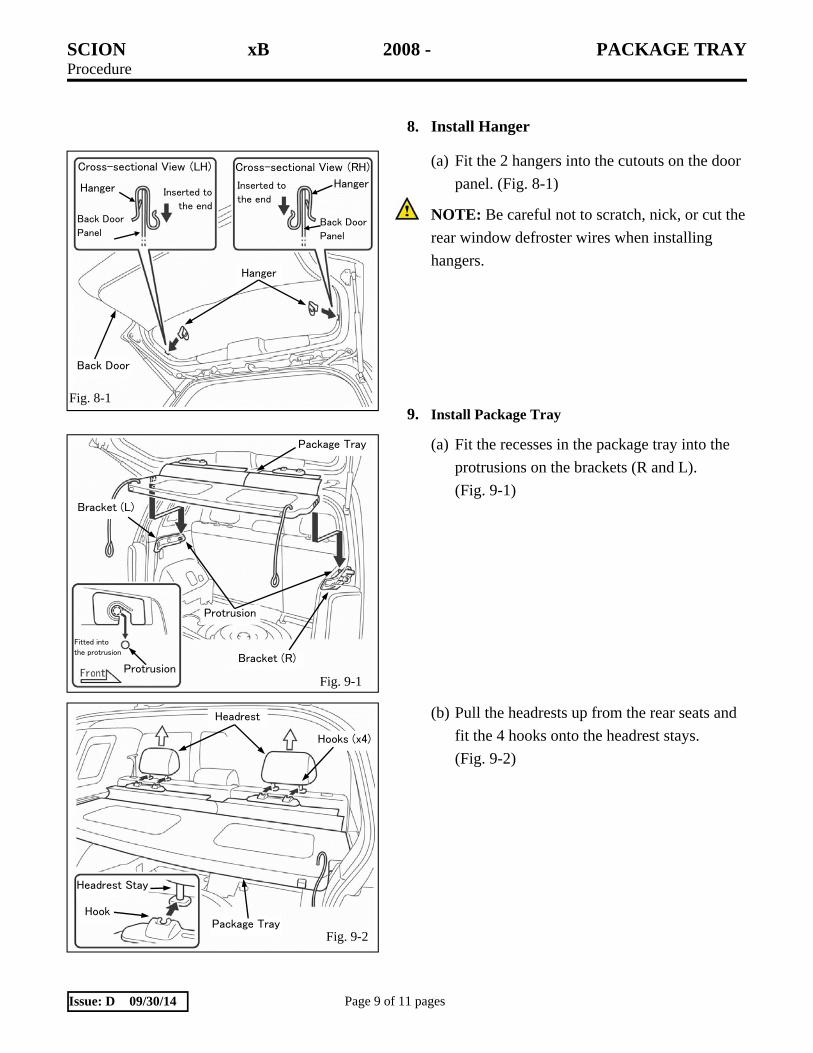
8. Install Hanger
(a) Fit the 2 hangers into the cutouts on the door
panel. (Fig. 8-1)
NOTE: Be careful not to scratch, nick, or cut the
rear window defroster wires when installing
hangers.
9. Install Package Tray
(a) Fit the recesses in the package tray into the
protrusions on the brackets (R and L).
(Fig. 9-1)
(b) Pull the headrests up from the rear seats and
fit the 4 hooks onto the headrest stays.
(Fig. 9-2)
Fig. 9-1
Package Tray
Bracket (R)
Bracket (L)
Fitted into
the protrusion
Protrusion
Protrusion
Hanger
Back Door
HangerHanger
Back Door
Panel
Inserted to
the end
Cross-sectional View (LH) Cross-sectional View (RH)
Inserted to
the end
Back Door
Panel
Fig. 8-1
Headrest
Hooks (x4)
Hook
Headrest Stay
Package Tray Fig. 9-2
SCION xB 2008 - PACKAGE TRAY Procedure
Page 10 of 11 pagesIssue: D 09/30/14
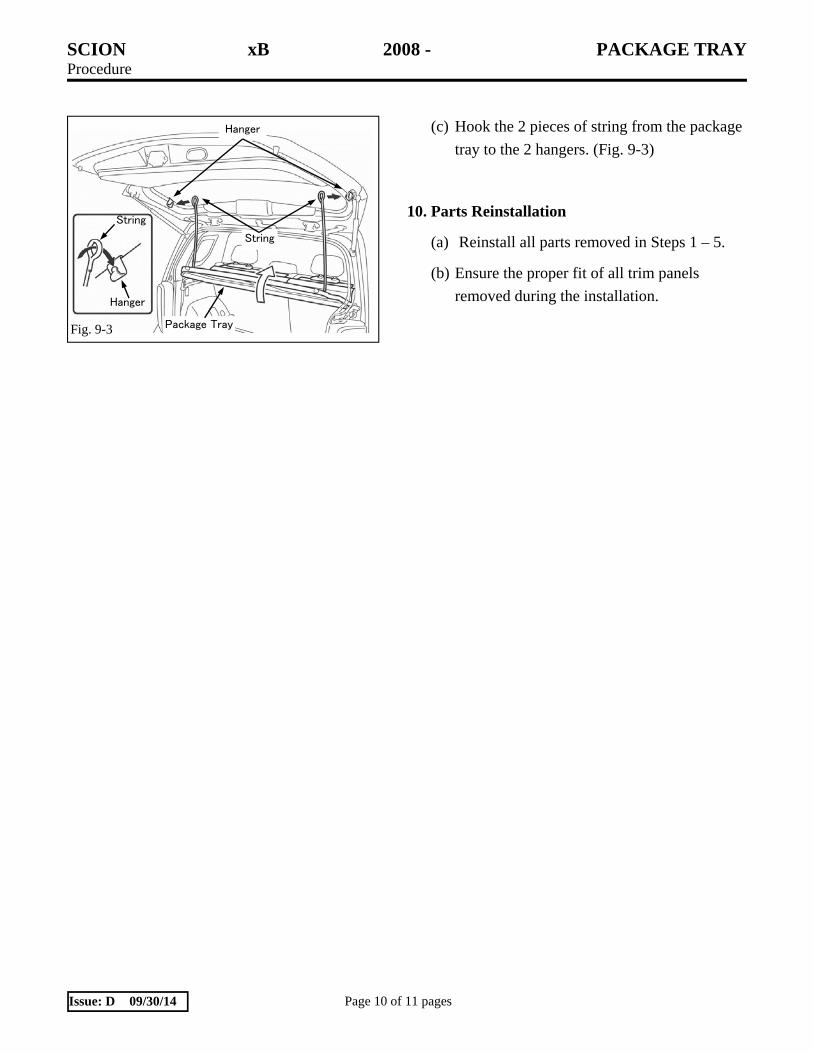
(c) Hook the 2 pieces of string from the package
tray to the 2 hangers. (Fig. 9-3)
10. Parts Reinstallation
(a) Reinstall all parts removed in Steps 1 – 5.
(b) Ensure the proper fit of all trim panels
removed during the installation.
Fig. 9-3 Package Tray
Hanger
Hanger
String
String
SCION xB 2008 - PACKAGE TRAY Checklist - these points MUST be checked to ensure a quality installation.
Check: Look For:
Page 11 of 11 pagesIssue: D 09/30/14
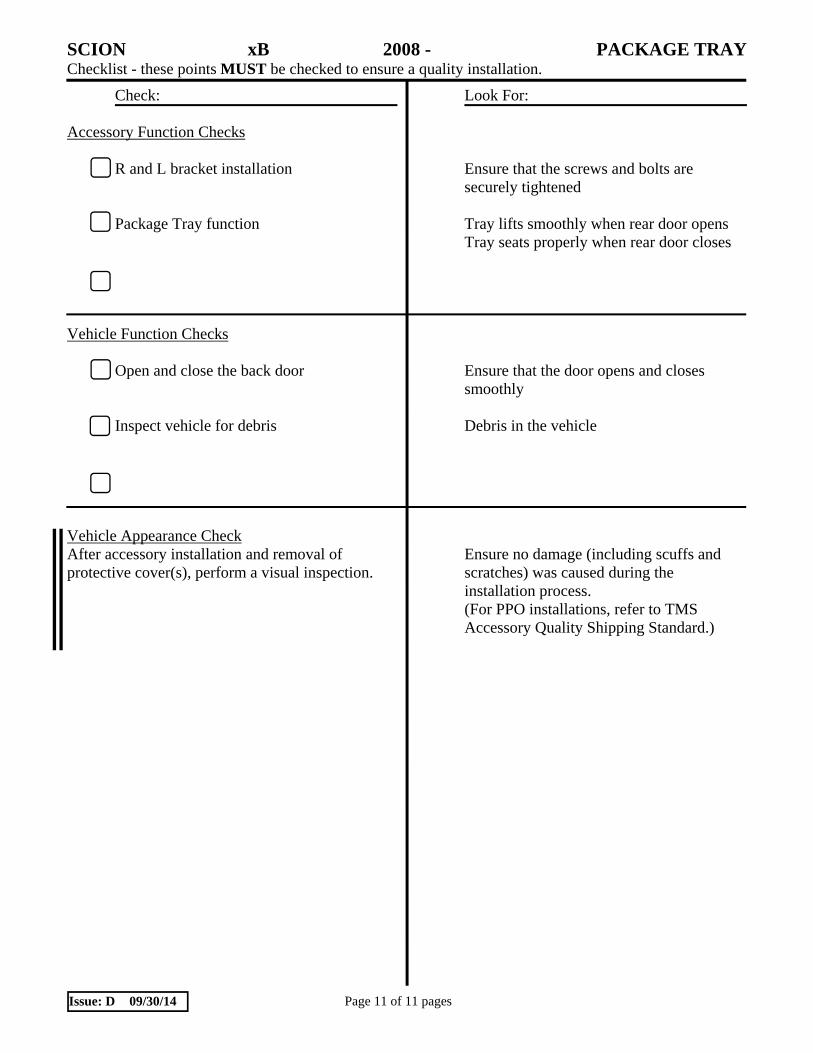
Accessory Function Checks
R and L bracket installation Package Tray function
Vehicle Function Checks
Open and close the back door Inspect vehicle for debris
Vehicle Appearance Check After accessory installation and removal of protective cover(s), perform a visual inspection.
Ensure that the screws and bolts are securely tightened Tray lifts smoothly when rear door opens Tray seats properly when rear door closes
Ensure that the door opens and closes smoothly Debris in the vehicle
Ensure no damage (including scuffs and scratches) was caused during the installation process. (For PPO installations, refer to TMS Accessory Quality Shipping Standard.)


![[Beinat@gvSIG] Trasformazioni di coordinate rgbdownloads.gvsig.org/download/events/giornate-italiane/...nel datum B XB,YB,ZB Coordinate geografiche nel datum A ϕϕϕϕA,λλλA,(](https://static.fdocument.org/doc/165x107/5b3bc06f7f8b9ace408cf304/beinatgvsig-trasformazioni-di-coordinate-datum-b-xbybzb-coordinate-geografiche.jpg)