μMETOS CLIMA
8
Pessl Instruments GmbH Werksweg 107, 8160 Weiz, Austria offi[email protected] +43 317 255 21 Thank you for choosing μMETOS station for monitoring your agrome- teorological and other environmental needs. The μMETOS CLIMA has been designed to monitor data with a different variety of sensors. Like all products of the μMETOS/iMETOS family, it measures, logs and sends data to the FieldClimate cloud. The users have free access to data through web and mobile applications. Additional services (like plant disease models and hyper localized weather forecasts) are available upon a license fee. Web API is available for interface with other custom applications. μMETOS CLIMA systems will be mainly used for: • Agro-Meteorological monitoring. • Site Specific weather forecast corrected with local measurements. • Plant disease models (depending on the configuration of the equipment). • Soil moisture and irrigation systems monitoring. • Hydrology and flood warning applications. • Environmental monitoring. μMETOS CLIMA USER MANUAL Version 1.0, 02-2020 ENGLISH
Transcript of μMETOS CLIMA

Pessl Instruments GmbHWerksweg 107, 8160 Weiz, [email protected]+43 317 255 21
Thank you for choosing μMETOS station for monitoring your agrome-teorological and other environmental needs. The μMETOS CLIMA has been designed to monitor data with a different variety of sensors. Like all products of the μMETOS/iMETOS family, it measures, logs and sends data to the FieldClimate cloud. The users have free access to data through web and mobile applications. Additional services (like plant disease models and hyper localized weather forecasts) are available upon a license fee. Web API is available for interface with other custom applications.
μMETOS CLIMA systems will be mainly used for:• Agro-Meteorological monitoring.• Site Specific weather forecast corrected with local measurements.• Plant disease models (depending on the configuration
of the equipment).• Soil moisture and irrigation systems monitoring.• Hydrology and flood warning applications.• Environmental monitoring.
μMETOS CLIMAUSER MANUAL
Version 1.0, 02-2020
ENGLISH
LPWAN DATA LOGGER FOR REMOTE AND URBAN AREAS (with LoRaWAN® or NBIoT connectivity)μMETOS CLIMA is a LPWAN (Low Power Wide Area Network) weather station that operates on LoRaWAN® or NBIoT network. It can be con-nected to any existing LoRaWAN® or NBIoT network, if present at your location. LoRaWAN® or NBIoT configuration can be required based on network provider configurations.
It is designed to monitor basic meteorological parameters (rain and temperature, humidity, frost, leaf wetness, solar radiation, wind speed), soil characteristics (soil moisture and soil temperature), as well as water level, water EC and pH.
μMETOS CLIMA can handle additional sensors if required. Data is permanently measured in 5-minute intervals and sent every 15 minutes to the server. All the data is synchronized in the FieldClimate platform.
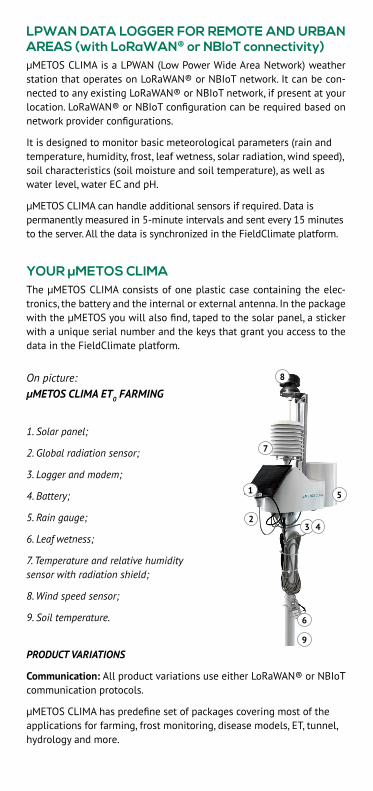
YOUR μMETOS CLIMAThe μMETOS CLIMA consists of one plastic case containing the elec-tronics, the battery and the internal or external antenna. In the package with the μMETOS you will also find, taped to the solar panel, a sticker with a unique serial number and the keys that grant you access to the data in the FieldClimate platform.
On picture:μMETOS CLIMA ET0 FARMING
1. Solar panel;
2. Global radiation sensor;
3. Logger and modem;
4. Battery;
5. Rain gauge;
6. Leaf wetness;
7. Temperature and relative humidity sensor with radiation shield;
8. Wind speed sensor;
9. Soil temperature.
PRODUCT VARIATIONS
Communication: All product variations use either LoRaWAN® or NBIoT communication protocols.
μMETOS CLIMA has predefine set of packages covering most of the applications for farming, frost monitoring, disease models, ET, tunnel, hydrology and more.
1
2
6
9
5
3 4
7
8
START-UP THE μMETOS CLIMA
1. Open the housing by un-screwing the 6 screws downside.
2. Loosen the nut from the cable gland on the battery.
3. Pull out the case cover letting the battery cable loop pass through the gland.
μMETOS CLIMA LoRa
For successful data communication, LoRa network needs to be availa-ble and covering the deployment location of the μMETOS LoRa device.
The μMETOS CLIMA LoRa needs to be provisioned on the LoRa net-work server (provided by the LoRa network provider) and integration between LoRa network provider and FieldClimate is needed.
All our LoRaWAN® based products are by default provisioned on our TTN LoRaWAN® network provider account. When there is a need to use different LoRaWAN® network provider, this can be done easily.
There is no requirement for a SIM card. If fine tuning of the configura-tion is needed, the user must open the housing and connect the board to the PC via serial-to-usb cable (provided with the station). The menu description is available on the extended manual for μMETOS CLIMA LoRa (metos.at/imetos-lora-manual/#D-3). During the complete process you will get support for each step by using our ticketing system [email protected].
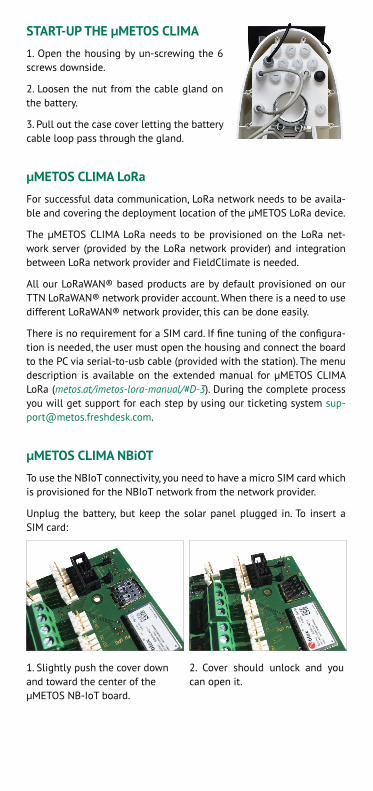
μMETOS CLIMA NBiOT
To use the NBIoT connectivity, you need to have a micro SIM card which is provisioned for the NBIoT network from the network provider.
Unplug the battery, but keep the solar panel plugged in. To insert a SIM card:
1. Slightly push the cover down and toward the center of the μMETOS NB-IoT board.
2. Cover should unlock and you can open it.
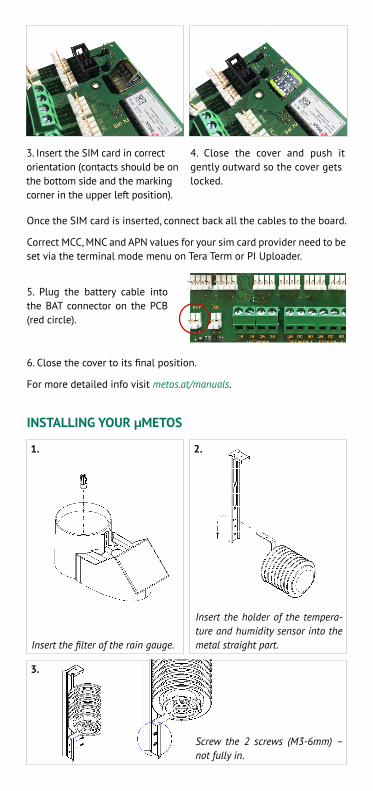
Once the SIM card is inserted, connect back all the cables to the board.
Correct MCC, MNC and APN values for your sim card provider need to be set via the terminal mode menu on Tera Term or PI Uploader.
5. Plug the battery cable into the BAT connector on the PCB (red circle).
6. Close the cover to its final position.
For more detailed info visit metos.at/manuals.
INSTALLING YOUR μMETOS
3. Insert the SIM card in correct orientation (contacts should be on the bottom side and the marking corner in the upper left position).
4. Close the cover and push it gently outward so the cover gets locked.
1.
3.
2.
Insert the filter of the rain gauge.
Insert the holder of the tempera-ture and humidity sensor into the metal straight part.
Screw the 2 screws (M3-6mm) – not fully in.
5.
4.
7.
6.
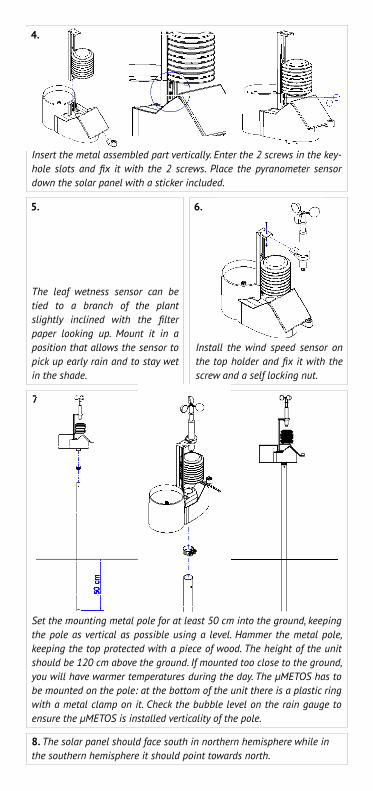
The leaf wetness sensor can be tied to a branch of the plant slightly inclined with the filter paper looking up. Mount it in a position that allows the sensor to pick up early rain and to stay wet in the shade.
Insert the metal assembled part vertically. Enter the 2 screws in the key-hole slots and fix it with the 2 screws. Place the pyranometer sensor down the solar panel with a sticker included.
Install the wind speed sensor on the top holder and fix it with the screw and a self locking nut.
8. The solar panel should face south in northern hemisphere while in the southern hemisphere it should point towards north.
Set the mounting metal pole for at least 50 cm into the ground, keeping the pole as vertical as possible using a level. Hammer the metal pole, keeping the top protected with a piece of wood. The height of the unit should be 120 cm above the ground. If mounted too close to the ground, you will have warmer temperatures during the day. The μMETOS has to be mounted on the pole: at the bottom of the unit there is a plastic ring with a metal clamp on it. Check the bubble level on the rain gauge to ensure the μMETOS is installed verticality of the pole.
USE YOUR μMETOS
To start using services Pessl Instruments provides, you need to register on the FieldClimate platform (see below), which will provide you access to the various sensor data in graphs or tables. FieldClimate also pro-vides a powerful decision support system for growing your crops (plant protection, irrigation, sowing, harvesting, fertilizing).
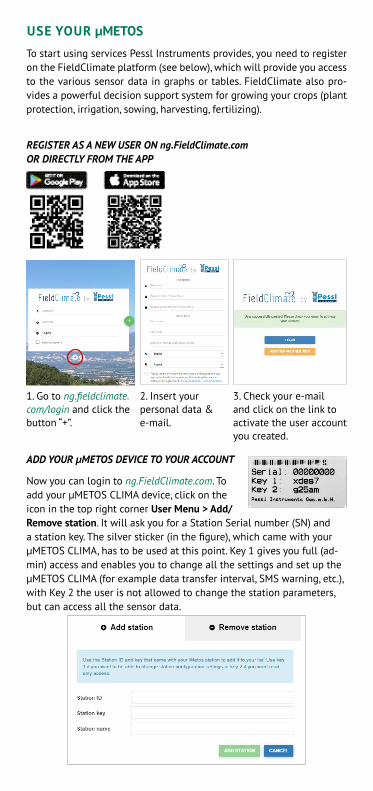
REGISTER AS A NEW USER ON ng.FieldClimate.com OR DIRECTLY FROM THE APP
ADD YOUR μMETOS DEVICE TO YOUR ACCOUNT
Now you can login to ng.FieldClimate.com. To add your μMETOS CLIMA device, click on the icon in the top right corner User Menu > Add/Remove station. It will ask you for a Station Serial number (SN) and a station key. The silver sticker (in the figure), which came with your μMETOS CLIMA, has to be used at this point. Key 1 gives you full (ad-min) access and enables you to change all the settings and set up the μMETOS CLIMA (for example data transfer interval, SMS warning, etc.), with Key 2 the user is not allowed to change the station parameters, but can access all the sensor data.
1. Go to ng.fieldclimate.com/login and click the button “+”.
2. Insert your personal data & e-mail.
3. Check your e-mail and click on the link to activate the user account you created.
DASHBOARD, STATION DATA AND SETTINGS
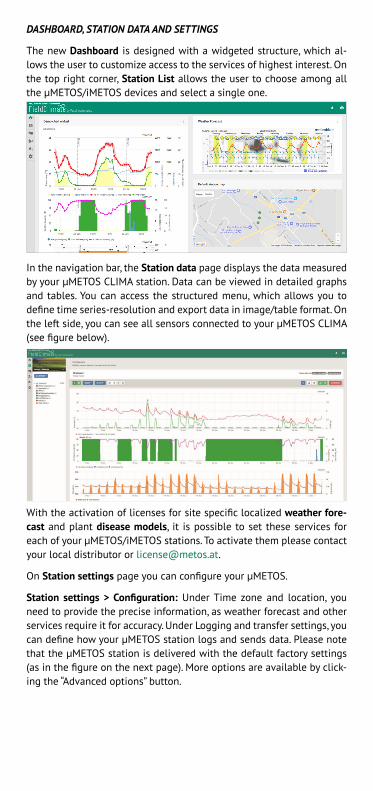
The new Dashboard is designed with a widgeted structure, which al-lows the user to customize access to the services of highest interest. On the top right corner, Station List allows the user to choose among all the μMETOS/iMETOS devices and select a single one.
In the navigation bar, the Station data page displays the data measured by your μMETOS CLIMA station. Data can be viewed in detailed graphs and tables. You can access the structured menu, which allows you to define time series-resolution and export data in image/table format. On the left side, you can see all sensors connected to your μMETOS CLIMA (see figure below).
With the activation of licenses for site specific localized weather fore-cast and plant disease models, it is possible to set these services for each of your μMETOS/iMETOS stations. To activate them please contact your local distributor or [email protected].
On Station settings page you can configure your μMETOS.
Station settings > Configuration: Under Time zone and location, you need to provide the precise information, as weather forecast and other services require it for accuracy. Under Logging and transfer settings, you can define how your μMETOS station logs and sends data. Please note that the μMETOS station is delivered with the default factory settings (as in the figure on the next page). More options are available by click-ing the “Advanced options” button.

For full user manual please visit:metos.at/manuals
Visit metos.at/terms-of-use/ to view legal information for Pessl Instruments products and services.
Station settings > Sensors and nodes: You can define a custom name for your station and nodes connected to it. For convenient viewing of data, you can also rename each sensor and customize its color in the graph.
For further inquiries visit metos.at/fieldclimate-manual.
MANTAINING THE μMETOS
The weather station should be checked periodically to ensure that sensors are in optimal condition. Regular maintenance is necessary for flawless operation and durability.
At the beginning of the new season, check that the station is working correctly; data must be transmitted at the set interval to FieldClimate. Keep the solar panel and sensors clean, especially the rain gauge. Clean rain gauge ensures correct rainfall measurements, also make sure it is levelled by checking the bubble indicator and not obstructed by leaves, insects or debris that could prevent it from functioning properly. Check if leaf wetness sensor has the appropriate filter paper intact and posi-tioned correctly.
When the solar panel of the μMETOS is exposed to the sun and unit receives enough sunlight it will constantly recharge the battery for op-erations.