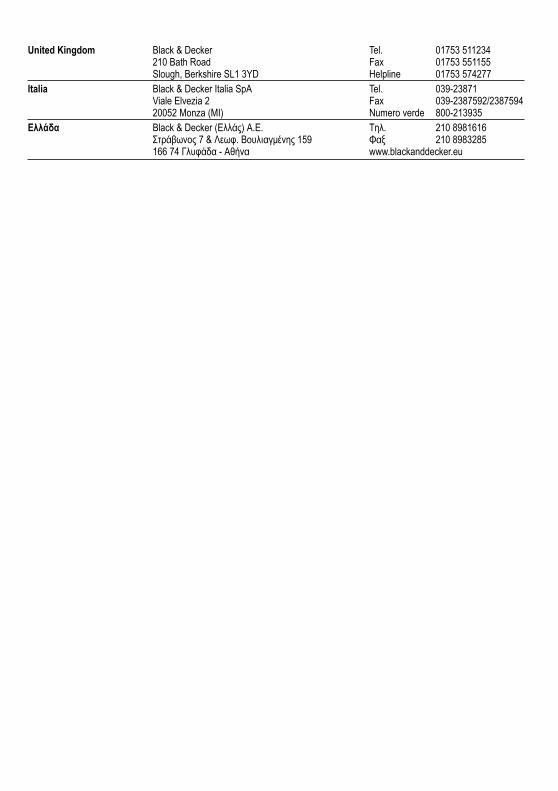
MAX ml - Black & Deckerservice.blackanddecker.co.uk/PDMSDocuments/EU/Docs//docpdf/wjd225... · Aqua...
16
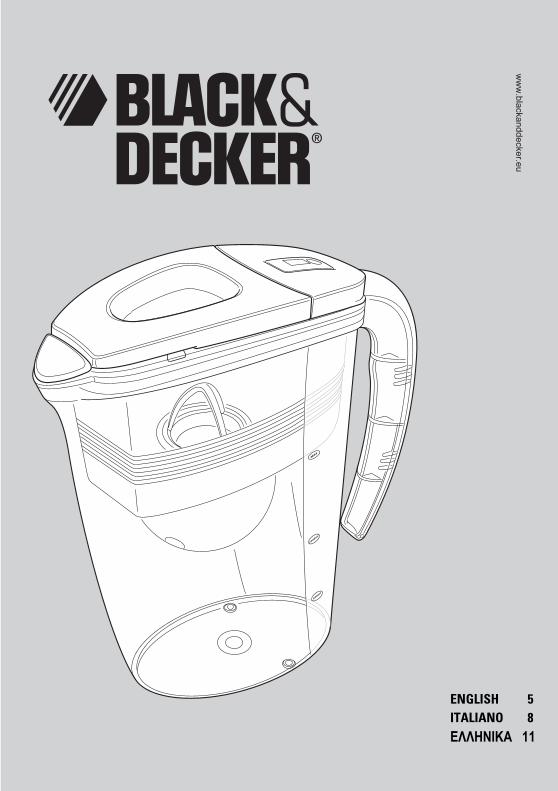
500ml 1000ml MAX ENGLISH 5 ITALIANO 8 ΕΛΛΗΝΙΚΑ 11
Transcript of MAX ml - Black & Deckerservice.blackanddecker.co.uk/PDMSDocuments/EU/Docs//docpdf/wjd225... · Aqua...
500ml
1000ml
MAX
ENGLISH 5ITALIANO 8ΕΛΛΗΝΙΚΑ 11
2
500ml
1000ml
MAX
41
5
6
32
3
BA
DC
E
5
4 5
7
4
3
RESET
4
H
F
G
8
10
11
9
5
ENGLISHENGLISHIntended useYour Black & Decker water filter has been designed to deliver pure filtered water quickly, removing high levels of chlorine and limescale. This product is intended for household use only.
Using your filter jugOnly filter cold water.Do not use the filter jug for any other purpose than filtering water.Treated water should be consumed or discarded within two days.If the water filter has not been used for more than 48 hours, flush the filter twice with fresh cold water and discard the water before using as normal.If the water filter is not be used for an extended period, remove the filter cartridge, place it in a clean plastic bag and store it in a refrigerator. Before using the filter after storage, follow the preparation instructions in this manual.Always store filter cartridges out of direct sunlight and away from heat sources.
Additional safety instructions for non-rechargeable batteries
Never attempt to open for any reason.Do not store in locations where the temperature may exceed 40 °C.When disposing of batteries, follow the instructions given in the section "Protecting the Environment".Do not incinerate the batteries.Never try to recharge non-rechargeable batteries.Install batteries correctly.Make sure the contact faces are clean.Do not mix different types or brands of batteries.Keep batteries away from small children.Under extreme conditions, battery leakage may occur. If liquid is noticed on the batteries, carefully wipe the liquid off using a cloth. Avoid skin contact.
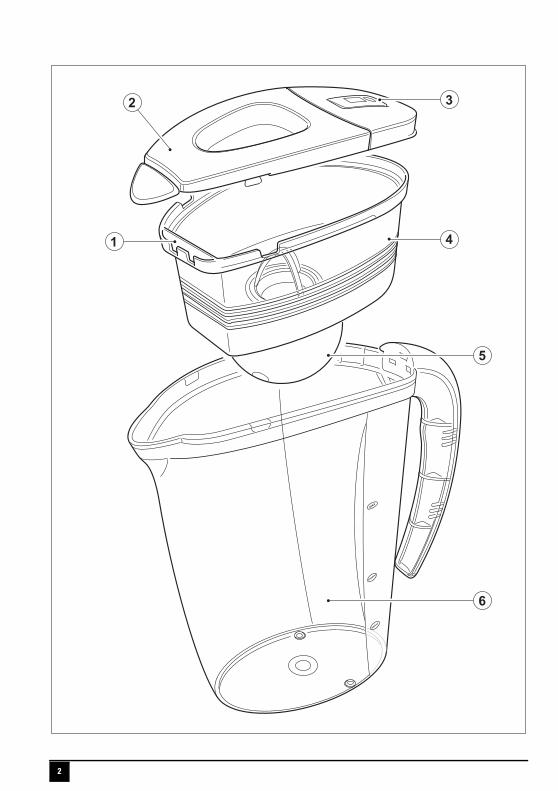
Features1. Spout2. Lid3. Cartridge life indicator4. Water tank5. Aqua OptimaTM filter cartridge6. Filter jug7. Seal
UnpackingRemove all packaging from the filter jug.
Remove the lid by gripping the sides of the lid (2) and lifting it from the filter jug.Take the water tank (4) and the filter cartridge (5) out of the filter jug (6) and remove any packaging.Clean the filter jug (6) with cold fresh water.
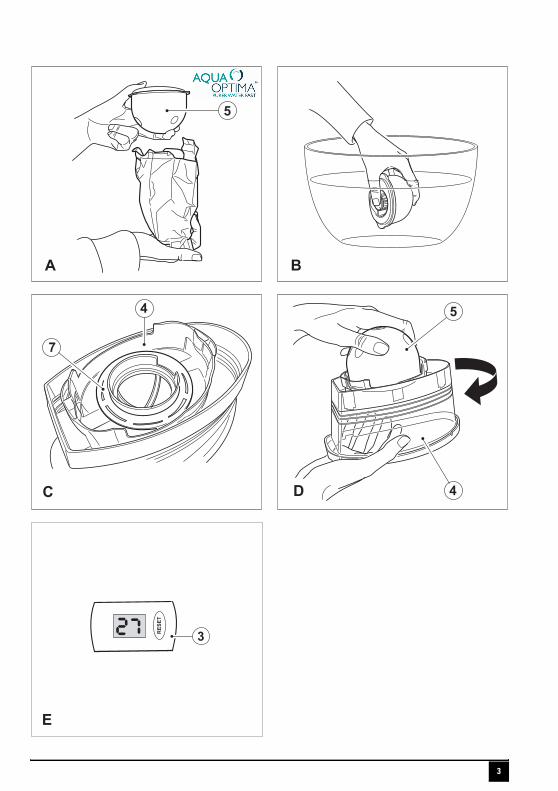
AssemblyPreparing the water filter cartridge (fig. A and B)
Prepare the filter cartridge (5) by carefully following all the instructions on the packaging.Remove the cartridge (5) from the packaging (fig. A).
Note: There may be a small residue of black carbon particles in the packaging or adhering to the body of the cartridge. This is normal, these particles are harmless and will be washed off during the following preparation process.
Immerse the cartridge (5) in cold fresh water and shake the cartridge (5) to remove the air trapped within the cartridge (5) (fig B).
Note: Some loose carbon particles may be released during this process. This is normal and does not affect the performance of the filter cartridge.
Fitting the Aqua OptimaTM filter cartridge (fig. C and D)Remove the lid (2).Remove the water tank (4) from the filter jug (6).Make sure that the seal (7) is seated correctly in the base of the water tank (4) (fig. C).
Note: If the seal is missing or incorrectly fitted, unfiltered water may leak into the filter jug.
Put the filter cartridge (5) into the recess in the base of the water tank (4).Press the filter cartridge (5) against the seal (7) and turn it clockwise to lock it in place (fig. D).Make sure that the filter cartridge (5) is securely locked in place.Put the water tank (4) into the filter jug (6).Fit the lid (2).Fill the water tank (4) with cold water, the water will pass through the cartridge (5) into the filter jug (6).Discard the water.Repeat the process of filling and discarding once more.Fill the water tank (4), the filter jug (6) is now ready for use.
Filter cartridge life indicator (fig. E)The cartridge life indicator (3) will remind you when to change the filter cartridge (5). Note: It is recommended that the filter cartridge is changed every four weeks.To set the cartridge life indicator (3):
6
ENGLISH
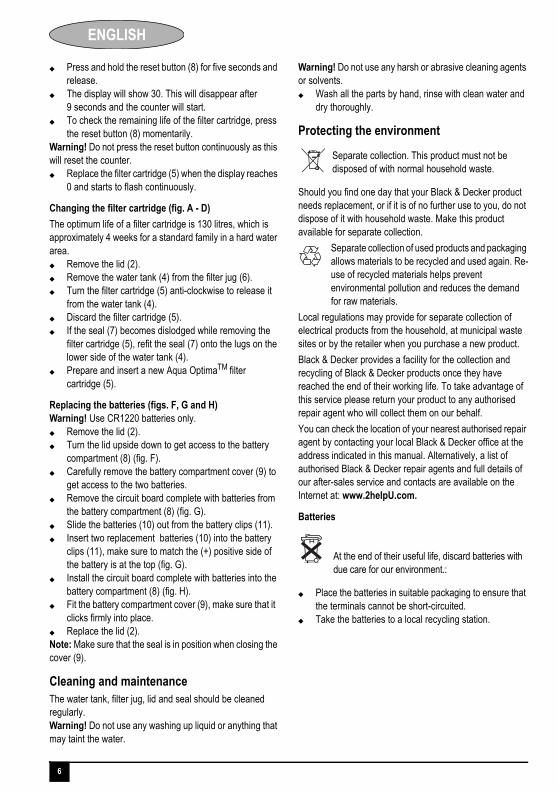
Press and hold the reset button (8) for five seconds and release.The display will show 30. This will disappear after 9 seconds and the counter will start.To check the remaining life of the filter cartridge, press the reset button (8) momentarily.
Warning! Do not press the reset button continuously as this will reset the counter.
Replace the filter cartridge (5) when the display reaches 0 and starts to flash continuously.
Changing the filter cartridge (fig. A - D)The optimum life of a filter cartridge is 130 litres, which is approximately 4 weeks for a standard family in a hard water area.
Remove the lid (2).Remove the water tank (4) from the filter jug (6).Turn the filter cartridge (5) anti-clockwise to release it from the water tank (4).Discard the filter cartridge (5).If the seal (7) becomes dislodged while removing the filter cartridge (5), refit the seal (7) onto the lugs on the lower side of the water tank (4).Prepare and insert a new Aqua OptimaTM filter cartridge (5).
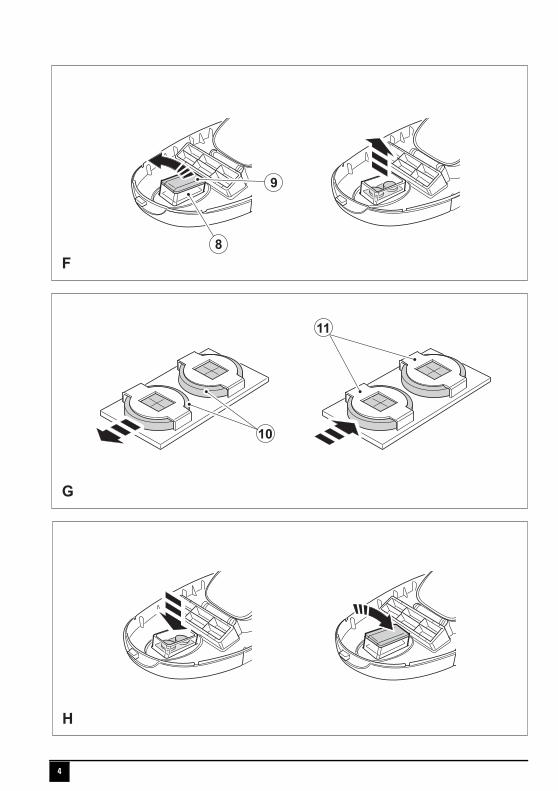
Replacing the batteries (figs. F, G and H)Warning! Use CR1220 batteries only.
Remove the lid (2).Turn the lid upside down to get access to the battery compartment (8) (fig. F).Carefully remove the battery compartment cover (9) to get access to the two batteries.Remove the circuit board complete with batteries from the battery compartment (8) (fig. G).Slide the batteries (10) out from the battery clips (11).Insert two replacement batteries (10) into the battery clips (11), make sure to match the (+) positive side of the battery is at the top (fig. G).Install the circuit board complete with batteries into the battery compartment (8) (fig. H).Fit the battery compartment cover (9), make sure that it clicks firmly into place.Replace the lid (2).
Note: Make sure that the seal is in position when closing the cover (9).
Cleaning and maintenanceThe water tank, filter jug, lid and seal should be cleaned regularly.Warning! Do not use any washing up liquid or anything that may taint the water.
Warning! Do not use any harsh or abrasive cleaning agents or solvents.
Wash all the parts by hand, rinse with clean water and dry thoroughly.
Protecting the environment
Should you find one day that your Black & Decker product needs replacement, or if it is of no further use to you, do not dispose of it with household waste. Make this product available for separate collection.
Separate collection of used products and packaging allows materials to be recycled and used again. Re-use of recycled materials helps prevent environmental pollution and reduces the demand for raw materials.
Local regulations may provide for separate collection of electrical products from the household, at municipal waste sites or by the retailer when you purchase a new product.Black & Decker provides a facility for the collection and recycling of Black & Decker products once they have reached the end of their working life. To take advantage of this service please return your product to any authorised repair agent who will collect them on our behalf.You can check the location of your nearest authorised repair agent by contacting your local Black & Decker office at the address indicated in this manual. Alternatively, a list of authorised Black & Decker repair agents and full details of our after-sales service and contacts are available on the Internet at: www.2helpU.com.
Batteries
Place the batteries in suitable packaging to ensure that the terminals cannot be short-circuited. Take the batteries to a local recycling station.
Separate collection. This product must not be disposed of with normal household waste.
At the end of their useful life, discard batteries with due care for our environment.:
7
ENGLISH
Technical data
EC declaration of conformityWJD225 - H1
Black & Decker declares that these products conform to:NFS/ANSI Standard 42
The undersigned is responsible for compilation of the technical file and makes this declaration on behalf of
Black & Decker
Kevin HewittDirector of Consumer Engineering
Spennymoor, County Durham, DL16 6JG,United Kingdom
08-04-2009
GuaranteeBlack & Decker is confident of the quality of its products and offers an outstanding guarantee. This guarantee statement is in addition to and in no way prejudices your statutory rights. The guarantee is valid within the territories of the Member States of the European Union and the European Free Trade Area. If a Black & Decker product becomes defective due to faulty materials, workmanship or lack of conformity, within 24 months from the date of purchase, Black & Decker guarantees to replace defective parts, repair products subjected to fair wear and tear or replace such products to make sure of the minimum inconvenience to the customer unless:
The product has been used for trade, professional or hire purposes.The product has been subjected to misuse or neglect.The product has sustained damage through foreign objects, substances or accidents.Repairs have been attempted by persons other than authorised repair agents or Black & Decker service staff.
To claim on the guarantee, you will need to submit proof of purchase to the seller or an authorised repair agent. You can check the location of your nearest authorised repair agent by contacting your local Black & Decker office at the address indicated in this manual. Alternatively, a list of authorised Black & Decker repair agents and full details of our after-sales service and contacts are available on the Internet at: www.2helpU.com Please visit our website www.blackanddecker.co.uk to register your new Black & Decker product and to be kept up to date on new products and special offers. Further information on the Black & Decker brand and our range of products is available at www.blackanddecker.co.uk.
WJD225Capacity l 2.25Batteries Type 2 x CR1220Weight (empty) kg 0.68
8
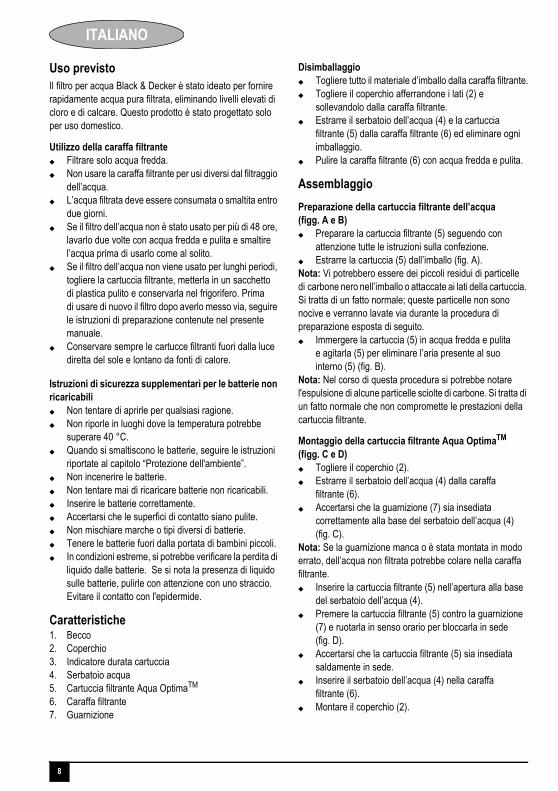
ITALIANOITALIANOUso previstoIl filtro per acqua Black & Decker è stato ideato per fornire rapidamente acqua pura filtrata, eliminando livelli elevati di cloro e di calcare. Questo prodotto è stato progettato solo per uso domestico.
Utilizzo della caraffa filtranteFiltrare solo acqua fredda.Non usare la caraffa filtrante per usi diversi dal filtraggio dell’acqua.L’acqua filtrata deve essere consumata o smaltita entro due giorni.Se il filtro dell’acqua non è stato usato per più di 48 ore, lavarlo due volte con acqua fredda e pulita e smaltire l’acqua prima di usarlo come al solito.Se il filtro dell’acqua non viene usato per lunghi periodi, togliere la cartuccia filtrante, metterla in un sacchetto di plastica pulito e conservarla nel frigorifero. Prima di usare di nuovo il filtro dopo averlo messo via, seguire le istruzioni di preparazione contenute nel presente manuale.Conservare sempre le cartucce filtranti fuori dalla luce diretta del sole e lontano da fonti di calore.
Istruzioni di sicurezza supplementari per le batterie non ricaricabili
Non tentare di aprirle per qualsiasi ragione.Non riporle in luoghi dove la temperatura potrebbe superare 40 °C.Quando si smaltiscono le batterie, seguire le istruzioni riportate al capitolo “Protezione dell'ambiente”.Non incenerire le batterie.Non tentare mai di ricaricare batterie non ricaricabili.Inserire le batterie correttamente.Accertarsi che le superfici di contatto siano pulite.Non mischiare marche o tipi diversi di batterie.Tenere le batterie fuori dalla portata di bambini piccoli.In condizioni estreme, si potrebbe verificare la perdita di liquido dalle batterie. Se si nota la presenza di liquido sulle batterie, pulirle con attenzione con uno straccio. Evitare il contatto con l'epidermide.
Caratteristiche1. Becco2. Coperchio3. Indicatore durata cartuccia4. Serbatoio acqua5. Cartuccia filtrante Aqua OptimaTM
6. Caraffa filtrante7. Guarnizione
DisimballaggioTogliere tutto il materiale d’imballo dalla caraffa filtrante.Togliere il coperchio afferrandone i lati (2) e sollevandolo dalla caraffa filtrante.Estrarre il serbatoio dell’acqua (4) e la cartuccia filtrante (5) dalla caraffa filtrante (6) ed eliminare ogni imballaggio.Pulire la caraffa filtrante (6) con acqua fredda e pulita.
AssemblaggioPreparazione della cartuccia filtrante dell’acqua (figg. A e B)
Preparare la cartuccia filtrante (5) seguendo con attenzione tutte le istruzioni sulla confezione.Estrarre la cartuccia (5) dall’imballo (fig. A).
Nota: Vi potrebbero essere dei piccoli residui di particelle di carbone nero nell’imballo o attaccate ai lati della cartuccia. Si tratta di un fatto normale; queste particelle non sono nocive e verranno lavate via durante la procedura di preparazione esposta di seguito.
Immergere la cartuccia (5) in acqua fredda e pulita e agitarla (5) per eliminare l’aria presente al suo interno (5) (fig. B).
Nota: Nel corso di questa procedura si potrebbe notare l'espulsione di alcune particelle sciolte di carbone. Si tratta di un fatto normale che non compromette le prestazioni della cartuccia filtrante.
Montaggio della cartuccia filtrante Aqua OptimaTM
(figg. C e D)Togliere il coperchio (2).Estrarre il serbatoio dell’acqua (4) dalla caraffa filtrante (6).Accertarsi che la guarnizione (7) sia insediata correttamente alla base del serbatoio dell’acqua (4) (fig. C).
Nota: Se la guarnizione manca o è stata montata in modo errato, dell’acqua non filtrata potrebbe colare nella caraffa filtrante.
Inserire la cartuccia filtrante (5) nell’apertura alla base del serbatoio dell’acqua (4).Premere la cartuccia filtrante (5) contro la guarnizione (7) e ruotarla in senso orario per bloccarla in sede (fig. D).Accertarsi che la cartuccia filtrante (5) sia insediata saldamente in sede.Inserire il serbatoio dell’acqua (4) nella caraffa filtrante (6).Montare il coperchio (2).
9
ITALIANO
Riempire il serbatoio dell’acqua (4) con acqua fredda; l’acqua passa attraverso la cartuccia (5) e raggiunge la caraffa filtrante (6).Smaltire l’acqua.Riempire il serbatoio e smaltire l'acqua ancora una volta.Riempire il serbatoio dell’acqua (4); la caraffa filtrante (6) è ora pronta all’impiego.
Indicatore di durata della cartuccia filtrante (fig. E)L’indicatore di durata della cartuccia (3) consente di ricordare quando sostituire la cartuccia filtrante (5). Nota: Si consiglia di sostituire la cartuccia filtrante ogni quattro settimane.Impostazione dell’indicatore di durata della cartuccia (3)
Premere e tenere premuto il pulsante di ripristino (8) per cinque secondi e quindi rilasciarlo.Il display indica 30. Questa cifra sparisce dopo 9 secondi e il contatore inizia il conteggio.Per controllare la durata rimanente della cartuccia filtrante, premere momentaneamente il pulsante di ripristino (8).
Attenzione! Non premere continuamente il pulsante di ripristino dato che facendolo si ripristina il contatore.
Sostituire la cartuccia filtrante (5) quando il display raggiunge zero e comincia a lampeggiare continuamente.
Sostituzione della cartuccia filtrante (figg. A - D)La durata ottimale di una cartuccia filtrante è di 130 litri, che corrisponde a 4 settimane circa di impiego per una famiglia normale in una zona con acqua dura.
Togliere il coperchio (2).Estrarre il serbatoio dell’acqua (4) dalla caraffa filtrante (6).Ruotare la cartuccia filtrante (5) in senso antiorario per liberarla dal serbatoio dell’acqua (4).Smaltire la cartuccia filtrante (5).Se la guarnizione (7) si stacca mentre si estrae la cartuccia filtrante (5), rimontarla (7) sulle linguette sul lato inferiore del serbatoio dell’acqua (4).Preparare e inserire una nuova cartuccia filtrante Aqua OptimaTM (5).
Sostituzione delle batterie (figg. F, G e H)Attenzione! Usare solo batterie CR1220.
Togliere il coperchio (2).Capovolgere il coperchio per poter accedere al vano delle batterie (8) (fig. F).Staccare con attenzione il coperchio del vano delle batterie (9) per raggiungere le due batterie.Staccare la scheda di circuito con le due batterie dal rispettivo vano (8) (fig. G).
Sfilare le batterie (10) dai rispettivi fermi (11).Inserire le due batterie di ricambio (10) nei rispettivi fermi (11), verificando di abbinare il lato positivo (+) della batteria che si trova in alto (fig. G).Montare la scheda di circuito con le due batterie nel rispettivo vano (8) (fig. H).Montare il coperchio della batteria (9), facendo attenzione che si agganci saldamente in sede.Rimettere il coperchio (2).
Nota: Controllare che la guarnizione sia posizionata quando si chiude il coperchio (9).
Pulizia e manutenzioneIl serbatoio dell’acqua, la caraffa filtrante, il coperchio e la guarnizione devono essere puliti regolarmente.Attenzione! Non usare detersivo per i piatti o nessun altro prodotto che possa contaminare l'acqua.Attenzione! Non usare detersivi corrosivi o abrasivi o solventi.
Lavare tutti i componenti a mano, risciacquarli con acqua pulita e asciugarli con cura.
Protezione dell’ambiente
Nel caso in cui l’elettroutensile Black & Decker debba essere sostituito o non sia più necessario, non smaltirlo con i normali rifiuti domestici. Metterlo da parte per la raccolta differenziata.
La raccolta differenziata dei prodotti e degli imballaggi utilizzati consente il riciclaggio dei materiali e il loro continuo utilizzo. Il riutilizzo dei materiali riciclati favorisce la protezione dell’ambiente prevenendo l’inquinamento e riduce
il fabbisogno di materie prime. Seguire la regolamentazione locale per la raccolta differenziata dei prodotti elettrici che può prevedere punti di raccolta o la consegna dell’elettroutensile al rivenditore presso il quale viene acquistato un nuovo prodotto.Black & Decker offre ai suoi clienti la possibilità di riciclare i prodotti Black & Decker che hanno esaurito la loro vita di servizio. Per usufruire di tale servizio, è sufficiente restituire il prodotto a qualsiasi tecnico autorizzato, incaricato della raccolta per conto dell’azienda.Per individuare il tecnico autorizzato più vicino, rivolgersi alla sede Black & Decker locale, presso il recapito indicato nel presente manuale. Altrimenti un elenco completo di tutti i tecnici autorizzati Black & Decker e i dettagli completi sui contatti e i servizi post-vendita sono disponibili su Internet presso: www.2helpU.com.
Raccolta differenziata. Questo prodotto non deve essere smaltito con i normali rifiuti domestici.
10
ITALIANO
Batterie
Imballare le batterie in modo idoneo per evitare che i terminali possano essere cortocircuitati. Consegnarle al centro di riciclaggio di zona.
Dati tecnici
Dichiarazione CE di conformitàWJD225 - H1
Black & Decker dichiara che i presenti prodotti sono conformi a:
Normativa NFS/ANSI 42
Il sottoscritto è responsabile della redazione di questo documento tecnico e rilascia questa dichiarazione per conto
di Black & Decker
Kevin HewittDirettore tecnico prodotti di consumo
Spennymoor, County Durham DL16 6JG,Regno Unito08-04-2009
GaranziaCerta della qualità dei suoi prodotti, Black & Decker offre una garanzia eccezionale. Il presente certificato di garanzia è complementare ai diritti legali e non li pregiudica in alcun modo. La garanzia è valida entro il territorio degli Stati membri dell’Unione Europea e dell’EFTA (European Free Trade Area). Se un prodotto Black & Decker risulta difettoso per qualità del materiale, della costruzione o per mancata conformità entro 24 mesi dalla data di acquisto, Black & Decker garantisce la sostituzione delle parti difettose, provvede alla riparazione dei prodotti se ragionevolmente usurati oppure alla loro sostituzione, in modo da ridurre al minimo il disagio del cliente a meno che:
Il prodotto non sia stato destinato ad usi commerciali, professionali o al noleggio;Il prodotto non sia stato usato in modo improprio o scorretto;
Il prodotto non abbia subito danni causati da oggetti o sostanze estranee oppure incidenti;Il prodotto non abbia subito tentativi di riparazione non effettuati da tecnici autorizzati né dall’assistenza Black & Decker.
Per attivare la garanzia è necessario esibire la prova comprovante l’acquisto al venditore o al tecnico autorizzato. Per individuare il tecnico autorizzato più vicino, rivolgersi alla sede Black & Decker locale, presso il recapito indicato nel presente manuale. Altrimenti un elenco completo di tutti i tecnici autorizzati Black & Decker e i dettagli completi sui contatti e i servizi post-vendita sono disponibili su Internet presso: www.2helpU.com I clienti che desiderano registrare il nuovo prodotto Black & Decker e ricevere gli aggiornamenti sui nuovi prodotti e le offerte speciali, sono invitati a visitare il sito Web (www.blackanddecker.it). Ulteriori informazioni sul marchio e la gamma di prodotti Black & Decker sono disponibili all’indirizzo www.blackanddecker.it.
Una volta esaurite le batterie, smaltirle batterie in conformità alle norme ambientali.
WJD225Capacità l 2,25Batterie Tipo 2 x CR1220Peso (da vuota) kg 0,68
11
ΕΛΛΗΝΙΚΑΕΛΛΗΝΙΚΑΕνδεδειγµένη χρήσηTo φίλτρο νερού της Black & Decker έχει σχεδιαστεί για να σας παρέχει καθαρό, φιλτραρισµένο νερό γρήγορα, αφαιρώντας υψηλά επίπεδα χλωρίου και αλάτων. Αυτό το προϊόν προορίζεται για οικιακή χρήση µόνο.
Χρήση της κανάτας φίλτρουΦιλτράρετε µόνο κρύο νερό.Μη χρησιµοποιείτε την κανάτα φίλτρου για οποιοδήποτε άλλο σκοπό εκτός από το να φιλτράρετε νερό.Το φιλτραρισµένο νερό πρέπει να καταναλώνεται µέσα σε δύο µέρες αλλιώς πρέπει να απορρίπτεται.Εάν δεν έχετε χρησιµοποιήσει το φίλτρο νερού για περισσότερο από 48 ώρες, ξεπλύνετε το φίλτρο δύο φορές µε κρύο νερό και απορρίψτε το νερό πριν την κανονική χρήση.Εάν δε χρησιµοποιήσετε το φίλτρο νερού για µεγάλη χρονική περίοδο, αφαιρέστε το στοιχείο φίλτρου, τοποθετήστε το σε µία πλαστική σακούλα και αποθηκεύστε το στο ψυγείο. Μετά τη φύλαξη πριν χρησιµοποιήσετε το φίλτρο, ακολουθήστε τις οδηγίες προετοιµασίας σε αυτό το εγχειρίδιο.Πάντα να αποθηκεύετε τα στοιχεία φίλτρου µακριά από άµεσο ηλιακό φως και µακριά από πηγές θερµότητας.
Συµπληρωµατικές οδηγίες ασφαλείας για µη επαναφορτιζόµενες µπαταρίες
Μην επιχειρήσετε ποτέ να ανοίξετε τις µπαταρίες για οποιοδήποτε λόγο.Μη φυλάσσετε σε µέρη όπου η θερµοκρασία µπορεί να υπερβεί τους 40 °C.Όταν απορρίπτετε τις µπαταρίες, ακολουθήστε τις οδηγίες που δίνονται στην ενότητα «Προστασία του περιβάλλοντος».Μην αποτεφρώνετε τις µπαταρίες.Μην επιχειρήσετε ποτέ να φορτίσετε µη επαναφορτιζόµενες µπαταρίες.Τοποθετήστε σωστά τις µπαταρίες.Βεβαιωθείτε ότι οι επιφάνειες επαφής είναι καθαρές.Μην αναµείξετε διαφορετικές µάρκες µπαταριών.Κρατήστε τις µπαταρίες µακριά από µικρά παιδιά.Κάτω από ακραίες συνθήκες, µπορεί να επέλθει διαρροή υγρών µπαταρίας. Αν παρατηρήσετε υγρό πάνω στις µπαταρίες, σκουπίστε το προσεκτικά µε ένα πανί. Αποφύγετε την επαφή µε το δέρµα.
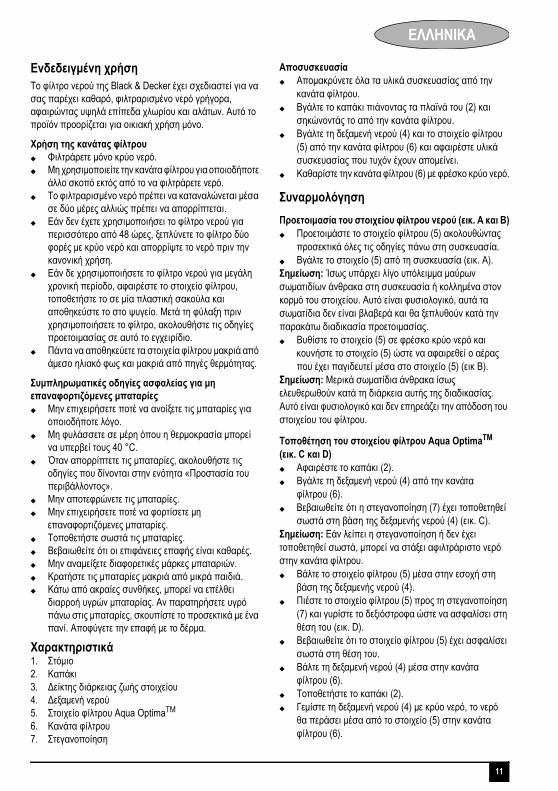
Χαρακτηριστικά1. Στόµιο2. Καπάκι3. ∆είκτης διάρκειας ζωής στοιχείου4. ∆εξαµενή νερού5. Στοιχείο φίλτρου Aqua OptimaTM 6. Κανάτα φίλτρου7. Στεγανοποίηση
ΑποσυσκευασίαΑποµακρύνετε όλα τα υλικά συσκευασίας από την κανάτα φίλτρου.Βγάλτε το καπάκι πιάνοντας τα πλαϊνά του (2) και σηκώνοντάς το από την κανάτα φίλτρου.Βγάλτε τη δεξαµενή νερού (4) και το στοιχείο φίλτρου (5) από την κανάτα φίλτρου (6) και αφαιρέστε υλικά συσκευασίας που τυχόν έχουν αποµείνει.Καθαρίστε την κανάτα φίλτρου (6) µε φρέσκο κρύο νερό.
ΣυναρµολόγησηΠροετοιµασία του στοιχείου φίλτρου νερού (εικ. Α και Β)
Προετοιµάστε το στοιχείο φίλτρου (5) ακολουθώντας προσεκτικά όλες τις οδηγίες πάνω στη συσκευασία.Βγάλτε το στοιχείο (5) από τη συσκευασία (εικ. Α).
Σηµείωση: Ίσως υπάρχει λίγο υπόλειµµα µαύρων σωµατιδίων άνθρακα στη συσκευασία ή κολληµένα στον κορµό του στοιχείου. Αυτό είναι φυσιολογικό, αυτά τα σωµατίδια δεν είναι βλαβερά και θα ξεπλυθούν κατά την παρακάτω διαδικασία προετοιµασίας.
Βυθίστε το στοιχείο (5) σε φρέσκο κρύο νερό και κουνήστε το στοιχείο (5) ώστε να αφαιρεθεί ο αέρας που έχει παγιδευτεί µέσα στο στοιχείο (5) (εικ Β).
Σηµείωση: Μερικά σωµατίδια άνθρακα ίσως ελευθερωθούν κατά τη διάρκεια αυτής της διαδικασίας. Αυτό είναι φυσιολογικό και δεν επηρεάζει την απόδοση του στοιχείου του φίλτρου.
Τοποθέτηση του στοιχείου φίλτρου Aqua OptimaTM (εικ. C και D)
Αφαιρέστε το καπάκι (2).Βγάλτε τη δεξαµενή νερού (4) από την κανάτα φίλτρου (6).Βεβαιωθείτε ότι η στεγανοποίηση (7) έχει τοποθετηθεί σωστά στη βάση της δεξαµενής νερού (4) (εικ. C).
Σηµείωση: Εάν λείπει η στεγανοποίηση ή δεν έχει τοποθετηθεί σωστά, µπορεί να στάξει αφιλτράριστο νερό στην κανάτα φίλτρου.
Βάλτε το στοιχείο φίλτρου (5) µέσα στην εσοχή στη βάση της δεξαµενής νερού (4).Πιέστε το στοιχείο φίλτρου (5) προς τη στεγανοποίηση (7) και γυρίστε το δεξιόστροφα ώστε να ασφαλίσει στη θέση του (εικ. D).Βεβαιωθείτε ότι το στοιχείο φίλτρου (5) έχει ασφαλίσει σωστά στη θέση του.Βάλτε τη δεξαµενή νερού (4) µέσα στην κανάτα φίλτρου (6).Τοποθετήστε το καπάκι (2).Γεµίστε τη δεξαµενή νερού (4) µε κρύο νερό, το νερό θα περάσει µέσα από το στοιχείο (5) στην κανάτα φίλτρου (6).
12
ΕΛΛΗΝΙΚΑ
Απορρίψτε το νερό.Επαναλάβετε τη διαδικασία γεµίσµατος και απόρριψης για µια ακόµη φορά.Γεµίστε τη δεξαµενή νερού (4), η κανάτα φίλτρου (6) είναι τώρα έτοιµη να τη χρησιµοποιήσετε.
∆είκτης διάρκειας ζωής του στοιχείου φίλτρου (εικ. Ε)Ο δείκτης διάρκειας ζωής του στοιχείου φίλτρου (3) θα σας υπενθυµίσει πότε πρέπει να αλλάξετε το στοιχείο φίλτρου (5). Σηµείωση: Συνιστάται να αλλάζετε το στοιχείο φίλτρου κάθε τέσσερις εβδοµάδες.Για να µηδενίσετε το δείκτη διάρκειας ζωής του στοιχείου (3):
Πιέστε και κρατήστε πατηµένο το κουµπί µηδενισµού (8) για πέντε δευτερόλεπτα και απελευθερώστε το.Η οθόνη θα δείξει 30. Η ένδειξη αυτή θα εξαφανιστεί µετά από 9 δευτερόλεπτα και θα ξεκινήσει ο µετρητής.Για να ελέγξετε τον υπολοιπόµενο χρόνο ζωής του στοιχείου του φίλτρου, πιέστε στιγµιαία το κουµπί µηδενισµού (8).
Προειδοποίηση! Μην πιέσετε το κουµπί µηδενισµού παρατεταµένα διότι έτσι θα µηδενιστεί ο µετρητής.
Αντικαταστήστε το στοιχείο φίλτρου (5) όταν η ένδειξη στην οθόνη φτάσει στο 0 και αρχίσει να αναβοσβήνει συνεχώς.
Αλλάξτε το στοιχείο του φίλτρου (εικ. A - D)Η βέλτιστη διάρκεια ζωής του στοιχείου φίλτρου είναι 130 λίτρα, το οποίο σηµαίνει περίπου 4 εβδοµάδες ζωής για µια οικογένεια που βρίσκεται σε περιοχή µε σκληρό νερό.
Αφαιρέστε το καπάκι (2).Βγάλτε τη δεξαµενή νερού (4) από την κανάτα φίλτρου (6).Γυρίστε το στοιχείο φίλτρου (5) αριστερόστροφα ώστε να το ελευθερώσετε από τη δεξαµενή νερού (4).Απορρίψετε το στοιχείο φίλτρου (5).Εάν η στεγανοποίηση (7) βγει ενώ βγάζετε το στοιχείο φίλτρου (5), επανατοποθετήστε τη στεγανοποίηση (7) πάνω στα πτερύγια στο κάτω µέρος της δεξαµενής νερού (4).Προετοιµάστε και εισάγετε ένα νέο στοιχείο φίλτρου Aqua OptimaTM (5).
Αντικατασταση των µπαταριών (εικ. F, G και H)Προειδοποίηση! Χρησιµοποιείτε µόνο µπαταρίες CR1220.
Αφαιρέστε το καπάκι (2).Γυρίστε το καπάκι ανάποδα για να αποκτήσετε πρόσβαση στο κάλυµµα της υποδοχής µπαταριών (8) (εικ. F).Αφαιρέστε προσεκτικά το κάλυµµα υποδοχής µπαταριών (9) για να έχετε πρόσβαση στις δύο µπαταρίες.
Αφαιρέστε την πλακέτα κυκλώµατος µαζί µε τις µπαταρίες από την υποδοχή των µπαταριών (8) (εικ. G).Σπρώξτε τις µπαταρίες (10) να βγουν από τα κλιπ τους (11).Τοποθετήστε δύο ανταλλακτικές µπαταρίες (10) στα κλιπ µπαταριών (11), βεβαιωθείτε ότι ταιριάζετε το (+) θετικό άκρο της µπαταρίας ώστε να βρίσκεται επάνω (εικ. G).Τοποθετήστε την πλακέτα κυκλώµατος µαζί µε τις µπαταρίες στην υποδοχή των µπαταριών (8) (εικ. H).Τοποθετήστε το κάλυµµα της θήκης των µπαταριών (7), βεβαιωθείτε ότι έχει κουµπώσει καλά στη θέση του.Επανατοποθετήστε το καπάκι (2).
Σηµείωση: Βεβαιωθείτε ότι η στεγανοποίηση είναι στη θέση της πριν κλείσετε το κάλυµµα (9).
Καθαρισµός και συντήρησηΠρέπει να καθαρίζετε τακτικά τη δεξαµενή νερού, την κανάτα φίλτρου, το καπάκι και τη στεγανοποίηση.Προειδοποίηση! Μη χρησιµοποιείτε οποιοδήποτε υγρό καθαρισµού ή οτιδήποτε άλλο που µπορεί να µολύνει το νερό.Προειδοποίηση! Μη χρησιµοποιείτε τυχόν σκληρά ή αποξεστικά καθαριστικά µέσα ή διαλυτικά.
Πλύνετε όλα τα µέρη µε το χέρι, ξεπλύνετε µε καθαρό νερό και στεγνώστε πολύ καλά.
Προστασία του περιβάλλοντος
Εάν κάποια µέρα διαπιστώσετε ότι το προϊόν σας Black & Decker χρειάζεται αντικατάσταση, ή ότι δεν το χρειάζεστε άλλο, µην το απορρίψετε µαζί µε τα κοινά οικιακά απορρίµµατα αλλά κάντε αυτό το προϊόν διαθέσιµο για ανεξάρτητη αποκοµιδή.
Η ανεξάρτητη συλλογή των µεταχειρισµένων προϊόντων και των υλικών συσκευασίας δίνει τη δυνατότητα ανακύκλωσης και επαναχρησιµοποίησης των υλικών. Με την επαναχρησιµοποίηση των ανακυκλωµένων υλικών
αποτρέπεται η µόλυνση του περιβάλλοντος και µειώνεται η ζήτηση πρώτων υλών. Οι κανονισµοί που ισχύουν στην περιοχή σας ενδέχεται να προβλέπουν την επιλεκτική περισυλλογή των ηλεκτρικών συσκευών που προέρχονται από νοικοκυριά σε κρατικές εγκαταστάσεις ή από τον έµπορο όταν αγοράσετε ένα καινούργιο προϊόν.
Επιλεκτική περισυλλογή. Αυτό το προϊόν δεν πρέπει να απορρίπτεται µαζί µε τα κοινά οικιακά απορρίµµατα.
13
ΕΛΛΗΝΙΚΑ
H Black & Decker δίνει τη δυνατότητα ανακύκλωσης των προϊόντων της που έχουν συµπληρώσει τη διάρκεια ζωής τους. Για να χρησιµοποιήσετε αυτήν την υπηρεσία, επιστρέψτε το προϊόν σας σε οποιοδήποτε εξουσιοδοτηµένο κέντρο επισκευών, όπου θα το παραλάβουν εκ µέρους µας.Ενηµερωθείτε για το πλησιέστερο εξουσιοδοτηµένο κέντρο επισκευών της περιοχής σας, επικοινωνώντας µε τα γραφεία της Black & Decker στη διεύθυνση που αναγράφεται στο εγχειρίδιο. Επίσης, για να πληροφορηθείτε για τα εξουσιοδοτηµένα κέντρα επισκευών της Black & Decker και τους αρµόδιους των υπηρεσιών που παρέχονται µετά την πώληση, µπορείτε να ανατρέξετε στο ∆ιαδίκτυο, στη διεύθυνση: www.2helpU.com
Μπαταρίες
Τοποθετήστε τις µπαταρίες σε κατάλληλη συσκευασία, ώστε να είναι αδύνατο το βραχυκύκλωµα των πόλων. Παραδώστε τις µπαταρίες σε έναν τοπικό σταθµό ανακύκλωσης.
Τεχνικά χαρακτηριστικά
∆ήλωση συµµόρφωσης µε την Ευρωπαϊκή ΚοινότηταWJD225 - H1
Η Black & Decker δηλώνει ότι τα προϊόντα αυτά συµµορφώνονται µε:
NFS/ANSI Πρότυπο 42
Ο κάτωθι υπογεγραµµένος είναι υπεύθυνος για την κατάρτιση του τεχνικού φακέλου και δηλώνει τα παρόντα εκ
µέρους της Black & Decker.
Kevin Hewitt∆ιευθυντής Εξυπηρέτησης Πελατών
Spennymoor, County Durham, DL16 6JG,Ηνωµένο Βασίλειο
08-04-2009
ΕγγύησηΗ Black & Decker είναι σίγουρη για την ποιότητα των προϊόντων της και παρέχει σηµαντική εγγύηση. Η παρούσα γραπτή εγγύηση αποτελεί πρόσθετο δικαίωµά σας και δεν ζηµιώνει τα νόµιµα δικαιώµατά σας. Η εγγύηση ισχύει εντός της επικράτειας των Κρατών Μελών της Ευρωπαϊκής Ένωσης και της Ευρωπαϊκής Ζώνης Ελευθέρων Συναλλαγών. Σε περίπτωση που κάποιο προϊόν της Black & Decker παρουσιάσει βλάβη εξαιτίας ελαττωµατικών υλικών, ποιότητας εργασίας ή έλλειψης συµφωνίας µε τις προδιαγραφές εντός 24 µηνών από την ηµεροµηνία αγοράς, η Black & Decker εγγυάται την αντικατάσταση των ελαττωµατικών τµηµάτων, την επισκευή προϊόντων που έχουν υποστεί εύλογη φθορά λόγω χρήσης ή την αντικατάσταση των προϊόντων προκειµένου να εξασφαλίσει την ελάχιστη ενόχληση στους πελάτες της, εκτός εάν:
Το προϊόν έχει χρησιµοποιηθεί σε εργασιακό, επαγγελµατικό περιβάλλον ή αν έχει ενοικιαστεί.Έχει γίνει εσφαλµένη χρήση του προϊόντος ή έχει παραµεληθεί.Το προϊόν έχει υποστεί βλάβη από άλλα αντικείµενα, από ουσίες ή λόγω ατυχήµατος.Έχει γίνει προσπάθεια επισκευής από µη εξουσιοδοτηµένα κέντρα επισκευών ή από προσωπικό που δεν ανήκει στο προσωπικό της Black & Decker.
Για να ισχύσει η εγγύηση, πρέπει να υποβάλετε απόδειξη αγοράς στον πωλητή ή το εξουσιοδοτηµένο κέντρο επισκευών. Ενηµερωθείτε για το πλησιέστερο εξουσιοδοτηµένο κέντρο επισκευών της περιοχής σας, επικοινωνώντας µε τα γραφεία της Black & Decker στη διεύθυνση που αναγράφεται στο εγχειρίδιο. Επίσης, για να πληροφορηθείτε για τα εξουσιοδοτηµένα κέντρα επισκευών της Black & Decker και τους αρµόδιους των υπηρεσιών που παρέχονται µετά την πώληση, µπορείτε να ανατρέξετε στο ∆ιαδίκτυο, στη διεύθυνση: www.2helpU.com Παρακαλούµε επισκεφθείτε την ιστοσελίδα µας www.blackanddecker.eu για να καταχωρήσετε το νέο σας προϊόν Black & Decker και για να ενηµερώνεστε για τα νέα προϊόντα και τις ειδικές προσφορές. Περισσότερες πληροφορίες σχετικά µε τη µάρκα Black & Decker και τη σειρά των προϊόντων µας θα βρείτε στη διεύθυνση www.blackanddecker.eu.
Στο τέλος της ωφέλιµης ζωής τους, απορρίψτε τις µπαταρίες µε την πρέπουσα φροντίδα για το περιβάλλον µας:
WJD225Χωρητικότητα l 2.25Μπαταρίες Τύπος 2 x CR1220Βάρος (άδειο) kg 0.68

14

Do not forget to register your product!www.blackanddecker.co.uk/productregistration
Register your product online at www.blackanddecker.co.uk/productregistration or send your name, surname and product code to Black & Decker in your country.
Non dimenticate di registrare il prodotto!www.blackanddecker.it/productregistration
Registrate il prodotto online su www.blackanddecker.it/productregistration o inviate nome, cognome e codice del prodotto al centro Black & Decker del vostro paese.
!www.blackanddecker.gr/productregistration
www.blackanddecker.gr/productregistration, Black & Decker .
90549996 04//09


![Filter Design with Op-amptera.yonsei.ac.kr/class/2020_1_1/lecture/Lect 29 Project... · 2020. 7. 8. · • Filter Design with ideal Op-amp [10], Operational Amplifier [20] ,Filter](https://static.fdocument.org/doc/165x107/60a6ee382a29926a6905df36/filter-design-with-op-29-project-2020-7-8-a-filter-design-with-ideal.jpg)