User Manual & Installation Quick Start Quidway S1700-8-AC ...
4
Install the device on a worktable. 安装设备到工作台。 Mark the screw locations on the wall according to the holes on the back of device. 根据设备后面板上的挂孔,用记号笔标记螺钉位置。 Rev: 02 膨胀套 Screw Ancrotron 膨胀套 Screw Ancrotron 技术支持 快速安装指南以及简易使用说明书 Service and Support Installing the Device on a Worktable 安装设备到工作台 Tool List 工具参考 Quidway S1700-8-AC 以太网交换机 Quidway S1700-8-AC Ethernet Switch User Manual & Installation Quick Start Crosshead screwdriver 十字螺丝刀 羊角锤 Claw hammer Marker pen 记号笔 电源适配器 Power adapter Installing the Device on a Wall 安装设备到墙面 M6 螺钉 M6 screw Accessories (S1700-8-AC) 设备附件介绍(S1700-8-AC ) Percussion drill(φ8 Drill bit) 冲击钻(φ8钻头) φ8 Drill bit φ8钻头 90 。 Install the Screw Ancrotron. 安装膨胀套。 ●To prevent injuries, check that there is no electrical wire at the locations to be drilled before drilling holes in the wall. ● ● ● Flammable and explosive items under the device is prohibited. Leave more than 100 mm of space around the device for proper heat dissipation. 在墙上打孔时,必须确认打孔处没有墙电,避免造成人身伤害。 设备下方禁止摆放易燃易爆物品,距离设备100mm范围内不能有异物挡住。 4
Transcript of User Manual & Installation Quick Start Quidway S1700-8-AC ...
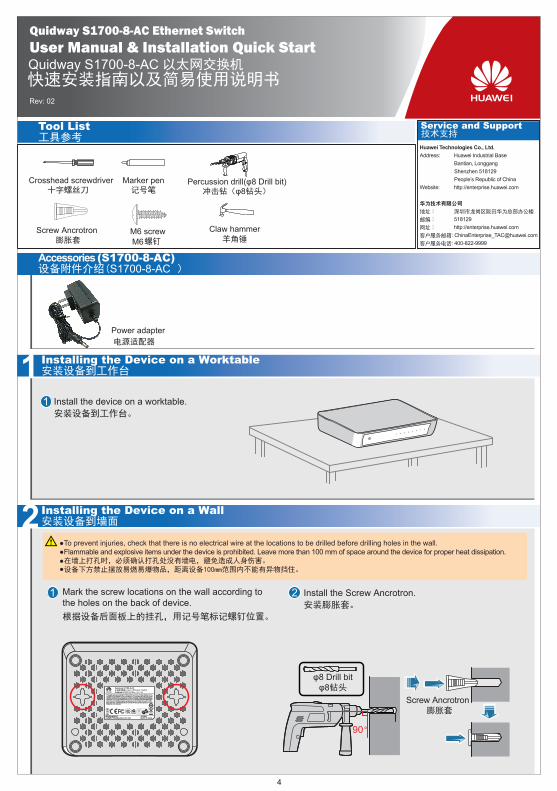
Install the device on a worktable. 安装设备到工作台。
Mark the screw locations on the wall according to the holes on the back of device. 根据设备后面板上的挂孔,用记号笔标记螺钉位置。
Rev: 02
膨胀套 Screw Ancrotron
膨胀套 Screw Ancrotron
技术支持
快速安装指南以及简易使用说明书
Service and Support
Installing the Device on a Worktable 安装设备到工作台
Tool List 工具参考
Quidway S1700-8-AC 以太网交换机
Quidway S1700-8-AC Ethernet Switch User Manual & Installation Quick Start
Crosshead screwdriver 十字螺丝刀
羊角锤 Claw hammer
Marker pen 记号笔
电源适配器
Power adapter
Installing the Device on a Wall 安装设备到墙面
M6螺钉 M6 screw
Accessories (S1700-8-AC) 设备附件介绍(S1700-8-AC )
Percussion drill(φ8 Drill bit) 冲击钻(φ8钻头)
φ8 Drill bit φ8钻头
90。
Install the Screw Ancrotron. 安装膨胀套。
●To prevent injuries, check that there is no electrical wire at the locations to be drilled before drilling holes in the wall. ● ● ●
Flammable and explosive items under the device is prohibited. Leave more than 100 mm of space around the device for proper heat dissipation. 在墙上打孔时,必须确认打孔处没有墙电,避免造成人身伤害。 设备下方禁止摆放易燃易爆物品,距离设备100mm范围内不能有异物挡住。
4
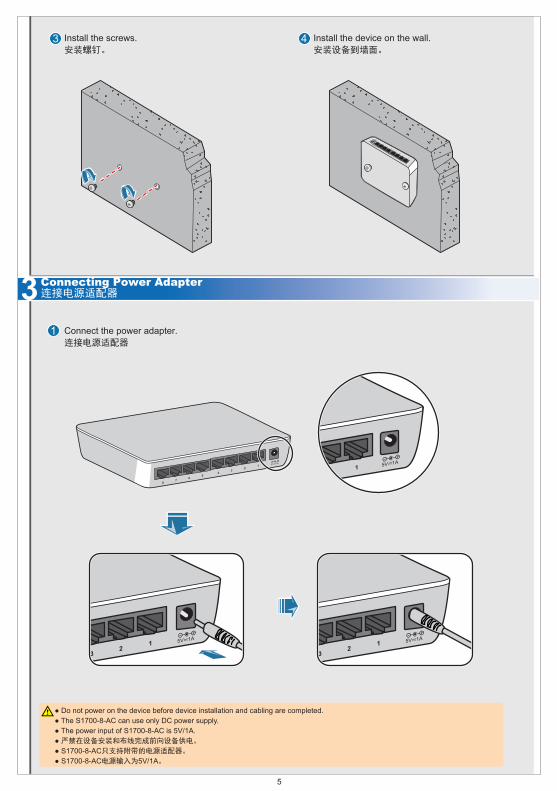
Install the screws.安装螺钉。
Connect the power adapter.连接电源适配器
Install the device on the wall.安装设备到墙面。
● Do not power on the device before device installation and cabling are completed.● The S1700-8-AC can use only DC power supply.● The power input of S1700-8-AC is 5V/1A.● 严禁在设备安装和布线完成前向设备供电。
● S1700-8-AC只支持附带的电源适配器。
● S1700-8-AC电源输入为5V/1A。
Connecting Power Adapter连接电源适配器
5
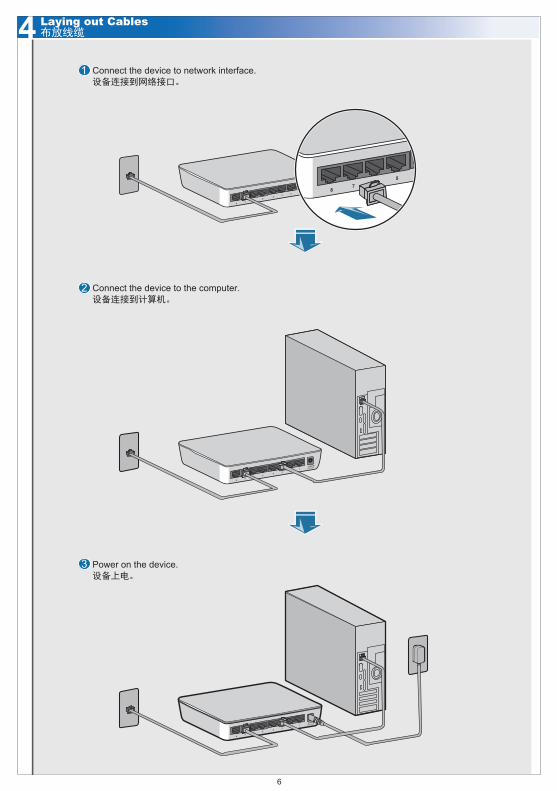
设备连接到网络接口。Connect the device to network interface.
设备连接到计算机。Connect the device to the computer.
设备上电。Power on the device.
Laying out Cables布放线缆
6
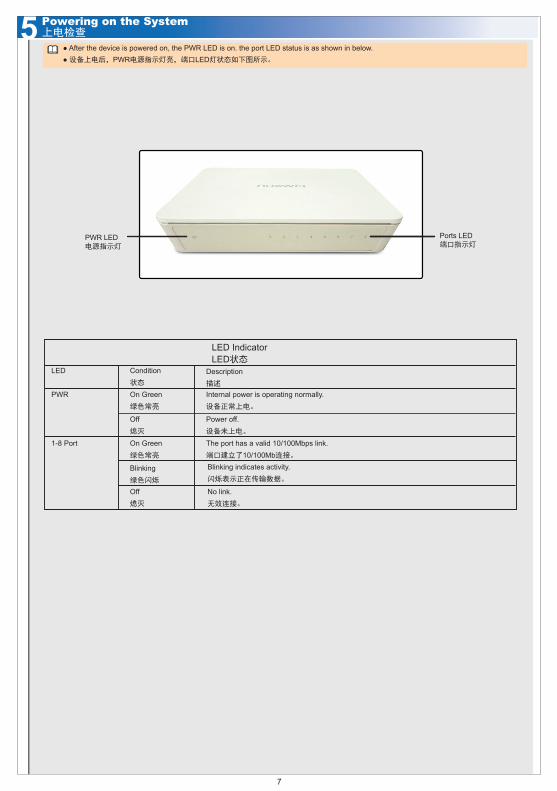
LED Indicator LED状态
LED Condition状态
Description 描述
PWR On Green绿色常亮
On Green绿色常亮
Internal power is operating normally.设备正常上电。
Off熄灭
Power off.设备未上电。
1-8 Port
Blinking 绿色闪烁
The port has a valid 10/100Mbps link. 端口建立了10/100Mb连接。
Blinking indicates activity.闪烁表示正在传输数据。
Off熄灭
No link.无效连接。
● After the device is powered on, the PWR LED is on. the port LED status is as shown in below.● 设备上电后,PWR电源指示灯亮,端口LED灯状态如下图所示。
PWR LED 电源指示灯
Ports LED端口指示灯
Powering on the System上电检查
7