QSG153: Micrium’s μC/Probe Tool Quick- Start Guide · QSG153: Micrium’s μC/Probe Tool Quick-...
10
QSG153: Micrium’s μC/Probe Tool Quick- Start Guide This document explains how to run Micrium's µC/Probe tool on the following EFM32 MCU boards from Silicon Labs: • Giant Gecko Starter Kit (EFM32GG-STK3700) • Giant Gecko GG11 Starter Kit (EFM32GG-STK3701A) • Pearl Gecko Starter Kit (SLSTK3401A) • Leopard Gecko Starter Kit (EFM32LG-STK3600) • Wonder Gecko Starter Kit (EFM32WG-STK3800) The instructions given here should be applicable to other J-Link-equipped, Cortex-M- based boards from Silicon Labs, but only the aforementioned boards have been tested with µC/Probe. If you're interested in running µC/Probe on a platform not officially cov- ered by this document, contact [email protected] for information on compatibility. KEY FEATURES • Building and running software examples in Simplicity Studio • Creating drag-and-drop µC/Probe workspaces • Visualizing C variables with µC/Probe • Establishing a target connection in µC/ Probe via the SEGGER J-Link silabs.com | Building a more connected world. Rev. 0.1
-
Upload
truongquynh -
Category
Documents
-
view
218 -
download
0
Transcript of QSG153: Micrium’s μC/Probe Tool Quick- Start Guide · QSG153: Micrium’s μC/Probe Tool Quick-...
QSG153: Micrium’s μC/Probe Tool Quick-Start Guide
This document explains how to run Micrium's µC/Probe tool onthe following EFM32 MCU boards from Silicon Labs:• Giant Gecko Starter Kit (EFM32GG-STK3700)• Giant Gecko GG11 Starter Kit (EFM32GG-STK3701A)• Pearl Gecko Starter Kit (SLSTK3401A)• Leopard Gecko Starter Kit (EFM32LG-STK3600)• Wonder Gecko Starter Kit (EFM32WG-STK3800)
The instructions given here should be applicable to other J-Link-equipped, Cortex-M-based boards from Silicon Labs, but only the aforementioned boards have been testedwith µC/Probe. If you're interested in running µC/Probe on a platform not officially cov-ered by this document, contact [email protected] for information on compatibility.
KEY FEATURES
• Building and running software examples inSimplicity Studio
• Creating drag-and-drop µC/Probeworkspaces
• Visualizing C variables with µC/Probe• Establishing a target connection in µC/
Probe via the SEGGER J-Link
silabs.com | Building a more connected world. Rev. 0.1
1. Required Software Tools
µC/Probe is a unique Graphical Live Watch tool that allows developers to read and write a running embedded system's variables. AnEducational edition of µC/Probe exists as a free option for developers seeking to evaluate the tool. The procedure given in this docu-ment was tested using v4.2.17 of the Educational edition of µC/Probe. Although it should be possible to follow the procedure usingother versions of µC/Probe, only the results for v4.2.17 have been confirmed.
Any of a wide range of IDEs can be run alongside µC/Probe, but this document assumes the use of Silicon Labs’ Simplicity Studioenvironment. Simplicity Studio is an Eclipse-based IDE that, as the below “Download Links” section indicates, now is not only compati-ble with µC/Probe but offers a built-in version of the tool. The contents of this document were tested using v4.0.5 of Simplicity Studio’sARM IDE. If you’re interested in pairing µC/Probe with a different IDE, contact [email protected] to learn more about your options.
QSG153: Micrium’s μC/Probe Tool Quick-Start GuideRequired Software Tools
silabs.com | Building a more connected world. Rev. 0.1 | 2
2. Download Links
Simplicity Studio: http://www.silabs.com/products/development-tools/software/simplicity-studio
µC/Probe
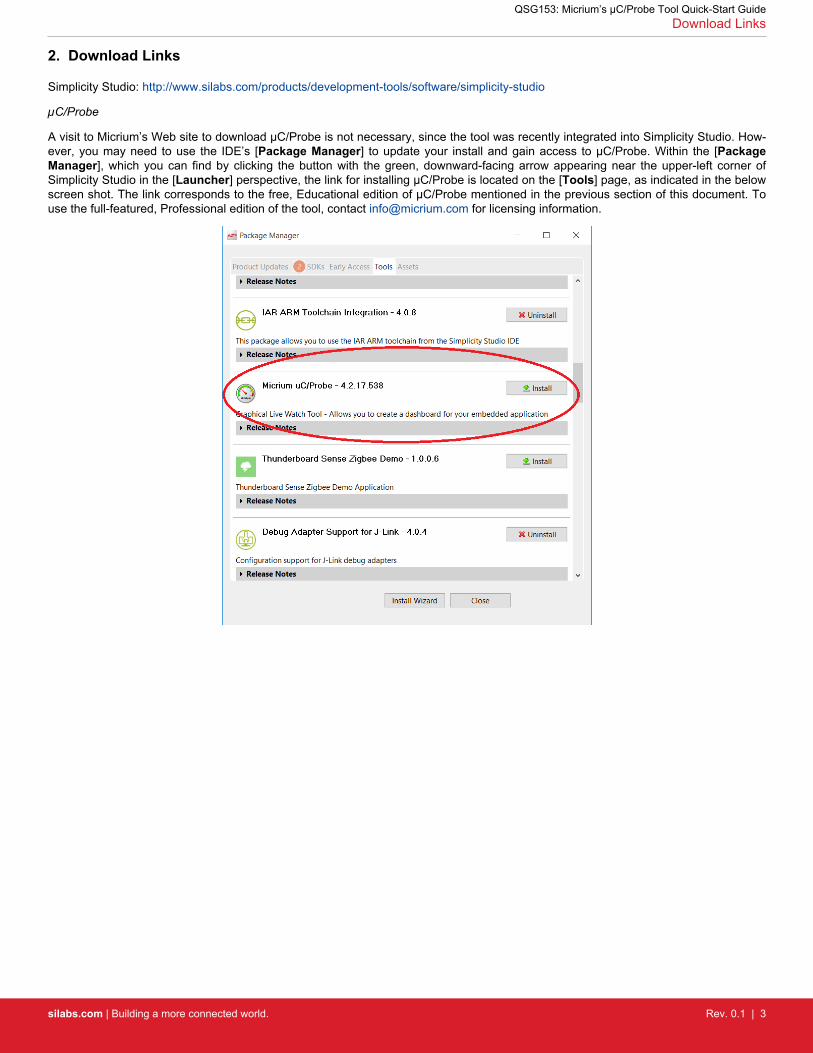
A visit to Micrium’s Web site to download µC/Probe is not necessary, since the tool was recently integrated into Simplicity Studio. How-ever, you may need to use the IDE’s [Package Manager] to update your install and gain access to µC/Probe. Within the [PackageManager], which you can find by clicking the button with the green, downward-facing arrow appearing near the upper-left corner ofSimplicity Studio in the [Launcher] perspective, the link for installing µC/Probe is located on the [Tools] page, as indicated in the belowscreen shot. The link corresponds to the free, Educational edition of µC/Probe mentioned in the previous section of this document. Touse the full-featured, Professional edition of the tool, contact [email protected] for licensing information.
QSG153: Micrium’s μC/Probe Tool Quick-Start GuideDownload Links
silabs.com | Building a more connected world. Rev. 0.1 | 3
3. Building and Running an Example Project for Your Board
µC/Probe is intended both for bare metal and RTOS-based embedded systems. The procedure that follows targets a bare metal exam-ple project that accompanies Simplicity Studio.
1. Because the example project is part of Simplicity Studio, open the IDE, via its entry in the Windows [Start] menu.2. This document assumes that you are using a board with a built-in J-Link debugger. You should now establish a USB connection
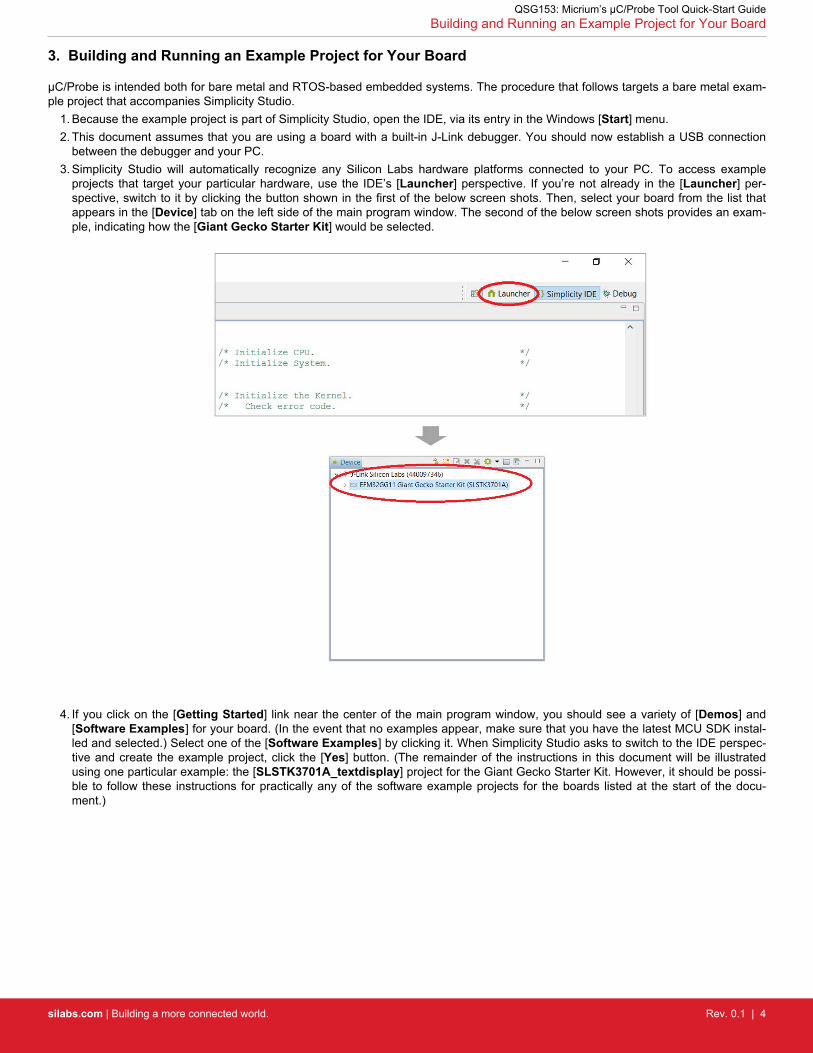
between the debugger and your PC.3. Simplicity Studio will automatically recognize any Silicon Labs hardware platforms connected to your PC. To access example
projects that target your particular hardware, use the IDE’s [Launcher] perspective. If you’re not already in the [Launcher] per-spective, switch to it by clicking the button shown in the first of the below screen shots. Then, select your board from the list thatappears in the [Device] tab on the left side of the main program window. The second of the below screen shots provides an exam-ple, indicating how the [Giant Gecko Starter Kit] would be selected.
4. If you click on the [Getting Started] link near the center of the main program window, you should see a variety of [Demos] and[Software Examples] for your board. (In the event that no examples appear, make sure that you have the latest MCU SDK instal-led and selected.) Select one of the [Software Examples] by clicking it. When Simplicity Studio asks to switch to the IDE perspec-tive and create the example project, click the [Yes] button. (The remainder of the instructions in this document will be illustratedusing one particular example: the [SLSTK3701A_textdisplay] project for the Giant Gecko Starter Kit. However, it should be possi-ble to follow these instructions for practically any of the software example projects for the boards listed at the start of the docu-ment.)
QSG153: Micrium’s μC/Probe Tool Quick-Start GuideBuilding and Running an Example Project for Your Board
silabs.com | Building a more connected world. Rev. 0.1 | 4
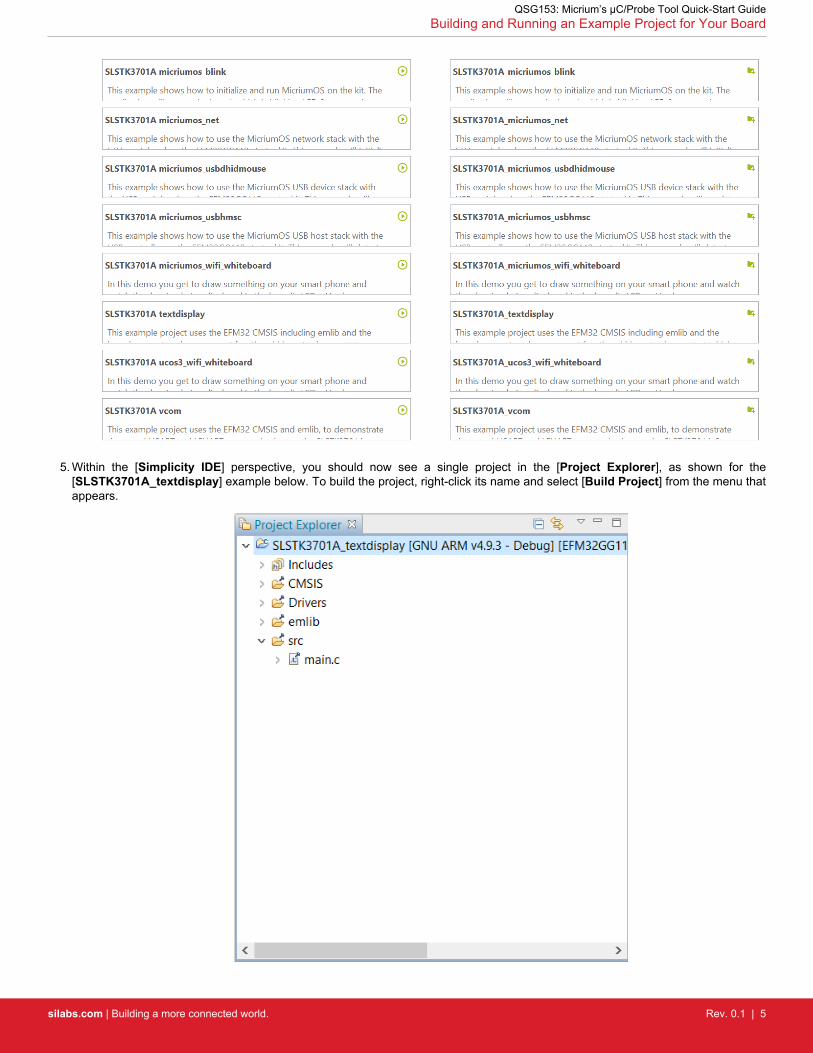
5. Within the [Simplicity IDE] perspective, you should now see a single project in the [Project Explorer], as shown for the[SLSTK3701A_textdisplay] example below. To build the project, right-click its name and select [Build Project] from the menu thatappears.
QSG153: Micrium’s μC/Probe Tool Quick-Start GuideBuilding and Running an Example Project for Your Board
silabs.com | Building a more connected world. Rev. 0.1 | 5
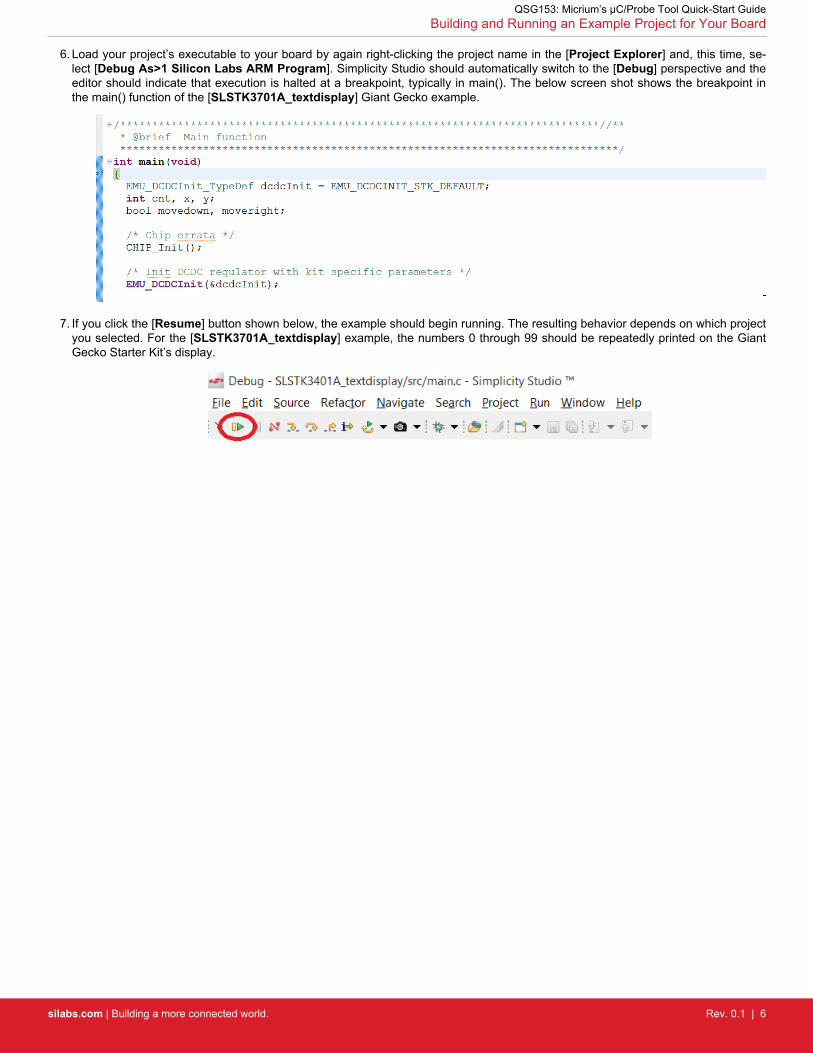
6. Load your project’s executable to your board by again right-clicking the project name in the [Project Explorer] and, this time, se-lect [Debug As>1 Silicon Labs ARM Program]. Simplicity Studio should automatically switch to the [Debug] perspective and theeditor should indicate that execution is halted at a breakpoint, typically in main(). The below screen shot shows the breakpoint inthe main() function of the [SLSTK3701A_textdisplay] Giant Gecko example.
7. If you click the [Resume] button shown below, the example should begin running. The resulting behavior depends on which projectyou selected. For the [SLSTK3701A_textdisplay] example, the numbers 0 through 99 should be repeatedly printed on the GiantGecko Starter Kit’s display.
QSG153: Micrium’s μC/Probe Tool Quick-Start GuideBuilding and Running an Example Project for Your Board
silabs.com | Building a more connected world. Rev. 0.1 | 6
4. Using µC/Probe
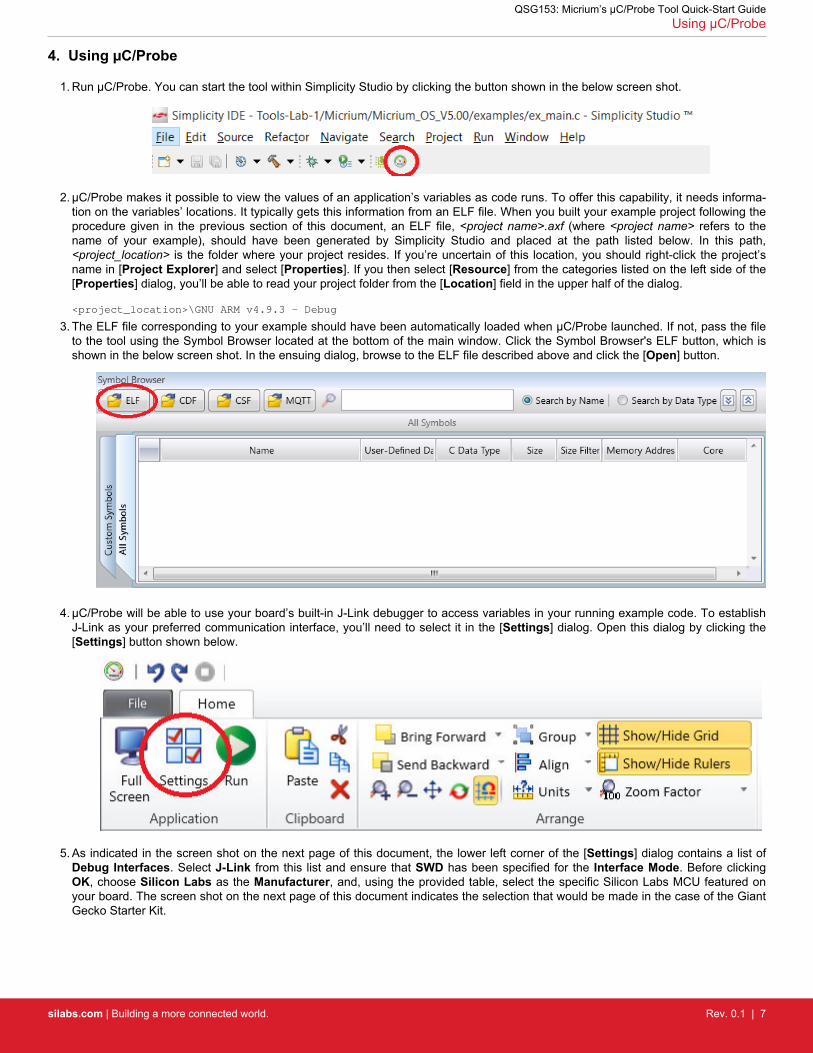
1. Run µC/Probe. You can start the tool within Simplicity Studio by clicking the button shown in the below screen shot.
2. µC/Probe makes it possible to view the values of an application’s variables as code runs. To offer this capability, it needs informa-tion on the variables’ locations. It typically gets this information from an ELF file. When you built your example project following theprocedure given in the previous section of this document, an ELF file, <project name>.axf (where <project name> refers to thename of your example), should have been generated by Simplicity Studio and placed at the path listed below. In this path,<project_location> is the folder where your project resides. If you’re uncertain of this location, you should right-click the project’sname in [Project Explorer] and select [Properties]. If you then select [Resource] from the categories listed on the left side of the[Properties] dialog, you’ll be able to read your project folder from the [Location] field in the upper half of the dialog.
<project_location>\GNU ARM v4.9.3 - Debug
3. The ELF file corresponding to your example should have been automatically loaded when µC/Probe launched. If not, pass the fileto the tool using the Symbol Browser located at the bottom of the main window. Click the Symbol Browser's ELF button, which isshown in the below screen shot. In the ensuing dialog, browse to the ELF file described above and click the [Open] button.
4. µC/Probe will be able to use your board’s built-in J-Link debugger to access variables in your running example code. To establishJ-Link as your preferred communication interface, you’ll need to select it in the [Settings] dialog. Open this dialog by clicking the[Settings] button shown below.
5. As indicated in the screen shot on the next page of this document, the lower left corner of the [Settings] dialog contains a list ofDebug Interfaces. Select J-Link from this list and ensure that SWD has been specified for the Interface Mode. Before clickingOK, choose Silicon Labs as the Manufacturer, and, using the provided table, select the specific Silicon Labs MCU featured onyour board. The screen shot on the next page of this document indicates the selection that would be made in the case of the GiantGecko Starter Kit.
QSG153: Micrium’s μC/Probe Tool Quick-Start GuideUsing µC/Probe
silabs.com | Building a more connected world. Rev. 0.1 | 7
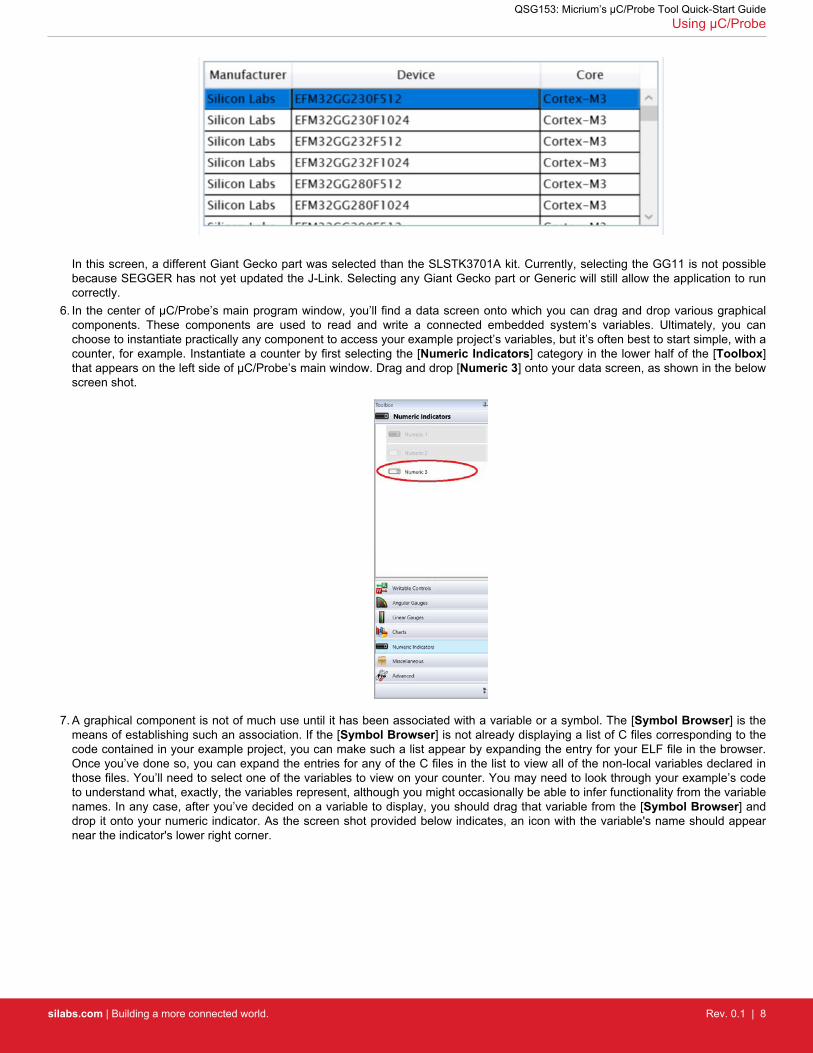
In this screen, a different Giant Gecko part was selected than the SLSTK3701A kit. Currently, selecting the GG11 is not possiblebecause SEGGER has not yet updated the J-Link. Selecting any Giant Gecko part or Generic will still allow the application to runcorrectly.
6. In the center of µC/Probe’s main program window, you’ll find a data screen onto which you can drag and drop various graphicalcomponents. These components are used to read and write a connected embedded system’s variables. Ultimately, you canchoose to instantiate practically any component to access your example project’s variables, but it’s often best to start simple, with acounter, for example. Instantiate a counter by first selecting the [Numeric Indicators] category in the lower half of the [Toolbox]that appears on the left side of µC/Probe’s main window. Drag and drop [Numeric 3] onto your data screen, as shown in the belowscreen shot.
7. A graphical component is not of much use until it has been associated with a variable or a symbol. The [Symbol Browser] is themeans of establishing such an association. If the [Symbol Browser] is not already displaying a list of C files corresponding to thecode contained in your example project, you can make such a list appear by expanding the entry for your ELF file in the browser.Once you’ve done so, you can expand the entries for any of the C files in the list to view all of the non-local variables declared inthose files. You’ll need to select one of the variables to view on your counter. You may need to look through your example’s codeto understand what, exactly, the variables represent, although you might occasionally be able to infer functionality from the variablenames. In any case, after you’ve decided on a variable to display, you should drag that variable from the [Symbol Browser] anddrop it onto your numeric indicator. As the screen shot provided below indicates, an icon with the variable's name should appearnear the indicator's lower right corner.
QSG153: Micrium’s μC/Probe Tool Quick-Start GuideUsing µC/Probe
silabs.com | Building a more connected world. Rev. 0.1 | 8
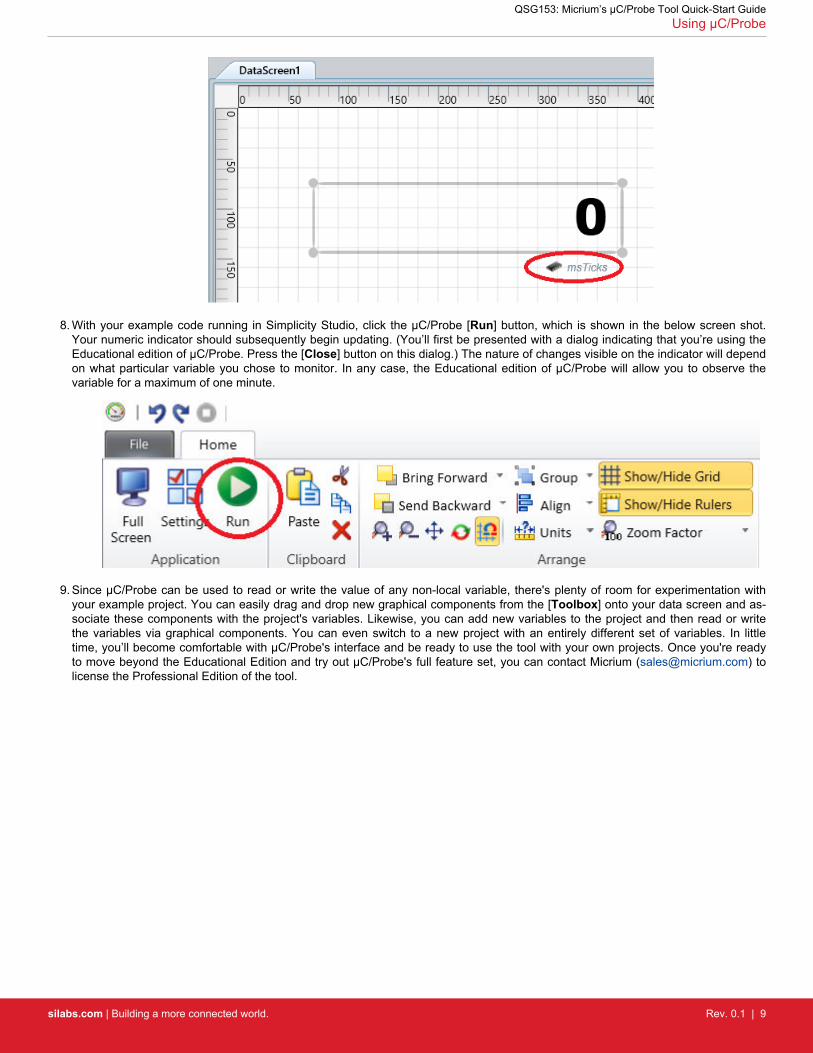
8. With your example code running in Simplicity Studio, click the µC/Probe [Run] button, which is shown in the below screen shot.Your numeric indicator should subsequently begin updating. (You’ll first be presented with a dialog indicating that you’re using theEducational edition of µC/Probe. Press the [Close] button on this dialog.) The nature of changes visible on the indicator will dependon what particular variable you chose to monitor. In any case, the Educational edition of µC/Probe will allow you to observe thevariable for a maximum of one minute.
9. Since µC/Probe can be used to read or write the value of any non-local variable, there's plenty of room for experimentation withyour example project. You can easily drag and drop new graphical components from the [Toolbox] onto your data screen and as-sociate these components with the project's variables. Likewise, you can add new variables to the project and then read or writethe variables via graphical components. You can even switch to a new project with an entirely different set of variables. In littletime, you’ll become comfortable with µC/Probe's interface and be ready to use the tool with your own projects. Once you're readyto move beyond the Educational Edition and try out µC/Probe's full feature set, you can contact Micrium ([email protected]) tolicense the Professional Edition of the tool.
QSG153: Micrium’s μC/Probe Tool Quick-Start GuideUsing µC/Probe
silabs.com | Building a more connected world. Rev. 0.1 | 9
http://www.silabs.com
Silicon Laboratories Inc.400 West Cesar ChavezAustin, TX 78701USA
Simplicity StudioOne-click access to MCU and wireless tools, documentation, software, source code libraries & more. Available for Windows, Mac and Linux!
IoT Portfoliowww.silabs.com/IoT
SW/HWwww.silabs.com/simplicity
Qualitywww.silabs.com/quality
Support and Communitycommunity.silabs.com
DisclaimerSilicon Labs intends to provide customers with the latest, accurate, and in-depth documentation of all peripherals and modules available for system and software implementers using or intending to use the Silicon Labs products. Characterization data, available modules and peripherals, memory sizes and memory addresses refer to each specific device, and "Typical" parameters provided can and do vary in different applications. Application examples described herein are for illustrative purposes only. Silicon Labs reserves the right to make changes without further notice and limitation to product information, specifications, and descriptions herein, and does not give warranties as to the accuracy or completeness of the included information. Silicon Labs shall have no liability for the consequences of use of the information supplied herein. This document does not imply or express copyright licenses granted hereunder to design or fabricate any integrated circuits. The products are not designed or authorized to be used within any Life Support System without the specific written consent of Silicon Labs. A "Life Support System" is any product or system intended to support or sustain life and/or health, which, if it fails, can be reasonably expected to result in significant personal injury or death. Silicon Labs products are not designed or authorized for military applications. Silicon Labs products shall under no circumstances be used in weapons of mass destruction including (but not limited to) nuclear, biological or chemical weapons, or missiles capable of delivering such weapons.
Trademark InformationSilicon Laboratories Inc.® , Silicon Laboratories®, Silicon Labs®, SiLabs® and the Silicon Labs logo®, Bluegiga®, Bluegiga Logo®, Clockbuilder®, CMEMS®, DSPLL®, EFM®, EFM32®, EFR, Ember®, Energy Micro, Energy Micro logo and combinations thereof, "the world’s most energy friendly microcontrollers", Ember®, EZLink®, EZRadio®, EZRadioPRO®, Gecko®, ISOmodem®, Micrium, Precision32®, ProSLIC®, Simplicity Studio®, SiPHY®, Telegesis, the Telegesis Logo®, USBXpress®, Zentri and others are trademarks or registered trademarks of Silicon Labs. ARM, CORTEX, Cortex-M3 and THUMB are trademarks or registered trademarks of ARM Holdings. Keil is a registered trademark of ARM Limited. All other products or brand names mentioned herein are trademarks of their respective holders.