H-4158 1-800-295-5510 COMPACT uline.com SHOP DESK · del escritorio. (Vea Diagrama 5) 3. Coloque la...
12
PAGE 1 OF 12 1216 IH-4158 π H-4158 COMPACT SHOP DESK 1-800-295-5510 uline.com Long Bolt x 4 PARTS Phillips Screwdriver 5/16" (8 mm) Wrench 3/8" (10 mm) Wrench Small Bolt x 4 Adjustable Foot x 4 Small Nut x 4 Nut x 36 Leg x 4 Washer x 4 Drawer Lock x 1 Lock Washer x 4 Desk x 1 Square Bracket x 1 Top Panel x 1 Bottom Shelf x 1 Top Shelf x 1 Standard Bolt x 32 TOOLS NEEDED Para Español, vea páginas 5-8. Pour le français, consulter les pages 9-12. Plastic Cable Ring and Cover x 1
Transcript of H-4158 1-800-295-5510 COMPACT uline.com SHOP DESK · del escritorio. (Vea Diagrama 5) 3. Coloque la...
PAGE 1 OF 12 1216 IH-4158
π H-4158COMPACT SHOP DESK
1-800-295-5510uline.com
Long Bolt x 4
PARTS
Phillips Screwdriver
5/16" (8 mm) Wrench
3/8" (10 mm) Wrench
Small Bolt x 4
Adjustable Foot x 4
Small Nut x 4 Nut x 36
Leg x 4
Washer x 4
Drawer Lock x 1
Lock Washer x 4
Desk x 1 Square Bracket x 1 Top Panel x 1
Bottom Shelf x 1Top Shelf x 1
Standard Bolt x 32
TOOLS NEEDED
Para Español, vea páginas 5-8.Pour le français, consulter les pages 9-12.
Plastic Cable Ring and Cover x 1
PAGE 2 OF 12 1216 IH-4158
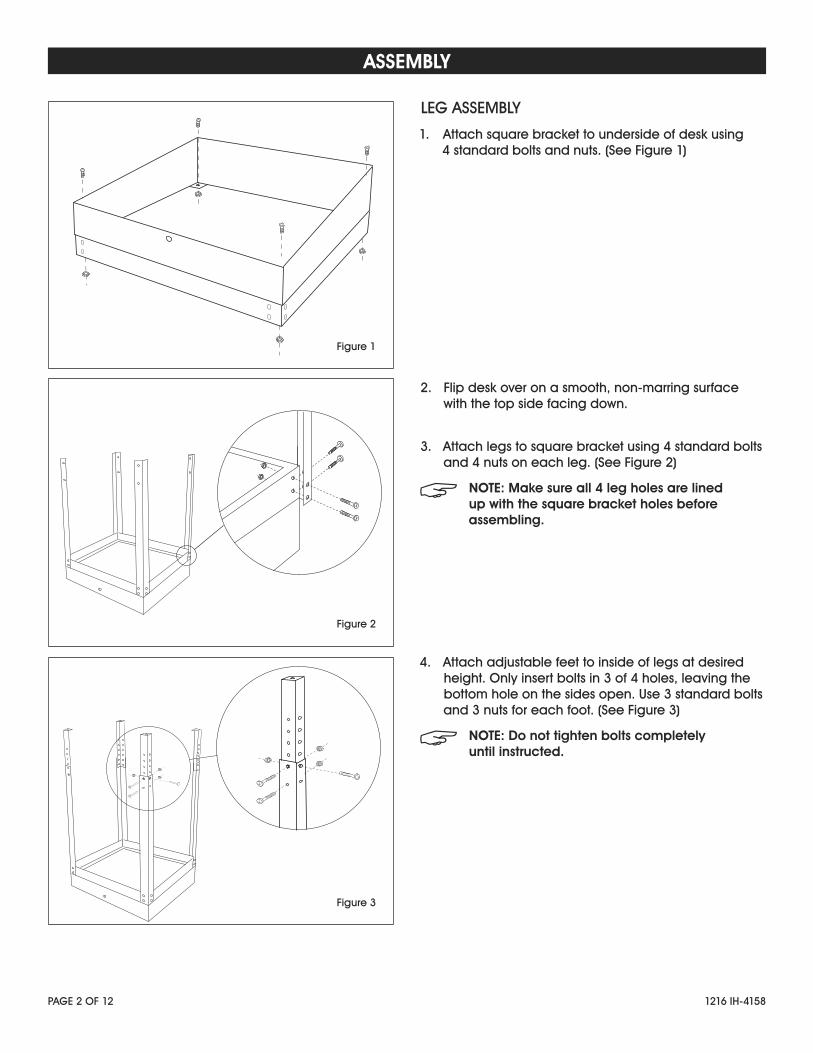
LEG ASSEMBLY
1. Attach square bracket to underside of desk using 4 standard bolts and nuts. (See Figure 1)
2. Flip desk over on a smooth, non-marring surface with the top side facing down.
3. Attach legs to square bracket using 4 standard bolts and 4 nuts on each leg. (See Figure 2)
NOTE: Make sure all 4 leg holes are lined up with the square bracket holes before assembling.
4. Attach adjustable feet to inside of legs at desired height. Only insert bolts in 3 of 4 holes, leaving the bottom hole on the sides open. Use 3 standard bolts and 3 nuts for each foot. (See Figure 3)
NOTE: Do not tighten bolts completely until instructed.
Figure 3
Figure 2
ASSEMBLY
Figure 1
PAGE 3 OF 12 1216 IH-4158
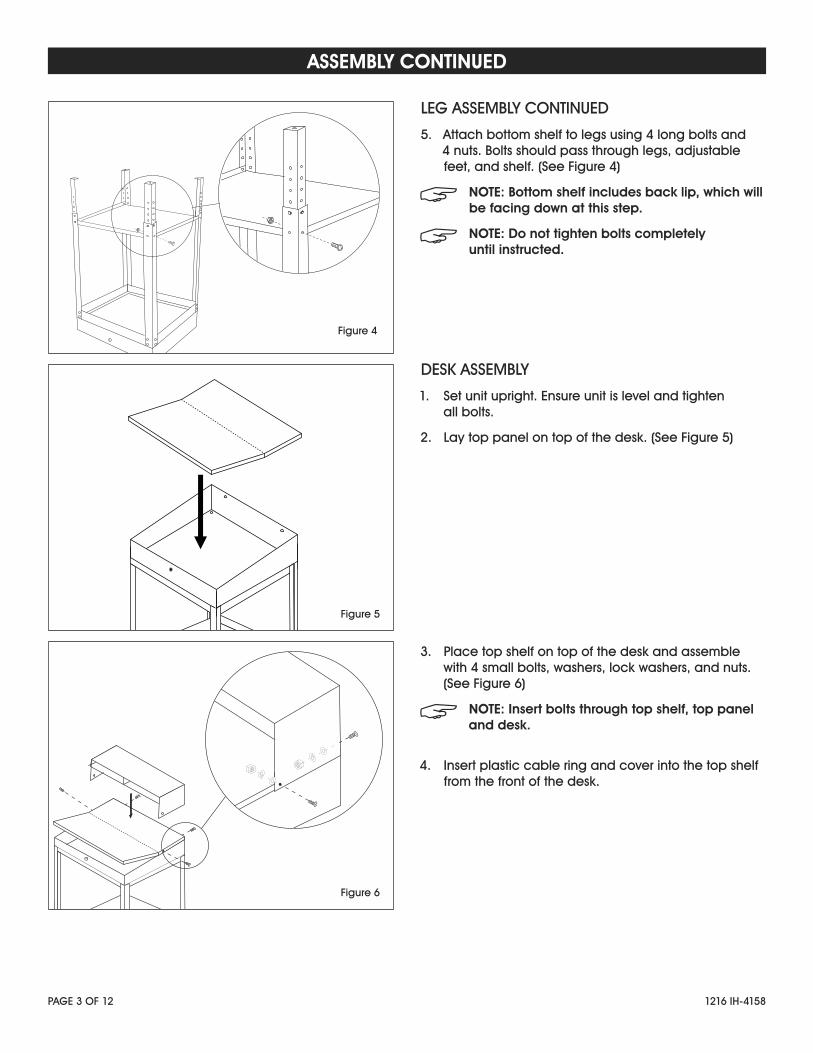
LEG ASSEMBLY CONTINUED
5. Attach bottom shelf to legs using 4 long bolts and 4 nuts. Bolts should pass through legs, adjustable feet, and shelf. (See Figure 4)
NOTE: Bottom shelf includes back lip, which will be facing down at this step.
NOTE: Do not tighten bolts completely until instructed.
DESK ASSEMBLY
1. Set unit upright. Ensure unit is level and tighten all bolts.
2. Lay top panel on top of the desk. (See Figure 5)
3. Place top shelf on top of the desk and assemble with 4 small bolts, washers, lock washers, and nuts. (See Figure 6)
NOTE: Insert bolts through top shelf, top panel and desk.
4. Insert plastic cable ring and cover into the top shelf from the front of the desk.
ASSEMBLY CONTINUED
Figure 6
Figure 4
Figure 5
PAGE 4 OF 12 1216 IH-4158
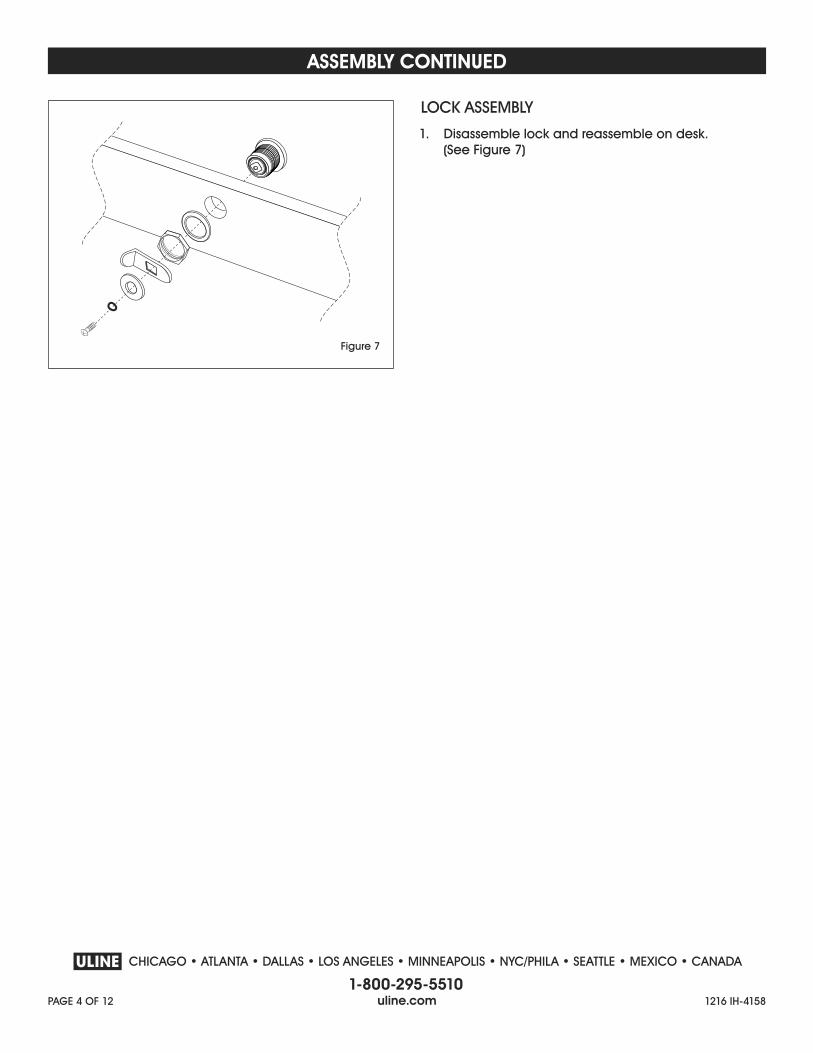
LOCK ASSEMBLY
1. Disassemble lock and reassemble on desk. (See Figure 7)
ASSEMBLY CONTINUED
Figure 7
π CHICAGO • ATLANTA • DALLAS • LOS ANGELES • MINNEAPOLIS • NYC/PHILA • SEATTLE • MEXICO • CANADA
1-800-295-5510uline.com
PAGE 5 OF 12 1216 IH-4158
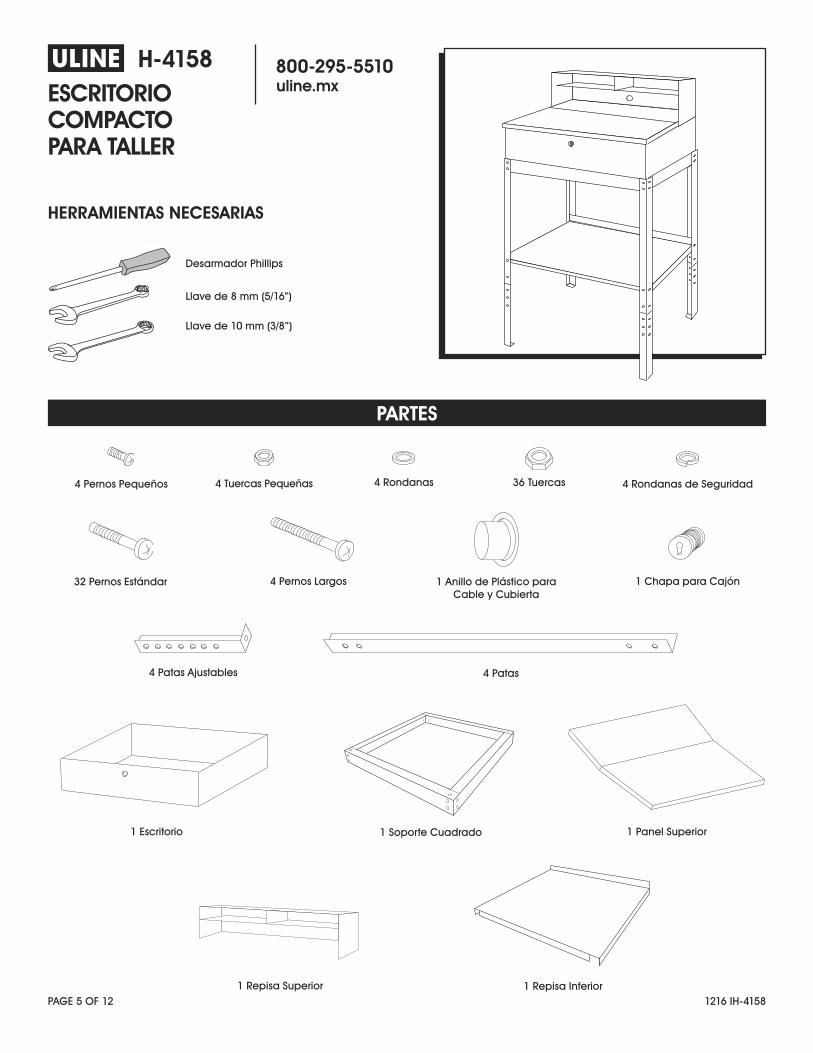
π H-4158ESCRITORIO COMPACTO PARA TALLER
800-295-5510uline.mx
1 Anillo de Plástico para Cable y Cubierta
4 Pernos Largos
PARTES
Desarmador Phillips
Llave de 8 mm (5/16”)
Llave de 10 mm (3/8”)
4 Pernos Pequeños
4 Patas Ajustables
4 Tuercas Pequeñas 36 Tuercas
4 Patas
4 Rondanas
1 Chapa para Cajón
4 Rondanas de Seguridad
1 Escritorio 1 Soporte Cuadrado 1 Panel Superior
1 Repisa Inferior 1 Repisa Superior
32 Pernos Estándar
HERRAMIENTAS NECESARIAS
PAGE 6 OF 12 1216 IH-4158
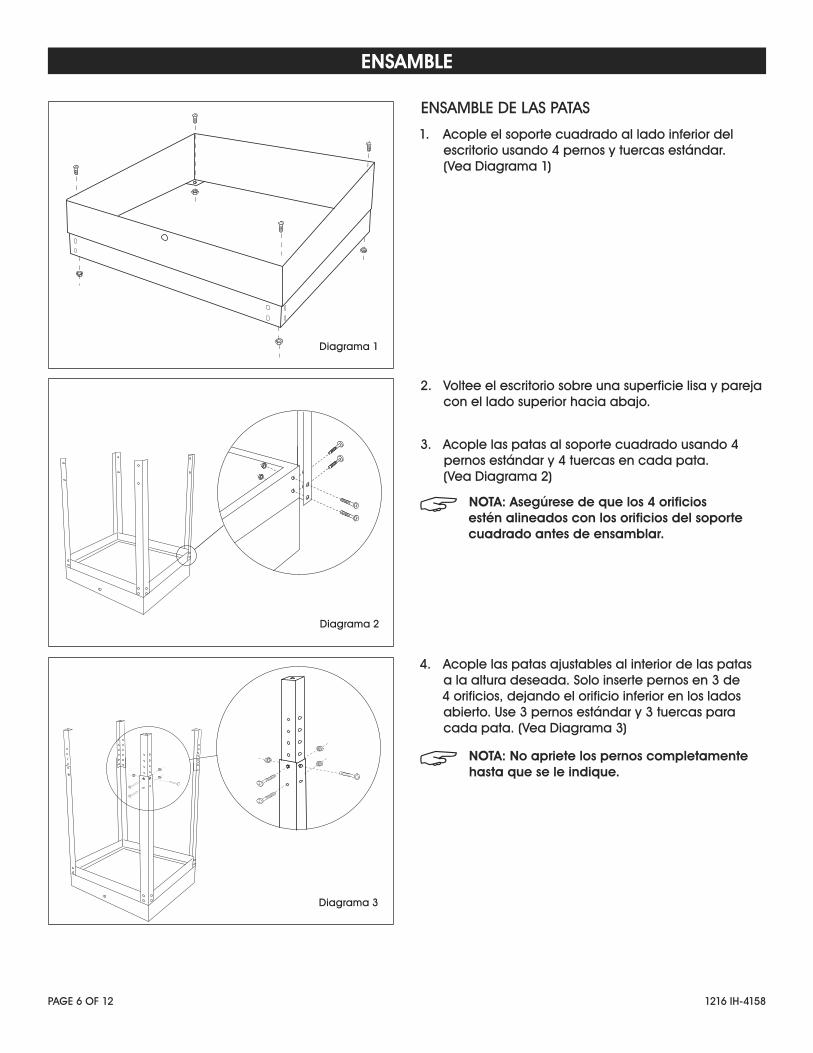
ENSAMBLE DE LAS PATAS
1. Acople el soporte cuadrado al lado inferior del escritorio usando 4 pernos y tuercas estándar. (Vea Diagrama 1)
2. Voltee el escritorio sobre una superficie lisa y pareja con el lado superior hacia abajo.
3. Acople las patas al soporte cuadrado usando 4 pernos estándar y 4 tuercas en cada pata. (Vea Diagrama 2)
NOTA: Asegúrese de que los 4 orificios estén alineados con los orificios del soporte cuadrado antes de ensamblar.
4. Acople las patas ajustables al interior de las patas a la altura deseada. Solo inserte pernos en 3 de 4 orificios, dejando el orificio inferior en los lados abierto. Use 3 pernos estándar y 3 tuercas para cada pata. (Vea Diagrama 3)
NOTA: No apriete los pernos completamente hasta que se le indique.
Diagrama 3
Diagrama 2
ENSAMBLE
Diagrama 1
PAGE 7 OF 12 1216 IH-4158
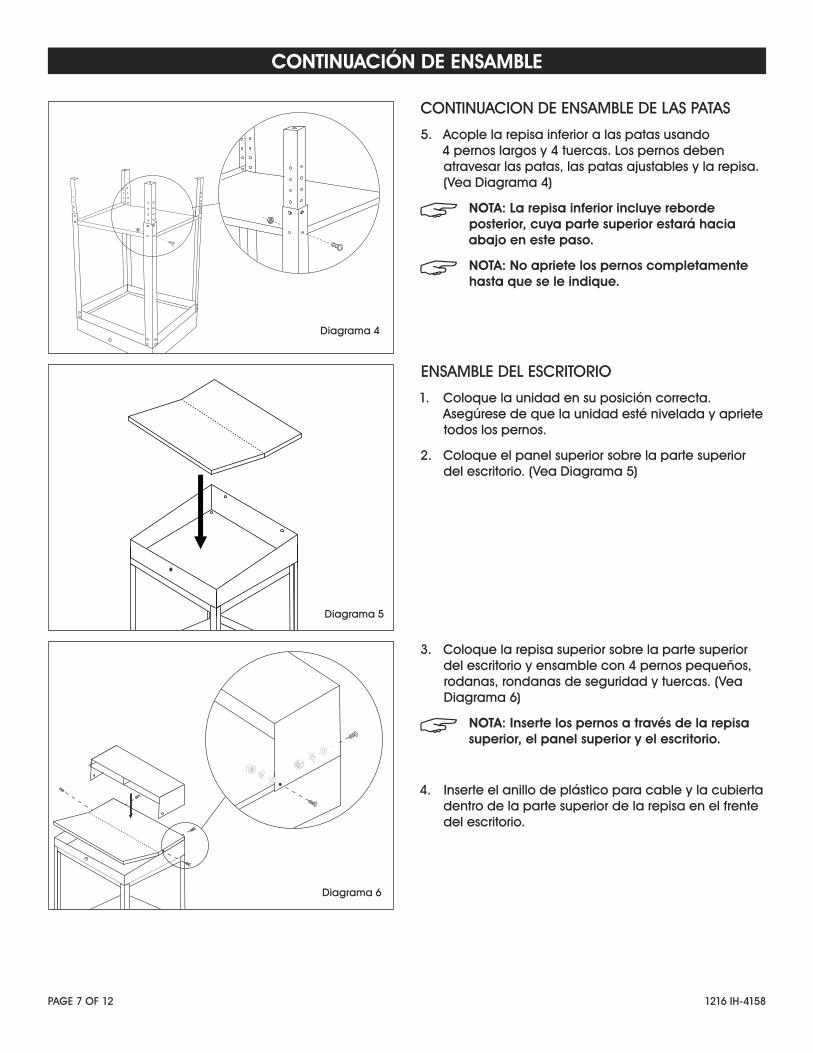
CONTINUACION DE ENSAMBLE DE LAS PATAS
5. Acople la repisa inferior a las patas usando 4 pernos largos y 4 tuercas. Los pernos deben atravesar las patas, las patas ajustables y la repisa. (Vea Diagrama 4)
NOTA: La repisa inferior incluye reborde posterior, cuya parte superior estará hacia abajo en este paso.
NOTA: No apriete los pernos completamente hasta que se le indique.
ENSAMBLE DEL ESCRITORIO
1. Coloque la unidad en su posición correcta. Asegúrese de que la unidad esté nivelada y apriete todos los pernos.
2. Coloque el panel superior sobre la parte superior del escritorio. (Vea Diagrama 5)
3. Coloque la repisa superior sobre la parte superior del escritorio y ensamble con 4 pernos pequeños, rodanas, rondanas de seguridad y tuercas. (Vea Diagrama 6)
NOTA: Inserte los pernos a través de la repisa superior, el panel superior y el escritorio.
4. Inserte el anillo de plástico para cable y la cubierta dentro de la parte superior de la repisa en el frente del escritorio.
CONTINUACIÓN DE ENSAMBLE
Diagrama 6
Diagrama 4
Diagrama 5
PAGE 8 OF 12 1216 IH-4158
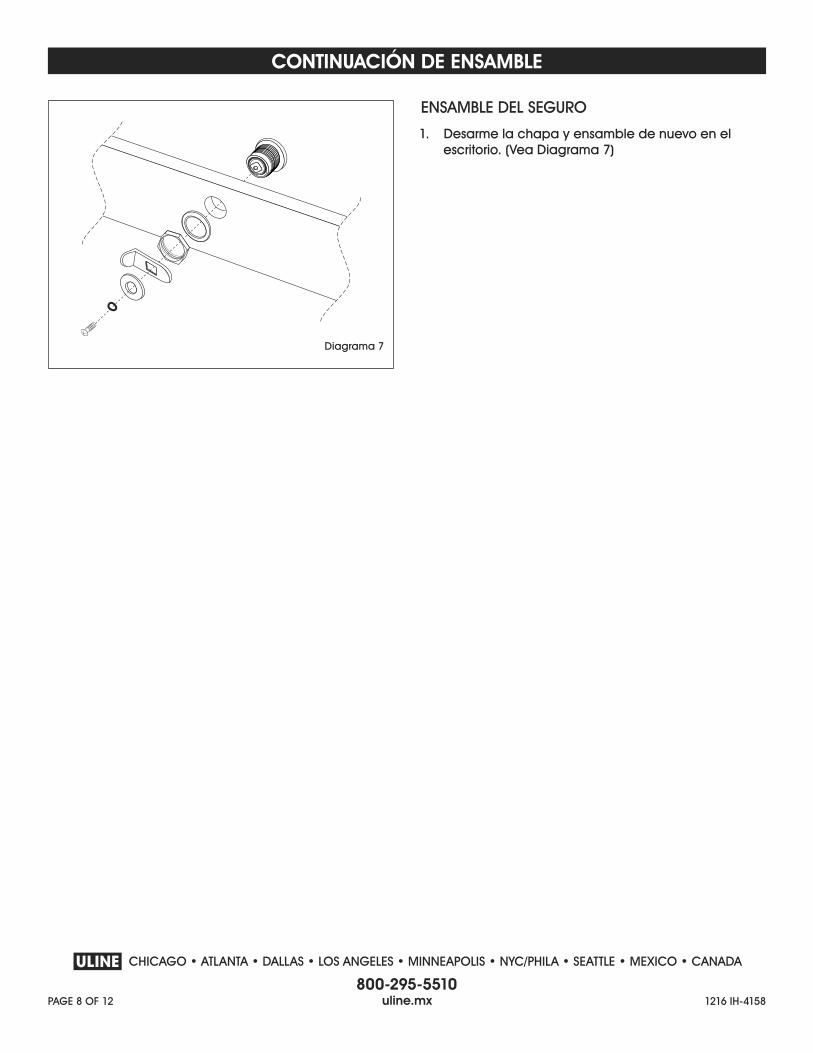
ENSAMBLE DEL SEGURO
1. Desarme la chapa y ensamble de nuevo en el escritorio. (Vea Diagrama 7)
CONTINUACIÓN DE ENSAMBLE
Diagrama 7
π CHICAGO • ATLANTA • DALLAS • LOS ANGELES • MINNEAPOLIS • NYC/PHILA • SEATTLE • MEXICO • CANADA
800-295-5510uline.mx
PAGE 9 OF 12 1216 IH-4158
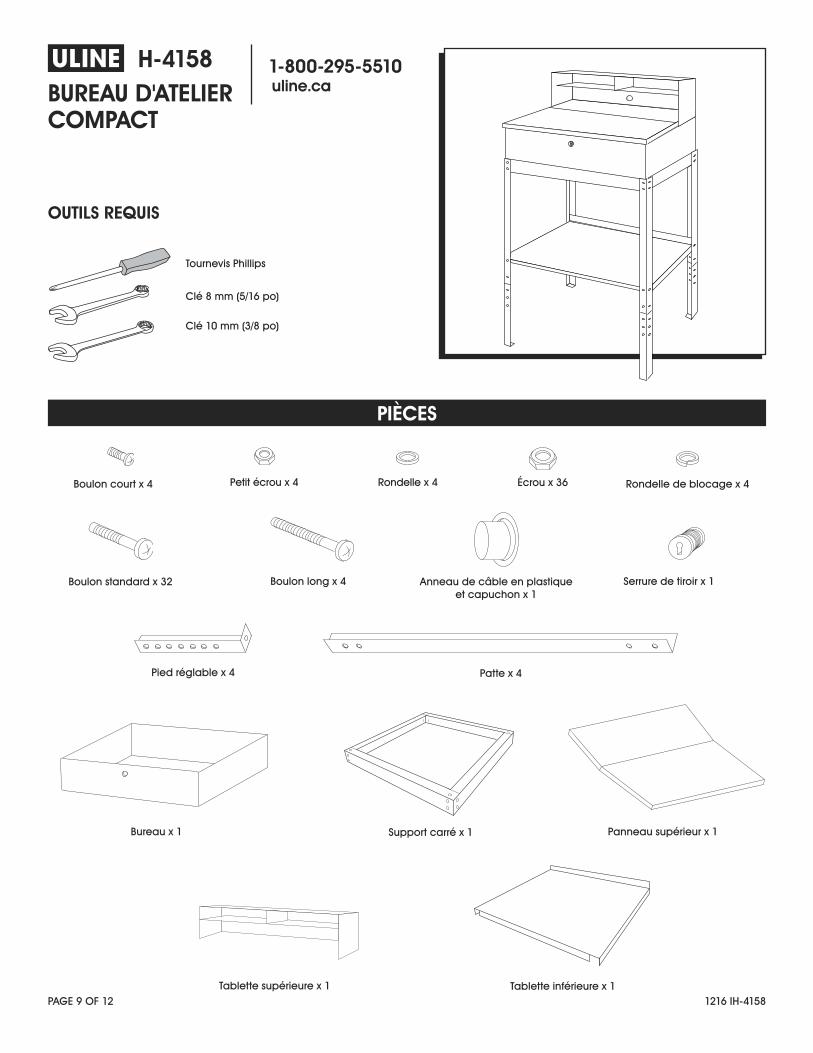
π H-4158BUREAU D'ATELIER COMPACT
1-800-295-5510uline.ca
Anneau de câble en plastique et capuchon x 1
Boulon long x 4
PIÈCES
Tournevis Phillips
Clé 8 mm (5/16 po)
Clé 10 mm (3/8 po)
Boulon court x 4
Pied réglable x 4
Petit écrou x 4 Écrou x 36
Patte x 4
Rondelle x 4
Serrure de tiroir x 1
Rondelle de blocage x 4
Bureau x 1 Support carré x 1 Panneau supérieur x 1
Tablette inférieure x 1Tablette supérieure x 1
Boulon standard x 32
OUTILS REQUIS
PAGE 10 OF 12 1216 IH-4158
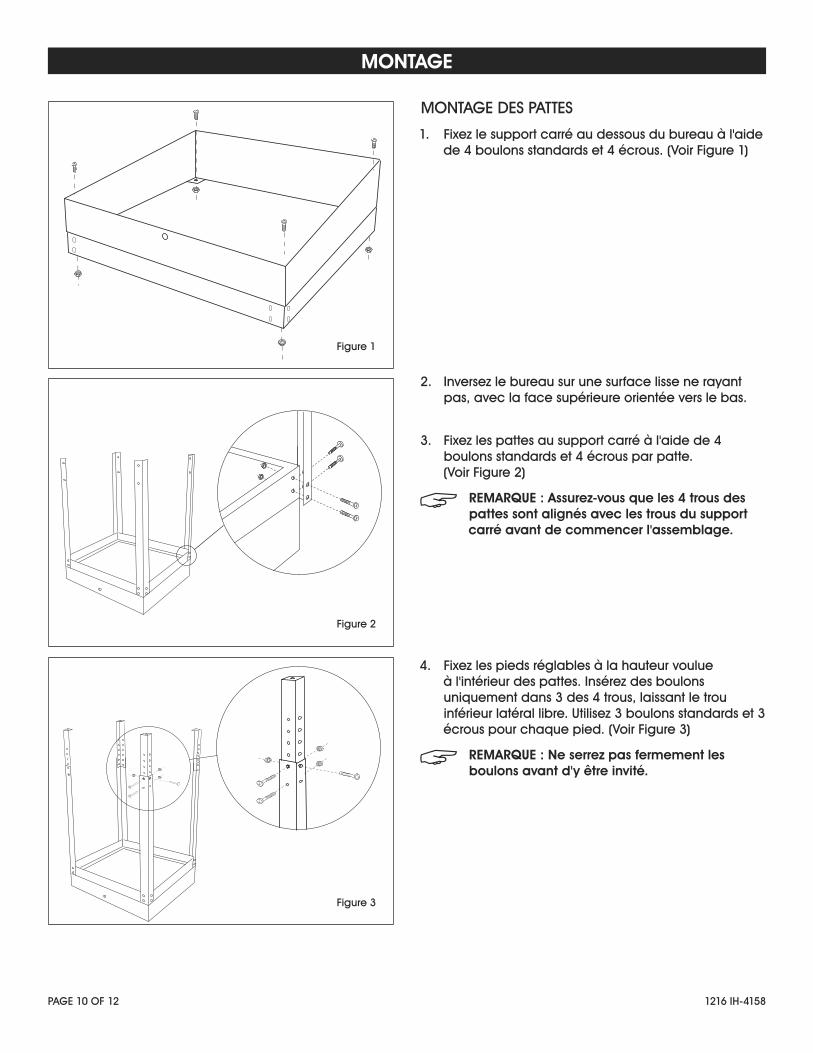
MONTAGE DES PATTES
1. Fixez le support carré au dessous du bureau à l'aide de 4 boulons standards et 4 écrous. (Voir Figure 1)
2. Inversez le bureau sur une surface lisse ne rayant pas, avec la face supérieure orientée vers le bas.
3. Fixez les pattes au support carré à l'aide de 4 boulons standards et 4 écrous par patte. (Voir Figure 2)
REMARQUE : Assurez-vous que les 4 trous des pattes sont alignés avec les trous du support carré avant de commencer l'assemblage.
4. Fixez les pieds réglables à la hauteur voulue à l'intérieur des pattes. Insérez des boulons uniquement dans 3 des 4 trous, laissant le trou inférieur latéral libre. Utilisez 3 boulons standards et 3 écrous pour chaque pied. (Voir Figure 3)
REMARQUE : Ne serrez pas fermement les boulons avant d'y être invité.
Figure 3
Figure 2
MONTAGE
Figure 1
PAGE 11 OF 12 1216 IH-4158
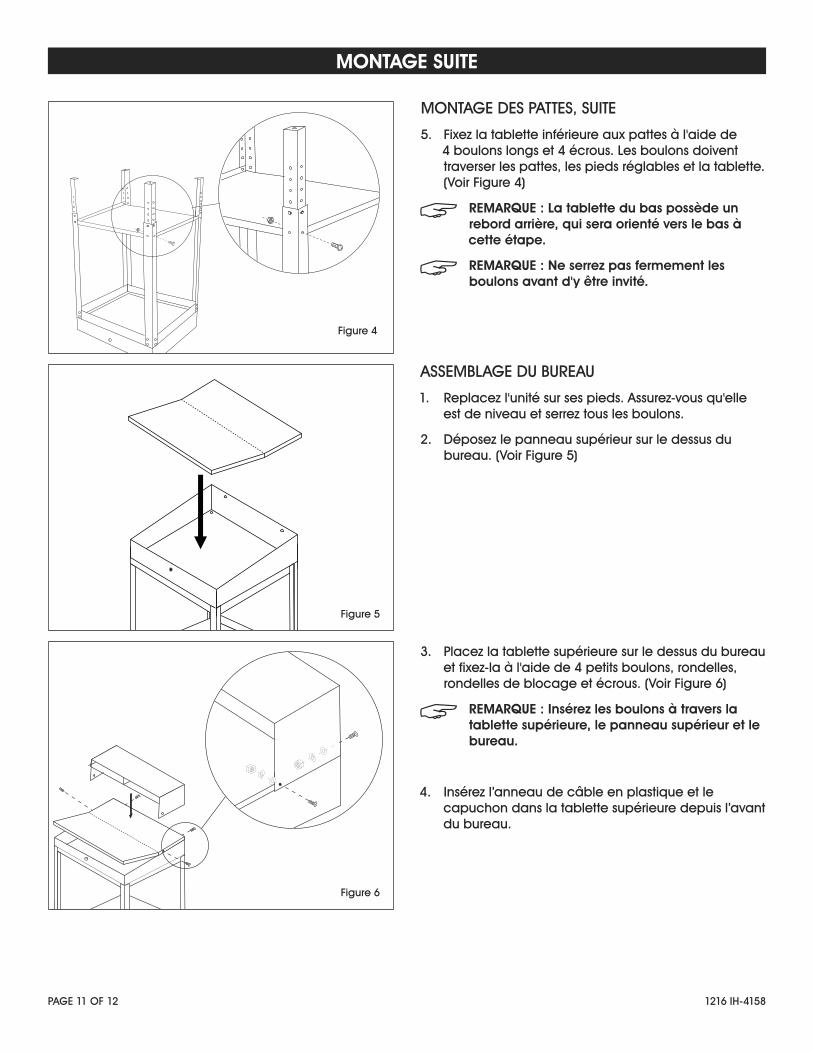
MONTAGE DES PATTES, SUITE
5. Fixez la tablette inférieure aux pattes à l'aide de 4 boulons longs et 4 écrous. Les boulons doivent traverser les pattes, les pieds réglables et la tablette. (Voir Figure 4)
REMARQUE : La tablette du bas possède un rebord arrière, qui sera orienté vers le bas à cette étape.
REMARQUE : Ne serrez pas fermement les boulons avant d'y être invité.
ASSEMBLAGE DU BUREAU
1. Replacez l'unité sur ses pieds. Assurez-vous qu'elle est de niveau et serrez tous les boulons.
2. Déposez le panneau supérieur sur le dessus du bureau. (Voir Figure 5)
3. Placez la tablette supérieure sur le dessus du bureau et fixez-la à l'aide de 4 petits boulons, rondelles, rondelles de blocage et écrous. (Voir Figure 6)
REMARQUE : Insérez les boulons à travers la tablette supérieure, le panneau supérieur et le bureau.
4. Insérez l’anneau de câble en plastique et le capuchon dans la tablette supérieure depuis l’avant du bureau.
MONTAGE SUITE
Figure 6
Figure 4
Figure 5
PAGE 12 OF 12 1216 IH-4158
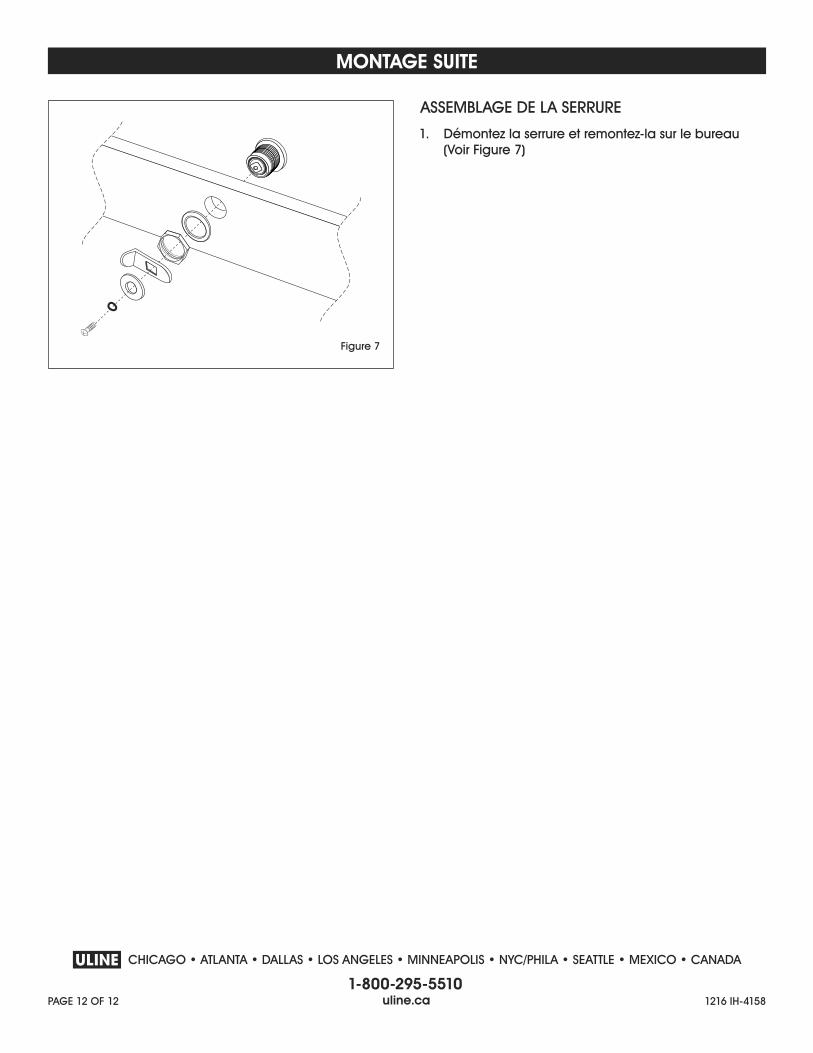
ASSEMBLAGE DE LA SERRURE
1. Démontez la serrure et remontez-la sur le bureau (Voir Figure 7)
MONTAGE SUITE
Figure 7
π CHICAGO • ATLANTA • DALLAS • LOS ANGELES • MINNEAPOLIS • NYC/PHILA • SEATTLE • MEXICO • CANADA
1-800-295-5510uline.ca