
CG um TRE/09-1¡gr-Cop - Free Instruction Manuals · OPERATOR’S MANUAL GEBRAUCHSANWEISUNG ... DO...
12
TRE 0701 TRE 0702 TRE 0801 FR MANUEL D’UTILISATION OPERATOR’S MANUAL GEBRAUCHSANWEISUNG MANUALE DI ISTRUZIONI GEBRUIKERSHANDLEIDING MANUAL DE INSTRUCCIONES MANUAL DE INSTRUÇÕES ∂°Ã∂πƒπ¢π√ √¢∏°πø¡ KULLANIM KILAVUZU УПАТСТВА ЗА УПОТРЕБА INSTRUKSJONSBOK BRUKSANVISNING BRUGSANVISNING KÄYTTÖOHJEET NÁVOD K POUŽITÍ INSTRUKCJE OBSŁUGI HASZNÁLATI UTASÍTÁS êìKéÇéÑëíÇé èé ùKëèãìÄíÄñàà PRIRUČNIK ZA UPORABO PRIROČNIK ZA UPORABU EN DE IT NL ES PT EL TR MK NO SV DA FI CS PL HU RU HR SL
Transcript of CG um TRE/09-1¡gr-Cop - Free Instruction Manuals · OPERATOR’S MANUAL GEBRAUCHSANWEISUNG ... DO...

TRE 0701TRE 0702TRE 0801
FR MANUEL D’UTILISATION
OPERATOR’S MANUAL
GEBRAUCHSANWEISUNG
MANUALE DI ISTRUZIONI
GEBRUIKERSHANDLEIDING
MANUAL DE INSTRUCCIONES
MANUAL DE INSTRUÇÕES
∂°Ã∂πƒπ¢π√ √¢∏°πø¡
KULLANIM KILAVUZU
УПАТСТВА ЗА УПОТРЕБА
INSTRUKSJONSBOK
BRUKSANVISNING
BRUGSANVISNING
KÄYTTÖOHJEET
NÁVOD K POUŽITÍ
INSTRUKCJE OBSŁUGI
HASZNÁLATI UTASÍTÁS
êìKéÇéÑëíÇé èé ùKëèãìÄíÄñàà
PRIRUČNIK ZA UPORABO
PRIROČNIK ZA UPORABU
EN
DE
IT
NL
ES
PT
EL
TR
MK
NO
SV
DA
FI
CS
PL
HU
RU
HR
SL

3.1
5.1.1
5.1.4
1
2
3
5
6
5.1.2
1
2
1
5.6
1
5.8
2
1
MAX
MIN
1 TRE 0701TRE 0801
TRE 07022 1 2a 3
1
3
1
1EN
READING AND UNDERSTANDINGTHE MANUAL
Some paragraphs in the manual containing infor-mation of particular importance for safety andoperation are highlighted at various levels of em-phasis, and signify the following:
orThese give details or further information onwhat has already been said, and aim to preventdamage either to the engine or other damages.
Non-observance will re-sult in the risk of injury to oneself or others.
Non-observance will re-sult in the risk of serious injury or death tooneself or others.
All indications,“front”, “rear”, “right” and “left”,are to be taken as referring to theengine positioned with the sparkplug facing forwards with respectto the observer.
NOTE
DANGER!
WARNING!
IMPORTANTNOTE
1.1
1. GENERAL INFORMATION
1. General information ................................. 12. Safety regulations ................................... 13. Components and controls ...................... 24. What you need to know .......................... 35. Standards of use ..................................... 46. Maintenance ............................................ 67. Troubleshooting ....................................... 88. Technical data ......................................... 8
TABLE OF CONTENTS
The number before the paragraph title refers tothe text references and their related figures(shown inside front and back covers).
SAFETY SYMBOLS
Your engine should be used with due care andattention. Symbols have therefore been placedon the engine to remind you of the main precau-tions to be taken. Their full meaning is explainedlater on.
You are also asked to carefully read the safetyregulations in the applicable chapter of thishandbook.
Warning! - Read and follow OperatingInstructions before running engine.
Warning! - Gasoline is flammable.Allow engine to cool at least 2 minutesbefore refuelling.
Warning! - Engines emit carbonmonoxide. DO NOT run in enclosedarea.
1.2
(to be strictly applied)
A) TRAINING
1) Carefully read the instructions contained inthis manual and the instructions of the ma-chine on which this engine is installed. Learnhow to stop the engine quickly.2) Never allow people unfamiliar with theseinstructions to use the engine.3) Never use the engine while people, espe-cially children, or pets are nearby.4) Remember that the operator or user is res-
2. GENERAL SAFETY STANDARDS ponsible for accidents or hazards occurringto other people or their property.
B) PREPARATION
1) Do not wear loose-fitting clothing, danglingdrawstrings, jewels or items that could beco-me caught; tie up long hair and keep at safedistance while starting the lawnmower. 2) Switch off the engine and let it cool downbefore removing the fuel tank cap.3) WARNING: DANGER! Ethanol is highlyinflammable.– store the fuel in suitable containers;– add fuel, using a funnel, only outdoors; do
not smoke during this operation and each
time fuel is handled;– add fuel before starting the engine. Never
remove the fuel tank cap or add fuel whilethe engine is running or when the engine ishot;
– if you have spilt some fuel, do not attemptto start the engine but move the machineaway from the area of spillage and avoidcreating any source of ignition until the fuelhas evaporated and fuel vapours have dis-sipated.
– always put the fuel tank and container capsback on and tighten well.
4) Replace faulty silencers and the guard, ifdamaged.
C) OPERATION
1) Do not operate the engine in a confinedspace where dangerous carbon monoxidefumes can collect.2) Do not use starting fluids or similar prod-ucts.3) Do not change the engine governor set-tings or overspeed the engine.4) Do not tilt the machine onto its side to thepoint where fuel leaks from the fuel tank cap.5) Do not touch the cylinder fins and/or thesilencer guard until the engine has cooleddown.6) Stop the engine and disconnect the sparkplug cable before checking, cleaning or serv-icing the machine or the engine.7) Do not crank the engine with spark plugremoved.8) Transport the machine with an empty fueltank.
D) MAINTENANCE AND STORAGE
1) A routine maintenance is essential for safe-ty and for keeping a high performance level.2) Do not store the machine with fuel in thetank in an area where the fuel vapors couldreach an open flame, a spark or a strong heatsource.3) Allow the engine to cool before storing inany enclosure.4) To reduce fire hazards, keep the engine,exhaust silencer and fuel storage area free ofgrass, leaves, or excessive grease.5) If the fuel tank has to be emptied, thisshould be done outdoors once the engine hascooled down.6)On safety ground, never use the enginewith either worn or damaged parts. Parts areto be replaced and not repaired. Use genuinespare parts. Parts that are not of the samequality can damage the engine and impairyour safety.
ENGINE COMPONENTS
1. Oil fillercap with dipstick2. Oil drain plug3. Air cleaner cover4. Spark plug cap5. Engine code
ACCELERATOR CONTROL
The throttle trigger (generally a lever), fitted tothe machine, is connected to the engine by acable.
Consult the machine’s Instructions Manual toidentify the throttle trigger and its positions, usu-ally marked by symbols, corresponding to:
CHOKE = to be used for starting fromcold.
FAST = corresponds to maximum revs;to be used when working.
SLOW = corresponds to minimum revs.
3.2
3.1
3. COMPONENTS AND CONTROLS
2 EN
Note your engine serial number here
✍

The engine performance, reliability and life areinfluenced by many factors, some external andsome strictly associated with the quality of theproducts used and with the scheduled mainte-nance.
The following information allow a better under-standing and use of your engine.
ENVIRONMENTAL CONDITIONS
The operation of a four-stroke endothermicengine is affected by:
a) Temperature:
– Working in low temperatures could lead to adifficult cold starting.
– When operating at very high temperatures, awarm start could prove difficult due to evapo-ration of fuel in the float chamber of the car-burettor or in the pump.
– In any case, the right kind of oil must be used,according to the operating temperatures.
b) Altitude:
– The higher the altitude (above sea level), thelower the max power developed by anendothermic engine.
– When there is a considerable increase in alti-tude, the load on the machine should bereduced and particularly heavy work avoided.
FUEL
A good quality fuel is the major issue for theengine reliability of operation.
a) Use unleaded gasoline, with a minimum of 90octane.
b) Use clean, fresh fuel; purchase fuel in quanti-ty that can be used within 30 days, to preventgum from forming inside the container or thetank.
c) Do not use fuel which contains Methanol.d) Do not add neither oil nor any kind of fuel
additive.
4.2
4.1
4. WHAT YOU NEED TO KNOW OIL
Use always high quality oils, choosing their vis-cosity grade according to the operating temper-ature.
a) Only use SF-SG quality classified detergentoil.
b) Choose the SAE viscosity grade of oil fromthis chart:
– from 5 to 35 °C = SAE 30– from -15 to + 35 °C = 10W-30
(Multi-viscosity)
c) The use of multi-viscosity oils in hot temper-atures will result in higher than normal oil con-sumption; therefore, check oil level more fre-quently.
d) Do not mix oils of different brands and fea-tures.
e) SAE 30 oil, if used below +5°C, could result inpossible engine damage due to inadequatelubrication.
f) Oil should be at «MAX» mark (see 5.1.1): donot overfill. Overfilling with oil may cause:– Smoking;– Spark plug or air filter fouling, which will
cause hard starting.
AIR FILTER
The air filter must always be in perfect workingorder, to prevent debris and dust from gettingsucked into the engine, reducing the efficiencyand life of the machine.
a) Always keep the filtering element free ofdebris and in perfect working order (see 6.5).
b) If necessary, replace the filtering element withan original spare part. Incompatible filteringelements can impair the efficiency and life ofthe engine.
c) Never start the engine without mounting thefiltering element properly.
SPARK PLUG
Not all the spark plugs for endothermic enginesare the same!
a) Use only spark plugs of the recommendedtype, with the right heat range.
b) Check the length of the thread, because – iftoo long – it will damage the engine beyondrepair.
c) Make sure that the electrodes are clean andtheir gap is correct (see 6.6).
4.5
4.4
4.3
3EN

BEFORE EVERY USE
Before every use, perform the following checkingprocedures in order to assure a regular opera-tion.
Check oil level
See the specific chapter (8.1) for the oil to beused.
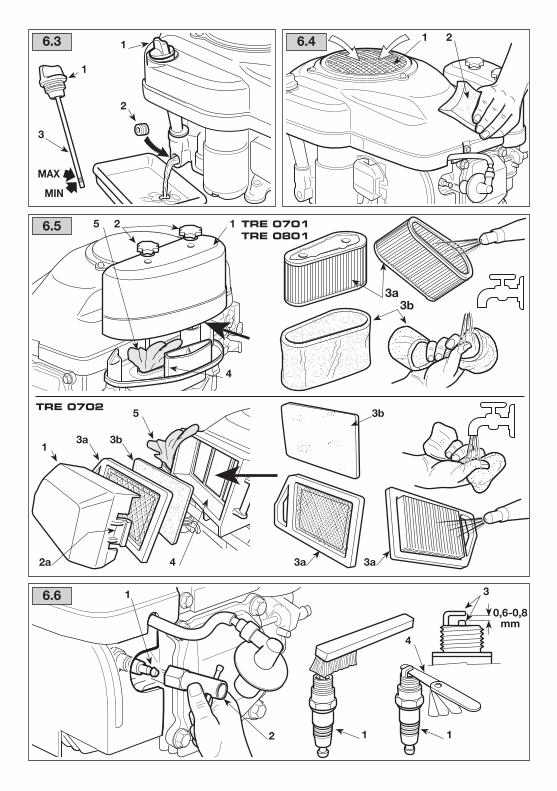
a) Place engine level.b) Clean around oil fill.c) Unscrew the cap (1), clean the end of the dip-
stick (2) and replace it, resting the cap on thefiller, as seen in the illustration, without tight-ening it.
d) Remove the cap with the dipstick and checkthe oil level that must be between the «MIN»and «MAX» marks.
e) If oil is required, add oil of the same kind upto the «MAX» mark, being careful not to spillany outside the oil fill.
f) Fully tighten the fillercap (1) and wipe off anyspilled oil.
Check air cleaner
The efficiency of the air filter is fundamental forthe engine to work properly. Do not start theengine if the filtering element is missing or bro-ken.
a) Clean around the filter cover (1).b) Remove the cover (1) by unscrewing the two
knobs (2 - TRE0701 - TRE0801), or by press-ing the tabs (2a - TRE0702).
c) Check the condition of the filtering element(3). It must be intact, clean and in perfectworking order; if not, either carry out mainte-nance or replace it (see 6.5).
d) Put the cover (1) back.
Refuelling
Do not drip fuel onto theplastic parts of the motor or the machine toprevent damaging them and remove all tracesof spilt fuel immediately. The warranty does notcover damage to plastic parts caused by fuel.
IMPORTANT
5.1.3
5.1.2
5.1.1
5.1
5. STANDARDS OF USE The fuel characteristics are given in the specificparagraph (see 4.2 and 8.1).
Refuelling must be made when the engine iscold, following the instructions contained in themachine's Instructions Manual.
Spark plug cap
Firmly connect the cable cap (1) to the sparkplug (2), making sure that there are no traces ofdirt inside the cap and on the spark plug termi-nal.
STARTING THE ENGINE (cold)
The engine must be started in the way describedin the machine’s Instruction Manual, alwaysmaking sure that any device (if present) thatcould cause the machine to advance or theengine to stop is disengaged.
a) Move the throttle to «CHOKE».b) Turn the starter key as described in the
machine’s instruction manual.
After a few seconds, slowly move the throttlefrom «CHOKE» to either «FAST» or «SLOW».
STARTING THE ENGINE (hot starting)
•) Follow the whole cold-starting procedurewith throttle control in «FAST» position.
USE OF THE ENGINE IN OPERATION
Maximum revs must be used to optimise theengine’s yield and performance, by setting thethrottle trigger to «FAST».
Keep your hands awayfrom the silencer and surrounding areasthat can become extremely hot. With theengine running, do not get loose-fitting
WARNING!
5.4
5.3
5.2
5.1.4
4 EN

clothing (ties, scarves, etc.) or hair closer tothe top part of the engine.
Do not operate on over 20°inclines to prevent malfunctioning of theengine.
STOPPING THE ENGINE DURINGMOWING
a) Move the throttle to «SLOW».b) Allow the engine to run at minimum speed for
at least 15-20 seconds.c) Stop the engine following the instructions
contained in the machine’s InstructionsManual.
STOPPING THE ENGINE AFTERMOWING
a) Move the throttle to «SLOW».b) Allow the engine to run at minimum speed for
at least 15-20 seconds.c) Stop the engine following the instructions
contained in the machine’s InstructionsManual.
d) When the engine is cold, disconnect thespark plug (1) and remove the starter key (ifpresent).
e) Remove any debris from the engine andespecially around the exhaust silencer toreduce the risk of fire.
CLEANING AND STORAGE
a) Do not spray with water or use hydrauliclances to clean the exterior of the engine.
b) Use a compressed air gun (max. 6 bars) forpreference, thus preventing debris and dustfrom penetrating inside.
c) Store the lawnmower (and the engine) in a dryplace, sheltered from severe weather condi-tions and sufficiently ventilated.
LONG STORAGE (over 30 days)
In case the engine has to be stored for a longtime (for example at the end of the season), afew precautions are needed to help the futurestart-up.
5.8
5.7
5.6
5.5
IMPORTANT
a) To prevent the formation of deposits insidethe tank, empty it of fuel by unscrewing thecarburettor float chamber plug (1) and col-lecting all the fuel in a suitable container. Atthe end of the operation remember to screwthe plug (1) back on and fully tighten it.
b) Remove the spark plug and pour about 3 cl ofclean engine oil into the spark plug hole, then,having blocked the hole with a rag, run thestarter motor briefly to turn the engine for afew revs and distribute the oil over the innersurface of the cylinder. Finally replace thespark plug without connecting the cable cap.
5EN
SAFETY RECOMMENDATIONS
Remove the spark plugcap and read instructions before carryingout any cleaning, repair or maintenanceoperation. Wear proper clothing and work-ing gloves whenever your hands are at risk.Do not perform maintenance or repairoperations without the necessary tools andtechnical knowledge.
Never get rid of used oil, fuelor other pollutants in unauthorised places.
MAINTENANCE SCHEDULE
Follow the hourly or calendar – whichever occurfirst – maintenance schedule shown in the fol-lowing table.
1) Change oil every 25 hours if the engine is oper-ating under heavy load or in ht weather.
2) Clean air cleaner more frequently if themachine is operating in dusty areas.
3) To be carried out by a specialized Centre.
6.2
IMPORTANT
WARNING!
6.1
6. MAINTENANCE CHANGE OIL
See the specific chapter (8.1) for the oil to beused.
Drain oil while the engineis warm, being careful not to touch the hotengine nor the drained oil.
Unless otherwise stated in this machine Instruc-tion Manual, to drain the oil it is necessary to:
a) Place the machine on a flat surface.b) Clean the area around the filler cap and
unscrew the cap with dipstick (1).c) Provide a suitable container for collecting the
oil and unscrew the drain plug (2).d) Refit the drain plug (2) and fully tighten it hav-
ing made sure that the gasket is in the rightposition.
e) Fill up with fresh oil (see 5.1.1).f) Check that the oil level has reached the
«MAX» notch on the dipstick (3).g) Close the cap (1) again and clean up any
traces of oil that was possibly spilt.
The engine holds a maxi-mum of 1.2 litres of oil. Topup gradually addingsmall amounts of oil at a time; check that the oillevel never exceeds the «MAX» notch on thedipstick.
CLEAN SILENCER AND ENGINE
Silencer must be cleaned when the engine iscold.
a) Use a jet of compressed air to remove anydebris and dirt that could cause a fire fromthe silencer and its protective cover.
b) Make sure that the cooling air intakes (1) arenot blocked.
c) Clean the plastic components with a sponge(2) soaked in water and detergent.
AIR FILTER MAINTENANCE
a) Clean the area around the filter cover (1).b) Remove the cover (1) by unscrewing the two
knobs (2 - TRE0701 - TRE0801), or by press-ing the tabs (2a - TRE0702).
6.5
6.4
IMPORTANT
WARNING!
6.3
6 EN
Check oil level - ✔ - -(see 5.1.1)
Change oil 1)
✔ - ✔ -(see 6.3)
Clean silencer and - ✔ - -engine (see 6.4)
Air filter cleaning 2)
- ✔ - -and check (see 6.5)
Air filter replacement - - ✔ -(see 6.5)
Check spark plug - - ✔ -(see 6.6)
Replace spark plug - - - ✔(see 6.6)
Fuel filter check 3)
- - - ✔
Operation
Aft
er F
irst
5 h
our
s
Eve
ry 5
ho
urs
or
dai
lyE
very
50
hour
s o
rev
ery
seas
on
Eve
ry 1
00 h
our
s
c) Remove the filtering element (3a + 3b).d) Remove the pre-filter (3b) from the cartridge
(3a).e) Tap the cartridge (3a) on a solid surface and
blow it from the inside with compressed air toremove dust and debris.
f) Wash the sponge pre-filter (3b) with waterand detergent and leave it to dry in the air.
Do not use water, petrol,detergents or any other products to clean thecartridge.
The sponge pre-filter (3b)must NEVER be oiled.
g) Clean the inside of the filter housing (4) fromdust and debris, making sure to block theinlet duct with a rag (5) to prevent them fromentering the engine.
h) Remove the rag (5), install the filtering ele-ment (3b + 3a) in its housing and refit thecover (1).
SPARK PLUG SERVICE
a) Remove the spark plug (1) using a spark plugsocket wrench (2).
b) Clean the electrodes (3) with a metal brushand remove any carbonaceous build-up.
c) Using a thickness gauge (4), check for theright gap (0.6 - 0.8 mm) between the elec-trodes.
d) Install the spark plug (1) and tighten with asocket wrench (2).
Replace the spark plug if the electrodes areburnt or if the porcelain is broken or damaged.
Fire hazard! Do not checkthe ignition system with spark plug remo-ved.
Use only spark plugs of therecommended type (see 8.1).
IMPORTANT
WARNING!
6.6
IMPORTANT
IMPORTANT
7EN

8 EN
REFILLING AND OPERATION MATERIALS
Fuel ........................................................................................ Unleaded gasoline, minimum 90 octaneEngine oil: from 5 to 35 °C ...................................................................................................... SAE 30
from -15 to +35 °C ............................................................................................... 10W-30Oil capacity ................................................................................................................................ 1.2 literSpark plug ................................................................... QC12YC / RC12YC (Champion) or equivalentSpark plug gap ................................................................................................................. 0.6 - 0.8 mm
8.1
8. TECHNICAL SPECIFICATIONS
PROBLEM LIKELY CAUSE SOLUTION
7. TROUBLESHOOTING
a) Hard starting
b) Inconsistentworking
c) Loss of powerwhilst operating
– No fuel
– Old fuel or deposits in the fuel tank
– Incorrect starting procedure
– Spark plug disconnected
– The spark plug is wet or the spark plugelectrodes are dirty or placedinadequately
– Air filter clogged
– Incorrect oil for the season
– Fuel evaporation in the carburetor(vapor lock) due to high temperatures
– Fault in carburation
– Hard starting
– Dirty electrodes or incorrect gap
– The spark plug cap is insertedincorrectly
– Air filter clogged
– Throttle trigger in «CHOKE» position
– Fault in carburation
– Fault in ignition
– Air filter clogged
– Fault in carburation
– Check and top up (see 5.1.3)
– Empty the fuel tank and add fresh fuel
– Perform the starting procedurecorrectly (see 5.2)
– Check that the spark plug cap fits wellover the plug terminals (see 5.1.4)
– Check (see 6.6)
– Check and clean (see 6.5)
– Replace with proper oil (see 6.3)
– Wait for a few minutes then start again(see 5.3)
– Contact a Licensed Service Centre
– Contact a Licensed Service Centre
– Check (see 6.6)
– Check that the cap is fitted correctly(see 5.1.4)
– Check and clean (see 6.5)
– Move the lever to the «FAST» position
– Contact a Licensed Service Centre
– Contact a Licensed Service Centre
– Check and clean (see 6.5)
– Contact a Licensed Service Centre
125
4
2a
1
5
4
6.3
6.5
6.4
3
1
MAX
MIN
2
11 2
1
2
0,6-0,8mm
3
1
4
1
6.6
TRE 0701TRE 0801
TRE 0702
3a
3b
3a 3b
3a
3a3b

1715
2014
9/2
Rea
lizza
zione:
ED
IPR
OM
/ b
ergam
o
GGP ITALY SPA
Via del Lavoro, 6
I-31033 Castelfranco Veneto (TV) ITALY
© b
y G
GP
- IT
ALY


![INTERAΜΕRΙCAΝ COP REPORT 2008-2009globalsustain.org/files/interamerican_group_cop_2008_09.pdf · the Society – Economy – Environment triptych] in its business strategy and](https://static.fdocument.org/doc/165x107/5f351202fa97306afc2a8ad8/interaoerca-cop-report-2008-the-society-a-economy-a-environment-triptych.jpg)