6318189 -Comando remoto SIME HOME - copie · onderie SIME S.p.A. 6318189 - 05/2015 - R1 EL ES EN IT...
47
Fonderie SIME S.p.A. 6318189 - 05/2015 - R1 EL ES EN IT SIME HOME MANUALE PER L’INSTALLAZIONE E L’USO - INSTALLATION AND USE MANUAL MANUAL DE INSTALACIÓN Y USO - ΕΓΧΕΙΡΊ∆ΙΟ ΕΓΚΑΤΆΣΤΑΣΗΣ ΚΑΙ ΣΥΝΤΉΡΗΣΗΣ Comando Remoto - Remote Control Control Remoto - Απομακρυσμένο Χειριστήριο Gi 20 Mar 2014 Zona 1 10:30 Inverno manuale - set 20.0°C Menu Modo
Transcript of 6318189 -Comando remoto SIME HOME - copie · onderie SIME S.p.A. 6318189 - 05/2015 - R1 EL ES EN IT...
Fonderie SIME S.p.A.
6318189 - 05/2015 - R1
EL ES EN IT
SIME H
OME
MAN
UALE PER L’IN
STALLAZIONE E L’U
SO - INSTALLATION
AND
USE M
ANU
ALM
ANU
AL DE IN
STALACIÓN Y U
SO - ΕΓΧΕΙΡΊ∆ΙΟ ΕΓΚΑΤΆΣΤΑΣΗΣ ΚΑΙ ΣΥΝ
ΤΉΡΗ
ΣΗΣ
Comando Rem
oto - Remote Control
Control Remoto - Αποµακρυσµένο Χειριστήριο
Gi 20 M
ar 2014Zona 1
10:30
Inverno manuale - set 20.0°C
Menu
Modo
2
ITGAM
MA
MODELLO
CODICESim
e HOM
E8092280
DICHIARAZION
E CE DI CONFORM
ITÀAi sensi della D
irettiva “Bassa Tensione” 2006/95/CE e Diret-
tiva “Compatibilità Elettrom
agnetica” 2004/108/CE, il produt-tore Fonderie SIM
E S.p.A., via Garbo 27, 37045 Legnago (VR), DICHIARA CHE il Com
ando Remoto m
odello Sime HOM
E è con-form
e alle medesim
e Direttive Com
unitarie.
Il Direttore Tecnico(Franco M
acchi)
1312
SIMBOLI
a
PERICOLOPer indicare azioni che, se non effettuate corretta-m
ente, possono provocare infortuni di origine gene-rica o possono generare m
alfunzionamenti o danni
materiali all’apparecchio; richiedono quindi partico-
lare cautela ed adeguata preparazione.
f
PERICOLOPer indicare azioni che, se non effettuate corretta-m
ente, possono provocare infortuni di origine elet-trica; richiedono quindi particolare cautela e ade-guata preparazione.
d
È VIETATOPer indicare azioni che N
ON D
EVONO essere esegui-
te.
m
AVVERTENZA
Per indicare informazioni particolarm
ente utili e im-
portanti.
3
IT
1 AVVERTEN
ZE E REGOLE DI SICU
REZZA 4
1.1 Avvertenze .....................................4
1.2 D
ivieti .........................................4
2 IN
STALLAZIONE
52.1
Ricevimento del prodotto .........................5
2.2 D
imensioni e peso
...............................52.3
Temperature ...................................5
2.4 M
ontaggio a muro ...............................6
3 D
ESCRIZIONE
83.1
Caratteristiche..................................83.2
Encoder mutifunzione............................8
3.3 Interfaccia utente................................9
4 U
TILIZZO 10
4.1 M
essa in funzione ..............................104.2
Impostazioni da tasto M
ENU
.....................104.2.1
Menù IM
POSTAZIONI GEN
ERALI.........10
4.2.2 M
enù INFORM
AZIONI..................
134.2.3
Menù TECN
ICO.......................
144.2.4
Albero di navigazione da tasto MEN
U.....
164.2.5
Precisazioni tecniche ..................17
4.3 Im
postazioni da tasto MOD
O......................184.3.1
Programm
azione oraria................
194.3.2
Funzione vacanze .....................20
4.3.3 Segnalazione anom
alia ................21
4.3.4 Im
postazioni rapide ...................22
4.4 N
avigazione da tasto MOD
O ......................23
INDICE

4
IT1
AVVERTENZE E REGOLE DI SICU
REZZA
1.1 Avvertenze
m
AVVERTENZE
– Prima dell’installazione dell’apparecchio leggere
con attenzione il presente manuale.
– L’apparecchio è parte integrante dell’impianto ge-
stito. Riferirsi anche alla documentazione della
caldaia c ontrollata.– L’installazione deve essere effettuata solo da Per -
sonale Professionalmente Qualificato.
– Per assicurare una corretta rilevazione della tem-
peratura media dell’am
biente posizionare il Co-m
ando Remoto in luoghi riparati dal sole e dalle
correnti d’aria continue.– Il costruttore non e responsabile di eventuali danni
a persone, animali o cose causati da una instal-
lazione o utilizzazione del Comando Rem
oto non corrette o im
proprie.
1.2 Divieti
d
È VIETATO– Installare il Com
ando Remoto nelle vicinanze di
apparecchi che emettono radiazioni elettrom
a-gnetiche.
– L’uso del Comando Rem
oto ai bambini e alle per-
sone inabili non assistite.
5
IT2
INSTALLAZION
E
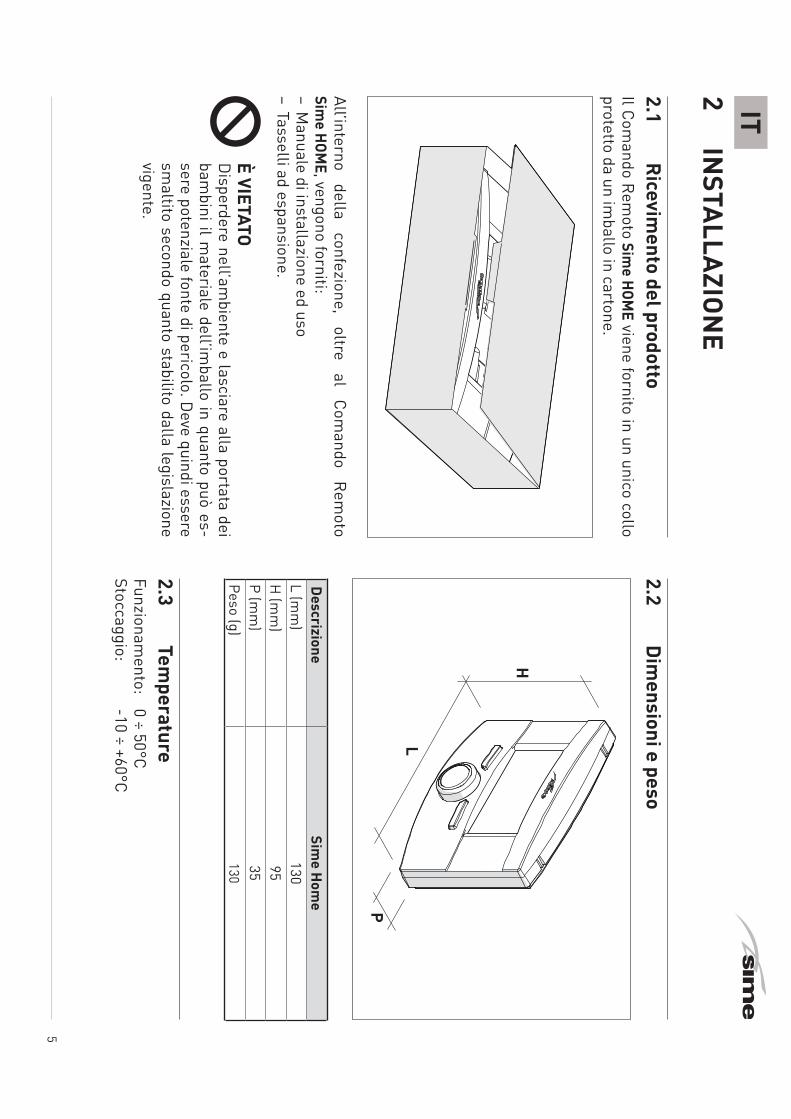
2.1 Ricevim
ento del prodottoIl Com
ando Remoto Sim
e HOME viene fornito in un unico collo
protetto da un imballo in cartone.
All’interno della
confezione, oltre
al Com
ando Rem
oto Sim
e HOME, vengono forniti:
– Manuale di installazione ed uso
– Tasselli ad espansione.
d
È VIETATOD
isperdere nell’ambiente e lasciare alla portata dei
bambini il m
ateriale dell’imballo in quanto può es-
sere potenziale fonte di pericolo. Deve quindi essere
smaltito secondo quanto stabilito dalla legislazione
vigente.
2.2 Dim
ensioni e peso
L
P
H
DescrizioneSim
e Hom
eL (m
m)
130H
(mm
)95
P (mm
)35
Peso (g)130
2.3 Tem
peratureFunzionam
ento: 0 ÷ 50°C
Stoccaggio: -10 ÷ +60°C
6
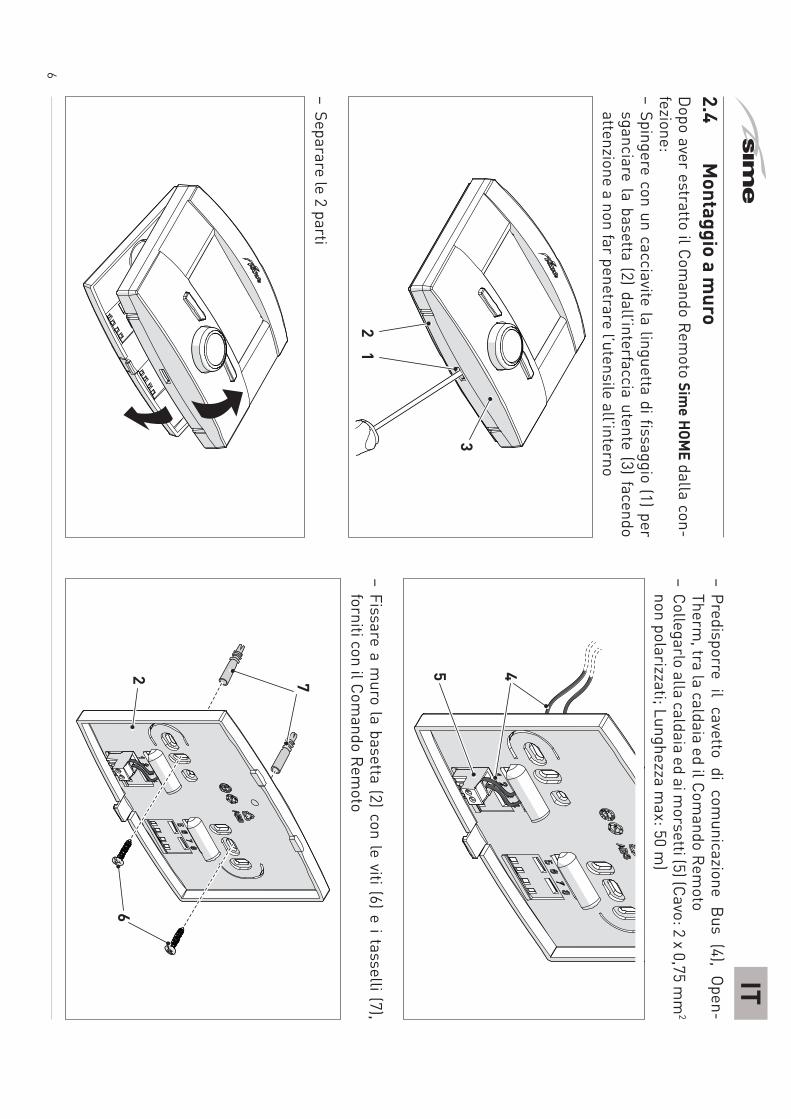
IT2.4
Montaggio a m
uroD
opo aver estratto il Comando Rem
oto Sime HOM
E dalla con-fezione: – Spingere con un cacciavite la linguetta di fissaggio (1) per
sganciare la basetta (2) dall’interfaccia utente (3) facendo attenzione a non far penetrare l’utensile all’interno
12
3
– Separare le 2 parti
– Predisporre il cavetto di comunicazione Bus (4), Open-
Therm, tra la caldaia ed il Com
ando Remoto
– Collegarlo alla caldaia ed ai morsetti (5) (Cavo: 2 x 0,75 m
m2
non polarizzati; Lunghezza max: 50 m
)
45
– Fissare a muro la basetta (2) con le viti (6) e i tasselli (7),
forniti con il Comando Rem
oto
26
7

7
IT– Rim
ontare l’interfaccia Utente (3) sulla basetta (2) aggan-
ciandole correttamente con la linguetta (1)
3
2
m
AVVERTENZA
Fare in modo che non ci siano eccedenze di cavetto
tra la basetta (2) e l’interfaccia utente (3).
8
IT3
DESCRIZIONE
3.1 Caratteristiche
Il Comando Rem
oto Sime HOM
E è un complem
ento d’impianto
funzionale ed elegante, studiato per un utilizzo facile e intui-tivo grazie all’am
pio display a matrice di punti che visualizza
tutte le possibili azioni che si possono compiere.
Il collegamento e la com
unicazione con la caldaia avviene me-
diante bus bifilare non polarizzato e protocollo Open Therm
standard.
Le caratteristiche principali del Comando Rem
oto Sime HOM
E sono:– Selezione m
odalità di funzionamento (Estate/Inverno/Off)
– Regolazione Temperature riscaldam
ento e ACS– Program
mazione settim
anale riscaldamento
– Regolazione climatica (con sonda esterna installata)
– Gestione dei parametri caldaia (solo per caldaie della gam
-m
a BRAVA)– Im
postazione temperatura antigelo
– Possibilità di programm
azione di 4 fasce orarie giornaliere– Possibilità di gestione del program
ma vacanze
– Visualizzazione continua di data e ora correnti– Visualizzazione continua della tem
peratura ambiente
– Visualizzazione parametri di funzionam
ento impianto
– Visualizzazione degli allarmi storici e gestione di quelli
eventualmente presenti.
NOTAIn caso di m
ancanza di corrente tutte le impostazioni effettua-
te vengono mantenute m
emorizzate tranne la data e l’ora che
permangono per cir ca 24 ore.
3.2 Encoder m
utifunzioneL’encoder può agire nei m
odi seguenti.
Rotazione, che permette di:
– scorrere i menù, i sottom
enù e le righe delle videate– m
odificare i dati o i valori nelle aree modificabili
Pressione, che permette di:
– confermare le selezioni effettuate
– confermare le m
odifiche introdotte.
9
IT3.3
Interfaccia utente
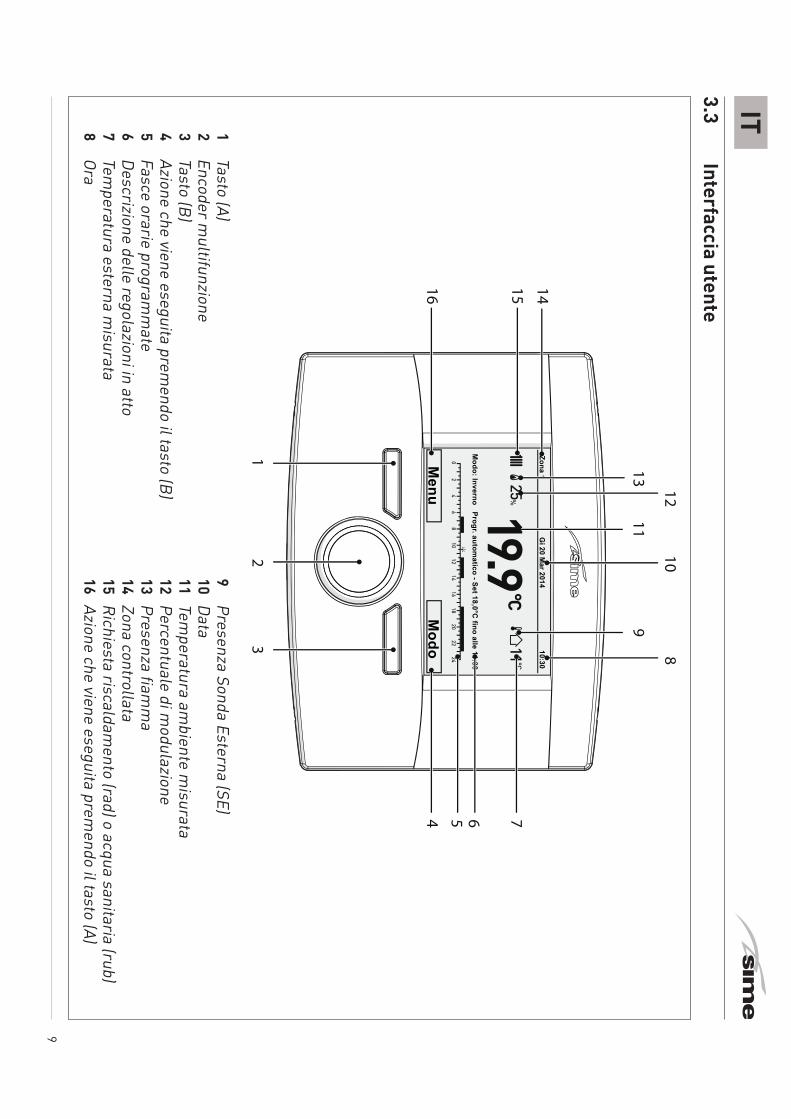
1 Tasto (A)
2 Encoder m
ultifunzione3
Tasto (B)4
Azione che viene eseguita premendo il tasto (B)
5 Fasce orarie program
mate
6 Descrizione delle regolazioni in atto
7 Tem
peratura esterna misurata
8 Ora
9 Presenza Sonda Esterna (SE)
10 Data11 Tem
peratura ambiente m
isurata12 Percentuale di m
odulazione13 Presenza fiam
ma
14 Zona controllata15 Richiesta riscaldam
ento (rad) o acqua sanitaria (rub)16 Azione che viene eseguita prem
endo il tasto (A)
Gi 20 M
ar 2014Zona 1
10:30
Modo: Inverno Progr. autom
atico - Set 18,0°C fino alle 11:30
Menu
Modo
12
3
16 15 14
13
12
119
108
4 5 6 7
10
IT4
UTILIZZO
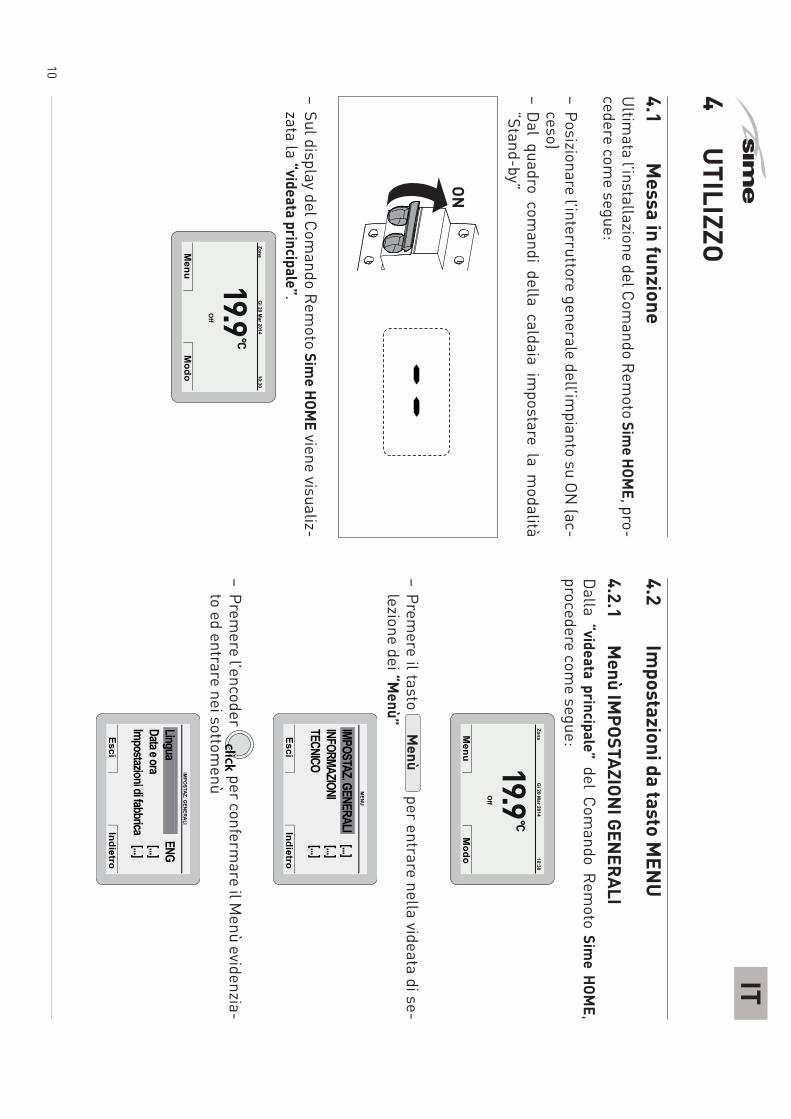
4.1 M
essa in funzioneU
ltimata l’installazione del Com
ando Remoto Sim
e HOME, pro-
cedere come segue:
– Posizionare l’interruttore generale dell’impianto su ON
(ac-ceso)
– Dal quadro com
andi della caldaia impostare la m
odalità “Stand-by”ON
– Sul display del Comando Rem
oto Sime HOM
E viene visualiz-zata la “videata principale”.
Gi 20 M
ar 2014Zona
10:30
Off
Menu
Modo
4.2 Im
postazioni da tasto MEN
U
4.2.1 M
enù IMPOSTAZION
I GENERALI
Dalla “videata principale” del Com
ando Remoto Sim
e HOME,
procedere come segue:
Gi 20 M
ar 2014Zona
10:30
Off
Menu
Modo
– Premere il tasto
Menù
per entrare nella videata di se-lezione dei “M
enù”
EsciIndietro
IMPOSTAZ. GENERALI [...]
INFORMAZIONI
[...]TECNICO
[...]
IMPOSTAZ. GENERALI M
ENU
– Premere l’encoder
click per confermare il M
enù evidenzia-to ed entrare nei sottom
enù
EsciIndietro
Lingua ENG
Data e ora
[...]
Impostazioni di fabbrica [...]
Lingua IM
POSTAZ. G
ENERALI
11
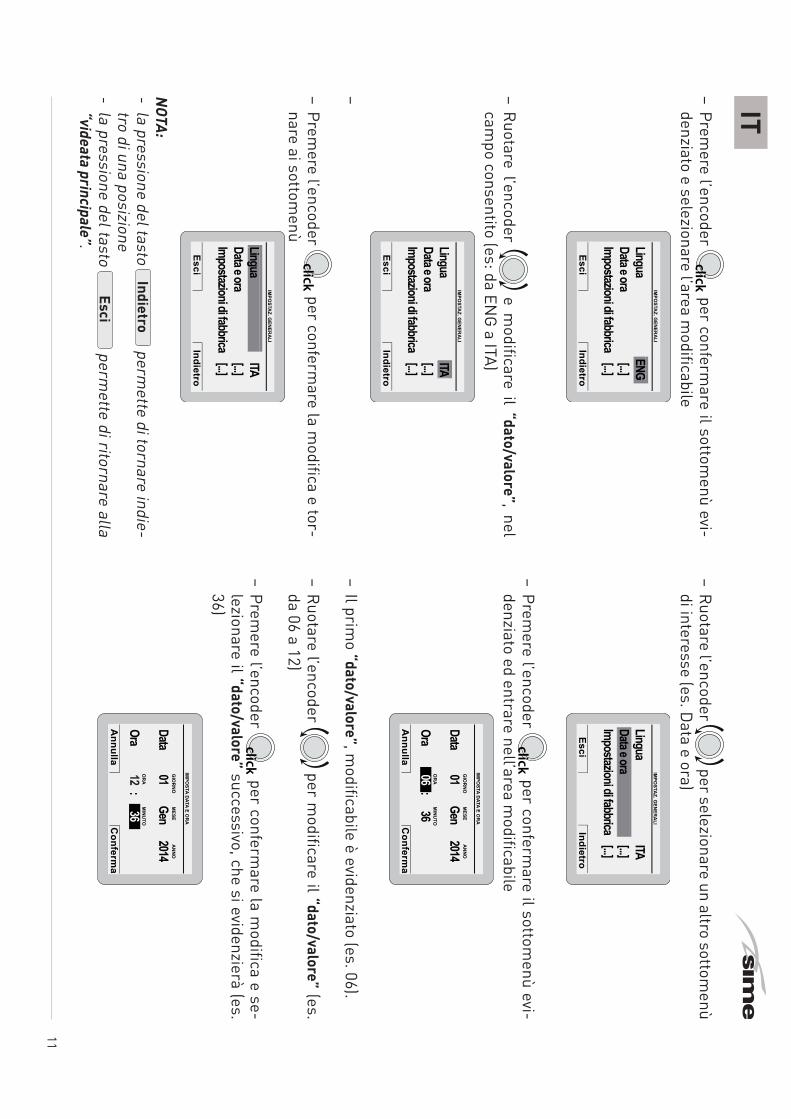
IT– Prem
ere l’encoder click per conferm
are il sottomenù evi-
denziato e selezionare l’area modificabile
IMPO
STAZ. GENERALI
EsciIndietro
Lingua ENG
Data e ora
[...]
Impostazioni di fabbrica [...]
ENG
– Ruotare l’encoder e m
odificare il “dato/valore”, nel cam
po consentito (es: da ENG a ITA)
–
IMPO
STAZ. GENERALI
EsciIndietro
Lingua
ITA
Data e ora
[...]
Impostazioni di fabbrica [...]
ITA
– Premere l’encoder
click per confermare la m
odifica e tor-nare ai sottom
enù
EsciIndietro
Lingua
ITA
Data e ora
[...]
Impostazioni di fabbrica [...]
Lingua
IM
POSTAZ. G
ENERALI
NOTA: - la pressione del tasto
Indietro perm
ette di tornare indie-tro di una posizione
- la pressione del tasto Esci
permette di ritornare alla
“videata principale”.
– Ruotare l’encoder per selezionare un altro sottom
enù di interesse (es. D
ata e ora)IM
POSTAZ. G
ENERALI
EsciIndietro
Lingua
ITA
Data e ora
[...]
Impostazioni di fabbrica [...]Data e ora
– Premere l’encoder
click per confermare il sottom
enù evi-denziato ed entrare nell’area m
odificabileIM
POSTA DATA E O
RA
GIO
RNOM
ESE
ORA
MINUTO
ANNO
Annulla
Conferm
a
Data 01 Gen 2014
Ora 06 : 36
– Il primo “dato/valore”, m
odificabile è evidenziato (es. 06).
– Ruotare l’encoder per m
odificare il “dato/valore” (es. da 06 a 12)
– Premere l’encoder
click per confermare la m
odifica e se-lezionare il “dato/valore” successivo, che si evidenzierà (es. 36)
IMPO
STA DATA E ORA
GIO
RNOM
ESE
ORA
MINUTO
ANNO
Annulla
Conferm
a
Data 01 Gen 2014
Ora 12 : 36
12
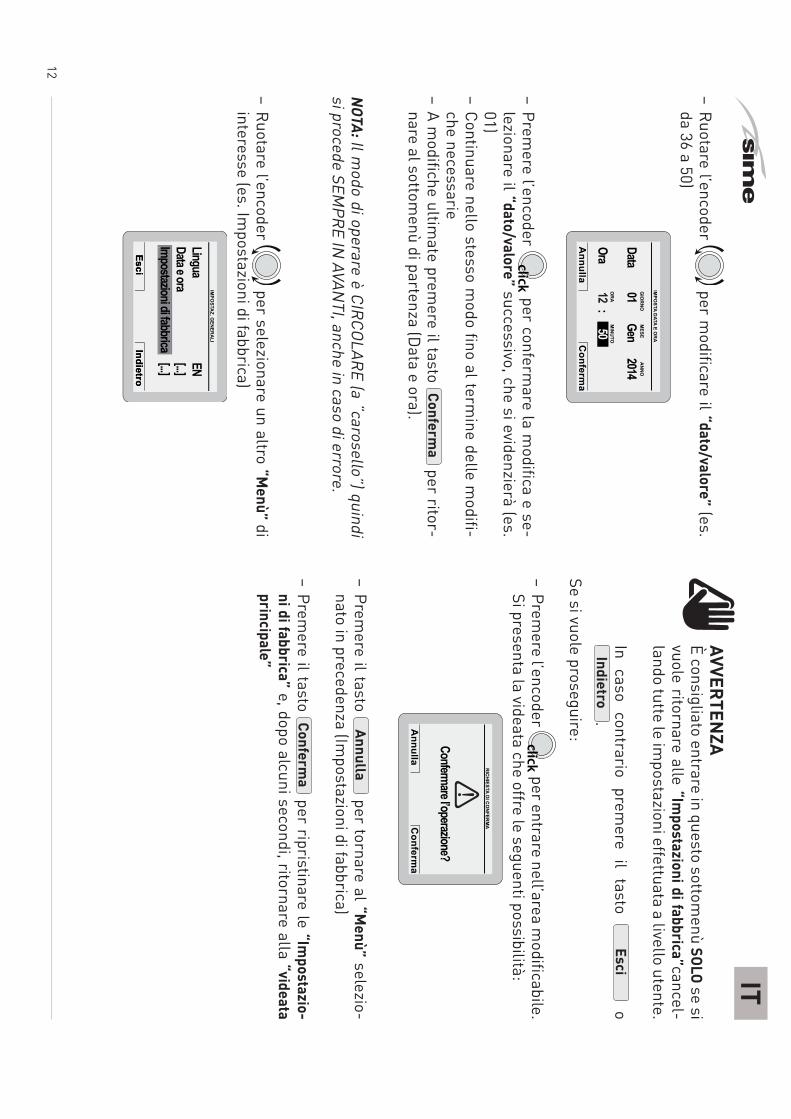
IT– Ruotare l’encoder
per modificare il “dato/valore” (es.
da 36 a 50)IM
POSTA DATA E O
RA
GIO
RNOM
ESE
ORA
MINUTO
ANNO
Annulla
Conferm
a
Data 01 Gen 2014
Ora 12 : 50
– Premere l’encoder
click per confermare la m
odifica e se-lezionare il “dato/valore” successivo, che si evidenzierà (es. 01)
– Continuare nello stesso modo fino al term
ine delle modifi-
che necessarie– A m
odifiche ultimate prem
ere il tasto Conferm
a per ritor-
nare al sottomenù di partenza (D
ata e ora).
NOTA: Il modo di operare è CIRCOLARE (a “carosello”) quindi
si procede SEMPRE IN
AVANTI, anche in caso di errore.
– Ruotare l’encoder per selezionare un altro “M
enù” di interesse (es. Im
postazioni di fabbrica)
EsciIndietro
IMPO
STAZ. GENERALI
EsciIndietro
Lingua
EN
Data e ora
[...]
Impostazioni di fabbrica [...]Impostazioni di fabbrica
m
AVVERTENZA
È consigliato entrare in questo sottomenù SOLO se si
vuole ritornare alle “Impostazioni di fabbrica”cancel-
lando tutte le impostazioni effettuata a livello utente.
In caso contrario premere il tasto
Esci o
Indietro.
Se si vuole proseguire:
– Premere l’encoder
click per entrare nell’area modificabile.
Si presenta la videata che offre le seguenti possibilità:
Annulla
Conferm
a
RICHIESTA DI CONFERM
A
Confermare l’operazione?
– Premere il tasto
Annulla per tornare al “M
enù” selezio-nato in precedenza (Im
postazioni di fabbrica)
– Premere il tasto
Conferma
per ripristinare le “Impostazio-
ni di fabbrica” e, dopo alcuni secondi, ritornare alla “videata principale”
13
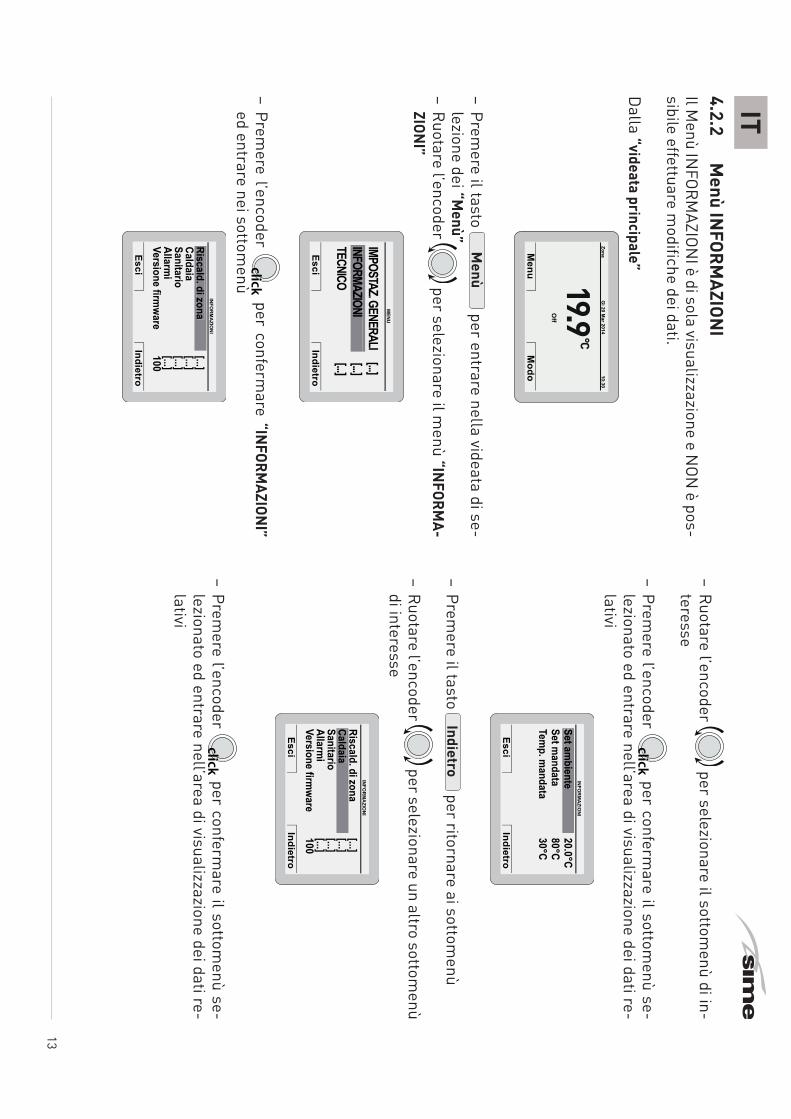
IT4.2.2
Menù IN
FORMAZION
IIl M
enù INFORM
AZIONI è di sola visualizzazione e N
ON è pos-
sibile effettuare modifiche dei dati.
Dalla “videata principale”
Gi 20 M
ar 2014Zona
10:30
Off
Menu
Modo
– Premere il tasto
Menù
per entrare nella videata di se-lezione dei “M
enù”– Ruotare l’encoder
per selezionare il menù “IN
FORMA-
ZIONI”
EsciIndietro
IMPOSTAZ. GENERALI [...]
INFORMAZIONI
[...]TECNICO
[...]INFORMAZIONI
MENU
– Premere l’encoder
click per confermare “IN
FORMAZION
I” ed entrare nei sottom
enù
EsciIndietro
INFORM
AZIONI
Riscald. di zona [...]
Caldaia [...]
Sanitario [...]
Allarmi
[...]Versione firm
ware 100
Riscald. di zona
– Ruotare l’encoder per selezionare il sottom
enù di in-teresse
– Premere l’encoder
click per confermare il sottom
enù se-lezionato ed entrare nell’area di visualizzazione dei dati re-lativi
EsciIndietro
INFORM
AZIONI
Set ambiente
20.0°CSet m
andata 80°C
Temp. m
andata 30°C
Set ambiente
– Premere il tasto
Indietro per ritornare ai sottom
enù
– Ruotare l’encoder per selezionare un altro sottom
enù di interesse
EsciIndietro
INFORM
AZIONI
Riscald. di zona [...]
Caldaia [...]
Sanitario [...]
Allarmi
[...]Versione firm
ware 100
Caldaia
– Premere l’encoder
click per confermare il sottom
enù se-lezionato ed entrare nell’area di visualizzazione dei dati re-lativi
14
IT– Ruotare l’encoder
per selezionare il menù “TECN
ICO”
EsciIndietro
IMPOSTAZ. GENERALI [...]
INFORMAZIONI
[...]TECNICO
[...]TECNICO
MENU
– Premere l’encoder
click per entrare nell’area modificabile.
Si presenta la videata che offre le seguenti possibilità:
Annulla
Conferm
a
RICHIESTA DI CONFERM
A
Confermare l’operazione?
– Premere il tasto
Annulla per tornare al m
enù “TECNICO”
– Premere il tasto Conferm
a per entrare nei sottom
enùTECNICO
EsciIndietro
Riscald. di zona
[...]Parametri caldaia
[...]Reset totale fabbrica
[...]
– Ruotare l’encoder per selezionare il sottom
enù di in-teresse
– Premere l’encoder
click per confermare il sottom
enù sele-zionato ed entrare nell’area dei param
etri modificabili.
– Continuare nello stesso modo fino al term
ine delle visualiz-zazioni desiderate
– Premere il tasto
Esci per ritornare alla “videata prin-
cipale”.
Gi 20 M
ar 2014Zona
10:30
Off
Menu
Modo
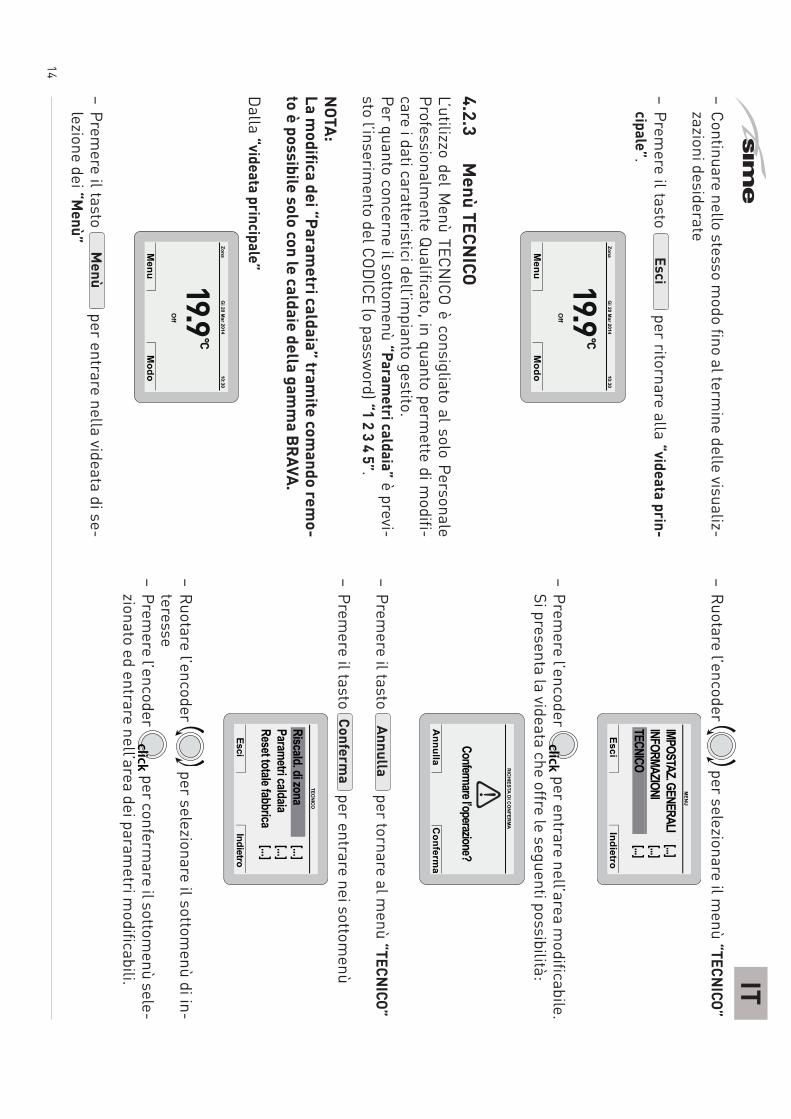
4.2.3 M
enù TECNICO
L’utilizzo del Menù TECN
ICO è consigliato al solo Personale Professionalm
ente Qualificato, in quanto permette di m
odifi-care i dati caratteristici dell’im
pianto gestito.Per quanto concerne il sottom
enù “Parametri caldaia” è previ-
sto l’inserimento del COD
ICE (o password) “1 2 3 4 5”.
NOTA:
La modifica dei “Param
etri caldaia” tramite com
ando remo-
to è possibile solo con le caldaie della gamm
a BRAVA.
Dalla “videata principale”
Gi 20 M
ar 2014Zona
10:30
Off
Menu
Modo
– Premere il tasto
Menù
per entrare nella videata di se-lezione dei “M
enù”
15
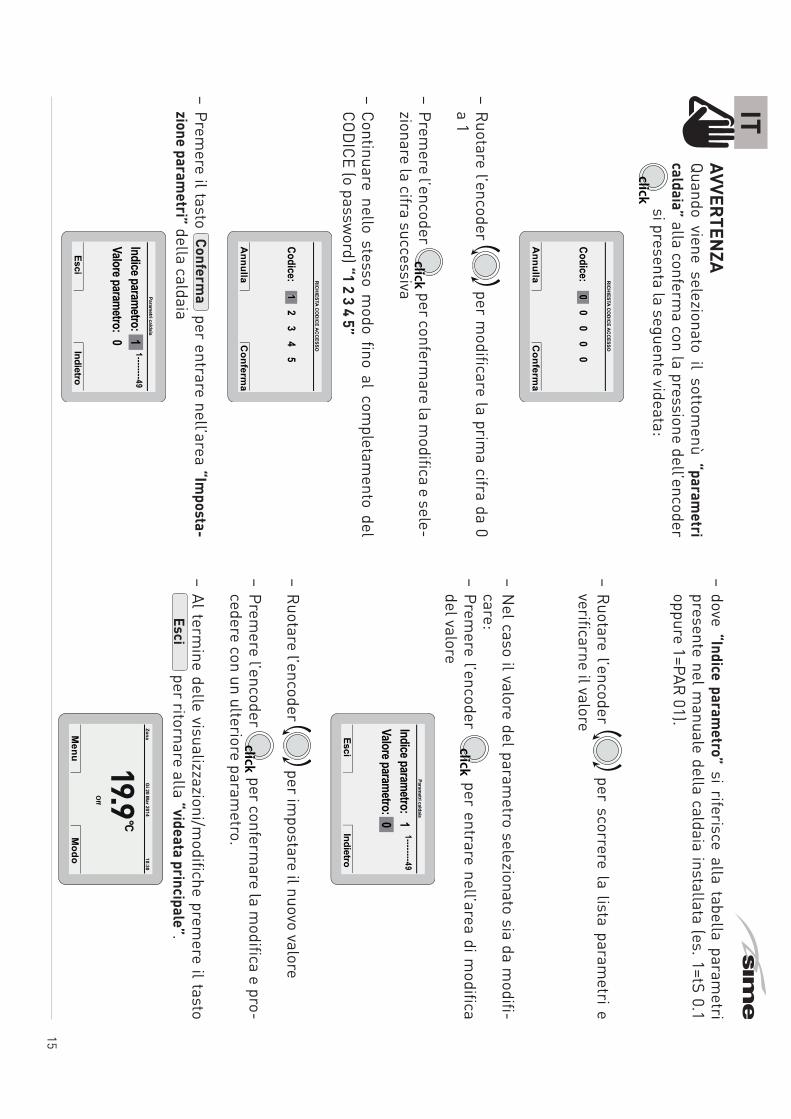
ITm
AVVERTEN
ZAQuando viene selezionato il sottom
enù “parametri
caldaia” alla conferma con la pressione dell’encoder
click si presenta la seguente videata:
RICHIESTA CODICE ACCESSO
Codice:0
00
00
0
Annulla
Conferm
a
– Ruotare l’encoder per m
odificare la prima cifra da 0
a 1
– Premere l’encoder
click per confermare la m
odifica e sele-zionare la cifra successiva
– Continuare nello stesso modo fino al com
pletamento del
CODICE (o passw
ord) “1 2 3 4 5”
RICHIESTA CODICE ACCESSO
Codice:1
23
45
1
Annulla
Conferm
a
– Premere il tasto
Conferma
per entrare nell’area “Imposta-
zione parametri” della caldaia
Parametri caldaia
EsciIndietro
Indice parametro: 1Valore parametro: 0
1--------49
– dove “Indice parametro” si riferisce alla tabella param
etri presente nel m
anuale della caldaia installata (es. 1=tS 0.1 oppure 1=PAR 01).
– Ruotare l’encoder per scorrere la lista param
etri e verificarne il valore
– Nel caso il valore del param
etro selezionato sia da modifi-
care:– Prem
ere l’encoder click per entrare nell’area di m
odifica del valore
Parametri caldaia
EsciIndietro
Indice parametro: 1Valore parametro: 0
1--------49
– Ruotare l’encoder per im
postare il nuovo valore
– Premere l’encoder
click per confermare la m
odifica e pro-cedere con un ulteriore param
etro.
– Al termine delle visualizzazioni/m
odifiche premere il tasto
Esci per ritornare alla “videata principale”.
Gi 20 M
ar 2014Zona
10:30
Off
Menu
Modo
16
IT
click
Per “selezionare” righe o “modificare” valori
Per “confermare” le selezioni o le m
odifiche
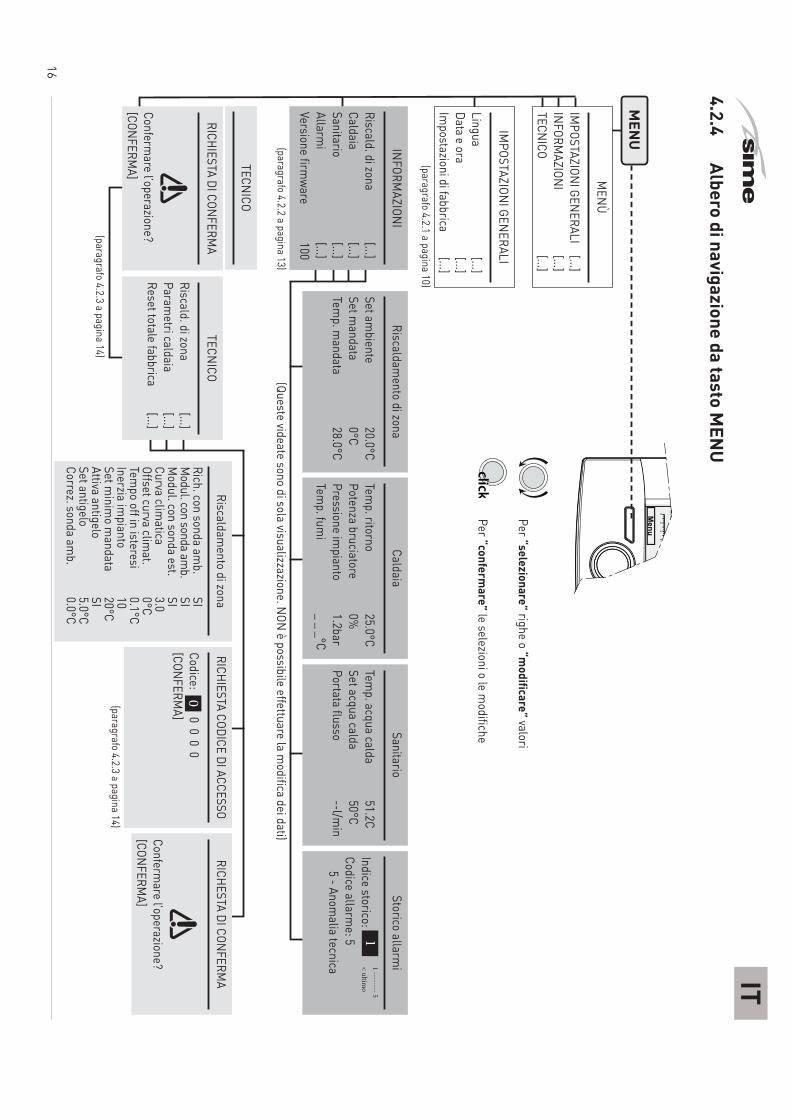
Riscaldamento di zona
Set ambiente
20.0°CSet m
andata 0°C
Temp. m
andata 28.0°C
Caldaia
Temp. ritorno
25.0°CPotenza bruciatore
0%Pressione im
pianto 1.2bar
Temp. fum
i
_ _ _°C
Sanitario
Temp. acqua calda
51.2CSet acqua calda
50°CPortata flusso
--l/min
Storico allarmi
Indice storico: 1
1 -------- 5< ultim
o
Codice allarme: 5
5 - Anomalia tecnica
Modo: Inverno Progr. autom
atico - Set 18,0C
fino alle 11:30
Menu
Modo
INFORMAZIONI
Riscald. di zona [...]
Caldaia
[...]Sanitario
[...]
Allarmi
[...]
Versione firmware
100
IMPOSTAZIONI GENERALI
Lingua [...]
Data e ora [...]
Impostazioni di fabbrica
[...]
MEN
U
RICHIESTA CODICE DI ACCESSO
Codice: 0 0 0 0 0
[CONFERMA]
Riscaldamento di zona
Rich. con sonda amb.
SIM
odul. con sonda amb.
SIM
odul. con sonda est. SI
Curva climatica
3.0Offset curva clim
at. 0°C
Tempo off in isteresi
0.1°CInerzia im
pianto 10
Set minim
o mandata
20°CAttiva antigelo
SISet antigelo
5.0°CCorrez. sonda am
b. 0.0°C
RICHESTA DI CONFERMA
aConferm
are l’operazione? [CONFERM
A]
RICHIESTA DI CONFERMA
aConferm
are l’operazione? [CONFERM
A]
TECNICO
Riscald. di zona [...]
Parametri caldaia
[...]Reset totale fabbrica
[...]
(paragrafo 4.2.1 a pagina 10)
(paragrafo 4.2.2 a pagina 13)
(paragrafo 4.2.3 a pagina 14)(paragrafo 4.2.3 a pagina 14)
MENÙ
IMPOSTAZIONI GENERALI
[...]INFORM
AZIONI [...]
TECNICO [...]
(Queste videate sono di sola visualizzazione. NON è possibile effettuare la modifica dei dati)
4.2.4 Albero di navigazione da tasto M
ENU
TECNICO
17
IT
Rich. con sonda amb.
Impostazione SI: la richiesta di calore dell’im
pianto di riscal-dam
ento avviene solo se la temperatura am
biente risulta in-feriore al set point am
biente impostato.
Impostazione N
O: la richiesta di calore dell’impianto di riscal-
damento è costantem
ente presente nelle modalità “M
anuale” e “AU
TO COMFORT”. N
elle altre modalità la richiesta non è
presente.
Modul. con sonda am
b.Im
postazione SI: la temperatura di m
andata è modulata in
base allo scostamento tra la reale tem
peratura ambiente,
misurata dalla sonda interna al dispositivo, e al set am
biente program
mato
Impostazione N
O: la temperatura di m
andata sarà mantenuta
fissa al massim
o permesso, durante tutti i periodi di richiesta
(gestione ad isteresi).
Modul. con sonda est.
Impostazione SI: la tem
peratura massim
a di mandata (e quel-
la modulata se abilitata la m
odulazione con sonda ambiente)
è regolata in base al valore della temperatura esterna (se pre-
sente la sonda esterna), tenendo conto anche dei valori impo-
stati per la Curva climatica e relativo Offset.
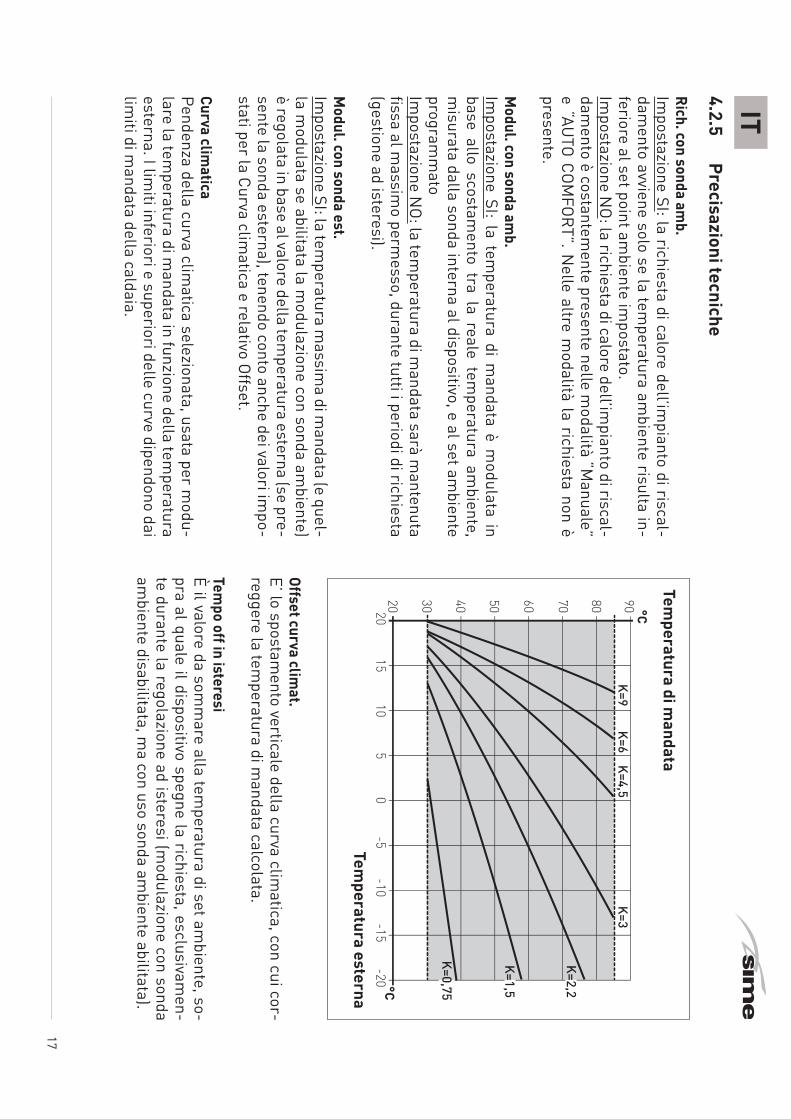
Curva climatica
Pendenza della curva climatica selezionata, usata per m
odu-lare la tem
peratura di mandata in funzione della tem
peratura esterna. I lim
iti inferiori e superiori delle curve dipendono dai lim
iti di mandata della caldaia.
4.2.5 Precisazioni tecniche
Temperatura di m
andata
2015
105
0-10
-15-5
-20
80 90706050403020 °C
°C
K=9K=6
K=4,5K=3
K=2,2
K=1,5
K=0,75
Temperatura esterna
Offset curva climat.
E’ lo spostamento verticale della curva clim
atica, con cui cor-reggere la tem
peratura di mandata calcolata.
Tempo off in isteresi
È il valore da somm
are alla temperatura di set am
biente, so-pra al quale il dispositivo spegne la richiesta, esclusivam
en-te durante la regolazione ad isteresi (m
odulazione con sonda am
biente disabilitata, ma con uso sonda am
biente abilitata).
18
ITInerzia im
piantoÈ un param
etro che regola la velocità di reazione dell’algorit-m
o di regolazione, da associare all’inerzia o alla dimensione e
tipo di edificio e di sistema di riscaldam
ento.
Set minim
o mandata
È il limite inferiore della tem
perature di mandata calcolata
(utile in caso di impianti con bassi rendim
enti a basse tempe-
rature calcolate).
Attiva antigeloIm
postazione SI: abilitazione del programm
a di protezione antigeloIm
postazione NO: il riscaldam
ento verrà mantenuto spento
nelle modalità di funzionam
ento OFF, ESTATE e nei periodi Ridotto in M
odalità AUTO se la sonda am
biente è disabilitata.
Set antigeloÈ la tem
peratura ambiente (antigelo), sotto la quale il dispo-
sitivo esegue una richiesta di riscaldamento al set di m
andata m
inimo. La richiesta viene m
antenuta attiva fino a quando la tem
peratura ambiente ha superato il valore “antigelo im
po-stato + 0.6°C”.
Correz. sonda amb.
È il valore utilizzato per correggere la lettura della temperatu-
ra ambiente, da parte della sonda interna al dispositivo.
4.3 Im
postazioni da tasto MODO
Dalla “videata principale”
Gi 20 M
ar 2014Zona
10:30
Off
Menu
Modo
– Premere il tasto
Modo
per entrare nella videata di se-lezione delle “M
odalità di funzionamento”.
– Ruotare l’encoder e selezionare una m
odalita. (es. “Inverno”)
EsciIndietro
InvernoOff
EstateAcqua calda
MAN 40°C
Riscaldamento
MAN 20.0°C
Funzione vacanze OFF
– Premere l’encoder
click per confermare la “M
odalità” evi-denziata ed entrare nelle “righe”
EsciIndietro
InvernoAcqua calda
MAN 40°C
Riscaldamento
MAN 20.0°C
Funzione vacanze OFF
– Ruotare l’encoder per selezionare “Riscaldam
ento”
19
IT– Prem
ere l’encoder click per conferm
are “Riscaldamento”
ed entrare nelle “righe”
EsciIndietro
Riscaldamento
Modo funzionamento
MANSet AUTO com
fort 20.0°C
Set AUTO ridotta 18.0°C
Set MAN 20.0°C
Programm
az. oraria [...]
Modo funzionamento
– Premere l’encoder
click per confermare la “Riga” eviden-
ziata ed entrare nell’area modificabile
EsciIndietro
Riscaldamento
Modo funzionamento
MANSet AUTO com
fort 20.0°C
Set AUTO ridotta 18.0°C
Set MAN 20.0°C
Programm
az. oraria [...]
MAN
– Ruotare l’encoder per m
odificare il “dato/valore”, nel cam
po consentito (es. MAN
- AUTO - OFF)
– Premere l’encoder
click per confermare l’eventuale m
o-difica effettuata e ritornare alla riga “M
odo funzionamento”
– Ruotare l’encoder per selezionare un’altra “riga“ (es.
Programm
az. oraria)
EsciIndietro
Riscaldamento
Modo funzionamento
MANSet AUTO com
fort 20.0°C
Set AUTO ridotta 18.0°C
Set MAN 20.0°C
Programm
az. oraria [...]
Programm
az. oraria
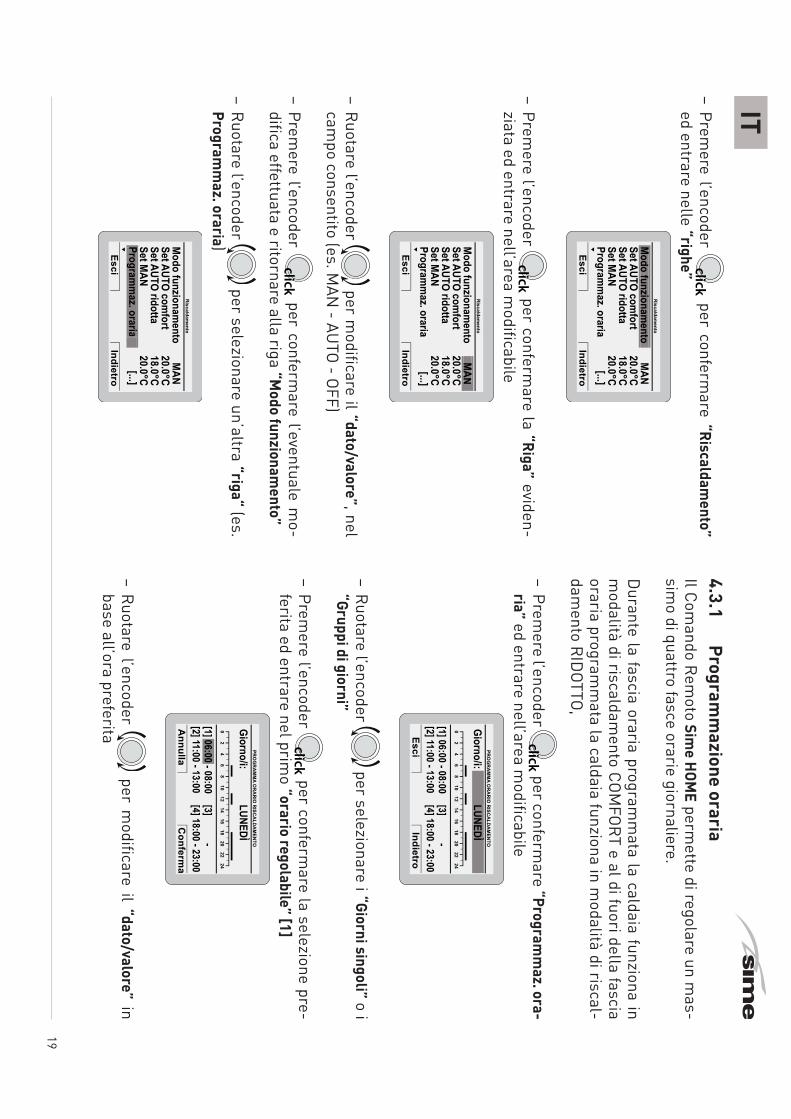
4.3.1 Program
mazione oraria
Il Comando Rem
oto Sime HOM
E permette di regolare un m
as-sim
o di quattro fasce orarie giornaliere.
Durante la fascia oraria program
mata la caldaia funziona in
modalità di riscaldam
ento COMFORT e al di fuori della fascia
oraria programm
ata la caldaia funziona in modalità di riscal-
damento RID
OTTO,
– Premere l’encoder
click per confermare “Program
maz. ora-
ria” ed entrare nell’area modificabile
EsciIndietro
PROG
RAMM
A ORARIO
RISCALDAMENTO
02
46
810
1214
1618
2022
24
Giorno/i:
[1] 06:00 - 08:00[2] 11:00 - 13:00
[3] -[4] 18:00 - 23:00
LUNEDÌLUNEDÌ
– Ruotare l’encoder per selezionare i “Giorni singoli” o i
“Gruppi di giorni”
– Premere l’encoder
click per confermare la selezione pre-
ferita ed entrare nel primo “orario regolabile” [1]
Annulla
Conferm
a
PROG
RAMM
A ORARIO
RISCALDAMENTO
02
46
810
1214
1618
2022
24
Giorno/i:
[1] 06:00 - 08:00[2] 11:00 - 13:00
[3] -[4] 18:00 - 23:00
LUNEDÌ
06:00
– Ruotare l’encoder per m
odificare il “dato/valore” in base all’ora preferita

20
IT– Prem
ere l’encoder click per conferm
are la modifica e pas-
sare al “dato/valore” successivo [2]
Annulla
Conferm
a
PROG
RAMM
A ORARIO
RISCALDAMENTO
02
46
810
1214
1618
2022
24
Giorno/i:
[1] 06:00 - 08:00[2] 11:00 - 13:00
[3] -[4] 18:00 - 23:00
LUNEDÌ
08:00
– Continuare nello stesso modo fino al term
ine delle modifi-
che necessarie per ogni giorno della settimana o per i grup-
pi di giorni.
NOTA: Il modo di operare è CIRCOLARE (a “carosello”) quindi
si procede SEMPRE IN
AVANTI anche in caso di errore.
m
AVVERTENZA
Nel caso N
ON si desideri utilizzare una fascia ora-
ria, è necessario impostare gli orari di inizio e fine,
di tale fascia, allo stesso valore (es. [3] 14:00-14:00).
– A modifiche ultim
ate premere il tasto
Conferma
per ritor-nare ai “Giorni singoli” o ai “Gruppi di giorni”
– Premere il tasto
Esci per ritornare alla“videata prin-
cipale”.
Gi 20 M
ar 2014Zona 1
10:30
Inverno manuale - set 20.0°C
Menu
Modo
4.3.2 Funzione vacanze
Questa funzione permette di disattivare sia il riscaldam
ento, sia la produzione di acqua sanitaria per il periodo di vacan-za “im
postato e attivato” durante il quale potrà essere attiva la funzione antigelo (se im
postata).Per im
postare la funzione vacanze, dalla “videata principale”: – Prem
ere il tasto M
odo.
– Premere l’encoder
click per confermare una m
odalità di funzionam
ento Estate o Inverno.
– Ruotare l’encoder per selezionare “Funzione vacanze”
EsciIndietro
InvernoOff
EstateAcqua calda
MAN 40°C
Funzione vacanze OFF
– Premere l’encoder
click per confermare “Funzione vacan-
ze” ed entrare nell’area modificabile
Annulla
Conferm
a
PROG
RAMM
A VACANZE
Acqua calda OFF - Risc. O
FF (antigelo attivo)
GIO
RNOM
ESEANNO
ORA
Inizio:05
022014
15 : 0020
022014
15 : 00Fine:Attiva vacanze:
NO
05
– Ruotare l’encoder per m
odificare il “dato/valore” che si evidenzierà.
21
IT– Prem
ere l’encoder click per conferm
are la modifica e pas-
sare al “dato/valore” successivo
Annulla
Conferm
a
PROG
RAMM
A VACANZE
Acqua calda OFF - Risc. O
FF (antigelo attivo)
GIO
RNOM
ESEANNO
ORA
Inizio:05
022014
15 : 0020
022014
15 : 00Fine:Attiva vacanze:
NO
05
– Ruotare l’encoder per m
odificare il “dato/valore” in base alla data di inizio della vacanza
– Premere l’encoder
click per confermare la m
odifica e pas-sare al “dato/valore” successivo
– Continuare nello stesso modo fino al term
ine delle modifi-
che necessarie
NOTA: Il modo di operare è CIRCOLARE (a “carosello”) quindi
si procede SEMPRE IN
AVANTI anche in caso di errore.
– A modifiche ultim
ate premere il tasto
Conferma
per ritor-nare alla voce “Funzione vacanze”
– Premere il tasto
Esci per ritornare alla“videata prin-
cipale”.
Gi 20 M
ar 2014Zona 1
10:30
Inverno manuale - set 20.0°C
Menu
Modo
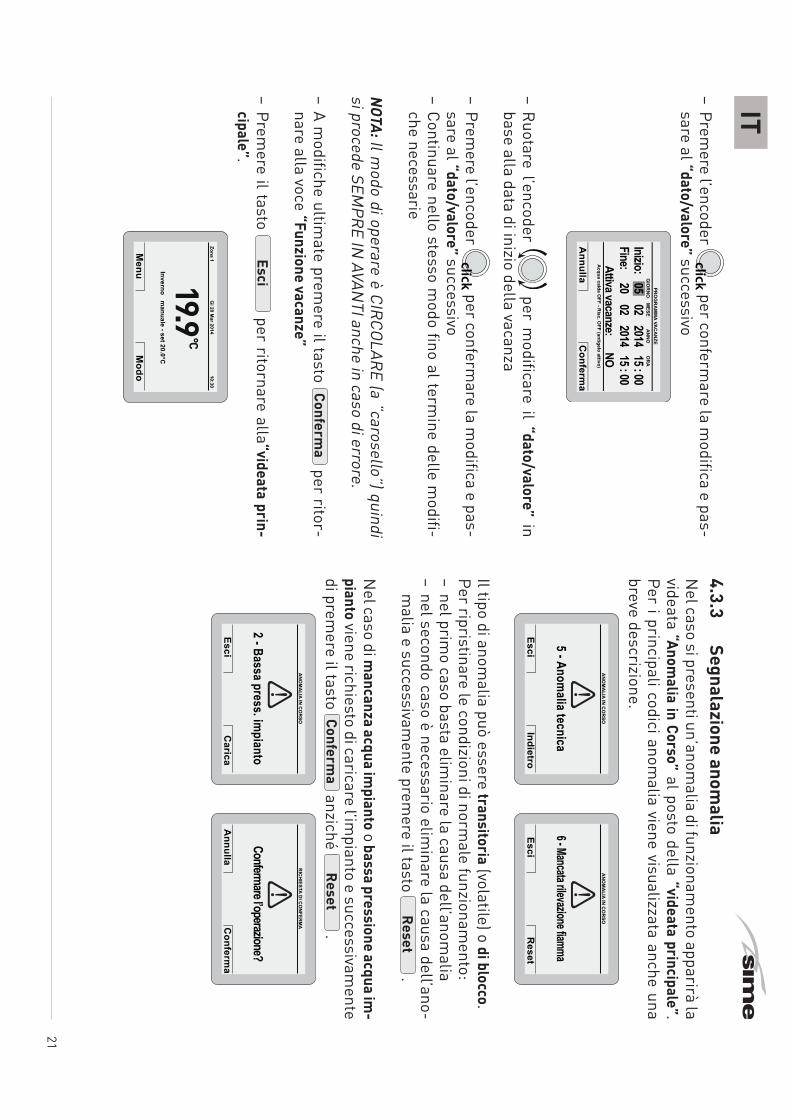
4.3.3 Segnalazione anom
aliaN
el caso si presenti un’anomalia di funzionam
ento apparirà la videata “Anom
alia in Corso” al posto della “videata principale”. Per i principali codici anom
alia viene visualizzata anche una breve descrizione.
EsciIndietro
ANOM
ALIA IN CORSO
5 - Anomalia tecnica
EsciR
eset
ANOM
ALIA IN CORSO
6 - Mancata rilevazione fiamma
Il tipo di anomalia può essere transitoria (volatile) o di blocco.
Per ripristinare le condizioni di normale funzionam
ento: – nel prim
o caso basta eliminare la causa dell’anom
alia– nel secondo caso è necessario elim
inare la causa dell’ano-m
alia e successivamente prem
ere il tasto Reset
.
Nel caso di m
ancanza acqua impianto o bassa pressione acqua im
-pianto viene richiesto di caricare l’im
pianto e successivamente
di premere il tasto Conferm
a anziché
Reset .
Annulla
Conferm
a
RICHIESTA DI CONFERM
A
Confermare l’operazione?
EsciC
arica
ANOM
ALIA IN CORSO
2 - Bassa press. impianto
22
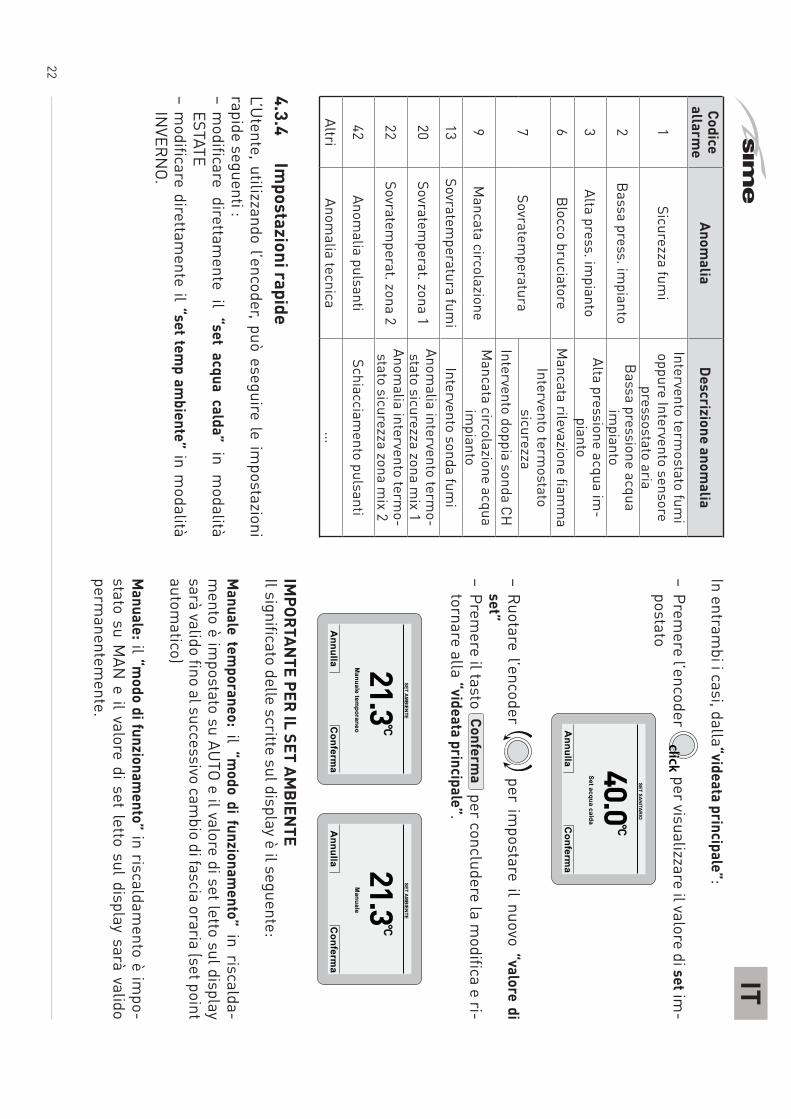
ITCodice
allarme
Anomalia
Descrizione anomalia
1Sicurezza fum
iIntervento term
ostato fumi
oppure Intervento sensore pressostato aria
2Bassa press. im
piantoBassa pressione acqua
impianto
3Alta press. im
piantoAlta pressione acqua im
-pianto
6Blocco bruciatore
Mancata rilevazione fiam
ma
7Sovratem
peraturaIntervento term
ostato sicurezza
Intervento doppia sonda CH
9M
ancata circolazioneM
ancata circolazione acqua im
pianto13
Sovratemperatura fum
iIntervento sonda fum
i
20Sovratem
perat. zona 1Anom
alia intervento termo-
stato sicurezza zona mix 1
22Sovratem
perat. zona 2Anom
alia intervento termo-
stato sicurezza zona mix 2
42Anom
alia pulsantiSchiacciam
ento pulsanti
AltriAnom
alia tecnica...
4.3.4 Im
postazioni rapideL’U
tente, utilizzando l’encoder, può eseguire le impostazioni
rapide seguenti :– m
odificare direttamente il “set acqua calda” in m
odalità ESTATE
– modificare direttam
ente il “set temp am
biente” in modalità
INVERN
O.
In entrambi i casi, dalla “videata principale”:
– Premere l’encoder
click per visualizzare il valore di set im-
postatoSET SANITARIO
Set acqua calda
Annulla
Conferm
a
40.0
– Ruotare l’encoder per im
postare il nuovo “valore di set”
– Premere il tasto Conferm
a per concludere la m
odifica e ri-tornare alla “videata principale”.
SET AMBIENTE
Manuale
Annulla
Conferm
a
21.3SET AM
BIENTE
Manuale tem
poraneo
Annulla
Conferm
a
21.3
IMPORTAN
TE PER IL SET AMBIEN
TEIl significato delle scritte sul display è il seguente:
Manuale tem
poraneo: il “modo di funzionam
ento” in riscalda-m
ento è impostato su AU
TO e il valore di set letto sul display sarà valido fino al successivo cam
bio di fascia oraria (set point autom
atico)
Manuale: il “m
odo di funzionamento” in riscaldam
ento è impo-
stato su MAN
e il valore di set letto sul display sarà valido perm
anentemente.

23
IT4.4
Navigazione da tasto M
ODO
click
Per “selezionare” righe o “modificare” valori
Per “confermare” le selezioni o le m
odifiche
(paragrafo 4.3.2 a pagina 20)
(paragrafo 4.3.2 a pagina 20)
(paragrafo 4.3.1 a pagina 19)
Modo: Inverno Progr. autom
atico - Set 18,0C
fino alle 11:30
Menu
Modo
Inverno
Acqua calda M
AN 50°CRiscaldam
ento M
AN 20.0°C_______________________________Funzione vacanze
OFF
Off
Acqua calda
Modo funzionam
ento M
ANSet acqua calda
50°C
Riscaldamento
Modo funzionam
ento M
ANSet AUTO com
fort 20.0°C
Set AUTO ridotta 18.0°C
Set MAN
20.0°C
Programm
az. oraria [...]
Set max m
andata 80°C
PROGRAMM
A ORARIO RISCALDAMENTO
Giorno/i: LUNEDI’
¬¬¬¬¬¬¬¬¬¬¬¬
¬¬¬¬¬¬¬¬
¬¬¬¬¬¬¬¬¬ ¬¬¬¬¬¬
0 2 4 6 8 10 12 14 16 18 20 22 24______________________________[1]04:00-08:00
[2]12:00-14:00[3]16:00-18:15
[4]20:30-22:30
PROGRAMM
A VACANZE
GIORNO MESE ANNO Ora
Inizio: 01
01 2014 07:00Fine:
08 01 2014 07:00
Attiva vacanze: NO
Acqua calda OFF - Risc. Off (antigelo attivo)
EstateInverno
Off
MODOEstate
Acqua calda M
AN 50°C_________________________________Funzione vacanze
OFF
Acqua calda
Modo funzionam
ento M
ANSet acqua calda
50°C
PROGRAMM
A VACANZE
GIORNO MESE ANNO Ora
Inizio: 01
01 2014 07:00Fine:
08 01 2014 07:00
Attiva vacanze: NO
Acqua calda OFF - Risc. Off (antigelo attivo)

24
ENRAN
GEM
ODELCODE
Sime H
OME
8092280
EC DECLARATION OF CON
FORMITY
In accordance
with
"Low
Voltage" D
irective 2006/95/EC,
"Electromagnetic Com
patibility" Directive 2004/108/EC, the
manufacturer Fonderie SIM
E S.p.A., via Garbo 27, 37045 Legnago (VR), DECLARES THAT the Rem
ote Control model Sim
e HOME
complies w
ith the Directives in question.
The Technical Manager
(Franco Macchi)
1312
SYMBOLS
a
DANGER
To indicate actions which, if not carried out correctly,
can result in injury of a general nature or may dam
-age or cause the appliance to m
alfunction; these actions therefore require particular caution and ad-equate preparation.
f
DANGER
To indicate actions which, if not carried out correctly,
could lead to injury of an electrical nature; these actions therefore require particular caution and ad-equate preparation.
d
IT IS FORBIDDENTo indicate actions w
hich MU
ST NOT BE carried out.
m
WARN
ING
To indicate particularly important and useful infor-
mation.
25
EN
1 SAFETY W
ARNIN
GS AND
REGULATION
S 26
1.1 W
arnings .....................................261.2
Restrictions ...................................26
2 IN
STALLATION
272.1
Receiving the product ...........................272.2
Dim
ensions and weight..........................27
2.3 Tem
peratures..................................272.4
Wall m
ounting .................................28
3 D
ESCRIPTION
303.1
Characteristics ................................303.2
Multifunction encoder...........................30
3.3 U
ser interface .................................31
4 U
SE 32
4.1 Start-up ......................................32
4.2 Settings from
the MEN
U button
...................324.2.1
GENERAL SETTIN
GS Menu .............
324.2.2
INFORM
ATION M
enu ..................35
4.2.3 TECH
NICAL M
enu.....................36
4.2.4 M
ENU
button for navigation tree.........38
4.2.5 Technical specifications
................39
4.3 Settings from
the MOD
E button...................40
4.3.1 Program
. time........................
414.3.2
Holiday function ......................
424.3.3
Fault warnings .......................
434.3.4
Quick settings........................
444.4
Navigating from
the MOD
E button.................45
INDEX
26
EN1
SAFETY WARN
INGS AN
D REGULATION
S
1.1 W
arnings
m
WARN
INGS
– Read this manual carefully before installing the
appliance. – The appliance is an integral part of the system
. Refer also to the docum
entation of the controlled boiler.
– Installation may only be carried out by Profession -
ally Qualified Personnel.– To ensure a correct reading of the average room
tem
perature, do not place the Remote Control
in direct sunlight or in the path of continuous draughts.
– The manufacturer is not responsible for any dam
-age to people, anim
als or objects resulting from
incorrect or improper installation or use of the
Remote Control.
1.2 Restrictions
d
IT IS FORBIDDEN– Install the Rem
ote Control near appliances which
emit electrom
agnetic radiation.– The Rem
ote Control is not to be used by children or unassisted disabled persons.
27
EN2
INSTALLATION
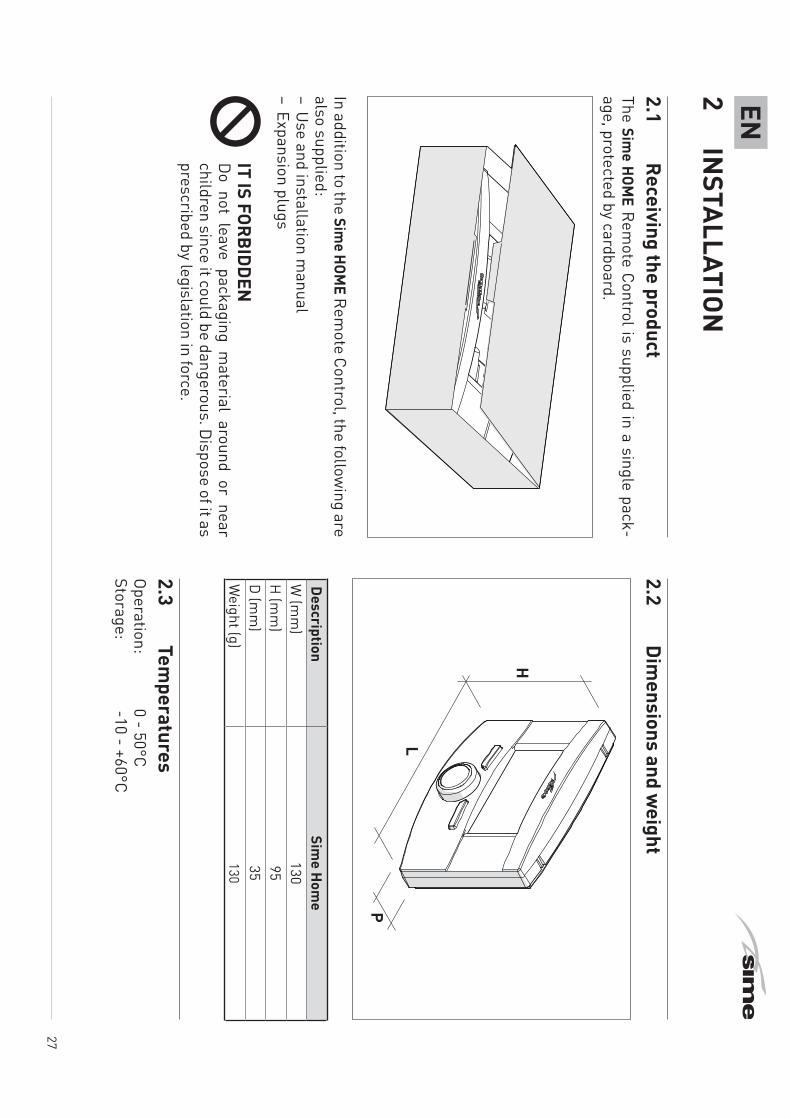
2.1 Receiving the product
The Sime HOM
E Remote Control is supplied in a single pack-
age, protected by cardboard.
In addition to the Sime HOM
E Remote Control, the follow
ing are also supplied:– U
se and installation manual
– Expansion plugs
d
IT IS FORBIDDEND
o not leave packaging material around or near
children since it could be dangerous. Dispose of it as
prescribed by legislation in force.
2.2 Dim
ensions and weight
L
P
H
DescriptionSim
e Hom
eW
(mm
)130
H (m
m)
95D
(mm
)35
Weight (g)
130
2.3 Tem
peraturesOperation:
0 - 50°C Storage:
-10 - +60°C
28
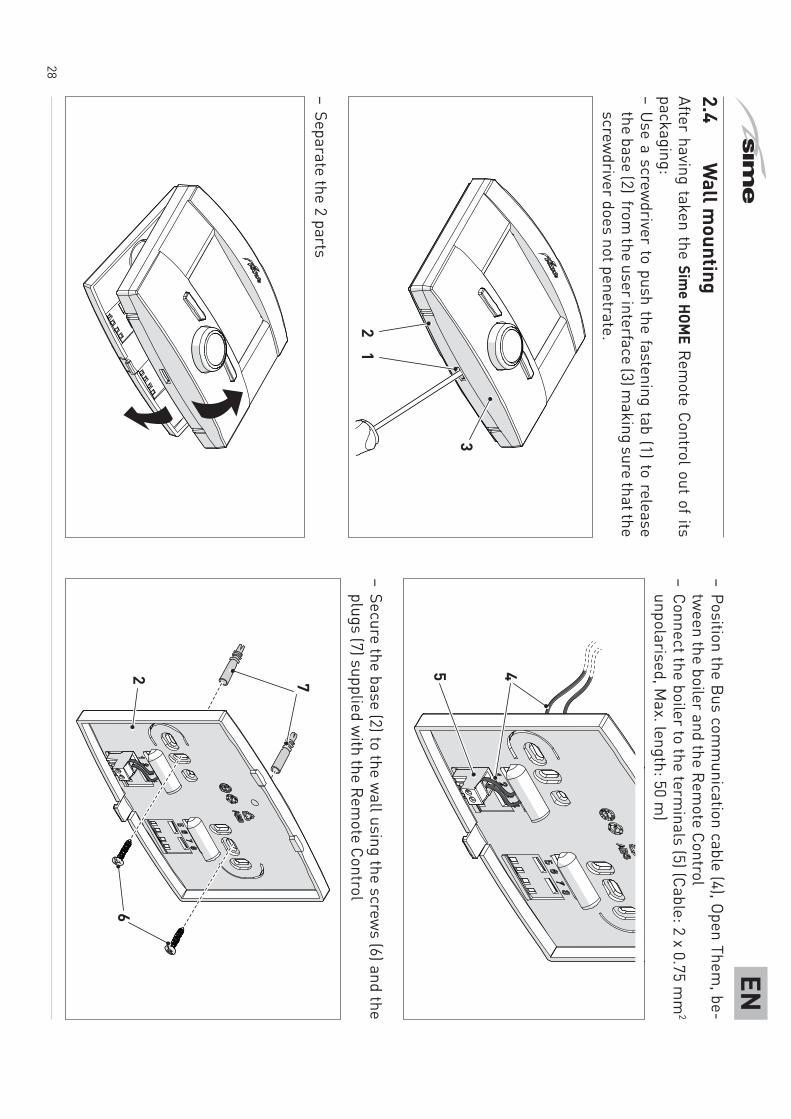
EN2.4
Wall m
ountingAfter having taken the Sim
e HOME Rem
ote Control out of its packaging: – U
se a screwdriver to push the fastening tab (1) to release
the base (2) from the user interface (3) m
aking sure that the screw
driver does not penetrate.
12
3
– Separate the 2 parts
– Position the Bus comm
unication cable (4), Open Them, be-
tween the boiler and the Rem
ote Control– Connect the boiler to the term
inals (5) (Cable: 2 x 0.75 mm
2 unpolarised, M
ax. length: 50 m)
45
– Secure the base (2) to the wall using the screw
s (6) and the plugs (7) supplied w
ith the Remote Control
26
7
29
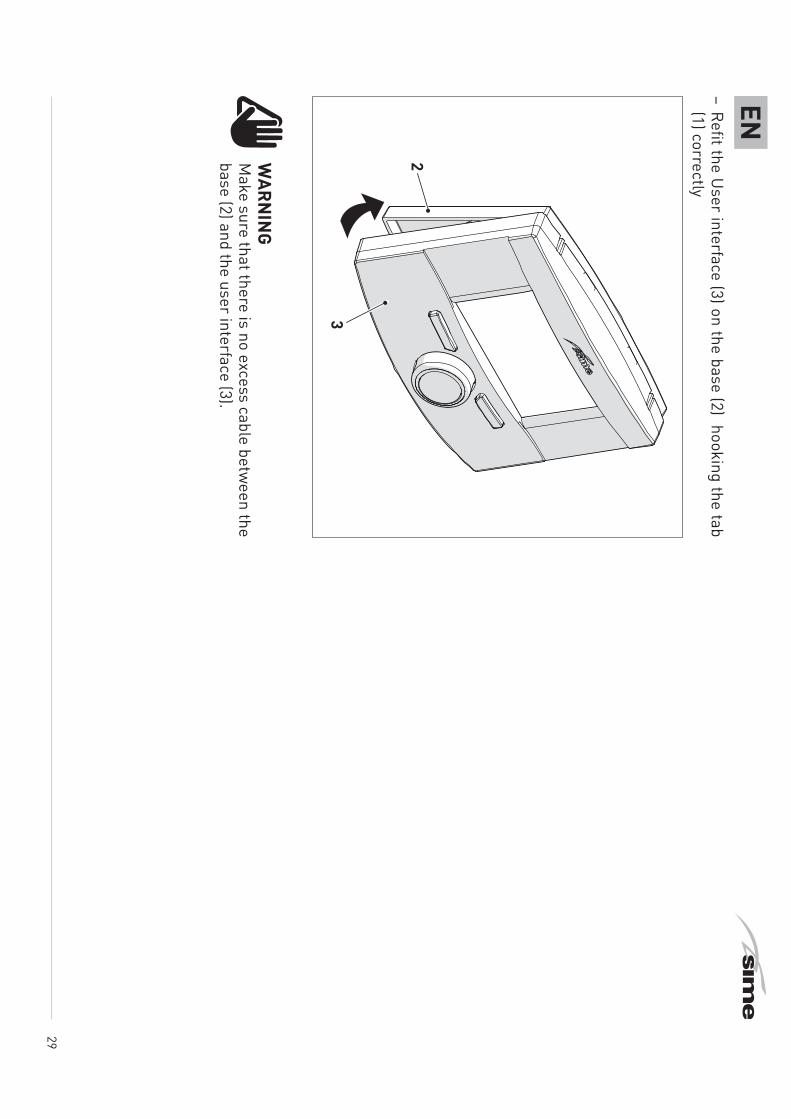
EN– Refit the U
ser interface (3) on the base (2) hooking the tab (1) correctly
3
2
m
WARN
ING
Make sure that there is no excess cable betw
een the base (2) and the user interface (3).
30
EN3
DESCRIPTION
3.1 Characteristics
The Sime HOM
E Remote Control is a functional yet elegant
complem
entary product for the system w
hich has been de-signed specifically to be used easily and intuitively as all op-erations w
hich can be carried out are indicated on a large dot-m
atrix display.The connection to and com
munication w
ith the boiler is by m
eans of the unpolarised bifilar bus and Open Therm stand-
ard protocol.
The main characteristics of the Sim
e HOME Rem
ote Control are:– Function m
ode selection (Summ
er/Winter/Off)
– Heating and D
HW
Temperature Adjustm
ent– W
eekly programm
ing for heating– Tem
perature adjustment (w
ith external sensor installed)– Boiler param
eter managem
ent (only for boilers from the
BRAVA range)– Anti-freeze tem
perature setting– Option of program
ming 4 daily tim
e bands– Option of system
managem
ent while on holiday
– Constant date and time display
– Constant room tem
perature display– D
isplay of system operation param
eters– D
isplay of alarm history and m
anagement of those present.
NB.If there is a pow
er failure, all settings are stored with the ex-
ception of the date and time w
hich are only stored for approxi-m
ately 24 hours.
3.2 M
ultifunction encoderThe encoder can be operated in the follow
ing ways.
Rotation, allowing the user to:
– scroll through the menus, subm
enus and the rows on the
screen– m
odify data or values in certain areas
Pressure, allowing the user to:
– confirm the selections m
ade– confirm
the modifications m
ade
31
EN3.3
User interface
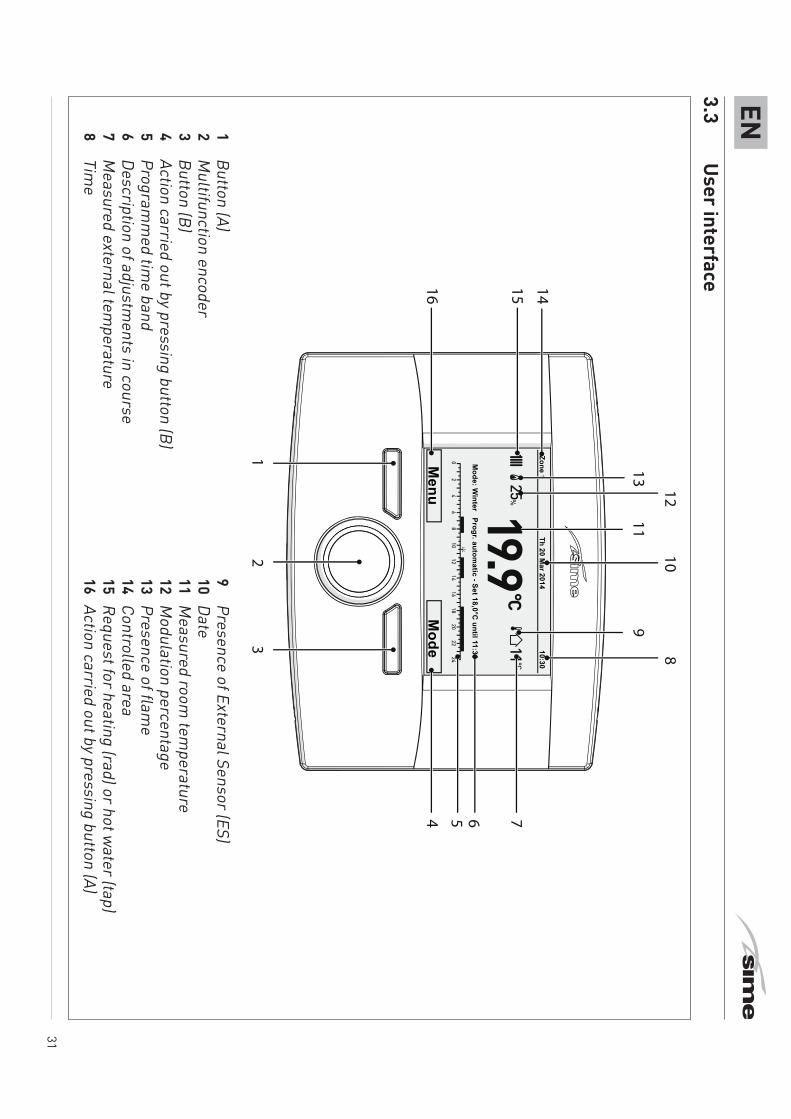
1 Button (A)
2 M
ultifunction encoder3
Button (B)4
Action carried out by pressing button (B)5
Programm
ed time band
6 Description of adjustm
ents in course7
Measured external tem
perature8
Time
9 Presence of External Sensor (ES)
10 Date11 M
easured room tem
perature12 M
odulation percentage13 Presence of flam
e14 Controlled area15 Request for heating (rad) or hot w
ater (tap)16 Action carried out by pressing button (A)
Th 20 Mar 2014
Zone 110:30
Mode: W
inter Progr. automatic - Set 18,0°C
until 11:30
Menu
Mode
12
3
16 15 14
13
12
119
108
4 5 6 7
32
EN4
USE
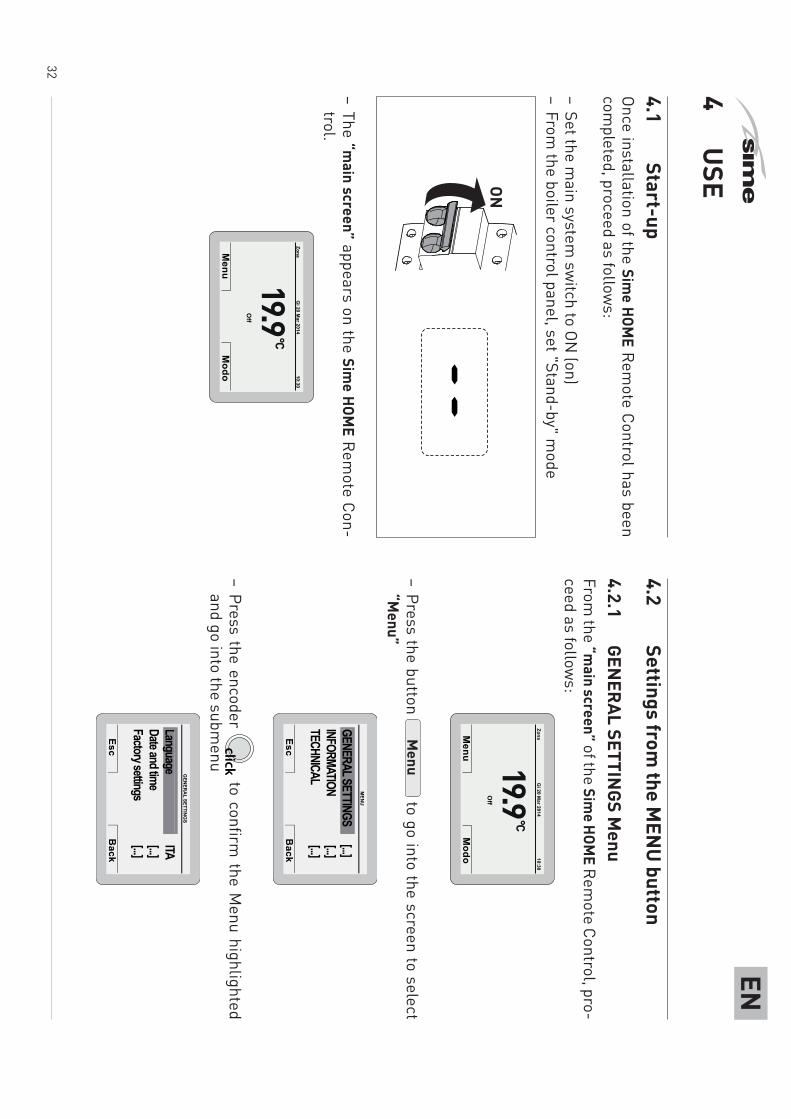
4.1 Start-up
Once installation of the Sime HOM
E Remote Control has been
completed, proceed as follow
s:
– Set the main system
switch to ON
(on)– From
the boiler control panel, set "Stand-by" mode
ON
– The “main screen” appears on the Sim
e HOME Rem
ote Con-trol.
Gi 20 M
ar 2014Zona
10:30
Off
Menu
Modo
4.2 Settings from
the MEN
U button
4.2.1 GEN
ERAL SETTINGS M
enuFrom
the “main screen” of the Sim
e HOME Rem
ote Control, pro-ceed as follow
s:
Gi 20 M
ar 2014Zona
10:30
Off
Menu
Modo
– Press the button M
enu to go into the screen to select
“Menu”
EscB
ack
GENERAL SETTINGS [...]
INFORMATION
[...]TECHNICAL
[...]
GENERAL SETTINGS M
ENU
– Press the encoder click to confirm
the Menu highlighted
and go into the submenu
EscB
ack
Language ITA
Date and time
[...]Factory settings
[...]
Language GENERAL SETTING
S
33
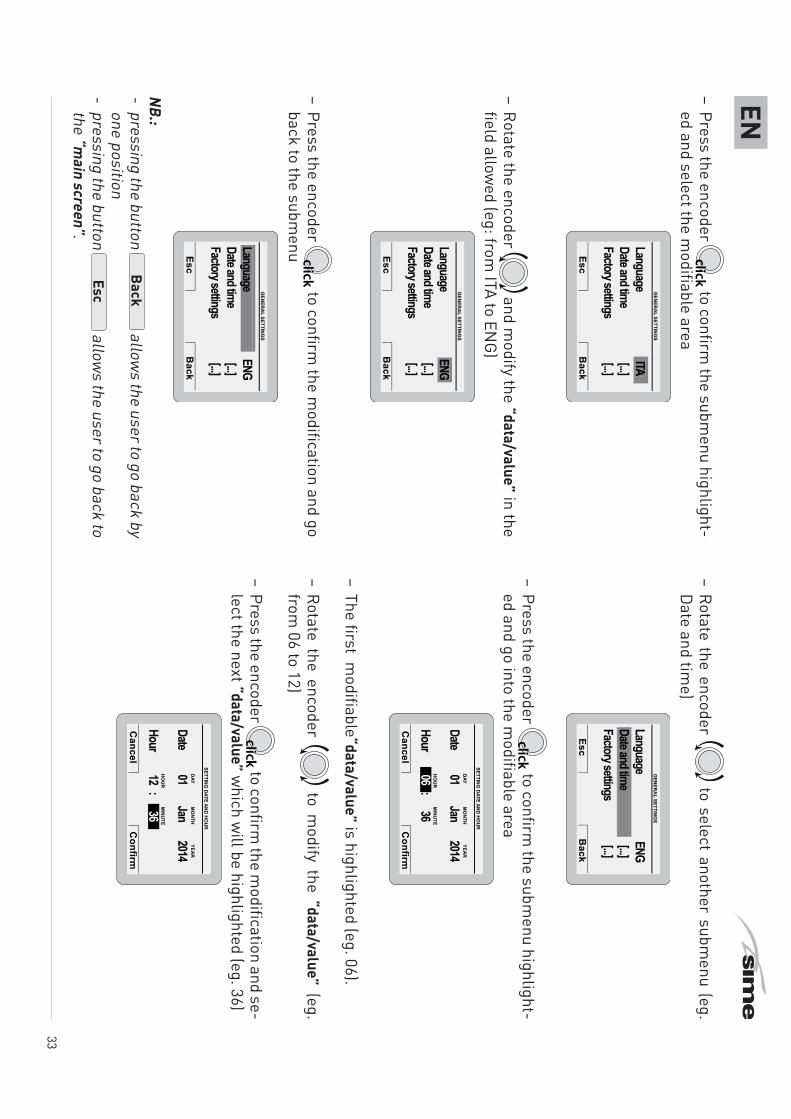
EN– Press the encoder
click to confirm the subm
enu highlight-ed and select the m
odifiable areaG
ENERAL SETTINGS
EscB
ack
Language ITA
Date and time
[...]Factory settings
[...]
ITA
– Rotate the encoder and m
odify the “data/value” in the field allow
ed (eg: from ITA to EN
G)G
ENERAL SETTINGS
EscB
ack
Language ENG
Date and time
[...]Factory settings
[...]
ENG
– Press the encoder click to confirm
the modification and go
back to the submenu
GENERAL SETTING
S
EscB
ack
Language ENG
Date and time
[...]Factory settings
[...]
Language
NB.: - pressing the button
Back allow
s the user to go back by one position
- pressing the button Esc
allows the user to go back to
the “main screen”.
– Rotate the encoder to select another subm
enu (eg. D
ate and time)
GENERAL SETTING
S
EscB
ack
Language ENG
Date and time
[...]Factory settings
[...]
Date and time
– Press the encoder click to confirm
the submenu highlight-
ed and go into the modifiable area
SETTING DATE AND HO
UR
DAYM
ONTH
HOUR
MINUTE
YEAR
Cancel
Confirm
Date 01 Jan 2014
Hour 06 : 36
– The first modifiable“data/value” is highlighted (eg. 06).
– Rotate the encoder to m
odify the “data/value” (eg. from
06 to 12)
– Press the encoder click to confirm
the modification and se-
lect the next “data/value” which w
ill be highlighted (eg. 36)SETTING
DATE AND HOUR
DAYM
ONTH
HOUR
MINUTE
YEAR
Cancel
Confirm
Date 01 Jan 2014
Hour 12 : 36
34
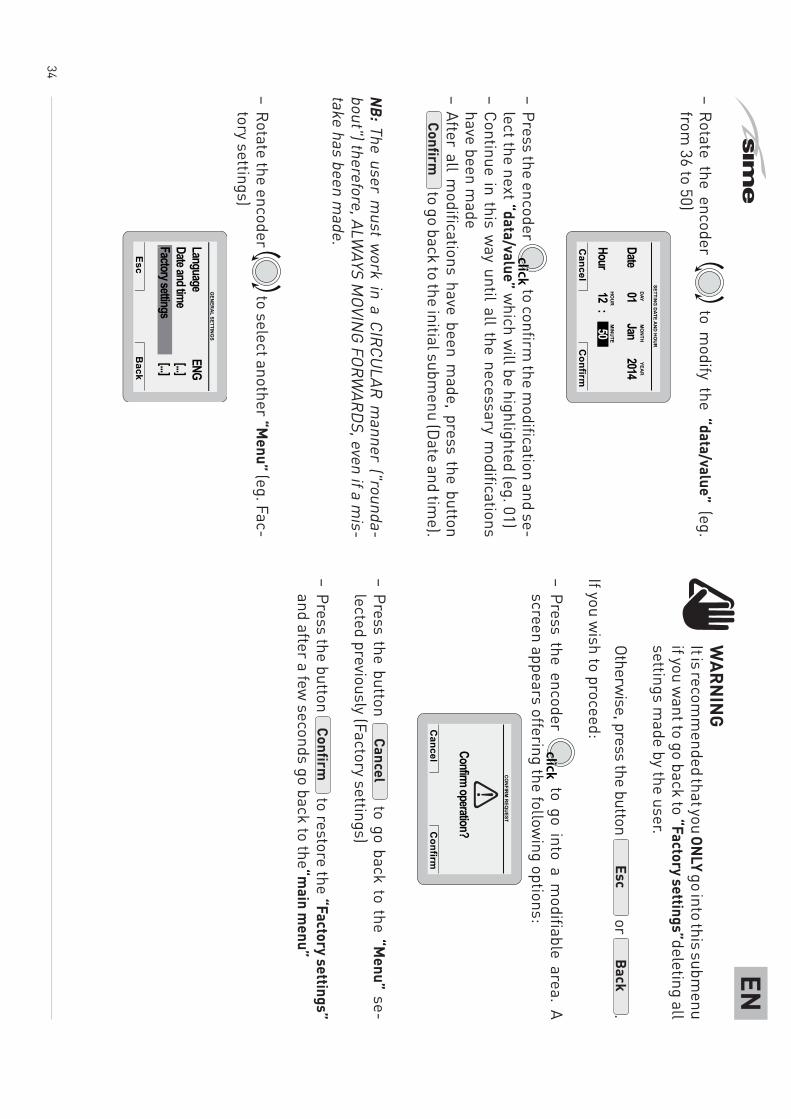
EN– Rotate the encoder
to modify the “data/value” (eg.
from 36 to 50)
SETTING DATE AND HO
UR
DAYM
ONTH
HOUR
MINUTE
YEAR
Cancel
Confirm
Date 01 Jan 2014
Hour 12 : 50
– Press the encoder click to confirm
the modification and se-
lect the next “data/value” which w
ill be highlighted (eg. 01)– Continue in this w
ay until all the necessary modifications
have been made
– After all modifications have been m
ade, press the button Confirm
to go back to the initial submenu (D
ate and time).
NB: The user must w
ork in a CIRCULAR m
anner ("rounda-bout") therefore, ALW
AYS MOVIN
G FORWARDS, even if a m
is-take has been m
ade.
– Rotate the encoder to select another “M
enu” (eg. Fac-tory settings)
GENERAL SETTING
S
EscB
ack
Language ENG
Date and time
[...]Factory settings
[...]
Factory settings
m
WARN
ING
It is recomm
ended that you ONLY go into this subm
enu if you w
ant to go back to “Factory settings”deleting all settings m
ade by the user.
Otherwise, press the button
Esc or
Back.
If you wish to proceed:
– Press the encoder click to go into a m
odifiable area. A screen appears offering the follow
ing options:
Cancel
Confirm
CONFIRM
REQUEST
Confirm operation?
– Press the button Cancel
to go back to the “Menu” se-
lected previously (Factory settings)
– Press the button Confirm
to restore the “Factory settings” and after a few
seconds go back to the “main m
enu”
35
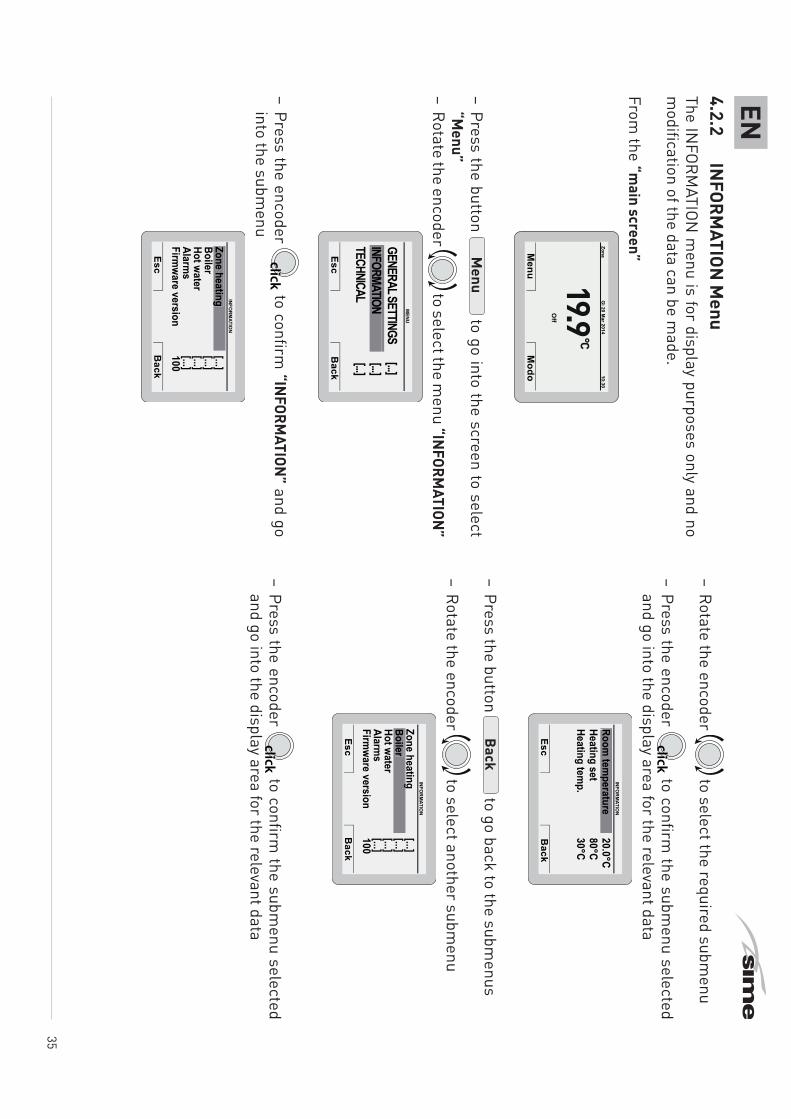
EN4.2.2
INFORM
ATION M
enuThe IN
FORMATION
menu is for display purposes only and no
modification of the data can be m
ade.
From the “m
ain screen”
Gi 20 M
ar 2014Zona
10:30
Off
Menu
Modo
– Press the button M
enu to go into the screen to select
“Menu”
– Rotate the encoder to select the m
enu “INFORM
ATION”
EscB
ack
GENERAL SETTINGS [...]
INFORMATION
[...]TECHNICAL
[...]
MENU
INFORMATION
– Press the encoder click to confirm
“INFORM
ATION” and go
into the submenu
EscB
ack
INFORM
ATION
Zone heating [...]
Boiler [...]
Hot water [...]
Alarms
[...]Firm
ware version 100
Zone heating
– Rotate the encoder to select the required subm
enu
– Press the encoder click to confirm
the submenu selected
and go into the display area for the relevant data
EscB
ack
INFORM
ATION
Room tem
perature 20.0°C
Heating set 80°C
Heating temp.
30°C
Room tem
perature
– Press the button Back
to go back to the submenus
– Rotate the encoder to select another subm
enu
EscB
ack
INFORM
ATION
Zone heating [...]
Boiler [...]
Hot water [...]
Alarms
[...]Firm
ware version 100
gBoiler
– Press the encoder click to confirm
the submenu selected
and go into the display area for the relevant data
36
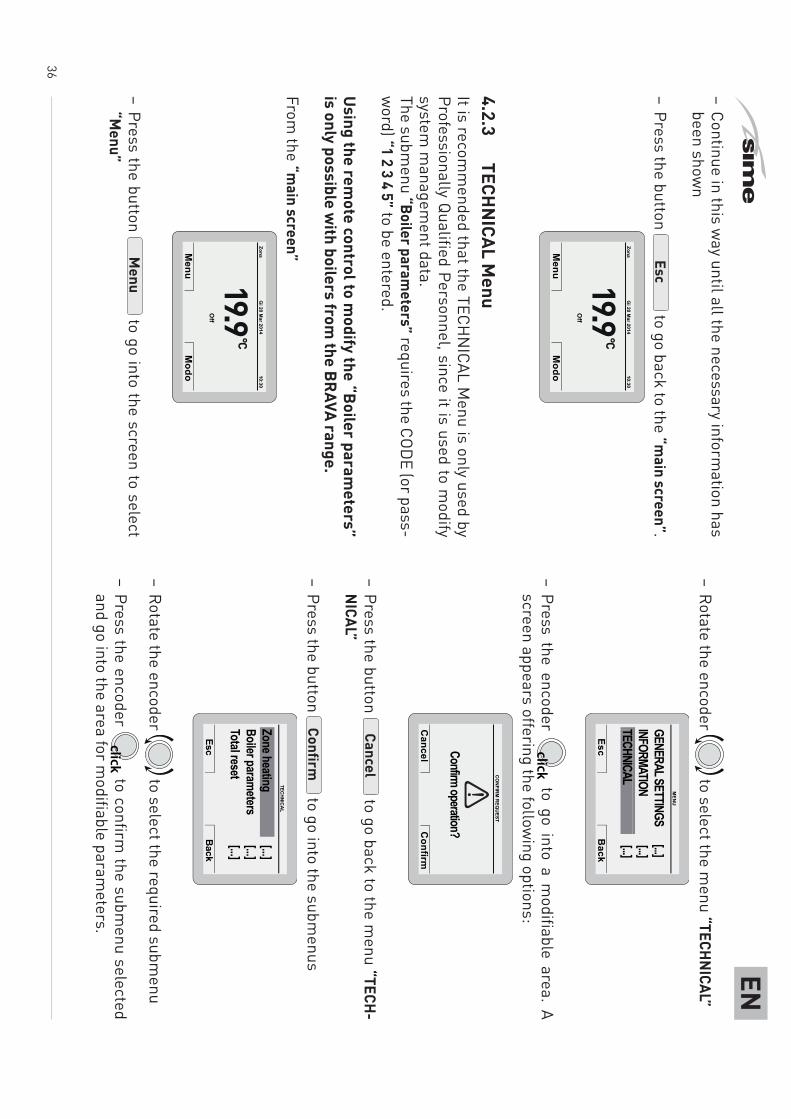
EN– Rotate the encoder
to select the menu “TECHN
ICAL”
EscB
ack
GENERAL SETTINGS [...]
INFORMATION
[...]TECHNICAL
[...]
MENU
TECHNICAL
– Press the encoder click to go into a m
odifiable area. A screen appears offering the follow
ing options:
Cancel
Confirm
CONFIRM
REQUEST
Confirm operation?
– Press the button Cancel
to go back to the menu “TECH-
NICAL”
– Press the button Confirm
to go into the submenus
TECHNICAL
EscBack
Zone heating
[...]Boiler parameters
[...]Total reset
[...]
– Rotate the encoder to select the required subm
enu
– Press the encoder click to confirm
the submenu selected
and go into the area for modifiable param
eters.
– Continue in this way until all the necessary inform
ation has been show
n
– Press the button Esc
to go back to the “main screen”.
Gi 20 M
ar 2014Zona
10:30
Off
Menu
Modo
4.2.3 TECH
NICAL M
enuIt is recom
mended that the TECH
NICAL M
enu is only used by Professionally Qualified Personnel, since it is used to m
odify system
managem
ent data.The subm
enu “Boiler parameters” requires the COD
E (or pass-w
ord) “1 2 3 4 5” to be entered.
Using the remote control to m
odify the “Boiler parameters”
is only possible with boilers from
the BRAVA range.
From the “m
ain screen”
Gi 20 M
ar 2014Zona
10:30
Off
Menu
Modo
– Press the button M
enu to go into the screen to select
“Menu”
37
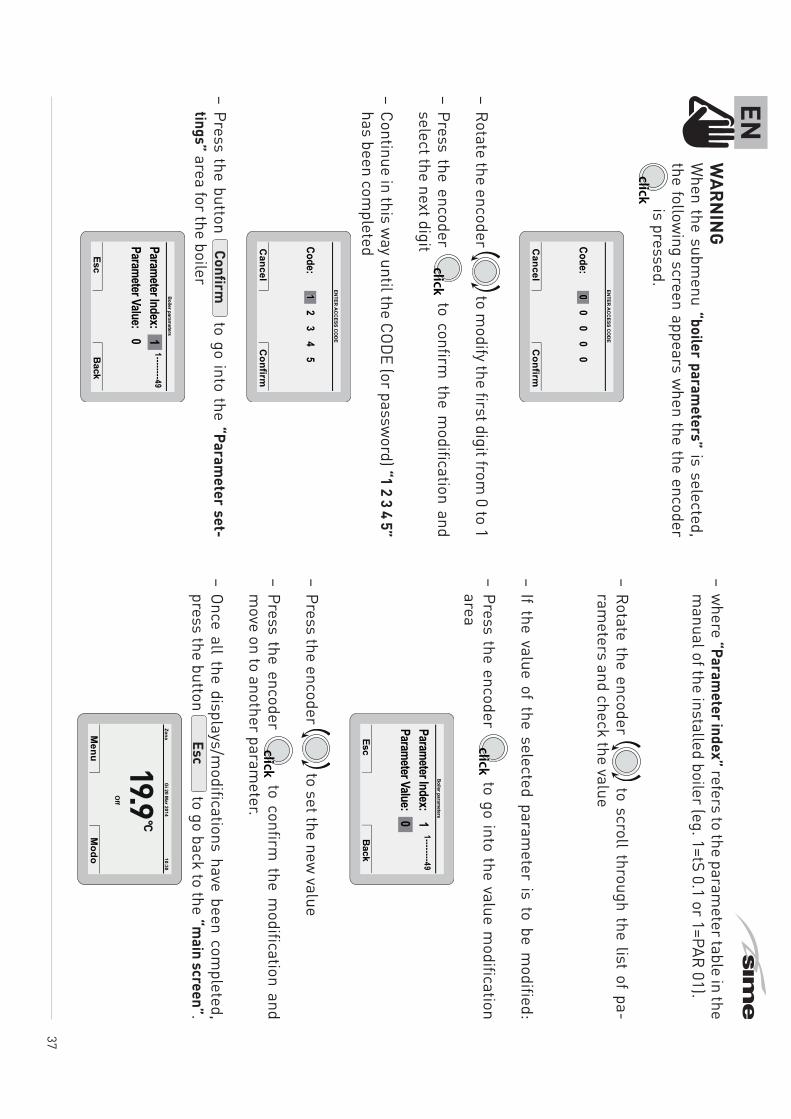
ENm
W
ARNIN
GW
hen the submenu “boiler param
eters” is selected, the follow
ing screen appears when the the encoder
click is pressed.
ENTER ACCESS CODE
Code:0
00
00
0
Cancel
Confirm
– Rotate the encoder to m
odify the first digit from 0 to 1
– Press the encoder click to confirm
the modification and
select the next digit
– Continue in this way until the COD
E (or password) “1 2 3 4 5”
has been completed
ENTER ACCESS CODE
Code:
Cancel
Confirm
12
34
51
– Press the button Confirm
to go into the “Parameter set-
tings” area for the boilerBoiler param
eters
EscBack
Parameter Index: 1Parameter Value: 0
1--------49
– where “Param
eter index” refers to the parameter table in the
manual of the installed boiler (eg. 1=tS 0.1 or 1=PAR 01).
– Rotate the encoder to scroll through the list of pa-
rameters and check the value
– If the value of the selected parameter is to be m
odified:
– Press the encoder click to go into the value m
odification area
Boiler parameters
EscBack
Parameter Index: 1Parameter Value: 0
1--------49
– Press the encoder to set the new
value
– Press the encoder click to confirm
the modification and
move on to another param
eter.
– Once all the displays/modifications have been com
pleted, press the button
Esc to go back to the “m
ain screen”.
Gi 20 M
ar 2014Zona
10:30
Off
Menu
Modo
38
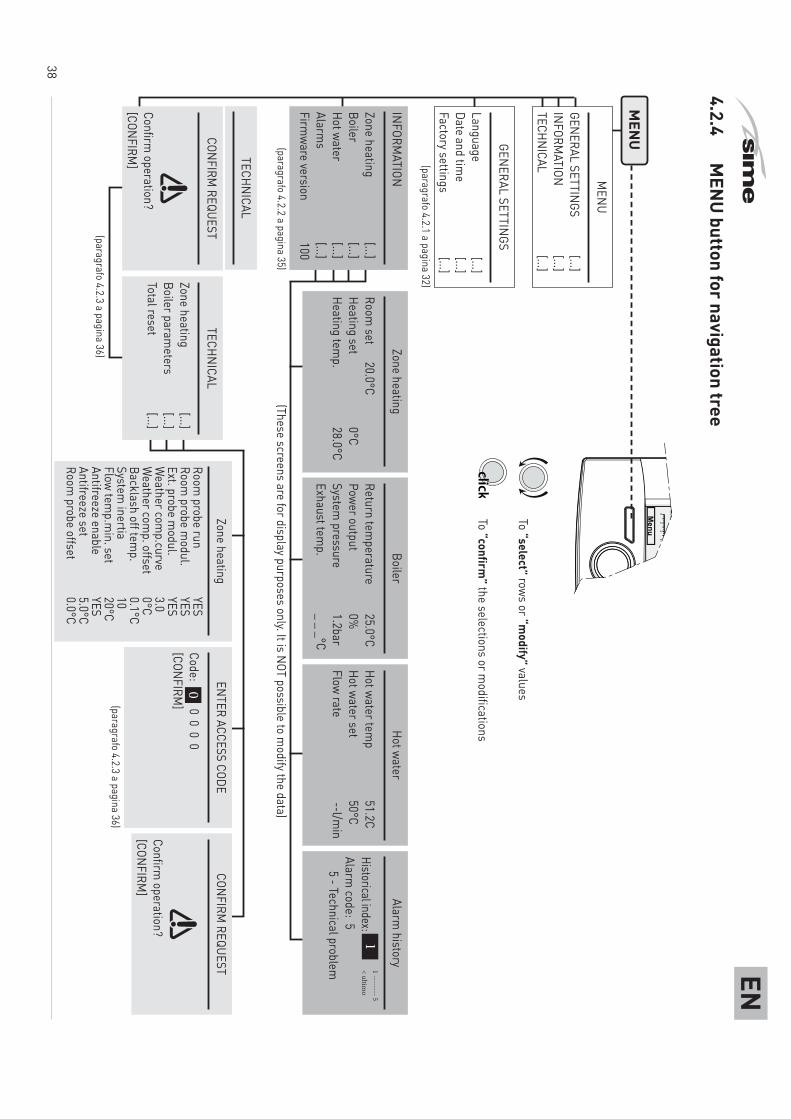
EN
click
To “select” rows or “modify” values
To “confirm” the selections or m
odifications
Zone heating
Room set
20.0°CHeating set
0°CHeating tem
p. 28.0°C
Boiler
Return temperature
25.0°CPower output
0%System
pressure 1.2bar
Exhaust temp.
_ _ _°C
Hot water
Hot water temp
51.2CHot water set
50°CFlow rate
--l/min
Alarm history
Historical index: 1
1 -------- 5< ultim
o
Alarm code: 5
5 - Technical problem
Modo: Inverno Progr. autom
atico - Set 18,0C
fino alle 11:30
Menu
Modo
INFORMATION
Zone heating [...]
Boiler
[...]Hot water
[...]
Alarms
[...]
Firmware version
100
GENERAL SETTINGS
Language [...]
Date and time
[...]Factory settings
[...]
MEN
U
ENTER ACCESS CODE
Code: 0 0 0 0 0
[CONFIRM]
Zone heating
Room probe run
YESRoom
probe modul.
YESExt. probe m
odul. YES
Weather com
p.curve 3.0
Weather com
p. offset 0°C
Backlash off temp.
0.1°CSystem
inertia 10
Flow temp.m
in. set 20°C
Antifreeze enable YES
Antifreeze set 5.0°C
Room probe offset
0.0°C
CONFIRM REQUEST
aConfirm
operation? [CONFIRM
]
CONFIRM REQUEST
aConfirm
operation? [CONFIRM
]
TECHNICAL
Zone heating [...]
Boiler parameters
[...]Total reset
[...]
(paragrafo 4.2.1 a pagina 32)
(paragrafo 4.2.2 a pagina 35)
(paragrafo 4.2.3 a pagina 36)(paragrafo 4.2.3 a pagina 36)
MENU
GENERAL SETTINGS [...]
INFORMATION
[...]TECHNICAL
[...]
(These screens are for display purposes only. It is NOT possible to modify the data)
TECHNICAL
4.2.4 M
ENU button for navigation tree
39
EN
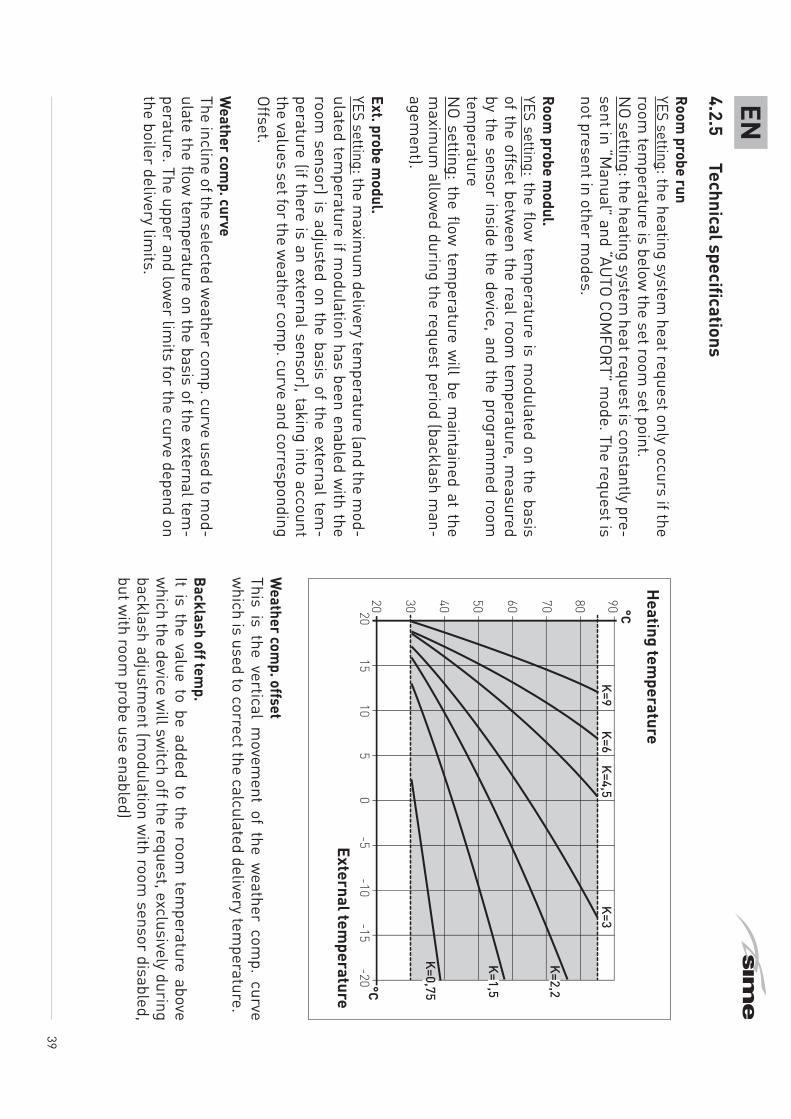
Room probe run
YES setting: the heating system heat request only occurs if the
room tem
perature is below the set room
set point.N
O setting: the heating system heat request is constantly pre-
sent in “Manual” and “AU
TO COMFORT” m
ode. The request is not present in other m
odes.
Room probe m
odul.YES setting: the flow
temperature is m
odulated on the basis of the offset betw
een the real room tem
perature, measured
by the sensor inside the device, and the programm
ed room
temperature
NO setting: the flow
temperature w
ill be maintained at the
maxim
um allow
ed during the request period (backlash man-
agement).
Ext. probe modul.
YES setting: the maxim
um delivery tem
perature (and the mod-
ulated temperature if m
odulation has been enabled with the
room sensor) is adjusted on the basis of the external tem
-perature (if there is an external sensor), taking into account the values set for the w
eather comp. curve and corresponding
Offset.
Weather com
p. curveThe incline of the selected w
eather comp. curve used to m
od-ulate the flow
temperature on the basis of the external tem
-perature. The upper and low
er limits for the curve depend on
the boiler delivery limits.
Heating tem
perature
2015
105
0-10
-15-5
-20
80 90706050403020 °C
°C
K=9K=6
K=4,5K=3
K=2,2
K=1,5
K=0,75
External temperature
Weather com
p. offsetThis is the vertical m
ovement of the w
eather comp. curve
which is used to correct the calculated delivery tem
perature.
Backlash off temp.
It is the value to be added to the room tem
perature above w
hich the device will sw
itch off the request, exclusively during backlash adjustm
ent (modulation w
ith room sensor disabled,
but with room
probe use enabled)
4.2.5 Technical specifications
40
ENSystem
inertiaThis is a param
eter which adjusts the reaction tim
e of the ad-justm
ent algorithm, to be associated w
ith inertia or with the
size and type of building and the heating system.
Flow Tem
p. min. set
It is the lower lim
it of the calculated flow tem
perature (use-ful in the case of low
efficiency systems w
ith low calculated
temperatures)
Antifreeze enableYES setting: enable the antifreeze protection programN
O setting: the heating will rem
ain off when in the function
mode OFF, SU
MM
ER and in periods of Reduced mode AU
TO if the room
sensor is disabled.
Antifreeze setThis is the room
temperature (antifreeze) below
which the de-
vice makes a heating request at the m
inimum
flow set. The
request remains active until the room
temperature has ex-
ceeded the "antifreeze temperature + 0.6°C”
Room probe offset
This is the value used to correct the room tem
perature read-ing by the sensor inside the device.
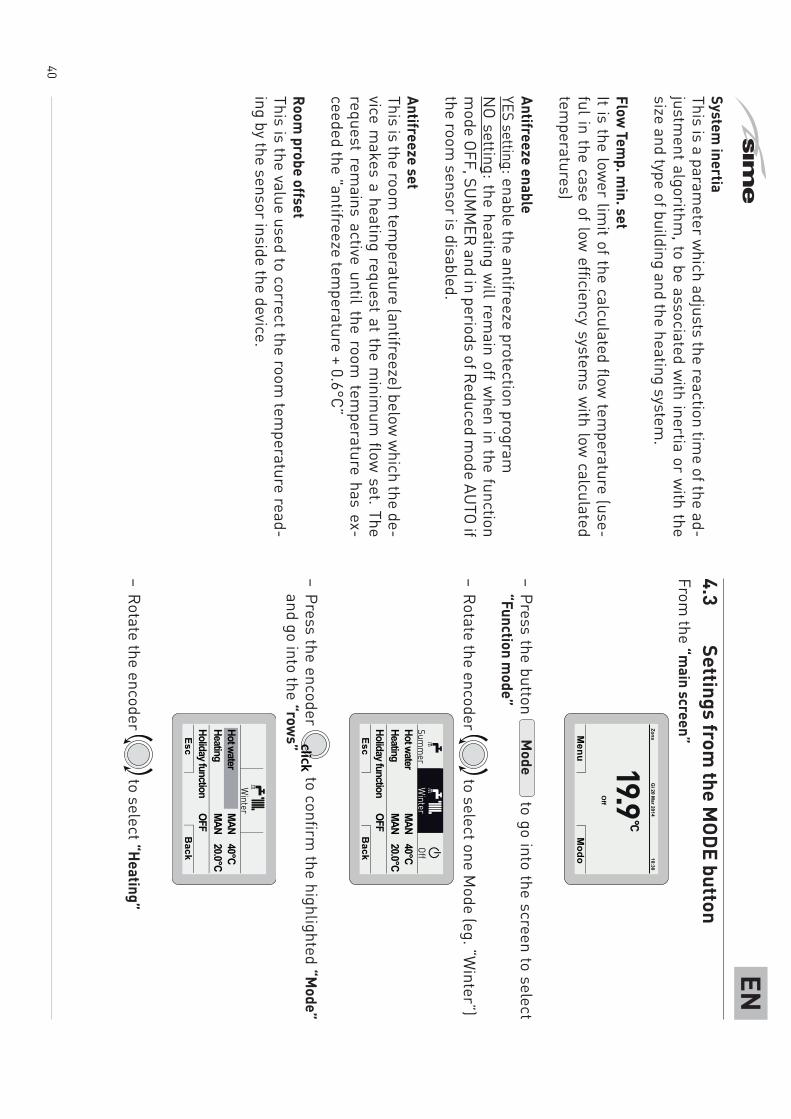
4.3 Settings from
the MODE button
From the “m
ain screen”
Gi 20 M
ar 2014Zona
10:30
Off
Menu
Modo
– Press the button M
ode to go into the screen to select
“Function mode”
– Rotate the encoder to select one M
ode (eg. “Winter”)
EscB
ack
Winter
OffSum
mer
Hot water MAN
40°CHeating
MAN 20.0°C
Holiday function OFF
– Press the encoder click to confirm
the highlighted “Mode”
and go into the “rows”Esc
Back
Winter
Hot water MAN
40°CHeating
MAN 20.0°C
Holiday function OFF
– Rotate the encoder to select “Heating”
41
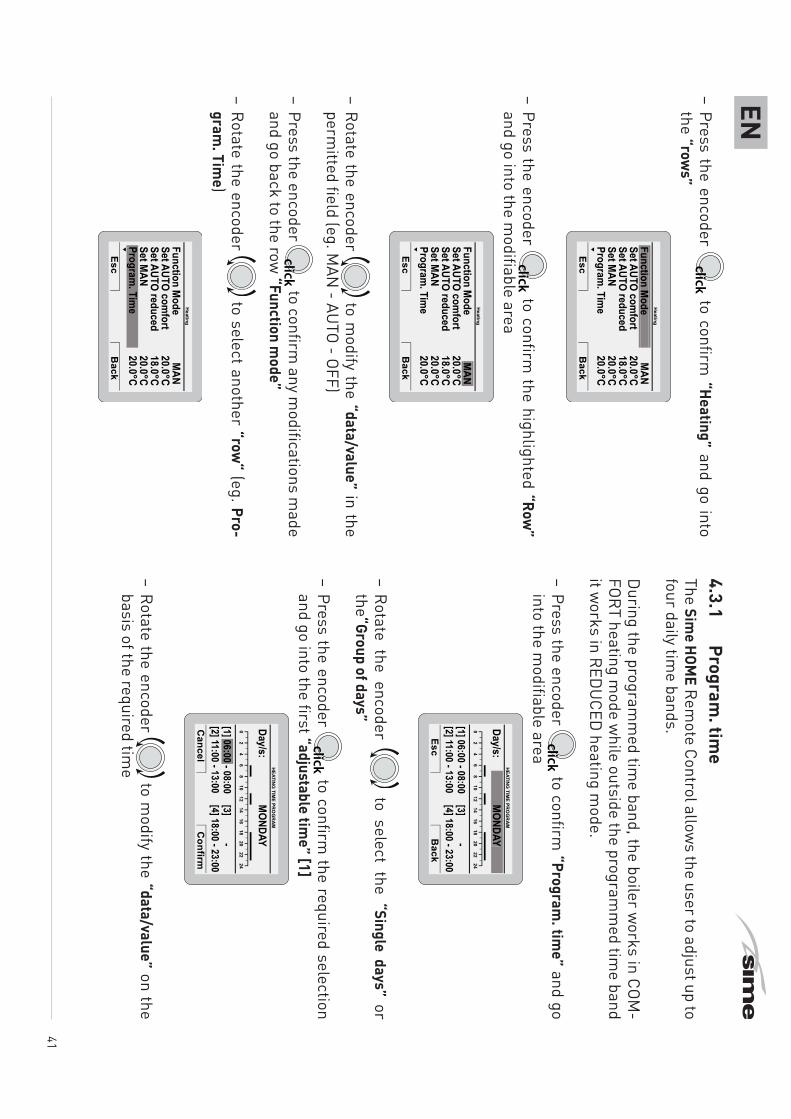
EN– Press the encoder
click to confirm “Heating” and go into
the “rows”
EscB
ack
Heating
Function Mode MAN
Set AUTO comfort
20.0°CSet AUTO reduced
18.0°CSet MAN
20.0°CProgram
. Time
20.0°C
Function Mode
– Press the encoder click to confirm
the highlighted “Row”
and go into the modifiable area
EscB
ack
Heating
Function Mode MAN
Set AUTO comfort
20.0°CSet AUTO reduced
18.0°CSet MAN
20.0°CProgram
. Time
20.0°C
MAN
– Rotate the encoder to m
odify the “data/value” in the perm
itted field (eg. MAN
- AUTO - OFF)
– Press the encoder click to confirm
any modifications m
ade and go back to the row
“Function mode”
– Rotate the encoder to select another “row
“ (eg. Pro-gram
. Time)
EscB
ack
Heating
Function Mode MAN
Set AUTO comfort
20.0°CSet AUTO reduced
18.0°CSet MAN
20.0°CProgram
. Time
20.0°CProgram
. Time
4.3.1 Program
. time
The Sime HOM
E Remote Control allow
s the user to adjust up to four daily tim
e bands.
During the program
med tim
e band, the boiler works in COM
-FORT heating m
ode while outside the program
med tim
e band it w
orks in REDU
CED heating m
ode.
– Press the encoder click to confirm
“Program. tim
e” and go into the m
odifiable area
EscB
ack
HEATING TIM
E PROG
RAM
02
46
810
1214
1618
2022
24
Day/s:
[1] 06:00 - 08:00[2] 11:00 - 13:00
[3] -[4] 18:00 - 23:00
MONDAY MONDAY
– Rotate the encoder to select the “Single days” or
the “Group of days”
– Press the encoder click to confirm
the required selection and go into the first “adjustable tim
e” [1]
HEATING TIM
E PROG
RAM
02
46
810
1214
1618
2022
24
Day/s:
[1] 06:00 - 08:00[2] 11:00 - 13:00
[3] -[4] 18:00 - 23:00
MONDAY
06:00
Cancel
Confirm
– Rotate the encoder to m
odify the “data/value” on the basis of the required tim
e

42
EN– Press the encoder
click to confirm the m
odification and m
ove to the next “data/value” [2]HEATING
TIME PRO
GRAM
02
46
810
1214
1618
2022
24
Day/s:
[1] 06:00 - 08:00[2] 11:00 - 13:00
[3] -[4] 18:00 - 23:00
MONDAY
Cancel
Confirm
08:00
– Continue in this way until all the necessary m
odifications have been m
ade for each day of the week or group of days.
NB: The user must w
ork in a CIRCULAR m
anner ("rounda-bout") therefore, ALW
AYS MOVIN
G FORWARDS, even if a m
is-take has been m
ade.
m
WARN
ING
If NO tim
e band is required, the start and stop times
of that band must be set to the sam
e value (eg. [3] 14:00-14:00).
– Once the modification has been m
ade, press the button Confirm
to go back to “Single days” or “Group of days”
– Press the button Esc
to go back to the “main screen”.
Th 20 Mar 2014
Zone 110:30
Winter m
anual - set 20.0°C
Menu
Mode
4.3.2 H
oliday functionThis function allow
s the user to deactivate both heating and hot w
ater production during a “set and activated” holiday pe-riod during w
hich the antifreeze function can be active (if set).To set the holiday function from
the “main screen”:
– Press the button M
ode.
– Press the encoder click to confirm
one of the function m
odes, Summ
er or Winter.
– Rotate the encoder to select “Holiday function”
EscB
ack
Winter
OffSum
mer
Hot water MAN
40°C
Holiday function OFF
– Press the encoder click to confirm
“Holiday function” and go into the m
odifiable area
Cancel
Confirm
HOLIDAY SCHEDULE
Hot water O
FF - Heat. OFF (nofrost active)
DAYM
ONTH
YEARHO
UR
Start:05
022014
15 : 0020
022014
15 : 00Stop:Enable holiday:
NO
05
– Rotate the encoder to m
odify the “data/value” which
will be highlighted.
43
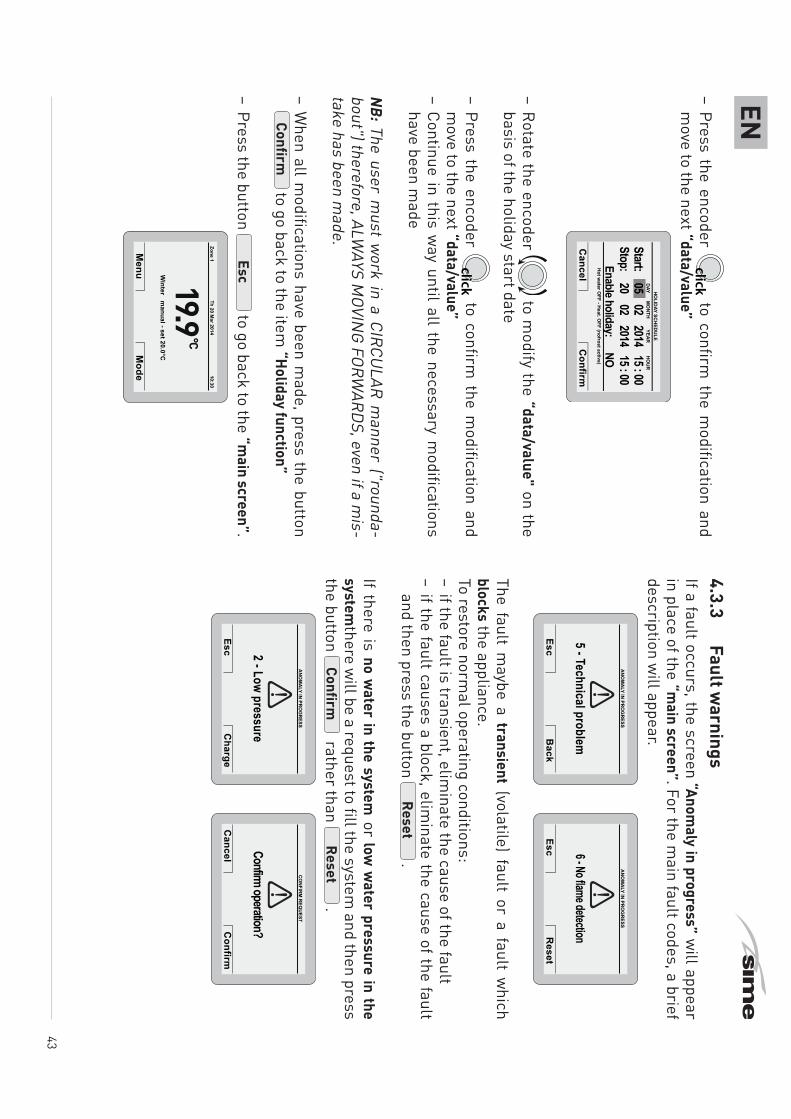
EN– Press the encoder
click to confirm the m
odification and m
ove to the next “data/value”
Cancel
Confirm
HOLIDAY SCHEDULE
Hot water O
FF - Heat. OFF (nofrost active)
DAYM
ONTH
YEARHO
UR
Start:05
022014
15 : 0020
022014
15 : 00Stop:Enable holiday:
NO
05
– Rotate the encoder to m
odify the “data/value" on the basis of the holiday start date
– Press the encoder click to confirm
the modification and
move to the next “data/value”
– Continue in this way until all the necessary m
odifications have been m
ade
NB: The user must w
ork in a CIRCULAR m
anner ("rounda-bout") therefore, ALW
AYS MOVIN
G FORWARDS, even if a m
is-take has been m
ade.
– When all m
odifications have been made, press the button
Confirm to go back to the item
“Holiday function”
– Press the button Esc
to go back to the “main screen”.
Th 20 Mar 2014
Zone 110:30
Winter m
anual - set 20.0°C
Menu
Mode
4.3.3 Fault w
arningsIf a fault occurs, the screen “Anom
aly in progress” will appear
in place of the “main screen”. For the m
ain fault codes, a brief description w
ill appear.
EscB
ack
ANOM
ALY IN PROG
RESS
5 - Technical problem
EscR
eset
ANOM
ALY IN PROG
RESS
6 - No flame detection
The fault maybe a transient (volatile) fault or a fault w
hich blocks the appliance.To restore norm
al operating conditions: – if the fault is transient, elim
inate the cause of the fault– if the fault causes a block, elim
inate the cause of the fault and then press the button
Reset .
If there is no water in the system
or low w
ater pressure in the system
there will be a request to fill the system
and then press the button
Confirm rather than
Reset .
Cancel
Confirm
CONFIRM
REQUEST
Confirm operation?
EscC
harge
ANOM
ALY IN PROG
RESS
2 - Low pressure

44
ENAlarm
code
FaultDescription of the fault
1Sm
oke safetySm
oke thermostat interven-
tion Air pressure switch
sensor intervention
2Low
pressureLow
water pressure in
system
3H
igh pressureH
igh water pressure in system
6Burner block
No flam
e detection
7Over tem
peratureSafety therm
ostat intervention
CH dual sensor intervention
9Circulation Failure
No w
ater circulating in the system
13Sm
oke over temperature
Smoke probe intervention
20Zone 1 over tem
peratureFault in zona m
ix 1 safety therm
ostat intervention
22Zone 2 over tem
peratureFault in zone m
ix 2 safety therm
ostat intervention
42Button fault
Buttons compressed
OtherTechnical problem
...
4.3.4 Quick settings
Using the encoder, the user can carry out the follow
ing quick settings:– m
odify the “set hot water” directly in SU
MM
ERmode
– modify the “set room
temperature” directly in W
INTER m
ode.
In both cases, from the“m
ain screen”:
– Press the encoder click to display the set value
HOT W
ATER SET
Set hot water
Cancel
Confirm
40.0
– Rotate the encoder to set the new
“set value”– Press the button
Confirm to com
plete the modification
and return to the “main screen”.
ROO
M SET
Manual
Cancel
Confirm
21.3RO
OM
SET
Manual tem
porary
Cancel
Confirm
21.3
IMPORTAN
T INFORM
ATION FOR TH
E ROOM SET
The meaning of the w
ords on the display are as follows:
Manual tem
porary: the “function mode” in heating is set to AU
TO and the value of the set read on the display w
ill be valid until the next tim
e band change (automatic set point)
Manual: the “function m
ode” in heating is set to MAN
and the value of the set read on the display w
ill be permanently valid
45
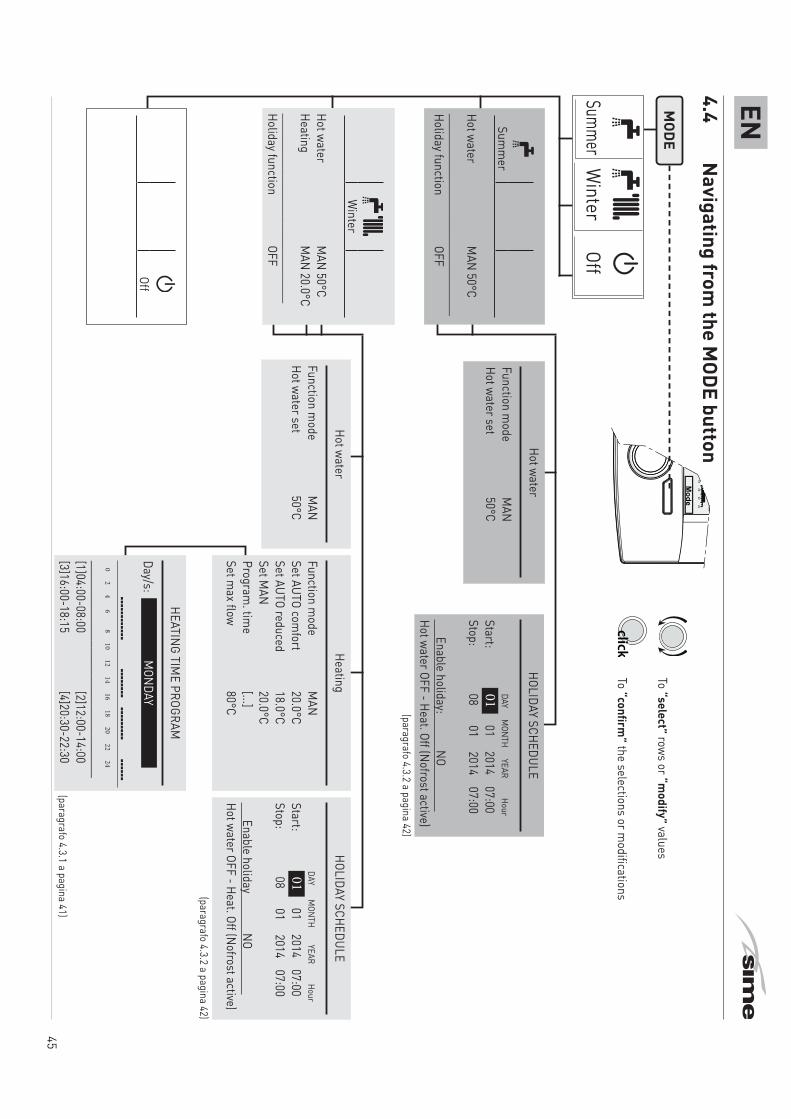
EN4.4
Navigating from
the MODE button
click
To “select” rows or “modify” values
To “confirm” the selections or m
odifications
(paragrafo 4.3.2 a pagina 42)
(paragrafo 4.3.2 a pagina 42)
(paragrafo 4.3.1 a pagina 41)
Modo: Inverno Progr. autom
atico - Set 18,0C
fino alle 11:30
Menu
Mode
Winter
Hot water M
AN 50°CHeating
MAN 20.0°C
_______________________________Holiday function
OFF
Off
Hot water
Function mode
MAN
Hot water set 50°C
Heating
Function mode
MAN
Set AUTO comfort
20.0°CSet AUTO reduced
18.0°CSet M
AN
20.0°CProgram
. time
[...]Set m
ax flow 80°C
HEATING TIME PROGRAM
Day/s: M
ONDAY
¬¬¬¬¬¬¬¬¬¬¬¬
¬¬¬¬¬¬¬¬
¬¬¬¬¬¬¬¬¬ ¬¬¬¬¬¬
0 2 4 6 8 10 12 14 16 18 20 22 24______________________________[1]04:00-08:00
[2]12:00-14:00[3]16:00-18:15
[4]20:30-22:30
HOLIDAY SCHEDULE
DAY MONTH YEAR Hour
Start: 01
01 2014 07:00Stop:
08 01 2014 07:00
Enable holiday NO
Hot water OFF - Heat. Off (Nofrost active)
SummerW
interOff
MODE
Summ
er
Hot water M
AN 50°C_________________________________Holiday function
OFF
Hot water
Function mode
MAN
Hot water set 50°C
HOLIDAY SCHEDULE
DAY MONTH YEAR Hour
Start: 01
01 2014 07:00Stop:
08 01 2014 07:00
Enable holiday: NO
Hot water OFF - Heat. Off (Nofrost active)
90
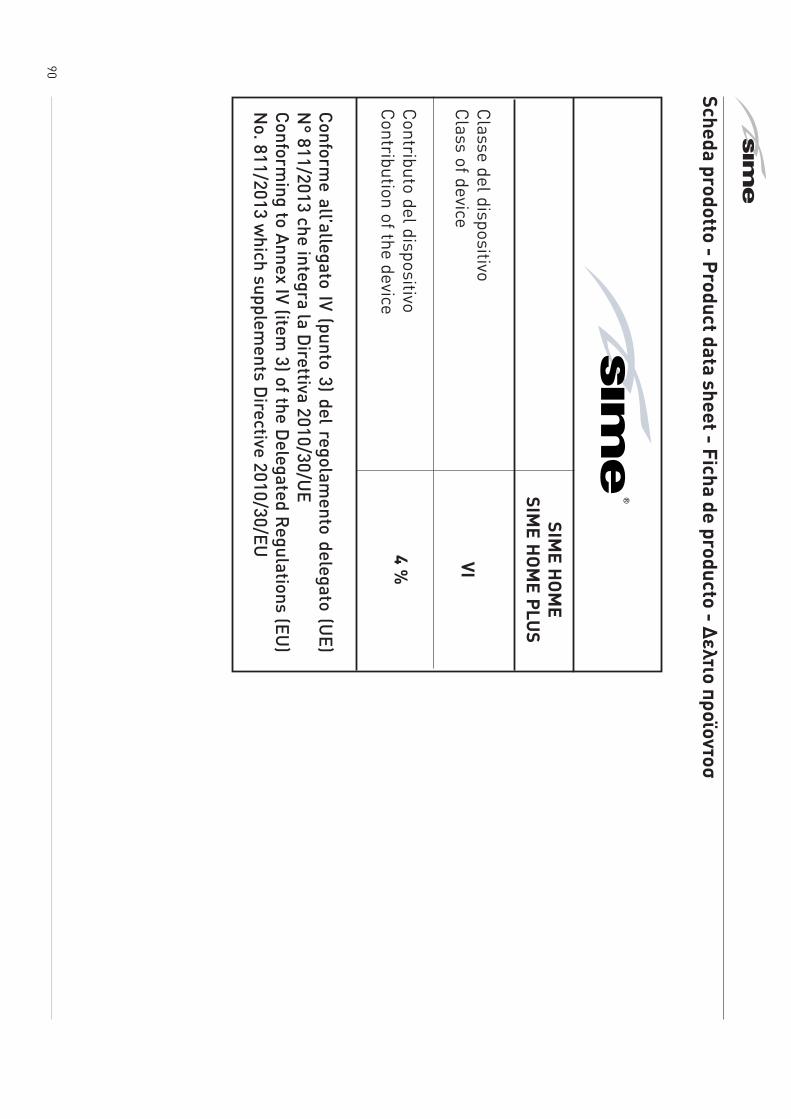
Scheda prodotto - Product data sheet - Ficha de producto - ∆ελτιo προϊοντοσ
Classe del dispositivo
Class of device
Contributo del dispositivo
Contribution of the device
Conforme all’allegato IV (punto 3) del regolam
ento delegato (UE)
N° 811/2013 che integra la D
irettiva 2010/30/UE
Conforming to Annex IV (item
3) of the Delegated R
egulations (EU)
No. 811/2013 w
hich supplements D
irective 2010/30/EU
SIME H
OM
ESIM
EH
OM
EPLU
S
VI
4 %
Fonderie Sime S.p.A - Via G
arbo, 27 - 37045 Legnago (Vr)Tel. +39 0442 631111 - Fax +39 0442 631292 - w
ww
.sime.it
Fonderie SIME SpA si riserva di variare in qualunque m
omento e senza preavviso i propri prodotti
nell’intento di migliorarli senza pregiudicarne le caratteristiche essenziali.
Fonderie SIME SpA reserves the right to m
ake changes at any time w
ithout prior notice in order to improve its products
without com
promising the essential characteristics.
Fonderie SIME SpA se reserva la facultad de m
odificar sus productos en cualquier mom
ento y sin previo aviso,con el objetivo de m
ejorarlos sin perjudicar sus características básicas.
Η Fonderie SIM
E SpA διατηρεί το δικαίωµα να µεταβάλλει οποιαδήποτε στιγµή και χω
ρίς προειδοποίηση τα προϊόντατης µε σκοπό τη βελτίω
ση αυτών χω
ρίς να επηρεαστούν τα βασικά χαρακτηριστικά.


![π °“√·ª√º‘§°“√‡√ ’¬π§≥ ‘µ»“ µ√ å —πPs].pdf · 38 ‡∑§π‘§°“√‡√ ’¬π§≥ ‘µ»“ µ√ å : °“√·ª√º —π](https://static.fdocument.org/doc/165x107/5e26221fca2e3d7e282c4145/-aoeaaaaoeaaa-aa-aaoe-a-a-pspdf.jpg)