· SECADOR DE MANOS / HAND DRYERS / SÉCHE-MAINS / ... BREAKDOWN LIST OF BASIC PARTS -16-...
24
SECADOR DE MANOS / HAND DRYERS / SÉCHE-MAINS / HÄNDETROCKNER / SECADOR DE MÃOS / ASCIUGAMANI / СУШИЛКА ДЛЯ РУК / ΣΤΕΓΝΩΤΗΡΑΣ ΧΕΡΙΩΝ / اﻟﯾدﯾنفѧѧѧѧѧѧѧѧѧѧ ﺗﺟﻔﯾ ﺟﮭﺎزM06A / M06AC / M06ACS M06AF / M06AB MANUAL DE INSTALACIÓN Y UTILIZACIÓN INSTALLATION AND OPERATING MANUAL MANUEL D’INSTALLATION ET D’UTILISATION INSTALLATIONS- UND BENUTZERHANDBUCH MANUAL DE INSTALAÇÃO E UTILIZAÇÃO MANUALE DI INSTALLAZIONE E D’USO РУКОВОДСТВО ПО ЭКСПЛУАТАЦИИ ΕΓΧΕΙΡΙΔΙΟ ΕΓΚΑΤΑΣΤΑΣΗΣ ΚΑΙ ΧΡΗΣΗΣ دﻟﯾل اﻟﺗرﻛﯾب واﻟﺗﺷﻐﯾل
Transcript of · SECADOR DE MANOS / HAND DRYERS / SÉCHE-MAINS / ... BREAKDOWN LIST OF BASIC PARTS -16-...
www.mediclinics.com
SECADOR DE MANOS / HAND DRYERS / SÉCHE-MAINS / HÄNDETROCKNER / SECADOR DE MÃOS / ASCIUGAMANI /
СУШИЛКА ДЛЯ РУК / ΣΤΕΓΝΩΤΗΡΑΣ ΧΕΡΙΩΝ / ف الیدین جھاز تجفی
M06A / M06AC / M06ACS M06AF / M06AB
MANUAL DE INSTALACIÓN Y UTILIZACIÓN INSTALLATION AND OPERATING MANUAL
MANUEL D’INSTALLATION ET D’UTILISATION INSTALLATIONS- UND BENUTZERHANDBUCH
MANUAL DE INSTALAÇÃO E UTILIZAÇÃO MANUALE DI INSTALLAZIONE E D’USO РУКОВОДСТВО ПО ЭКСПЛУАТАЦИИ
ΕΓΧΕΙΡΙΔΙΟ ΕΓΚΑΤΑΣΤΑΣΗΣ ΚΑΙ ΧΡΗΣΗΣ دلیل التركیب والتشغیل

-10-
Before to carry on any operation, please read carefully and take into account the following safety instructions: - Only a qualified technician can install, adjust and maintain this device. All this
operations must be always done according to the current legal European Standards of installation and according the local installation regulations as well.
- Be careful when the casing of the appliance is dismantled because active parts of the device become accessible and then there is a potential risk of an electric shock.
- Before any electrical manipulation, the electrical current must be cut in order to avoid any electric shock risk
- The device must be fixed out of reach of a water source in order to fulfil the security distances marked into the current IEC standards and as the following figure shows:
- Be careful because local installation requirements can ask more than 1 m of
safety distance. Take into account these local requirements as well.
- Hairdryers must be fixed out of reach of a person taking a bath or a shower.
- Means for disconnection, with contact separations at least 3 mm (0.12"), must be incorporated in the fixing wiring involving all poles, accordingly to the current legal European Standards.
- The installer must make sure that the electric system is grounded in accordance with the law in force.
SAFETY INSTRUCTIONS
ENGLISH
www.mediclinics.com
-11-
- This appliance can be used by children aged from 8 years and above and persons with reduced physical, sensory or mental capabilities or lack of experience and knowledge if they have been given supervision or instruction concerning use of the appliance in a safe way and understand the hazards involved. Children shall not play with the appliance. Cleaning and user maintenance shall not be made by children without supervision.
- The device could not be installed on a normally inflammable surface.
- To fix the hand dryer to the wall follow the instructions of this manual and use the template provided with the device as well. To fix the machine with adhesives or similar methods is forbidden by the European safety standards.
The Hand dryers Speedflow family has the following technical features: - Automatic operation (IR sensors). - Universal input voltage. Hand dryer works at 100-240 V and 50/60 Hz range. - Adjustable range detection (50-230 mm) - Motor speed adjustable. - Vandal proof operation system (no more than 60 seconds of continuous running). - ADDAG compliance (ADA Accessibility Guideline). Mains connection and regulations of motor speed and range detection must be handled by an authorized technician. The appliance is supplied with the two lower screws screwed to the base that secures the cover from the inside. The cover should be removed in the following manner: 1. Screw the lower screws in a clockwise direction (CW) with the supplied special tool until they are fully screwed in place (see figure nº 1).
INTRODUCTION
INSTALLATION
-12-
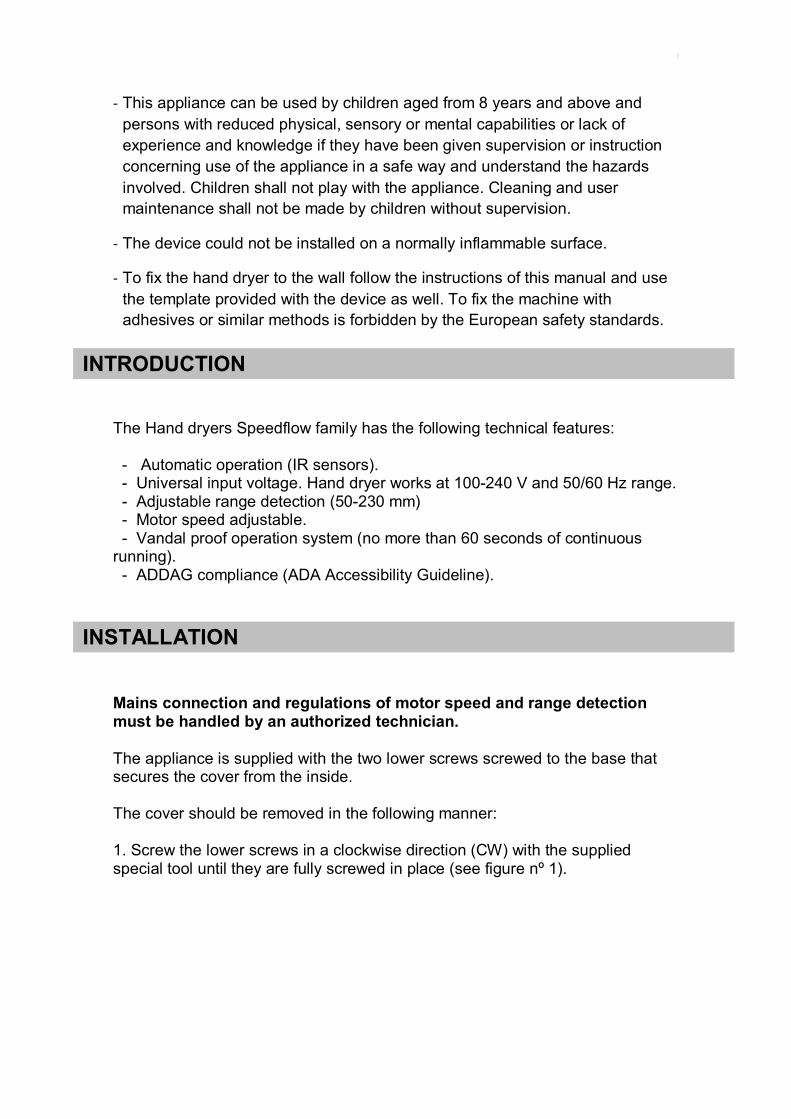
2. Remove the cover by rasing it a slight angle until the upper securing tab is freed (see figure nº 2). Remove the cover in a vertical direction without striking the inside of the machine (see figure nº3). WARNING: when the cover is removed, live parts of the appliance are exposed. During this operation do not: - Damage any internal components, especially the electronic circuit housed under the volute (see figure nº 4). - Scratch the cover or the visor of the IR sensor. The appliance's electrical installation is made via rear channelling (figure nº 5), as follows: 1. Drill four Ø 8 mm (Ø 0.31") holes using the supplied template. Clean up the holes once they have been made. Insert the four plugs until they are flush with the surface (see figure 6). 2. Pass the 3 electric cables (3 cables 16 AWG/105ºC) from the wall through the entrance hole (Ø 22 mm - Ø 0.87") as figure nº 8 shows. Means for disconnection with contact separations at least 3 mm (0.12") must be incorporated in the fixing wiring. During the installation process, the protection areas should be considered according to Standard VDE 0100. 3. Assure that the four silent blocks of the base-plate are properly located. Screw in the four supplied screws to firmly secure the base of the appliance to the wall (see figure 7). 4. Connect the Neutral and Line (N, L) wires to the terminal block and the A/V cable to the earth connection screw (Class I) as figure nº 8 shows.
www.mediclinics.com
-13-
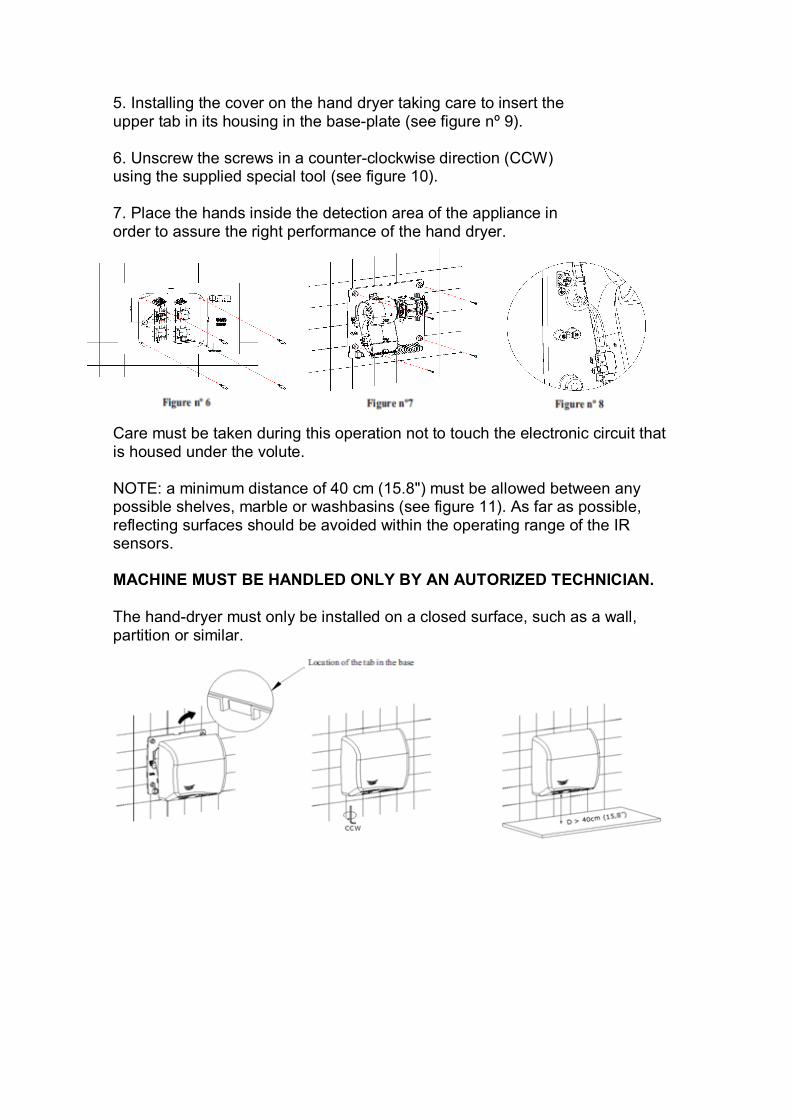
5. Installing the cover on the hand dryer taking care to insert the upper tab in its housing in the base-plate (see figure nº 9). 6. Unscrew the screws in a counter-clockwise direction (CCW) using the supplied special tool (see figure 10). 7. Place the hands inside the detection area of the appliance in order to assure the right performance of the hand dryer. Care must be taken during this operation not to touch the electronic circuit that is housed under the volute. NOTE: a minimum distance of 40 cm (15.8") must be allowed between any possible shelves, marble or washbasins (see figure 11). As far as possible, reflecting surfaces should be avoided within the operating range of the IR sensors. MACHINE MUST BE HANDLED ONLY BY AN AUTORIZED TECHNICIAN. The hand-dryer must only be installed on a closed surface, such as a wall, partition or similar.
-14-
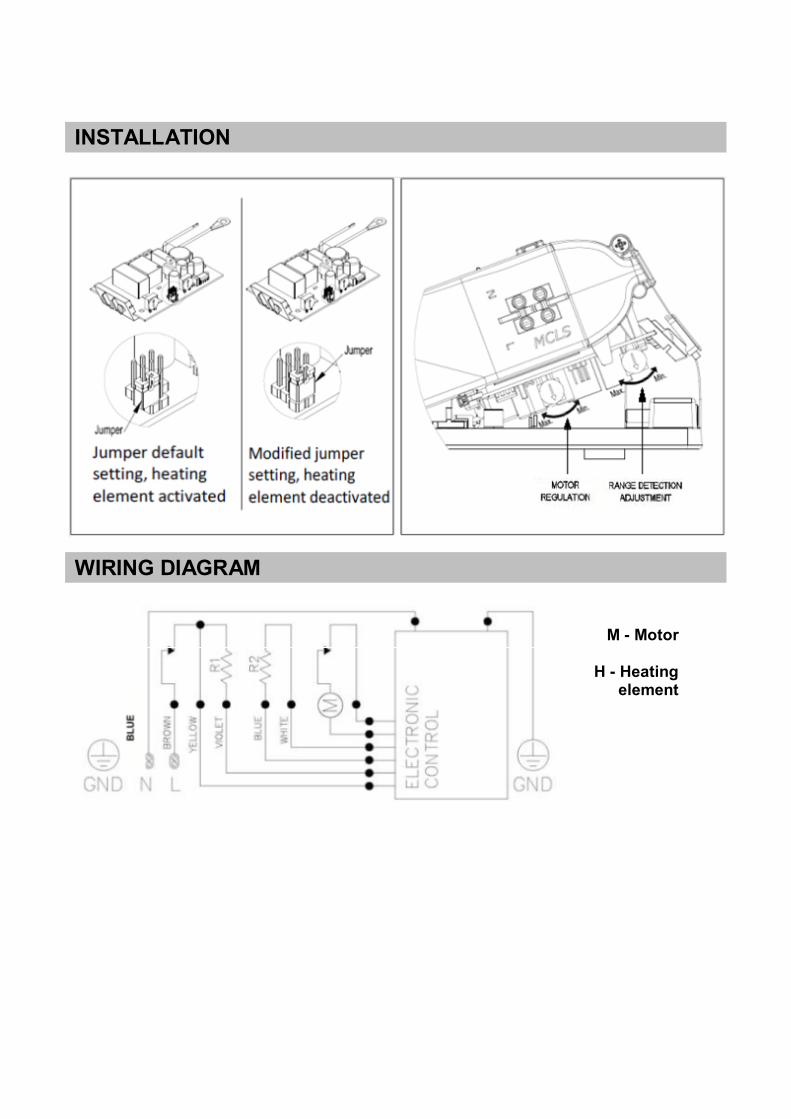
M - Motor
H - Heating element
INSTALLATION
WIRING DIAGRAM
www.mediclinics.com
-15-
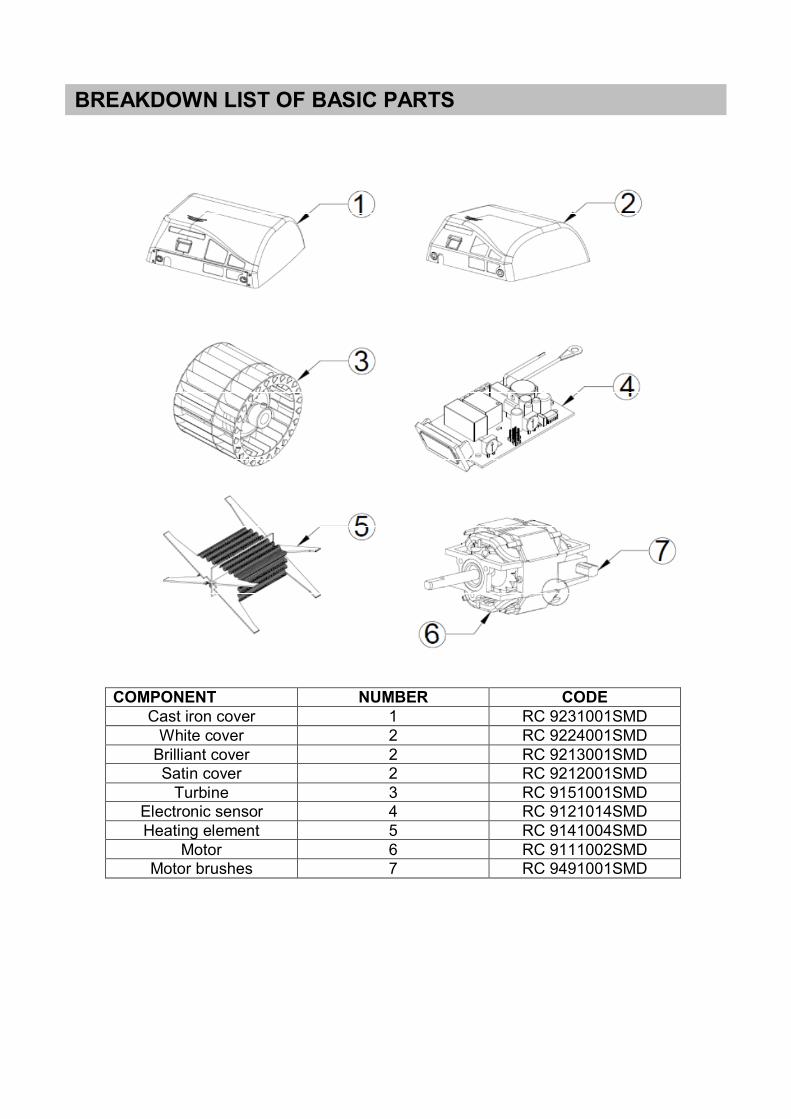
COMPONENT NUMBER CODE Cast iron cover 1 RC 9231001SMD
White cover 2 RC 9224001SMD Brilliant cover 2 RC 9213001SMD Satin cover 2 RC 9212001SMD
Turbine 3 RC 9151001SMD Electronic sensor 4 RC 9121014SMD Heating element 5 RC 9141004SMD
Motor 6 RC 9111002SMD Motor brushes 7 RC 9491001SMD
BREAKDOWN LIST OF BASIC PARTS
-16-
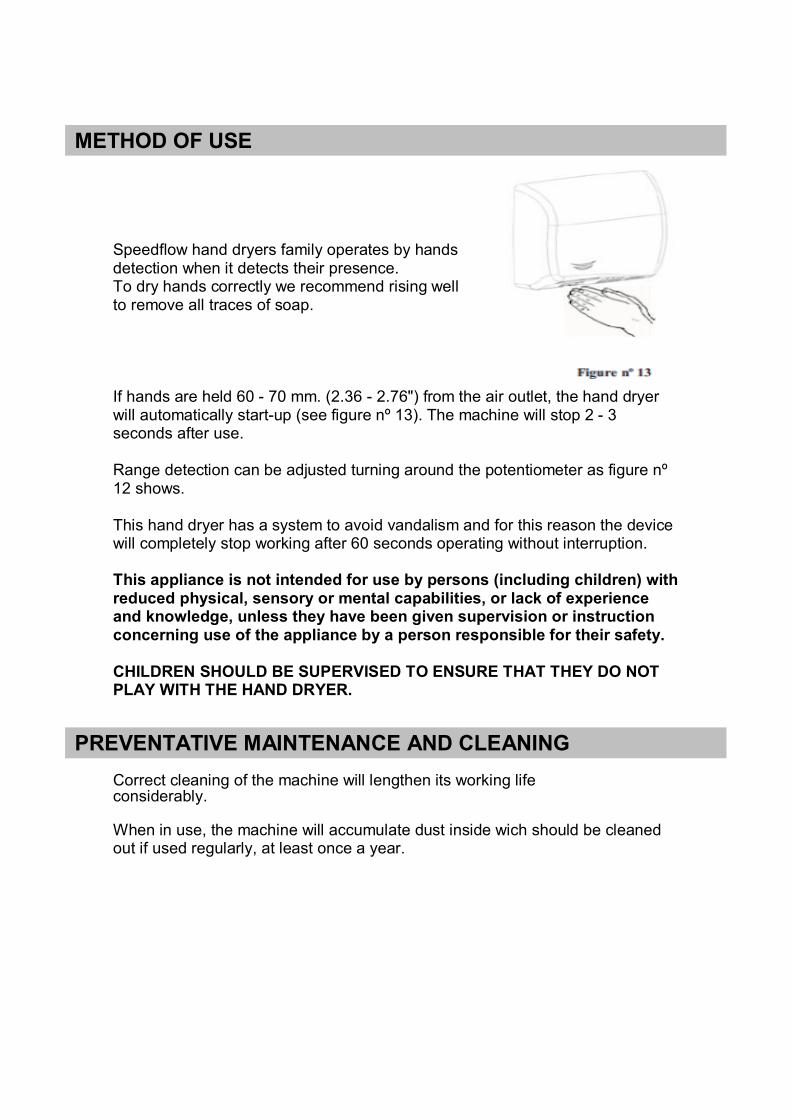
Speedflow hand dryers family operates by hands detection when it detects their presence. To dry hands correctly we recommend rising well to remove all traces of soap. If hands are held 60 - 70 mm. (2.36 - 2.76") from the air outlet, the hand dryer will automatically start-up (see figure nº 13). The machine will stop 2 - 3 seconds after use. Range detection can be adjusted turning around the potentiometer as figure nº 12 shows. This hand dryer has a system to avoid vandalism and for this reason the device will completely stop working after 60 seconds operating without interruption. This appliance is not intended for use by persons (including children) with reduced physical, sensory or mental capabilities, or lack of experience and knowledge, unless they have been given supervision or instruction concerning use of the appliance by a person responsible for their safety. CHILDREN SHOULD BE SUPERVISED TO ENSURE THAT THEY DO NOT PLAY WITH THE HAND DRYER. Correct cleaning of the machine will lengthen its working life considerably. When in use, the machine will accumulate dust inside wich should be cleaned out if used regularly, at least once a year.
METHOD OF USE
PREVENTATIVE MAINTENANCE AND CLEANING
www.mediclinics.com
-17-
1. Remove the mains supply to the hand-dryer. 2. Remove the cover (see the section "INSTALLATION" in this manual). 3. Clean away any accumulated dust on the scroll-fun with a soft-bristle brush while rotating it manually. 4. Use the same brush to clean away all accumulated dust from the other components. 5. Use a medium brush to clean the air inlet grill. Check the motor brushes condition. These should be replaced when they are less than 5 mm (0.2"). 6. Carefully remove any dust from the electronic circuit using a fine brush. Check that there is no dust or other dirt on the hand-detection sensors. 7. Ensure that the IR LED visor is totally clean. 8. Start up the machine and leave until no further dust remaining from the cleaning process, comes out from the air outlet. CLEANING OF THE COVERS For cleaning purposes only a wet cloth is to be used. Do not use any kind of detergent, acids, lye, abrasives, hydrochloric acid, etc. Take care not to damage or force any component. NOTE: All maintenance and cleaning processes must be carried out by qualified personnel.
CLEANING METHOD
-26-
Bitte lesen und beachten Sie sorgfältig folgende Sicherheitshinweise, bevor Sie irgendwelche Vorgänge durchführen:
- Die Vorrichtung darf ausschließlich durch einen qualifizierten Techniker installiert, eingestellt oder gewartet werden. All diese Vorgänge sind stets in Übereinstimmung mit den gegenwärtigen gesetzlichen europäischen Installationsstandards und den örtlichen Installationsvorschriften vorzunehmen.
- Vorsicht ist geboten, wenn das Gehäuse des Gerätes demontiert wird, weil aktive Teile des Gerätes zugänglich werden und dann das potenzielle Risiko eines elektrischen Schlages besteht.
- Die Vorrichtung ist vor jedem elektrischen Eingriff zunächst außer Spannung zu setzen, um jegliche Stromschlaggefahr zu vermeiden.
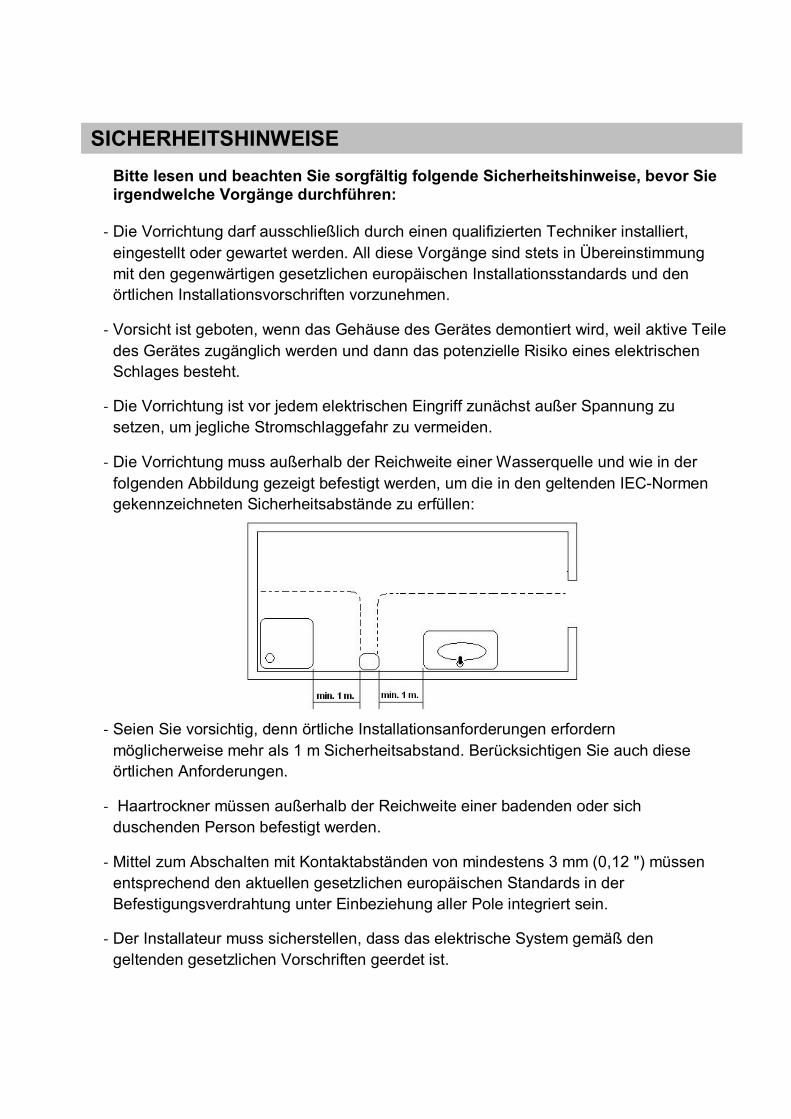
- Die Vorrichtung muss außerhalb der Reichweite einer Wasserquelle und wie in der folgenden Abbildung gezeigt befestigt werden, um die in den geltenden IEC-Normen gekennzeichneten Sicherheitsabstände zu erfüllen:
- Seien Sie vorsichtig, denn örtliche Installationsanforderungen erfordern
möglicherweise mehr als 1 m Sicherheitsabstand. Berücksichtigen Sie auch diese örtlichen Anforderungen.
- Haartrockner müssen außerhalb der Reichweite einer badenden oder sich duschenden Person befestigt werden.
- Mittel zum Abschalten mit Kontaktabständen von mindestens 3 mm (0,12 ") müssen entsprechend den aktuellen gesetzlichen europäischen Standards in der Befestigungsverdrahtung unter Einbeziehung aller Pole integriert sein.
- Der Installateur muss sicherstellen, dass das elektrische System gemäß den geltenden gesetzlichen Vorschriften geerdet ist.
SICHERHEITSHINWEISE
www.mediclinics.com
-27-
- Dieses Gerät kann von Kindern ab 8 Jahren und darüber sowie von Personen mit verringerten physischen, sensorischen oder mentalen Fähigkeiten oder Mangel an Erfahrung und Wissen benutzt werden, wenn sie beaufsichtigt oder bezüglich des sicheren Gebrauchs des Gerätes unterwiesen wurden und die daraus resultierenden Gefahren verstehen. Kinder dürfen nicht mit dem Gerät spielen. Reinigung und Benutzer- Wartung dürfen nicht von Kindern ohne Beaufsichtigung durchgeführt werden.“
- Die Vorrichtung darf nicht auf einer normal entflammbaren Oberfläche installiert werden.
- Zur Befestigung des Händetrockners an der Wand folgen Sie bitte den Anweisungen in diesem Handbuch und verwenden Sie die mitgelieferte Schablone. Die Befestigung des Geräts mit Klebstoffen oder ähnlichen Methoden verstößt gegen die europäischen Sicherheitsstandards.
Die Händetrockner der Serie Speedflow weisen die nachfolgenden technischen Eigenschaften auf: - Automatische Betätigung mittels Infrarotsensor (IR Sensor). - Universaleingangsspannung Der Händetrockner erlaubt Spannungen zwischen 100 und 240 V, bei 50/60 Hz. - einstellbarer Detektionsbereich zwischen 50 und 230 mm. - Motordrehzahl einstellbar. - Vandalensicheres System mit automatischer Stoppfunktion. Die maximale durchgehende Betriebszeit beträgt 60 Sekunden.
- Übereinstimmung mit der amerikanischen Norm ADDAG (ADA Accessibility Guideline) - Optional kann der Heizwiderstand gehemmt werden, wenn nur der Motor arbeitet. Mit dieser Option kann Energie gespart werden.
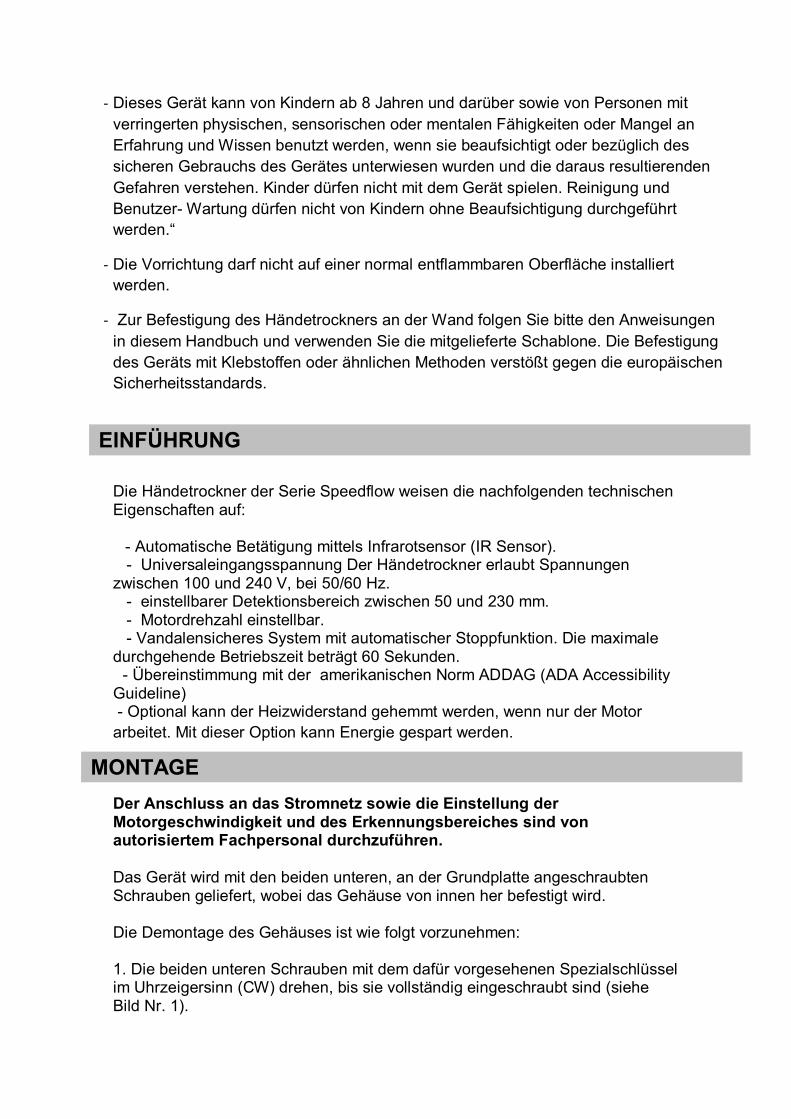
Der Anschluss an das Stromnetz sowie die Einstellung der Motorgeschwindigkeit und des Erkennungsbereiches sind von autorisiertem Fachpersonal durchzuführen. Das Gerät wird mit den beiden unteren, an der Grundplatte angeschraubten Schrauben geliefert, wobei das Gehäuse von innen her befestigt wird. Die Demontage des Gehäuses ist wie folgt vorzunehmen: 1. Die beiden unteren Schrauben mit dem dafür vorgesehenen Spezialschlüssel im Uhrzeigersinn (CW) drehen, bis sie vollständig eingeschraubt sind (siehe Bild Nr. 1).
EINFÜHRUNG
MONTAGE
-28-
2. Das Gehäuse durch Anheben und leichte Schräglage lösen, so dass die obere Rastnase aus ihrer Aussparung gehoben wird (siehe Bild Nr. 2). Das Gehäuse jetzt senkrecht nach oben abziehen und darauf achten, dass dabei keine Teile im Inneren beschädigt werden (siehe Bild Nr. 3). ACHTUNG: Nach der Demontage des Gehäuses sind unter Spannung stehende Teile zugänglich! Während der Demontage ist folgendes zu beachten: - Darauf achten, dass keine inneren Teile, insbesondere der elektronische Schaltkreis, beschädigt werden (siehe Bild Nr. 4). - Das Gehäuse und den Ausschnitt der IR-Sensoren nicht zerkratzen.
Der elektrische Anschluss des Gerätes erfolgt, wie nachfolgend beschrieben, durch eine in der Grundplatte vorgesehene Kabeldurchführung (Bild Nr. 5):
1. Mithilfe der beiliegenden Schablone 4 Löcher von jeweils Ø 8 mm (Ø 0,31") bohren. Den Bohrstaub ausblasen und die 4 mitgelieferten Dübel bündig einsetzen (siehe Bild Nr. 6).
2. Anschluss- und Erdkabel (3 Kabel 14 AWG/105°C)
durch die vorgesehene Kabeldurchführung in der Grundplatte (Ø 22 mm bzw. Ø 0,87") anschließen, wie in Bild Nr. 8 dargestellt. Im Versorgungsnetz sind Trennvorrichtungen mit einem Kontaktabstand von mindestens 3 mm an allen Polen vorzusehen. Diese Trennvorrichtungen müssen im das Festnetz integriert sein. Während der Montagearbeiten sind die nach VDE 0100 festgelegten Schutzbereiche einzuhalten.
3. Darauf achten, dass die 4 Puffer der Grundplatte richtig positioniert sind. Mittels der 4 beiliegenden Schrauben die Grundplatte an die Wand schrauben, so dass diese fest anliegt (siehe Bild Nr. 7).
4. Die beiden Phasen (N und L) an der Klemme und das Erdkabel an der dafür
vorgesehenen Erdungsschraube (Klasse I) anschließen, wie in Bild Nr. 8 dargestellt.
www.mediclinics.com
-29-
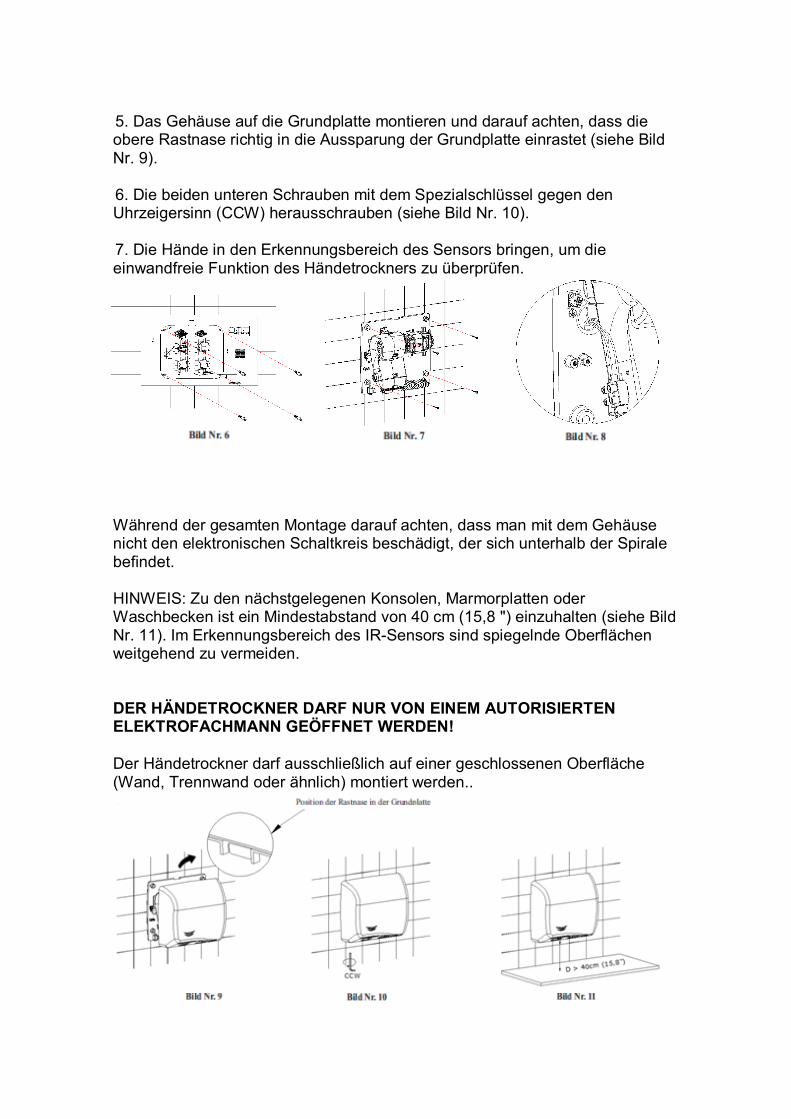
5. Das Gehäuse auf die Grundplatte montieren und darauf achten, dass die
obere Rastnase richtig in die Aussparung der Grundplatte einrastet (siehe Bild Nr. 9).
6. Die beiden unteren Schrauben mit dem Spezialschlüssel gegen den
Uhrzeigersinn (CCW) herausschrauben (siehe Bild Nr. 10). 7. Die Hände in den Erkennungsbereich des Sensors bringen, um die
einwandfreie Funktion des Händetrockners zu überprüfen.
Während der gesamten Montage darauf achten, dass man mit dem Gehäuse nicht den elektronischen Schaltkreis beschädigt, der sich unterhalb der Spirale befindet. HINWEIS: Zu den nächstgelegenen Konsolen, Marmorplatten oder Waschbecken ist ein Mindestabstand von 40 cm (15,8 ") einzuhalten (siehe Bild Nr. 11). Im Erkennungsbereich des IR-Sensors sind spiegelnde Oberflächen weitgehend zu vermeiden. DER HÄNDETROCKNER DARF NUR VON EINEM AUTORISIERTEN ELEKTROFACHMANN GEÖFFNET WERDEN! Der Händetrockner darf ausschließlich auf einer geschlossenen Oberfläche (Wand, Trennwand oder ähnlich) montiert werden..
-30-
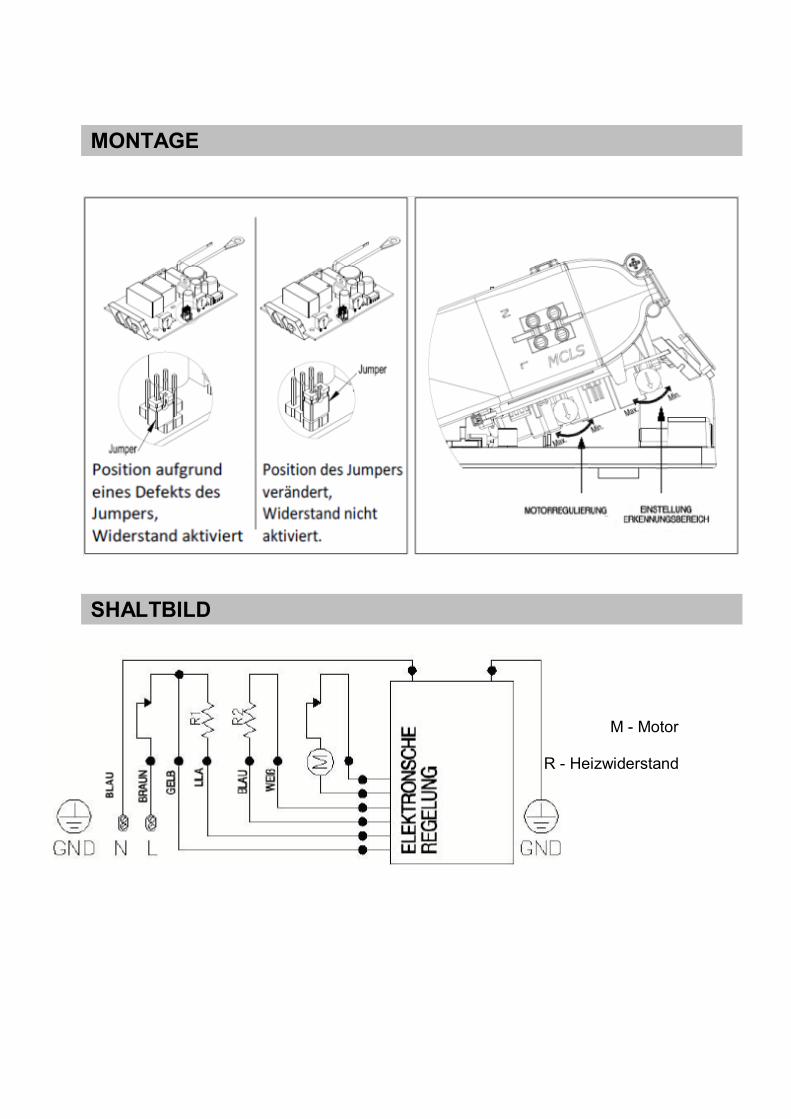
M - Motor
R - Heizwiderstand
MONTAGE
SHALTBILD
www.mediclinics.com
-31-
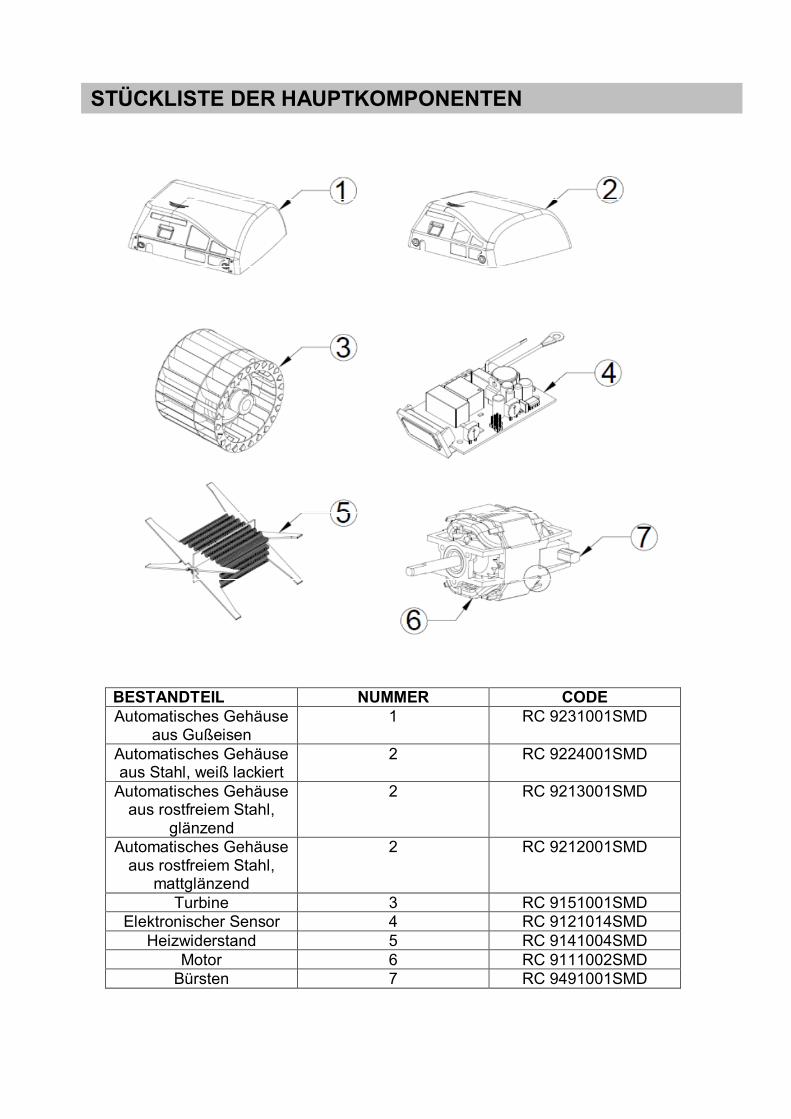
BESTANDTEIL NUMMER CODE Automatisches Gehäuse
aus Gußeisen 1 RC 9231001SMD
Automatisches Gehäuse aus Stahl, weiß lackiert
2 RC 9224001SMD
Automatisches Gehäuse aus rostfreiem Stahl,
glänzend
2 RC 9213001SMD
Automatisches Gehäuse aus rostfreiem Stahl,
mattglänzend
2 RC 9212001SMD
Turbine 3 RC 9151001SMD Elektronischer Sensor 4 RC 9121014SMD
Heizwiderstand 5 RC 9141004SMD Motor 6 RC 9111002SMD
Bürsten 7 RC 9491001SMD
STÜCKLISTE DER HAUPTKOMPONENTEN

-32-
Die Händetrockner der Serie Speedflow schalten sich automatisch ein, sobald eine Hand in den Erkennungsbereich gelangt. Um eine gute Trocknung der Hände zu erreichen, ist es ratsam, diese vorher gut zu spülen, um sie von allen Seifenresten zu befreien. Die Hände unterhalb des Luftausgangs in einem Abstand von 60 - 70 mm (2,36 - 2,76 ") halten und aneinander reiben (siehe Bild Nr. 13). Händetrockner nach 2 - 3 Sekunden automatisch aus. Der Erkennungsbereich kann durch Drehen des Potentiometers, wie in Bild Nr. 12 dargestellt, verändert werden. Dieser Händetrockner ist mit einem System gegen unsachgemäßen Gebrauch ausgestattet, das diesen automatisch nach 60 Sekunden Dauerbetrieb ausschaltet. Der Händetrockner ist nicht für Personen (einschließlich Kinder) geeignet, die eine Körper- Sinnes- oder geistige Behinderung aufweisen bzw. keine Erfahrung und/oder Kenntnisse mit derartigen Geräten haben, es sei denn, sie sind vorher über den Gebrauch unterwiesen worden oder sie benutzen den Händetrockner unter Aufsicht einer verantwortlichen Person! SOLLTE EIN KIND DIESEN HÄNDETROCKNER BENUTZEN, SO HAT EINE VERANTWORTLICHE PERSON DEN KORREKTEN GEBRAUCH ZU BEAUFSICHTIGEN UND ZU GEWÄHRLEISTEN, DASS DAS KIND NICHT MIT DEM GERÄT SPIELT! Die richtige Reinigung des Gerätes verlängert seine Nutzungsdauer. Es wird empfohlen, mindestens einmal im Jahr den im Innern des Gerätes angehäuften Staub und Schmutz zu entfernen.
GEBRAUCHSANWEISUNG
VORBEUGENDE WARTUNG UND REININGUNG
www.mediclinics.com
-33-
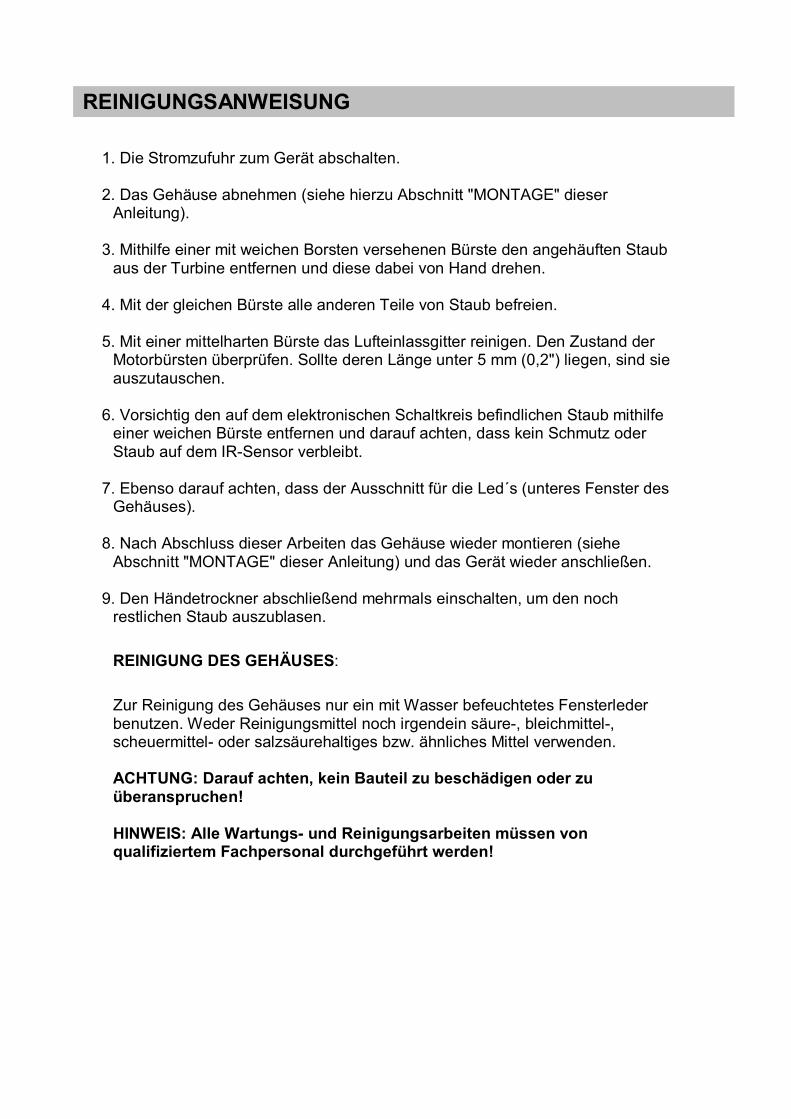
1. Die Stromzufuhr zum Gerät abschalten. 2. Das Gehäuse abnehmen (siehe hierzu Abschnitt "MONTAGE" dieser
Anleitung). 3. Mithilfe einer mit weichen Borsten versehenen Bürste den angehäuften Staub
aus der Turbine entfernen und diese dabei von Hand drehen. 4. Mit der gleichen Bürste alle anderen Teile von Staub befreien. 5. Mit einer mittelharten Bürste das Lufteinlassgitter reinigen. Den Zustand der
Motorbürsten überprüfen. Sollte deren Länge unter 5 mm (0,2") liegen, sind sie auszutauschen.
6. Vorsichtig den auf dem elektronischen Schaltkreis befindlichen Staub mithilfe
einer weichen Bürste entfernen und darauf achten, dass kein Schmutz oder Staub auf dem IR-Sensor verbleibt.
7. Ebenso darauf achten, dass der Ausschnitt für die Led´s (unteres Fenster des
Gehäuses). 8. Nach Abschluss dieser Arbeiten das Gehäuse wieder montieren (siehe
Abschnitt "MONTAGE" dieser Anleitung) und das Gerät wieder anschließen. 9. Den Händetrockner abschließend mehrmals einschalten, um den noch
restlichen Staub auszublasen.
REINIGUNG DES GEHÄUSES: Zur Reinigung des Gehäuses nur ein mit Wasser befeuchtetes Fensterleder benutzen. Weder Reinigungsmittel noch irgendein säure-, bleichmittel-, scheuermittel- oder salzsäurehaltiges bzw. ähnliches Mittel verwenden. ACHTUNG: Darauf achten, kein Bauteil zu beschädigen oder zu überanspruchen!
HINWEIS: Alle Wartungs- und Reinigungsarbeiten müssen von qualifiziertem Fachpersonal durchgeführt werden!
REINIGUNGSANWEISUNG
www.mediclinics.com
-71-
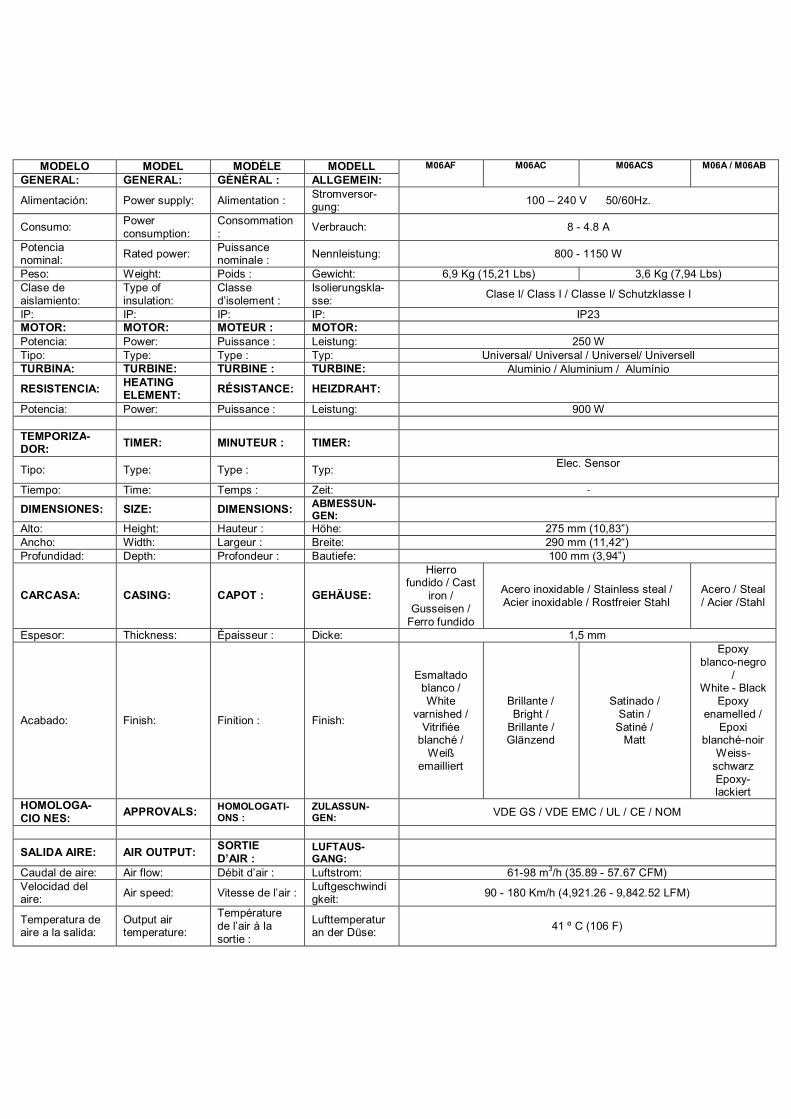
MODELO MODEL MODÈLE MODELL M06AF M06AC M06ACS M06A / M06AB GENERAL: GENERAL: GÉNÉRAL : ALLGEMEIN:
Alimentación: Power supply: Alimentation : Stromversor-gung: 100 – 240 V 50/60Hz.
Consumo: Power consumption:
Consommation : Verbrauch: 8 - 4.8 A
Potencia nominal: Rated power: Puissance
nominale : Nennleistung: 800 - 1150 W
Peso: Weight: Poids : Gewicht: 6,9 Kg (15,21 Lbs) 3,6 Kg (7,94 Lbs) Clase de aislamiento:
Type of insulation:
Classe d’isolement :
Isolierungskla-sse: Clase I/ Class I / Classe I/ Schutzklasse I
IP: IP: IP: IP: IP23 MOTOR: MOTOR: MOTEUR : MOTOR: Potencia: Power: Puissance : Leistung: 250 W Tipo: Type: Type : Typ: Universal/ Universal / Universel/ Universell TURBINA: TURBINE: TURBINE : TURBINE: Aluminio / Aluminium / Alumínio
RESISTENCIA: HEATING ELEMENT: RÉSISTANCE: HEIZDRAHT:
Potencia: Power: Puissance : Leistung: 900 W TEMPORIZA-DOR: TIMER: MINUTEUR : TIMER:
Tipo: Type: Type : Typ: Elec. Sensor
Tiempo: Time: Temps : Zeit: -
DIMENSIONES: SIZE: DIMENSIONS: ABMESSUN-GEN:
Alto: Height: Hauteur : Höhe: 275 mm (10,83”) Ancho: Width: Largeur : Breite: 290 mm (11,42“) Profundidad: Depth: Profondeur : Bautiefe: 100 mm (3,94”)
CARCASA: CASING: CAPOT : GEHÄUSE:
Hierro fundido / Cast
iron / Gusseisen /
Ferro fundido
Acero inoxidable / Stainless steal / Acier inoxidable / Rostfreier Stahl
Acero / Steal / Acier /Stahl
Espesor: Thickness: Épaisseur : Dicke: 1,5 mm
Acabado: Finish: Finition : Finish:
Esmaltado blanco / White
varnished / Vitrifiée
blanché / Weiß
emailliert
Brillante / Bright /
Brillante / Glänzend
Satinado / Satin /
Satiné / Matt
Epoxy blanco-negro
/ White - Black
Epoxy enamelled /
Epoxi blanché-noir
Weiss-schwarz Epoxy-lackiert
HOMOLOGA-CIO NES: APPROVALS: HOMOLOGATI-
ONS : ZULASSUN-GEN: VDE GS / VDE EMC / UL / CE / NOM
SALIDA AIRE: AIR OUTPUT: SORTIE D’AIR :
LUFTAUS-GANG:
Caudal de aire: Air flow: Débit d’air : Luftstrom: 61-98 m3/h (35.89 - 57.67 CFM) Velocidad del aire: Air speed: Vitesse de l’air : Luftgeschwindi
gkeit: 90 - 180 Km/h (4,921.26 - 9,842.52 LFM)
Temperatura de aire a la salida:
Output air temperature:
Température de l’air à la sortie :
Lufttemperatur an der Düse: 41 º C (106 F)
-72-
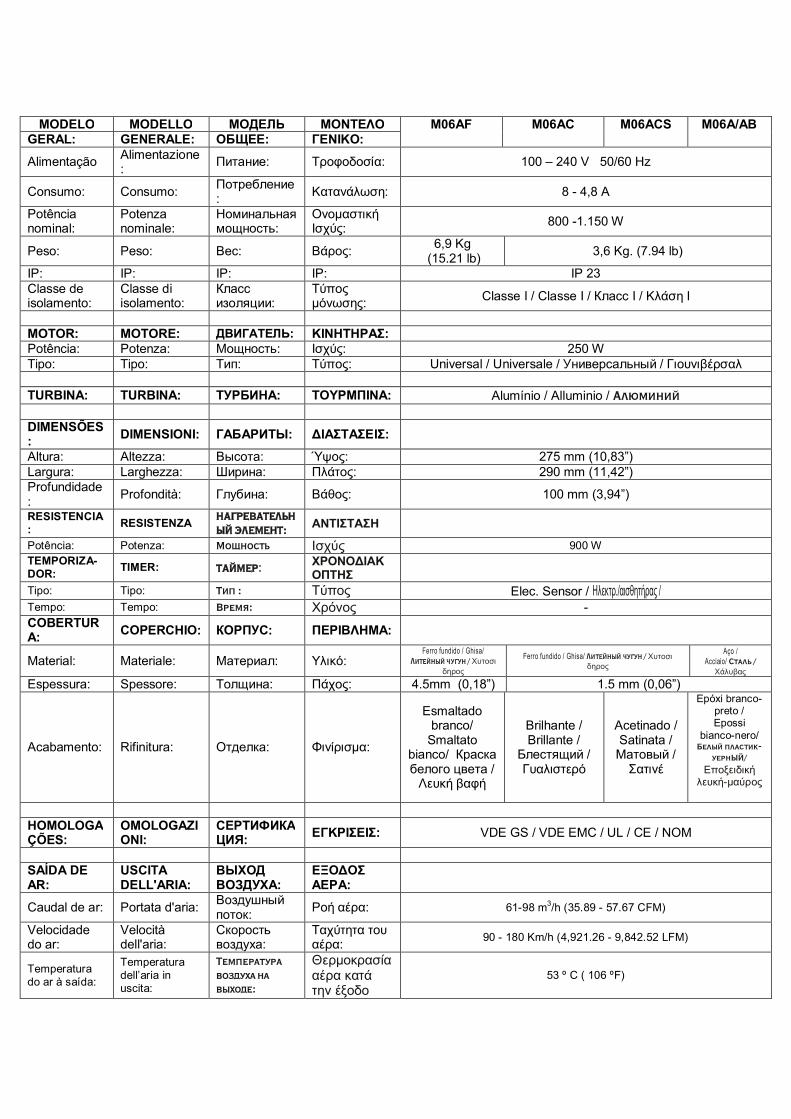
MODELO MODELLO МОДЕЛЬ ΜΟΝΤΕΛΟ M06AF M06AC M06ACS M06A/AB GERAL: GENERALE: ОБЩЕЕ: ΓΕΝΙΚΟ:
Alimentação Alimentazione: Питание: Τροφοδοσία: 100 – 240 V 50/60 Hz
Consumo: Consumo: Потребление: Κατανάλωση: 8 - 4,8 A
Potência nominal:
Potenza nominale:
Номинальная мощность:
Ονομαστική Ισχύς: 800 -1.150 W
Peso: Peso: Вес: Βάρος: 6,9 Kg (15.21 lb) 3,6 Kg. (7.94 lb)
IP: IP: IP: IP: IP 23 Classe de isolamento:
Classe di isolamento:
Класс изоляции:
Τύπος μόνωσης: Classe I / Classe I / Класс I / Κλάση I
MOTOR: MOTORE: ДВИГАТЕЛЬ: ΚΙΝΗΤΗΡΑΣ: Potência: Potenza: Мощность: Ισχύς: 250 W Tipo: Tipo: Тип: Τύπος: Universal / Universale / Универсальный / Γιουνιβέρσαλ TURBINA: TURBINA: ТУРБИНА: ΤΟΥΡΜΠΙΝΑ: Alumínio / Alluminio / Aлюìèíèй DIMENSÕES: DIMENSIONI: ГАБАРИТЫ: ΔΙΑΣΤΑΣΕΙΣ:
Altura: Altezza: Высота: Ύψος: 275 mm (10,83”) Largura: Larghezza: Ширина: Πλάτος: 290 mm (11,42”) Profundidade: Profondità: Глубина: Βάθος: 100 mm (3,94”)
RESISTENCIA: RESISTENZA ÍÀÃÐÅÂÀÒÅËÜÍ
ÛÉ ÝËÅÌÅÍÒ: ANTISTASH
Potência: Potenza: Ìîùíîñòü Iscúv 900 W TEMPORIZA-DOR: TIMER: ÒÀÉÌÅÐ: CRONODIAK
OPTHS
Tipo: Tipo: Òèï : Túpov Elec. Sensor / Hlektr./aisqhtñrav / Tempo: Tempo: Âðåìÿ: Crónov - COBERTURA: COPERCHIO: КОРПУС: ΠΕΡΙΒΛΗΜΑ:
Material: Materiale: Материал: Υλικό: Ferro fundido / Ghisa/
Ëèòåéíûé ÷óãóí / Cutosi dhrov
Ferro fundido / Ghisa/ Ëèòåéíûé ÷óãóí / Cutosi dhrov
Aço / Acciaio/ Ñòàëü /
Cálubav Espessura: Spessore: Толщина: Πάχος: 4.5mm (0,18”) 1.5 mm (0,06”)
Acabamento: Rifinitura: Отделка: Φινίρισμα:
Esmaltado branco/
Smaltato bianco/ Краска белого цвета /
Λευκή βαφή
Brilhante / Brillante /
Блестящий / Γυαλιστερό
Acetinado / Satinata / Матовый /
Σατινέ
Epóxi branco-preto / Epossi
bianco-nero/ Áåëûé ïëàñòèê-
уернЫÉ/ Epoxeidikñ
leukñ-maúrov
HOMOLOGAÇÕES:
OMOLOGAZIONI:
СЕРТИФИКАЦИЯ: ΕΓΚΡΙΣΕΙΣ: VDE GS / VDE EMC / UL / CE / NOM
SAÍDA DE AR:
USCITA DELL'ARIA:
ВЫХОД ВОЗДУХА:
ΕΞΟΔΟΣ ΑΕΡΑ:
Caudal de ar: Portata d'aria: Воздушный поток: Ροή αέρα: 61-98 m3/h (35.89 - 57.67 CFM)
Velocidade do ar:
Velocità dell'aria:
Скорость воздуха:
Ταχύτητα του αέρα: 90 - 180 Km/h (4,921.26 - 9,842.52 LFM)
Temperatura do ar à saída:
Temperatura dell’aria in uscita:
Òåìïåðàòóðà âîçäóõà íà âûõîäå:
Qermokrasía aéra katá thn éxodo
53 º C ( 106 ºF)
-74-
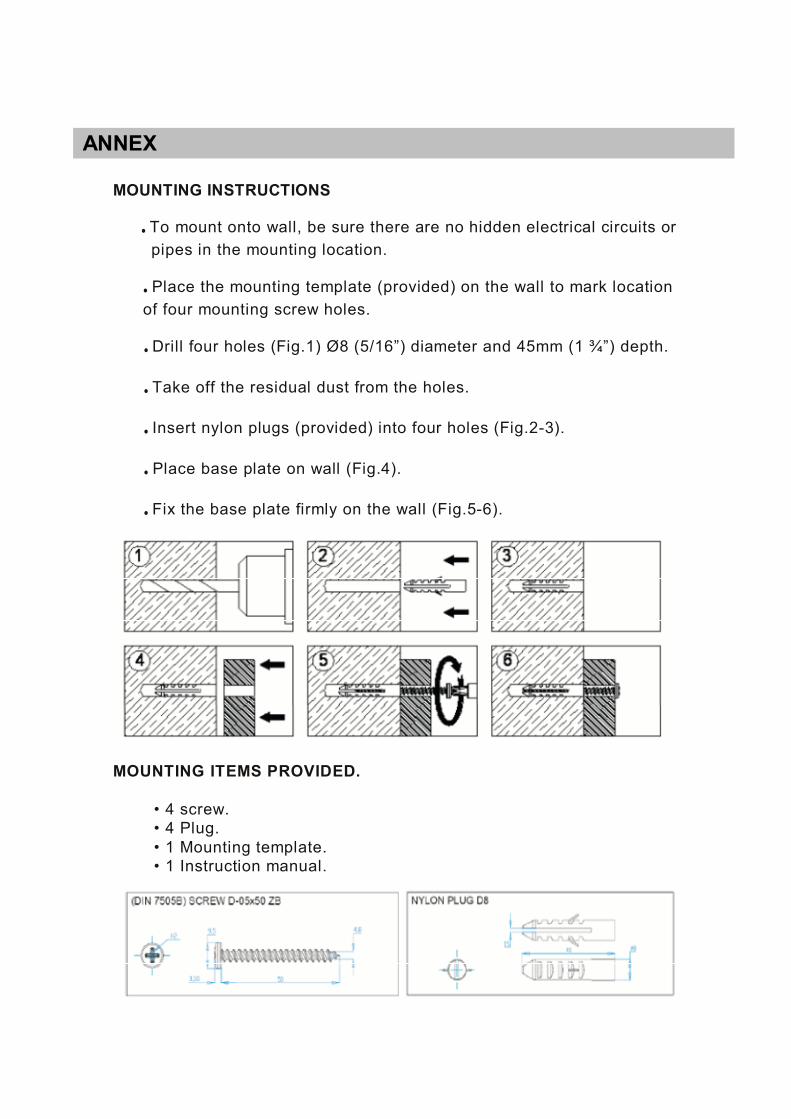
MOUNTING INSTRUCTIONS
• To mount onto wall, be sure there are no hidden electrical circuits or pipes in the mounting location. • Place the mounting template (provided) on the wall to mark location of four mounting screw holes.
• Drill four holes (Fig.1) Ø8 (5/16”) diameter and 45mm (1 ¾”) depth. • Take off the residual dust from the holes. • Insert nylon plugs (provided) into four holes (Fig.2-3). • Place base plate on wall (Fig.4). • Fix the base plate firmly on the wall (Fig.5-6).
MOUNTING ITEMS PROVIDED. • 4 screw. • 4 Plug. • 1 Mounting template. • 1 Instruction manual.
ANNEX
www.mediclinics.com
-75-
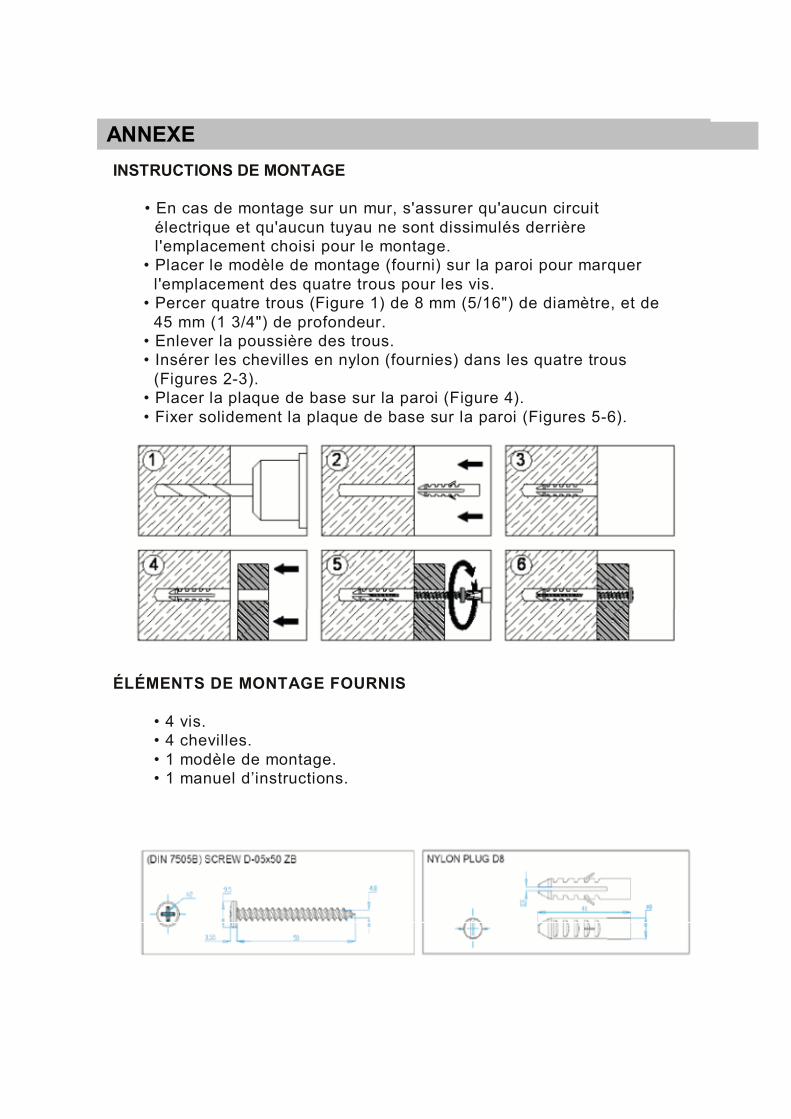
INSTRUCTIONS DE MONTAGE
• En cas de montage sur un mur, s'assurer qu'aucun circuit électrique et qu'aucun tuyau ne sont dissimulés derrière l'emplacement choisi pour le montage.
• Placer le modèle de montage (fourni) sur la paroi pour marquer l'emplacement des quatre trous pour les vis. • Percer quatre trous (Figure 1) de 8 mm (5/16") de diamètre, et de 45 mm (1 3/4") de profondeur. • Enlever la poussière des trous. • Insérer les chevilles en nylon (fournies) dans les quatre trous (Figures 2-3). • Placer la plaque de base sur la paroi (Figure 4). • Fixer solidement la plaque de base sur la paroi (Figures 5-6). ÉLÉMENTS DE MONTAGE FOURNIS • 4 vis. • 4 chevilles. • 1 modèle de montage. • 1 manuel d’instructions.
ANNEXE
-76-
ELIMINACIÓN DE RESIDUOS DE APARATOS ELÉCTRICOS Y ELECTRÓNICOS POR PARTE DE USUARIOS DOMÉSTICOS EN LA UNIÓN EUROPEA.
El producto que ha adquirido ha sido diseñado y fabricado con materiales y componentes de alta calidad que pueden ser reciclados y reutilizados. Cuando vea un producto marcado con este símbolo de un contenedor de basura con ruedas tachado significa que dicho producto está regulado por la Directiva Europea 2002/96/EC sobre residuos de aparatos eléctricos y electrónicos. Este símbolo indica que el producto no se puede desechar junto con los residuos urbanos habituales. Cuando un producto marcado con dicho símbolo deba ser eliminado es responsabilidad del usuario entregarlo en un punto de recolección de aparatos eléctricos y electrónicos designado. Para obtener más información sobre cómo desechar sus aparatos eléctricos o electrónicos una vez hayan concluido su vida útil, póngase en contacto con las autoridades locales, el servicio de gestión de residuos urbanos o el establecimiento donde adquirió el producto. La correcta recogida y tratamiento de los aparatos inservibles contribuye a preservar recursos naturales y también a evitar riesgos potenciales para la salud pública.
DISPOSAL OF WASTE ELECTRICAL AND ELECTRONIC EQUIPMENT BY DOMESTIC USERS IN THE EUROPEAN UNION.
The product you have purchased has been designed and manufactured using high-quality materials and components that can be recycled and reused. If you see a product marked with this symbol, consisting of a crossed-out rubbish bin with wheels, it means that the product is regulated by European Directive 2002/96/EC regarding the disposal of waste electrical and electronic equipment. This symbol indicates that the product must not be disposed of together with habitual municipal waste. Owners and users of all products marked with this symbol should take them to a specially designated collection point for waste electrical and electronic equipment. For further information on how to dispose of waste electrical or electronic equipment once its useful life has ended, please contact your local authorities, the urban waste disposal service or the establishment in which the product was purchased. The proper collection and disposal of old equipment contributes to preserving the natural environment and preventing potential hazards to public health.
ENTSORGUNG VON ABFALLPRODUKTEN ELEKTRISCHER UND ELEKTRONISCHER GERÄTE VON PRIVATPERSONEN IN
DER EUROPÄISCHEN GEMEINSCHAFT
Das von Ihnen erworbene Produkt ist unter Verwendung hochwertiger Materialien und Bauteilen entwickelt und hergestellt worden, die wiederverwertet und –verwendet werden können. Wenn ein Produkt mit dem nebenstehenden Symbol – ein durchgestrichener Müllcontainer auf Rädern – gekennzeichnet ist, dann bedeutet dies, dass dieses Produkt der Europäischen Richtlinie 2002/96/EC über elektrische und elektronische Abfallprodukte unterliegt. Dies bedeutet, dass das Produkt nicht mit dem gewöhnlichen Haushaltsmüll entsorgt werden darf. Wenn ein derart gekennzeichnetes Produkts entsorgt werden muss, dann ist es Verantwortung des Anwenders, das Produkt in einem speziell für elektrische und elektronische Abfallprodukte ausgewiesenen Wertstoffhof zu entsorgen. Wenn Sie mehr Information über die Entsorgung von elektrischen und elektronischen Abfallprodukten nach deren Nutzungsdauer wünschen, dann setzen Sie sich bitte mit den örtlichen Behörden, mit dem für die Hausmüllentsorgung beauftragten Unternehmen oder mit dem Geschäft in Verbindung, in dem Sie das Produkt erworben haben. Die richtige Entsorgung und Behandlung von nicht mehr brauchbaren Geräten trägt zur Beibehaltung der natürlichen Ressourcen bei und verhindert potenzielle Gefahren für die allgemeine Gesundheit.
ÉLIMINATION DES DÉCHETS DES ÉQUIPEMENTS ÉLECTRIQUES ET ÉLECTRONIQUES PAR LES UTILISATEURS DOMESTIQUES DANS L’UNION EUROPÉENNE.
Le produit dont vous venez de faire l’acquisition a été conçu et fabriqué à l’aide de matériaux et de composants de haute qualité qui peuvent être recyclés et réutilisés. Quand vous voyez un produit portant ce symbole de container poubelle suroues barré, cela signifie que ledit produit
est régulé par la Directive Européenne 2002/96/CE relative aux déchets d'équipements électriques et électroniques. Ce symbole indique que le produit ne peut pas être jeté avec les déchets urbains habituels. Lorsqu’un produit marqué par ce symbole doit être jeté, il en va de la responsabilité de l’utilisateur de le remettre à un point de collecte appareils électriques et électroniques désigné.
Pour obtenir plus d’informations sur le moyen de jeter vos appareils électriques et électroniques une fois leur durée de vie épuisée, contactez les autorités locales, le service de gestion des déchets urbains ou l’établissement où vous avez acheté le produit. La collecte et le traitement corrects des appareils inutilisables contribue à préserver les ressources naturelles et également à éviter des risques potentiels pour la santé publique.
SMALTIMENTO DEI RIFIUTI D’APPARECCHIATURE ELETTRICHE ED ELETTRONICHE DA PARTE DEGLI UTENTI DOMESTICI ALL’INTERNO DELL’UNIONE EUROPEA.
Il prodotto che avete acquistato è stato disegnato e fabbricato con materiali e componenti d’alta qualità che possono essere riciclati e riutilizzati. Quando un prodotto è contrassegnato con questo simbolo, un bidone di spazzatura con ruote sbarrato, significa che è regolato dalla direttiva europea 2002/96/EC sui rifiuti d’apparecchiature elettriche ed elettroniche. Questo simbolo indica che il prodotto non deve essere smaltito insieme ai normali residui urbani. Quando si deve smaltire un prodotto contrassegnato con questo simbolo è responsabilità dell’utente provvedere a depositarlo negli appositi punti di raccolta destinati ad apparecchiature elettriche ed elettroniche. Per ottenere maggiori informazioni circa lo smaltimento delle apparecchiature elettriche ed elettroniche ormai inutilizzabili, Vi invitiamo a contattare le autorità locali di competenza, il servizio di smaltimento rifiuti urbani o il rivenditore presso il quale avete acquistato il prodotto. La corretta raccolta ed il trattamento delle apparecchiature inutilizzabili aiuteranno a conservare le risorse naturali e a prevenire potenziali rischi per la salute pubblica.

www.mediclinics.com
-77-
ELIMINAÇÃO DE RESÍDUOS DE EQUIPAMENTOS ELÉCTRICOS E ELECTRÓNICOS POR PARTE DE UTILIZADORES DOMÉSTICOS NA UNIÃO EUROPEIA
O produto que adquiriu foi concebido e fabricado com materiais e componentes de elevada qualidade que podem ser reciclados e reutilizados. Quando vir um produto marcado com este símbolo de um contentor de rodas barrado com uma cruz significa que esse produto está regulado pela Directiva Europeia 2002/96/EC sobre resíduos de equipamentos eléctricos e electrónicos. Este símbolo indica que o produto não se pode deitar ao lixo juntamente com os resíduos urbanos habituais. Quando um produto marcado com este símbolo tiver de ser eliminado, é da responsabilidade do utilizador entregá-lo num ponto de recolha de aparelhos eléctricos e electrónicos designado. Para obter mais informações sobre como eliminar os seus equipamentos eléctricos ou electrónicos, quando estes tiverem concluído a sua vida útil, entre em contacto com as autoridades locais, o serviço de gestão de resíduos urbanos ou o estabelecimento onde adquiriu o produto. A recolha e o tratamento correctos dos equipamentos fora de uso contribuem para preservação dos recursos naturais e também para evitar potenciais riscos para a saúde pública.
УТИЛИЗАЦИЯ ЭЛЕКТРИЧЕСКОГО И ЭЛЕКТРОННОГО ОБОРУДОВАНИЯ БЫТОВЫМИ ПОЛЬЗОВАТЕЛЯМИ В ЕВРОПЕЙСКОМ СОЮЗЕ.
Приобретенный Вами продукт был спроектирован и произведен из высококачественных материалов и компонентов, которые могут быть подвергнуты вторичной обработке и повторно использованы. Если Вы видите продукт с указанным символом в виде перечеркнутого контейнера для мусора на колесиках, это означает, что использование данного продукта регулируется Директивой ЕС № 2002/96/EC "Об утилизации электрического и электронного оборудования". Данный символ означает, что продукт не может быть утилизирован вместе с обычными городскими отходами. В том случае если продукт с указанным символом подлежит утилизации, пользователь должен сдать его в специальном пункте сбора электрической и электронной аппаратуры. Для получения более подробной информации относительно утилизации Вашего электрического и электронного оборудования после истечения срока их службы свяжитесь с местными органами власти, обратитесь в службу, отвечающую за организацию сбора и удаления городских отходов, либо в организацию, в которой данный продукт был приобретен. Соблюдение норм при сборе и переработке непригодного оборудования способствует сохранению природных ресурсов и позволяет избежать потенциального риска для здоровья людей.
HUSHÅLLENS AVFALLSHANTERING AV ELEKTRISKA OCH ELEKTRONISKA INOM EUROPEISKA UNIONEN. Denna produkt är utformad och tillverkad med material och komponenter av hög kvalitet som kan återvinnas eller återanvändas. När en produkt visas med denna symbol med en överkryssad soptunna på hjul anger detta att produkten omfattas av rådets direktiv 2002/96/EG om avfall som utgörs av eller innehåller elektriska eller elektroniska produkter. Symbolen innebär att produkten inte skall slängas tillsammans med vanligt hushållsavfall. När en produkt märkt med denna symbol skall elimineras är det användarens ansvar att lämna den på en plats för insamling av elektriska och elektroniska apparater. För mer information om hur elektriska och elektroniska apparater skall hanteras när de inte längre är användbara, kontakta lokala myndigheter, kommunal avfallshantering eller företaget där produkten förvärvades. Korrekt insamling och behandling av gamla apparater bidrar till att bevara naturresurser och även till att undvika potentiella risker för allmän hälsa.
ODLAGANJE ELEKTRIČNOG I ELEKTRONSKOG OTPADA U EVROPSKOJ UNIJI Proizvod koji ste kupili je dizajniran i proizveden od veoma kvalitetnih materijala i delova koji se mogu reciklirati i ponovo upotrebiti. Ako na proizvodu vidite ovaj simbol precrtane kante za đubre na točkićima, to znači da taj proizvod podleže Evropskoj regulativi broj 2002/96/EC o odlaganju električnog i elektronskog otpada. Ovaj simbol znači da proizvod ne sme da se meša sa običnim otpadom. Vlasnici i korisnici svih proizvoda obeleženih ovim simbolom treba da ih odnesu na posebno mesto gde se odlaže električni i elektronski otpad. Za dalje informacije šta učiniti sa električnim i elektronskim aparatima koji više nisu u upotrebi, molimo da se obratite vašim lokalnim službama, gradskoj službi za odlaganje otpada ili firmi kod koje je proizvod kupljen. Propisno sakupljanje i odlaganje starih aparata doprinosi očuvanju prirodne sredine i sprečavanju mogućih opasnosti po zdravlje.
BORTSKAFFELSE AF AFFALD AF ELEKTRISK OG ELEKTRONISK UDSTYR FRA PRIVATE FORBRUGERE I EU Elektrisk og elektronisk udstyr indeholder materialer, komponenter og stoffer, der kan være skadelige for menneskers sundhed og for miljøet, hvis kasseret elektrisk og elektronisk udstyr ikke håndteres korrekt. Elektrisk og elektronisk udstyr er mærket med en overkrydsede skraldespand. Den symboliserer, at elektrisk og elektronisk udstyr ikke må bortskaffes sammen med usorteret husholdningsaffald, men skal indsamles særskilt. Alle kommuner har etableret indsamlingsordninger, hvor elektrisk og elektronisk udstyr gratis kan afleveres af borgerne på genbrugsstationer og andre indsamlingssteder eller bliver afhentet direkte fra husholdningerne. Nærmere information kan fås hos kommunens tekniske forvaltning.
-78-
ΔΙΑΘΕΣΗ ΑΠΟΒΛΗΤΩΝ ΕΙΔΩΝ ΗΛΕΚΤΡΙΚΟΥ ΚΑΙ ΗΛΕΚΤΡΟΝΙΚΟΥ ΕΞΟΠΛΙΣΜΟΥ ΑΠΟ ΟΙΚΙΑΚΟΥΣ ΧΡΗΣΤΕΣ ΣΤΗΝ ΕΥΡΩΠΑΪΚΗ ΕΝΩΣΗ
Το προϊόν που αγοράσατε σχεδιάστηκε και κατασκευάστηκε με υλικά και στοιχεία υψηλής ποιότητας, τα οποία μπορούν να ανακυκλωθούν και να επαναχρησιμοποιηθούν. Η επισήμανση προϊόντων με αυτό το σύμβολο ενός διαγραμμένου κάδου απορριμμάτων με ρόδες σημαίνει ότι η διάθεση του εκάστοτε προϊόντος διέπεται από την Ευρωπαϊκή Οδηγία 2002/96/ΕΚ σχετικά με τα απόβλητα ειδών ηλεκτρικού και ηλεκτρονικού εξοπλισμού. Αυτό το σύμβολο υποδεικνύει ότι το προϊόν δεν μπορεί να αποκομιστεί μαζί με τα συνηθισμένα αστικά απόβλητα. Όταν το επισημασμένο με αυτό το σύμβολο προϊόν πρέπει να αποκομιστεί, υπόκειται στην ευθύνη του χρήστη η παράδοσή του σε ένα σημείο συλλογής ειδών ηλεκτρικού και ηλεκτρονικού εξοπλισμού. Για περισσότερες πληροφορίες σχετικά με τον τρόπο αποκομιδής των ειδών του ηλεκτρικού και ηλεκτρονικού εξοπλισμού σας, απευθυνθείτε στις τοπικές αρχές, στην υπηρεσία διάθεσης αστικών αποβλήτων ή στο κατάστημα, από το οποίο αγοράσατε το προϊόν, όταν αυτό ολοκληρώσει την ωφέλιμη διάρκεια ζωής του. Η σωστή αποκομιδή και κατεργασία άχρηστων συσκευών συμβάλλει στη διατήρηση των φυσικών πόρων καθώς και στην αποφυγή δυνητικών κινδύνων για τη δημόσια υγεία.
DE VERWIJDERING VAN AFVALSTOFFEN UIT ELEKTRISCHE EN ELEKTRONISCHE APPARATEN DOOR HUISHOUDELIJK
GEBRUIKERS BINNEN DE EUROPESE GEMEENSCHAP. Het door u gekochte product is ontworpen en vervaardigd met materialen en onderdelen die aan hoge kwaliteitsnormen voldoen en die gerecycled en hergebruikt kunnen worden. Wanneer u een product ziet voorzien van dit kenmerk van een doorgestreepte vuilniscontainer op wielen, betekent dit dat de Europese Richtlijn 2002/96/EEG betreffende afgedankte elektrische en elektronische apparatuur hierop van toepassing is. Dit kenmerk geeft aan dat het product niet bij het normale huisvuil kan worden gedeponeerd. Producten voorzien van genoemd kenmerk dienen door de gebruiker aangeboden te worden bij een recyclepunt voor elektrische en elektronische apparaten in zijn gemeente. Voor meer informatie over het afdanken van van onbruikbare elektrische en elektronische apparaten, kunt u contact opnemen met uw gemeente, de ophaaldienst voor stadsvuil of de winkel waar u het product heeft gekocht. De correcte verwerking en behandeling van onbruikbare apparaten draagt bij tot het behoud van de natuurlijke rijkdommen en voorkomt eveneens het risico van mogelijke schade aan de volksgezondheid.
![[θ] [h] [ıə] [eə] thank ham here hare think hand ear hair mouth hair there.](https://static.fdocument.org/doc/165x107/56649f3f5503460f94c5fbe7/-h-i-e-thank-ham-here-hare-think-hand-ear-hair-mouth-hair-there.jpg)