5DE User Defined Assay (UDA) Guide Egyéni vizsgálatok (UDA ......
63
User Defined Assay (UDA) Guide VITROS ® 4600 Chemistry System J39825EN
Transcript of 5DE User Defined Assay (UDA) Guide Egyéni vizsgálatok (UDA ......
J39825CS
metody (UDA)Příručka pro uživatelské
VITROS® 4600 Chemistry System
J39825DA
Vejledning om brugerdefineret analyse (UDA)
VITROS® 4600 Chemistry System
Handbuch für benutzerdefinierteTests (UDA)
J39825DE
VITROS® 4600 Chemistry System
Προσδιορισμός οριζόμενος από τονχρήστη (UDA)
J39825EL
Σύστημα Χημείας VITROS® 4600
User Defined Assay (UDA) Guide VITROS® 4600 Chemistry System
J39825EN
Manual de la prueba definida por elusuario (UDA)
J39825ES
VITROS® 4600 Chemistry System
J39825FR
Guide des dosages définis par l’utilisateur (UDA)Système de chimie clinique VITROS® 4600
Egyéni vizsgálatok (UDA) útmutatóVITROS®
J39825HU
VITROS® 4600 laboratóriumi rendszer
Guida ai Dosaggi personalizzati (UDA)
J39825IT
Sistema VITROS® 4600
J39825JA
ユーザー定義項目(UDA)ガイド
VITROS® ケミストリーシステム
J39825KO
사용자정의분석항목(UDA)가이드VITROS® 4600 화학시스템
Veiledning for brukerdefinert analyse (UDA)
J39825NO
VITROS® 4600 Chemistry System
J39825PL
Analizator biochemiczny VITROS® 4600
Przewodnik dotyczący oznaczeń zdefiniowanych przez użytkownika
Guia de Ensaios Definidos pelo Utilizador (UDA)
J39825PT
Sistema Químico VITROS® 4600
J39825RO
Ghid Analiză definită de utilizator (ADU) Sistemele de chimie VITROS® 4600
J39825SV
Guide för användardefinierade analyser (UDA) VITROS® 4600 kemisystem
Export authorized under general license GTDA (General Technical Data Available)
IMPORTANTThe information contained herein is based on the experience and knowledge relating to the subject matter gained by Ortho Clinical Diagnostics prior to publication.
No patent license is granted by the information.
Ortho Clinical Diagnostics reserves the right to change this information without notice, and makes no warranty, express or implied, with respect to the information. The company shall not be lia-ble for any loss or damage, including consequential or special damages resulting from the use of this information, even if loss or damage is caused by its negligence or other fault.
VITROS® is a registered trademark of Ortho Clinical Diagnostics.
© Ortho Clinical Diagnostics 2008-2016. All rights reserved.
Pub. No.: J39825EN i2016-06-30
VITROS® 4600 Chemistry System
Revision History: User Defined Assay (UDA) Guide
Title Location Change
Worksheet Key • On the System: Worksheet Key(page 8-3)
• On the CD-ROM: Chapter 8, UserDefined Assay Worksheet
Updated UD10 to UD20.
Note: Refer to V-Docs for Revision Histories of previous versions.

This page is intentionally left blank.
ii Pub. No.: J39825EN2016-06-30
VITROS® 4600 Chemistry System
Pub. No.: J39825EN iii2016-06-30
VITROS® 4600 Chemistry System
Contents
Chapter 1 IntroductionVITROS MicroTip Assay Processing ............................................................................................. 1-2
Chapter 2 Define a User Defined AssayStep 1: Complete the User Defined Assay Worksheet .................................................................. 2-1Step 2: Define a New Assay .......................................................................................................... 2-1Step 3: Configure Dilution Parameters .......................................................................................... 2-6Step 4: Configure Result Parameters ............................................................................................ 2-7
End Point ................................................................................................................................. 2-92 Point Rate ........................................................................................................................... 2-102 Point with Antigen Excess Rate Check ............................................................................... 2-11Multi-Point Rate ..................................................................................................................... 2-12
Step 5: Configure Protocol Parameters ....................................................................................... 2-14Step 6: Configure Calibration Parameters ................................................................................... 2-15
Linear or Logit/Log Parameters ............................................................................................. 2-16Cubic Spline Additional Parameters ...................................................................................... 2-17
Step 7: Configure Triple Read Parameters ................................................................................. 2-18Step 8: Enter Reagent Lot Information ........................................................................................ 2-18Step 9: Fill and Load Reagent Packs .......................................................................................... 2-19
Chapter 3 Maintain a User Defined AssayReview/Edit a User Defined Assay ................................................................................................ 3-1Configure Sample Indices Threshold Limits .................................................................................. 3-2Edit Reagent Lot Information ......................................................................................................... 3-2Delete a User Defined Assay ........................................................................................................ 3-3Delete a User Defined Calibrator Lot ............................................................................................. 3-4Define a New User Defined Diluent ............................................................................................... 3-5Delete a User Defined Diluent ....................................................................................................... 3-5
Chapter 4 Antigen ExcessMethod 1: Early Absorbance Read ............................................................................................... 4-2Method 2: Early Rate Read ........................................................................................................... 4-4Method 3: Antigen Excess Defined Kinetics Slope Changes ........................................................ 4-6
Chapter 5 Triple Read Algorithm OverviewTriple Read Parameter Defaults .................................................................................................... 5-1Triple Read Parameters Adjustment ............................................................................................. 5-2
Chapter 6 Molar Extinction Coefficient
Chapter 7 Quick Reference Table
Chapter 8 User Defined Assay WorksheetWorksheet Key .............................................................................................................................. 8-3
This page is intentionally left blank.
iv Pub. No.: J39825EN2016-06-30
VITROS® 4600 Chemistry System
Pub. No.: J39825EN 1-12016-06-30
VITROS® 4600 Chemistry System
Chapter 1 Introduction
The User Defined Assay (UDA) feature allows you to expand the assay menu beyond thoseassays currently available from Ortho Clinical Diagnostics (OCD). Using the UDA feature, youcan program assay protocols using pre-formatted assay templates and reagents from othervendors, or you can define your own protocols.UDAs use the VITROS® MicroTip™ assay processing side of the MicroImmunoassay Center.This processing center is equipped with a thermally controlled reagent supply for on-systemreagent storage (at 8°C ± 2°C), a metering system capable of delivering precise and accuratesample and reagent volume, an incubator (at 37°C), and a photometer with 12 wavelengths.The system supports enzymatic, colorimetric, and turbidimetric assay methodologies. You canuse serum, plasma, urine, cerebrospinal fluid, and whole blood hemolysate samples. Sampledilution and pre-dilution are supported for these sample types. OCD provides empty reagentpacks to be filled with your reagents.Multiple calibration models (linear regression, cubic spline, Logit/Log4 and Logit/Log5) areavailable. The UDA feature is supported by all of the current capabilities of the system thatensure quality results for assays, including:
• Sample clot detection• Sample indices checks• Calibration checks: replicate range, monotonicity, variability of response• Optical quality of reaction cuvettes• Antigen excess/substrate depletion checks
This guide contains the following sections:Define a User Defined Assay (page 2-1)Maintain a User Defined Assay (page 3-1)Antigen Excess (page 4-1)Triple Read Algorithm Overview (page 5-1)Molar Extinction Coefficient (page 6-1)Quick Reference Table (page 7-1)User Defined Assay Worksheet (page 8-1)
DisclaimerWARNING: Ortho Clinical Diagnostics expressly disclaims all warranties with respect to userdefined methods whether express or implied, including warranties of merchantability or fitnessfor a particular purpose.WARNING: Since Ortho Clinical Diagnostics does not manufacture or otherwise control thereagents that may be used in the VITROS UD Pack, the warranty for the system does notextend to the performance of user-defined reagents (including user-defined test results orstandard system test results that are affected by user-defined testing), their effect on thesystem operation and types and frequency of maintenance, or their effect on operator safety.The user assumes full responsibility for the selection of the proper reagents and entering theproper test parameters, use of the proper test protocol, correctness of the test results, and anyassociated errors or omissions. Each laboratory must establish its own performancecharacteristics in compliance with applicable laws and regulations before performing tests andreporting patient results for diagnostic purposes. The user assumes full responsibility for anylocal or regional regulatory requirements resulting from the use of user-defined reagents on thesystem.
1-2 Pub. No.: J39825EN2016-06-30
Introduction VITROS® 4600 Chemistry System
WARNING: All fluids used on the system are disposed of in an on-board waste container.Use of reactive chemicals may create a hazard to the operator.IMPORTANT: Neither the Customer nor its employees or agents may alter or modify anypart of the Equipment or related software without prior written consent from Ortho-ClinicalDiagnostics, Inc.IMPORTANT: Report all VITROS® System errors generated when processing ResearchUse Only (RUO) Reagents to Customer Technical Services at Ortho Clinical Diagnostics.
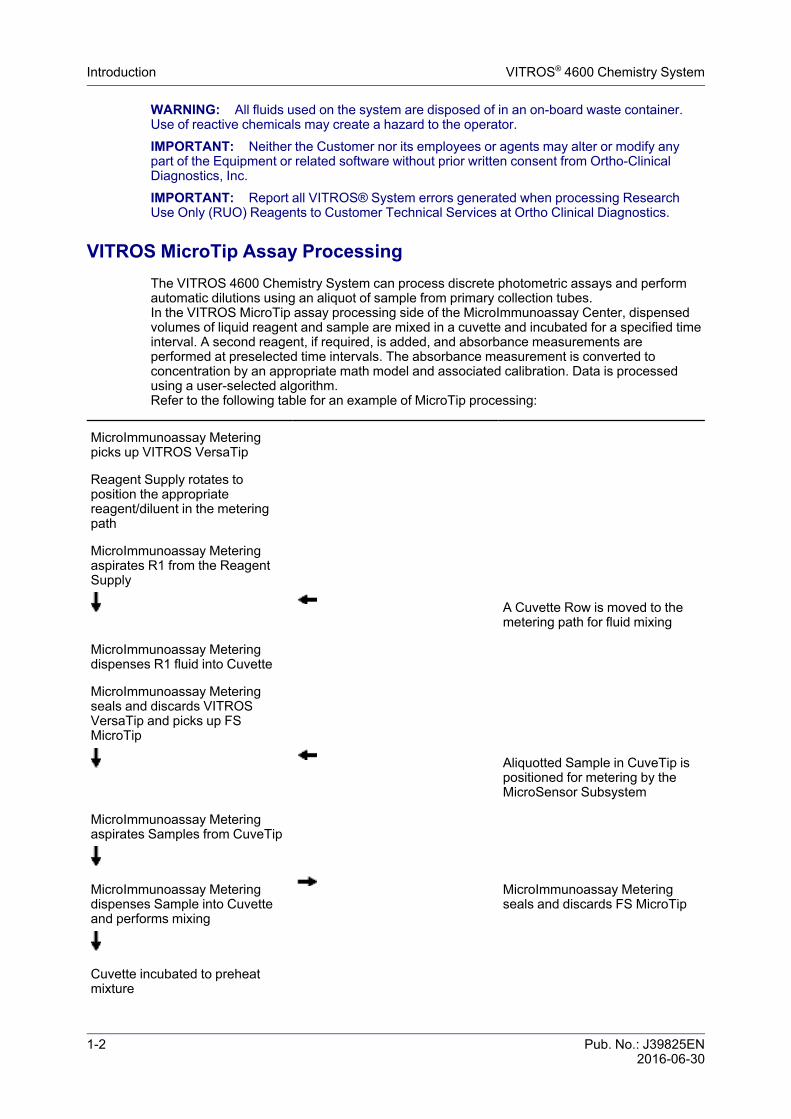
VITROS MicroTip Assay ProcessingThe VITROS 4600 Chemistry System can process discrete photometric assays and performautomatic dilutions using an aliquot of sample from primary collection tubes.In the VITROS MicroTip assay processing side of the MicroImmunoassay Center, dispensedvolumes of liquid reagent and sample are mixed in a cuvette and incubated for a specified timeinterval. A second reagent, if required, is added, and absorbance measurements areperformed at preselected time intervals. The absorbance measurement is converted toconcentration by an appropriate math model and associated calibration. Data is processedusing a user-selected algorithm.Refer to the following table for an example of MicroTip processing:
MicroImmunoassay Meteringpicks up VITROS VersaTip
Reagent Supply rotates toposition the appropriatereagent/diluent in the meteringpath
MicroImmunoassay Meteringaspirates R1 from the ReagentSupply
A Cuvette Row is moved to themetering path for fluid mixing
MicroImmunoassay Meteringdispenses R1 fluid into Cuvette
MicroImmunoassay Meteringseals and discards VITROSVersaTip and picks up FSMicroTip
Aliquotted Sample in CuveTip ispositioned for metering by theMicroSensor Subsystem
MicroImmunoassay Meteringaspirates Samples from CuveTip
MicroImmunoassay Meteringdispenses Sample into Cuvetteand performs mixing
MicroImmunoassay Meteringseals and discards FS MicroTip
Cuvette incubated to preheatmixture
Pub. No.: J39825EN 1-32016-06-30
VITROS® 4600 Chemistry System
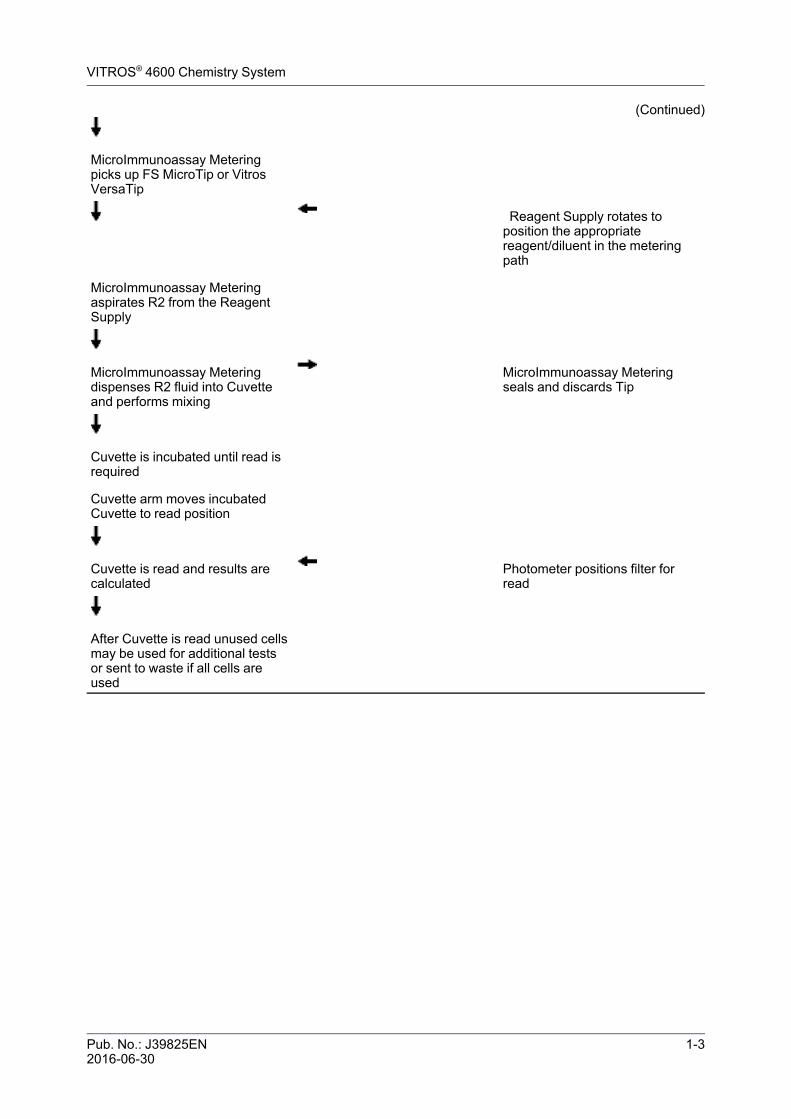
(Continued)
MicroImmunoassay Meteringpicks up FS MicroTip or VitrosVersaTip
Reagent Supply rotates toposition the appropriatereagent/diluent in the meteringpath
MicroImmunoassay Meteringaspirates R2 from the ReagentSupply
MicroImmunoassay Meteringdispenses R2 fluid into Cuvetteand performs mixing
MicroImmunoassay Meteringseals and discards Tip
Cuvette is incubated until read isrequired
Cuvette arm moves incubatedCuvette to read position
Cuvette is read and results arecalculated
Photometer positions filter forread
After Cuvette is read unused cellsmay be used for additional testsor sent to waste if all cells areused

This page is intentionally left blank.
1-4 Pub. No.: J39825EN2016-06-30
VITROS® 4600 Chemistry System
Pub. No.: J39825EN 2-12016-06-30
VITROS® 4600 Chemistry System
Chapter 2 Define a User Defined Assay
Touch the steps below to access information about the procedure.
1 Complete the User Defined Assay Worksheet (page 8-1)
2 Define a New Assay (page 2-1)
3 Configure Dilution Parameters (page 2-6)
4 Configure Result Parameters (page 2-7)
5 Configure Protocol Parameters (page 2-14)
6 Configure Calibration Parameters (page 2-15)
7 Configure Triple Read Parameters (page 2-18)
8 Enter Reagent Lot Information (page 2-18)
9 Fill and Load Reagent Packs (page 2-19)
Step 1: Complete the User Defined Assay WorksheetSpecial requirements: Use the vendor-supplied application sheet or your own assayprotocol information to complete the User Defined Assay Worksheet.
1 Use the UDA Worksheet (page 8-1) to organize and record data about your user-definedassay.
2 Use the UDA Worksheet Key (page 8-3) to understand information on the UDA Worksheet.
Step 2: Define a New AssaySpecial requirements: Note: Define the Sample Indices Threshold limits. Please refer tothe V-Docs Reference Guide for more information.
1 Navigate to the Options & Configuration – User Defined Assays screen.a Touch Options on the Status Console.
This button displays the Options & Configuration screen.b On the Options & Configuration screen, touch Configure Assays.
2-2 Pub. No.: J39825EN2016-06-30
Define a User Defined Assay VITROS® 4600 Chemistry System
This button displays the Options & Configuration – Configure Assays screen.c On the Options & Configuration – Configure Assays screen, touch the User Defined
Assays process button.
This button displays a Warning dialog and the Options & Configuration – User DefinedAssays screen.
d Read the information on the Warning dialog and touch OK to indicate that you acceptresponsibility for using non-OCD reagents on the system.
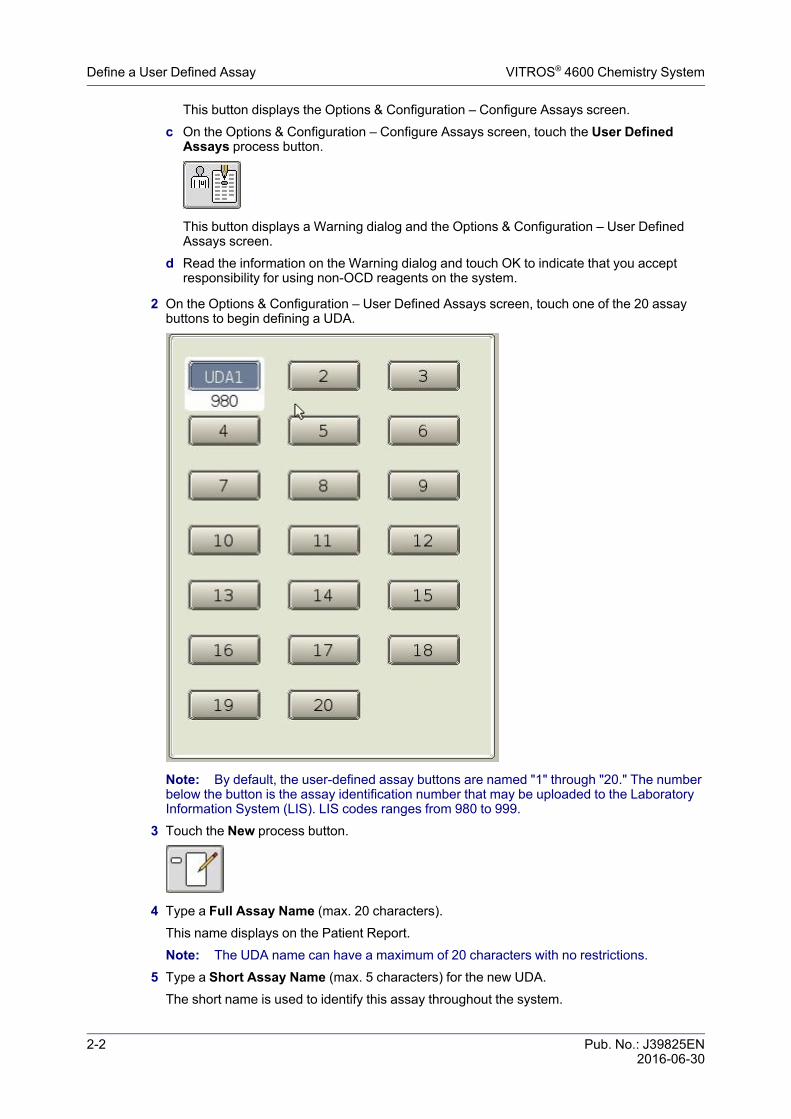
2 On the Options & Configuration – User Defined Assays screen, touch one of the 20 assaybuttons to begin defining a UDA.
Note: By default, the user-defined assay buttons are named "1" through "20." The numberbelow the button is the assay identification number that may be uploaded to the LaboratoryInformation System (LIS). LIS codes ranges from 980 to 999.
3 Touch the New process button.
4 Type a Full Assay Name (max. 20 characters).This name displays on the Patient Report.Note: The UDA name can have a maximum of 20 characters with no restrictions.
5 Type a Short Assay Name (max. 5 characters) for the new UDA.The short name is used to identify this assay throughout the system.
Pub. No.: J39825EN 2-32016-06-30
VITROS® 4600 Chemistry System Step 2: Define a New Assay
IMPORTANT: The short assay name must be distinct from existing OCD or other user-defined assay short names. The system checks for assays that are supported by OCD oralready defined assays.
6 Select a fluid from Fluid Type pulldown.IMPORTANT: Serum is currently the only available option.
7 Select an assay model from the Assay Model Type pulldown.The assay model type specifies when and how many photometric readings are taken. Yourselection is used to populate the list of templates available in the next step. Available optionsare:
Assay Model Type Description
None Select this option if you are unsure of the assaymodel and would like to view all of the availabletemplates in the next step.
2 Point Rate The system takes two readings, one at thebeginning of the reaction, and one at the end of thereaction.
2 Point w/ Antigen Excess Check A two-point rate with an additional early read tocheck for Antigen Excess.
End Point The system take a single reading at the end of thereaction and incubation period, with an optionalblank.
Multi-point The system takes a number of user-definablereads during the reaction, with an optional AntigenExcess check.
8 Select a protocol from the Template pulldown.The protocol template is a set of default values for an assay model type and protocol.Templates are loaded onto your system through the Assay Data Disk (ADD). Any previouslydefined UDA also displays as a template. This allows you to define a new user definedassay using the specific information from an existing UDA as a starting point.IMPORTANT: If appropriate, select the template options for End Point, Two Point Rateand Two Point Rate with Antigen Excess Rate Check that begin with an asterisk. Thesetemplates have pre-selected reagent and sample times that provide higher systemthroughput when multiple MicroTip assays are being run at the same time, compared toother templates. Use of the other templates could slow system throughput under times ofhigh usage.
Template Name Assay Model Protocol Steps
*EPT1 R1-S-R2 End Point • 1st Reagent Addition• Sample Addition• Optional Blank Read• 2nd Reagent Addition• End Point Read
2-4 Pub. No.: J39825EN2016-06-30
Define a User Defined Assay VITROS® 4600 Chemistry System
(Continued)*2PTAE R1-S-R2 Two Point Rate with Antigen
Excess Rate Check• 1st Reagent Addition• Sample Addition• 2nd Reagent Addition• Early Rate Read• 1st Rate Read• 2nd Rate Read
*2PT R1-S-R2 Two Point Rate • 1st Reagent Addition• Sample Addition• 2nd Reagent Addition• 1st Rate Read• 2nd Rate Read
Template Name Assay Model Protocol Steps
EPT1 R1-S End Point • Reagent Addition• Optional Blank Read• Sample Addition• End Point Read
EPT1 R1-R2-S End Point • 1st Reagent Addition• 2nd Reagent Addition• Optional Blank Read• Sample Addition• End Point Read
EPT2 R1-S End Point • Reagent Addition• Sample Addition• Optional Blank Read• End Point Read
EPT2 R1-S-R2 End Point • 1st Reagent Addition• Sample Addition• 2nd Reagent Addition• Optional Blank Read• End Point Read
EPT2 R1-R2-S End Point • 1st Reagent Addition• 2nd Reagent Addition• Sample Addition• Optional Blank Read• End Point Read
Pub. No.: J39825EN 2-52016-06-30
VITROS® 4600 Chemistry System Step 2: Define a New Assay
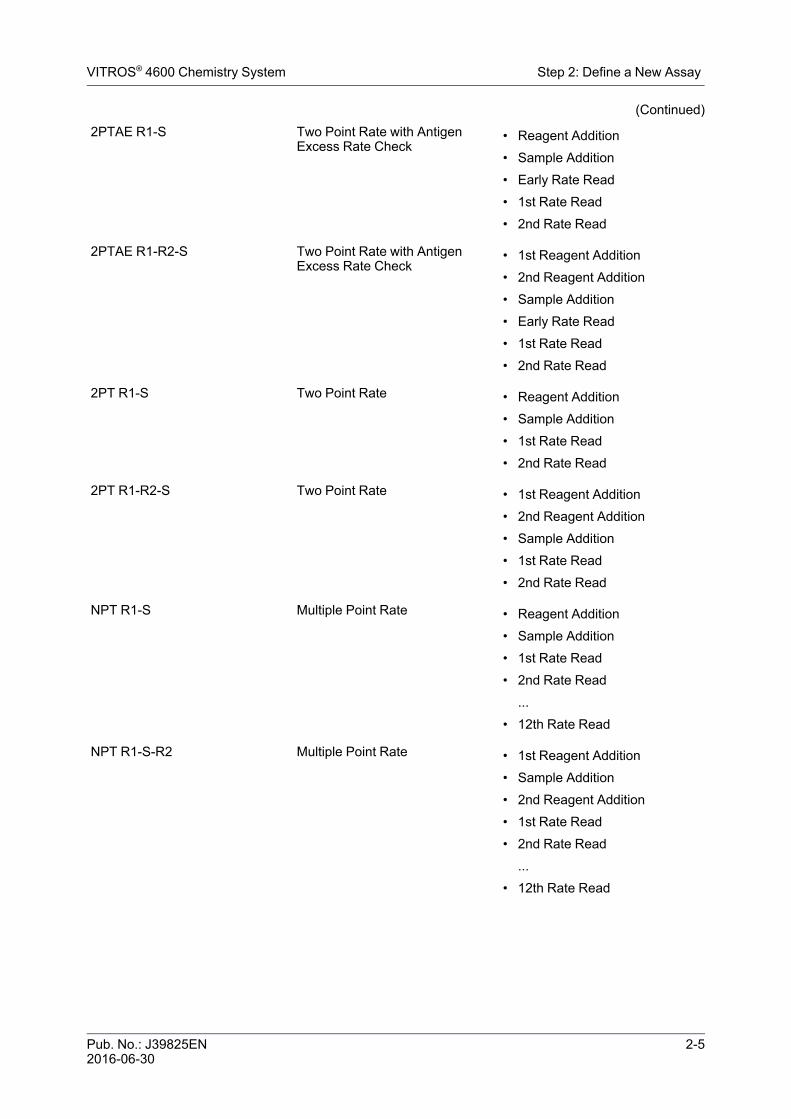
(Continued)2PTAE R1-S Two Point Rate with Antigen
Excess Rate Check• Reagent Addition• Sample Addition• Early Rate Read• 1st Rate Read• 2nd Rate Read
2PTAE R1-R2-S Two Point Rate with AntigenExcess Rate Check
• 1st Reagent Addition• 2nd Reagent Addition• Sample Addition• Early Rate Read• 1st Rate Read• 2nd Rate Read
2PT R1-S Two Point Rate • Reagent Addition• Sample Addition• 1st Rate Read• 2nd Rate Read
2PT R1-R2-S Two Point Rate • 1st Reagent Addition• 2nd Reagent Addition• Sample Addition• 1st Rate Read• 2nd Rate Read
NPT R1-S Multiple Point Rate • Reagent Addition• Sample Addition• 1st Rate Read• 2nd Rate Read
...• 12th Rate Read
NPT R1-S-R2 Multiple Point Rate • 1st Reagent Addition• Sample Addition• 2nd Reagent Addition• 1st Rate Read• 2nd Rate Read
...• 12th Rate Read
2-6 Pub. No.: J39825EN2016-06-30
Define a User Defined Assay VITROS® 4600 Chemistry System
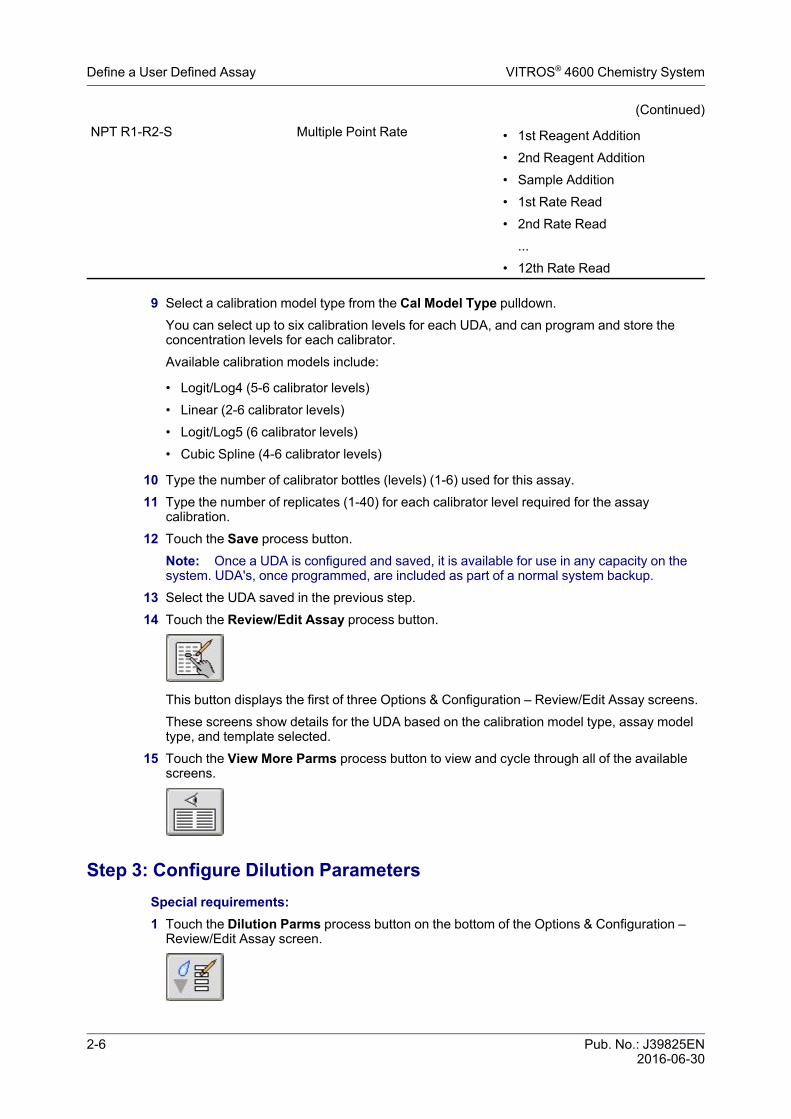
(Continued)NPT R1-R2-S Multiple Point Rate • 1st Reagent Addition
• 2nd Reagent Addition• Sample Addition• 1st Rate Read• 2nd Rate Read
...• 12th Rate Read
9 Select a calibration model type from the Cal Model Type pulldown.You can select up to six calibration levels for each UDA, and can program and store theconcentration levels for each calibrator.Available calibration models include:
• Logit/Log4 (5-6 calibrator levels)• Linear (2-6 calibrator levels)• Logit/Log5 (6 calibrator levels)• Cubic Spline (4-6 calibrator levels)
10 Type the number of calibrator bottles (levels) (1-6) used for this assay.11 Type the number of replicates (1-40) for each calibrator level required for the assay
calibration.12 Touch the Save process button.
Note: Once a UDA is configured and saved, it is available for use in any capacity on thesystem. UDA's, once programmed, are included as part of a normal system backup.
13 Select the UDA saved in the previous step.14 Touch the Review/Edit Assay process button.
This button displays the first of three Options & Configuration – Review/Edit Assay screens.These screens show details for the UDA based on the calibration model type, assay modeltype, and template selected.
15 Touch the View More Parms process button to view and cycle through all of the availablescreens.
Step 3: Configure Dilution ParametersSpecial requirements:1 Touch the Dilution Parms process button on the bottom of the Options & Configuration –
Review/Edit Assay screen.
Pub. No.: J39825EN 2-72016-06-30
VITROS® 4600 Chemistry System Step 4: Configure Result Parameters
This button displays the Edit Dilution Parameters dialog box.Note: For a user-defined diluent to appear on the drop-down list, you must first define it.See Define a New User Diluent (page 3-5) for more information.WARNING: If changing an existing UDA diluent or dilution factor, consider recalibration ofthe assay.
2 Select a diluent from the available options on the Edit Dilution Parameters dialog box.Diluents are loaded onto your system through the ADD and any previously user-defineddiluents display as available selections.Available diluents are:
• Saline• BSA• Water• Specialty• UED• ApoDiluent• DATDil2• DATDil• Lysis Buff• User Defined Diluents
3 Type a new value for the Standard Dilution Factor.This is the value used to calculate a result when a sample is diluted with a diluent prior toanalysis. Supported dilution factors are 1, 1.3-101, where 1 is an undiluted sample.For example, a standard dilution factor of 5 is 1 part sample and 4 parts diluent.
4 If you wish to enable reflex dilution, touch On.Reflex dilution enables the system to automatically dilute and re-assay samples with out-of-range results.
5 Type a reflex Dilution Factor.This reflex dilution factor will be used for samples requiring dilution at a reflex meteringstation.
6 Type a Reduction Factor.The reduction factor is used to reflex test results that are below the reportable range. Thestandard dilution factor is multiplied by the reduction factor (valid entries 0.2-1.0). Theresulting reflex dilution will be less than the standard dilution factor but must still be greaterthan 1.3.Standard Dilution Factor × Reduction Factor = Dilution Factor for Reflex TestNote: This is only applicable if the protocol includes pre-dilution of sample. The reductionfactor will allow a smaller pre-dilution factor.
7 Touch Save.
Step 4: Configure Result ParametersSpecial requirements:1 Touch the Result Parms process button on the bottom of the Options & Configuration –
Review/Edit Assay screen.
2-8 Pub. No.: J39825EN2016-06-30
Define a User Defined Assay VITROS® 4600 Chemistry System
This button launches the Options & Configuration – Edit Results Parameters screen.2 Select a Reporting Type
a Quantitative — Reference, Supplementary, and Measuring (Reportable) Rangesb Qualitative — 2 to 5 Qualitative Range and Measuring (Reportable) Range
Choice will determine what information is needed in step Step 10 (page 2-8) below.3 In the RESULT PARAMETERS section of the screen, touch the Units pulldown and select a
unit type from the list, or type the units into the box (max. 8 characters).WARNING: Changing units of an existing UDA affects previous results. Previous results inthe old units are not converted and no longer display correctly.
4 Enter the number of Significant Digits.Significant digits are the maximum number of digits (1–6) that display for all results andnumerical data.
5 Enter the number of Precision Digits.Precision digits are the maximum number of digits (0–3) that display to the right of thedecimal point.
6 In the USER ADJUSTED PARAMETERS section of the screen, type the Slope necessaryto correlate to the comparative method.
7 Type the Intercept necessary to correlate to a comparative method.The intercept is the mathematically established value of the observed result for method ‘y’when the result determined by method ‘x’ equals zero. The intercept value may be negativeor positive.
8 Select a time from the CuveTip Expiration Time pulldown.This is the amount of time a CuveTip sample can remain in the CUVETIP RING for thisparticular User Defined Assay before it is flagged as expired. Default is 35 minutes andminimum is 5 minutes.You can determine this number by considering the following factors: the approximateamount of time that a small amount of your sample can remain stable, considering samplevolatility and the affects of temperature and humidity on the sample’s stability.When you set a shorter expiration time, you affect the priority of processing of this samplewithin the system. However, if the system is very busy or other tasks are queued as stat, yourisk the possibility that your sample will be flagged by the system as expired before it can beprocessed.
9 Touch the Temperature Sensitive check box, if required.The temperature sensitive assays option improves the precision of temperature sensitiveassays by restricting the cells within a cuvette row that can be used. Although precision maybe improved, throughput may be reduced.
10 In the RANGES section of the screen enter the Quantitative or Qualitative Rangeinformation depending on the choice made in step Step 2 (page 2-8) above.a Quantitative Ranges
Quantitative Ranges Description
Type the upper and lower values for the Referencerange.
The reference range defines the highest and lowestamounts of the analyte found in an apparentlyhealthy population. Also referred to as “normalrange.”
Pub. No.: J39825EN 2-92016-06-30
VITROS® 4600 Chemistry System Step 4: Configure Result Parameters
(Continued)Type the upper and lower values for theSupplementary range.
The supplementary range is the operator-definedlimits, outside or equal to the reference range, forresults that may require immediate attention and/oraction by the laboratory.
Type the upper and lower values for theMeasuring (Reportable) range.
The lowest to the highest analyte concentrationthat the protocol is capable of predicting. Alsoreferred to as dynamic range.
b Qualitative Ranges
Qualitative Ranges Description
Type the Number of Qualitative Ranges (2–5). This value indicates how many rows of result textand cut-off values are displayed in the RANGESsection of the screen.
Type the result text for each qualitative range. Qualitative result string for each range
Type the cut-off values for each qualitative range Range of results that will report the definedqualitative result string.
Report Qualitative Result Outside of Range If selected, the qualitative result string will bereported if the result is outside of the measuring(reportable) range.
Type the upper and lower values for theMeasuring (Reportable) range.
The measuring (reportable) range defines thelowest and the highest amount of the analyte thatan assay protocol is capable of predicting. Alsoreferred to as the “calibration range” or “linearrange.”
11 Touch the Save process button.12 Touch the More Assay Parms process button to configure additional parameters.
The Additional Parameters dialog that displays depends on the selected assay's model type:
• End Point (page 2-9)• 2 Point Rate (page 2-10)• 2 Point with Antigen Excess Rate Check (page 2-11)• Multi Point (page 2-12)
End PointSpecial requirements: If you previously selected End Point as the assay model type, theEdit End Point Additional Parameters dialog displays when you touch the More Assay Parms
process button.
1 Edit the following parameters for this assay:
2-10 Pub. No.: J39825EN2016-06-30
Define a User Defined Assay VITROS® 4600 Chemistry System
Initial Absorbance Limits The range of values expected at the system's first check of the calibrationcurve to determine whether it is within the expected assay range.Absorbance units.
• Values for each field are -0.2 to 3.5• Field length (including sign): 6 characters• Significant digits: 4• Precision digits: 3
Blank Absorbance Limits The range of values expected at the system's blank-read check of thecalibration curve to determine whether it is within the expected assayrange. Absorbance units.
• Values for each field are -0.2 to 3.5• Field length (including sign): 6 characters• Significant digits: 4• Precision digits: 3
2 Touch Save to save the result parameters and return to the Options & Configurations – EditResults Parameters screen.
2 Point RateSpecial requirements: If you previously selected 2 Point Rate as the assay model type, theEdit 2 Point Rate Additional Parameters dialog displays when you touch the More Assay
Parms process button.
1 Edit the following parameters for this assay:
Initial Absorbance Limits The range of values expected at the system's first check of the calibrationcurve to determine whether it is within the expected assay range.Absorbance units.
• Values for each field are -0.2 to 3.5• Field length (including sign): 6 characters• Significant digits: 4• Precision digits: 3
Second Absorbance Limits The range of values expected at the system's second check of thecalibration curve to determine whether it is within the expected assayrange. Absorbance units.
• Values for each field are -0.2 to 3.5• Field length (including sign): 6 characters• Significant digits: 4• Precision digits: 3
Pub. No.: J39825EN 2-112016-06-30
VITROS® 4600 Chemistry System Step 4: Configure Result Parameters
Antigen Excess Factor An absorbance value that, when added to the high calibrator absorbancevalue, will set the antigen excess limit. For example, if the absorbance ofmultiple runs of the high level calibrator is 0.900 and the operator decidesto use a 20% cutoff, the operator will enter a value of 0.18 (20% of 0.900)absorbance units.
• Values are 0-10• Field length including the decimal point: 7 characters• Precision after decimal point: 4 digits
IMPORTANT: Before changing the default Antigen Excess Factor, foryour UDA, please review Antigen Excess (page 4-1).
2 Touch Save to save the result parameters and return to the Options & Configurations – EditResults Parameters screen.
2 Point with Antigen Excess Rate CheckSpecial requirements: If 2 Point with Antigen Excess Rate Check is selected as the assaymodel type, the Edit 2 Point with Antigen Excess Rate Check Additional Parameters dialog is
displayed when you touch the More Assay Parms process button.
1 Edit the additional parameters for this assay.
Initial Absorbance Limits The range of values expected at the system's first check of the calibrationcurve to determine whether it is within the expected assay range.Absorbance units.
• Values for each field are -0.2 to 3.5• Field length (including sign): 6 characters• Significant digits: 4• Precision digits: 3
Second Absorbance Limits The range of values expected at the system's second check of thecalibration curve to determine whether it is within the expected assayrange. Absorbance units.
• Values for each field are -0.2 to 3.5• Field length (including sign): 6 characters• Significant digits: 4• Precision digits: 3
Antigen Excess Factor An absorbance value that, when added to the high calibrator absorbancevalue, will set the antigen excess limit. For example, if the absorbance ofmultiple runs of the high level calibrator is 0.900 and the operator decidesto use a 20% cutoff, the operator will enter a value of 0.18 (20% of 0.900)absorbance units.
• Values are 0-10• Field length including the decimal point: 7 characters• Precision after decimal point: 4 digits
IMPORTANT: Before changing the default Antigen Excess Factor, foryour UDA, please review Antigen Excess (page 4-1).
2-12 Pub. No.: J39825EN2016-06-30
Define a User Defined Assay VITROS® 4600 Chemistry System
Early Rate Read Index The earliest-read value that is not included in the response computation.
• Values are 1 or 2• Field length: 1 character
Note: This value is not displayed for 2–Point assays without antigenexcess rate check.
2 Touch Save to save the result parameters and return to the Options & Configurations – EditResults Parameters screen.
Multi-Point RateSpecial requirements: If Multi Point is selected as the assay model type, the Edit Multi-Point Rate Additional Parameters dialog is displayed when you touch the More Assay Parms
process button.
1 Edit the additional parameters for this assay.
Initial Absorbance Limits The range of values expected at the system's first check of the calibrationcurve to determine whether it is within the expected assay range.Absorbance units.
• Values for each field are -0.2 to 3.5• Field length (including sign): 6 characters• Significant digits: 4• Precision digits: 3
Antigen Excess Limit A slope that defines antigen excess. Samples with slopes above theAntigen Excess Limit are "flagged" as being in antigen excess. Forexample, if the slope of the calibrator is 1.0 and the user decides to use a20% cutoff, a slope of 1.20 is entered as the Antigen Excess Limit. Asample giving a slope of 1.25 will be in antigen excess (1.25 > 1.20).Response units.
• Values are 0-10• Field length including the decimal: 7 characters• Precision after decimal point: 4 digit
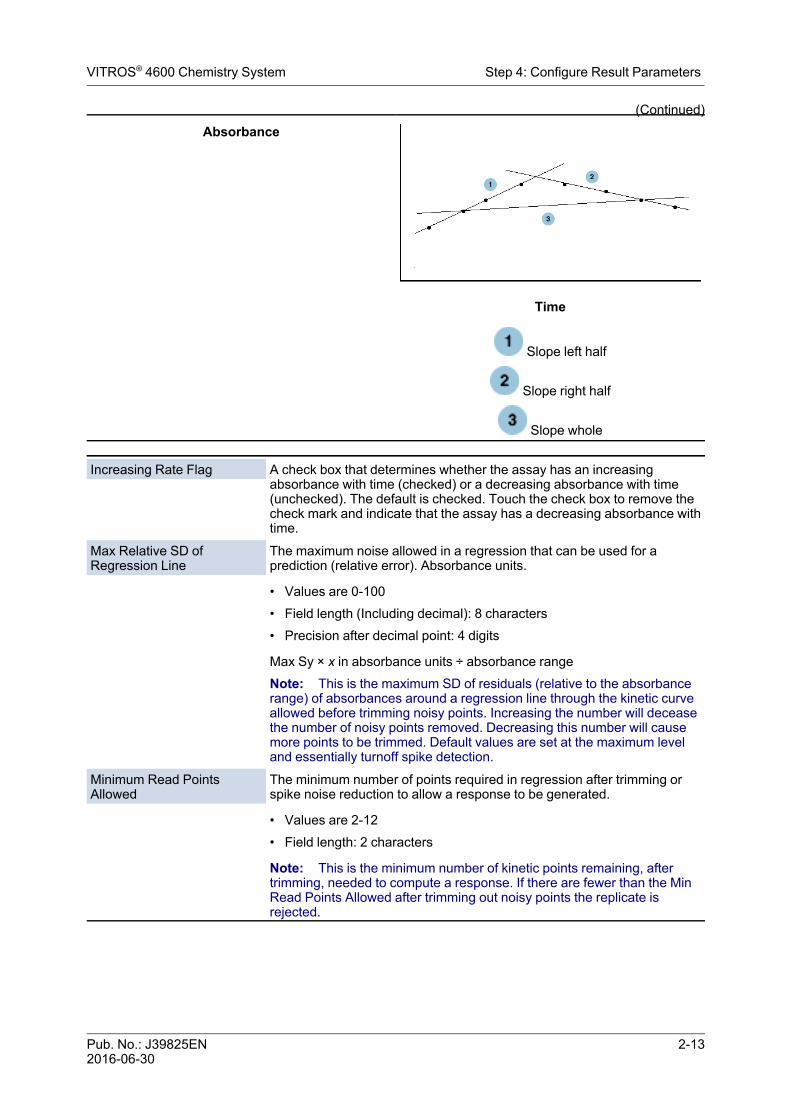
Nonlinearity Limit The amount of curvature required prior to trimming the calibration curve.Response units.
• Values are 0-1000• Field length (including the decimal) 9 characters• Field length (including decimal): 9 characters• Precision after Decimal Point: 4 digits
Pub. No.: J39825EN 2-132016-06-30
VITROS® 4600 Chemistry System Step 4: Configure Result Parameters
(Continued)Absorbance
Time
Slope left half
Slope right half
Slope whole
Increasing Rate Flag A check box that determines whether the assay has an increasingabsorbance with time (checked) or a decreasing absorbance with time(unchecked). The default is checked. Touch the check box to remove thecheck mark and indicate that the assay has a decreasing absorbance withtime.
Max Relative SD ofRegression Line
The maximum noise allowed in a regression that can be used for aprediction (relative error). Absorbance units.
• Values are 0-100• Field length (Including decimal): 8 characters• Precision after decimal point: 4 digits
Max Sy × x in absorbance units ÷ absorbance rangeNote: This is the maximum SD of residuals (relative to the absorbancerange) of absorbances around a regression line through the kinetic curveallowed before trimming noisy points. Increasing the number will deceasethe number of noisy points removed. Decreasing this number will causemore points to be trimmed. Default values are set at the maximum leveland essentially turnoff spike detection.
Minimum Read PointsAllowed
The minimum number of points required in regression after trimming orspike noise reduction to allow a response to be generated.
• Values are 2-12• Field length: 2 characters
Note: This is the minimum number of kinetic points remaining, aftertrimming, needed to compute a response. If there are fewer than the MinRead Points Allowed after trimming out noisy points the replicate isrejected.
2-14 Pub. No.: J39825EN2016-06-30
Define a User Defined Assay VITROS® 4600 Chemistry System
Max SD of Regression Line The maximum noise allowed in a regression that can be used for aprediction (absolute error). Absorbance units.
• Values are 0-10• Field length (including decimal): 7 characters• Precision after decimal point: 4 digits
Max Sy × x in absorbance unitsNote: This is the maximum SD of residuals of absorbances around aregression line through the kinetic curve allowed before trimming noisypoints. Increasing the number will decrease the number of noisy pointsremoved. Decreasing this number will cause more points to be trimmed.Default values are set at the maximum level and essentially turn-off spikedetection.
2 Touch Save to save the result parameters and return to the Options & Configurations – EditResults Parameters screen.IMPORTANT: Multi-point assay selection will decrease the throughput of all assays.
Step 5: Configure Protocol ParametersSpecial requirements: Note: The protocol parameters that are configured in this step aredependent upon the template selected. Use of templates starting with an astrisk have pre-selected reagent and sample times that provide higher system throughput when multipleMicroTip assays are being run at the same time, compared to other templates.
1 Touch the Protocol Parms process button at the bottom of the Review/Edit Assay screen.
This button launches the Options & Configuration – Edit Protocol Parameters screen.The left side of the Options & Configuration – Edit Protocol Parameters screen displays theProtocol Steps (determined by the template chosen).The right side of the Options & Configuration – Edit Protocol Parameters screen displays theView Protocol parameters for each protocol step.
2 On the left side of the Options & Configuration – Edit Protocol Parameters screen, touch oneof the Protocol Steps (Reagent, Sample, Incubation, Read) in the list to display theselected Protocol Step dialog.
3 Touch the View Protocol process button to re-display the View Protocol parameters foreach protocol step on the right side of the screen.
This button re-displays the View Protocol parameters.The following steps describe how to configure each protocol parameter.
4 Touch a Reagent protocol step displayed on the left side of the screen to display theprotocol step dialog.a Type the reagent Volume (µL) (30 – 200µL in 0.1µL increments) in the text box.
This volume is only applicable to the first reagent addition.b Select a Pack Name/Bottle designation from the pulldown.
Pub. No.: J39825EN 2-152016-06-30
VITROS® 4600 Chemistry System Step 6: Configure Calibration Parameters
5 Touch a Sample protocol step displayed on the left side of the screen to display the protocolstep dialog.a Type the sample Volume (µL) (2 – 59.9µL in 0.1µL increments) in the text box.
Note: For samples that require pre-dilution (standard dilution), enter the volume of thediluted sample (sample plus diluent).
6 Touch an Incubation protocol step displayed on the left side of the screen to display theprotocol step dialog.a Select an incubation time from the Seconds pulldown.
Note: If an Incubation Protocol Step is not needed, select 0 (zero) or the shortestavailable time displayed to work within the system timing cycle.
7 Touch a Read protocol step displayed on the left side of the screen to display the protocolstep dialog.a Select a Wavelength from the pulldown or select "None" to disable the read protocol
step.
8 When you finish configuring the protocol data, touch the Save button.9 Touch the Print Protocol button to print the displayed protocol information.
Step 6: Configure Calibration ParametersSpecial requirements: Note: If your UDA uses a factor that is based on the MolarExtinction Coefficient, please skip this step and Refer to Molar Extinction Coefficient (page 6-1).
1 Touch the Calibration Parms process button at the bottom of the Review/Edit Assayscreen.
This button launches the Enter/Edit Calibration Parameters screen.2 On the Enter/Edit Calibration Parameters screen, touch the Lot pulldown menu and select a
calibrator lot number from the list or type a new lot number in the box (max. 2 digits).3 Type a Calibrator Value for each calibrator bottle for the lot you selected.
The calibrator value is the known amount of analyte contained in the calibrator (1–5characters including sign and decimal point, numeric).
4 (Optional) For a new lot, enter the Expiration Date using the current date format. (Ifpreviously entered, the Expiration Date for an existing lot is displayed in the Expiration Datefield.)
5 Type new Dilution Factor values for each bottle if the calibrator requires dilutions prior toprocessing.The dilution factor is the automatic dilution factor for the assay to be calibrated (1 – 4characters, including decimal point).Note: The limits on the factor are 1, 1.3-101 and no less than tenths.
6 Type new Calibrator Replicate Response Range values for each bottle.This range is the maximum allowable difference between replicates of the same calibrator.Values are 0 to 0.2.
7 Touch Save to save the calibration parameters.8 Touch the More Cal Parms process button to configure additional Calibration parameters for
the assay.
2-16 Pub. No.: J39825EN2016-06-30
Define a User Defined Assay VITROS® 4600 Chemistry System
Note: The dialog that displays to configure additional calibration parameters depends onthe selected assay's calibration model: Linear, Logit/Log, and Cubic Spline.a If Linear or Logit/Log is the selected assay's calibration model type, edit the Linear or
Logit/Log Parameters (page 2-16).b If Cubic Spline is the selected assay's calibration model type, edit the Cubic Spline
Additional Parameters (page 2-17).
Linear or Logit/Log ParametersSpecial requirements: If Linear or Logit/Log is the selected assay's calibration model type,the Edit Linear or Logit/Log Additional Parameters dialog is displayed when you touch theMore Cal Parms process button.
1 Edit the following parameters for this assay:
Monotonicity A choice of Increase Monotinicity or Decrease Monotinicity. This indicateswhether the calibration uses increasing or decreasing monotonicity.
Max Response High The maximum high calibration response. Values are -1000 to 1000 with amaximum of 8 characters including the decimal point and minus sign.Response units.
Max Response Low The maximum low calibration response. Values are -1000 to 1000 with amaximum of 8 characters including the decimal point and minus sign.Response units.
Cal fit Goodness Limit (R2 Correlation Coefficient)The measure of fit of the data points generated by the assay to thecalibration model. Values are 0.000 to 1.000 with a maximum of 5characters including the decimal point.Note: A value of 1.000 allows only a perfectly fit cal curve to beaccepted. Anything smaller is less restrictive.
Min Response High The minimum high calibration response. Values are -1000 to 1000 with amaximum of 8 characters including the decimal point and minus sign.Response units.
Min Response Low The minimum low calibration response. Values are -1000 to 1000 with amaximum of 8 characters including the decimal point and minus sign.Response units.
Calibration Interval (days) The number of days between calibrations. Values are 1-999.
Note: Consider the following guidelines:
• If the lowest response from a calibration is less than the Min Response Low or greaterthan the Min Response High, the calibration is rejected.
• If the highest response from a calibration is less than the Max Response Low or greaterthan the Max Response High, the calibration is rejected.
• You can widen the acceptance range for lowest response (by increasing differencebetween Min Response High and Min Response Low) to decrease the chance of rejectinga calibration.
• You can also widen the acceptance range for highest response (by increasing thedifference between Max Response High and Max Response Low).
• At the start of optimization these values may be maxed out to response defaults of -3.0 to3.0 OD and then tightened as you add response checks to the UDA calibration. Thedefaults make this check inoperative.
Pub. No.: J39825EN 2-172016-06-30
VITROS® 4600 Chemistry System Step 6: Configure Calibration Parameters
2 Touch Save to save the parameters and return to the Options & Configuration – Enter/EditResults Parameters screen.
3 Touch Return/Cancel to continue and return to the Options & Configuration – Review/EditAssay screen.
Cubic Spline Additional ParametersSpecial requirements: If Cubic Spline is selected as the cal model type, the Edit CubicSpline Additional Parameters dialog is displayed when you touch the More Cal Parms processbutton.
1 Edit the following parameters for this assay:
Monotonicity A choice of Increase Monotinicity or Decrease Monotinicity. This indicateswhether the calibration uses increasing or decreasing monotonicity.
Max Response High The maximum high calibration response. Values are -1000 to 1000 with amaximum of 8 characters including the decimal point and minus sign.Response units.
Max Response Low The maximum low calibration response. Values are -1000 to 1000 with amaximum of 8 characters including the decimal point and minus sign.Response units.
Min Response High The minimum high calibration response. Values are -1000 to 1000 with amaximum of 8 characters including the decimal point and minus sign.Response units.
Min Response Low The minimum low calibration response. Values are -1000 to 1000 with amaximum of 8 characters including the decimal point and minus sign.Response units.
Calibration Interval (days) The number of days between calibrations. Values are 1-999.
Note: Consider the following guidelines:
• If the lowest response from a calibration is less than the Min Response Low or greaterthan the Min Response High, the calibration is rejected.
• If the highest response from a calibration is less than the Max Response Low or greaterthan the Max Response High, the calibration is rejected.
• You can widen the acceptance range for lowest response (by increasing differencebetween Min Response High and Min Response Low) to decrease the chance of rejectinga calibration.
• You can also widen the acceptance range for highest response (by increasing thedifference between Max Response High and Max Response Low).
• At the start of optimization these values may be maxed out to response defaults of -3.0 to3.0 OD and then tightened as you add response checks to the UDA calibration. Thedefaults make this check inoperative.
2 Touch Save to save the parameters and return to the Options & Configuration – Enter/EditResults Parameters screen.
3 Touch Return/Cancel to continue and return to the Options & Configuration – Review/EditAssay screen.
2-18 Pub. No.: J39825EN2016-06-30
Define a User Defined Assay VITROS® 4600 Chemistry System
Step 7: Configure Triple Read ParametersIMPORTANT: Before changing the default triple read parameters for your UDA, pleasereview the Triple Read (page 5-1) section of this UDA Guide.
1 If changing Triple Read parameters is required, touch the Triple Read Parms processbutton at the bottom of the Options & Configuration Review/Edit Assay screen.
This button launches the Edit Triple Read Parameters dialog box.Note: The Measuring (Reportable) Min and Measuring (Reportable) Max are thereportable range of values you entered for this UDA on the Options & Configuration EditResult Parameters screen.
2 Type the Critical Concentration.The default is the mid point between the Measuring (Reportable) Min and Measuring(Reportable) Max.
3 Type the Triple Read Limit for the Measuring (Reportable) Min value.If you change this value it must be greater than 0.
4 Type the Triple Read % Limit for the Critical Concentration.5 Type the Triple Read % Limit for the Measuring (Reportable) Max.6 Touch Save.
WARNING: Larger Triple Read Limits can degrade precision while a lower limit canimprove precision but can suppress potentially good results. The goal is to set theappropriate balance between these two factors.
Step 8: Enter Reagent Lot InformationReagent Lot information is used to track the on board stability and shelf expiration for areagent. This information can be accessed by touching the Reagent Lot process button at thebottom of the Options & Configuration Review/Edit Assay screen.
1 Touch the Reagent Lot process button at the bottom of the Options & ConfigurationReview/Edit Assay screen.
This button launches the Reagent Lot Information dialog box.2 Type the On Board Stability, in days (1-99), for the reagent.
Reagents that are on board for longer than the specified period are flagged on the ReagentManagement screen and on the Results report.Note: Any change to the on board stability for an existing reagent is automaticallycalculated for any packs of that reagent currently on board.
3 Type the Reagent Lot Number, up to 12 characters.Note: The user-defined Reagent Lot Number and the reagent pack lot number are bothincluded on the Calibration Report and uploaded to the LIS (if Upload Extended Result Datais selected on the Options & Configuration – Configure LIS screen). When reviewing theOptions & Configuration – Review/Edit Calibrations, or Reagent Management screens, thelot number displayed is the reagent pack lot number assigned by Ortho Clinical Diagnostics.Note: If you change the lot number, you should consider a recalibration of the UDA.
Pub. No.: J39825EN 2-192016-06-30
VITROS® 4600 Chemistry System
4 Type the Shelf Expiration Date of the reagent.Expired reagents are flagged on the Reagent Management screen and on the Resultsreport.Note: Any change to the shelf expiration date for an existing reagent is not reflected until anew pack of that reagent is loaded.
5 Touch Save.Note: All reagent packs used by this assay are updated with this information.WARNING: Tests have shown that some reagents have lower on board stability at lowerresidual volumes in the pack. Manufacturers’ test data may not be applicable to the system.
Step 9: Fill and Load Reagent PacksNote: Reagent Lot information must be entered before a reagent can be loaded onto thesystem.IMPORTANT: Be sure to follow these instructions whenever you fill Ortho ClinicalDiagnostics reagent packs.Caution: Do not use reagent packs that are damaged or that have any damaged packaging.Verify that labels and caps are secured. To avoid damage, be careful when opening the outerpackaging with sharp instruments.Caution: Use caution when considering reagents such as strong alkaline and acid solutions,organic solvents, viscous liquids, heavy metals, metal chelating agents, bleach, or ammonia.These materials may have adverse effects on the system and may produce incorrect results forboth OCD-supplied and User Defined Assays.IMPORTANT: Do not reuse reagent packs.Note: Reagent is assigned to a reagent pack and bottle on the Edit Protocol Parametersscreen when a Reagent Protocol Step is selected.
1 Inspect the packaging for any signs of damage. Remove the reagent pack from the cartonand ensure that the pack is not damaged. The label and cap should be securely attached.
2 Write any necessary information about the reagent on the label before you fill the pack.3 Estimate the fill volumes for the reagent packs, based on the ratio of Reagent A to Reagent
B. Refer to the UDA Guidelines for reagent volume ranges and dead volumes (page 7-1).Note: An optional tray (catalog # 6802120) is available to hold reagent packs while you fillthem.
4 Remove the cap from Bottle A. Keep the cap on Bottle B.5 Ensure that there are no particulates in the reagent, and then transfer the reagent into Bottle
A gently to prevent foaming or splashing.6 Replace the cap on Bottle A. Tighten the cap until it is snug enough to protect the reagent
and provide sufficient resistance for the MICROTIP PACK OPENER.7 If Bottle B is being used, remove the cap from Bottle B.8 Repeat step 5 and step 6 for Bottle B, if a second reagent is used.9 After you fill both bottles, store the pack according to reagent instructions until you are ready
to load it onto the system.IMPORTANT: Do not loosen or remove the caps before you load the reagent pack.
10 Load the reagent pack. Please refer to V-Docs for more information on loading a reagentpack.WARNING: High fluid heights can trigger false bubble detection codes.

This page is intentionally left blank.
2-20 Pub. No.: J39825EN2016-06-30
VITROS® 4600 Chemistry System
Pub. No.: J39825EN 3-12016-06-30
VITROS® 4600 Chemistry System
Chapter 3 Maintain a User DefinedAssay
Perform the following procedures to review, configure, edit and delete a User Defined Assay.
• Review a User Defined Assay (page 3-1)• Configure Sample Indices Threshold Limits (page 3-2)• Edit Reagent Lot Information (page 3-2)• Delete a User Defined Assay (page 3-3)• Delete a User Defined Calibrator Lot (page 3-4)• Define a New User Defined Diluent (page 3-5)• Delete a User Defined Diluent (page 3-5)
Review/Edit a User Defined Assay1 Navigate to the Options & Configuration – User Defined Assays screen.
a Touch Options on the Status Console.
This button displays the Options & Configuration screen.b On the Options & Configuration screen, touch Configure Assays.
This button displays the Options & Configuration – Configure Assays screen.c On the Options & Configuration – Configure Assays screen, touch the User Defined
Assays process button.
This button displays a Warning dialog and the Options & Configuration – User DefinedAssays screen.
d Read the information on the Warning dialog and touch OK to indicate that you acceptresponsibility for using non-OCD reagents on the system.
2 On the Options & Configuration – User Defined Assays screen, touch one of the 20 assaybuttons to select the assay to review/edit.
3 Touch the Review/Edit Assay process button.
3-2 Pub. No.: J39825EN2016-06-30
Maintain a User Defined Assay VITROS® 4600 Chemistry System
This button displays the first of three Options & Configuration – Review/Edit Assay screens.These screens show details for the UDA based on the calibration model type, assay modeltype, and template selected.
4 Touch the View More Parms process button to view and cycle through all of the availablescreens.
Configure Sample Indices Threshold Limits1 Navigate to the Options & Configuration – Configure Assays screen.
a Touch Options on the Status Console.
This button displays the Options & Configuration screen.b On the Options & Configuration screen, touch Configure Assays.
This button displays the Options & Configuration – Configure Assays screen.
2 On the Options & Configuration – Configure Assays screen, touch the appropriate BodyFluid button and Assay button for the assay you wish to configure limits for, and then touchthe Sample Indices Thresholds process button.
This button displays the Sample Indices Threshold Limits dialog box.3 Touch the Enable Sample Indices Checks check box for to select it, if it is not already
checked.Default indices are set at the high end of the concentration values for each index.
4 Type new threshold values for Hemolysis, Icterus, and Turbidity in their text boxes.Values above this threshold are flagged with the appropriate Sample Indices Flag (H, I, orT).
5 Touch Save.
Edit Reagent Lot InformationReagent Lot information is used to track the on board stability and shelf expiration for areagent. This information can be accessed by touching the Reagent Lot process button at thebottom of the Options & Configuration Review/Edit Assay screen.IMPORTANT: If more than one user defined assay uses the same reagent, a change to thereagent lot information here applies to all UDAs that contain that reagent.
Pub. No.: J39825EN 3-32016-06-30
VITROS® 4600 Chemistry System Delete a User Defined Assay
Note: Only one reagent lot can be on the system at a time. If the reagent lot on boardchanges, the on board packs are marked unusable and should be removed from the system.
1 Select the UDA that contains the reagent that you would like to edit.Tell me how to Review/Edit a User Defined Assay (page 3-1).
2 Touch the Reagent Lot process button at the bottom of the Options & ConfigurationReview/Edit Assay screen.
This button launches the Reagent Lot Information dialog box.3 Type the On Board Stability, in days (1-99), for the reagent.
Reagents that are on board for longer than the specified period are flagged on the ReagentManagement screen and on the Results report.Note: Any change to the on board stability for an existing reagent is automaticallycalculated for any packs of that reagent currently on board.
4 Type the Reagent Lot Number, up to 12 characters.Note: The user-defined Reagent Lot Number and the reagent pack lot number are bothincluded on the Calibration Report and uploaded to the LIS (if Upload Extended Result Datais selected on the Options & Configuration – Configure LIS screen). When reviewing theOptions & Configuration – Review/Edit Calibrations, or Reagent Management screens, thelot number displayed is the reagent pack lot number assigned by Ortho Clinical Diagnostics.Note: If you change the lot number, you should consider a recalibration of the UDA.
5 Type the Shelf Expiration Date of the reagent.Expired reagents are flagged on the Reagent Management screen and on the Resultsreport.Note: Any change to the shelf expiration date for an existing reagent is not reflected until anew pack of that reagent is loaded.
6 Touch Save.
Delete a User Defined Assay1 Navigate to the Options & Configuration – User Defined Assays screen.
a Touch Options on the Status Console.
This button displays the Options & Configuration screen.b On the Options & Configuration screen, touch Configure Assays.
This button displays the Options & Configuration – Configure Assays screen.c On the Options & Configuration – Configure Assays screen, touch the User Defined
Assays process button.

3-4 Pub. No.: J39825EN2016-06-30
Maintain a User Defined Assay VITROS® 4600 Chemistry System
This button displays a Warning dialog and the Options & Configuration – User DefinedAssays screen.
d Read the information on the Warning dialog and touch OK to indicate that you acceptresponsibility for using non-OCD reagents on the system.
2 On the Options & Configuration – User Defined Assays screen, touch the UDA that youwould like to delete.
3 Touch the Delete process button.
This button displays the Delete Assay dialog box.4 Read the information on the Delete Assay dialog box and touch Yes to verify that you want
to delete the assay and its associated records and information from the system.5 Touch Yes to delete the assay and its result records, QC and calibration records, and to
remove the assay from sample programs.
Delete a User Defined Calibrator Lot1 Navigate to the Options & Configuration – User Defined Assays screen.
a Touch Options on the Status Console.
This button displays the Options & Configuration screen.b On the Options & Configuration screen, touch Configure Assays.
This button displays the Options & Configuration – Configure Assays screen.c On the Options & Configuration – Configure Assays screen, touch the User Defined
Assays process button.
This button displays a Warning dialog and the Options & Configuration – User DefinedAssays screen.
d Read the information on the Warning dialog and touch OK to indicate that you acceptresponsibility for using non-OCD reagents on the system.
2 Select the UDA that contains the user defined calibrator lot that you would like to delete.Tell me how to Review/Edit a User Defined Assay (page 3-1).
3 Touch the Calibration Parms process button at the bottom of the Review/Edit Assayscreen.
This button launches the Enter/Edit Calibration Parameters screen.
Pub. No.: J39825EN 3-52016-06-30
VITROS® 4600 Chemistry System Delete a User Defined Diluent
4 Select the lot to be deleted from the Lot pulldown.5 Touch the Delete Lot process button.
This button displays the Delete Lot dialog box.6 Touch Yes to delete the Calibration lot.
Define a New User Defined Diluent1 Navigate to the Options & Configuration – User Defined Diluents screen.
a Touch Options on the Status Console.
This button displays the Options & Configuration screen.b On the Options & Configuration screen, touch Configure Assays.
This button displays the Options & Configuration – Configure Assays screen.c On the Options & Configuration – Configure Assays screen, touch the User Defined
Diluents process button.
This button displays the Options & Configuration – User Defined Diluents screen.
2 On the Options & Configuration – User Defined Diluents screen, touch the New processbutton.
3 Type a name for the new diluent in the Diluent Name text box (max. 10 characters).4 Select a pack and bottle designation for the new diluent from the Pack Name/Bottle
pulldown.Note: Two bottles in each of the two diluent packs let you define up to four diluents. BottleA is the inner chamber and Bottle B is the outer chamber.
5 Type the On Board Stability, in days, for the diluent.6 Type the Diluent Lot Number, up to 12 characters.7 Type the Shelf Expiration Date of the diluent.8 Touch the Save process button.
Delete a User Defined Diluent1 Navigate to the Options & Configuration – User Defined Diluents screen.
a Touch Options on the Status Console.
3-6 Pub. No.: J39825EN2016-06-30
Maintain a User Defined Assay VITROS® 4600 Chemistry System
This button displays the Options & Configuration screen.b On the Options & Configuration screen, touch Configure Assays.
This button displays the Options & Configuration – Configure Assays screen.c On the Options & Configuration – Configure Assays screen, touch the User Defined
Diluents process button.
This button displays the Options & Configuration – User Defined Diluents screen.
2 Select the user defined diluent that you would like to delete.3 Touch the Delete process button.
This button displays the Delete Diluent dialog box.4 Touch Yes to delete the diluent.
Pub. No.: J39825EN 4-12016-06-30
VITROS® 4600 Chemistry System
Chapter 4 Antigen Excess
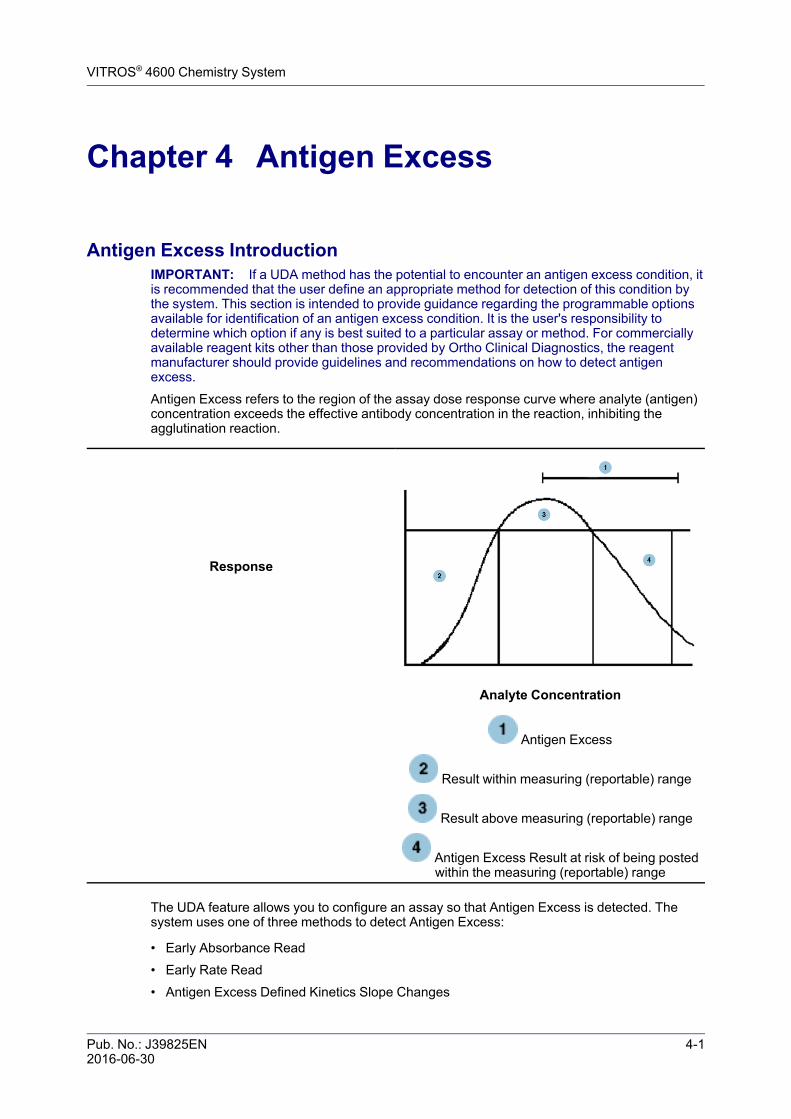
Antigen Excess IntroductionIMPORTANT: If a UDA method has the potential to encounter an antigen excess condition, itis recommended that the user define an appropriate method for detection of this condition bythe system. This section is intended to provide guidance regarding the programmable optionsavailable for identification of an antigen excess condition. It is the user's responsibility todetermine which option if any is best suited to a particular assay or method. For commerciallyavailable reagent kits other than those provided by Ortho Clinical Diagnostics, the reagentmanufacturer should provide guidelines and recommendations on how to detect antigenexcess.Antigen Excess refers to the region of the assay dose response curve where analyte (antigen)concentration exceeds the effective antibody concentration in the reaction, inhibiting theagglutination reaction.
Response
Analyte Concentration
Antigen Excess
Result within measuring (reportable) range
Result above measuring (reportable) range
Antigen Excess Result at risk of being postedwithin the measuring (reportable) range
The UDA feature allows you to configure an assay so that Antigen Excess is detected. Thesystem uses one of three methods to detect Antigen Excess:
• Early Absorbance Read• Early Rate Read• Antigen Excess Defined Kinetics Slope Changes
4-2 Pub. No.: J39825EN2016-06-30
Antigen Excess VITROS® 4600 Chemistry System
Method 1: Early Absorbance ReadThe Antigen Excess flag is set at an absorbance level greater than the high calibratorabsorbance when measured at the first read.Note: With the Early Absorbance Read method for Antigen Excess detection, highly turbidsamples may trigger false Antigen Excess flags. In these cases, it is recommended to use theEarly Rate Read method for Antigen Excess detection.Method 1: Early Absorbance Read (page 4-2)
Method 2: Early Rate ReadAn additional absorbance reading is added to a 2-point rate assay, typically immediately afterthe last fluid addition step. This additional reading is used to take an early look at the reactionslope (change in optical absorbance per unit time) to determine if the observed slope is greaterthan a predetermined maximum slope limit.Method 2: Early Rate Read (page 4-4)
Method 3: Antigen Excess Defined Kinetics Slope ChangesThis method is used with Multi-point kinetic assays only. For samples being tested for AntigenExcess, the reaction rate (change in optical absorbance per change in unit time) measuredover the first 3 readings (rate C) is compared to the reaction rate measured over the last 3readings (rate D) and a rate difference is calculated. When this rate difference exceeds apredetermined threshold, an antigen excess condition flag is posted.Method 3: Antigen Excess Defined Kinetics Slope Changes (page 4-6)
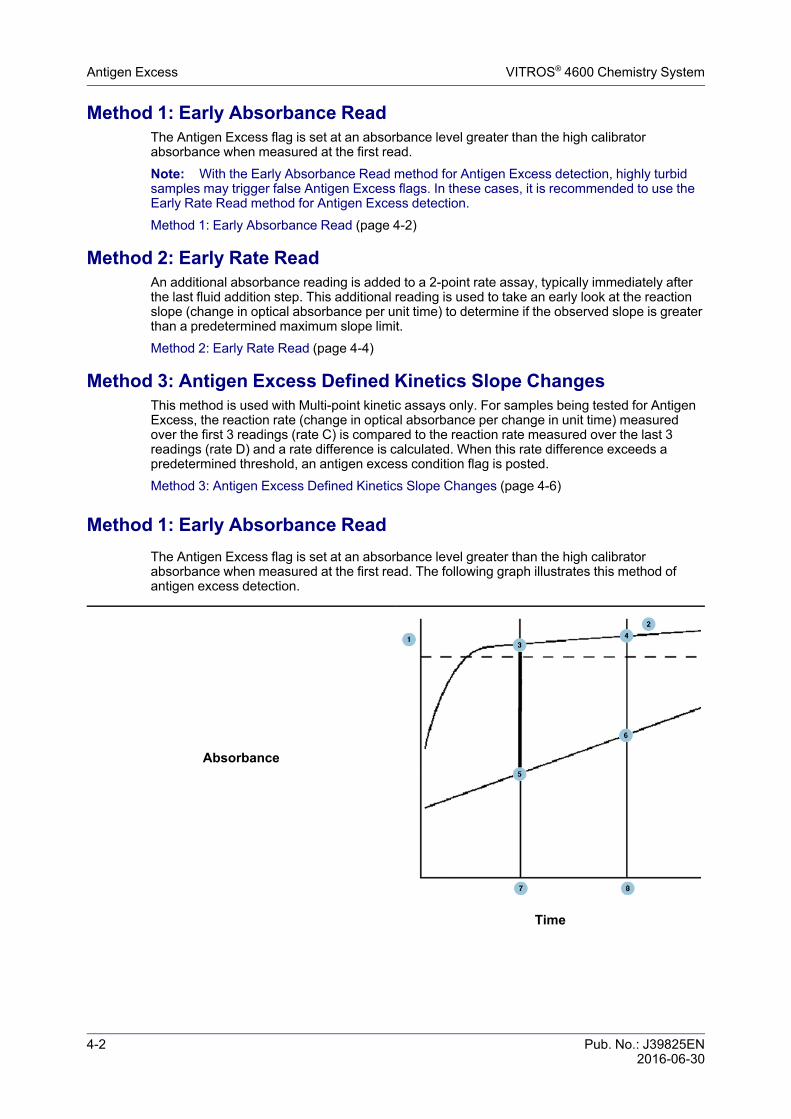
Method 1: Early Absorbance ReadThe Antigen Excess flag is set at an absorbance level greater than the high calibratorabsorbance when measured at the first read. The following graph illustrates this method ofantigen excess detection.
Absorbance
Time
Pub. No.: J39825EN 4-32016-06-30
VITROS® 4600 Chemistry System Method 1: Early Absorbance Read
(Continued)
Antigen Excess
Sample in Antigen Excess
1st Read of Sample
2nd Read of Sample
1st Read of High Calibrator
2nd Read of High Calibrator
First Read Time
Second Read Time
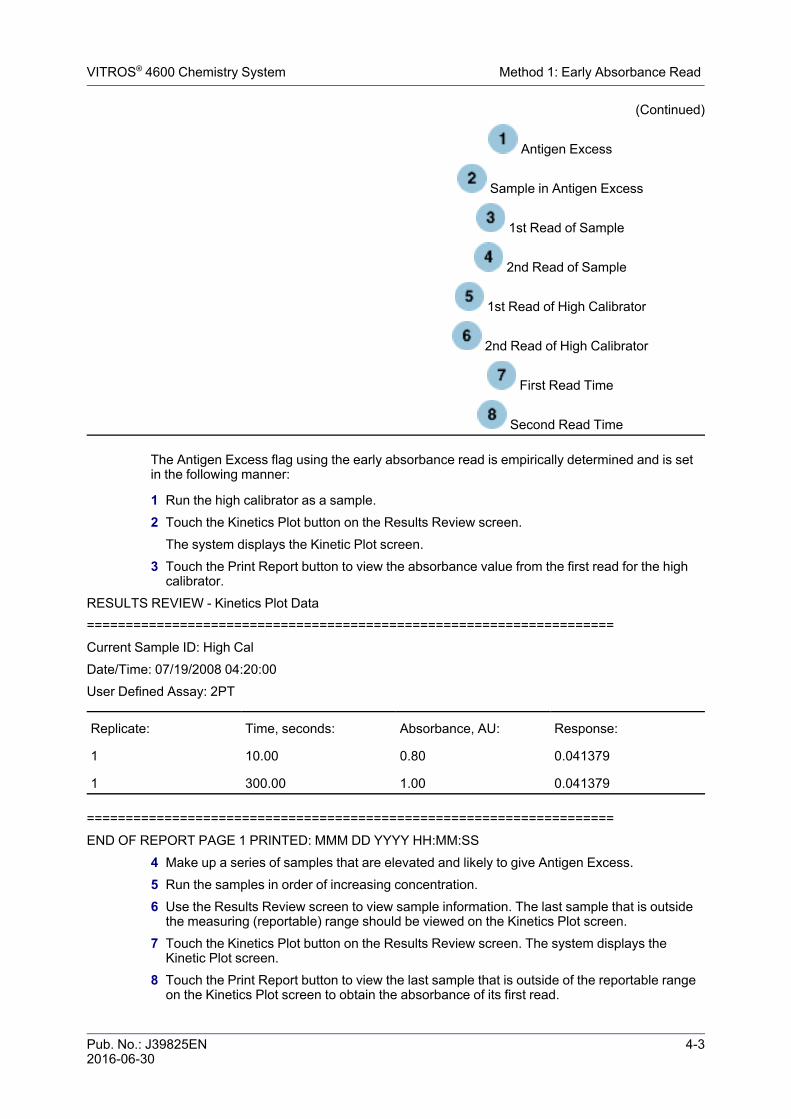
The Antigen Excess flag using the early absorbance read is empirically determined and is setin the following manner:
1 Run the high calibrator as a sample.2 Touch the Kinetics Plot button on the Results Review screen.
The system displays the Kinetic Plot screen.3 Touch the Print Report button to view the absorbance value from the first read for the high
calibrator.RESULTS REVIEW - Kinetics Plot Data====================================================================Current Sample ID: High CalDate/Time: 07/19/2008 04:20:00User Defined Assay: 2PT
Replicate: Time, seconds: Absorbance, AU: Response:
1 10.00 0.80 0.041379
1 300.00 1.00 0.041379
====================================================================END OF REPORT PAGE 1 PRINTED: MMM DD YYYY HH:MM:SS
4 Make up a series of samples that are elevated and likely to give Antigen Excess.5 Run the samples in order of increasing concentration.6 Use the Results Review screen to view sample information. The last sample that is outside
the measuring (reportable) range should be viewed on the Kinetics Plot screen.7 Touch the Kinetics Plot button on the Results Review screen. The system displays the
Kinetic Plot screen.8 Touch the Print Report button to view the last sample that is outside of the reportable range
on the Kinetics Plot screen to obtain the absorbance of its first read.
4-4 Pub. No.: J39825EN2016-06-30
Antigen Excess VITROS® 4600 Chemistry System
RESULTS REVIEW - Kinetics Plot Data====================================================================Current Sample ID: High Sample 3Date/Time: 07/19/2008 04:20:00User Defined Assay: 2PT
Replicate: Time, seconds: Absorbance, AU: Response:
1 10.00 1.30 0.062069
1 300.00 1.60 0.062069
====================================================================END OF REPORT PAGE 1 PRINTED: MMM DD YYYY HH:MM:SS
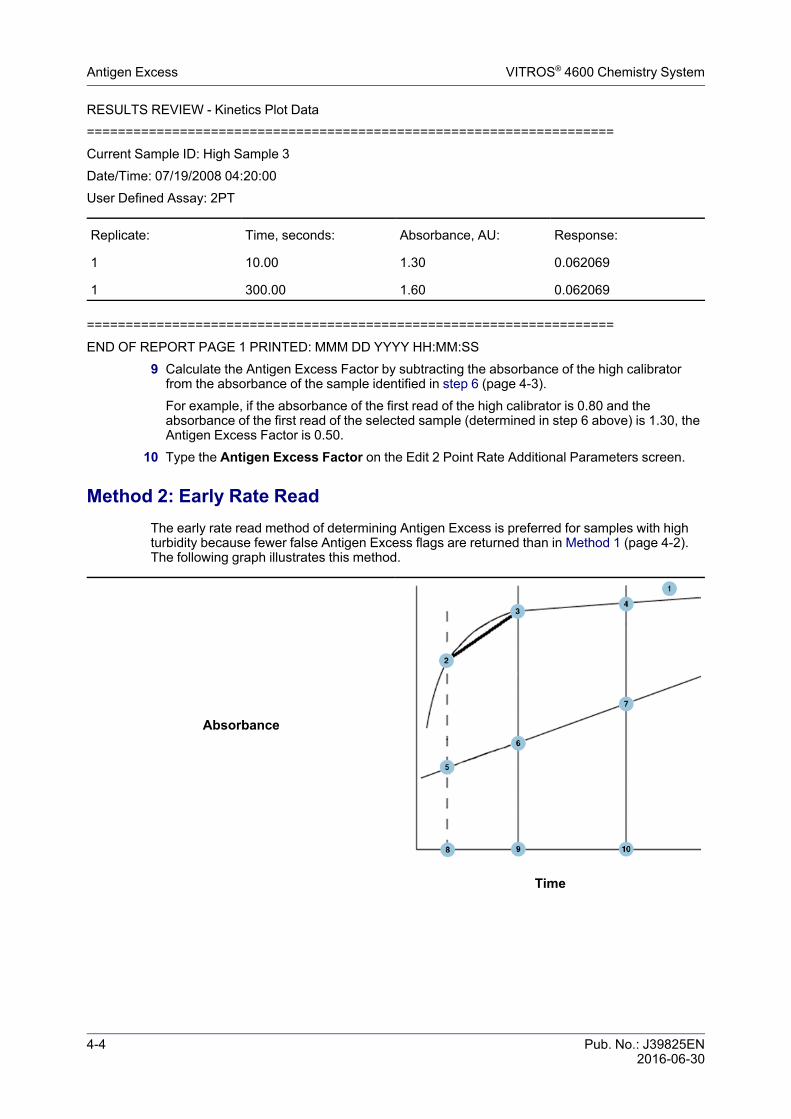
9 Calculate the Antigen Excess Factor by subtracting the absorbance of the high calibratorfrom the absorbance of the sample identified in step 6 (page 4-3).For example, if the absorbance of the first read of the high calibrator is 0.80 and theabsorbance of the first read of the selected sample (determined in step 6 above) is 1.30, theAntigen Excess Factor is 0.50.
10 Type the Antigen Excess Factor on the Edit 2 Point Rate Additional Parameters screen.
Method 2: Early Rate ReadThe early rate read method of determining Antigen Excess is preferred for samples with highturbidity because fewer false Antigen Excess flags are returned than in Method 1 (page 4-2).The following graph illustrates this method.
Absorbance
Time
Pub. No.: J39825EN 4-52016-06-30
VITROS® 4600 Chemistry System Method 2: Early Rate Read
(Continued)
Sample in Antigen Excess
Early Read of Sample User DefinedAbsorbance
1st Read of Sample
2nd Read of Sample
Early Read of High Calibrator
1st Read of High Calibrator
2nd Read of High Calibrator
Early Read Time
First Read Time
Second Read Time
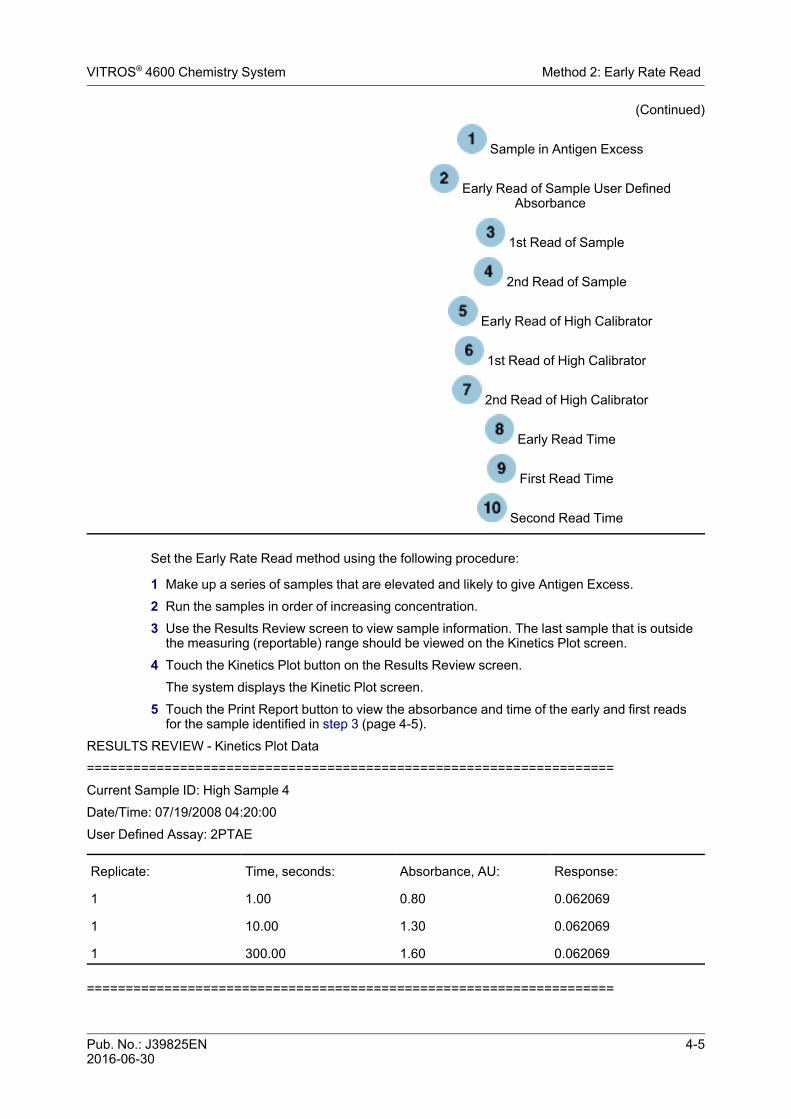
Set the Early Rate Read method using the following procedure:
1 Make up a series of samples that are elevated and likely to give Antigen Excess.2 Run the samples in order of increasing concentration.3 Use the Results Review screen to view sample information. The last sample that is outside
the measuring (reportable) range should be viewed on the Kinetics Plot screen.4 Touch the Kinetics Plot button on the Results Review screen.
The system displays the Kinetic Plot screen.5 Touch the Print Report button to view the absorbance and time of the early and first reads
for the sample identified in step 3 (page 4-5).RESULTS REVIEW - Kinetics Plot Data====================================================================Current Sample ID: High Sample 4Date/Time: 07/19/2008 04:20:00User Defined Assay: 2PTAE
Replicate: Time, seconds: Absorbance, AU: Response:
1 1.00 0.80 0.062069
1 10.00 1.30 0.062069
1 300.00 1.60 0.062069
====================================================================
4-6 Pub. No.: J39825EN2016-06-30
Antigen Excess VITROS® 4600 Chemistry System
END OF REPORT PAGE 1 PRINTED: MMM DD YYYY HH:MM:SS6 Type the slope in the Antigen Excess Factor field in the Edit 2 Point with Antigen Excess
Rate Check Additional Parameters screen.A slope is determined using the early read and the first read:Δ absorbance ÷ Δ time in minutes = slopeFor example, if the read for the early read taken at 1 second had an absorbance of 0.80 andthe first read taken at 10 seconds had an absorbance of 1.30, the Antigen Excess Factor is3.333. Slope = 1.30 – .08 ÷ 0.15 minutes = 3.333
7 The Early Rate Read Index field allows the operator to select which read is excluded fromthe final response in the Antigen Excess rate check.
• Typing the number 1 instructs the software to not use the early read information whendetermining analyte concentration (the first and second read will be used).
• Similarly, typing a number 2 eliminates the first read in calculations for analyte predictions(early and second reads are used in the two-point rate equation).
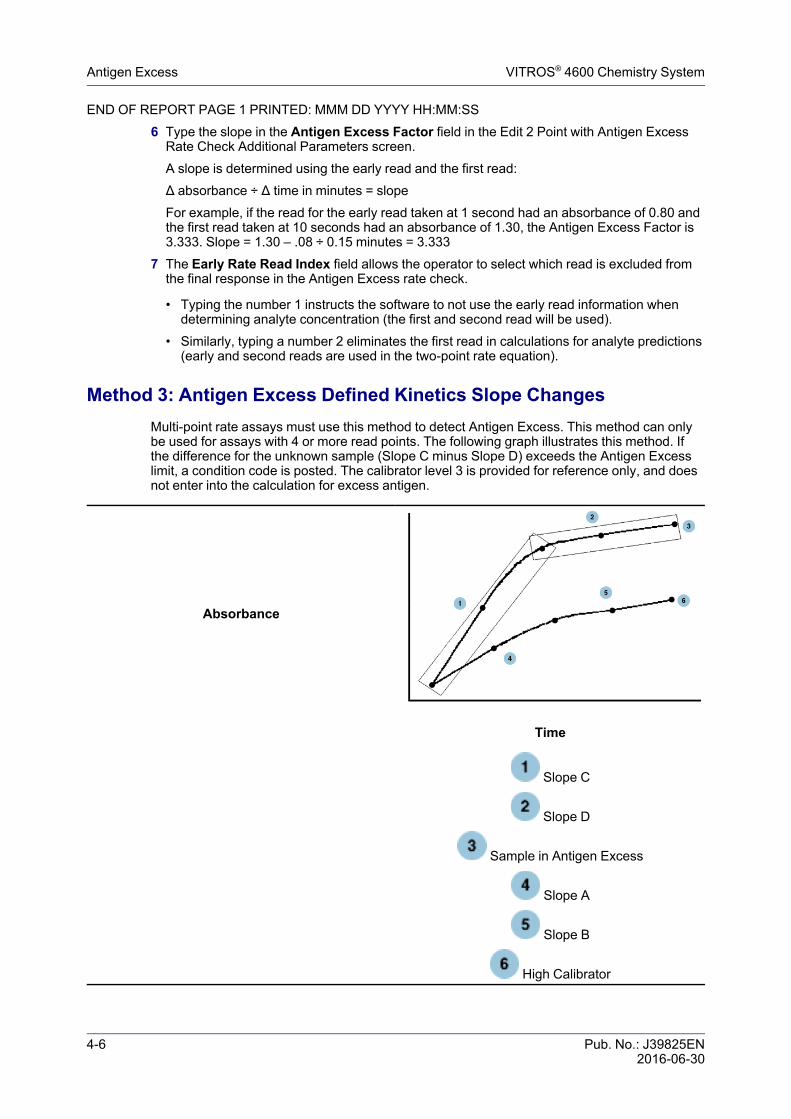
Method 3: Antigen Excess Defined Kinetics Slope ChangesMulti-point rate assays must use this method to detect Antigen Excess. This method can onlybe used for assays with 4 or more read points. The following graph illustrates this method. Ifthe difference for the unknown sample (Slope C minus Slope D) exceeds the Antigen Excesslimit, a condition code is posted. The calibrator level 3 is provided for reference only, and doesnot enter into the calculation for excess antigen.
Absorbance
Time
Slope C
Slope D
Sample in Antigen Excess
Slope A
Slope B
High Calibrator
Pub. No.: J39825EN 4-72016-06-30
VITROS® 4600 Chemistry System Method 3: Antigen Excess Defined Kinetics Slope Changes
The Antigen Excess flag using kinetics slope changes is empirically determined and is set inthe following manner:
1 Make up a series of samples that are elevated and likely to give Antigen Excess.2 Run the samples in order of increasing concentration.3 Use the Results Review screen to view sample information. The last sample that is outside
the measuring (reportable) range should be viewed on the Kinetics Plot screen.4 Touch the Kinetics Plot button on the Results Review screen.
The system displays the Kinetic Plot screen.5 Touch the Print Report button to view the absorbance and time of the early and first reads
for the sample identified in step 3 (page 4-7) using the Kinetics Plot screen in ResultsReview.
• Calculate (using least squares regression) the slope for the first three points• Calculate the slope for the last three points
Note: This method applies to assays with 4 to 12 reads. Assays with 4 or 5 reads willshare points when making slope calculations. A three point kinetic will effectively disable thecheck.
RESULTS REVIEW - Kinetics Plot Data
====================================================================
Current Sample ID: High Sample 4
Date/Time: 07/19/2008 04:20:00
User Defined Assay: NPT
Replicate: Time, seconds: Absorbance, AU: Response:
1 100.00 1.00 0.172800
1 150.00 1.35 0.172800
1 200.00 1.55 0.172800
1 250.00 1.59 0.172800
1 300.00 1.60 0.172800
====================================================================
END OF REPORT PAGE 1 PRINTED: MMM DD YYYY HH:MM:SS
In the example above, the slope of the first three points is 0.33 and the slope of the last threepoints is 0.03.
6 Calculate the absolute value of the difference of the slope of the first three read points andthe slope of the last three read points to detect a drop of the kinetic activity indicatingAntigen Excess conditions.The Antigen Excess Limit from the example would be the absolute difference of 0.33 and0.03, or 0.30.
7 Type the Antigen Excess Limit on the Edit Multi-Point Additional Parameters screen. SeeConfigure Result Parameters (page 2-7) for more information.

4-8 Pub. No.: J39825EN2016-06-30
Antigen Excess VITROS® 4600 Chemistry System
The additional fields on this screen are not related to Antigen Excess. Please refer to thehelp text for this screen for more information about these fields.

Pub. No.: J39825EN 5-12016-06-30
VITROS® 4600 Chemistry System
Chapter 5 Triple Read AlgorithmOverview
Triple Read Algorithm OverviewTriple reads are performed for each cuvette to detect imperfections (air bubbles, atypicalaggregates in liquids, etc.) that can affect concentration prediction. For each cuvette, thesystem performs optical reads at three different locations as illustrated below. A response iscalculated at each location. The maximum difference among the three responses should besmaller than the triple read bias limit.
Cuvete Cell Read #1
Cuvete Cell Read #2
Cuvete Cell Read #3In a User Defined Assay, you can define bias limits in concentration on an assay by assaybasis to detect imperfections in the optical path balanced against inappropriately rejecting anacceptable result. See Configure Triple Read Parameters (page 2-18) for more information.The bias limit can be based on either clinical need or analytical capability.Touch a link below to read more about bias limits in concentration:
• Triple Read Parameter Defaults (page 5-1)• Triple Read Parameters Adjustment (page 5-2)
Triple Read Parameter DefaultsThe default Critical Concentration is the midpoint of the Measuring (Reportable) range. SeeConfigure Result Parameters (page 2-7) for more information.From the Measuring (Reportable) Minimum to the Critical Concentration, the default triple readlimit is 8% of the Critical Concentration (constant bias domain).From Critical Concentration to the Measuring (Reportable) Maximum, the default triple readlimit is 8% of the concentration (constant % bias, variable bias domain).
5-2 Pub. No.: J39825EN2016-06-30
Triple Read Algorithm Overview VITROS® 4600 Chemistry System
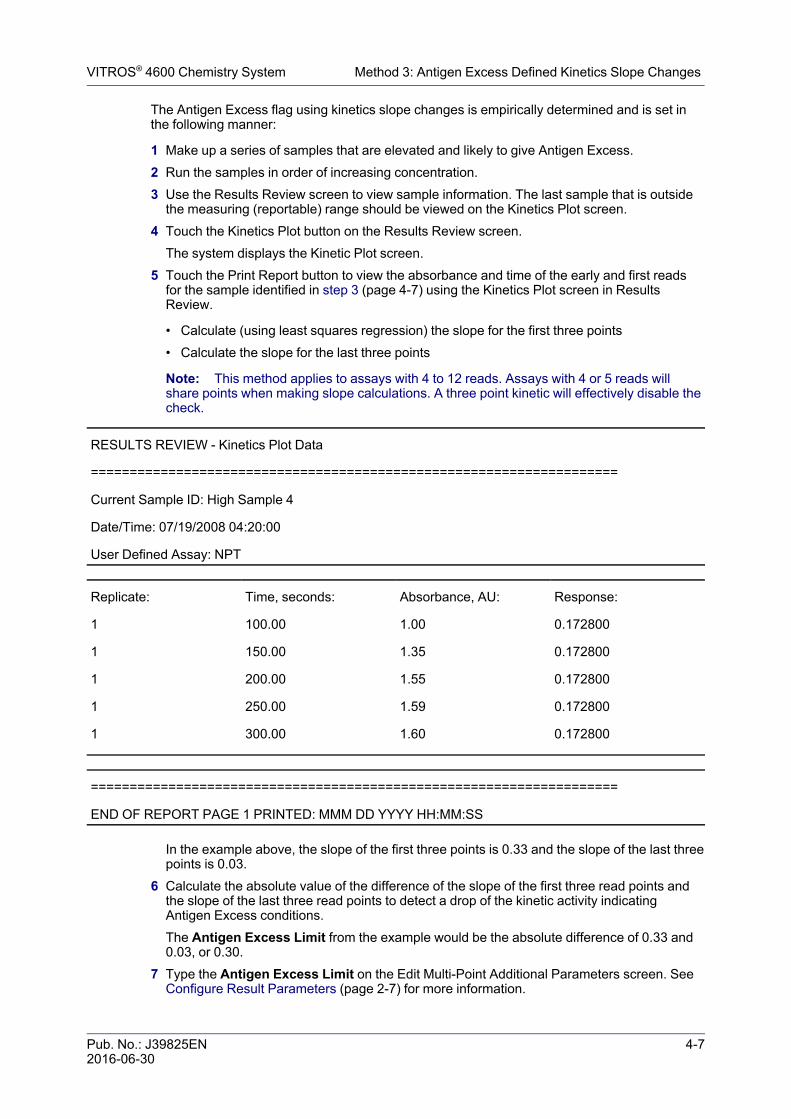
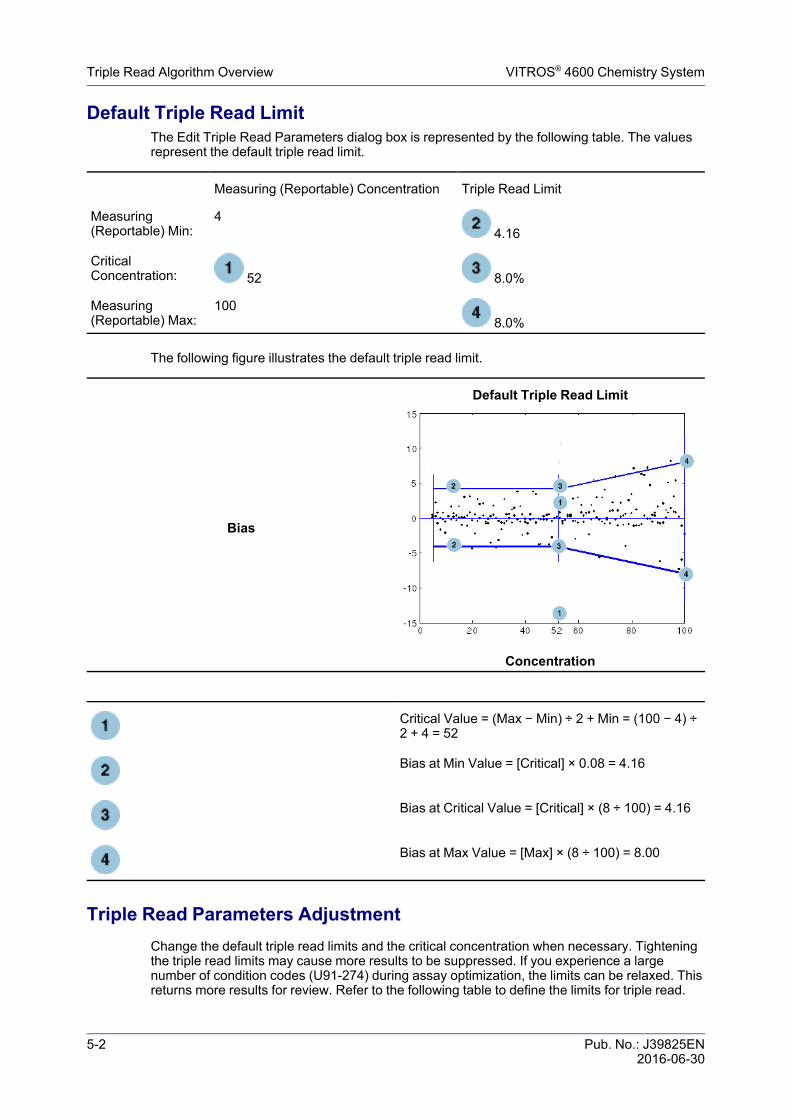
Default Triple Read LimitThe Edit Triple Read Parameters dialog box is represented by the following table. The valuesrepresent the default triple read limit.
Measuring (Reportable) Concentration Triple Read Limit
Measuring(Reportable) Min:
44.16
CriticalConcentration: 52 8.0%
Measuring(Reportable) Max:
1008.0%
The following figure illustrates the default triple read limit.
Default Triple Read Limit
Bias
Concentration
Critical Value = (Max − Min) ÷ 2 + Min = (100 − 4) ÷2 + 4 = 52
Bias at Min Value = [Critical] × 0.08 = 4.16
Bias at Critical Value = [Critical] × (8 ÷ 100) = 4.16
Bias at Max Value = [Max] × (8 ÷ 100) = 8.00
Triple Read Parameters AdjustmentChange the default triple read limits and the critical concentration when necessary. Tighteningthe triple read limits may cause more results to be suppressed. If you experience a largenumber of condition codes (U91-274) during assay optimization, the limits can be relaxed. Thisreturns more results for review. Refer to the following table to define the limits for triple read.

Pub. No.: J39825EN 5-32016-06-30
VITROS® 4600 Chemistry System Triple Read Parameters Adjustment
The following table represents the Edit Triple Read Parameters dialog box.
Measuring (Reportable) Concentration Triple Read Limit
Measuring(Reportable)Minimum
Cmin* Real Number (>0.0)
CriticalConcentration (CO)
CO % of CO
Measuring(Reportable)Maximum
Cmax* % of Cmax
* The measuring (reportable) minimum and maximum can only be adjusted on the Options &Configuration – Edit Result Parameters screen. See Configure Result Parameters (page 2-7)for more information.The triple read limits are the allowable bias defined at Measuring (Reportable) Minimum,Critical Concentration, and Measuring (Reportable) Maximum.Bias in concentration = real concentration − predicted concentration.
• The critical concentration (CO) can be adjusted by typing a concentration value within themeasuring (reportable) range. The critical concentration is the point at which medicaldecisions are made between normal and abnormal test results.
• The triple read limit corresponding to measuring (reportable) minimum must be a bias inconcentration value (Real Number).
• The triple read limit corresponding to critical concentration is defined as a percentage of thecritical concentration (% of CO).
• The triple read limit corresponding to measuring (reportable) maximum is defined as apercentage of the measuring (reportable) maximum (% of Cmax).
Relaxed Adjusted Triple Read LimitsThe following table represents the Edit Triple Read Parameters dialog box. The valuesrepresent a relaxed triple read limit across the measuring (reportable) range.
Measuring (Reportable) Concentration Triple Read Limit
Measuring(Reportable) Min:
46.25
CriticalConcentration: 52 12 %
Measuring(Reportable) Max:
10012 %
The following figure illustrates a relaxed triple read limit across the measuring (reportable)range.
Increase Triple Read Limit
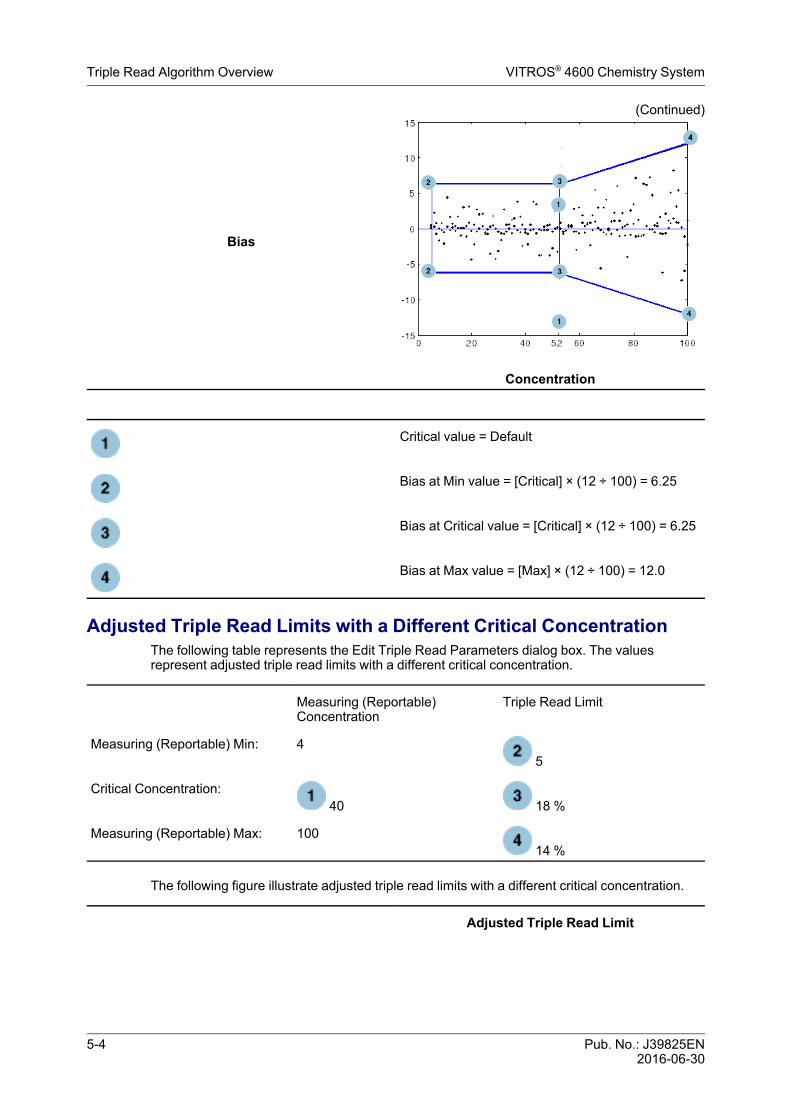
5-4 Pub. No.: J39825EN2016-06-30
Triple Read Algorithm Overview VITROS® 4600 Chemistry System
(Continued)
Bias
Concentration
Critical value = Default
Bias at Min value = [Critical] × (12 ÷ 100) = 6.25
Bias at Critical value = [Critical] × (12 ÷ 100) = 6.25
Bias at Max value = [Max] × (12 ÷ 100) = 12.0
Adjusted Triple Read Limits with a Different Critical ConcentrationThe following table represents the Edit Triple Read Parameters dialog box. The valuesrepresent adjusted triple read limits with a different critical concentration.
Measuring (Reportable)Concentration
Triple Read Limit
Measuring (Reportable) Min: 45
Critical Concentration:40 18 %
Measuring (Reportable) Max: 10014 %
The following figure illustrate adjusted triple read limits with a different critical concentration.
Adjusted Triple Read Limit
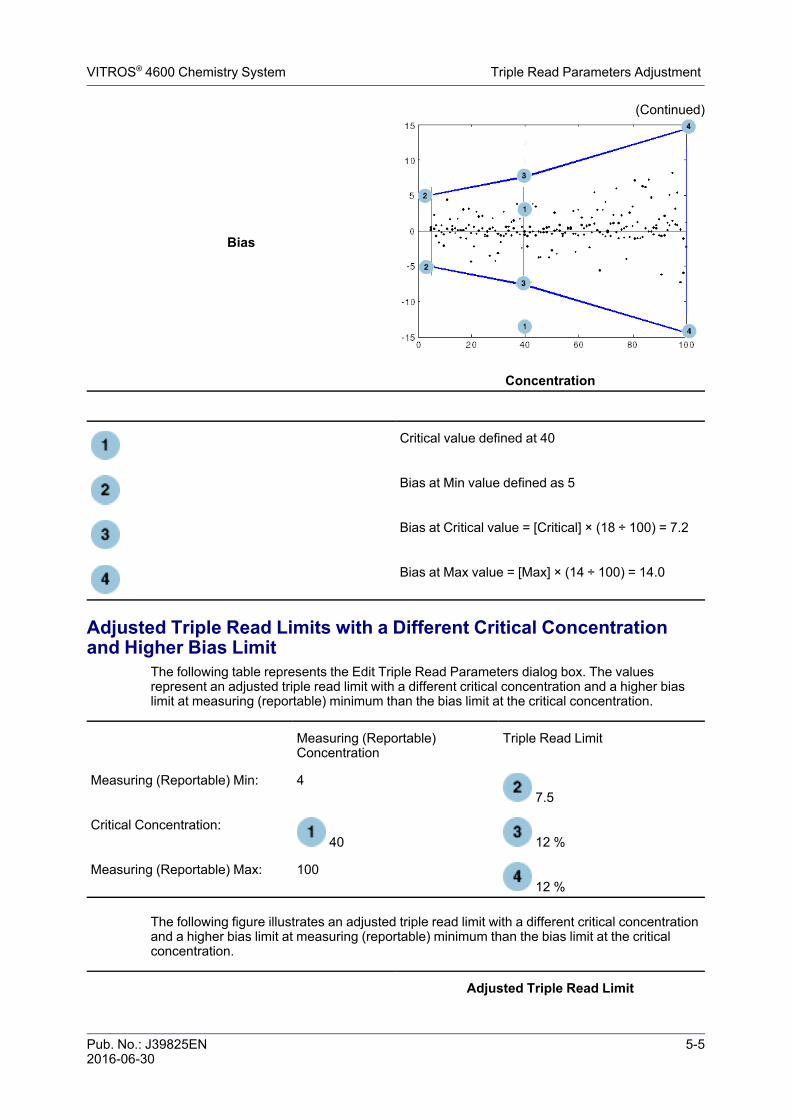
Pub. No.: J39825EN 5-52016-06-30
VITROS® 4600 Chemistry System Triple Read Parameters Adjustment
(Continued)
Bias
Concentration
Critical value defined at 40
Bias at Min value defined as 5
Bias at Critical value = [Critical] × (18 ÷ 100) = 7.2
Bias at Max value = [Max] × (14 ÷ 100) = 14.0
Adjusted Triple Read Limits with a Different Critical Concentrationand Higher Bias Limit
The following table represents the Edit Triple Read Parameters dialog box. The valuesrepresent an adjusted triple read limit with a different critical concentration and a higher biaslimit at measuring (reportable) minimum than the bias limit at the critical concentration.
Measuring (Reportable)Concentration
Triple Read Limit
Measuring (Reportable) Min: 47.5
Critical Concentration:40 12 %
Measuring (Reportable) Max: 10012 %
The following figure illustrates an adjusted triple read limit with a different critical concentrationand a higher bias limit at measuring (reportable) minimum than the bias limit at the criticalconcentration.
Adjusted Triple Read Limit
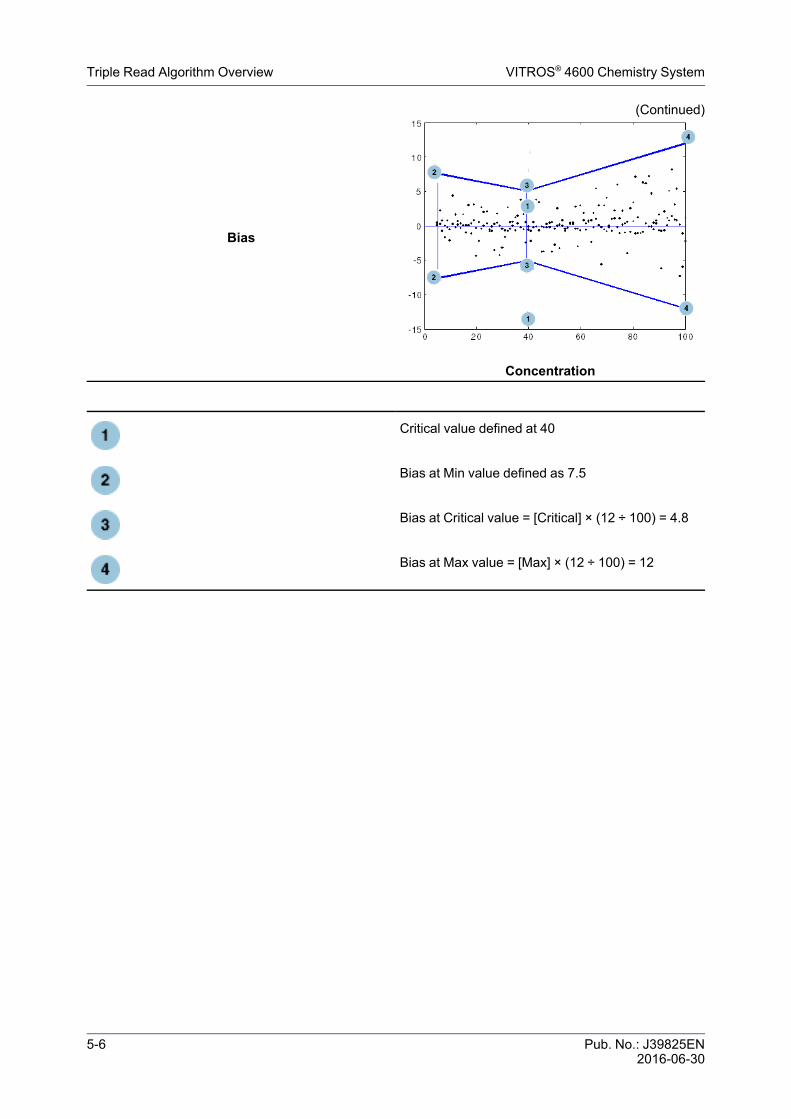
5-6 Pub. No.: J39825EN2016-06-30
Triple Read Algorithm Overview VITROS® 4600 Chemistry System
(Continued)
Bias
Concentration
Critical value defined at 40
Bias at Min value defined as 7.5
Bias at Critical value = [Critical] × (12 ÷ 100) = 4.8
Bias at Max value = [Max] × (12 ÷ 100) = 12
Pub. No.: J39825EN 6-12016-06-30
VITROS® 4600 Chemistry System
Chapter 6 Molar Extinction Coefficient
Special requirements: UDA Molar Extinction Coefficient GuidelinesThe Cal Model Type of Linear must be selected when first setting up the UDA.UDA features that require input are:
• Reagent Lot information• Result Parameters• Protocol Parameters
Note: Cal Params do not require input.
1 After appropriate parameters have been entered, touch Reagents on the Status Consoleand load the UDA reagent pack.Note: If no reagent is loaded for the assay, you cannot access the Options &Configuration – User Calibrate screen
2 On the Options and Configuration screen, touch Review/Edit Calibrations.3 On the Options and Configuration – Review/Edit Calibrations screen, select the UDA assay
and then touch the User Calibrate process button.
This button displays the Options & Configuration – User Calibrate screen.4 Select the reagent pack lot number from the Reagent Lot pulldown.5 Input the Intercept and Slope.
Intercept = Response when distilled water is run as a sample.Slope = (Sv × ME) ÷ (Tv × 1000 mL/L × DIL).
• Sv = Sample volume (mL)• ME = Molar Extinction coefficient in cm2/µmol
(example: NADH = 6.25 at 340 nm)• Tv = Total reaction volume (mL) (sample + reagent)• DIL = Dilution factor of sample prior to being added to cuvette.
Note: Results from above calculations are either in µmol/min or µmol/L.6 Touch the Save button to save your changes.
Note: Results reported will display a "UC" code notifying the user that the result is based ona User Calibration.

This page is intentionally left blank.
6-2 Pub. No.: J39825EN2016-06-30
VITROS® 4600 Chemistry System
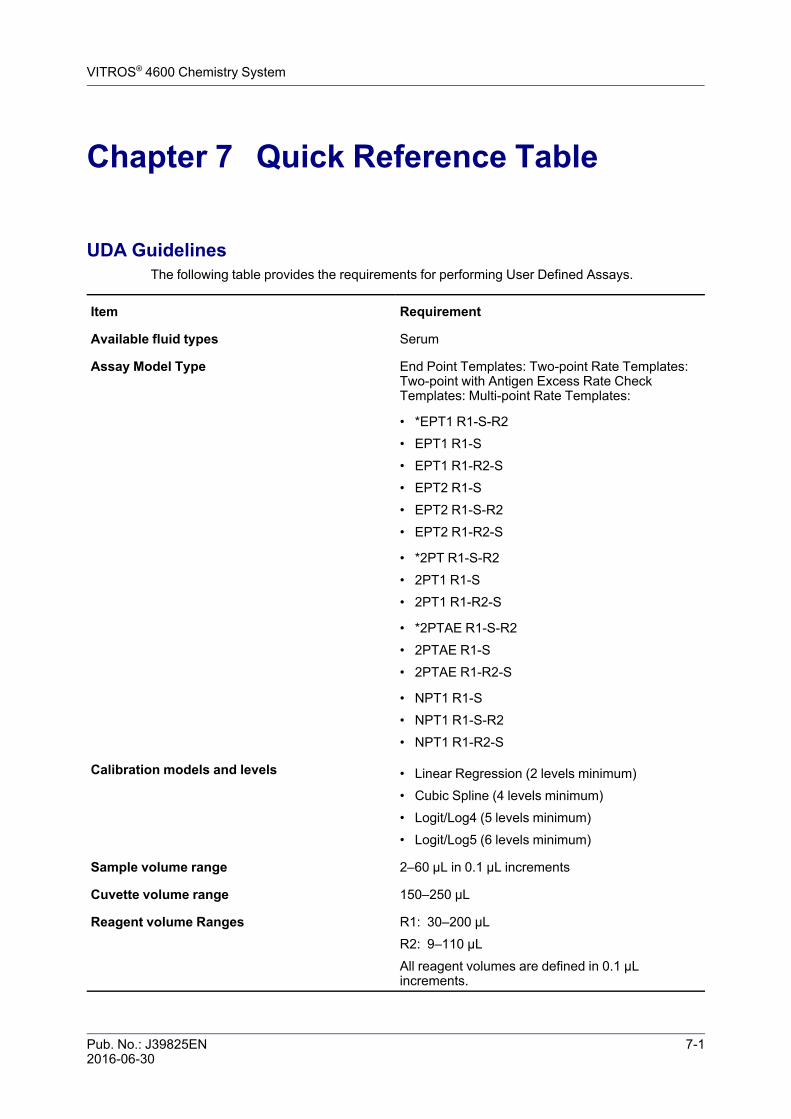
Pub. No.: J39825EN 7-12016-06-30
VITROS® 4600 Chemistry System
Chapter 7 Quick Reference Table
UDA GuidelinesThe following table provides the requirements for performing User Defined Assays.
Item Requirement
Available fluid types Serum
Assay Model Type End Point Templates: Two-point Rate Templates:Two-point with Antigen Excess Rate CheckTemplates: Multi-point Rate Templates:
• *EPT1 R1-S-R2• EPT1 R1-S• EPT1 R1-R2-S• EPT2 R1-S• EPT2 R1-S-R2• EPT2 R1-R2-S
• *2PT R1-S-R2• 2PT1 R1-S• 2PT1 R1-R2-S
• *2PTAE R1-S-R2• 2PTAE R1-S• 2PTAE R1-R2-S
• NPT1 R1-S• NPT1 R1-S-R2• NPT1 R1-R2-S
Calibration models and levels • Linear Regression (2 levels minimum)• Cubic Spline (4 levels minimum)• Logit/Log4 (5 levels minimum)• Logit/Log5 (6 levels minimum)
Sample volume range 2–60 µL in 0.1 µL increments
Cuvette volume range 150–250 µL
Reagent volume Ranges R1: 30–200 µLR2: 9–110 µLAll reagent volumes are defined in 0.1 µLincrements.
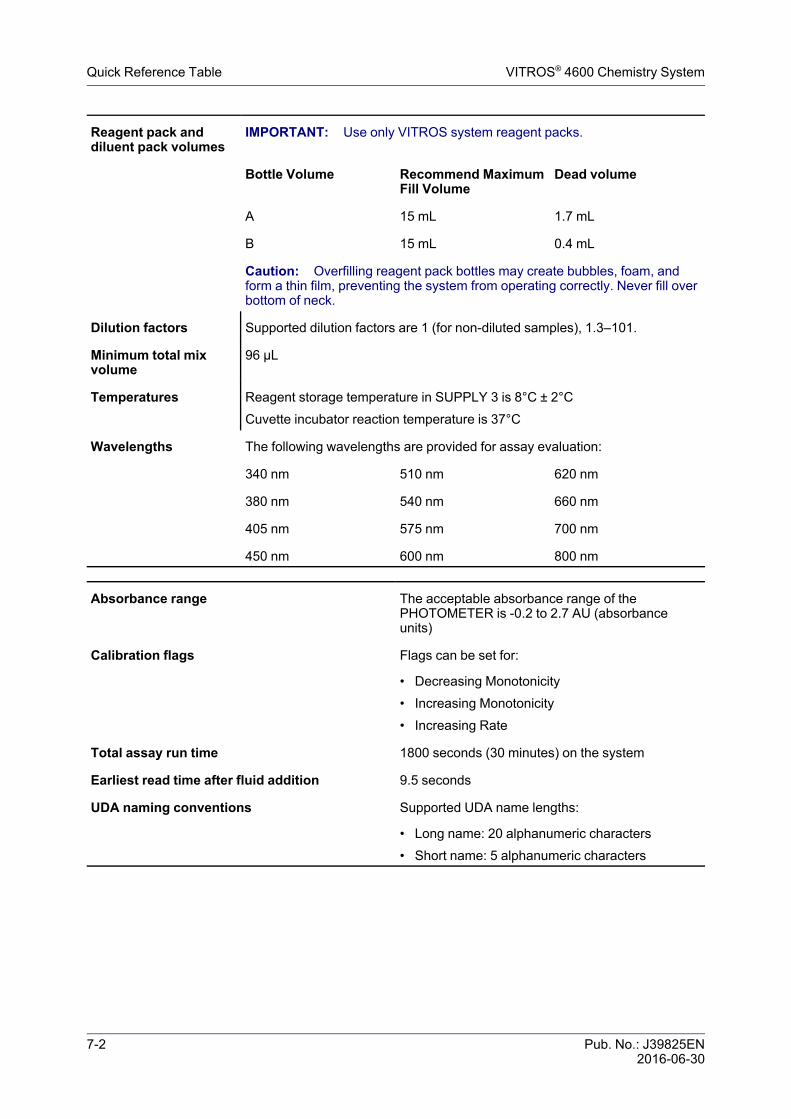
7-2 Pub. No.: J39825EN2016-06-30
Quick Reference Table VITROS® 4600 Chemistry System
Reagent pack anddiluent pack volumes
IMPORTANT: Use only VITROS system reagent packs.
Bottle Volume Recommend MaximumFill Volume
Dead volume
A 15 mL 1.7 mL
B 15 mL 0.4 mL
Caution: Overfilling reagent pack bottles may create bubbles, foam, andform a thin film, preventing the system from operating correctly. Never fill overbottom of neck.
Dilution factors Supported dilution factors are 1 (for non-diluted samples), 1.3–101.
Minimum total mixvolume
96 µL
Temperatures Reagent storage temperature in SUPPLY 3 is 8°C ± 2°CCuvette incubator reaction temperature is 37°C
Wavelengths The following wavelengths are provided for assay evaluation:
340 nm 510 nm 620 nm
380 nm 540 nm 660 nm
405 nm 575 nm 700 nm
450 nm 600 nm 800 nm
Absorbance range The acceptable absorbance range of thePHOTOMETER is -0.2 to 2.7 AU (absorbanceunits)
Calibration flags Flags can be set for:
• Decreasing Monotonicity• Increasing Monotonicity• Increasing Rate
Total assay run time 1800 seconds (30 minutes) on the system
Earliest read time after fluid addition 9.5 seconds
UDA naming conventions Supported UDA name lengths:
• Long name: 20 alphanumeric characters• Short name: 5 alphanumeric characters
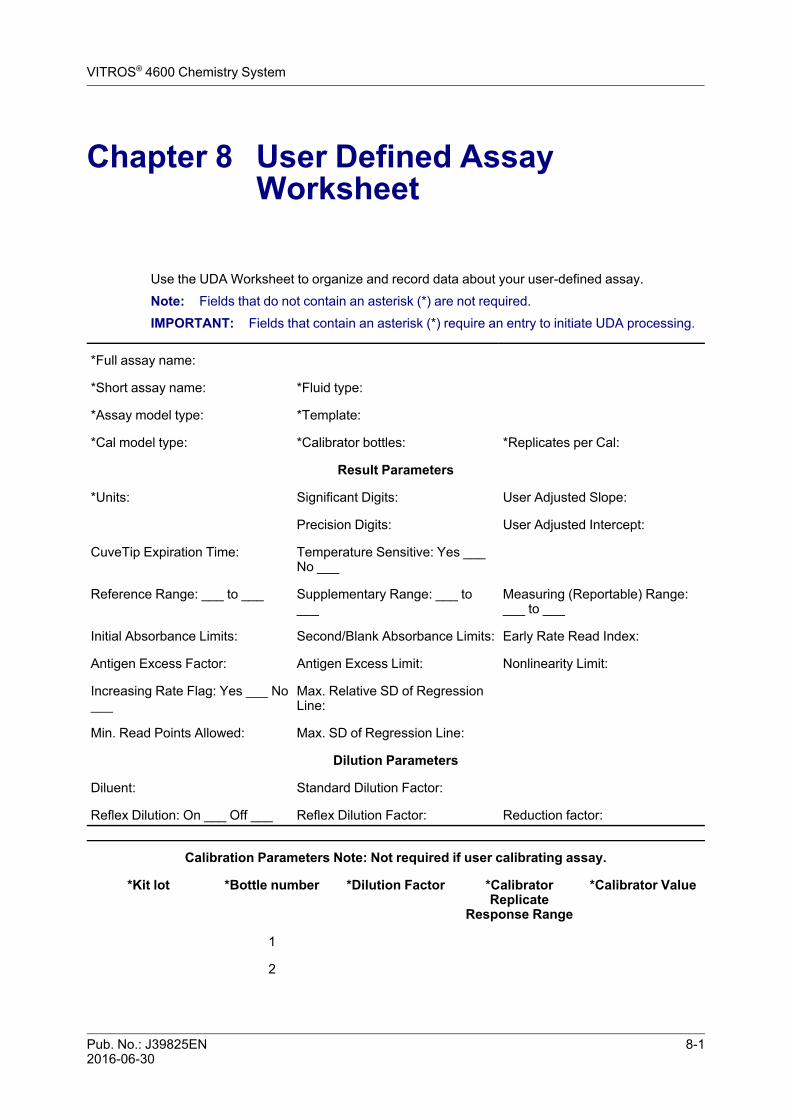
Pub. No.: J39825EN 8-12016-06-30
VITROS® 4600 Chemistry System
Chapter 8 User Defined AssayWorksheet
Use the UDA Worksheet to organize and record data about your user-defined assay.Note: Fields that do not contain an asterisk (*) are not required.IMPORTANT: Fields that contain an asterisk (*) require an entry to initiate UDA processing.
*Full assay name:
*Short assay name: *Fluid type:
*Assay model type: *Template:
*Cal model type: *Calibrator bottles: *Replicates per Cal:
Result Parameters
*Units: Significant Digits: User Adjusted Slope:
Precision Digits: User Adjusted Intercept:
CuveTip Expiration Time: Temperature Sensitive: Yes ___No ___
Reference Range: ___ to ___ Supplementary Range: ___ to___
Measuring (Reportable) Range:___ to ___
Initial Absorbance Limits: Second/Blank Absorbance Limits: Early Rate Read Index:
Antigen Excess Factor: Antigen Excess Limit: Nonlinearity Limit:
Increasing Rate Flag: Yes ___ No___
Max. Relative SD of RegressionLine:
Min. Read Points Allowed: Max. SD of Regression Line:
Dilution Parameters
Diluent: Standard Dilution Factor:
Reflex Dilution: On ___ Off ___ Reflex Dilution Factor: Reduction factor:
Calibration Parameters Note: Not required if user calibrating assay.
*Kit lot *Bottle number *Dilution Factor *CalibratorReplicate
Response Range
*Calibrator Value
1
2
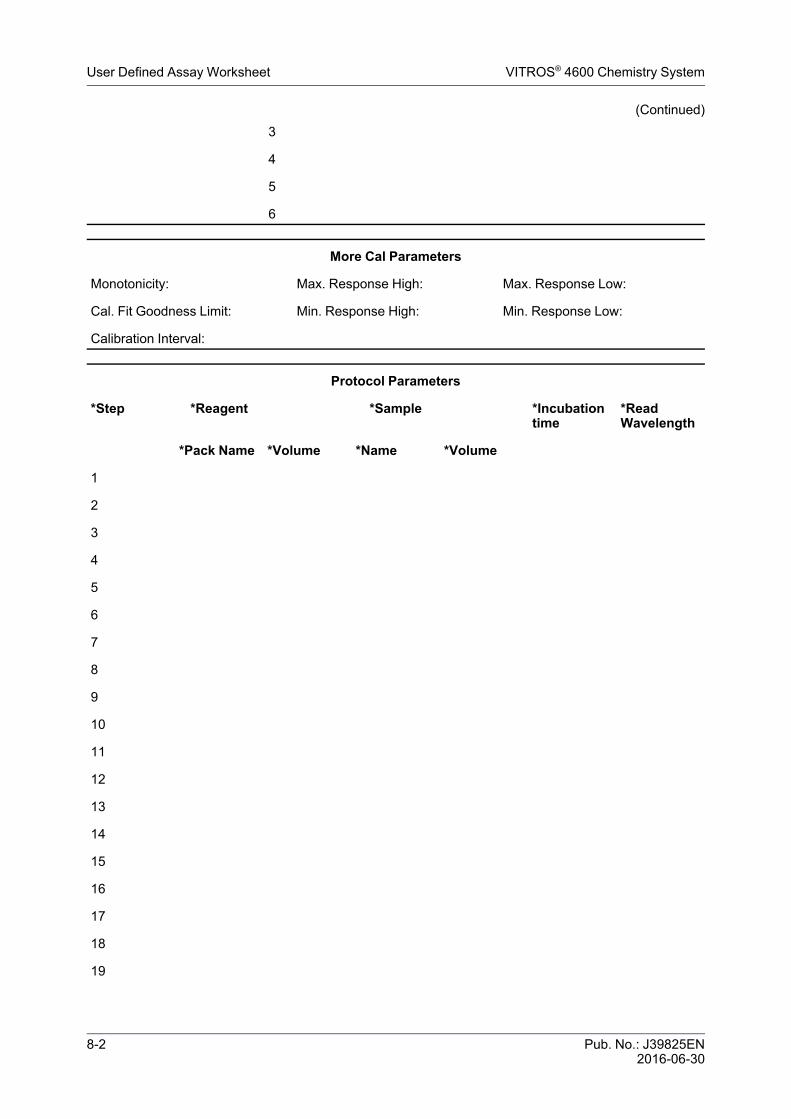
8-2 Pub. No.: J39825EN2016-06-30
User Defined Assay Worksheet VITROS® 4600 Chemistry System
(Continued)3
4
5
6
More Cal Parameters
Monotonicity: Max. Response High: Max. Response Low:
Cal. Fit Goodness Limit: Min. Response High: Min. Response Low:
Calibration Interval:
Protocol Parameters
*Step *Reagent *Sample *Incubationtime
*ReadWavelength
*Pack Name *Volume *Name *Volume
1
2
3
4
5
6
7
8
9
10
11
12
13
14
15
16
17
18
19
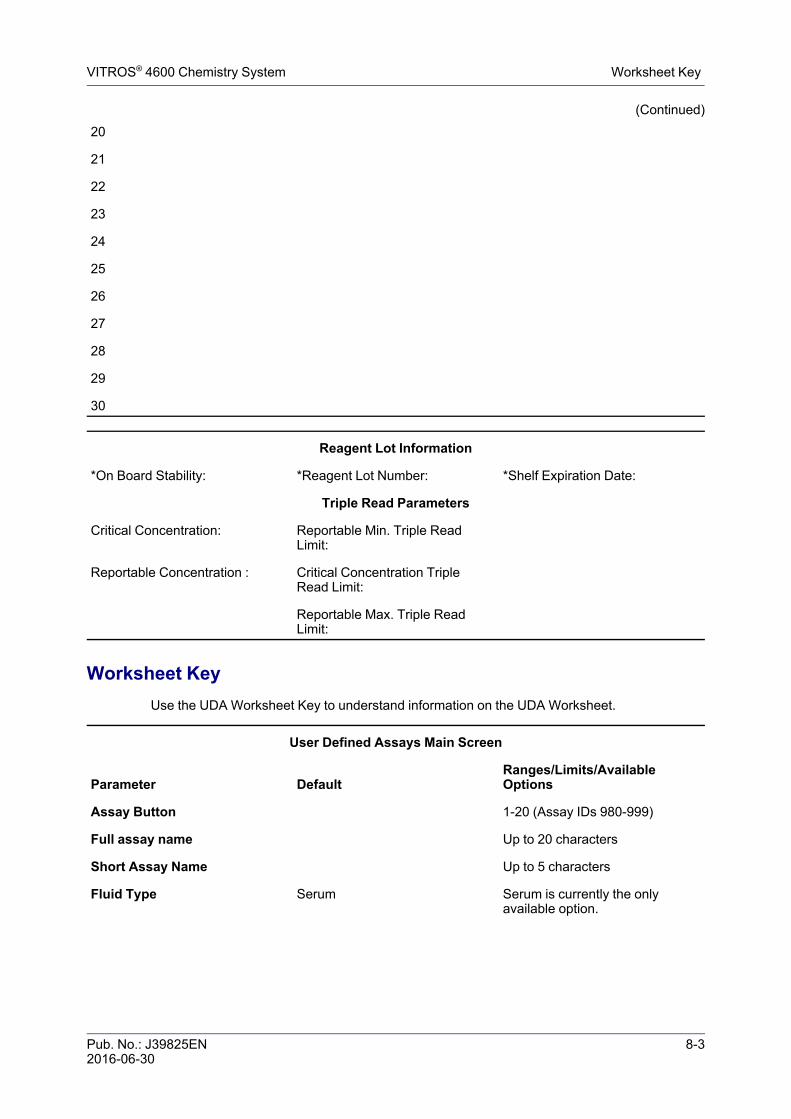
Pub. No.: J39825EN 8-32016-06-30
VITROS® 4600 Chemistry System Worksheet Key
(Continued)20
21
22
23
24
25
26
27
28
29
30
Reagent Lot Information
*On Board Stability: *Reagent Lot Number: *Shelf Expiration Date:
Triple Read Parameters
Critical Concentration: Reportable Min. Triple ReadLimit:
Reportable Concentration : Critical Concentration TripleRead Limit:
Reportable Max. Triple ReadLimit:
Worksheet KeyUse the UDA Worksheet Key to understand information on the UDA Worksheet.
User Defined Assays Main Screen
Parameter DefaultRanges/Limits/AvailableOptions
Assay Button 1-20 (Assay IDs 980-999)
Full assay name Up to 20 characters
Short Assay Name Up to 5 characters
Fluid Type Serum Serum is currently the onlyavailable option.
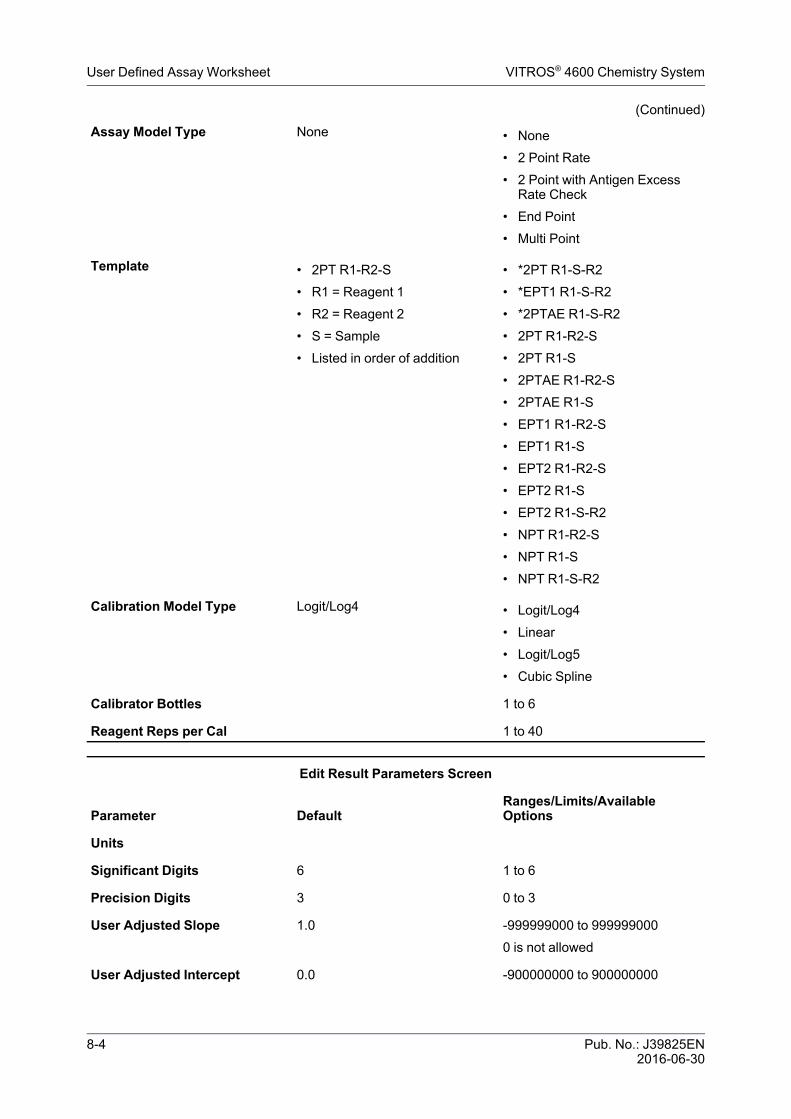
8-4 Pub. No.: J39825EN2016-06-30
User Defined Assay Worksheet VITROS® 4600 Chemistry System
(Continued)Assay Model Type None • None
• 2 Point Rate• 2 Point with Antigen Excess
Rate Check• End Point• Multi Point
Template • 2PT R1-R2-S• R1 = Reagent 1• R2 = Reagent 2• S = Sample• Listed in order of addition
• *2PT R1-S-R2• *EPT1 R1-S-R2• *2PTAE R1-S-R2• 2PT R1-R2-S• 2PT R1-S• 2PTAE R1-R2-S• 2PTAE R1-S• EPT1 R1-R2-S• EPT1 R1-S• EPT2 R1-R2-S• EPT2 R1-S• EPT2 R1-S-R2• NPT R1-R2-S• NPT R1-S• NPT R1-S-R2
Calibration Model Type Logit/Log4 • Logit/Log4• Linear• Logit/Log5• Cubic Spline
Calibrator Bottles 1 to 6
Reagent Reps per Cal 1 to 40
Edit Result Parameters Screen
Parameter DefaultRanges/Limits/AvailableOptions
Units
Significant Digits 6 1 to 6
Precision Digits 3 0 to 3
User Adjusted Slope 1.0 -999999000 to 9999990000 is not allowed
User Adjusted Intercept 0.0 -900000000 to 900000000
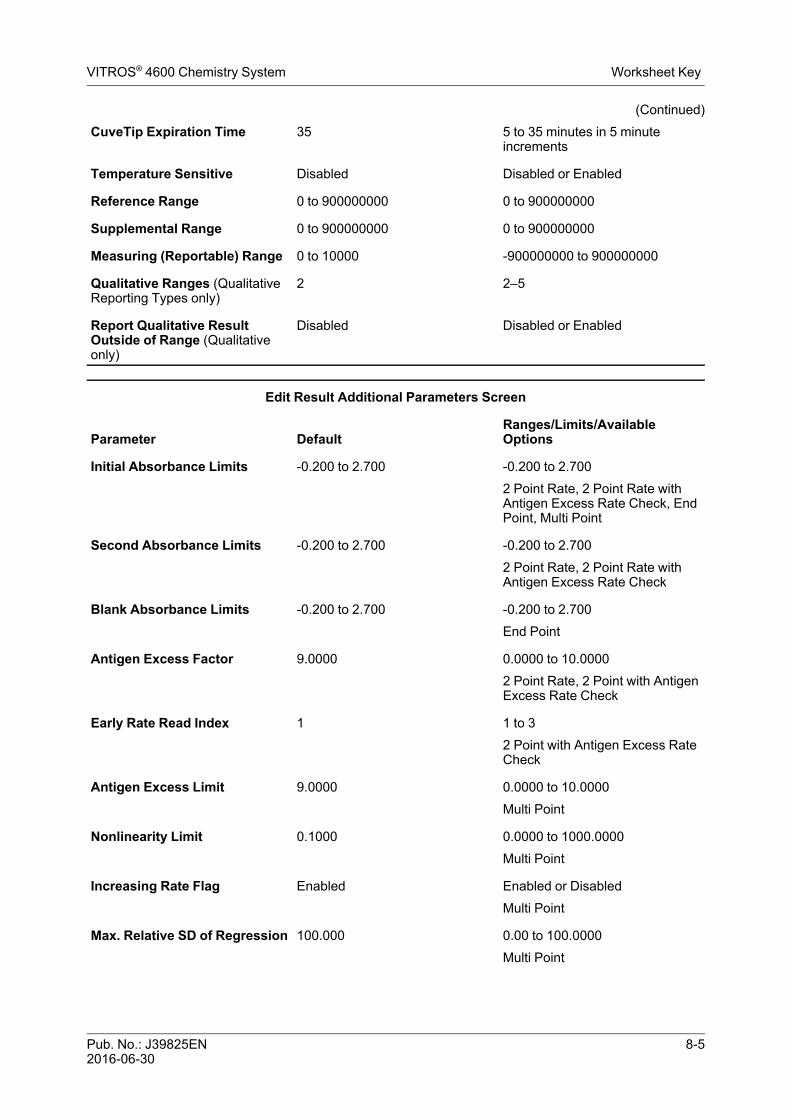
Pub. No.: J39825EN 8-52016-06-30
VITROS® 4600 Chemistry System Worksheet Key
(Continued)CuveTip Expiration Time 35 5 to 35 minutes in 5 minute
increments
Temperature Sensitive Disabled Disabled or Enabled
Reference Range 0 to 900000000 0 to 900000000
Supplemental Range 0 to 900000000 0 to 900000000
Measuring (Reportable) Range 0 to 10000 -900000000 to 900000000
Qualitative Ranges (QualitativeReporting Types only)
2 2–5
Report Qualitative ResultOutside of Range (Qualitativeonly)
Disabled Disabled or Enabled
Edit Result Additional Parameters Screen
Parameter DefaultRanges/Limits/AvailableOptions
Initial Absorbance Limits -0.200 to 2.700 -0.200 to 2.7002 Point Rate, 2 Point Rate withAntigen Excess Rate Check, EndPoint, Multi Point
Second Absorbance Limits -0.200 to 2.700 -0.200 to 2.7002 Point Rate, 2 Point Rate withAntigen Excess Rate Check
Blank Absorbance Limits -0.200 to 2.700 -0.200 to 2.700End Point
Antigen Excess Factor 9.0000 0.0000 to 10.00002 Point Rate, 2 Point with AntigenExcess Rate Check
Early Rate Read Index 1 1 to 32 Point with Antigen Excess RateCheck
Antigen Excess Limit 9.0000 0.0000 to 10.0000Multi Point
Nonlinearity Limit 0.1000 0.0000 to 1000.0000Multi Point
Increasing Rate Flag Enabled Enabled or DisabledMulti Point
Max. Relative SD of Regression 100.000 0.00 to 100.0000Multi Point

8-6 Pub. No.: J39825EN2016-06-30
User Defined Assay Worksheet VITROS® 4600 Chemistry System
(Continued)Minimum Read Points Allowed 3 2 to 12
Multi Point
Max. SD of Regression Line 10.000 0 to 10Multi Point
Edit Dilution Parameters Screen
Parameter DefaultRanges/Limits/AvailableOptions
Diluent None • None• Saline• BSA• Water• Specialty• Urine Electrolyte Diluent (UED)• ApoDiluent• DATDil2• DATDil• Lysis Buff• User Defined Diluents
Standard Dilution Factor 1.0 (no dilution) 1.0, 1.3 to 101.0 in 0.1increments
Reflex Dilution Off Off or On
Dilution Factor 1.0 (no dilution) 1.0 to 101.0 in 0.1 increments
Reduction Factor 1.0 0.1 to 1.0 in 0.1 increments
Edit Calibration Parameters Screen
Parameter DefaultRanges/Limits/AvailableOptions
Dilution Factor 1.0 (no dilution) 1, 1.3 to 101
Calibrator Replicate ResponseRange
0.20000 0 to 0.2
Kit Lot 1 to 99
Calibrator Value -900000000 to 900000000
Edit Calibration Additional Parameters Screen
Parameter DefaultRanges/Limits/AvailableOptions
Monotinicity Increase Increase or Decrease
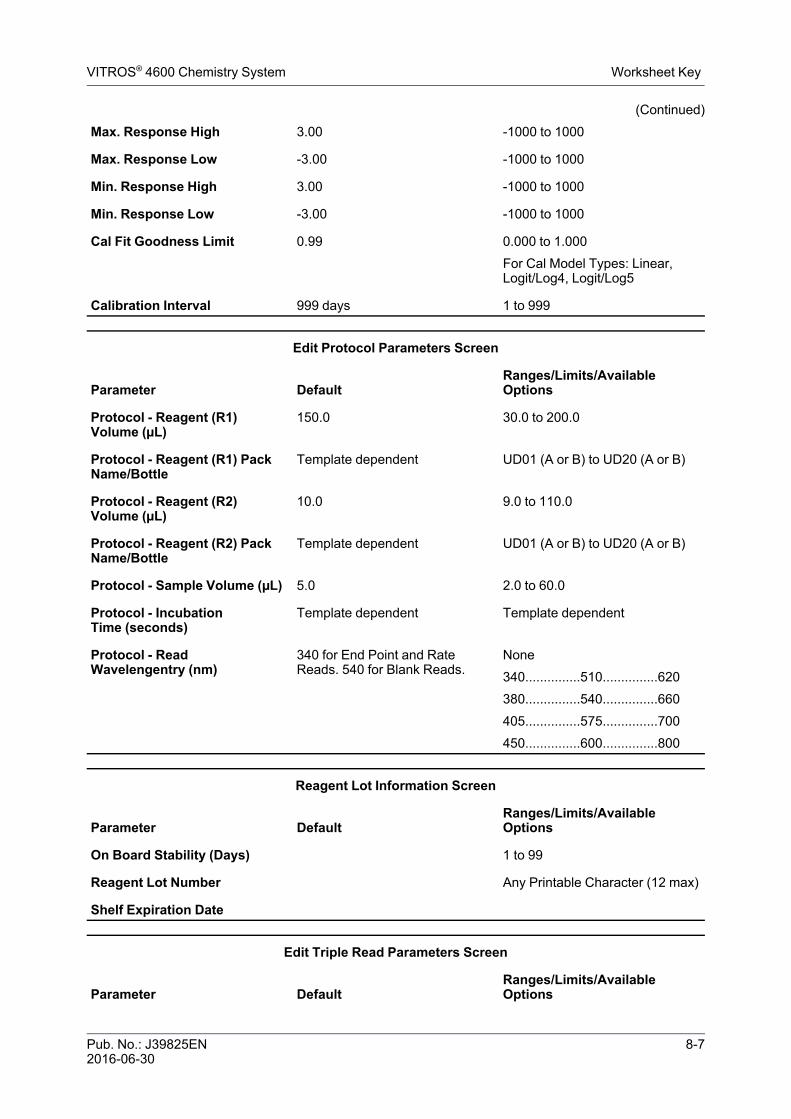
Pub. No.: J39825EN 8-72016-06-30
VITROS® 4600 Chemistry System Worksheet Key
(Continued)Max. Response High 3.00 -1000 to 1000
Max. Response Low -3.00 -1000 to 1000
Min. Response High 3.00 -1000 to 1000
Min. Response Low -3.00 -1000 to 1000
Cal Fit Goodness Limit 0.99 0.000 to 1.000For Cal Model Types: Linear,Logit/Log4, Logit/Log5
Calibration Interval 999 days 1 to 999
Edit Protocol Parameters Screen
Parameter DefaultRanges/Limits/AvailableOptions
Protocol - Reagent (R1)Volume (µL)
150.0 30.0 to 200.0
Protocol - Reagent (R1) PackName/Bottle
Template dependent UD01 (A or B) to UD20 (A or B)
Protocol - Reagent (R2)Volume (µL)
10.0 9.0 to 110.0
Protocol - Reagent (R2) PackName/Bottle
Template dependent UD01 (A or B) to UD20 (A or B)
Protocol - Sample Volume (µL) 5.0 2.0 to 60.0
Protocol - IncubationTime (seconds)
Template dependent Template dependent
Protocol - ReadWavelengentry (nm)
340 for End Point and RateReads. 540 for Blank Reads.
None340...............510...............620380...............540...............660405...............575...............700450...............600...............800
Reagent Lot Information Screen
Parameter DefaultRanges/Limits/AvailableOptions
On Board Stability (Days) 1 to 99
Reagent Lot Number Any Printable Character (12 max)
Shelf Expiration Date
Edit Triple Read Parameters Screen
Parameter DefaultRanges/Limits/AvailableOptions
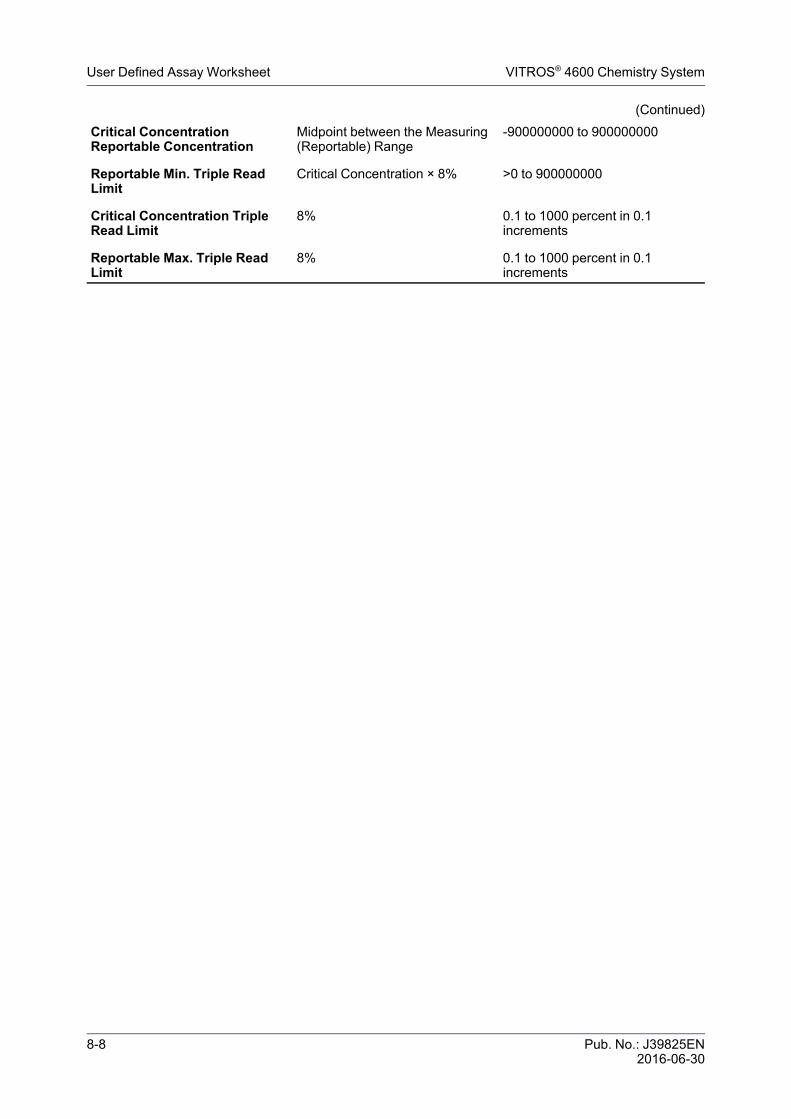
8-8 Pub. No.: J39825EN2016-06-30
User Defined Assay Worksheet VITROS® 4600 Chemistry System
(Continued)Critical ConcentrationReportable Concentration
Midpoint between the Measuring(Reportable) Range
-900000000 to 900000000
Reportable Min. Triple ReadLimit
Critical Concentration × 8% >0 to 900000000
Critical Concentration TripleRead Limit
8% 0.1 to 1000 percent in 0.1increments
Reportable Max. Triple ReadLimit
8% 0.1 to 1000 percent in 0.1increments
Ortho Clinical DiagnosticsFelindre MeadowsPencoedBridgendCF35 5PZUnited Kingdom
Ortho Clinical Diagnostics100 Indigo Creek DriveRochester, NY 14626USA
IVD
EC REP