
γλώσσες
Σελίδες
Νομικός

SU MO TU WE TH FR SA
AMPM
3 6 9 12 15 18 21
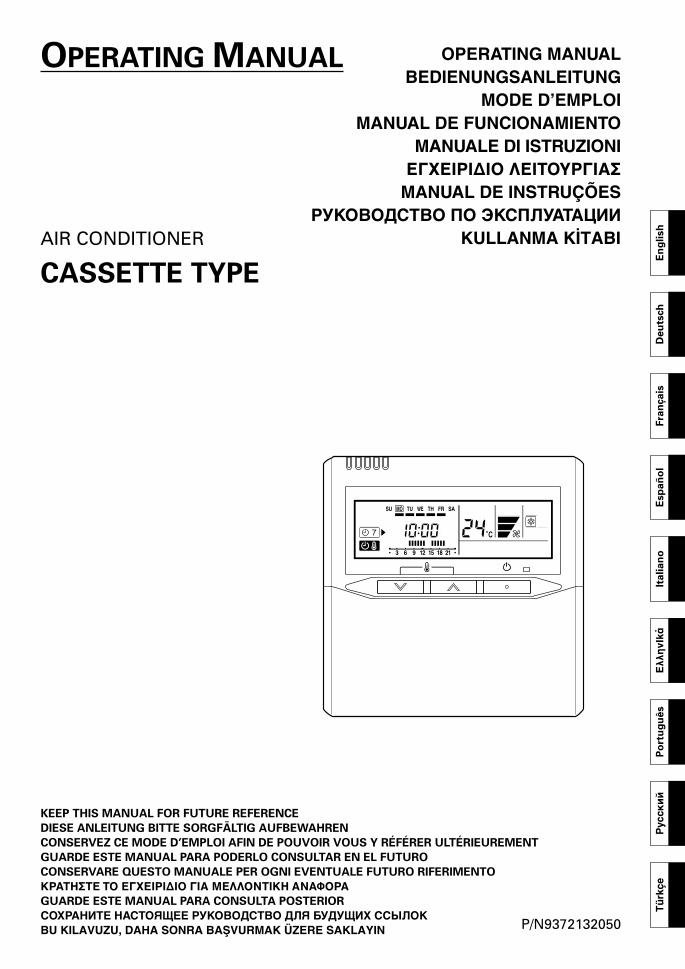
OPERATING MANUAL
AIR CONDITIONER
CASSETTE TYPE
OPERATING MANUALBEDIENUNGSANLEITUNG
MODE D’EMPLOIMANUAL DE FUNCIONAMIENTO
MANUALE DI ISTRUZIONIΕΓ�ΕΙΡΙ∆Ι� ΛΕΙΤ�ΥΡΓΙΑΣ
MANUAL DE INSTRUÇÕESРУКОВОДСТВО ПО ЭКСПЛУАТАЦИИ
KULLANMA K‹TABI
Po
rtu
gu
ês
Eλλ
ηvI
kάIt
ali
an
oE
sp
añ
ol
Fra
nçais
De
uts
ch
En
gli
sh
Рус
ски
йT
ürk
çe
KEEP THIS MANUAL FOR FUTURE REFERENCE
DIESE ANLEITUNG BITTE SORGFÄLTIG AUFBEWAHREN
CONSERVEZ CE MODE D’EMPLOI AFIN DE POUVOIR VOUS Y RÉFÉRER ULTÉRIEUREMENT
GUARDE ESTE MANUAL PARA PODERLO CONSULTAR EN EL FUTURO
CONSERVARE QUESTO MANUALE PER OGNI EVENTUALE FUTURO RIFERIMENTO
ΚΡΑΤΗΣΤΕ Τ� ΕΓ�ΕΙΡΙ∆Ι� ΓΙΑ ΜΕΛΛ�ΝΤΙΚΗ ΑΝΑΦ�ΡΑGUARDE ESTE MANUAL PARA CONSULTA POSTERIOR
СОХРАНИТЕ НАСТОЯЩЕЕ РУКОВОДСТВО ДЛЯ БУДУЩИХ ССЫЛОКBU KILAVUZU, DAHA SONRA BAfiVURMAK ÜZERE SAKLAYIN P/N9372132050
9372132050_OM_cover1.p65 20/3/07, 17:271
En-1
SAFETY PRECAUTIONS� Before using the appliance, read these “PRECAUTIONS” thoroughly and operate in the correct way.
� The instructions in this section all relate to safety; be sure to maintain safe operating conditions.
� “DANGER”, “WARNING” and “CAUTION” have the following meanings in these instructions:
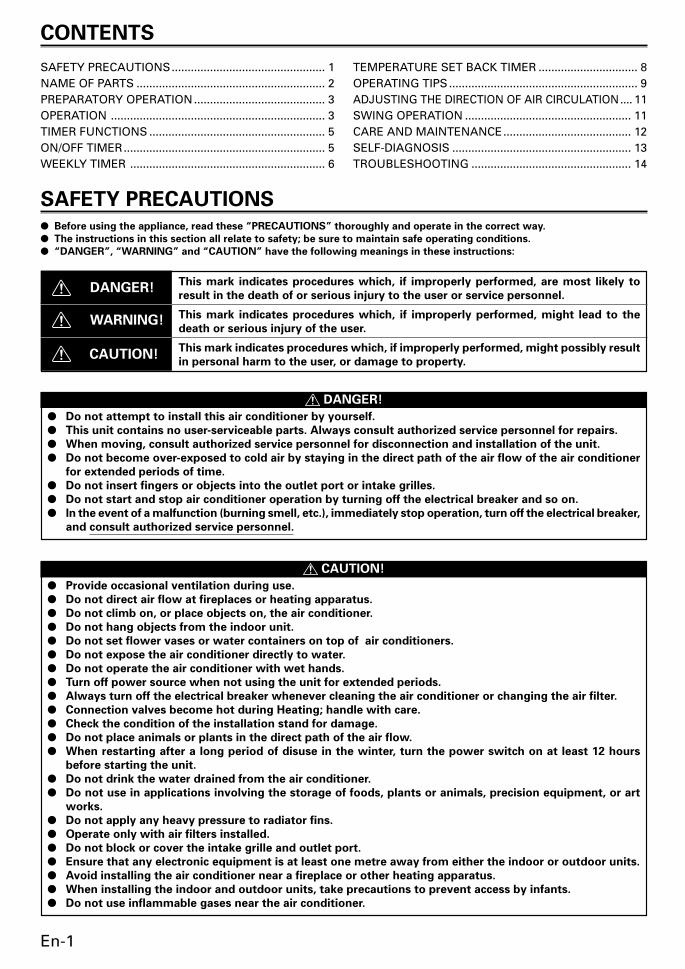
CONTENTS
SAFETY PRECAUTIONS................................................ 1NAME OF PARTS ........................................................... 2PREPARATORY OPERATION......................................... 3OPERATION ................................................................... 3TIMER FUNCTIONS ....................................................... 5ON/OFF TIMER............................................................... 5WEEKLY TIMER ............................................................. 6
TEMPERATURE SET BACK TIMER ............................... 8OPERATING TIPS........................................................... 9ADJUSTING THE DIRECTION OF AIR CIRCULATION.... 11SWING OPERATION .................................................... 11CARE AND MAINTENANCE........................................ 12SELF-DIAGNOSIS ........................................................ 13TROUBLESHOOTING .................................................. 14
DANGER!
� Do not attempt to install this air conditioner by yourself.
� This unit contains no user-serviceable parts. Always consult authorized service personnel for repairs.
� When moving, consult authorized service personnel for disconnection and installation of the unit.
� Do not become over-exposed to cold air by staying in the direct path of the air flow of the air conditioner
for extended periods of time.
� Do not insert fingers or objects into the outlet port or intake grilles.
� Do not start and stop air conditioner operation by turning off the electrical breaker and so on.
� In the event of a malfunction (burning smell, etc.), immediately stop operation, turn off the electrical breaker,
and consult authorized service personnel.
CAUTION!
� Provide occasional ventilation during use.
� Do not direct air flow at fireplaces or heating apparatus.
� Do not climb on, or place objects on, the air conditioner.
� Do not hang objects from the indoor unit.
� Do not set flower vases or water containers on top of air conditioners.
� Do not expose the air conditioner directly to water.
� Do not operate the air conditioner with wet hands.
� Turn off power source when not using the unit for extended periods.
� Always turn off the electrical breaker whenever cleaning the air conditioner or changing the air filter.
� Connection valves become hot during Heating; handle with care.
� Check the condition of the installation stand for damage.
� Do not place animals or plants in the direct path of the air flow.
� When restarting after a long period of disuse in the winter, turn the power switch on at least 12 hours
before starting the unit.
� Do not drink the water drained from the air conditioner.
� Do not use in applications involving the storage of foods, plants or animals, precision equipment, or art
works.
� Do not apply any heavy pressure to radiator fins.
� Operate only with air filters installed.
� Do not block or cover the intake grille and outlet port.
� Ensure that any electronic equipment is at least one metre away from either the indoor or outdoor units.
� Avoid installing the air conditioner near a fireplace or other heating apparatus.
� When installing the indoor and outdoor units, take precautions to prevent access by infants.
� Do not use inflammable gases near the air conditioner.
WARNING!
CAUTION!
DANGER!This mark indicates procedures which, if improperly performed, are most likely to
result in the death of or serious injury to the user or service personnel.
This mark indicates procedures which, if improperly performed, might lead to the
death or serious injury of the user.
This mark indicates procedures which, if improperly performed, might possibly result
in personal harm to the user, or damage to property.
9372132050_OM_en.p65 20/3/07, 17:281
En-2
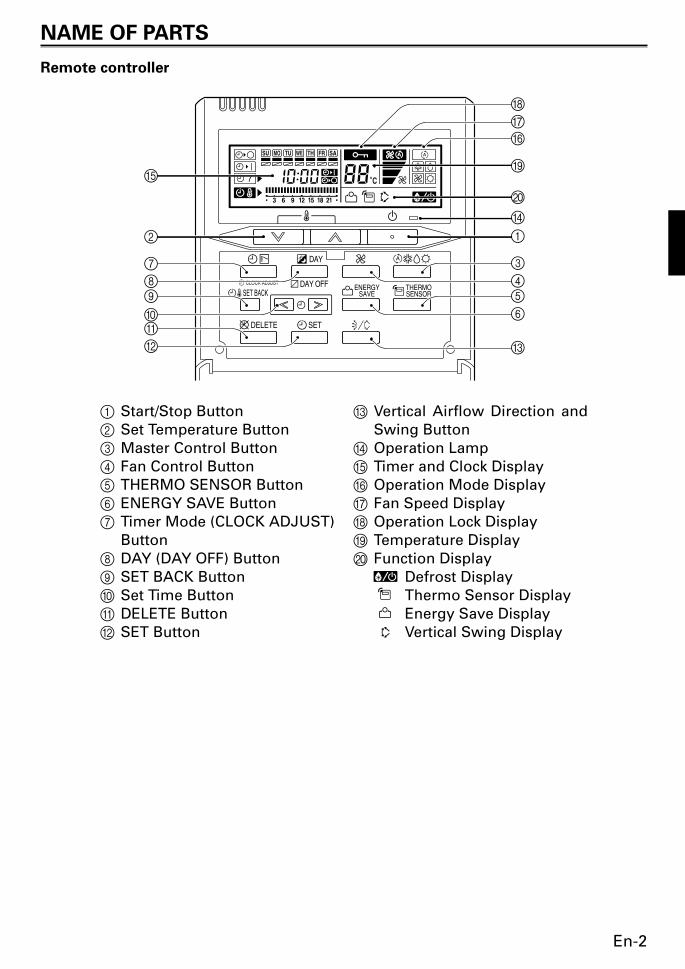
NAME OF PARTS
Remote controller
1 Start/Stop Button2 Set Temperature Button3 Master Control Button4 Fan Control Button5 THERMO SENSOR Button6 ENERGY SAVE Button7 Timer Mode (CLOCK ADJUST)
Button8 DAY (DAY OFF) Button9 SET BACK Button0 Set Time ButtonA DELETE ButtonB SET Button
C Vertical Airflow Direction andSwing Button
D Operation LampE Timer and Clock DisplayF Operation Mode DisplayG Fan Speed DisplayH Operation Lock DisplayI Temperature DisplayJ Function Display
Defrost DisplayThermo Sensor DisplayEnergy Save DisplayVertical Swing Display
DAY OFF
DELETE SET
ENERGYSAVE
THERMOSENSORSET BACK
DAY
CLOCK ADJUST
SU MO TU WE TH FR SA
3 6 9 12 15 18 21
E
2
7
89
0A
B
H
GF
I
J
D
1
3
4
C
5
6
9372132050_OM_en.p65 20/3/07, 17:282

En-3
PREPARATORY OPERATION
To set the operation mode
� Operation mode setting
� Room temperature setting
� Fan speed setting
OPERATIONInstructions relating to heating are applicable only to “HEAT & COOL MODEL” (Reverse Cycle).
To start/stop operation
CLOCK ADJUST
Press the timer mode (CLOCKADJUST) button for 2 secondsor more. The time display onthe remote controller will flash.
2DAY OFF
DAY
SU MO TU WE TH FR SA
Press the DAY button and select the current day.A appears around the selected day.
Press the set time buttons to set the current time.Press repeatedly to adjust the current time in 1-minute increments. Press and hold to adjust thecurrent time in 10-minute increments.
ex. Monday 10:00
Press again to end.
CLOCK ADJUST
SU MO TU WE TH FR SA
1
3 4
AUTO COOL DRY HEATFAN
AUTO HIGH MED LOW
Temperature setting rangeAUTO ............................................... 18 to 30 °CCOOL/DRY ....................................... 18 to 30 °CHEAT ................................................ 16 to 30 °C
Lower Raise
Operation lamp
Air conditioner ON: Lit brightlyAir conditioner OFF: Not lit
Press the start/stop button.
Press the master control button to set the operation mode.If DRY is selected, the fan speed will be set to AUTO.
Press the set temperature buttons to set the room temperature.
Press the fan control button to set the fan speed.
Set the current day and time
9372132050_OM_en.p65 20/3/07, 17:283

En-4
Press the ENERGY SAVE button to start or stop the energy-sav-ing air conditioner operation.For details on the function, refer to page 9.
ENERGYSAVE
THERMOSENSOR
Child lock function
DAY OFF
DELETE SET
SET BACK
DAY
CLOCK ADJUST
Press the DAY (DAY OFF) button and SET button simulta-neously for 2 seconds or more to activate the child lockfunction and lock all buttons on the remote controller.Press the buttons again for 2 seconds or more to deacti-vate the child lock function.When the child lock function is activated, the markappears. If any button is pressed during the child lock,
the CL display flashes.
Indoor unit
Room temperature sensor selection
Press the THERMO SENSOR button to select whether theroom temperature is detected at the indoor unit (remotesensor) or the remote controller.
When the thermo sensor display appears, the roomtemperature is detected at the remote controller.
NOTES
• This function is locked at the factory. In order to detect the room temperature correctly, consult authorized servicepersonnel when using this function.
• If this function is locked, the location where the room temperature is detected cannot be changed and the mark flashes when the THERMO SENSOR button is pushed.
Energy save
9372132050_OM_en.p65 20/3/07, 17:284
En-5
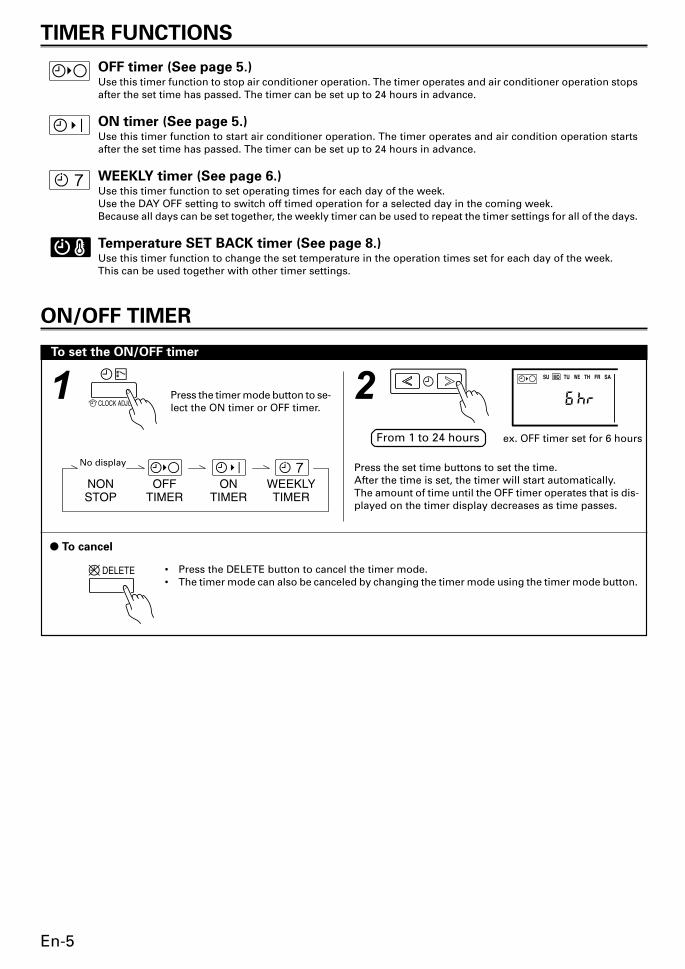
TIMER FUNCTIONS
OFF timer (See page 5.)Use this timer function to stop air conditioner operation. The timer operates and air conditioner operation stopsafter the set time has passed. The timer can be set up to 24 hours in advance.
ON timer (See page 5.)Use this timer function to start air conditioner operation. The timer operates and air condition operation startsafter the set time has passed. The timer can be set up to 24 hours in advance.
WEEKLY timer (See page 6.)Use this timer function to set operating times for each day of the week.Use the DAY OFF setting to switch off timed operation for a selected day in the coming week.Because all days can be set together, the weekly timer can be used to repeat the timer settings for all of the days.
Temperature SET BACK timer (See page 8.)Use this timer function to change the set temperature in the operation times set for each day of the week.This can be used together with other timer settings.
ON/OFF TIMER
Press the timer mode button to se-lect the ON timer or OFF timer.
2
• Press the DELETE button to cancel the timer mode.• The timer mode can also be canceled by changing the timer mode using the timer mode button.
1CLOCK ADJUST
NONSTOP
OFFTIMER
ONTIMER
WEEKLYTIMER
No display
SU MO TU WE TH FR SA
Press the set time buttons to set the time.After the time is set, the timer will start automatically.The amount of time until the OFF timer operates that is dis-played on the timer display decreases as time passes.
From 1 to 24 hours ex. OFF timer set for 6 hours
� To cancel
DELETE
To set the ON/OFF timer
9372132050_OM_en.p65 20/3/07, 17:285
En-6
SU MO TU WE TH FR SA
3 6 9 12 15 18 21
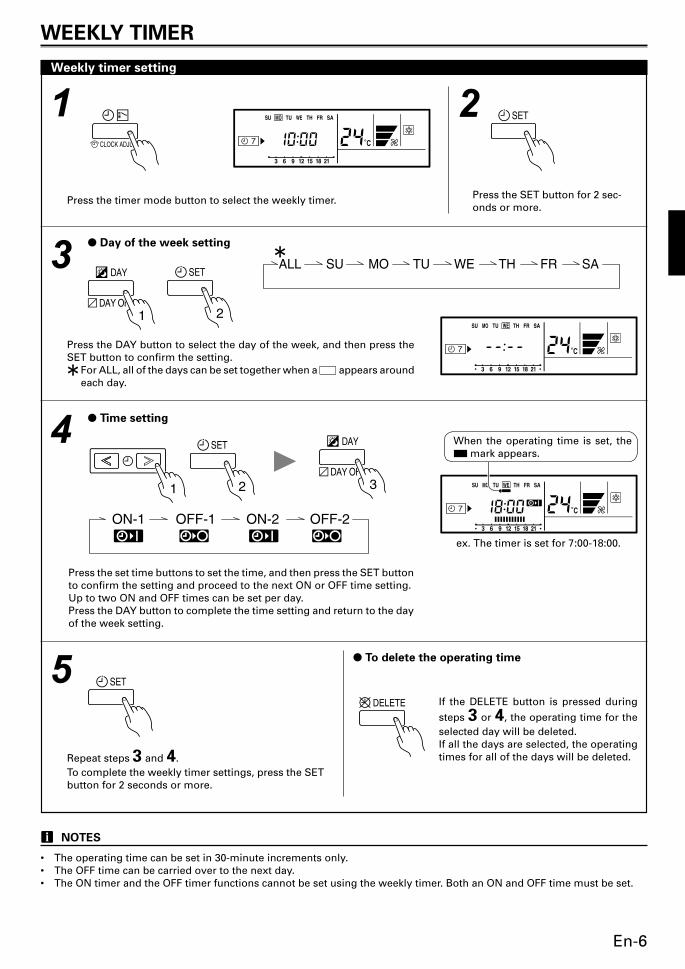
WEEKLY TIMER
Press the timer mode button to select the weekly timer.
2
Press the SET button for 2 sec-onds or more.
1
3
CLOCK ADJUST
SU MO TU WE TH FR SA
3 6 9 12 15 18 21
� Day of the week setting
DAY OFF
DAY SET
1 2
Press the DAY button to select the day of the week, and then press theSET button to confirm the setting.
For ALL, all of the days can be set together when a appears aroundeach day.
ALL SU MO TU WE TH FR SA
SU MO TU WE TH FR SA
3 6 9 12 15 18 21
4� Time setting
Press the set time buttons to set the time, and then press the SET buttonto confirm the setting and proceed to the next ON or OFF time setting.Up to two ON and OFF times can be set per day.Press the DAY button to complete the time setting and return to the dayof the week setting.
When the operating time is set, the mark appears.
5
Repeat steps 3 and 4.To complete the weekly timer settings, press the SETbutton for 2 seconds or more.
SET
� To delete the operating time
DELETE If the DELETE button is pressed during
steps 3 or 4, the operating time for theselected day will be deleted.If all the days are selected, the operatingtimes for all of the days will be deleted.
NOTES
• The operating time can be set in 30-minute increments only.• The OFF time can be carried over to the next day.• The ON timer and the OFF timer functions cannot be set using the weekly timer. Both an ON and OFF time must be set.
SET
Weekly timer setting
SET
1 2DAY OFF
DAY
3
ON-1 OFF-1 ON-2 OFF-2
ex. The timer is set for 7:00-18:00.
9372132050_OM_en.p65 20/3/07, 17:286
En-7
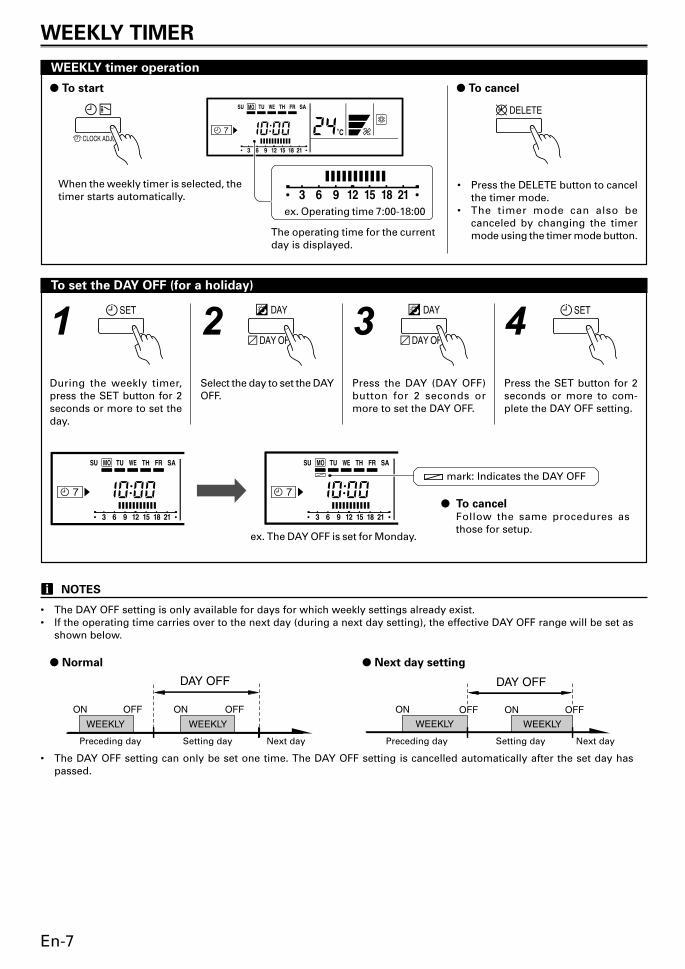
WEEKLY TIMER
� To start
CLOCK ADJUST
When the weekly timer is selected, thetimer starts automatically.
The operating time for the currentday is displayed.
� To cancel
• Press the DELETE button to cancelthe timer mode.
• The timer mode can also becanceled by changing the timermode using the timer mode button.
To set the DAY OFF (for a holiday)
1
During the weekly timer,press the SET button for 2seconds or more to set theday.
SET
Select the day to set the DAYOFF.
Press the DAY (DAY OFF)button for 2 seconds ormore to set the DAY OFF.
Press the SET button for 2seconds or more to com-plete the DAY OFF setting.
2 4DAY OFF
DAY SET
3DAY OFF
DAY
SU MO TU WE TH FR SA
3 6 9 12 15 18 21
SU MO TU WE TH FR SA
3 6 9 12 15 18 21
� To cancelFollow the same procedures asthose for setup.
ex. The DAY OFF is set for Monday.
NOTES
• The DAY OFF setting is only available for days for which weekly settings already exist.• If the operating time carries over to the next day (during a next day setting), the effective DAY OFF range will be set as
shown below.
� Normal � Next day setting
Setting dayPreceding day Next day Setting dayPreceding day Next day
• The DAY OFF setting can only be set one time. The DAY OFF setting is cancelled automatically after the set day haspassed.
mark: Indicates the DAY OFF
ON OFF ON OFF
DAY OFF
WEEKLY WEEKLY WEEKLYWEEKLY
ON OFF ON OFF
DAY OFF
DELETE
WEEKLY timer operation
SU MO TU WE TH FR SA
3 6 9 12 15 18 21
3 6 9 12 15 18 21ex. Operating time 7:00-18:00
9372132050_OM_en.p65 20/3/07, 17:287
En-8
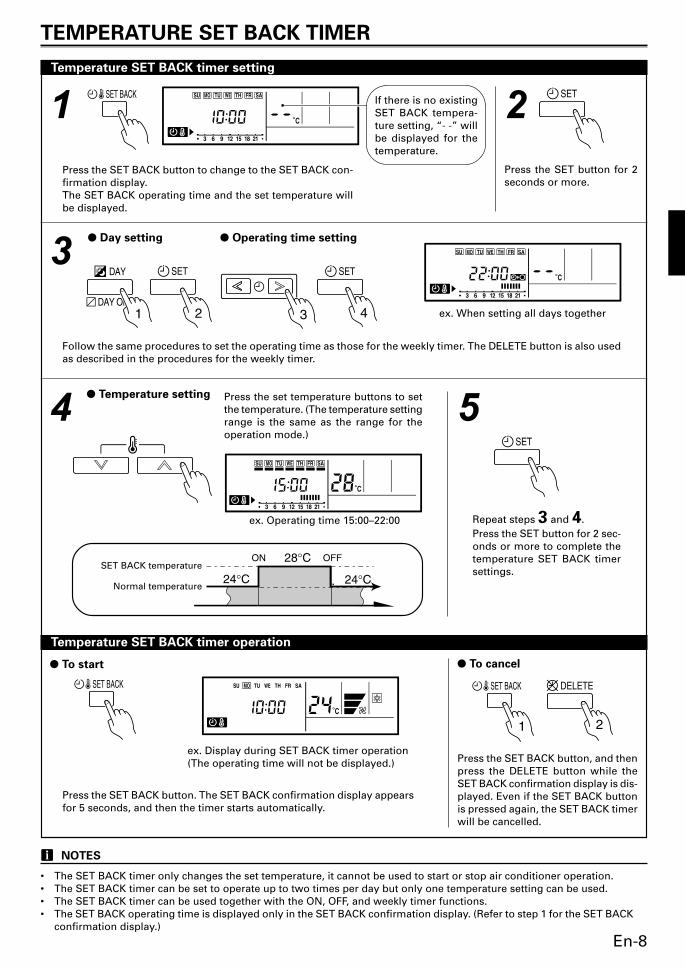
TEMPERATURE SET BACK TIMER
Press the SET BACK button to change to the SET BACK con-firmation display.The SET BACK operating time and the set temperature willbe displayed.
2
Press the SET button for 2seconds or more.
1
3� Day setting � Operating time setting
Follow the same procedures to set the operating time as those for the weekly timer. The DELETE button is also usedas described in the procedures for the weekly timer.
4
NOTES
• The SET BACK timer only changes the set temperature, it cannot be used to start or stop air conditioner operation.• The SET BACK timer can be set to operate up to two times per day but only one temperature setting can be used.• The SET BACK timer can be used together with the ON, OFF, and weekly timer functions.• The SET BACK operating time is displayed only in the SET BACK confirmation display. (Refer to step 1 for the SET BACK
confirmation display.)
SET BACK SET
SU MO TU WE TH FR SA
3 6 9 12 15 18 21
DAY OFF
DAY
1 3
SET
2
SET
4
SU MO TU WE TH FR SA
3 6 9 12 15 18 21
ex. When setting all days together
� Temperature setting Press the set temperature buttons to setthe temperature. (The temperature settingrange is the same as the range for theoperation mode.)
ex. Operating time 15:00–22:00
5
Repeat steps 3 and 4.Press the SET button for 2 sec-onds or more to complete thetemperature SET BACK timersettings.
SET
ON OFF
24°C 24°C
28°CSET BACK temperature
Normal temperature
Temperature SET BACK timer operation
� To start
SET BACK
Press the SET BACK button. The SET BACK confirmation display appearsfor 5 seconds, and then the timer starts automatically.
ex. Display during SET BACK timer operation(The operating time will not be displayed.)
� To cancel
Press the SET BACK button, and thenpress the DELETE button while theSET BACK confirmation display is dis-played. Even if the SET BACK buttonis pressed again, the SET BACK timerwill be cancelled.
Temperature SET BACK timer setting
SU MO TU WE TH FR SA
3 6 9 12 15 18 21
If there is no existingSET BACK tempera-ture setting, “- -” willbe displayed for thetemperature.
SET BACK
1
DELETE
2
SU MO TU WE TH FR SA
9372132050_OM_en.p65 20/3/07, 17:288
En-9
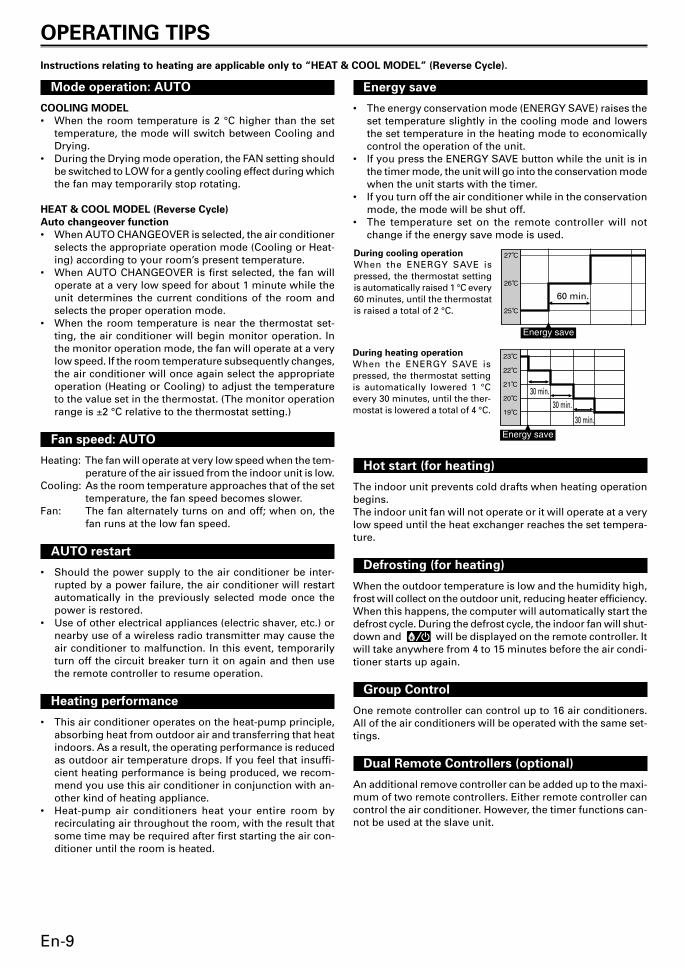
During cooling operation
When the ENERGY SAVE ispressed, the thermostat settingis automatically raised 1 °C every60 minutes, until the thermostatis raised a total of 2 °C.
27
25
26
Energy save
23
22
21
20
19
Energy save
OPERATING TIPS
Mode operation: AUTO
COOLING MODEL
• When the room temperature is 2 °C higher than the settemperature, the mode will switch between Cooling andDrying.
• During the Drying mode operation, the FAN setting shouldbe switched to LOW for a gently cooling effect during whichthe fan may temporarily stop rotating.
HEAT & COOL MODEL (Reverse Cycle)
Auto changeover function
• When AUTO CHANGEOVER is selected, the air conditionerselects the appropriate operation mode (Cooling or Heat-ing) according to your room’s present temperature.
• When AUTO CHANGEOVER is first selected, the fan willoperate at a very low speed for about 1 minute while theunit determines the current conditions of the room andselects the proper operation mode.
• When the room temperature is near the thermostat set-ting, the air conditioner will begin monitor operation. Inthe monitor operation mode, the fan will operate at a verylow speed. If the room temperature subsequently changes,the air conditioner will once again select the appropriateoperation (Heating or Cooling) to adjust the temperatureto the value set in the thermostat. (The monitor operationrange is ±2 °C relative to the thermostat setting.)
Fan speed: AUTO
Heating: The fan will operate at very low speed when the tem-perature of the air issued from the indoor unit is low.
Cooling: As the room temperature approaches that of the settemperature, the fan speed becomes slower.
Fan: The fan alternately turns on and off; when on, thefan runs at the low fan speed.
AUTO restart
• Should the power supply to the air conditioner be inter-rupted by a power failure, the air conditioner will restartautomatically in the previously selected mode once thepower is restored.
• Use of other electrical appliances (electric shaver, etc.) ornearby use of a wireless radio transmitter may cause theair conditioner to malfunction. In this event, temporarilyturn off the circuit breaker turn it on again and then usethe remote controller to resume operation.
Heating performance
• This air conditioner operates on the heat-pump principle,absorbing heat from outdoor air and transferring that heatindoors. As a result, the operating performance is reducedas outdoor air temperature drops. If you feel that insuffi-cient heating performance is being produced, we recom-mend you use this air conditioner in conjunction with an-other kind of heating appliance.
• Heat-pump air conditioners heat your entire room byrecirculating air throughout the room, with the result thatsome time may be required after first starting the air con-ditioner until the room is heated.
During heating operation
When the ENERGY SAVE ispressed, the thermostat settingis automatically lowered 1 °Cevery 30 minutes, until the ther-mostat is lowered a total of 4 °C.
60 min.
30 min.30 min.
30 min.
Energy save
• The energy conservation mode (ENERGY SAVE) raises theset temperature slightly in the cooling mode and lowersthe set temperature in the heating mode to economicallycontrol the operation of the unit.
• If you press the ENERGY SAVE button while the unit is inthe timer mode, the unit will go into the conservation modewhen the unit starts with the timer.
• If you turn off the air conditioner while in the conservationmode, the mode will be shut off.
• The temperature set on the remote controller will notchange if the energy save mode is used.
Hot start (for heating)
The indoor unit prevents cold drafts when heating operationbegins.The indoor unit fan will not operate or it will operate at a verylow speed until the heat exchanger reaches the set tempera-ture.
Defrosting (for heating)
When the outdoor temperature is low and the humidity high,frost will collect on the outdoor unit, reducing heater efficiency.When this happens, the computer will automatically start thedefrost cycle. During the defrost cycle, the indoor fan will shut-down and will be displayed on the remote controller. Itwill take anywhere from 4 to 15 minutes before the air condi-tioner starts up again.
Group Control
One remote controller can control up to 16 air conditioners.All of the air conditioners will be operated with the same set-tings.
Dual Remote Controllers (optional)
An additional remove controller can be added up to the maxi-mum of two remote controllers. Either remote controller cancontrol the air conditioner. However, the timer functions can-not be used at the slave unit.
Instructions relating to heating are applicable only to “HEAT & COOL MODEL” (Reverse Cycle).
9372132050_OM_en.p65 20/3/07, 17:289
En-10
This indoor unit can be connected to a multi-type outdoor unit. The multi-type air conditioner allows multiple indoor units tobe operated in multiple locations. The indoor units may be operated simultaneously, in accordance with their respectiveoutput.
Instructions relating to inverter (❖) are applicable only to “INVERTER MODEL”.
❖ � Operation can be done in the following different operat-ing modes.
Cooling mode and dry mode
Cooling mode and fan mode
Dry mode and fan mode❖ � The operating mode (heating mode or cooling (dry)
mode) of the outdoor unit will be determined by the op-erating mode of the indoor unit that was operated first.If the indoor unit was started in fan mode, the operatingmode of the outdoor unit will not be determined.
For example, if indoor unit (A) was started in fan modeand then indoor unit (B) was then operated in heatingmode, indoor unit (A) would temporarily start opera-tion in fan mode but when indoor unit (B) started oper-ating in heating mode, will be shown on the re-mote controller display and it would go into standbymode. Indoor unit (B) would continue to operate in heat-ing mode.
Instructions relating to heating (*) are applicable only to “HEAT & COOL MODEL” (Reverse Cycle).
*� During use of the heating mode, the top of the indoorunit may become warm, but this is due to the fact thatcoolant is circulated through the indoor unit even whenit is stopped; it is not a malfunction.
� When using a multi-type air conditioner, the multipleindoor units can be operated simultaneously, but whentwo or more indoor units of the same group are oper-ated simultaneously, the heating and cooling efficiencywill be less than when a single indoor unit is used alone.Accordingly, when you wish to use more than one in-door unit for cooling at the same time, the use shouldbe concentrated at night and other times when less out-put is required. In the same way, when multiple unitsare used simultaneously for heating, it is recommendedthat they be used in conjunction with other auxiliaryspace heaters, as required.
� Seasonal and outdoor temperature conditions, the struc-ture of the rooms and the number of persons presentmay also result in differences of operating efficiency.We recommend that you try various operating patternsin order to confirm the level of heating and cooling out-put provided by your units, and use the units in the waythat best matches your family's lifestyle.
� If you discover that one or more units delivers a lowlevel of cooling or heating during simultaneous opera-tion, we recommend that you stop simultaneous opera-tion of the multiple units.
❖ � Operation cannot be done in the following different op-erating modes.
If the indoor unit is instructed to do an operating modethat it cannot perform, will be shown on the re-mote controller display and the unit will go into thestandby mode.
Heating mode and cooling mode (or dry mode)
Heating mode and fan mode
*� During use of the heating mode, the outdoor unit willoccasionally commence the defrost operation for briefperiods. During the defrosting operation, if the user setsthe indoor unit for heating again, the defrosting modewill continue, and the heating operation will begin aftercompletion of defrosting, with the result that some timemay be required before warm air is emitted.
Multi-type Air conditioner
Simultaneous Use of Multiple Units
Notice
9372132050_OM_en.p65 20/3/07, 17:2810
En-11
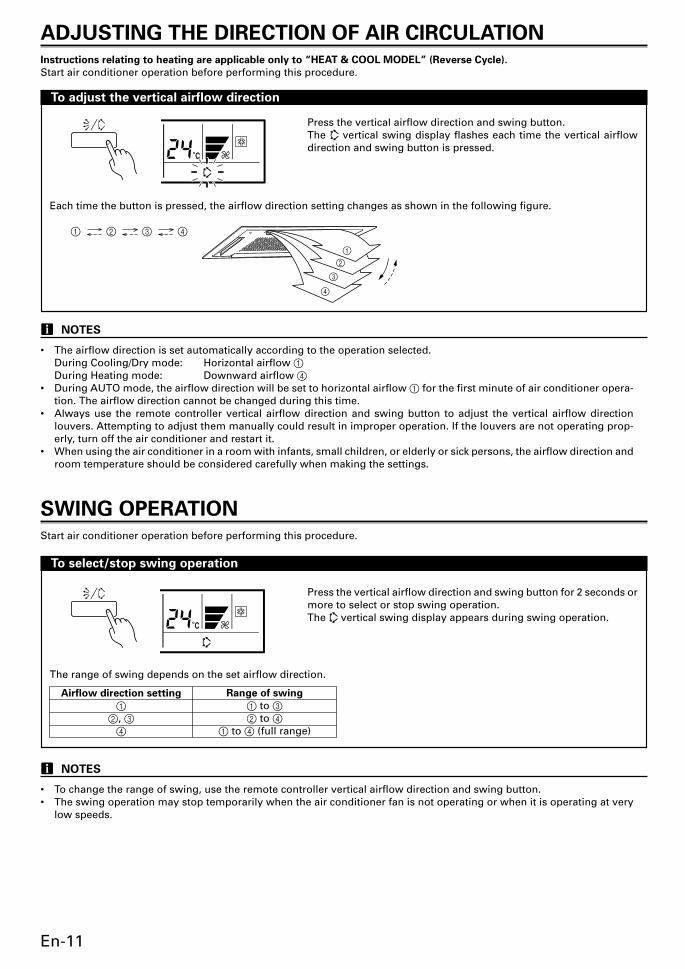
ADJUSTING THE DIRECTION OF AIR CIRCULATIONInstructions relating to heating are applicable only to “HEAT & COOL MODEL” (Reverse Cycle).
Start air conditioner operation before performing this procedure.
NOTES
• To change the range of swing, use the remote controller vertical airflow direction and swing button.• The swing operation may stop temporarily when the air conditioner fan is not operating or when it is operating at very
low speeds.
To adjust the vertical airflow direction
Press the vertical airflow direction and swing button.The vertical swing display flashes each time the vertical airflowdirection and swing button is pressed.
Each time the button is pressed, the airflow direction setting changes as shown in the following figure.
1 2 3 4
1
2
3
4
NOTES
• The airflow direction is set automatically according to the operation selected.During Cooling/Dry mode: Horizontal airflow 1During Heating mode: Downward airflow 4
• During AUTO mode, the airflow direction will be set to horizontal airflow 1 for the first minute of air conditioner opera-tion. The airflow direction cannot be changed during this time.
• Always use the remote controller vertical airflow direction and swing button to adjust the vertical airflow directionlouvers. Attempting to adjust them manually could result in improper operation. If the louvers are not operating prop-erly, turn off the air conditioner and restart it.
• When using the air conditioner in a room with infants, small children, or elderly or sick persons, the airflow direction androom temperature should be considered carefully when making the settings.
SWING OPERATIONStart air conditioner operation before performing this procedure.
To select/stop swing operation
Press the vertical airflow direction and swing button for 2 seconds ormore to select or stop swing operation.The vertical swing display appears during swing operation.
Airflow direction setting
1
2, 34
Range of swing
1 to 32 to 4
1 to 4 (full range)
The range of swing depends on the set airflow direction.
9372132050_OM_en.p65 20/3/07, 17:2811

En-12
CARE AND MAINTENANCE
CAUTION!
� Before cleaning the unit, be sure to stop the unit and power supply. (Turn off the electrical breaker)
� A fan operates at high speed inside the unit, and personal injury could result.
Cleaning the air filter
1 Push the intake grille pushbuttons (two places) and open the intake grille.
2Hold down the hook at A and pull the filter out.
OPENPUSH
Filter
3Clean the air filters.Remove the dust from the air filters by vacuuming or washing them. After washing, allow the air filters to drythoroughly in an area protected from sunlight.
NOTES
• Dust can be cleaned from the air filter either with a vacuum cleaner, or by washing the filter in a solution of mild deter-gent and warm water. If you wash the filter, be sure to allow it to dry thoroughly in a shady place before reinstalling.
• If dirt is allowed to accumulate on the air filter, air flow will be reduced, lowering operating efficiency and increasingnoise.
• During periods of normal use, the air filters should be cleaned every two months.
OPENPUSH
A A
Filter
AB
Filter
Intake grille
B
When reinstalling the filter, be sure that the hooks at A and B engage correctly into place.
9372132050_OM_en.p65 20/3/07, 17:2812
En-13
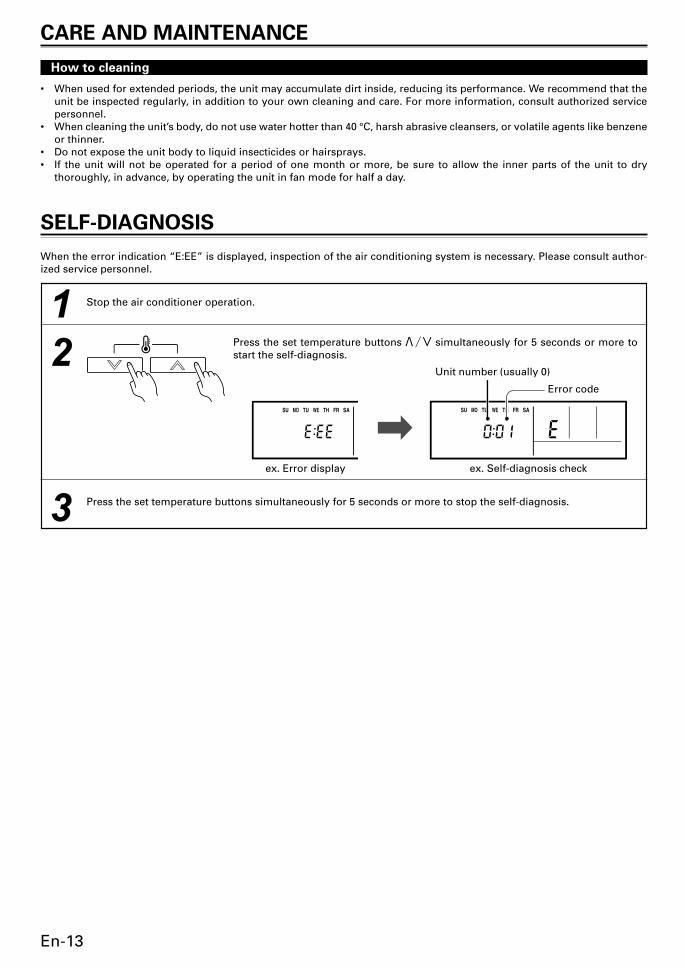
SELF-DIAGNOSIS
1
2
Stop the air conditioner operation.
Press the set temperature buttons simultaneously for 5 seconds or more tostart the self-diagnosis.
SU MO TU WE TH FR SASU MO TU WE TH FR SA
Unit number (usually 0)
Error code
ex. Error display ex. Self-diagnosis check
3Press the set temperature buttons simultaneously for 5 seconds or more to stop the self-diagnosis.
When the error indication “E:EE” is displayed, inspection of the air conditioning system is necessary. Please consult author-ized service personnel.
How to cleaning
• When used for extended periods, the unit may accumulate dirt inside, reducing its performance. We recommend that theunit be inspected regularly, in addition to your own cleaning and care. For more information, consult authorized servicepersonnel.
• When cleaning the unit’s body, do not use water hotter than 40 °C, harsh abrasive cleansers, or volatile agents like benzeneor thinner.
• Do not expose the unit body to liquid insecticides or hairsprays.• If the unit will not be operated for a period of one month or more, be sure to allow the inner parts of the unit to dry
thoroughly, in advance, by operating the unit in fan mode for half a day.
CARE AND MAINTENANCE
9372132050_OM_en.p65 20/3/07, 17:2813
En-14
TROUBLESHOOTING
Symptom
Doesn’t operate immedi-ately:
Noise is heard:
Smells:
Mist or steam areemitted:
Air flow is stopped:
Water is produced fromthe outdoor unit:
thermo sensordisplay on the remotecontroller is flashing:
Problem
� If the unit is stopped and then immediately started again, the com-pressor will not operate for about 3 minutes, in order to preventfuse blowouts.
� Whenever the electrical breaker is turned off then on again, theprotection circuit will operate for about 3 minutes, preventing unitoperation during that period.
� During operation and immediately after stopping the unit, thesound of water flowing in the air conditioner’s piping may beheard. Also, noise may be particularly noticeable for about 2 to 3minutes after starting operation (sound of coolant flowing).
� During operation, a slight squeaking sound may be heard. This isthe result of minute expansion and contraction of the panel dueto temperature changes.
� During Heating operation, a sizzling sound may be heard occa-sionally. This sound is produced by the Automatic Defrosting op-eration.
� Some smell may be emitted from the indoor unit. This smell isthe result of room smells (furniture, tobacco, etc.) which havebeen taken into the air conditioner.
� During Cooling, a thin mist may be seen emitted from the indoorunit. This results from the sudden Cooling of room air by the airemitted from the air conditioner, resulting in condensation andmisting.
� During Heating operation, the outdoor unit’s fan may stop, andsteam may be seen rising from the unit. This is due to the Auto-matic Defrosting operation.
� When Heating operation is started, fan speed is temporarily verylow, to allow internal parts to warm up.
� During Heating operation, if the room temperature rises abovethe thermostat setting, the outdoor unit will stop, and the indoorunit will operate at very low fan speed. If you wish to warm theroom further, set the thermostat to a higher setting.
� During Heating operation, the unit will temporarily stop opera-tion (between 2 and 16 minutes) as the Automatic Defrosting modeoperates. During the Automatic Defrosting operation, willbe shown on the remote controller display.
� The fan may operate at very low speed when the unit is monitor-ing the room’s temperature.
� In the monitor AUTO operation, the fan will operate at very lowspeed.
� In case of Multi-type unit, if multiple units are operated in differ-ent operation modes as shown below, the units operated after-ward will stop and will be shown on the remote controllerdisplay of the stopped indoor units.Heating mode and cooling mode (or dry mode)Heating mode and fan mode
� During Heating operation, water may be produced from the out-door unit due to the Automatic Defrosting operation.
� The room temperature sensor may be malfunctioning. Pleaseconsult authorized service personnel.
See page
—
—
9
—
—
9
—
9
—
—
10
9
—
NORMALFUNCTION
Instructions relating to heating are applicable only to “HEAT & COOL MODEL” (Reverse Cycle).
WARNING!
In the event of a malfunction (burning smell, etc.), immediately stop operation, turn off the electrical breaker,
and consult authorized service personnel.
Merely turning off the unit’s power switch will not completely disconnect the unit from the power source.
Always be sure to turn off the electrical breaker to ensure that power is completely off.
Before requesting service, perform the following checks:
9372132050_OM_en.p65 20/3/07, 17:2814
En-15
Symptom
Doesn’t operate at all:
Poor Cooling (or Heating)performance:
See page
—
5 to 7
—
CHECK ONCEMORE
Items to check
� Has there been a power failure?� Has a fuse blown out, or a circuit breaker been tripped?
� Is the timer operating?
� Is the air filter dirty?� Are the air conditioner’s intake grille or outlet port blocked?� Did you adjust the room temperature settings (thermostat) cor-
rectly?� Is there a window or door open?� In the case of Cooling operation, is a window allowing bright sun-
light to enter? (Close the curtains.)� In the case of Cooling operation, are there heating apparatus and
computers inside the room, or are there too many people in theroom?
If the problem persists after performing these checks, or if you notice burning smells, stop operation immediately, turn off theelectrical breaker, and consult with authorized service personnel.
TROUBLESHOOTING
9372132050_OM_en.p65 20/3/07, 17:2815

○ ○ ○ ○ ○ ○ ○ ○ ○ ○ ○ ○ ○ ○ ○ ○ ○ ○ ○ ○ ○ ○ ○ ○ ○ ○ ○ ○ ○ ○ ○ ○ ○ ○ ○ ○ ○ ○ ○ ○ ○ ○ ○ ○ ○ ○ ○ ○ ○ ○ ○ ○ ○ ○ ○ ○ ○ ○ ○
○ ○ ○ ○ ○ ○ ○ ○ ○ ○ ○ ○ ○ ○ ○ ○ ○ ○ ○ ○ ○ ○ ○ ○ ○ ○ ○ ○ ○ ○ ○ ○ ○ ○ ○ ○ ○ ○ ○ ○ ○ ○ ○ ○ ○ ○ ○ ○ ○ ○ ○ ○ ○ ○ ○ ○ ○ ○ ○
○ ○ ○ ○ ○ ○ ○ ○ ○ ○ ○ ○ ○ ○ ○ ○ ○ ○ ○ ○ ○ ○ ○ ○ ○ ○ ○ ○ ○ ○ ○ ○ ○ ○ ○ ○ ○ ○ ○ ○ ○ ○ ○ ○ ○ ○ ○ ○ ○ ○ ○ ○ ○ ○ ○ ○ ○ ○ ○
○ ○ ○ ○ ○ ○ ○ ○ ○ ○ ○ ○ ○ ○ ○ ○ ○ ○ ○ ○ ○ ○ ○ ○ ○ ○ ○ ○ ○ ○ ○ ○ ○ ○ ○ ○ ○ ○ ○ ○ ○ ○ ○ ○ ○ ○ ○ ○ ○ ○ ○ ○ ○ ○ ○ ○ ○ ○ ○
○ ○ ○ ○ ○ ○ ○ ○ ○ ○ ○ ○ ○ ○ ○ ○ ○ ○ ○ ○ ○ ○ ○ ○ ○ ○ ○ ○ ○ ○ ○ ○ ○ ○ ○ ○ ○ ○ ○ ○ ○ ○ ○ ○ ○ ○ ○ ○ ○ ○ ○ ○ ○ ○ ○ ○ ○ ○ ○
○ ○ ○ ○ ○ ○ ○ ○ ○ ○ ○ ○ ○ ○ ○ ○ ○ ○ ○ ○ ○ ○ ○ ○ ○ ○ ○ ○ ○ ○ ○ ○ ○ ○ ○ ○ ○ ○ ○ ○ ○ ○ ○ ○ ○ ○ ○ ○ ○ ○ ○ ○ ○ ○ ○ ○ ○ ○ ○
○ ○ ○ ○ ○ ○ ○ ○ ○ ○ ○ ○ ○ ○ ○ ○ ○ ○ ○ ○ ○ ○ ○ ○ ○ ○ ○ ○ ○ ○ ○ ○ ○ ○ ○ ○ ○ ○ ○ ○ ○ ○ ○ ○ ○ ○ ○ ○ ○ ○ ○ ○ ○ ○ ○ ○ ○ ○ ○
○ ○ ○ ○ ○ ○ ○ ○ ○ ○ ○ ○ ○ ○ ○ ○ ○ ○ ○ ○ ○ ○ ○ ○ ○ ○ ○ ○ ○ ○ ○ ○ ○ ○ ○ ○ ○ ○ ○ ○ ○ ○ ○ ○ ○ ○ ○ ○ ○ ○ ○ ○ ○ ○ ○ ○ ○ ○ ○
○ ○ ○ ○ ○ ○ ○ ○ ○ ○ ○ ○ ○ ○ ○ ○ ○ ○ ○ ○ ○ ○ ○ ○ ○ ○ ○ ○ ○ ○ ○ ○ ○ ○ ○ ○ ○ ○ ○ ○ ○ ○ ○ ○ ○ ○ ○ ○ ○ ○ ○ ○ ○ ○ ○ ○ ○ ○ ○
○ ○ ○ ○ ○ ○ ○ ○ ○ ○ ○ ○ ○ ○ ○ ○ ○ ○ ○ ○ ○ ○ ○ ○ ○ ○ ○ ○ ○ ○ ○ ○ ○ ○ ○ ○ ○ ○ ○ ○ ○ ○ ○ ○ ○ ○ ○ ○ ○ ○ ○ ○ ○ ○ ○ ○ ○ ○ ○
○ ○ ○ ○ ○ ○ ○ ○ ○ ○ ○ ○ ○ ○ ○ ○ ○ ○ ○ ○ ○ ○ ○ ○ ○ ○ ○ ○ ○ ○ ○ ○ ○ ○ ○ ○ ○ ○ ○ ○ ○ ○ ○ ○ ○ ○ ○ ○ ○ ○ ○ ○ ○ ○ ○ ○ ○ ○ ○
○ ○ ○ ○ ○ ○ ○ ○ ○ ○ ○ ○ ○ ○ ○ ○ ○ ○ ○ ○ ○ ○ ○ ○ ○ ○ ○ ○ ○ ○ ○ ○ ○ ○ ○ ○ ○ ○ ○ ○ ○ ○ ○ ○ ○ ○ ○ ○ ○ ○ ○ ○ ○ ○ ○ ○ ○ ○ ○
○ ○ ○ ○ ○ ○ ○ ○ ○ ○ ○ ○ ○ ○ ○ ○ ○ ○ ○ ○ ○ ○ ○ ○ ○ ○ ○ ○ ○ ○ ○ ○ ○ ○ ○ ○ ○ ○ ○ ○ ○ ○ ○ ○ ○ ○ ○ ○ ○ ○ ○ ○ ○ ○ ○ ○ ○ ○ ○
○ ○ ○ ○ ○ ○ ○ ○ ○ ○ ○ ○ ○ ○ ○ ○ ○ ○ ○ ○ ○ ○ ○ ○ ○ ○ ○ ○ ○ ○ ○ ○ ○ ○ ○ ○ ○ ○ ○ ○ ○ ○ ○ ○ ○ ○ ○ ○ ○ ○ ○ ○ ○ ○ ○ ○ ○ ○ ○
○ ○ ○ ○ ○ ○ ○ ○ ○ ○ ○ ○ ○ ○ ○ ○ ○ ○ ○ ○ ○ ○ ○ ○ ○ ○ ○ ○ ○ ○ ○ ○ ○ ○ ○ ○ ○ ○ ○ ○ ○ ○ ○ ○ ○ ○ ○ ○ ○ ○ ○ ○ ○ ○ ○ ○ ○ ○ ○
○ ○ ○ ○ ○ ○ ○ ○ ○ ○ ○ ○ ○ ○ ○ ○ ○ ○ ○ ○ ○ ○ ○ ○ ○ ○ ○ ○ ○ ○ ○ ○ ○ ○ ○ ○ ○ ○ ○ ○ ○ ○ ○ ○ ○ ○ ○ ○ ○ ○ ○ ○ ○ ○ ○ ○ ○ ○ ○
○ ○ ○ ○ ○ ○ ○ ○ ○ ○ ○ ○ ○ ○ ○ ○ ○ ○ ○ ○ ○ ○ ○ ○ ○ ○ ○ ○ ○ ○ ○ ○ ○ ○ ○ ○ ○ ○ ○ ○ ○ ○ ○ ○ ○ ○ ○ ○ ○ ○ ○ ○ ○ ○ ○ ○ ○ ○ ○
○ ○ ○ ○ ○ ○ ○ ○ ○ ○ ○ ○ ○ ○ ○ ○ ○ ○ ○ ○ ○ ○ ○ ○ ○ ○ ○ ○ ○ ○ ○ ○ ○ ○ ○ ○ ○ ○ ○ ○ ○ ○ ○ ○ ○ ○ ○ ○ ○ ○ ○ ○ ○ ○ ○ ○ ○ ○ ○
○ ○ ○ ○ ○ ○ ○ ○ ○ ○ ○ ○ ○ ○ ○ ○ ○ ○ ○ ○ ○ ○ ○ ○ ○ ○ ○ ○ ○ ○ ○ ○ ○ ○ ○ ○ ○ ○ ○ ○ ○ ○ ○ ○ ○ ○ ○ ○ ○ ○ ○ ○ ○ ○ ○ ○ ○ ○ ○
○ ○ ○ ○ ○ ○ ○ ○ ○ ○ ○ ○ ○ ○ ○ ○ ○ ○ ○ ○ ○ ○ ○ ○ ○ ○ ○ ○ ○ ○ ○ ○ ○ ○ ○ ○ ○ ○ ○ ○ ○ ○ ○ ○ ○ ○ ○ ○ ○ ○ ○ ○ ○ ○ ○ ○ ○ ○ ○
○ ○ ○ ○ ○ ○ ○ ○ ○ ○ ○ ○ ○ ○ ○ ○ ○ ○ ○ ○ ○ ○ ○ ○ ○ ○ ○ ○ ○ ○ ○ ○ ○ ○ ○ ○ ○ ○ ○ ○ ○ ○ ○ ○ ○ ○ ○ ○ ○ ○ ○ ○ ○ ○ ○ ○ ○ ○ ○
○ ○ ○ ○ ○ ○ ○ ○ ○ ○ ○ ○ ○ ○ ○ ○ ○ ○ ○ ○ ○ ○ ○ ○ ○ ○ ○ ○ ○ ○ ○ ○ ○ ○ ○ ○ ○ ○ ○ ○ ○ ○ ○ ○ ○ ○ ○ ○ ○ ○ ○ ○ ○ ○ ○ ○ ○ ○ ○
○ ○ ○ ○ ○ ○ ○ ○ ○ ○ ○ ○ ○ ○ ○ ○ ○ ○ ○ ○ ○ ○ ○ ○ ○ ○ ○ ○ ○ ○ ○ ○ ○ ○ ○ ○ ○ ○ ○ ○ ○ ○ ○ ○ ○ ○ ○ ○ ○ ○ ○ ○ ○ ○ ○ ○ ○ ○ ○
○ ○ ○ ○ ○ ○ ○ ○ ○ ○ ○ ○ ○ ○ ○ ○ ○ ○ ○ ○ ○ ○ ○ ○ ○ ○ ○ ○ ○ ○ ○ ○ ○ ○ ○ ○ ○ ○ ○ ○ ○ ○ ○ ○ ○ ○ ○ ○ ○ ○ ○ ○ ○ ○ ○ ○ ○ ○ ○
○ ○ ○ ○ ○ ○ ○ ○ ○ ○ ○ ○ ○ ○ ○ ○ ○ ○ ○ ○ ○ ○ ○ ○ ○ ○ ○ ○ ○ ○ ○ ○ ○ ○ ○ ○ ○ ○ ○ ○ ○ ○ ○ ○ ○ ○ ○ ○ ○ ○ ○ ○ ○ ○ ○ ○ ○ ○ ○
○ ○ ○ ○ ○ ○ ○ ○ ○ ○ ○ ○ ○ ○ ○ ○ ○ ○ ○ ○ ○ ○ ○ ○ ○ ○ ○ ○ ○ ○ ○ ○ ○ ○ ○ ○ ○ ○ ○ ○ ○ ○ ○ ○ ○ ○ ○ ○ ○ ○ ○ ○ ○ ○ ○ ○ ○ ○ ○
○ ○ ○ ○ ○ ○ ○ ○ ○ ○ ○ ○ ○ ○ ○ ○ ○ ○ ○ ○ ○ ○ ○ ○ ○ ○ ○ ○ ○ ○ ○ ○ ○ ○ ○ ○ ○ ○ ○ ○ ○ ○ ○ ○ ○ ○ ○ ○ ○ ○ ○ ○ ○ ○ ○ ○ ○ ○ ○
9372132050_OM_en.p65 20/3/07, 17:2816
Top Related