User Manual - cafe24nicesuper3.cafe24.com/down/Thermal Expert_ User Manual_09.Nov.20… · User...
52
Intelligent Image & Information System 1 of 52 User Manual Thermal Expert™ (QVGA 384ⅹ288 17μm) (VGA 640ⅹ480 17μm) Thermal Expert™_QVGA Thermal Expert™_VGA
Transcript of User Manual - cafe24nicesuper3.cafe24.com/down/Thermal Expert_ User Manual_09.Nov.20… · User...
Intelligent Image & Information System
1 of 52
User Manual
Thermal Expert™
(QVGA 384ⅹ288 17μm)
(VGA 640ⅹ480 17μm)
Thermal Expert™_QVGA Thermal Expert™_VGA
Intelligent Image & Information System
2 of 52
Contents
1. Product Introduction ............................................................................................. 4
1.1 product constitution ........................................................................................................... 4
1.2 Part Name of Thermal Expert ......................................................................................... 5
1.3 Installation Method for Thermal Expert_ App ......................................................... 5
1.4 Operation Method .............................................................................................................. 7
1.5 Method of using accessary Kit ...................................................................................... 8
1.6 Description for application menu of Thermal Expert........................................... 9
2. Product Specification ........................................................................................... 11
2.1 Detailed Specification ...................................................................................................... 11
2.1.1 QVGA ............................................................................................................................. 11
2.1.2 VGA ................................................................................................................................ 12
2.2 Feature of Thermal Expert ............................................................................................. 13
2.2.1 Key Features of Product ........................................................................................ 13
2.2.2 Ker Feature of Application ................................................................................... 13
2.2.3 Dimension of Product ............................................................................................ 13
2.2.4 Snapshot Image of Thermal Expert ................................................................. 14
3. Method of Operation........................................................................................... 15
3.1 Operation procedure ........................................................................................................ 15
3.2 Method of rebooting the application. ...................................................................... 16
3.2.1 When the application closed thru “Home” or “Back” button of
Android smart-phone............................................................................................. 16
3.3 When Thermal Expert camera not detected by the smart-phone. .............. 16
3.3.1 Method of connecting the devices. ................................................................. 16
3.4 Details of each smart phone operation ................................................................... 17

Intelligent Image & Information System
3 of 52
4. Description of Thermal Expert application ..................................................... 19
4.1 Opening screen .................................................................................................................. 19
4.2 Main Screen & Menu ....................................................................................................... 19
4.3 Non Uniformity Correction ............................................................................................ 20
4.4 Image Capture..................................................................................................................... 22
4.5 Video Capture ..................................................................................................................... 24
4.6 Viewer ..................................................................................................................................... 25
4.7 Color Map ............................................................................................................................. 27
4.8 Digital Zooming.................................................................................................................. 29
4.9 Level Span ............................................................................................................................. 31
4.10 General settings ............................................................................................................... 33
5. Lens Specification ................................................................................................. 45
5.1. Lens Performance ............................................................................................................. 45
5.1.1 QVGA ............................................................................................................................. 45
5.1.2 VGA ................................................................................................................................ 46
6. Warranty Service................................................................................................... 47
6.1 Contact point ....................................................................................................................... 47
6.2 Warranty................................................................................................................................. 47
6.3 Copyright and use of software .................................................................................... 48
6.4 User guide............................................................................................................................. 49
6.5 Calibration ............................................................................................................................. 49
6.6 Temperature accuracy ...................................................................................................... 49
6.7 Warning .................................................................................................................................. 50
6.8 Documentation Update ................................................................................................... 51
Intelligent Image & Information System
4 of 52
1. Product Introduction
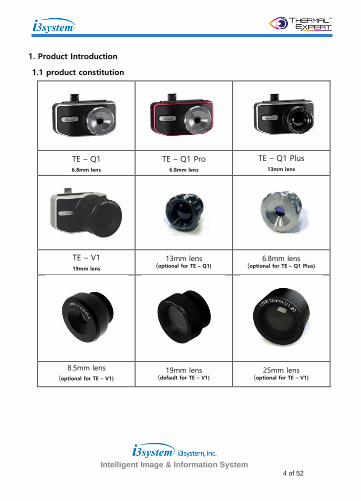
1.1 product constitution
TE – Q1 6.8mm lens
TE – Q1 Pro 6.8mm lens
TE – Q1 Plus
13mm lens
TE – V1
19mm lens 13mm lens
(optional for TE – Q1) 6.8mm lens
(optional for TE – Q1 Plus)
8.5mm lens
(optional for TE – V1) 19mm lens
(default for TE – V1) 25mm lens
(optional for TE – V1)
Intelligent Image & Information System
5 of 52
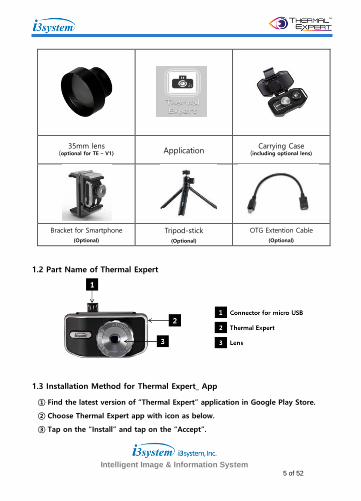
35mm lens (optional for TE – V1) Application
Carrying Case (including optional lens)
Bracket for Smartphone
(Optional) Tripod-stick
(Optional)
OTG Extention Cable
(Optional)
1.2 Part Name of Thermal Expert
1.3 Installation Method for Thermal Expert_ App
① Find the latest version of “Thermal Expert” application in Google Play Store.
② Choose Thermal Expert app with icon as below.
③ Tap on the “Install” and tap on the “Accept”.
Intelligent Image & Information System
6 of 52
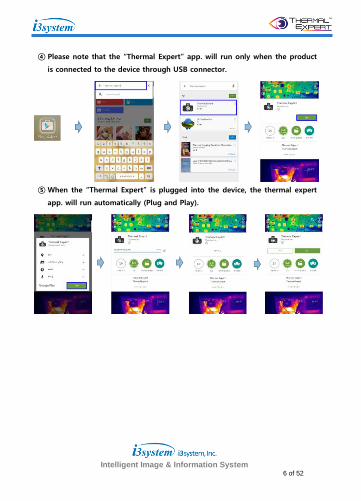
④ Please note that the “Thermal Expert” app. will run only when the product
is connected to the device through USB connector.
⑤ When the “Thermal Expert” is plugged into the device, the thermal expert
app. will run automatically (Plug and Play).
Intelligent Image & Information System
7 of 52
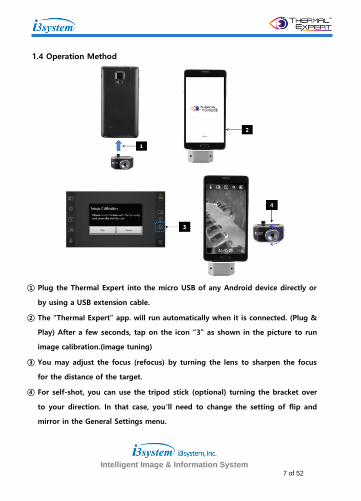
1.4 Operation Method
① Plug the Thermal Expert into the micro USB of any Android device directly or
by using a USB extension cable.
② The “Thermal Expert” app. will run automatically when it is connected. (Plug &
Play) After a few seconds, tap on the icon “3” as shown in the picture to run
image calibration.(image tuning)
③ You may adjust the focus (refocus) by turning the lens to sharpen the focus
for the distance of the target.
④ For self-shot, you can use the tripod stick (optional) turning the bracket over
to your direction. In that case, you’ll need to change the setting of flip and
mirror in the General Settings menu.
Intelligent Image & Information System
8 of 52
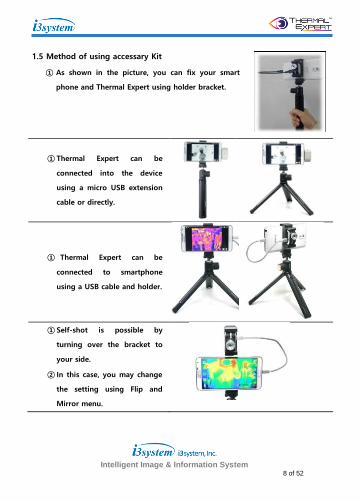
1.5 Method of using accessary Kit
① As shown in the picture, you can fix your smart
phone and Thermal Expert using holder bracket.
① Thermal Expert can be
connected into the device
using a micro USB extension
cable or directly.
① Thermal Expert can be
connected to smartphone
using a USB cable and holder.
① Self-shot is possible by
turning over the bracket to
your side.
② In this case, you may change
the setting using Flip and
Mirror menu.

Intelligent Image & Information System
9 of 52
1.6 Description for application menu of Thermal Expert.
① Digital zoom
- The picture image can be magnified by selecting resolutions.
② General setting
- Both or selective saving of the infrared and the visible image shot or movie.
- Temperature display by Fahrenheit or Celsius.
- Temperature compensation Turn On / Off.
③ Image processing
- Uniformity of the brightness image.
- Automatic gain control.
④ Image View
- 5 different methods of image view of infrared and visible images.
(50 : 50 View, Twin View, Overlay View, Floating View, and FOV Adjust View)
⑤ Temperature measurement
- It provides many methods of temperature measurement.
(Point, Min/Max, Line, Rectangle, Circle, Alarm, Emissivity Setting)
- It can display the temperature of the point and the area which was selected in
Intelligent Image & Information System
10 of 52
many ways.
⑥ Color map(Color Palettes)
- Using the 12 types of color maps, the user can selects preferred color display.
(Gray, Black hot, Hottest, Coldest, Iron, Rainbow, Medical, Purple, Blaze, Aqua,
Red, Green)
- White color (Bright color) used to represents high temperature, in the mean
time, the black color (dark color) or purple color used to represents the low
temperature. (In case of Black Hot, it represent opposite temperature)
⑦ Video shot
- When you take the video shot, it is saved at the “Gallery”.
- You can browse them using your browser app in the device.
⑧ Snap shot
- When you take the snap shot, it is saved at the “Gallery”.
- You can browse them using your browser app in the device.
⑨ Image correction
- For more uniform image, flat field correction can be applied.
- Flat field correction can be done either by closing the lens cap or covering the
lens with flat surface in the temperature perspective. (Manual shutter)
- You may wait for several seconds for Flat field correction procedure.
⑩ Viewer
- You can browse the pictures in the Gallery of the device.
- You can select All, Image and Video by tapping on the icon of the device.
⑪ Level Span
- Depending on the input temperature value, Adjustable clear of the image.
- If you select the AGC, the temperature of the Max, Min value is adjusted
automatically.
Intelligent Image & Information System
11 of 52
2. Product Specification
2.1 Detailed Specification
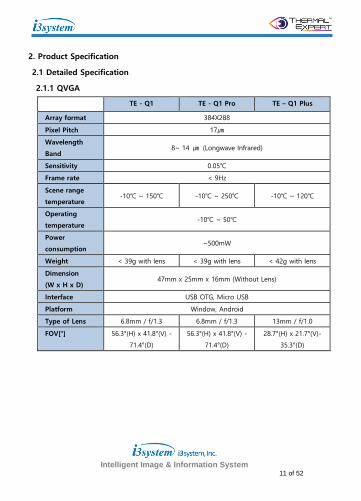
2.1.1 QVGA
TE - Q1 TE - Q1 Pro TE – Q1 Plus
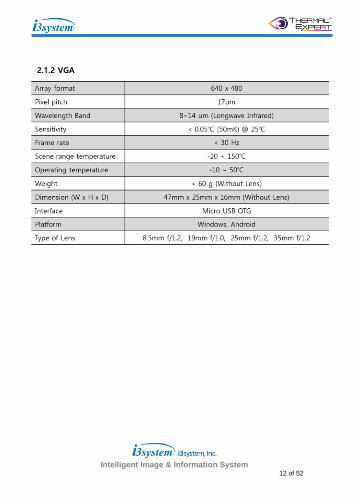
Array format 384X288
Pixel Pitch 17㎛
Wavelength
Band 8~ 14 ㎛ (Longwave Infrared)
Sensitivity 0.05℃
Frame rate < 9Hz
Scene range
temperature -10℃ ~ 150℃ -10℃ ~ 250℃ -10℃ ~ 120℃
Operating
temperature -10℃ ~ 50℃
Power
consumption ~500mW
Weight < 39g with lens < 39g with lens < 42g with lens
Dimension
(W x H x D) 47mm x 25mm x 16mm (Without Lens)
Interface USB OTG, Micro USB
Platform Window, Android
Type of Lens 6.8mm / f/1.3 6.8mm / f/1.3 13mm / f/1.0
FOV[°] 56.3°(H) x 41.8°(V) -
71.4°(D)
56.3°(H) x 41.8°(V) -
71.4°(D)
28.7°(H) x 21.7°(V)-
35.3°(D)
Intelligent Image & Information System
12 of 52
2.1.2 VGA

Intelligent Image & Information System
13 of 52
2.2 Feature of Thermal Expert
2.2.1 Key Features of Product
① Temperature measurement for whole pixels
② Temperature measurement
③ Convenient image of both infrared and eye visible range in one shot
④ Easy user interface (digital zooming, color palette……)
⑤ Interchangeable Lens
2.2.2 Key Feature of Application
① Color palettes (12 color maps)
② Images (IR, visible with snapshot and video)
③ Digital zooming (384 x 288, 320 x 240, 240 x 160, 160 x 120)
④ Infrared Image view along with visible image
(50:50, Twin, Overlay, Floating)
⑤ Temperature Measurement
(Alarm, Min/Max, Point/Line/Rectangle/Circle profile)
⑥ Report creation (Generate PDF report)
2.2.3 Dimension of Product
Dimension (W x H x D) : 47mm x 25mm x 16mm (without lens)
Intelligent Image & Information System
14 of 52
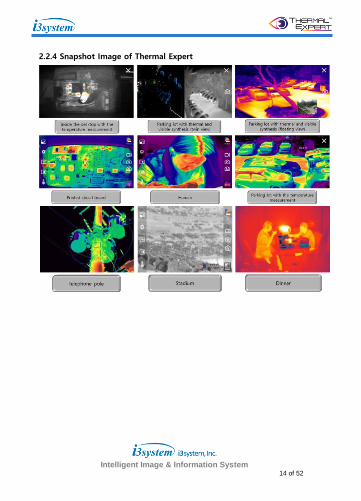
2.2.4 Snapshot Image of Thermal Expert
Intelligent Image & Information System
15 of 52
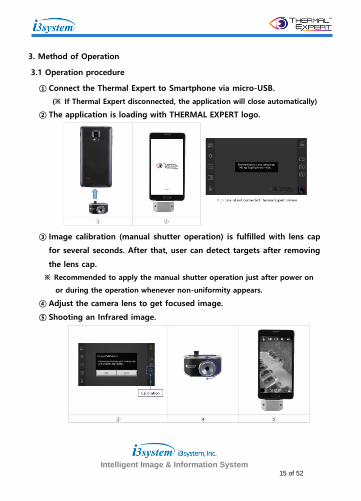
3. Method of Operation
3.1 Operation procedure
① Connect the Thermal Expert to Smartphone via micro-USB.
(※ If Thermal Expert disconnected, the application will close automatically)
② The application is loading with THERMAL EXPERT logo.
③ Image calibration (manual shutter operation) is fulfilled with lens cap
for several seconds. After that, user can detect targets after removing
the lens cap.
※ Recommended to apply the manual shutter operation just after power on
or during the operation whenever non-uniformity appears.
④ Adjust the camera lens to get focused image.
⑤ Shooting an Infrared image.
Intelligent Image & Information System
16 of 52
3.2 Method of rebooting the application
3.2.1 When the application closed through “Home” or “Back” button of
Android Smartphone
① Tap the bottom “window shape” menu or select Thermal Expert
application in the operating application lists.
② Run the application again.
3.3 When Thermal Expert camera is not detected by the Smartphone
3.3.1 Method of connecting the devices
① Unplug Thermal Expert and plug it to Smartphone again.
② If the connection cannot be completed, try to clear the temporary
memory your Smartphone, and then plug- in Thermal Expert again.
※ Method of clearing the memory (using your Smartphone)
- Samsung Galaxy Series : Select the bottom “window shape” button or Push
“Home” button for several seconds and then close the operating applications.
- LG G Series : Select the bottom “window shape” button and then close the all
operating applications.
- Galaxy S6 : Select the left bottom “window shape” button Close all.
Intelligent Image & Information System
17 of 52
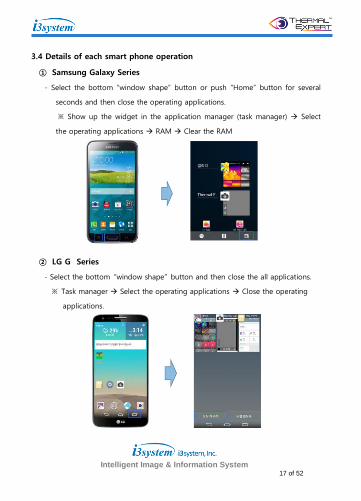
3.4 Details of each smart phone operation
① Samsung Galaxy Series
- Select the bottom “window shape” button or push “Home” button for several
seconds and then close the operating applications.
※ Show up the widget in the application manager (task manager) Select
the operating applications RAM Clear the RAM
② LG G Series
- Select the bottom “window shape” button and then close the all applications.
※ Task manager Select the operating applications Close the operating
applications.
Intelligent Image & Information System
18 of 52
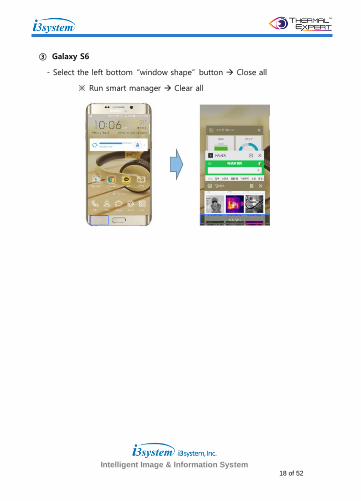
③ Galaxy S6
- Select the left bottom “window shape” button Close all
※ Run smart manager Clear all
Intelligent Image & Information System
19 of 52
4. Description of Thermal Expert application
4.1 Opening screen
① Opening screen of the application.
② The application is loading with THERMAL EXPERT logo.
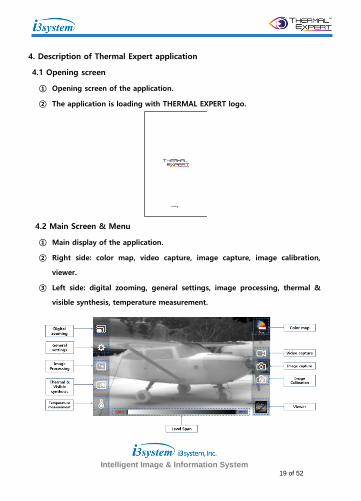
4.2 Main Screen & Menu
① Main display of the application.
② Right side: color map, video capture, image capture, image calibration,
viewer.
③ Left side: digital zooming, general settings, image processing, thermal &
visible synthesis, temperature measurement.
Intelligent Image & Information System
20 of 52
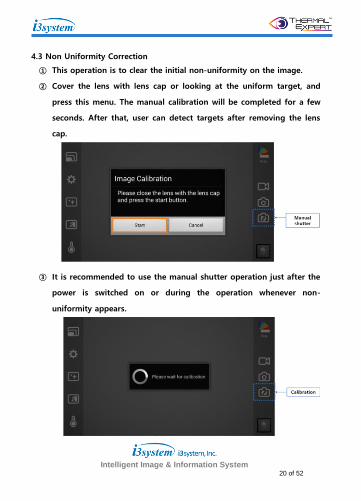
4.3 Non Uniformity Correction
① This operation is to clear the initial non-uniformity on the image.
② Cover the lens with lens cap or looking at the uniform target, and
press this menu. The manual calibration will be completed for a few
seconds. After that, user can detect targets after removing the lens
cap.
③ It is recommended to use the manual shutter operation just after the
power is switched on or during the operation whenever non-
uniformity appears.
Intelligent Image & Information System
21 of 52
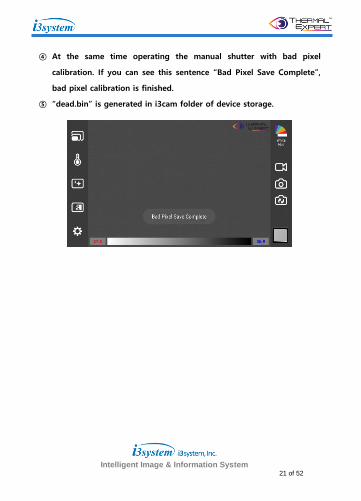
④ At the same time operating the manual shutter with bad pixel
calibration. If you can see this sentence “Bad Pixel Save Complete”,
bad pixel calibration is finished.
⑤ “dead.bin” is generated in i3cam folder of device storage.
Intelligent Image & Information System
22 of 52
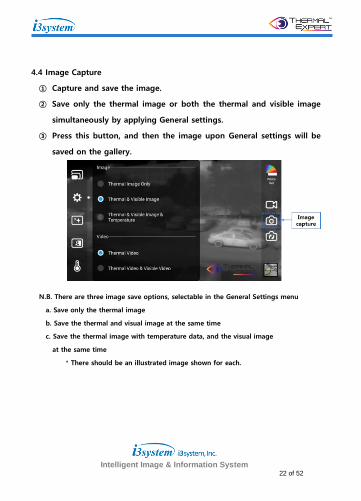
4.4 Image Capture
① Capture and save the image.
② Save only the thermal image or both the thermal and visible image
simultaneously by applying General settings.
③ Press this button, and then the image upon General settings will be
saved on the gallery.
N.B. There are three image save options, selectable in the General Settings menu
a. Save only the thermal image
b. Save the thermal and visual image at the same time
c. Save the thermal image with temperature data, and the visual image
at the same time
* There should be an illustrated image shown for each.
Intelligent Image & Information System
23 of 52
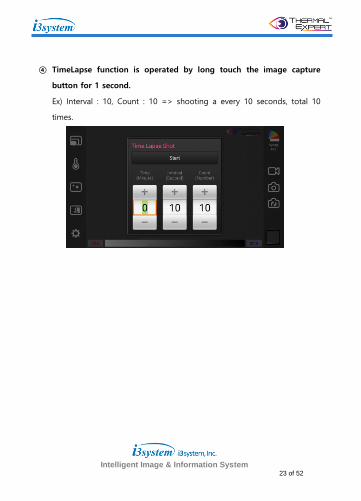
④ TimeLapse function is operated by long touch the image capture
button for 1 second.
Ex) Interval : 10, Count : 10 => shooting a every 10 seconds, total 10
times.
Intelligent Image & Information System
24 of 52
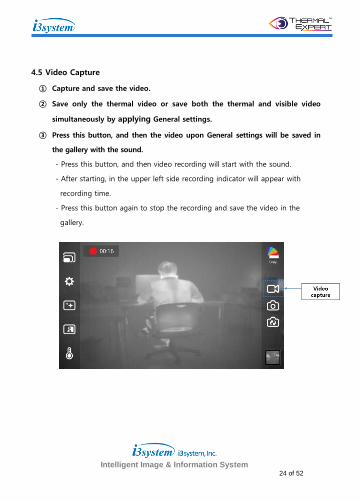
4.5 Video Capture
① Capture and save the video.
② Save only the thermal video or save both the thermal and visible video
simultaneously by applying General settings.
③ Press this button, and then the video upon General settings will be saved in
the gallery with the sound.
- Press this button, and then video recording will start with the sound.
- After starting, in the upper left side recording indicator will appear with
recording time.
- Press this button again to stop the recording and save the video in the
gallery.
Intelligent Image & Information System
25 of 52
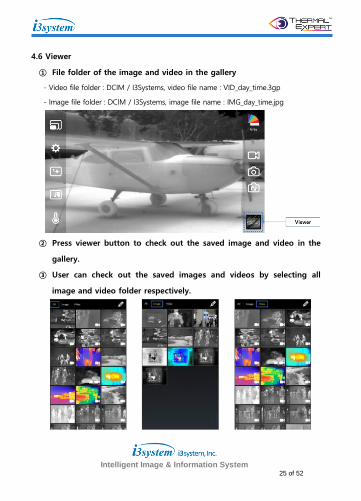
4.6 Viewer
① File folder of the image and video in the gallery
- Video file folder : DCIM / I3Systems, video file name : VID_day_time.3gp
- Image file folder : DCIM / I3Systems, image file name : IMG_day_time.jpg
② Press viewer button to check out the saved image and video in the
gallery.
③ User can check out the saved images and videos by selecting all
image and video folder respectively.
Intelligent Image & Information System
26 of 52
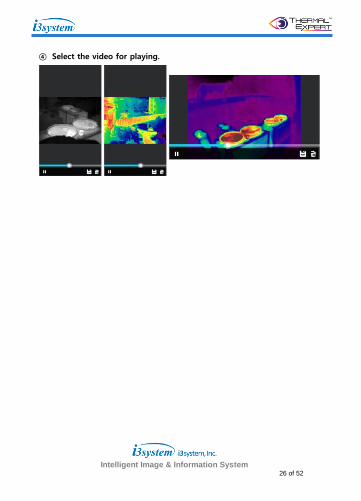
④ Select the video for playing.
Intelligent Image & Information System
27 of 52
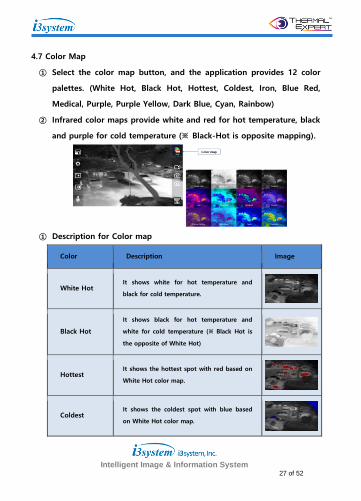
4.7 Color Map
① Select the color map button, and the application provides 12 color
palettes. (White Hot, Black Hot, Hottest, Coldest, Iron, Blue Red,
Medical, Purple, Purple Yellow, Dark Blue, Cyan, Rainbow)
② Infrared color maps provide white and red for hot temperature, black
and purple for cold temperature (※ Black-Hot is opposite mapping).
① Description for Color map
Color Description Image
White Hot It shows white for hot temperature and
black for cold temperature.
Black Hot
It shows black for hot temperature and
white for cold temperature (※ Black Hot is
the opposite of White Hot)
Hottest It shows the hottest spot with red based on
White Hot color map.
Coldest It shows the coldest spot with blue based
on White Hot color map.
Intelligent Image & Information System
28 of 52
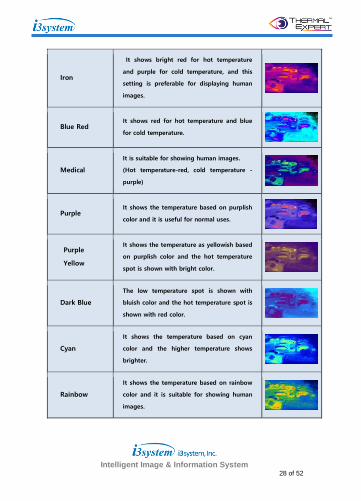
Iron
It shows bright red for hot temperature
and purple for cold temperature, and this
setting is preferable for displaying human
images.
Blue Red It shows red for hot temperature and blue
for cold temperature.
Medical
It is suitable for showing human images.
(Hot temperature-red, cold temperature -
purple)
Purple It shows the temperature based on purplish
color and it is useful for normal uses.
Purple
Yellow
It shows the temperature as yellowish based
on purplish color and the hot temperature
spot is shown with bright color.
Dark Blue
The low temperature spot is shown with
bluish color and the hot temperature spot is
shown with red color.
Cyan
It shows the temperature based on cyan
color and the higher temperature shows
brighter.
Rainbow
It shows the temperature based on rainbow
color and it is suitable for showing human
images.
Intelligent Image & Information System
29 of 52
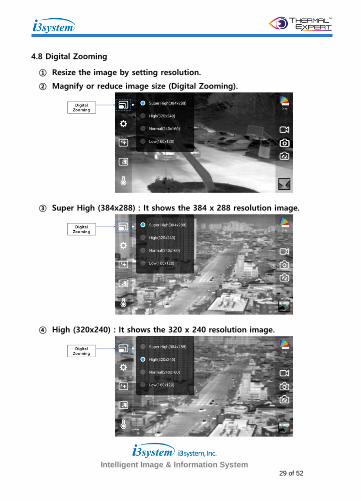
4.8 Digital Zooming
① Resize the image by setting resolution.
② Magnify or reduce image size (Digital Zooming).
③ Super High (384x288) : It shows the 384 x 288 resolution image.
④ High (320x240) : It shows the 320 x 240 resolution image.
Intelligent Image & Information System
30 of 52
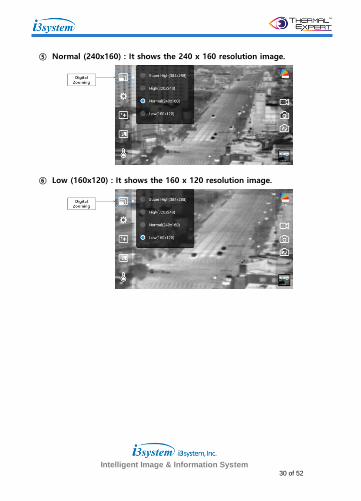
⑤ Normal (240x160) : It shows the 240 x 160 resolution image.
⑥ Low (160x120) : It shows the 160 x 120 resolution image.
Intelligent Image & Information System
31 of 52
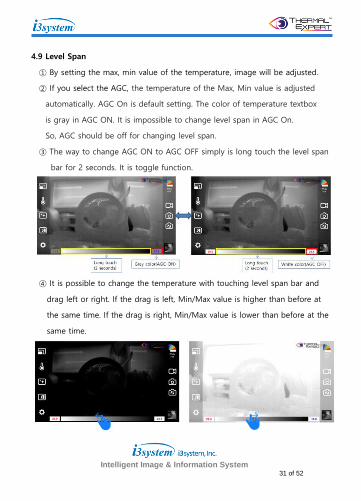
4.9 Level Span
① By setting the max, min value of the temperature, image will be adjusted.
② If you select the AGC, the temperature of the Max, Min value is adjusted
automatically. AGC On is default setting. The color of temperature textbox
is gray in AGC ON. It is impossible to change level span in AGC On.
So, AGC should be off for changing level span.
③ The way to change AGC ON to AGC OFF simply is long touch the level span
bar for 2 seconds. It is toggle function.
④ It is possible to change the temperature with touching level span bar and
drag left or right. If the drag is left, Min/Max value is higher than before at
the same time. If the drag is right, Min/Max value is lower than before at the
same time.
Intelligent Image & Information System
32 of 52
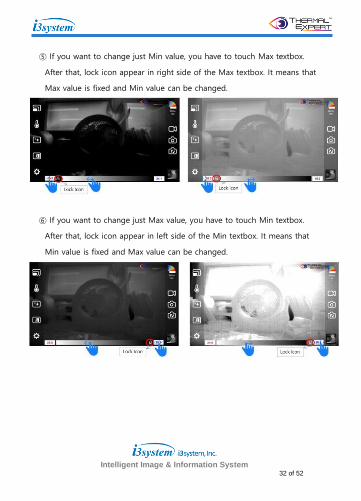
⑤ If you want to change just Min value, you have to touch Max textbox.
After that, lock icon appear in right side of the Max textbox. It means that
Max value is fixed and Min value can be changed.
⑥ If you want to change just Max value, you have to touch Min textbox.
After that, lock icon appear in left side of the Min textbox. It means that
Min value is fixed and Max value can be changed.
Intelligent Image & Information System
33 of 52
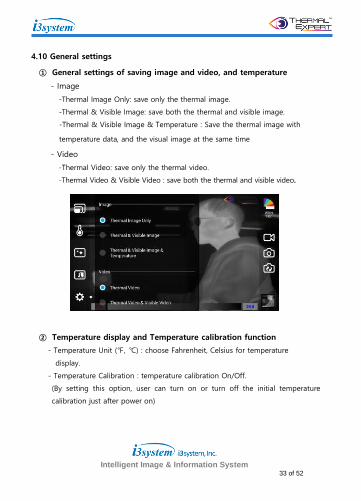
4.10 General settings
① General settings of saving image and video, and temperature
- Image
-Thermal Image Only: save only the thermal image.
-Thermal & Visible Image: save both the thermal and visible image.
-Thermal & Visible Image & Temperature : Save the thermal image with
temperature data, and the visual image at the same time
- Video
-Thermal Video: save only the thermal video.
-Thermal Video & Visible Video : save both the thermal and visible video.
② Temperature display and Temperature calibration function
- Temperature Unit (℉, ℃) : choose Fahrenheit, Celsius for temperature
display.
- Temperature Calibration : temperature calibration On/Off.
(By setting this option, user can turn on or turn off the initial temperature
calibration just after power on)
Intelligent Image & Information System
34 of 52
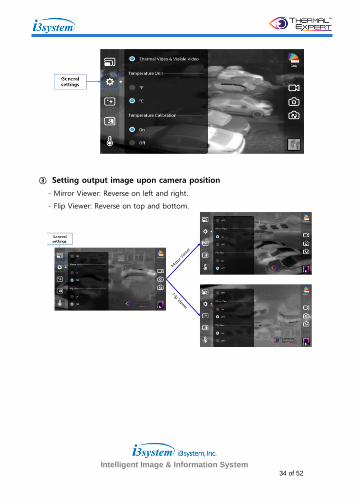
③ Setting output image upon camera position
- Mirror Viewer: Reverse on left and right.
- Flip Viewer: Reverse on top and bottom.
Intelligent Image & Information System
35 of 52
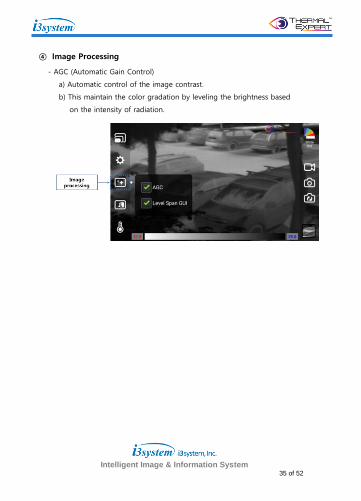
④ Image Processing
- AGC (Automatic Gain Control)
a) Automatic control of the image contrast.
b) This maintain the color gradation by leveling the brightness based
on the intensity of radiation.
Intelligent Image & Information System
36 of 52
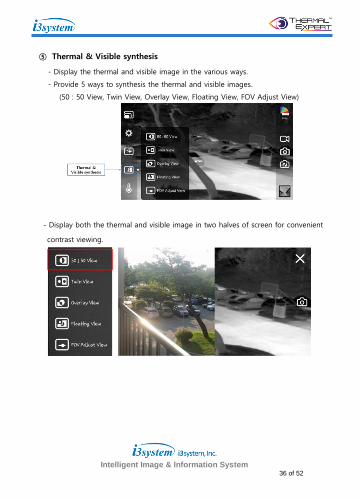
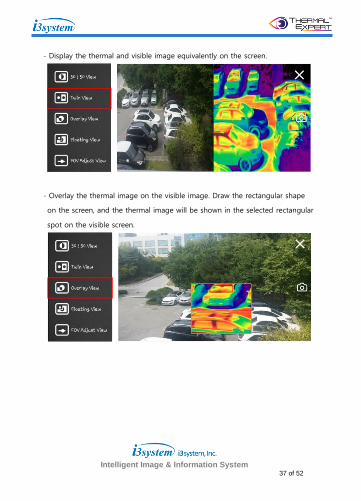
⑤ Thermal & Visible synthesis
- Display the thermal and visible image in the various ways.
- Provide 5 ways to synthesis the thermal and visible images.
(50 : 50 View, Twin View, Overlay View, Floating View, FOV Adjust View)
- Display both the thermal and visible image in two halves of screen for convenient
contrast viewing.
Intelligent Image & Information System
37 of 52
- Display the thermal and visible image equivalently on the screen.
- Overlay the thermal image on the visible image. Draw the rectangular shape
on the screen, and the thermal image will be shown in the selected rectangular
spot on the visible screen.
Intelligent Image & Information System
38 of 52
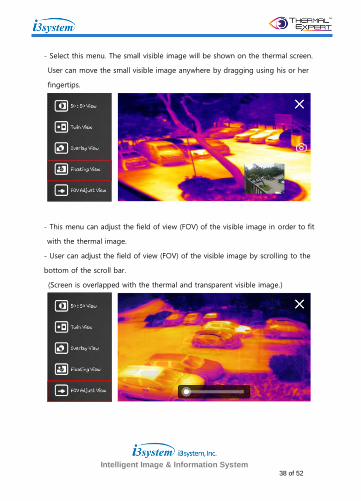
- Select this menu. The small visible image will be shown on the thermal screen.
User can move the small visible image anywhere by dragging using his or her
fingertips.
- This menu can adjust the field of view (FOV) of the visible image in order to fit
with the thermal image.
- User can adjust the field of view (FOV) of the visible image by scrolling to the
bottom of the scroll bar.
(Screen is overlapped with the thermal and transparent visible image.)
Intelligent Image & Information System
39 of 52
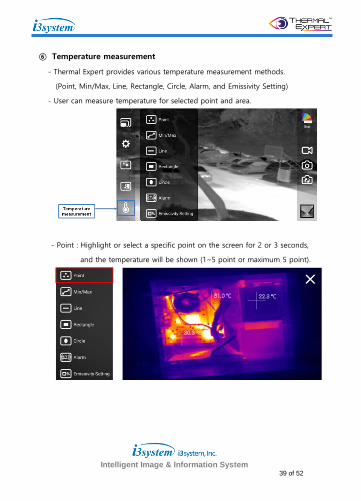
⑥ Temperature measurement
- Thermal Expert provides various temperature measurement methods.
(Point, Min/Max, Line, Rectangle, Circle, Alarm, and Emissivity Setting)
- User can measure temperature for selected point and area.
- Point : Highlight or select a specific point on the screen for 2 or 3 seconds,
and the temperature will be shown (1~5 point or maximum 5 point).

Intelligent Image & Information System
40 of 52
- Min/Max : Select this menu and both the Min and Max temperature will be
displayed at the same time in real time.
- Line : Draw the horizontal line, and the temperature profile will be shown with
average, maximum and minimum temperature displayed.
Intelligent Image & Information System
41 of 52
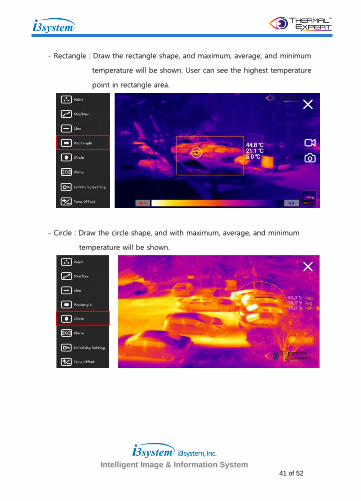
- Rectangle : Draw the rectangle shape, and maximum, average, and minimum
temperature will be shown. User can see the highest temperature
point in rectangle area.
- Circle : Draw the circle shape, and with maximum, average, and minimum
temperature will be shown.
Intelligent Image & Information System
42 of 52
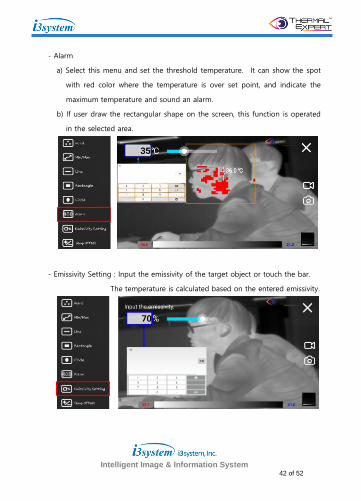
- Alarm
a) Select this menu and set the threshold temperature. It can show the spot
with red color where the temperature is over set point, and indicate the
maximum temperature and sound an alarm.
b) If user draw the rectangular shape on the screen, this function is operated
in the selected area.
- Emissivity Setting : Input the emissivity of the target object or touch the bar.
The temperature is calculated based on the entered emissivity.
Intelligent Image & Information System
43 of 52
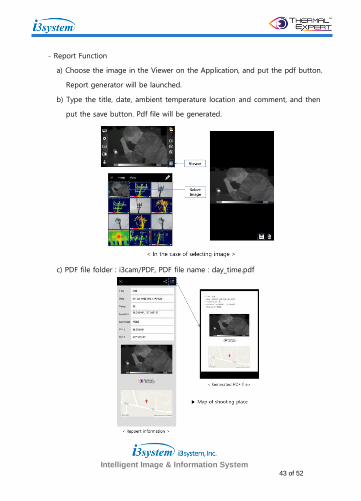
- Report Function
a) Choose the image in the Viewer on the Application, and put the pdf button.
Report generator will be launched.
b) Type the title, date, ambient temperature location and comment, and then
put the save button. Pdf file will be generated.
c) PDF file folder : i3cam/PDF, PDF file name : day_time.pdf
Intelligent Image & Information System
44 of 52
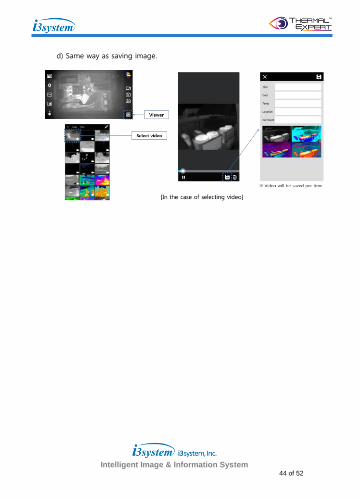
d) Same way as saving image.
Intelligent Image & Information System
45 of 52
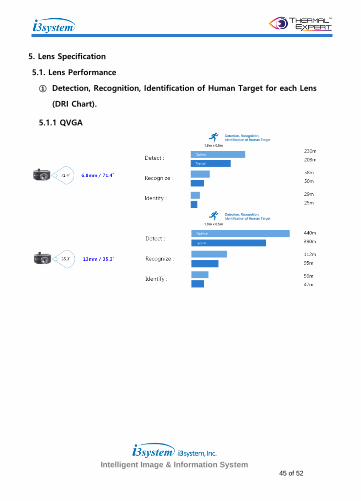
5. Lens Specification
5.1. Lens Performance
① Detection, Recognition, Identification of Human Target for each Lens
(DRI Chart).
5.1.1 QVGA

Intelligent Image & Information System
46 of 52
5.1.2 VGA
Intelligent Image & Information System
47 of 52
6. Warranty Service
6.1 Contact point
i3system, Inc, _ Jang-Dong
26-32, Gajeonbuk-ro, Yuseong-gu, Daejeon, 34113 Republic of Korea
Tel : +82-42-360-2503, Fax +82-42-360-2555
Webpage : www.i3-thermalexpert.com
E-mail : [email protected]
6.2 Warranty
① i3system, inc. with all products purchased through the affiliates or
authorized distributors, on the basis of the conditions that are described in
this document, has a range of limited warranty.
② Upon purchasing through i3system, inc., its affiliates and authorized
distributors only, you can receive warranty services described in this
documents. In addition, the warranty is valid only in the country of
purchase.
③ The services in this document are valid during the warranty period from
purchase date shown in the receipt. If there are no consumer faults in
product defects within the warranty period, i3system, inc. , its affiliates or
authorized distributors provide you with repair services or replacement of
defective parts.
④ The warranty period is one year from the date of purchase. The warranty
period for the repaired product by the warranty service will be 90 days or
the remaining period of the original period, whichever is longer.
⑤ Software updates are exempt from the warranty conditions. Updates can be
manually downloaded at our product website www.i3-thermalexpert.com
Intelligent Image & Information System
48 of 52
⑥ Warranty services are not provided for general wear and tear of the
product, any modification, remodeling, repairing by users, careless uses or
faults, damages from improper operations.
⑦ This document, including agreement of the quality assurance between
i3system, Inc. and users, cannot be modified without written permission of
the company.
⑧ This warranty observes consumer protection laws, including e-commerce.
⑨ Procedures of requesting for warranty service.
a) In order to repair or replace the defects based on the warranty, you
must notify the company within 30 days of finding defects with the
product. You need to receive a registration number before returning
the product to service center by providing original documents of
product purchase.
b) i3system, inc. has the rights to determine the warranty coverage of
returned product. And if a product is out of warranty coverage, the cost
of repairing and delivery is at the expense of the claimant.
6.3 Copyright and use of software
① None of the product software shall be handled as copy, transfer,
modification, reverse analysis, decompiling in electronic, magnetic, and
optical formats without prior written authorization by the company
② In order to use the product, please download Thermal ExpertTM in the
Google Play Store or our website (www.i3-thermalexpert.com)..
③ It is necessary to follow the software license terms to use the software.
And it is assumed that user has agreed to the license terms and conditions
of the warranty.
Intelligent Image & Information System
49 of 52
④ The application of Thermal ExpertTM might be distributed with outdated
software but this can be corrected right away by a regular software update.
You can check for software updates manually in the Google Play Store and
on our website (www.i3-thermalexpert.com).
6.4 User guide
① Device Connection
a) Please connect the product with the compatible mobile devices.
b) Please refer to the list of compatible mobile devices in the webpage.
c) Please ensure your mobile devices are compatible with the product before
purchasing.
6.5 Calibration
① Thermal ExpertTM is applied with the calibration data at the manufacturing
stage. After a long period of product use, the image quality might not be of
the same quality as it originally displayed in the beginning. In this case you
can return your product to i3system, Inc. to apply new calibration data for
better image processing. For more information, please contact the company
at our previously shown address.
6.6 Temperature accuracy
① In order to get the most accurate value in measuring temperature,
please measure temperature in 5 minutes after the product has been
started in order to allow for proper calibration
② Configuration of temperature measurement is set for the default lens
standard. (6.8mm lens for TE-Q1 and Pro, 13mm lens for TE-Q1 plus, 19mm
lens for TE-V1)
Intelligent Image & Information System
50 of 52
6.7 Warning
① Do not drop or apply shock or stress to the product, as this may lead to
damage.
② Please be cautious in connecting the product with mobile devices.
When connected with excessive forces, the product and mobile devices can
be damaged.
③ The lens on the infrared camera is fragile, please avoid putting excessive
pressure on it.
④ Since the infrared camera lens has been coated front and back,
please handle it carefully to avoid any damages to the lens.
⑤ The camera lens is exchangeable, and it is recommended to change lenses
in clean environment.
⑥ Please take care of infrared sensor from contamination while changing
camera lenses. If the infrared sensor is contaminated, image quality gets
worse, or the Product might not operate properly.
⑦ Please be careful while using product accessories not to be injured.
⑧ Do not expose the infrared sensor(camera) directly to the sun, high-
temperature energy source and laser.
⑨ Once exposed to such sources, image quality may get worse, and infrared
sensor can be damaged.
⑩ Do not use the product at environment where the operational temperature
is out of range. Infrared sensors and electronic components can be
damaged.
⑪ Since the product is not waterproof and dust-proof, please do not expose it
to water, rain and dust.
⑫ Do not use compressed air for cleaning of the product.
Intelligent Image & Information System
51 of 52
⑬ Please connect only 5V DC power supply through USB Connector.
Otherwise, the product can be damaged.
⑭ If you want to connect the product with mobile devices, please use the
cable that has been provided by i3system, Inc. If you use a different cable,
it may not work, or damage the product.
6.8 Documentation Update
① This document can be updated upon necessary notices. In order to search
the latest version, please visit company product webpage (www.i3-
thermalexpert.com).
Intelligent Image & Information System
52 of 52
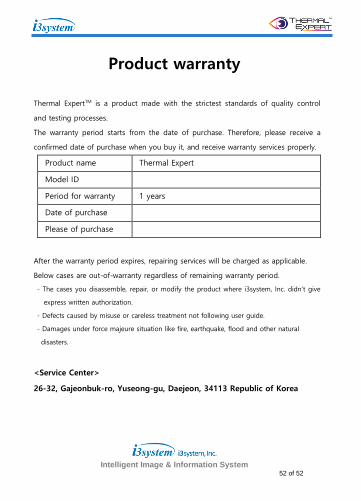
Product warranty
Thermal ExpertTM is a product made with the strictest standards of quality control
and testing processes.
The warranty period starts from the date of purchase. Therefore, please receive a
confirmed date of purchase when you buy it, and receive warranty services properly.
Product name Thermal Expert
Model ID
Period for warranty 1 years
Date of purchase
Please of purchase
After the warranty period expires, repairing services will be charged as applicable.
Below cases are out-of-warranty regardless of remaining warranty period.
- The cases you disassemble, repair, or modify the product where i3system, Inc. didn’t give
express written authorization.
- Defects caused by misuse or careless treatment not following user guide.
- Damages under force majeure situation like fire, earthquake, flood and other natural
disasters.
<Service Center>
26-32, Gajeonbuk-ro, Yuseong-gu, Daejeon, 34113 Republic of Korea