Tanks Practice Fact Sheet - Home | Clearwater
6
Heading | Publish Date: 1 fact sheet Tanks and Passive Irrigation Ι September 2012 Tanks and Passive Irrigation Installing tanks and passive irrigation at a lot scale Acknowledgement – the information in this fact sheet has been adapted from the practice notes prepared by Storm Consulting for the Little Stringy Bark Creek Project. For more information on this project please visit the project website - http://www.urbanstreams.unimelb.edu.au/ Why install a rainwater tank? Tanks are often installed at residential homes across Victoria. Whilst most home owners appreciate the water and cost savings of harvesting water from their roofs, tanks are also a great way to protect the health of our local waterways. Our rivers and creeks have an excess of water flow during storm events that cause erosion, damage vegetation and wash away aquatic life. Tanks that capture water from hard (impervious) surfaces such as roofs, reduce the amount of water that reach our waterways and protect its ecosystem. Rainwater from roofs can be easily captured in above ground tanks, whilst stormwater from other impervious surfaces can be captured and reused in tanks underground. Whilst usually more expensive, underground tanks can conveniently be located beneath a driveway or grassed surface. For the tanks to be effective they need as much water as possible to be used, so that storage volume is available to capture the next rainfall. It’s recommended the tank be connected to as many internal and external uses as possible such as toilet flushing, washing machine and garden watering. You should also consider the energy efficiency the pump used in your rainwater tank when looking into options. Refer to the Tankulator for more energy information - http://tankulator.ata.org.au/pump-info.php and you may be eligible for a rebate from the Victorian Government, visit - http://www.water.vic.gov.au/saving/home/rebates. Please note: A certified plumber must be used for stormwater connections and modifications. Figure1. Rainwater tanks collecting water from the roof
Transcript of Tanks Practice Fact Sheet - Home | Clearwater
Heading | Publish Date: 1
fact sheet
Tanks and Passive Irrigation Ι September 2012
Tanks and Passive Irrigation Installing tanks and passive irrigation at a lot scale
Acknowledgement – the information in this fact sheet has been adapted from the practice notes prepared by Storm Consulting for the Little Stringy Bark Creek Project. For more information on this project please visit the project website - http://www.urbanstreams.unimelb.edu.au/
Why install a rainwater tank? Tanks are often installed at residential homes across Victoria. Whilst most home owners appreciate the water and cost savings of harvesting water from their roofs, tanks are also a great way to protect the health of our local waterways. Our rivers and creeks have an excess of water flow during storm events that cause erosion, damage vegetation and wash away aquatic life. Tanks that capture water from hard (impervious) surfaces such as roofs, reduce the amount of water that reach our waterways and protect its ecosystem. Rainwater from roofs can be easily captured in above ground tanks, whilst stormwater from other impervious surfaces can be captured and reused in tanks underground. Whilst usually more expensive, underground tanks can conveniently be located beneath a driveway or grassed surface. For the tanks to be effective they need as much water as possible to be used, so that storage volume is available to capture the next rainfall. It’s recommended the tank be connected to as many internal and external uses as possible such as toilet flushing, washing machine and garden watering. You should also consider the energy efficiency the pump used in your rainwater tank when looking into options. Refer to the Tankulator for more energy information - http://tankulator.ata.org.au/pump-info.php and you may be eligible for a rebate from the Victorian Government, visit - http://www.water.vic.gov.au/saving/home/rebates.
Pleasenote:Acertifiedplumbermustbeusedforstormwaterconnectionsandmodifications.
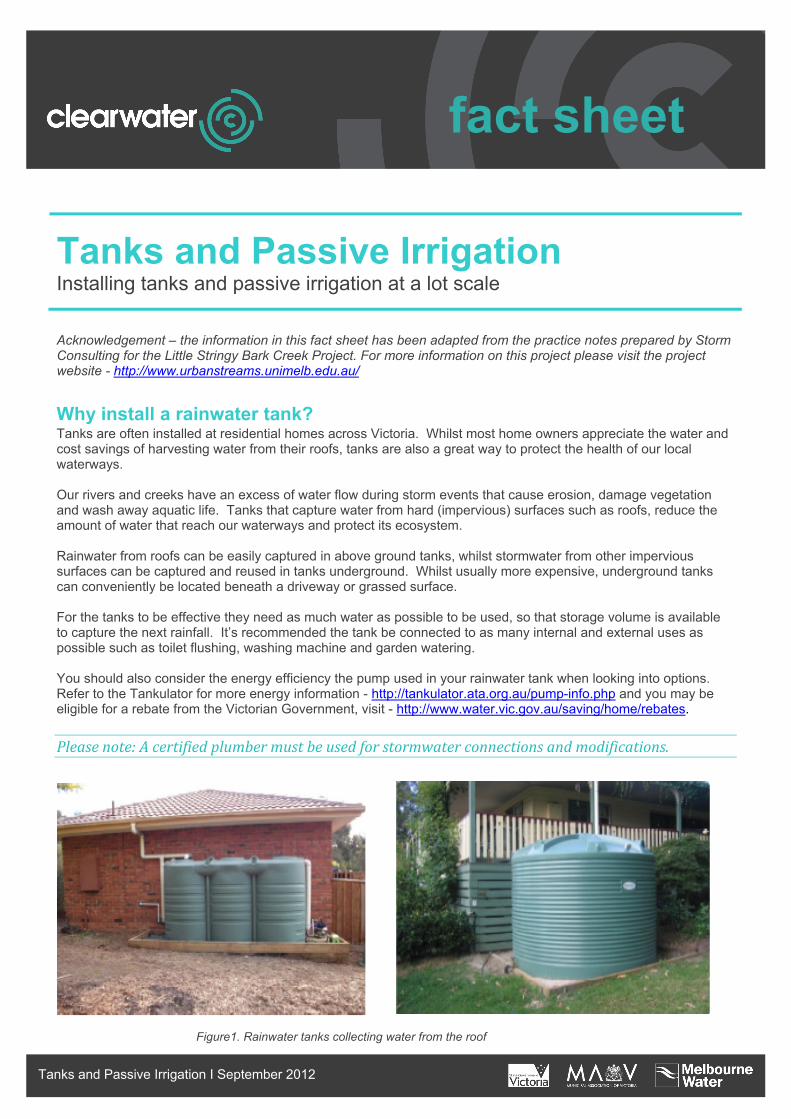
Figure1. Rainwater tanks collecting water from the roof
Heading | Publish Date: 2
fact sheet
Tanks and Passive Irrigation Ι September 2012
What is the difference between a tank and a passive irrigation tank?
In some circumstances it can be hard to capture an entire roof into one tank, or even use the required amount of water to protect the local waterway. Another option is to capture the water into a tank that the trickles slowly into a garden bed or grassed area. In effect this tank passively waters the vegetated area and slowly empties the tank, providing more space for another rainfall event. Passive irrigation tanks can be built to have little to no effect on the reliability of supply for other uses (such as garden watering, or toilet flushing). The passive irrigation tank can take a variety of forms such as:
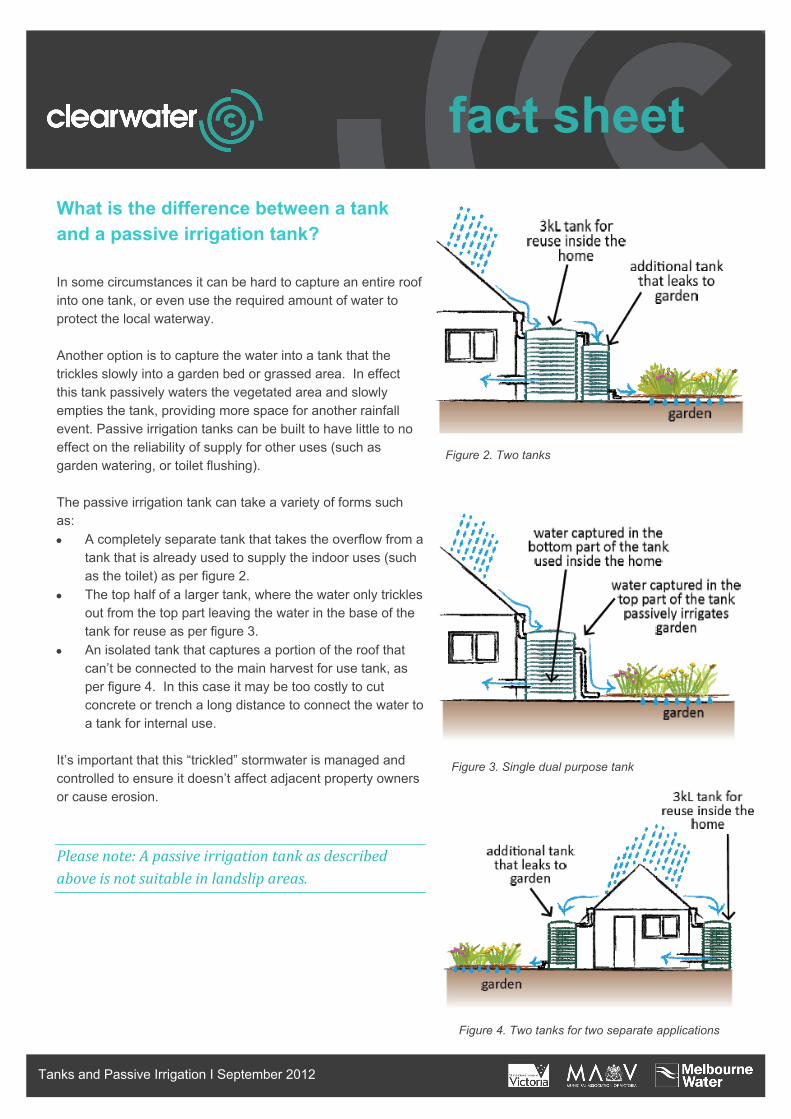
A completely separate tank that takes the overflow from a tank that is already used to supply the indoor uses (such as the toilet) as per figure 2.
The top half of a larger tank, where the water only trickles out from the top part leaving the water in the base of the tank for reuse as per figure 3.
An isolated tank that captures a portion of the roof that can’t be connected to the main harvest for use tank, as per figure 4. In this case it may be too costly to cut concrete or trench a long distance to connect the water to a tank for internal use.
It’s important that this “trickled” stormwater is managed and controlled to ensure it doesn’t affect adjacent property owners or cause erosion.
Pleasenote:Apassiveirrigationtankasdescribedaboveisnotsuitableinlandslipareas.
Figure 2. Two tanks
Figure 3. Single dual purpose tank
Figure 4. Two tanks for two separate applications
Heading | Publish Date: 3
fact sheet
Tanks and Passive Irrigation Ι September 2012
Installing your tank Step 1- Getting Started Location It’s best to install your tank as close to the water source as possible, such as a downpipe. This isn’t always practical, especially when you are trying to divert multiple downpipes into the one tank. Alternatively a tank can be located anywhere on your property as long as the top of the tank is at least 300mm lower than the water source (such as a roof). The water can be transferred underground via a charged pipe system. Your plumber should be able to assist with this, but for more information you can refer to the Plumbing Industry Commission website for more information, specifically:http://www.pic.vic.gov.au/resources/documents/4.05_Storm_water_drainage_-_charged_systems_to_rainwater_tanks.pdf The tank will need to be located on level ground and supported as per the manufacturer’s requirements. This could be on a layer of sand or a concrete pad. You may need to cut in or build up an area to provide a flat pad for the tank to sit on. A few things to consider when locating your tank:
Can you divert all the necessary downpipes or pits into the tank/s?
Will you need to cut any concrete to get the water into that tank (keeping in mind this can be expensive)?
Can you get power to the location to supply the pump?
How hard is it to plumb the re-use water back into your internal uses (such as the toilet and washing machine)? Underground services Be aware of any underground services (gas, electricity, water, sewerage) that run near your house or under your proposed tank site as this may determine where you can install it. If you’re unsure its best to get all services located before you install your tank/s. Services can be located by calling Dial Before You Dig, on 1100, or online at www.1100.com.au
Size
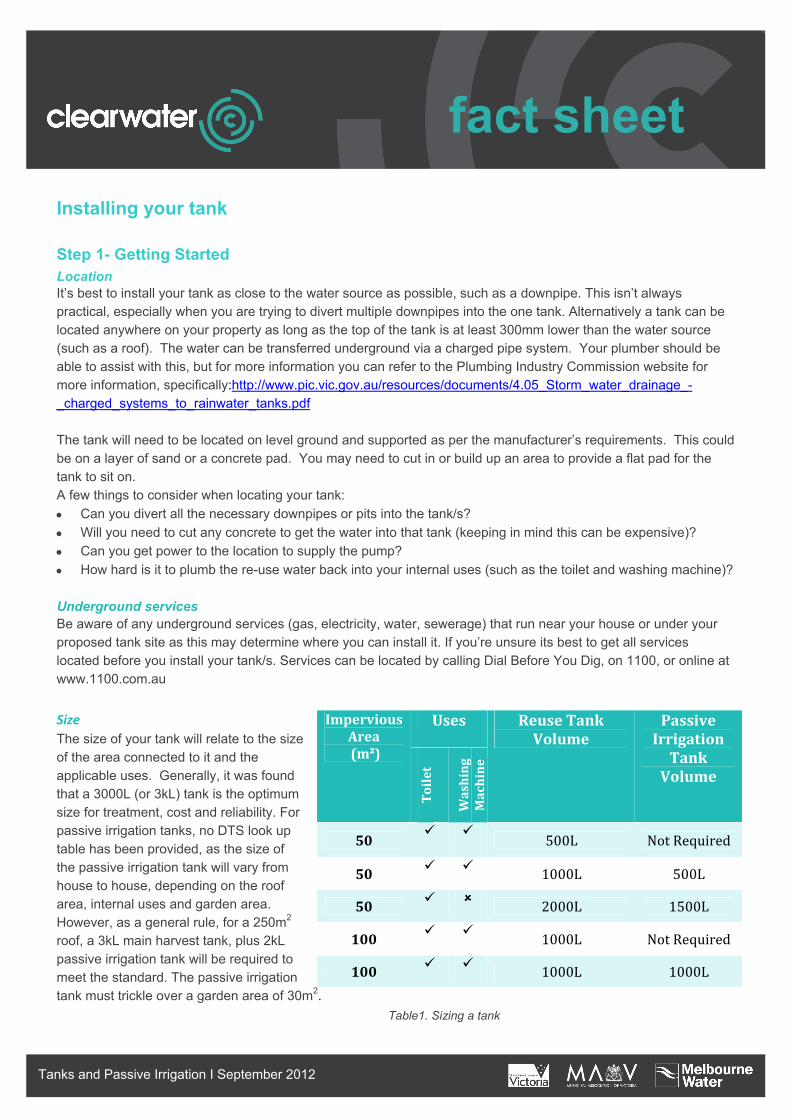
The size of your tank will relate to the size of the area connected to it and the applicable uses. Generally, it was found that a 3000L (or 3kL) tank is the optimum size for treatment, cost and reliability. For passive irrigation tanks, no DTS look up table has been provided, as the size of the passive irrigation tank will vary from house to house, depending on the roof area, internal uses and garden area. However, as a general rule, for a 250m2 roof, a 3kL main harvest tank, plus 2kL passive irrigation tank will be required to meet the standard. The passive irrigation tank must trickle over a garden area of 30m2.
ImperviousArea(m²)
Uses ReuseTankVolume
PassiveIrrigationTankVolume
Toilet
Washing
Machine
50
500L NotRequired
50 1000L 500L
50 2000L 1500L
100
1000L NotRequired
100 1000L 1000L
Table1. Sizing a tank
Heading | Publish Date: 4
fact sheet
Tanks and Passive Irrigation Ι September 2012
Stormwater reconnection The overflow from your rainwater tank will need to be connected to another treatment option, such as a raingarden, infiltration trench or passive irrigation tank. Overflow from the last treatment in the series must be connected back to the stormwater system. This allows any excess water to drain formally. It is best to locate the overflow pipe as close as possible to the existing underground stormwater pipes. This will minimise the additional pipework needed to reconnect the overflow back into the drainage system.
Alicensedplumberwillneedtoundertakethestormwaterconnectionworktoensurethatpipesarereconnectingintotheproperty’sstormwaterandnotanotherservicesuchasthesewer.
Passive Irrigation Tank
The passive irrigation tank not only reduces excess stormwater volume by allowing garden plants to take up most of the released water, but also infiltrates some water back into the soil, which eventually reaches the stream to provide important baseflows. It could be seen as guaranteed garden watering. The tank can be located:
Next to the re-use tank
Within the top portion of the re-use tank (ie a free draining portion of the re-use tank)
Anywhere there is a water source (such as a downpipe). The size of the passive irrigation tank will relate to the area connected to it as outlined in table 1. The important feature of the passive irrigation tank is its ability to self-water your garden by slowly draining the tank. This leaves the tank empty and waiting for that next rainfall event. No more than 0.1L of water should be released every hour for every square metre of hardstand area such as your roof or driveway. For example if you have 200 m2 of roof water entering the tank, the water should be trickling into your garden at 20 litres every hour. Your plumber or irrigation consultant should be able to design a system to suit this rate. The area to be watered will need to be downhill of the outlet pipe of the tank to ensure gravity drains the passive irrigation tank (or portion of main harvest tank excluded for irrigation). If you are using the top portion of the harvest tank, this pipe would be installed part way down the tank wall. It’s also important to note where that water is going and aim to disperse the water over a wide area. The area of garden required for passive irrigation depends on the tank size, usage, and trickle rate, as well as the catchment (roof) area. A dripline or soaker hose is a great way to distribute this water evenly across a garden bed or grassed area. Make sure none of this water enters or disrupts your neighbour’s property.
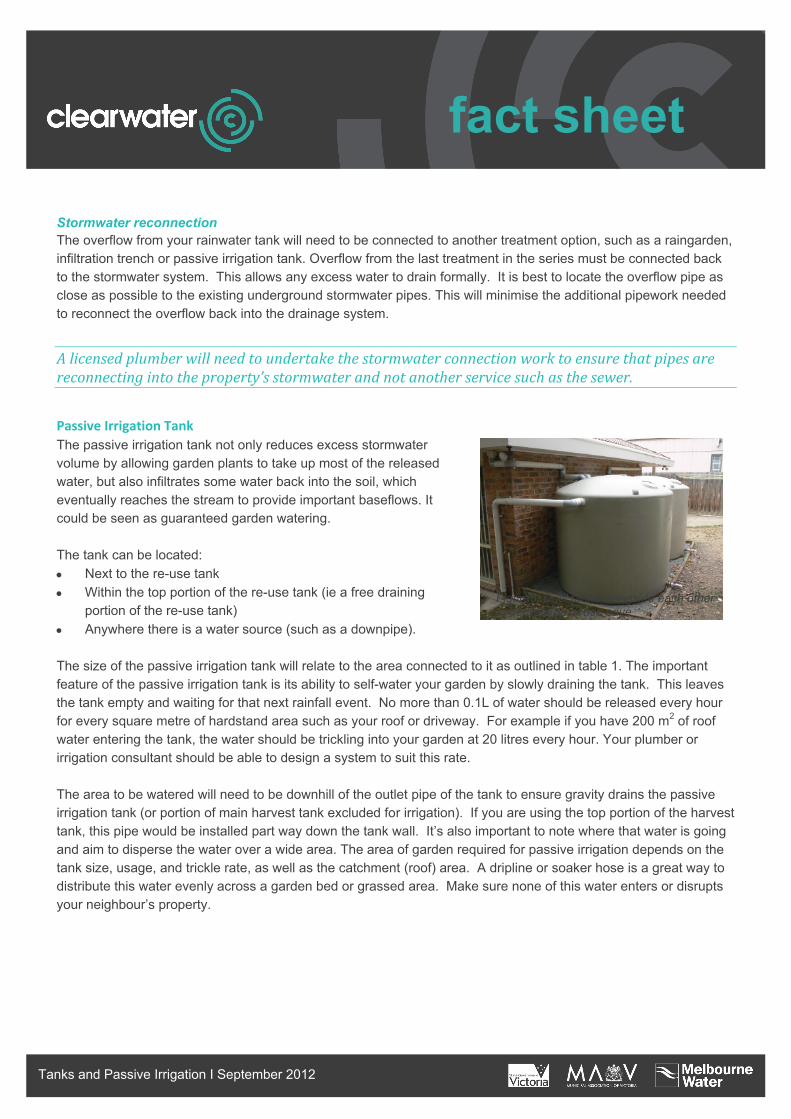
Figure5. Duel tanks alongside each other underneath a house eave
Heading | Publish Date: 5
fact sheet
Tanks and Passive Irrigation Ι September 2012
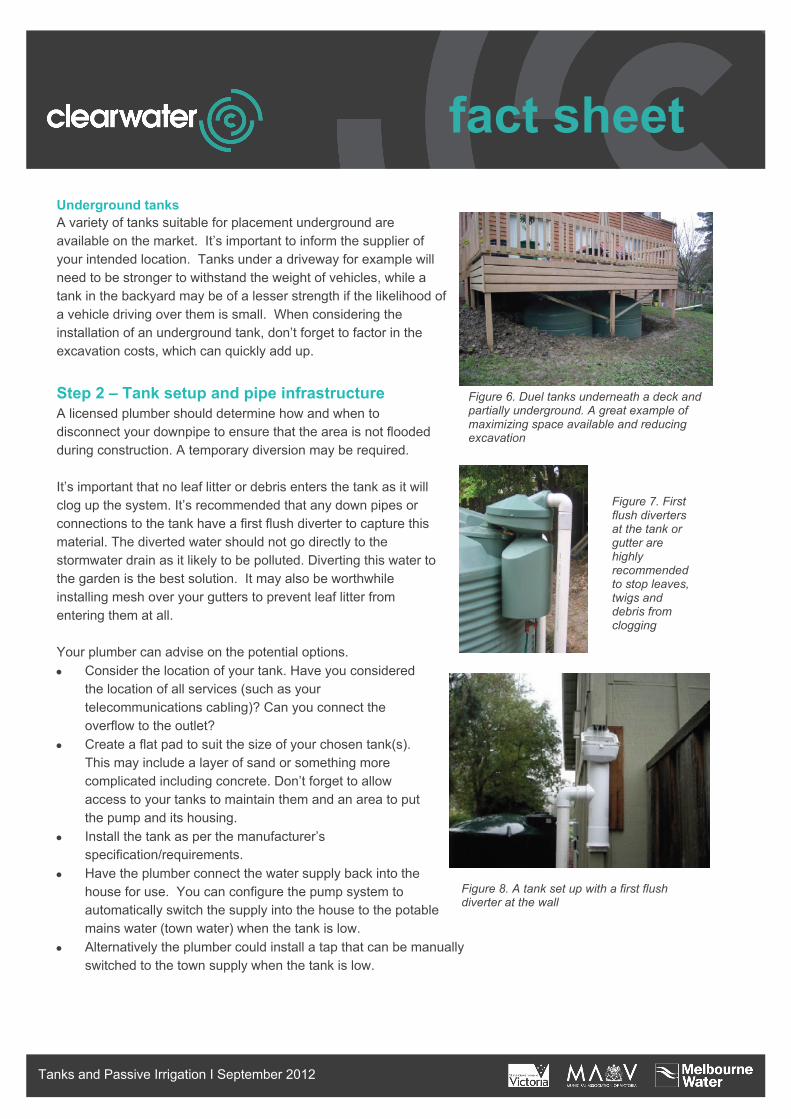
Underground tanks A variety of tanks suitable for placement underground are available on the market. It’s important to inform the supplier of your intended location. Tanks under a driveway for example will need to be stronger to withstand the weight of vehicles, while a tank in the backyard may be of a lesser strength if the likelihood of a vehicle driving over them is small. When considering the installation of an underground tank, don’t forget to factor in the excavation costs, which can quickly add up.
Step 2 – Tank setup and pipe infrastructureA licensed plumber should determine how and when to disconnect your downpipe to ensure that the area is not flooded during construction. A temporary diversion may be required. It’s important that no leaf litter or debris enters the tank as it will clog up the system. It’s recommended that any down pipes or connections to the tank have a first flush diverter to capture this material. The diverted water should not go directly to the stormwater drain as it likely to be polluted. Diverting this water to the garden is the best solution. It may also be worthwhile installing mesh over your gutters to prevent leaf litter from entering them at all. Your plumber can advise on the potential options. Consider the location of your tank. Have you considered
the location of all services (such as your telecommunications cabling)? Can you connect the overflow to the outlet?
Create a flat pad to suit the size of your chosen tank(s). This may include a layer of sand or something more complicated including concrete. Don’t forget to allow access to your tanks to maintain them and an area to put the pump and its housing.
Install the tank as per the manufacturer’s specification/requirements.
Have the plumber connect the water supply back into the house for use. You can configure the pump system to automatically switch the supply into the house to the potable mains water (town water) when the tank is low.
Alternatively the plumber could install a tap that can be manually switched to the town supply when the tank is low.
Figure 6. Duel tanks underneath a deck and partially underground. A great example of maximizing space available and reducing excavation
Figure 7. First flush diverters at the tank or gutter are highly recommended to stop leaves, twigs and debris from clogging
Figure 8. A tank set up with a first flush diverter at the wall
Heading | Publish Date: 6
fact sheet
Tanks and Passive Irrigation Ι September 2012
If you have a passive irrigation tank, have the plumber configure the outlet trickle rate and connect it to your soaker hose or drip line. Your plumber will then connect the downpipes to your tank and overflow back into the existing
stormwater system or alternative treatment on the property.
Didyouknowthelegalpointofdischargeisthepointatwhichyourpropertydischargestothestreetstormwatersystem?Thispointisspecifiedbycouncilandshouldnotbealteredwithoutcouncilapproval.
Looking after your tank Once installed, tanks and passive irrigation tanks are low maintenance, but there are some things to watch for. 1. Check your gutters for leaves and debris. Remove them
if necessary.
2. Clean out the first flush diverter if you have one (recommended).
3. Clean the mesh cover on the tank to make sure it is in
good condition. 4. Check the tank for large volumes of sediment in the
base. Have the sediment removed via suction if it gets too deep. You can do this by looking into the tank from the inlet. If the sediment is approaching the level of the outlet you should consider pumping it out.
5. Ensure the pump is running effectively, this may need to
be serviced periodically.
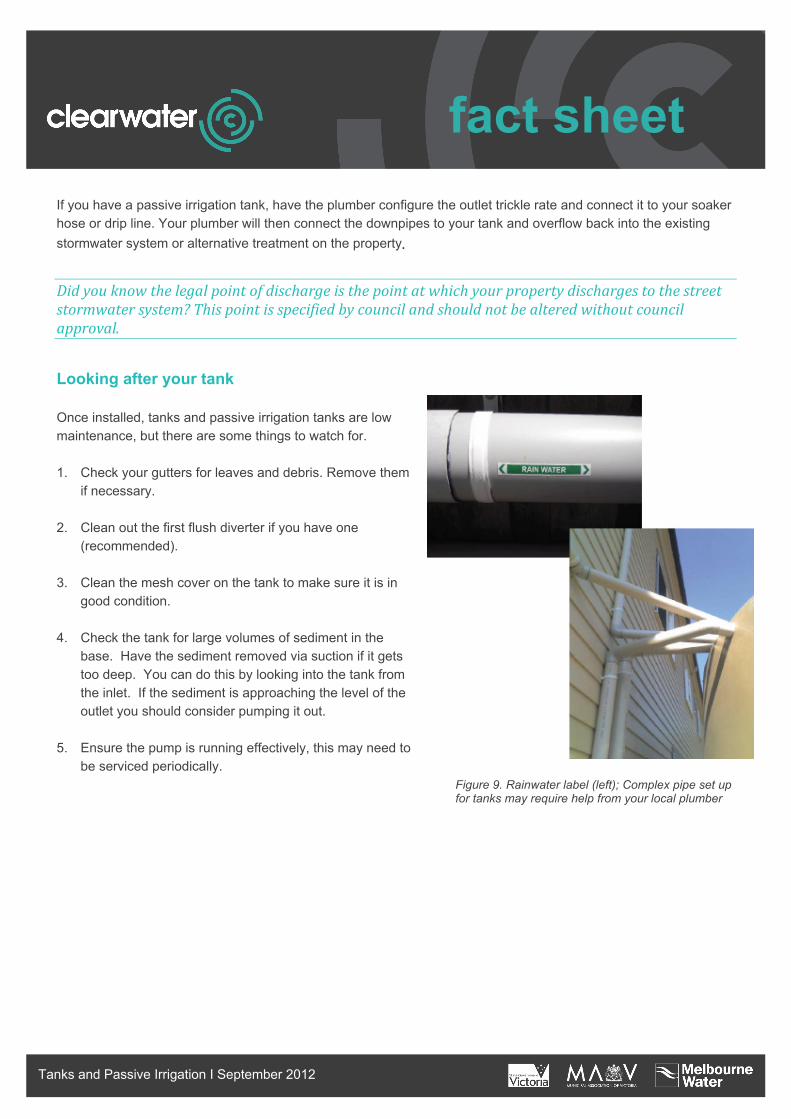
Figure 9. Rainwater label (left); Complex pipe set up for tanks may require help from your local plumber