Smart TRV User Guide
4
2 x AA1.5 V, alkaline batteries. EEPROM 7 days programming (4 periods/day) 868Mhz 5°C ~ 35°C, in 0.5℃ ± 1℃ PID φ55*69mm 5.0mm White 20. CE,ROHS,RED Technical Data Thermostat operating voltage: Backup storage: Switching options: Frequency: Temperature settings: Accuracy: Control: Thermostat dimensions: Max Extension: Colour: IP protection rating: Certification: Smart TRV User Guide Contents Technical Data Page ‑ 1 Set Up and Pairing - Page 2 Connecting to Mobile or Tablet - Page 2 Display Page - 2 Settings Page - 3 Recycling Page - 4 Aftercare - Page 4 Your Guarantee Page ‑ 4 1
Transcript of Smart TRV User Guide
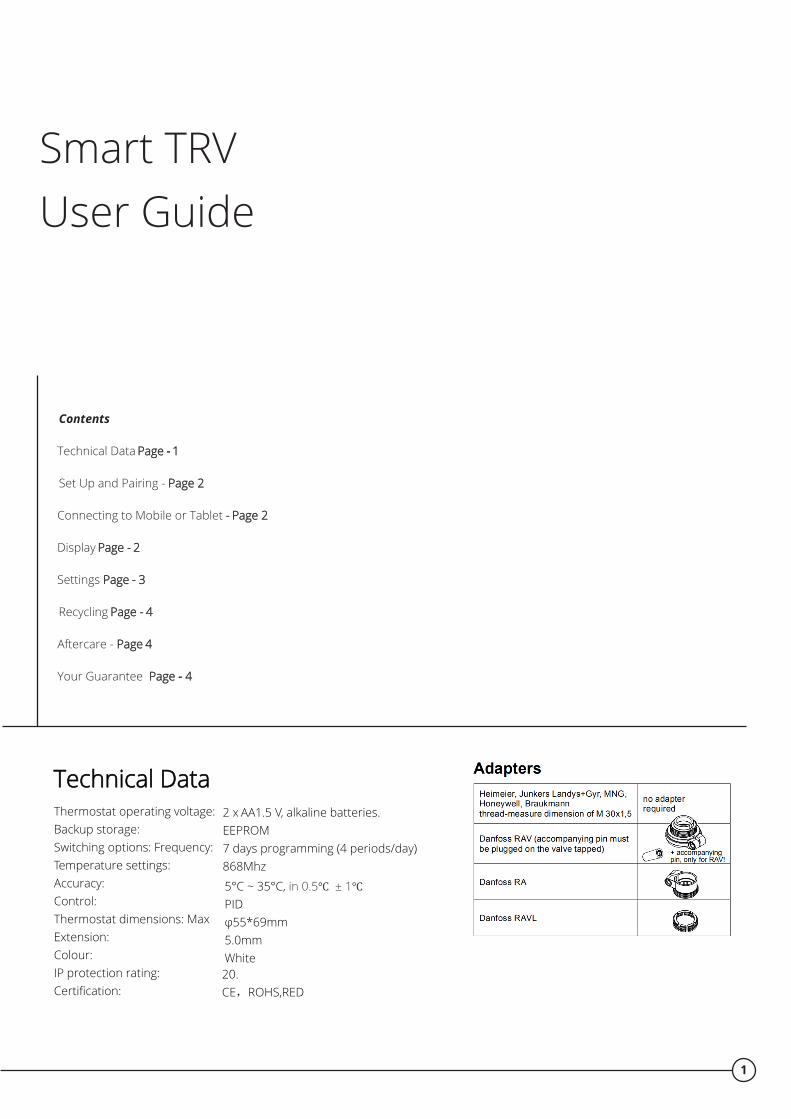
2 x AA1.5 V, alkaline batteries. EEPROM 7 days programming (4 periods/day) 868Mhz
5°C ~ 35°C, in 0.5℃ ± 1℃ PID φ55*69mm 5.0mm White 20. CE,ROHS,RED
Technical Data Thermostat operating voltage: Backup storage: Switching options: Frequency: Temperature settings: Accuracy: Control: Thermostat dimensions: Max Extension:Colour: IP protection rating: Certification:
Smart TRV User Guide
Contents
Technical Data Page ‑ 1
Set Up and Pairing - Page 2
Connecting to Mobile or Tablet - Page 2
Display Page - 2
Settings Page - 3
Recycling Page - 4
Aftercare - Page 4
Your Guarantee Page ‑ 4
1
21
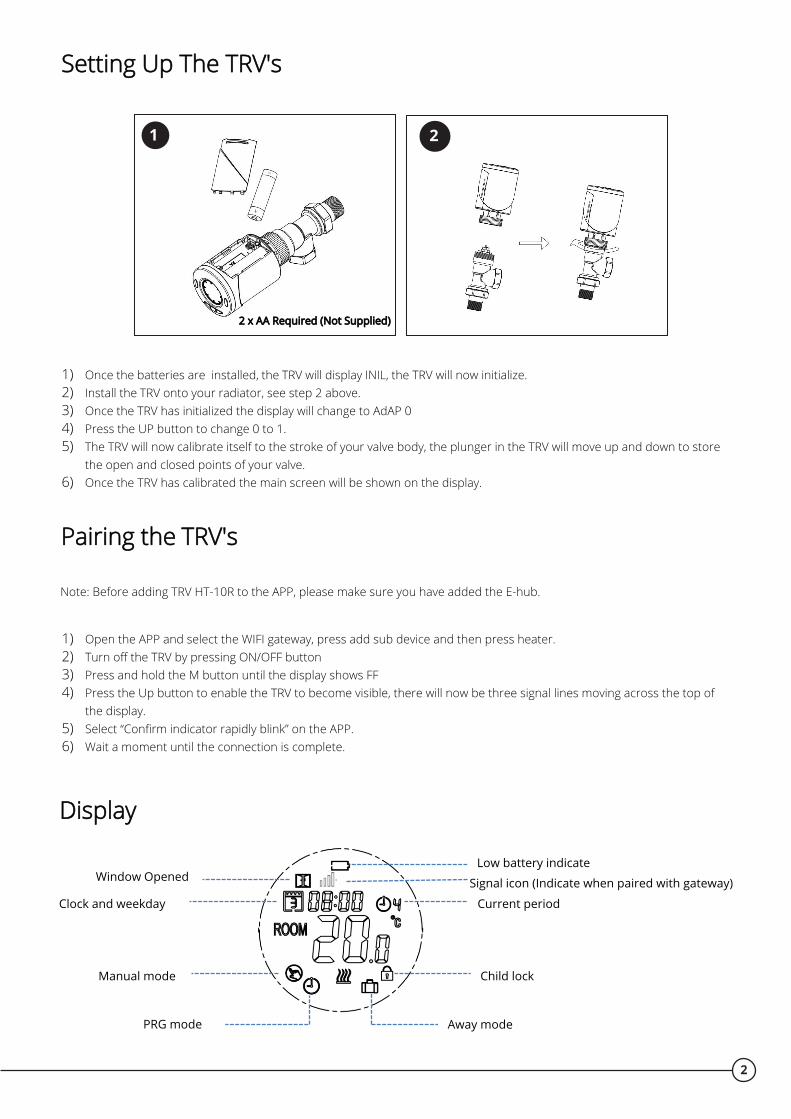
Setting Up The TRV's
2 x AA Required (Not Supplied)
1) Once the batteries are installed, the TRV will display INIL, the TRV will now initialize.2) Install the TRV onto your radiator, see step 2 above.3) Once the TRV has initialized the display will change to AdAP 04) Press the UP button to change 0 to 1.5) The TRV will now calibrate itself to the stroke of your valve body, the plunger in the TRV will move up and down to store
the open and closed points of your valve.6) Once the TRV has calibrated the main screen will be shown on the display.
Pairing the TRV's
Note: Before adding TRV HT-10R to the APP, please make sure you have added the E-hub.
1) Open the APP and select the WIFI gateway, press add sub device and then press heater.2) Turn off the TRV by pressing ON/OFF button3) Press and hold the M button until the display shows FF4) Press the Up button to enable the TRV to become visible, there will now be three signal lines moving across the top of
the display.5) Select “Confirm indicator rapidly blink” on the APP.6) Wait a moment until the connection is complete.
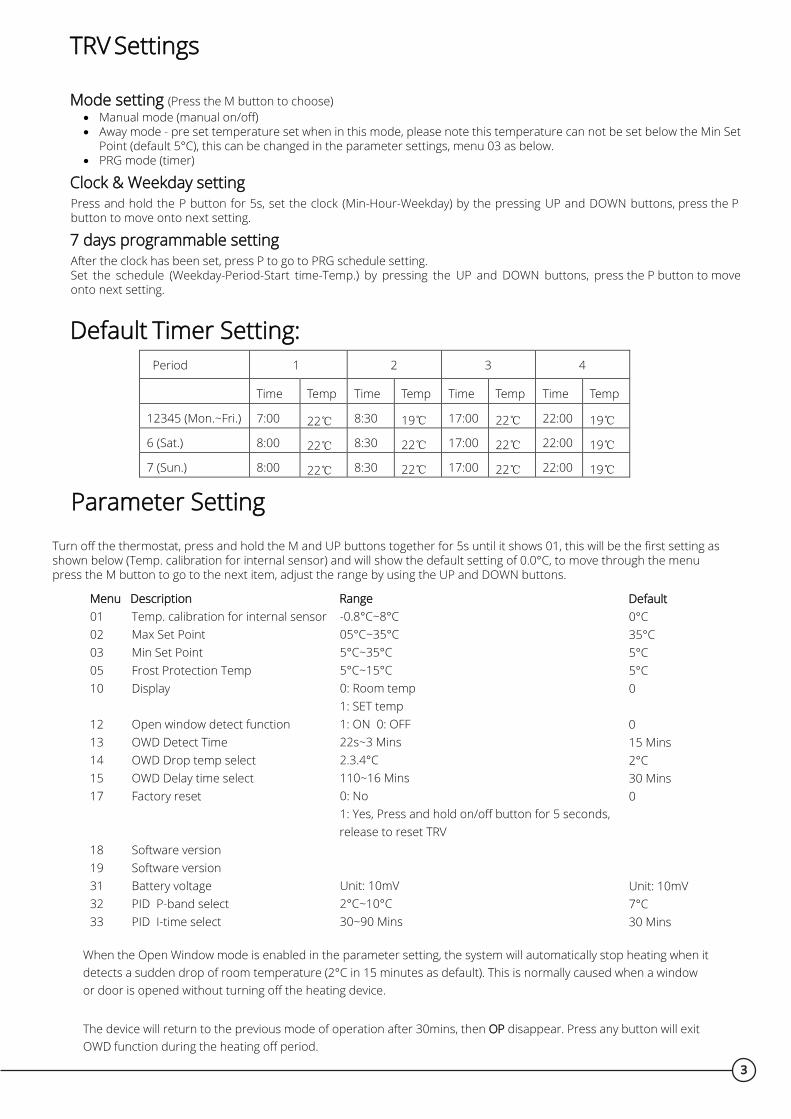
Clock and weekday
Window Opened
Manual mode
Away mode
Current period
Child lock
PRG mode
Low battery indicate Signal icon (Indicate when paired with gateway)
Display
2
Period 1 2 3 4
Time Temp Time Temp Time Temp Time Temp
12345 (Mon.~Fri.) 7:00 22℃ 8:30 19℃ 17:00 22℃ 22:00 19℃
6 (Sat.) 8:00 22℃ 8:30 22℃ 17:00 22℃ 22:00 19℃
7 (Sun.) 8:00 22℃ 8:30 22℃ 17:00 22℃ 22:00 19℃
TRV Settings
Mode setting (Press the M button to choose)• Manual mode (manual on/off)• Away mode - pre set temperature set when in this mode, please note this temperature can not be set below the Min Set
Point (default 5°C), this can be changed in the parameter settings, menu 03 as below.• PRG mode (timer)
Clock & Weekday settingPress and hold the P button for 5s, set the clock (Min-Hour-Weekday) by the pressing UP and DOWN buttons, press the P button to move onto next setting.
7 days programmable settingAfter the clock has been set, press P to go to PRG schedule setting. Set the schedule (Weekday-Period-Start time-Temp.) by pressing the UP and DOWN buttons, press the P button to move onto next setting.
Default Timer Setting:
Parameter Setting
Turn off the thermostat, press and hold the M and UP buttons together for 5s until it shows 01, this will be the first setting as shown below (Temp. calibration for internal sensor) and will show the default setting of 0.0°C, to move through the menu press the M button to go to the next item, adjust the range by using the UP and DOWN buttons.
Menu Description01 Temp. calibration for internal sensor 02 03
Max Set Point Min Set Point
05 Frost Protection Temp10 Display
12 Open window detect function 13 OWD Detect Time14 OWD Drop temp select15 OWD Delay time select17 Factory reset
18 Software version19 Software version31 Battery voltage32 PID P-band select33 PID I-time select
Default0°C35°C5°C5°C0
015 Mins2°C30 Mins0
Unit: 10mV7°C30 Mins
Range-0.8°C~8°C05°C~35°C5°C~35°C5°C~15°C0: Room temp1: SET temp1: ON 0: OFF22s~3 Mins2.3.4°C110~16 Mins0: No1: Yes, Press and hold on/off button for 5 seconds,release to reset TRV
Unit: 10mV2°C~10°C30~90 Mins
When the Open Window mode is enabled in the parameter setting, the system will automatically stop heating when it detects a sudden drop of room temperature (2°C in 15 minutes as default). This is normally caused when a window or door is opened without turning off the heating device.
The device will return to the previous mode of operation after 30mins, then OP disappear. Press any button will exit OWD function during the heating off period.
3
Aftercare
Clean any marks with a soft dry or damp cloth, if you are unsure, please contact us first.
Your Guarantee
• This product is covered by a 3 year guarantee.
• The guarantee starts from the date of purchase.
• The guarantee covers you against issues caused as a result of manufacturing related issues, it does not apply to issues that arefound to be a result of poor installation.
• Labour costs for installation of the product are not covered under this warranty.
Recycling and DisposalPlease recycle the packaging in accordance with your local government regulations on waste handling, and follow the same
advice at the end of the products life. Do not recycle the element in your general waste.
Product - ABS.
Packaging - Cardboard.
Contact us Unit 1 & 2 Dawson Ct
Burnley
Lancashire
BB11 5UB
4