
OpenStage 40 T HiPath 4000 - xn-...
143
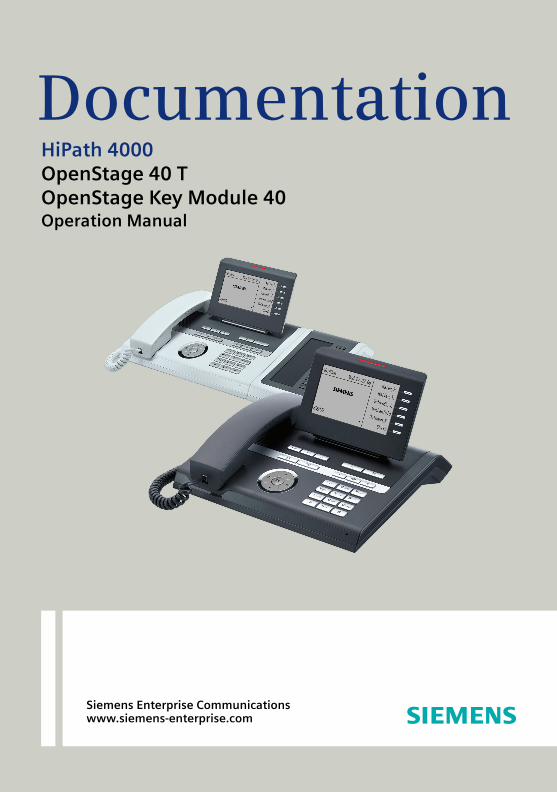
Siemens Enterprise Communications www.siemens-enterprise.com Documentation HiPath 4000 OpenStage 40 T OpenStage Key Module 40 Operation Manual
Transcript of OpenStage 40 T HiPath 4000 - xn-...
Siemens Enterprise Communicationswww.siemens-enterprise.com
DocumentationHiPath 4000OpenStage 40 TOpenStage Key Module 40Operation Manual
Important information
Important information
Trademarks
For safety reasons, the telephone should only be supplied with power (required in connection with an OpenStage Key Module 40 Page 15):• using the original power supply unit.
Part number: L30250-F600-C14x (x: 1=EU, 2=UK, 3=US).
Never open the telephone or a key module. Should you en-counter any problems, contact the responsible service per-sonnel.
Use only original Siemens accessories. The use of other ac-cessories may be hazardous and will render the warranty, extended manufacturer’s liability and the CE marking in-valid.
The device conforms to the EU directive 1999/5/EC as at-tested by the CE marking.
All electrical and electronic products should be disposed of separately from the municipal waste stream via designated collection facilities appointed by the government or the lo-cal authorities.
Proper disposal and separate collection of your old appli-ance will help prevent potential damage to the environ-ment and human health. It is a prerequisite for reuse and recycling of used electrical and electronic equipment.
For more detailed information about disposal of your old appliance, please contact your city office, waste disposal service, the shop where you purchased the product or your sales representative.
The statements quoted above are only fully valid for equip-ment which is installed and sold in the countries of the Eu-ropean Union and is covered by the directive 2002/96/EC. Countries outside the European Union may impose other regulations regarding the disposal of electrical and elec-tronic equipment.
Q
2
Important information
Location of the telephone• The telephone should be operated in a controlled environment with an
ambient temperature between 5•C and 40•C. • To ensure good speakerphone quality, the area in front of the micro-
phone (front right) should be kept clear. The optimum speakerphone distance is 50 cm.
• Do not install the telephone in a room where large quantities of dust accumulate; this can considerably reduce the service life of the tele-phone.
• Do not expose the telephone to direct sunlight or any other source of heat, as this is liable to damage the electronic components and the plastic casing.
• Do not operate the telephone in damp environments, such as bath-rooms.
Product support on the InternetInformation and support for our products can be found on the Internet at:http://www.siemens-enterprise.com/.
Technical notes, current information about firmware updates, frequently asked questions and lots more can be found on the Internet at:http://wiki.siemens-enterprise.com/.
3
Contents
Contents
Important information . . . . . . . . . . . . . . . . . . . . . . . . . .2Trademarks . . . . . . . . . . . . . . . . . . . . . . . . . . . . . . . . . . . . . . . . . . . . . . . 2Location of the telephone . . . . . . . . . . . . . . . . . . . . . . . . . . . . . . . . . . . . 3Product support on the Internet . . . . . . . . . . . . . . . . . . . . . . . . . . . . . . . 3
General information. . . . . . . . . . . . . . . . . . . . . . . . . . .11About this manual . . . . . . . . . . . . . . . . . . . . . . . . . . . . . . . . . . . . . . . . . 11Service. . . . . . . . . . . . . . . . . . . . . . . . . . . . . . . . . . . . . . . . . . . . . . . . . . 11Intended use . . . . . . . . . . . . . . . . . . . . . . . . . . . . . . . . . . . . . . . . . . . . . 12Telephone type . . . . . . . . . . . . . . . . . . . . . . . . . . . . . . . . . . . . . . . . . . . 12Speakerphone quality and display legibility . . . . . . . . . . . . . . . . . . . . . . 12Single-line telephone/multi-line telephone. . . . . . . . . . . . . . . . . . . . . . . 12Executive-secretary functions . . . . . . . . . . . . . . . . . . . . . . . . . . . . . . . . 12
Getting to know your OpenStage phone . . . . . . . . .13The user interface of your OpenStage 40 T . . . . . . . . . . . . . . . . . . . . . 13Ports on the underside of the phone. . . . . . . . . . . . . . . . . . . . . . . . . . . 14Key module . . . . . . . . . . . . . . . . . . . . . . . . . . . . . . . . . . . . . . . . . . . . . . 15
OpenStage Key Module 40 . . . . . . . . . . . . . . . . . . . . . . . . . . . . . . . 15OpenStage Key Module 15 . . . . . . . . . . . . . . . . . . . . . . . . . . . . . . . 16
OpenStage Busy Lamp Field 40 . . . . . . . . . . . . . . . . . . . . . . . . . . . . . . 17Keys. . . . . . . . . . . . . . . . . . . . . . . . . . . . . . . . . . . . . . . . . . . . . . . . . . . . 18
Function keys. . . . . . . . . . . . . . . . . . . . . . . . . . . . . . . . . . . . . . . . . . 18Audio keys . . . . . . . . . . . . . . . . . . . . . . . . . . . . . . . . . . . . . . . . . . . . 185-way navigator . . . . . . . . . . . . . . . . . . . . . . . . . . . . . . . . . . . . . . . . 19Programmable sensor keys . . . . . . . . . . . . . . . . . . . . . . . . . . . . . . . 20Keypad. . . . . . . . . . . . . . . . . . . . . . . . . . . . . . . . . . . . . . . . . . . . . . . 21
Display. . . . . . . . . . . . . . . . . . . . . . . . . . . . . . . . . . . . . . . . . . . . . . . . . . 23Idle mode. . . . . . . . . . . . . . . . . . . . . . . . . . . . . . . . . . . . . . . . . . . . . 23Telephony dialogs . . . . . . . . . . . . . . . . . . . . . . . . . . . . . . . . . . . . . . 25
Mailbox . . . . . . . . . . . . . . . . . . . . . . . . . . . . . . . . . . . . . . . . . . . . . . . . . 27Messages (callback requests) . . . . . . . . . . . . . . . . . . . . . . . . . . . . . 27Voicemail . . . . . . . . . . . . . . . . . . . . . . . . . . . . . . . . . . . . . . . . . . . . . 27
Call log. . . . . . . . . . . . . . . . . . . . . . . . . . . . . . . . . . . . . . . . . . . . . . . . . . 28Menu . . . . . . . . . . . . . . . . . . . . . . . . . . . . . . . . . . . . . . . . . . . . . . . . . . 29
Program/Service menu . . . . . . . . . . . . . . . . . . . . . . . . . . . . . . . . . . 29Call preparation . . . . . . . . . . . . . . . . . . . . . . . . . . . . . . . . . . . . . . . . 30Call pop up . . . . . . . . . . . . . . . . . . . . . . . . . . . . . . . . . . . . . . . . . . . . 31Audio accessories . . . . . . . . . . . . . . . . . . . . . . . . . . . . . . . . . . . . . . 32
4
Contents
Basic functions . . . . . . . . . . . . . . . . . . . . . . . . . . . . . . 33Answering a call . . . . . . . . . . . . . . . . . . . . . . . . . . . . . . . . . . . . . . . . . . 33
Answering a call via the handset . . . . . . . . . . . . . . . . . . . . . . . . . . . 33Answering a call via the loudspeaker (speakerphone mode) . . . . . . 33Accepting calls via the headset . . . . . . . . . . . . . . . . . . . . . . . . . . . . 34
Switching to speakerphone mode. . . . . . . . . . . . . . . . . . . . . . . . . . . . . 34Switching to the handset. . . . . . . . . . . . . . . . . . . . . . . . . . . . . . . . . . . . 35Open listening . . . . . . . . . . . . . . . . . . . . . . . . . . . . . . . . . . . . . . . . . . . . 35Turning the microphone on and off . . . . . . . . . . . . . . . . . . . . . . . . . . . . 36Ending a call. . . . . . . . . . . . . . . . . . . . . . . . . . . . . . . . . . . . . . . . . . . . . . 36Making calls. . . . . . . . . . . . . . . . . . . . . . . . . . . . . . . . . . . . . . . . . . . . . . 37
Off-hook dialing . . . . . . . . . . . . . . . . . . . . . . . . . . . . . . . . . . . . . . . . 37Dialing in speakerphone mode. . . . . . . . . . . . . . . . . . . . . . . . . . . . . 37Dialing with the headset connected . . . . . . . . . . . . . . . . . . . . . . . . 37Dialing using En-bloc dialing. . . . . . . . . . . . . . . . . . . . . . . . . . . . . . . 38Dialing with DDS keys . . . . . . . . . . . . . . . . . . . . . . . . . . . . . . . . . . . 38
Redialing a number (last dialed number) . . . . . . . . . . . . . . . . . . . . . . . . 39Redial key . . . . . . . . . . . . . . . . . . . . . . . . . . . . . . . . . . . . . . . . . . . . 39Redialing from the menu . . . . . . . . . . . . . . . . . . . . . . . . . . . . . . . . . 39
Redialing a number (saved number) . . . . . . . . . . . . . . . . . . . . . . . . . . . 40Calling a second party (consultation) . . . . . . . . . . . . . . . . . . . . . . . . . . . 40Switching to the held party (alternating) . . . . . . . . . . . . . . . . . . . . . . . . 41Transferring a call . . . . . . . . . . . . . . . . . . . . . . . . . . . . . . . . . . . . . . . . . 42Call forwarding. . . . . . . . . . . . . . . . . . . . . . . . . . . . . . . . . . . . . . . . . . . . 43
Overview of forwarding types . . . . . . . . . . . . . . . . . . . . . . . . . . . . . 43Fixed call forwarding (all calls) . . . . . . . . . . . . . . . . . . . . . . . . . . . . . 44Activating/deactivating fixed call forwarding . . . . . . . . . . . . . . . . . . 45Variable call forwarding (all calls) . . . . . . . . . . . . . . . . . . . . . . . . . . . 46Additional forwarding types . . . . . . . . . . . . . . . . . . . . . . . . . . . . . . . 47Displays . . . . . . . . . . . . . . . . . . . . . . . . . . . . . . . . . . . . . . . . . . . . . . 48
Using callback . . . . . . . . . . . . . . . . . . . . . . . . . . . . . . . . . . . . . . . . . . . . 49Storing a callback . . . . . . . . . . . . . . . . . . . . . . . . . . . . . . . . . . . . . . . 49Accepting a callback. . . . . . . . . . . . . . . . . . . . . . . . . . . . . . . . . . . . . 49Responding to a callback request . . . . . . . . . . . . . . . . . . . . . . . . . . 50Checking/deleting a saved callback . . . . . . . . . . . . . . . . . . . . . . . . . 50
Saving phone numbers for redial. . . . . . . . . . . . . . . . . . . . . . . . . . . . . . 51Saving the current phone number . . . . . . . . . . . . . . . . . . . . . . . . . . 51Saving any phone number . . . . . . . . . . . . . . . . . . . . . . . . . . . . . . . . 51
5
Contents
Enhanced phone functions. . . . . . . . . . . . . . . . . . . . .52Answering calls . . . . . . . . . . . . . . . . . . . . . . . . . . . . . . . . . . . . . . . . . . . 52
Accepting calls via the headset . . . . . . . . . . . . . . . . . . . . . . . . . . . . 52Answering a call via a DSS key . . . . . . . . . . . . . . . . . . . . . . . . . . . . 52Accepting a call for another member of your team . . . . . . . . . . . . . 53Accepting a specific call. . . . . . . . . . . . . . . . . . . . . . . . . . . . . . . . . . 53Picking up a call in a hunt group. . . . . . . . . . . . . . . . . . . . . . . . . . . . 54Using the speakerphone . . . . . . . . . . . . . . . . . . . . . . . . . . . . . . . . . 54
Making calls. . . . . . . . . . . . . . . . . . . . . . . . . . . . . . . . . . . . . . . . . . . . . . 55Making calls with a direct station selection key. . . . . . . . . . . . . . . . 55Dialing a phone number from a list . . . . . . . . . . . . . . . . . . . . . . . . . 55Using speed dialing . . . . . . . . . . . . . . . . . . . . . . . . . . . . . . . . . . . . . 57Talking to your colleague with a speaker call. . . . . . . . . . . . . . . . . . 58
During a call . . . . . . . . . . . . . . . . . . . . . . . . . . . . . . . . . . . . . . . . . . . . . . 59Call waiting with a direct station selection key . . . . . . . . . . . . . . . . 59Using the second call feature . . . . . . . . . . . . . . . . . . . . . . . . . . . . . 59Activating/deactivating second call . . . . . . . . . . . . . . . . . . . . . . . . . 59Accepting a second call with a sensor key . . . . . . . . . . . . . . . . . . . 60Accepting a second call via the menu . . . . . . . . . . . . . . . . . . . . . . . 60Using the key Push-Pull . . . . . . . . . . . . . . . . . . . . . . . . . . . . . . . . . . 61
System-supported conference . . . . . . . . . . . . . . . . . . . . . . . . . . . . . . . 62Establishing a conference . . . . . . . . . . . . . . . . . . . . . . . . . . . . . . . . 63Adding a party . . . . . . . . . . . . . . . . . . . . . . . . . . . . . . . . . . . . . . . . . 64Transferring a conference . . . . . . . . . . . . . . . . . . . . . . . . . . . . . . . . 65Disconnecting a specific participant from the conference. . . . . . . . 66Putting the conference on hold . . . . . . . . . . . . . . . . . . . . . . . . . . . . 66
Entering commands using tone dialing (DTMF suffix dialing) . . . . . . . . 67System-wide parking. . . . . . . . . . . . . . . . . . . . . . . . . . . . . . . . . . . . . . . 68
Automatically parking a call . . . . . . . . . . . . . . . . . . . . . . . . . . . . . . . 68Manually parking a call . . . . . . . . . . . . . . . . . . . . . . . . . . . . . . . . . . . 69
If you cannot reach a destination .... . . . . . . . . . . . . . . . . . . . . . . . . . . . 70Call waiting (camp-on) . . . . . . . . . . . . . . . . . . . . . . . . . . . . . . . . . . . 70Busy override – joining a call in progress. . . . . . . . . . . . . . . . . . . . . 70
HiPath 4000 as an entrance telephone system (two-way intercom). . . 71System-wide speaker call . . . . . . . . . . . . . . . . . . . . . . . . . . . . . . . . 72Speaker call in a group. . . . . . . . . . . . . . . . . . . . . . . . . . . . . . . . . . . 73Announcement (broadcast) to all members of a line trunk group . . 75
Using call forwarding . . . . . . . . . . . . . . . . . . . . . . . . . . . . . . . . . . . . . . . 76Automatically forwarding calls . . . . . . . . . . . . . . . . . . . . . . . . . . . . . 76Delayed call forwarding . . . . . . . . . . . . . . . . . . . . . . . . . . . . . . . . . . 76
6
Contents
Forwarding calls for other stations . . . . . . . . . . . . . . . . . . . . . . . . . . . . 77Saving a call forwarding destination for another phone and activating call forwarding. . . . . . . . . . . . . . . . . . . . . . . . . . . . . . 77Saving a call forwarding destination for fax/PC/busy station and activating call forwarding. . . . . . . . . . . . . . . . . . . . . . . . . . . . . . 78Displaying/deactivating call forwarding for another phone . . . . . . . 79Displaying/deactivating call forwarding for fax/PC/busy stations . . . 80Changing call forwarding for another station . . . . . . . . . . . . . . . . . . 80
Leaving/rejoining a hunt group . . . . . . . . . . . . . . . . . . . . . . . . . . . . . . . 81
Programming sensor keys . . . . . . . . . . . . . . . . . . . . . 82Configuring function keys . . . . . . . . . . . . . . . . . . . . . . . . . . . . . . . . . . . 82Configuring repdial keys . . . . . . . . . . . . . . . . . . . . . . . . . . . . . . . . . . . . 83
Additional repdial key functions . . . . . . . . . . . . . . . . . . . . . . . . . . . . 85Programming direct station selection key . . . . . . . . . . . . . . . . . . . . . . . 86Changing the label . . . . . . . . . . . . . . . . . . . . . . . . . . . . . . . . . . . . . . . . . 88Configuring the pickup key . . . . . . . . . . . . . . . . . . . . . . . . . . . . . . . . . . 89Deleting sensor key programming . . . . . . . . . . . . . . . . . . . . . . . . . . . . 90
Saving speed dial numbers and appointments . . . 91Central speed dial numbers. . . . . . . . . . . . . . . . . . . . . . . . . . . . . . . . . . 91Speed dialing with extensions. . . . . . . . . . . . . . . . . . . . . . . . . . . . . . . . 91Individual speed dial numbers . . . . . . . . . . . . . . . . . . . . . . . . . . . . . . . . 92Appointments function . . . . . . . . . . . . . . . . . . . . . . . . . . . . . . . . . . . . . 93
Saving appointments . . . . . . . . . . . . . . . . . . . . . . . . . . . . . . . . . . . . 93Using timed reminders . . . . . . . . . . . . . . . . . . . . . . . . . . . . . . . . . . 93
Dialing with call charge assignment. . . . . . . . . . . . 94Dialing with project assignment . . . . . . . . . . . . . . . . . . . . . . . . . . . . . . 94Call duration display. . . . . . . . . . . . . . . . . . . . . . . . . . . . . . . . . . . . . . . . 95
Privacy/security . . . . . . . . . . . . . . . . . . . . . . . . . . . . . . 96Locking the telephone to prevent unauthorized use . . . . . . . . . . . . . . . 96Activating/deactivating "Do not disturb". . . . . . . . . . . . . . . . . . . . . . . . . 97Activating/deactivating "Speaker call protect" . . . . . . . . . . . . . . . . . . . . 98Caller ID suppression. . . . . . . . . . . . . . . . . . . . . . . . . . . . . . . . . . . . . . . 98Identifying anonymous callers (trace call) . . . . . . . . . . . . . . . . . . . . . . . 99
7
Contents
More functions/services. . . . . . . . . . . . . . . . . . . . . .100Using another telephone in the same way as your own . . . . . . . . . . . 100
Logging on to another phone. . . . . . . . . . . . . . . . . . . . . . . . . . . . . 100Logging off from another phone . . . . . . . . . . . . . . . . . . . . . . . . . . 101
Moving with the phone . . . . . . . . . . . . . . . . . . . . . . .102Logging the phone off from the current port. . . . . . . . . . . . . . . . . . . . 102Log the phone on at the new location. . . . . . . . . . . . . . . . . . . . . . . . . 102
Making calls via multiple lines . . . . . . . . . . . . . . . .103Line keys . . . . . . . . . . . . . . . . . . . . . . . . . . . . . . . . . . . . . . . . . . . . . . . 103Line utilization . . . . . . . . . . . . . . . . . . . . . . . . . . . . . . . . . . . . . . . . . . . 104Preview . . . . . . . . . . . . . . . . . . . . . . . . . . . . . . . . . . . . . . . . . . . . . . . . 105Answering calls with the line keys . . . . . . . . . . . . . . . . . . . . . . . . . . . 106
Answering calls in the sequence in which they are offered . . . . . 106Answering calls preferentially . . . . . . . . . . . . . . . . . . . . . . . . . . . . 106
Deactivating/activating ringing (call). . . . . . . . . . . . . . . . . . . . . . . . . . . 107Dialing with line keys. . . . . . . . . . . . . . . . . . . . . . . . . . . . . . . . . . . . . . 108Holding a call on the trunk key . . . . . . . . . . . . . . . . . . . . . . . . . . . . . . 109Saved number redial for a specific line . . . . . . . . . . . . . . . . . . . . . . . . 110Last number dialed for a specific line . . . . . . . . . . . . . . . . . . . . . . . . . 110Saving phone numbers for "Redial on a line" . . . . . . . . . . . . . . . . . . . . 111Line mailbox . . . . . . . . . . . . . . . . . . . . . . . . . . . . . . . . . . . . . . . . . . . . 111
Retrieving messages . . . . . . . . . . . . . . . . . . . . . . . . . . . . . . . . . . . 112Identifying the line used . . . . . . . . . . . . . . . . . . . . . . . . . . . . . . . . . . . 113Making calls on multiple lines alternately . . . . . . . . . . . . . . . . . . . . . . 113
Ending the connection on a line key . . . . . . . . . . . . . . . . . . . . . . . 114Entering a call on a line (three-party conference). . . . . . . . . . . . . . 114
Allowing or blocking a party from joining a call . . . . . . . . . . . . . . . . . . 114Allowing a party to join a call . . . . . . . . . . . . . . . . . . . . . . . . . . . . . 114Blocking other parties from joining a call . . . . . . . . . . . . . . . . . . . . 115Ending the connection on a line key . . . . . . . . . . . . . . . . . . . . . . . 115
Third-party monitoring . . . . . . . . . . . . . . . . . . . . . . . . . . . . . . . . . . . . . 116Holding and re-accepting a call on a trunk key . . . . . . . . . . . . . . . . . . 117Exclusively holding and re-accepting a call on a trunk key . . . . . . . . . 117Accepting a specific held line . . . . . . . . . . . . . . . . . . . . . . . . . . . . . . . 118Forwarding calls on lines . . . . . . . . . . . . . . . . . . . . . . . . . . . . . . . . . . . 118Ring transfer . . . . . . . . . . . . . . . . . . . . . . . . . . . . . . . . . . . . . . . . . . . . 119
8
Contents
Making calls in an executive-secretary team . . . 120Calling an executive or secretary phone . . . . . . . . . . . . . . . . . . . . . . . 120
Calling an executive/secretary phone . . . . . . . . . . . . . . . . . . . . . . 120Accepting calls for the executive phone at the secretary phone. . . . . 121
Accepting calls for the executive phone when already on a call . . 121Transferring calls directly to the executive phone . . . . . . . . . . . . . . . . 122Accepting calls on the executive phone . . . . . . . . . . . . . . . . . . . . . . . 122Accepting a call for another executive-secretary team . . . . . . . . . . . . 122Using a second (executive) telephone. . . . . . . . . . . . . . . . . . . . . . . . . 123Activating/deactivating a second executive call. . . . . . . . . . . . . . . . . . 123Using signal call . . . . . . . . . . . . . . . . . . . . . . . . . . . . . . . . . . . . . . . . . . 124Placing a messenger call . . . . . . . . . . . . . . . . . . . . . . . . . . . . . . . . . . . 124Defining a representative for the secretary . . . . . . . . . . . . . . . . . . . . . 124
Individual phone configuration . . . . . . . . . . . . . . . 125Adjusting display settings . . . . . . . . . . . . . . . . . . . . . . . . . . . . . . . . . . 125
Adjusting the display to a comfortable reading angle . . . . . . . . . . 125Illuminated display . . . . . . . . . . . . . . . . . . . . . . . . . . . . . . . . . . . . . 125Setting contrast . . . . . . . . . . . . . . . . . . . . . . . . . . . . . . . . . . . . . . . 125
Adjusting displays on the OpenStage key module . . . . . . . . . . . . . . . 125Adjusting audio settings . . . . . . . . . . . . . . . . . . . . . . . . . . . . . . . . . . . 126
Adjusting the ring volume . . . . . . . . . . . . . . . . . . . . . . . . . . . . . . . 126Adjusting the ring tone. . . . . . . . . . . . . . . . . . . . . . . . . . . . . . . . . . 126Room character for speakerphone mode . . . . . . . . . . . . . . . . . . . 126Setting the volume of the alert tone . . . . . . . . . . . . . . . . . . . . . . . 127Turn ringtone on/off . . . . . . . . . . . . . . . . . . . . . . . . . . . . . . . . . . . . 127
Testing the phone . . . . . . . . . . . . . . . . . . . . . . . . . . . 128Testing functionality . . . . . . . . . . . . . . . . . . . . . . . . . . . . . . . . . . . . . . 128
Special parallel call (ONS) functions . . . . . . . . . . 129
9
Contents
Fixing problems . . . . . . . . . . . . . . . . . . . . . . . . . . . . .130Responding to error messages on the screen . . . . . . . . . . . . . . . . . . 130Contact partner in the case of problems . . . . . . . . . . . . . . . . . . . . . . . 132Troubleshooting. . . . . . . . . . . . . . . . . . . . . . . . . . . . . . . . . . . . . . . . . . 132Caring for your telephone . . . . . . . . . . . . . . . . . . . . . . . . . . . . . . . . . . 132Labeling keys. . . . . . . . . . . . . . . . . . . . . . . . . . . . . . . . . . . . . . . . . . . . 133
Index. . . . . . . . . . . . . . . . . . . . . . . . . . . . . . . . . . . . . . .134
Display icons. . . . . . . . . . . . . . . . . . . . . . . . . . . . . . . .137
HiPath 4000 service menu . . . . . . . . . . . . . . . . . . . .138
10
General information
General information
About this manualThis document contains general descriptions of the technical options, which may not always be available in individual cases. The respective fea-tures must therefore be individually defined in the terms of the contract.
If a particular function on your phone is not available to you, this may be due to one of the following reasons:• The function is not configured for you or your telephone. Please con-
tact your system support representative.• Your communications platform does not feature this function. Please
contact your Siemens sales partner for information on how to upgrade.
This user guide is intended to help you familiarize yourself with OpenStage and all of its functions. It contains important information on the safe and proper operation of your OpenStage phone. These instructions should be strictly complied with to avoid operating errors and ensure optimum use of your multifunctional telephone.
These instructions should be read and followed by every person installing, operating or programming an OpenStage phone.
This user guide is designed to be simple and easy to understand, providing clear step-by-step instructions for operating your OpenStage phone.
Administrative tasks are dealt with in a separate manual. The Quick Refer-ence Guide contains quick and reliable explanations of frequently used functions.
Service
If you experience problems or defects with the phone, please dial the ser-vice number for your country.
For your own protection, please read the section dealing with safety in detail. Follow the safety instructions carefully in order to avoid en-dangering yourself or other persons and to prevent damage to the unit.
The Siemens service department can only help you if you experi-ence problems or defects with the phone. Should you have any questions regarding operation, your specialist retailer or network administrator will gladly help you.For queries regarding connection of the telephone, please contact your network provider.
11
General information
Intended useThe OpenStage phone was developed as a device for speech transmission and should be placed on the desk or mounted on the wall. Any other use is regarded as unauthorized.
Telephone typeThe phone name data can be found on the name plate on the base of the device; The exact product name and serial number are specified here. Spe-cific details concerning your communications platform can be obtained from your service technician.Please have this information ready when you contact our service depart-ment regarding faults or problems with the product.
Speakerphone quality and display legibility• To ensure good speakerphone quality, the area in front of the telephone
(front right) should be kept clear.The optimum handsfree distance is 20 in. (50 cm).
• Proceed as follows to optimize display legibility:– Turn the phone to tilt the display. This ensures you have a frontal view
of the display while eliminating light reflexes.
Single-line telephone/multi-line telephoneYour OpenStage 40 T is multi-line-enabled. This means that your service personnel can configure multiple lines on your phone, which is not the case with single-line phones. Each line is assigned an individual phone number which you can use to make and receive calls.
The programmable sensor keys function as line keys on multi-line phones Page 103.
When using a multi-line phone to make and receive calls, certain particu-lars must be taken into account Page 106.
Executive-secretary functionsThe executive-secretary configuration is a special case. This is a multi-line telephone with special features (e. g."Call transfer to exec", "Call pickup" and "Representative"), configured especially for executive-secretary use
Page 120.
12
Getting to know your OpenStage phone
Getting to know your OpenStage phoneThe following sections describe the most frequently used operating ele-ments and the displays on your OpenStage phone.
The user interface of your OpenStage 40 T
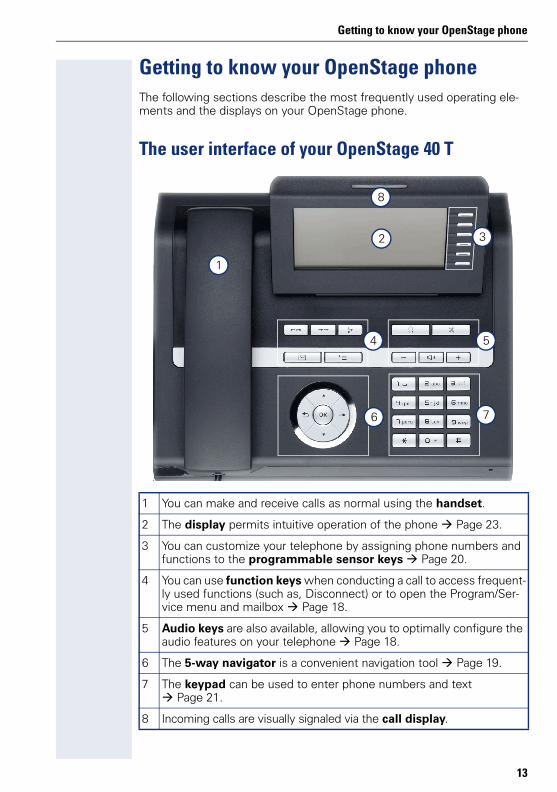
1 You can make and receive calls as normal using the handset.
2 The display permits intuitive operation of the phone Page 23.
3 You can customize your telephone by assigning phone numbers and functions to the programmable sensor keys Page 20.
4 You can use function keys when conducting a call to access frequent-ly used functions (such as, Disconnect) or to open the Program/Ser-vice menu and mailbox Page 18.
5 Audio keys are also available, allowing you to optimally configure the audio features on your telephone Page 18.
6 The 5-way navigator is a convenient navigation tool Page 19.
7 The keypad can be used to enter phone numbers and text Page 21.
8 Incoming calls are visually signaled via the call display.
5
7
1
6
4
8
2 3
13
Getting to know your OpenStage phone
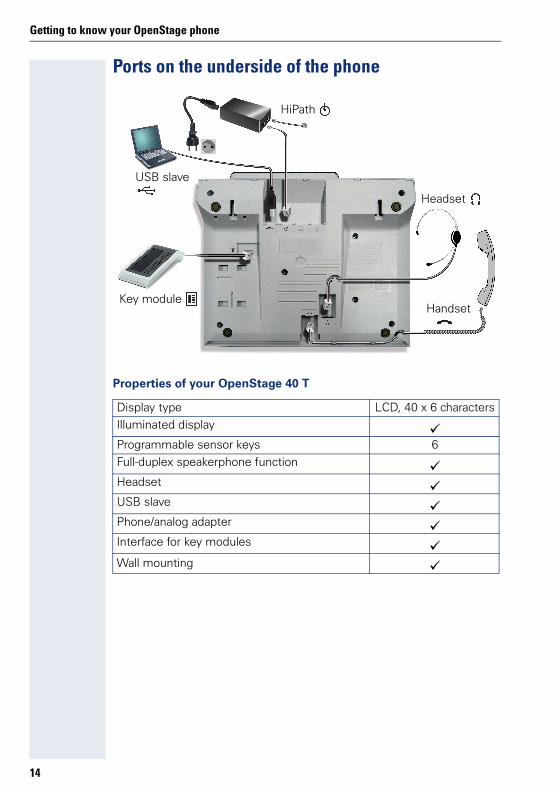
Ports on the underside of the phone
Properties of your OpenStage 40 T
Display type LCD, 40 x 6 characters
Illuminated display ;Programmable sensor keys 6
Full-duplex speakerphone function ;Headset ;USB slave ;Phone/analog adapter ;Interface for key modules ;Wall mounting ;
Headset
Key module Handset
USB slave
HiPath
14
Getting to know your OpenStage phone
Key module
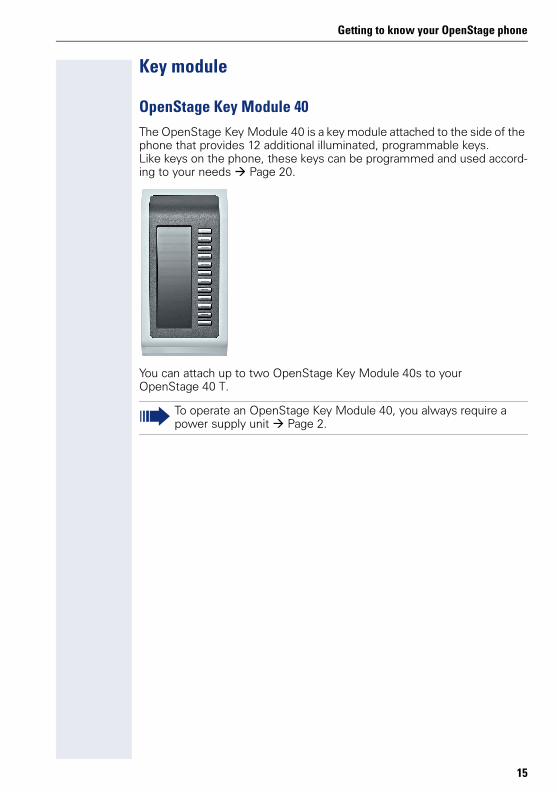
OpenStage Key Module 40The OpenStage Key Module 40 is a key module attached to the side of the phone that provides 12 additional illuminated, programmable keys.Like keys on the phone, these keys can be programmed and used accord-ing to your needs Page 20.
You can attach up to two OpenStage Key Module 40s to your OpenStage 40 T.
To operate an OpenStage Key Module 40, you always require a power supply unit Page 2.
15
Getting to know your OpenStage phone
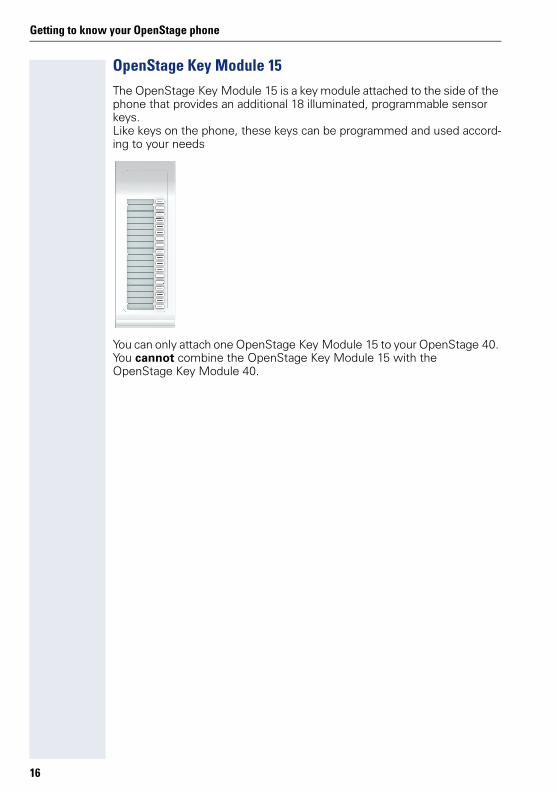
OpenStage Key Module 15The OpenStage Key Module 15 is a key module attached to the side of the phone that provides an additional 18 illuminated, programmable sensor keys.Like keys on the phone, these keys can be programmed and used accord-ing to your needs
You can only attach one OpenStage Key Module 15 to your OpenStage 40. You cannot combine the OpenStage Key Module 15 with the OpenStage Key Module 40.
16
Getting to know your OpenStage phone
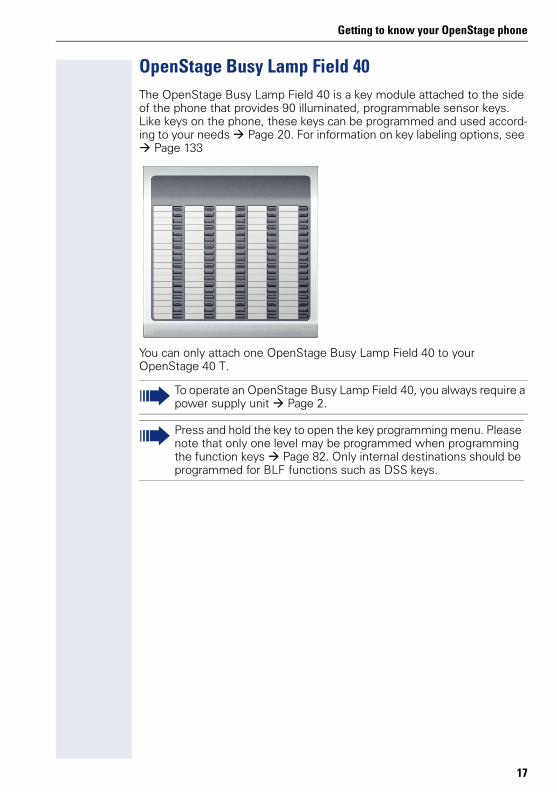
OpenStage Busy Lamp Field 40The OpenStage Busy Lamp Field 40 is a key module attached to the side of the phone that provides 90 illuminated, programmable sensor keys.Like keys on the phone, these keys can be programmed and used accord-ing to your needs Page 20. For information on key labeling options, see
Page 133
You can only attach one OpenStage Busy Lamp Field 40 to your OpenStage 40 T.
To operate an OpenStage Busy Lamp Field 40, you always require a power supply unit Page 2.
Press and hold the key to open the key programming menu. Please note that only one level may be programmed when programming the function keys Page 82. Only internal destinations should be programmed for BLF functions such as DSS keys.
17
Getting to know your OpenStage phone
Keys
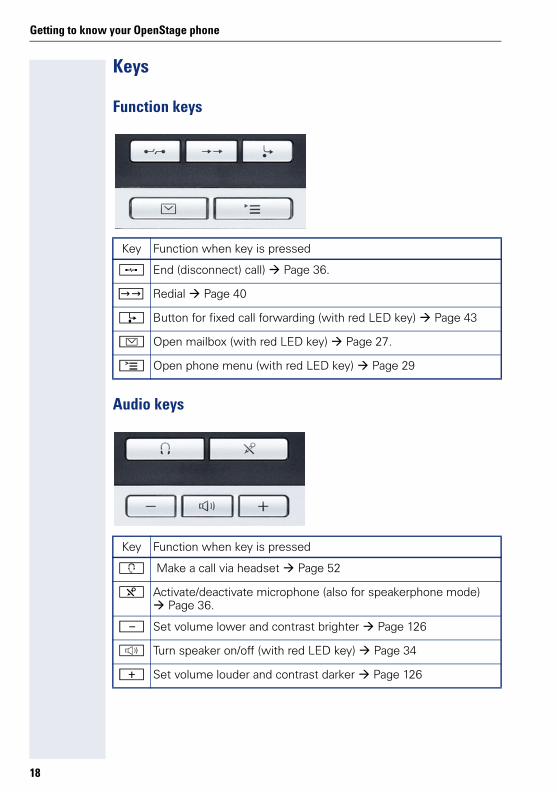
Function keys
Audio keys
Key Function when key is pressed
s End (disconnect) call) Page 36.
, Redial Page 40
r Button for fixed call forwarding (with red LED key) Page 43
O Open mailbox (with red LED key) Page 27.
N Open phone menu (with red LED key) Page 29
Key Function when key is pressed
o Make a call via headset Page 52
p Activate/deactivate microphone (also for speakerphone mode) Page 36.
- Set volume lower and contrast brighter Page 126
n Turn speaker on/off (with red LED key) Page 34
+ Set volume louder and contrast darker Page 126
18
Getting to know your OpenStage phone
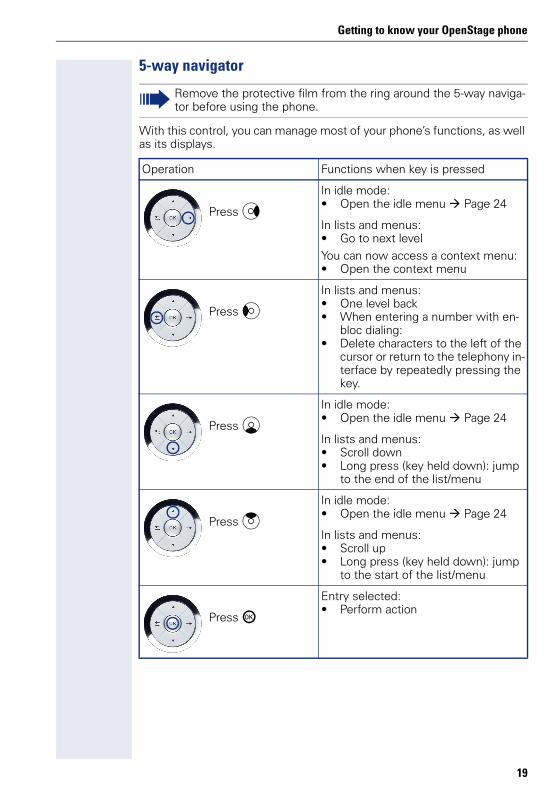
5-way navigator
With this control, you can manage most of your phone’s functions, as well as its displays.
Remove the protective film from the ring around the 5-way naviga-tor before using the phone.
Operation Functions when key is pressed
Press cIn idle mode:• Open the idle menu Page 24
In lists and menus:• Go to next level
You can now access a context menu:• Open the context menu
Press aIn lists and menus:• One level back• When entering a number with en-
bloc dialing: • Delete characters to the left of the
cursor or return to the telephony in-terface by repeatedly pressing the key.
Press dIn idle mode:• Open the idle menu Page 24
In lists and menus:• Scroll down• Long press (key held down): jump
to the end of the list/menu
Press bIn idle mode:• Open the idle menu Page 24
In lists and menus:• Scroll up• Long press (key held down): jump
to the start of the list/menu
Press iEntry selected:• Perform action
19
Getting to know your OpenStage phone
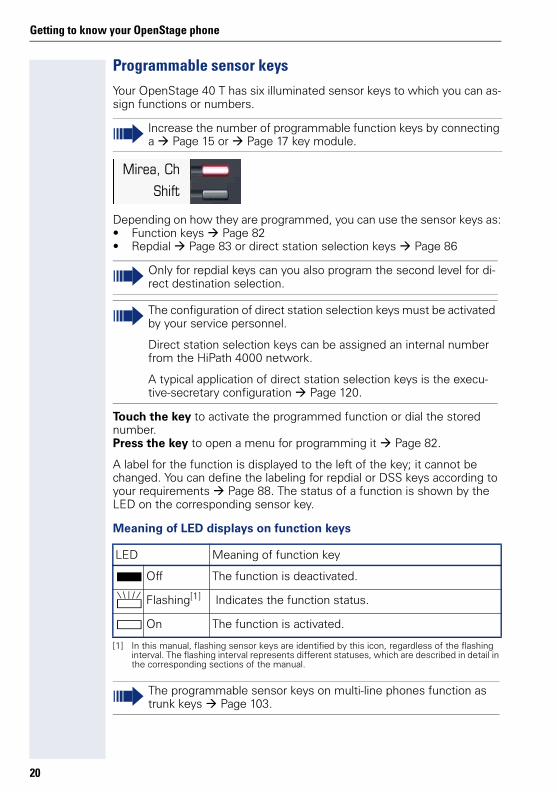
Programmable sensor keysYour OpenStage 40 T has six illuminated sensor keys to which you can as-sign functions or numbers.
Depending on how they are programmed, you can use the sensor keys as:• Function keys Page 82• Repdial Page 83 or direct station selection keys Page 86
Touch the key to activate the programmed function or dial the stored number. Press the key to open a menu for programming it Page 82.
A label for the function is displayed to the left of the key; it cannot be changed. You can define the labeling for repdial or DSS keys according to your requirements Page 88. The status of a function is shown by the LED on the corresponding sensor key.
Meaning of LED displays on function keys
Increase the number of programmable function keys by connecting a Page 15 or Page 17 key module.
Only for repdial keys can you also program the second level for di-rect destination selection.
The configuration of direct station selection keys must be activated by your service personnel.
Direct station selection keys can be assigned an internal number from the HiPath 4000 network.
A typical application of direct station selection keys is the execu-tive-secretary configuration Page 120.
LED Meaning of function key
S Off The function is deactivated.
T Flashing[1]
[1] In this manual, flashing sensor keys are identified by this icon, regardless of the flashing interval. The flashing interval represents different statuses, which are described in detail in the corresponding sections of the manual.
Indicates the function status.
R On The function is activated.
The programmable sensor keys on multi-line phones function as trunk keys Page 103.
Mirea, Ch
Shift
20
Getting to know your OpenStage phone
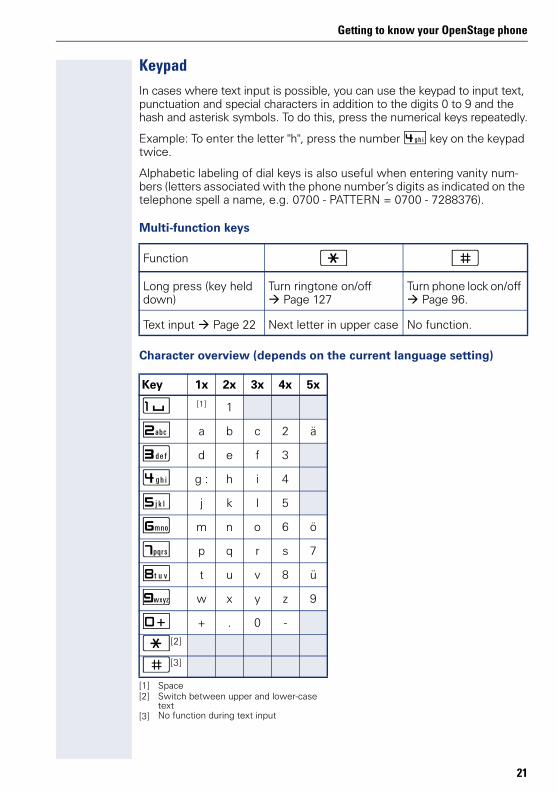
KeypadIn cases where text input is possible, you can use the keypad to input text, punctuation and special characters in addition to the digits 0 to 9 and the hash and asterisk symbols. To do this, press the numerical keys repeatedly.
Example: To enter the letter "h", press the number 4 key on the keypad twice.
Alphabetic labeling of dial keys is also useful when entering vanity num-bers (letters associated with the phone number’s digits as indicated on the telephone spell a name, e.g. 0700 - PATTERN = 0700 - 7288376).
Multi-function keys
Character overview (depends on the current language setting)
Function ) (Long press (key held down)
Turn ringtone on/off Page 127
Turn phone lock on/off Page 96.
Text input Page 22 Next letter in upper case No function.
Key 1x 2x 3x 4x 5x
1 [1]
[1] Space
1
2 a b c 2 ä
3 d e f 3
4 g : h i 4
5 j k l 5
6 m n o 6 ö
7 p q r s 7
8 t u v 8 ü
9 w x y z 9
0 + . 0 -
)[2]
[2] Switch between upper and lower-case text
([3]
[3] No function during text input
21
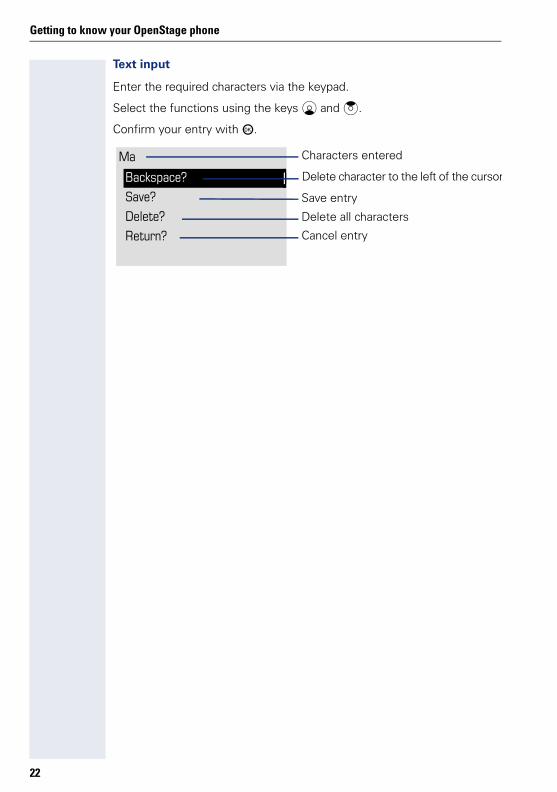
Getting to know your OpenStage phone
Text input
Enter the required characters via the keypad.
Select the functions using the keys d and b.
Confirm your entry with i.
Delete?
Backspace?
Save?
Return?
Characters entered
Save entry
Delete all characters
Cancel entry
MaDelete character to the left of the cursor
22
Getting to know your OpenStage phone
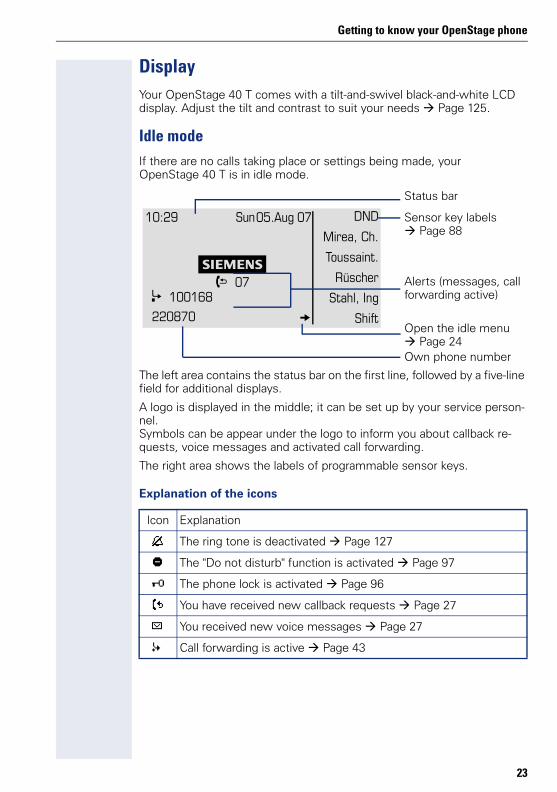
DisplayYour OpenStage 40 T comes with a tilt-and-swivel black-and-white LCD display. Adjust the tilt and contrast to suit your needs Page 125.
Idle modeIf there are no calls taking place or settings being made, your OpenStage 40 T is in idle mode.
The left area contains the status bar on the first line, followed by a five-line field for additional displays.
A logo is displayed in the middle; it can be set up by your service person-nel.Symbols can be appear under the logo to inform you about callback re-quests, voice messages and activated call forwarding.
The right area shows the labels of programmable sensor keys.
Explanation of the icons
Icon Explanation
The ring tone is deactivated Page 127
The "Do not disturb" function is activated Page 97
The phone lock is activated Page 96
You have received new callback requests Page 27
You received new voice messages Page 27
Call forwarding is active Page 43
L 07
10:29 Sun
S
K 100168
220870 g
DND
Mirea, Ch.
Toussaint.
Rüscher
Stahl, Ing
Shift
Status bar
Sensor key labels Page 88
Alerts (messages, call forwarding active)
Own phone number
Open the idle menuPage 24
05.Aug 07
23
Getting to know your OpenStage phone
Idle menu
When in idle mode, press a key on the 5-way navigator Page 19 to dis-play the idle menu. You can call up various functions here. Entries may vary.
The idle menu may contain the following entries:• Unanswered calls?[1]
• Incoming calls?[1]
• Outgoing calls?[1]
• Deact call forwarding?[2]
• Act. FWD-FIXED?[3]
• Act. FWD-VAR-ALL-BOTH?• Direct call pickup?• Display callbacks?[4]
• Program/Service?
[1] This appears as an option if entries are available.[2] This appears as an option if fixed or variable call forwarding is activated.[3] This appears as an option if a phone number is saved for fixed call forwarding.[4] This appears as an option if a callback is saved.
24
Getting to know your OpenStage phone
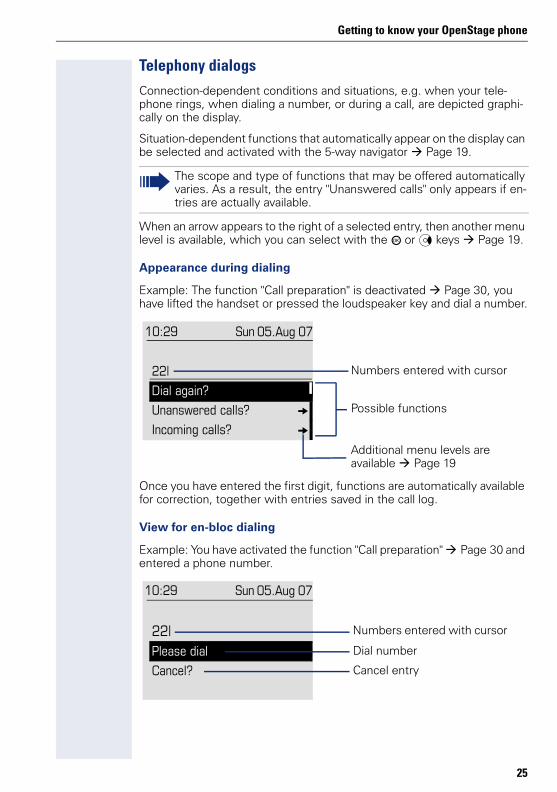
Telephony dialogsConnection-dependent conditions and situations, e.g. when your tele-phone rings, when dialing a number, or during a call, are depicted graphi-cally on the display.
Situation-dependent functions that automatically appear on the display can be selected and activated with the 5-way navigator Page 19.
When an arrow appears to the right of a selected entry, then another menu level is available, which you can select with the i or c keys Page 19.
Appearance during dialing
Example: The function "Call preparation" is deactivated Page 30, you have lifted the handset or pressed the loudspeaker key and dial a number.
Once you have entered the first digit, functions are automatically available for correction, together with entries saved in the call log.
View for en-bloc dialing
Example: You have activated the function "Call preparation" Page 30 and entered a phone number.
The scope and type of functions that may be offered automatically varies. As a result, the entry "Unanswered calls" only appears if en-tries are actually available.
Dial again?
22|
Unanswered calls? g
Incoming calls? g
Numbers entered with cursor
Possible functions
Additional menu levels are available Page 19
10:29 Sun 05.Aug 07
Please dial
22|
Cancel?
Numbers entered with cursor
Dial number
Cancel entry
10:29 Sun 05.Aug 07
25
Getting to know your OpenStage phone
Appearance during an ongoing call
Example: You are connected with a caller.
Appearance during multi-line operation
Example: You have pressed a line key.
Once you have pressed a line key, saved number redial functions are auto-matically available.
Icons for frequent call states
Icon Explanation
The call is active.
The call has been disconnected.
You have placed the call on hold (e.g. consultation hold).
Your call partner has placed the call on hold.
Detailed descriptions of the various functions can be found in the sections "Making calls – basic functions" Page 33 and "Making calls – enhanced phone functions" Page 52.
Start transfer?
Smith Michael 3:16
100168
Consultation?
Save number?
Direct call pickup?
Icon indicating call status
Call duration
Current connection
Options relevant to situation; scroll bar shows that more op-tions are available.
Last number redial?
Saved number redial?
Unanswered calls? g
Selected (used) line
Possible functions
Additional menu levels are available Page 19
220807
10:29 Sun 05.Aug 07
active
26

Getting to know your OpenStage phone
MailboxDepending on your communication platform and its configuration (contact your service personnel), you can use the mailbox key to access received callback requests and messages from services such as HiPath Xpressions.The following messages are saved:• Callback requests• Voicemail
Messages (callback requests)New messages, or messages that have not yet been processed are sig-naled as follows:• O The key LED lights up.• In idle mode, the display shows the symbol L and the number of new
messages.• When the handset is lifted and the speaker key pressed, you hear an
acoustic announcement (announcement text).
To access the menu: Press the mailbox key O. The newest entry is dis-played.
Example:
VoicemailPress the mailbox key O.If your system is appropriately configured, you can call the voice mailbox directly and immediately play back the stored messages.
These announcements remain active until all messages have been viewed or deleted.
For a description of how to edit the entries Page 50.
New voicemails that have not been played back fully cannot be de-leted. To mark a message as "played back", jump with 66 to the end of the message.
Time and date
Delete?
100168 PETER Call N
Sun 16:25
Call originator?
Next entry?
Cancel?
Caller ID
Possible functions
Type of message
05.Aug
27
Getting to know your OpenStage phone
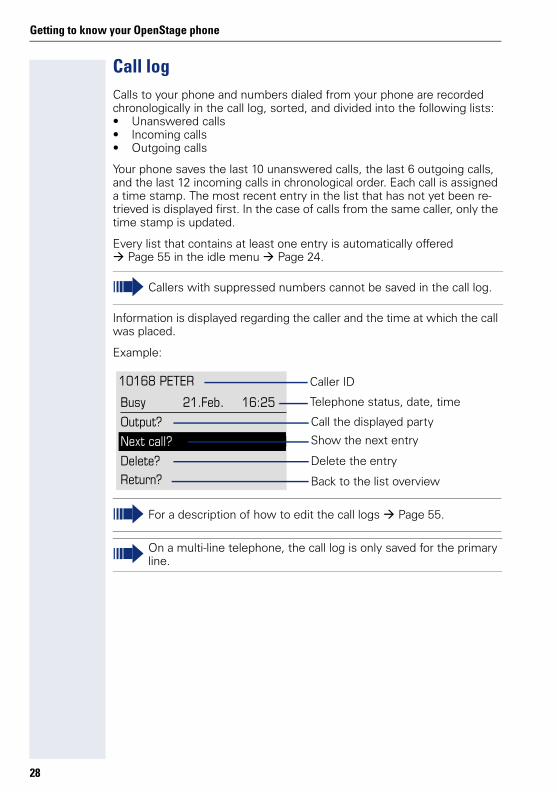
Call logCalls to your phone and numbers dialed from your phone are recorded chronologically in the call log, sorted, and divided into the following lists:• Unanswered calls• Incoming calls• Outgoing calls
Your phone saves the last 10 unanswered calls, the last 6 outgoing calls, and the last 12 incoming calls in chronological order. Each call is assigned a time stamp. The most recent entry in the list that has not yet been re-trieved is displayed first. In the case of calls from the same caller, only the time stamp is updated.
Every list that contains at least one entry is automatically offered Page 55 in the idle menu Page 24.
Information is displayed regarding the caller and the time at which the call was placed.
Example:
Callers with suppressed numbers cannot be saved in the call log.
For a description of how to edit the call logs Page 55.
On a multi-line telephone, the call log is only saved for the primary line.
Next call?
10168 PETER
Busy 21.Feb. 16:25
Output?
Delete?Return?
Call the displayed party
Show the next entry
Delete the entry
Back to the list overview
Telephone status, date, time
Caller ID
28
Getting to know your OpenStage phone
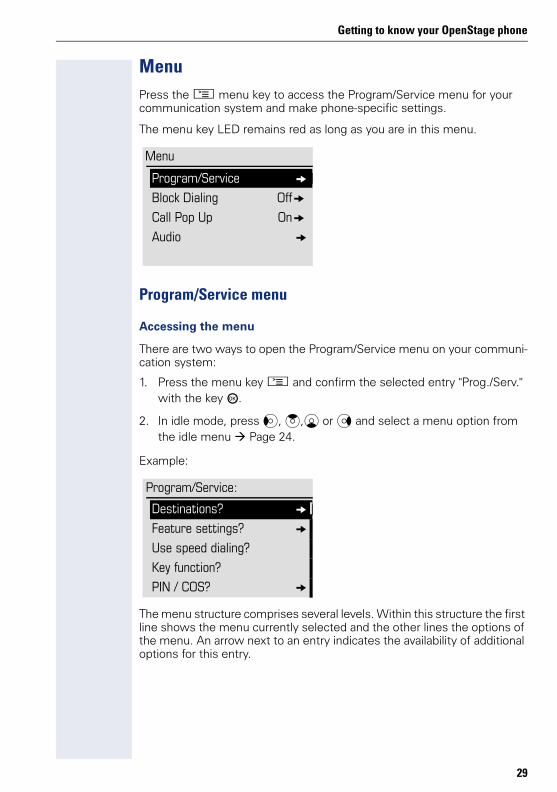
Menu Press the N menu key to access the Program/Service menu for your communication system and make phone-specific settings.
The menu key LED remains red as long as you are in this menu.
Program/Service menu
Accessing the menu
There are two ways to open the Program/Service menu on your communi-cation system:
1. Press the menu key N and confirm the selected entry "Prog./Serv." with the key i.
2. In idle mode, press a, b,d or c and select a menu option from the idle menu Page 24.
Example:
The menu structure comprises several levels. Within this structure the first line shows the menu currently selected and the other lines the options of the menu. An arrow next to an entry indicates the availability of additional options for this entry.
Call Pop Up On g
Menu
Program/Service g
Block Dialing Off g
Audio g
Feature settings? g
Use speed dialing?
Program/Service:
Destinations? g
Key function?
PIN / COS? g
29
Getting to know your OpenStage phone
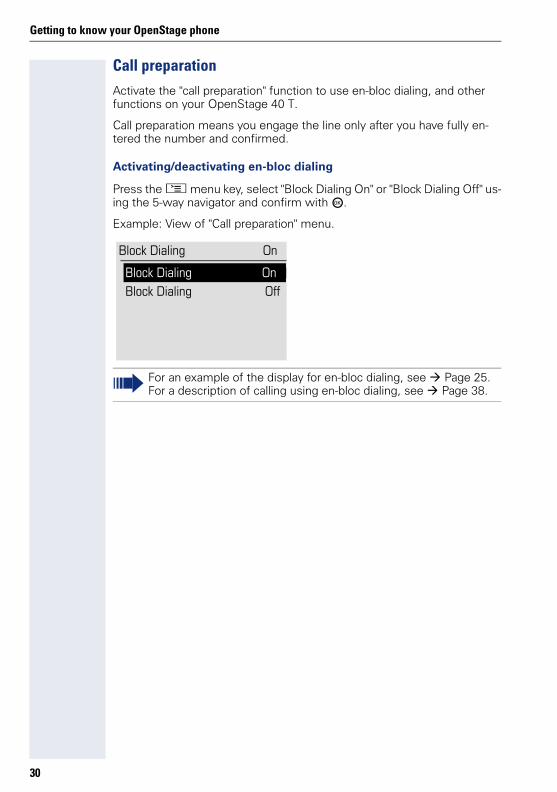
Call preparation Activate the "call preparation" function to use en-bloc dialing, and other functions on your OpenStage 40 T.
Call preparation means you engage the line only after you have fully en-tered the number and confirmed.
Activating/deactivating en-bloc dialing
Press the N menu key, select "Block Dialing On" or "Block Dialing Off" us-ing the 5-way navigator and confirm with i.
Example: View of "Call preparation" menu.
For an example of the display for en-bloc dialing, see Page 25.For a description of calling using en-bloc dialing, see Page 38.
Block Dialing On
Block Dialing OnBlock Dialing Off
30
Getting to know your OpenStage phone
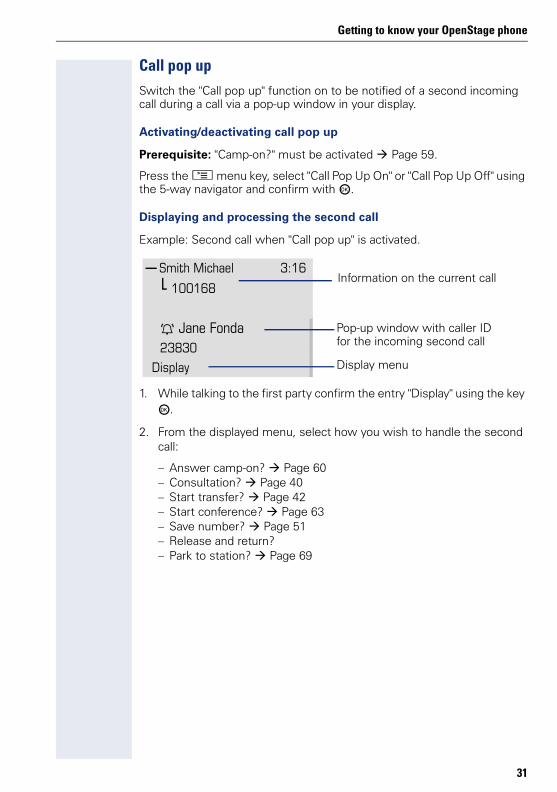
Call pop upSwitch the "Call pop up" function on to be notified of a second incoming call during a call via a pop-up window in your display.
Activating/deactivating call pop up
Prerequisite: "Camp-on?" must be activated Page 59.
Press the N menu key, select "Call Pop Up On" or "Call Pop Up Off" using the 5-way navigator and confirm with i.
Displaying and processing the second call
Example: Second call when "Call pop up" is activated.
1. While talking to the first party confirm the entry "Display" using the key i.
2. From the displayed menu, select how you wish to handle the second call:
– Answer camp-on? Page 60– Consultation? Page 40– Start transfer? Page 42– Start conference? Page 63– Save number? Page 51– Release and return?– Park to station? Page 69
Y Jane Fonda
Smith Michael 3:16
100168
23830
Display
Information on the current call
Pop-up window with caller ID for the incoming second call
Display menu
31
Getting to know your OpenStage phone
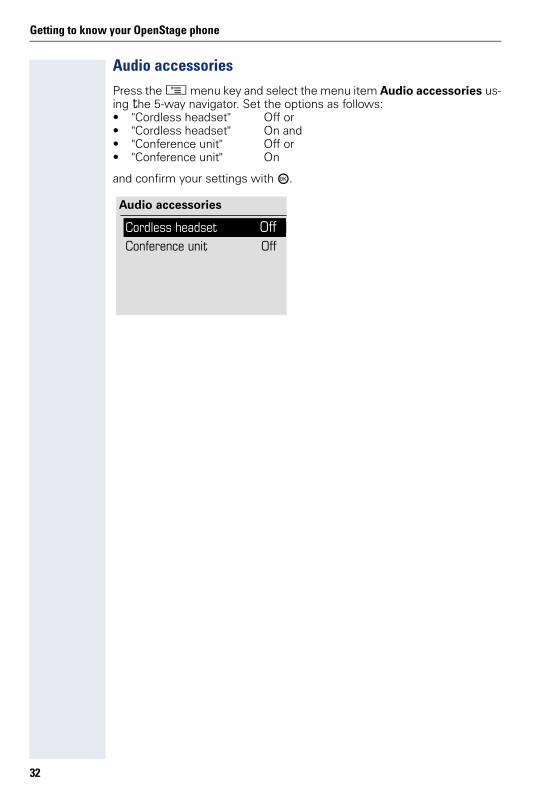
Audio accessoriesPress the N menu key and select the menu item Audio accessories us-ing the 5-way navigator. Set the options as follows:• "Cordless headset" Off or• "Cordless headset" On and • "Conference unit" Off or• "Conference unit" On
and confirm your settings with i.
Audio accessories
Cordless headset OffConference unit Off
32
Basic functions
Step by step
Basic functions
Answering a call
Answering a call via the handset
The phone rings. The caller is displayed.
^ Lift the handset.
if nec. + or - Set the call volume.
Answering a call via the loudspeaker (speakerphone mode)
The phone rings. The caller is displayed.
n Press the key shown. The LED lights up.
The speakerphone function is activated.
if nec. + or - Set the call volume.
Suggestions for using speakerphone mode:• Tell the other party that speakerphone mode is ac-
tive.• Adjust the call volume while speakerphone mode is
active.• The ideal distance between the user and the phone
in speakerphone mode is 50 cm.
Please read the introductory chapter "Getting to know your OpenStage phone" Page 13 care-fully before performing any of the steps de-scribed here on your phone.
An incoming call will cancel any ongoing tele-phone setting operations. The phone automati-cally returns to the point in the menu structure where you were interrupted as soon as the call ends.
33
Step by step
Basic functions
Accepting calls via the headset
Prerequisite: A headset is connected.
The phone rings. The o key flashes.
o Press the key shown.
if nec. + or - Set the call volume.
Switching to speakerphone modePeople present in the room can participate in your call.
Prerequisite: You are conducting a call via the handset.
n] Hold down the key and replace the handset. Then re-lease the key and proceed with your call.
if nec. + or - Set the call volume.
U.S. mode
If your communication system is set to U.S. mode (con-tact your service personnel), you do not have to hold down the speaker key when replacing the handset when switching to speakerphone mode.
n Press the key shown.
] Replace the handset. Proceed with your call.
if nec. + or - Set the call volume.
Make sure your headset port is set up properly Seite 32.
34
Basic functions
Step by step
Switching to the handset
Prerequisite: You are conducting a call in speaker-phone mode.
^ Lift the handset.
n The key shown goes out.
Open listeningPeople present in the room can silently monitor your call.
Prerequisite: You are conducting a call via the handset.
Activating
n Press the key shown.
Deactivating
n Press the lit key.
35
Step by step
Basic functions
Turning the microphone on and offTo prevent the other party from listening in while you consult with someone in your office, you can temporari-ly switch off the handset microphone or the handsfree microphone.
Prerequisite: You are conducting a call.
Deactivating the microphone
p Press the key shown.
Activating the microphone
p Press the lit key.
Ending a call
s Press the key shown.or
n Press the lit key.or
\ Replace the handset.
36
Basic functions
Step by step
Making calls
Off-hook dialing
^ Lift the handset.
j Internal calls: Enter the station number.External calls: Enter the external code and the station number.
The connection is set up as soon as your input is com-plete.
Dialing in speakerphone mode
j Internal calls: Enter the station number.External calls: Enter the external code and the station number.
n The speaker key lights up.
The party you are calling answers via loudspeaker.
You can also use speakerphone mode.
Dialing with the headset connected
Prerequisite: The headset is connected.j Internal calls: Enter the station number.
External calls: Enter the external code and the station number.
o The headset key lights up.
The connection is set up as soon as your input is com-plete.
Make sure your headset port is set up properly Seite 32.
37
Step by step
Basic functions
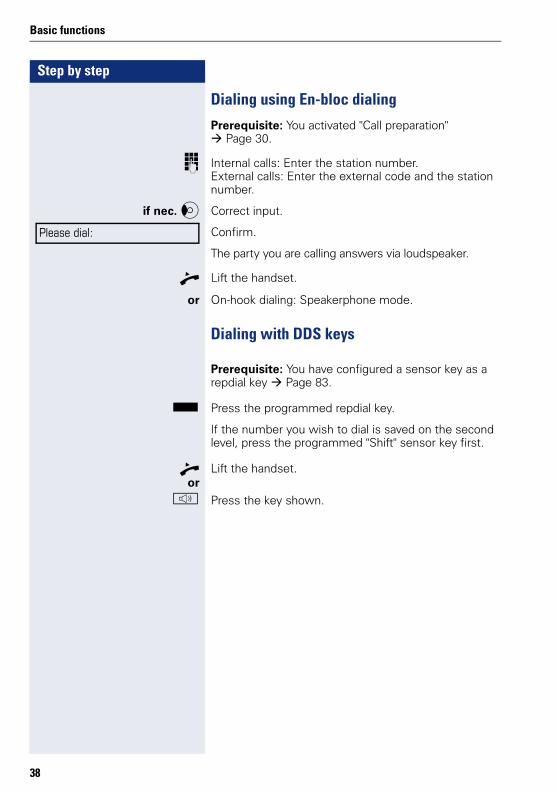
Dialing using En-bloc dialing
Prerequisite: You activated "Call preparation" Page 30.
j Internal calls: Enter the station number.External calls: Enter the external code and the station number.
if nec. a Correct input.
Confirm.
The party you are calling answers via loudspeaker.
^ Lift the handset.
or On-hook dialing: Speakerphone mode.
Dialing with DDS keys
Prerequisite: You have configured a sensor key as a repdial key Page 83.
S Press the programmed repdial key.
If the number you wish to dial is saved on the second level, press the programmed "Shift" sensor key first.
^ Lift the handset.or
n Press the key shown.
Please dial:
38
Basic functions
Step by step
Redialing a number (last dialed number)The last phone number dialed on your telephone is di-aled.
Redial key
, Press the key shown.
n The key lights up. Speakerphone mode.
or
^ Lift the handset.
Redialing from the menu
^ Lift the handset.
or
n Press the key shown.
Confirm.Last number redial?
On a multi-line phone, the last number dialed on the primary line is always saved.
39

Step by step
Basic functions
Redialing a number (saved number)
Prerequisite: You have saved a phone number Page 51.
^ Lift the handset.
or
n Press the key shown.
Select and confirm the option shown.
The saved phone number is dialed.
Calling a second party (consultation)You can call a second party while a call is in progress. The connection to the first party is placed on hold.
Prerequisite: You are conducting a call.
Confirm.
j Enter and confirm the second party’s phone number.
Ending a consultation call
Confirm.
The consultation call is disconnected. The call with the first party is resumed.
Saved number redial?
Consultation?
Release and return?
40
Basic functions
Step by step
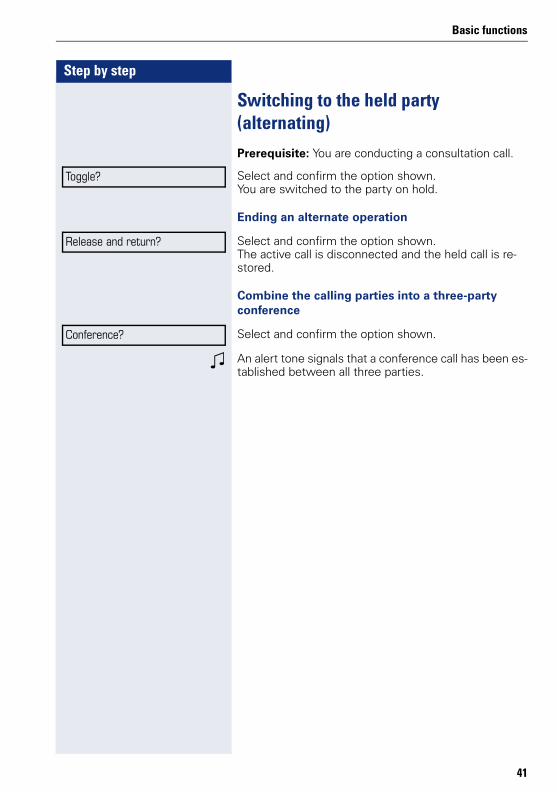
Switching to the held party (alternating)
Prerequisite: You are conducting a consultation call.
Select and confirm the option shown.You are switched to the party on hold.
Ending an alternate operation
Select and confirm the option shown.The active call is disconnected and the held call is re-stored.
Combine the calling parties into a three-party conference
Select and confirm the option shown.
Z An alert tone signals that a conference call has been es-tablished between all three parties.
Toggle?
Release and return?
Conference?
41
Step by step
Basic functions
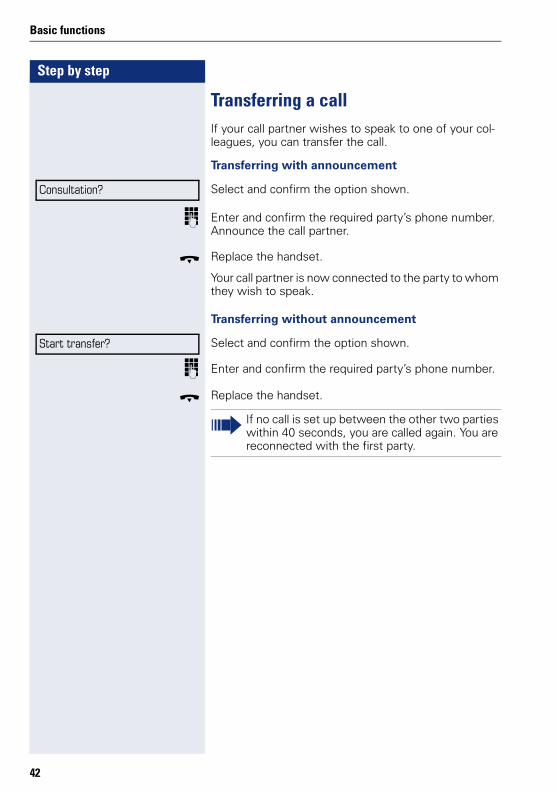
Transferring a callIf your call partner wishes to speak to one of your col-leagues, you can transfer the call.
Transferring with announcement
Select and confirm the option shown.
j Enter and confirm the required party’s phone number. Announce the call partner.
\ Replace the handset.
Your call partner is now connected to the party to whom they wish to speak.
Transferring without announcement
Select and confirm the option shown.
j Enter and confirm the required party’s phone number.
\ Replace the handset.
Consultation?
Start transfer?
If no call is set up between the other two parties within 40 seconds, you are called again. You are reconnected with the first party.
42
Basic functions
Step by step
Call forwarding
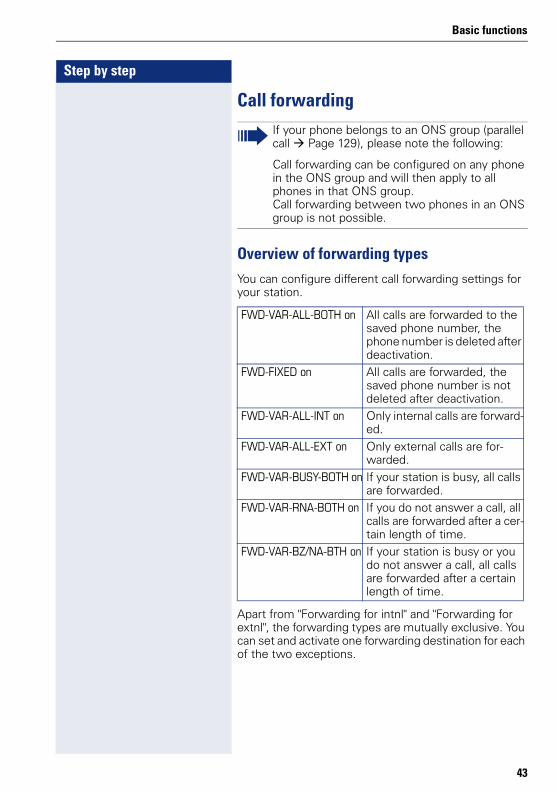
Overview of forwarding typesYou can configure different call forwarding settings for your station.
Apart from "Forwarding for intnl" and "Forwarding for extnl", the forwarding types are mutually exclusive. You can set and activate one forwarding destination for each of the two exceptions.
If your phone belongs to an ONS group (parallel call Page 129), please note the following:
Call forwarding can be configured on any phone in the ONS group and will then apply to all phones in that ONS group.Call forwarding between two phones in an ONS group is not possible.
FWD-VAR-ALL-BOTH on All calls are forwarded to the saved phone number, the phone number is deleted after deactivation.
FWD-FIXED on All calls are forwarded, the saved phone number is not deleted after deactivation.
FWD-VAR-ALL-INT on Only internal calls are forward-ed.
FWD-VAR-ALL-EXT on Only external calls are for-warded.
FWD-VAR-BUSY-BOTH on If your station is busy, all calls are forwarded.
FWD-VAR-RNA-BOTH on If you do not answer a call, all calls are forwarded after a cer-tain length of time.
FWD-VAR-BZ/NA-BTH on If your station is busy or you do not answer a call, all calls are forwarded after a certain length of time.
43
Step by step
Basic functions
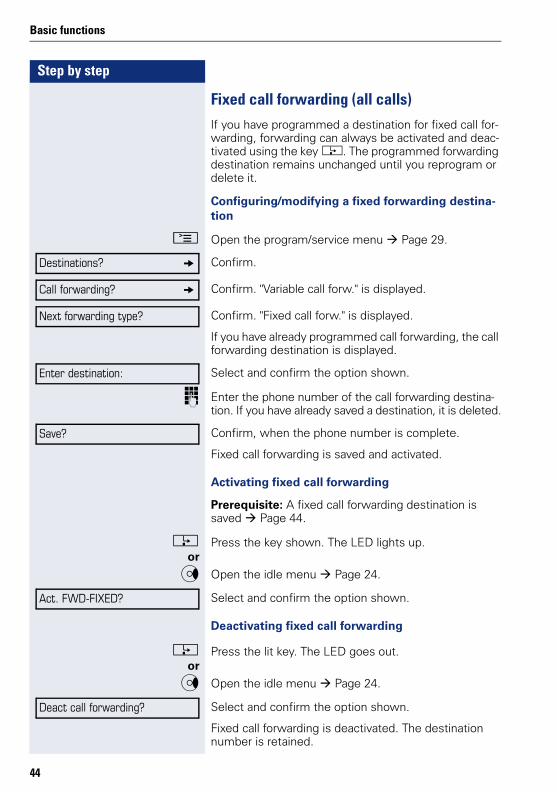
Fixed call forwarding (all calls)If you have programmed a destination for fixed call for-warding, forwarding can always be activated and deac-tivated using the key r. The programmed forwarding destination remains unchanged until you reprogram or delete it.
Configuring/modifying a fixed forwarding destina-tion
N Open the program/service menu Page 29.
Confirm.
Confirm. "Variable call forw." is displayed.
Confirm. "Fixed call forw." is displayed.
If you have already programmed call forwarding, the call forwarding destination is displayed.
Select and confirm the option shown.
j Enter the phone number of the call forwarding destina-tion. If you have already saved a destination, it is deleted.
Confirm, when the phone number is complete.
Fixed call forwarding is saved and activated.
Activating fixed call forwarding
Prerequisite: A fixed call forwarding destination is saved Page 44.
r Press the key shown. The LED lights up.or
c Open the idle menu Page 24.
Select and confirm the option shown.
Deactivating fixed call forwarding
r Press the lit key. The LED goes out.or
c Open the idle menu Page 24.
Select and confirm the option shown.
Fixed call forwarding is deactivated. The destination number is retained.
Destinations? g
Call forwarding? g
Next forwarding type?
Enter destination:
Save?
Act. FWD-FIXED?
Deact call forwarding?
44
Basic functions
Step by step
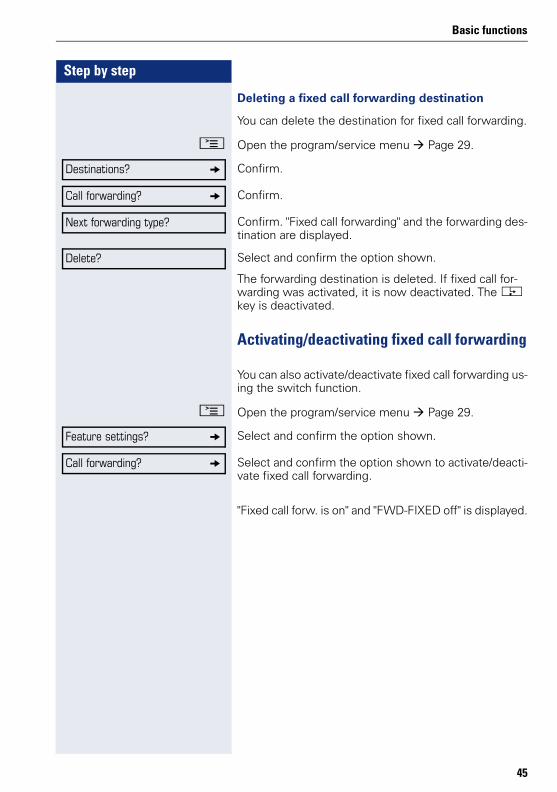
Deleting a fixed call forwarding destination
You can delete the destination for fixed call forwarding.
N Open the program/service menu Page 29.
Confirm.
Confirm.
Confirm. "Fixed call forwarding" and the forwarding des-tination are displayed.
Select and confirm the option shown.
The forwarding destination is deleted. If fixed call for-warding was activated, it is now deactivated. The r key is deactivated.
Activating/deactivating fixed call forwarding
You can also activate/deactivate fixed call forwarding us-ing the switch function.
N Open the program/service menu Page 29.
Select and confirm the option shown.
Select and confirm the option shown to activate/deacti-vate fixed call forwarding.
"Fixed call forw. is on" and "FWD-FIXED off" is displayed.
Destinations? g
Call forwarding? g
Next forwarding type?
Delete?
Feature settings? g
Call forwarding? g
45

Step by step
Basic functions
Variable call forwarding (all calls)In the case of variable call forwarding, programming a forwarding destination activates call forwarding for all calls. If call forwarding is deactivated, the forwarding destination is deleted at the same time.
Configuring and activating variable call forwarding
c Open the idle menu Page 24.
Select and confirm the option shown.
or
N Open the program/service menu Page 29.
Confirm.
Confirm.
"Variable call forw." is displayed.
Select and confirm the option shown.
j Enter the phone number of the call forwarding destina-tion.
Confirm, when the phone number is complete.
Call forwarding is saved and activated.
Deactivating variable call forwarding
r Press the lit key. The LED goes out.or
c Open the idle menu Page 24.
Select and confirm the option shown.
Call forwarding is deactivated. The destination number is deleted.
Act. FWD-VAR-ALL-BOTH?
Destinations? g
Call forwarding? g
Enter destination:
Save?
If you enter a cross-system number, you must complete your entry by pressing (.
Deact call forwarding?
46
Basic functions
Step by step
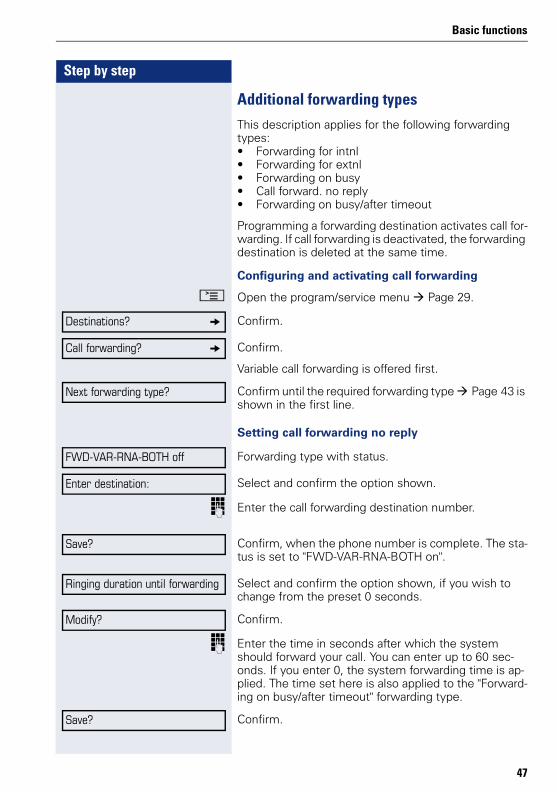
Additional forwarding typesThis description applies for the following forwarding types:• Forwarding for intnl• Forwarding for extnl• Forwarding on busy• Call forward. no reply• Forwarding on busy/after timeout
Programming a forwarding destination activates call for-warding. If call forwarding is deactivated, the forwarding destination is deleted at the same time.
Configuring and activating call forwarding
N Open the program/service menu Page 29.
Confirm.
Confirm.
Variable call forwarding is offered first.
Confirm until the required forwarding type Page 43 is shown in the first line.
Setting call forwarding no reply
Forwarding type with status.
Select and confirm the option shown.
j Enter the call forwarding destination number.
Confirm, when the phone number is complete. The sta-tus is set to "FWD-VAR-RNA-BOTH on".
Select and confirm the option shown, if you wish to change from the preset 0 seconds.
Confirm.
j Enter the time in seconds after which the system should forward your call. You can enter up to 60 sec-onds. If you enter 0, the system forwarding time is ap-plied. The time set here is also applied to the "Forward-ing on busy/after timeout" forwarding type.
Confirm.
Destinations? g
Call forwarding? g
Next forwarding type?
FWD-VAR-RNA-BOTH off
Enter destination:
Save?
Ringing duration until forwarding
Modify?
Save?
47
Step by step
Basic functions
Deactivating variable call forwarding
For "Call forwarding for internal" and "Call forwarding for external":
r Press the lit key. The LED goes out.
For all other forwarding types:
c Open the idle menu Page 24.
Select and confirm the option shown.
Call forwarding is deactivated and the destination num-ber is deleted.
DisplaysIn idle mode ( Page 23), the following signals remind you that call forwarding is activated:
Fixed/variable call forwarding
r The LED lights up.
The call forwarding icon and the phone number or, if necessary, the name of the forwarding destination are shown.
Call forwarding for internal/external
r The LED lights up.
Only the call forwarding icon is displayed.
Deact call forwarding?
Call forwarding can also be preconfigured in the system Page 76.
K 100168
KThere is no display message for the call forward-ing types "Busy", "No answer" and "Busy/no an-swer". The LED key does not light up.
48
Basic functions
Step by step
Using callback
Storing a callback
Prerequisite: The internal station called is busy or no-body answers.
Confirm.
Accepting a callback
Prerequisite: The internal station called was busy. You have saved a callback.
Z Your telephone rings.
^ Lift the handset. You hear a ring tone.or
n Press the key shown. You hear a ring tone.
Cancel call backs
Confirm.
or Do not answer the call. After ringing four times, the call-back is canceled.
If your phone belongs to an ONS group (parallel call Page 129), please note the following:Callback on busy is only signaled on the busy phone, not in the whole ONS group.Callback on no reply is entered in the mailbox ( Page 27) on all internal system phones in an ONS group.
Callback?
If the called party was busy, the callback is auto-matic.
If the called party did not answer, a message is left in the called party’s mailbox.
If the party has activated call forwarding ( Page 43), you will receive the callback from the call forwarding destination.
Cancel callback?
49
Step by step
Basic functions
Responding to a callback request
Prerequisite: You have received at least one callback request Page 27.
O Press the key shown.
Information regarding the caller is displayed Page 27.
Select and confirm until the required entry is displayed.
Select and confirm the option shown.
The party is called and the entry deleted from the list.
Checking/deleting a saved callback
Prerequisite: You have saved a callback Page 49.
if nec. R Press the "Callback" programmed sensor key.
or
c Open the idle menu Page 24.
Select and confirm the option shown.The newest entry is displayed first.
Select and confirm to display additional entries.
Deleting a displayed entry
Select and confirm the option shown.
Ending retrieval
N Press the key shown.or
Select and confirm the option shown.
Next entry?
Output?
Display callbacks?
Next callback?
Delete?
Cancel?
50
Basic functions
Step by step
Saving phone numbers for redial
Saving the current phone number
Prerequisite: You are conducting a call. The other par-ty’s phone number is displayed.
Select and confirm the option shown.
Saving any phone number
Prerequisite: Your phone is in idle mode Page 23.
N Open the program/service menu Page 29.
Confirm.
Select and confirm the option shown.
Confirm.
j Enter the station number.
Confirm.
This phone number is saved under the idle menu entry "Saved number redial?", and overwrites previously saved phone numbers. Dial the saved phone number from the idle menu Page 40.
Save number?
Destinations? g
Saved number redial? g
New entry?
Save?
51
Step by step
Enhanced phone functions
Enhanced phone functions
Answering calls
Accepting calls via the headset
Prerequisite: The headset is connected.
o The LED flashes when a call is received. Press the key shown. Conduct call.
Ending the call:
o Press the key shown. The LED goes out.
Answering a call via a DSS key
Prerequisite: You have configured direct station selec-tion keys on your telephone Page 20 and Page 83.
T Press the DSS key.
n The LED key lights up. You can use speakerphone mode.
or
^ Lift the handset.
Make sure your headset port is set up properly Seite 32.
For information on the meanings of the LED dis-plays of the DSS keys, see Page 20.
52
Enhanced phone functions
Step by step
Accepting a call for another member of your teamIf a team member does not answer a call within 15 sec-onds (system-dependant), the remaining team mem-bers hear an alert tone.
In idle mode
The phone rings. "Call for" is displayed on the phone.
^ T Lift the handset and press the flashing "Pickup" key. You have now picked up the call.
or T Press the flashing "Pickup" key.Speakerphone mode.
During calls
T Press the flashing "Pickup" key.The first party is placed on hold while you are connect-ed to the second party.
Ending the second call and returning to the first one
s Press the key shown.
Accepting a specific callYou hear another telephone ring and recognize the num-ber, or a colleague requests that you pick up calls for a specific phone.
^ Lift the handset.
Select and confirm the option shown.
j Enter the phone number of the phone from which you wish to pick up calls. In this way you can accept the call.
Direct call pickup?
53
Step by step
Enhanced phone functions
Displaying the called extension
If the number of the phone in a call pickup group, for which you wish to pick up a call, is not displayed (the de-fault display for call pickup groups is deactivated), you can lift the handset and enter the code for "Display on request". Contact your service personnel for this code.
^ Lift the handset.
j Enter the system code for "Display on request" (contact the relevant service personnel if necessary).
The phone number is displayed once you have entered the code.
Picking up a call in a hunt groupIf configured, you can also be reached using a hunt group phone number.
Z Your telephone rings.
^ Lift the handset.
Using the speakerphoneA colleague addresses you directly over the speaker with a speaker call. Speakerphone mode and open lis-tening are automatically activated.
n Answering via speakerphone mode is immediately pos-sible.
or ^ Lift the handset and answer the call.
Enter code!
Placing a speaker call to a colleague Page 72.
54
Enhanced phone functions
Step by step
Making calls
Making calls with a direct station selection key
Prerequisite: You have configured direct station selec-tion keys on your telephone Page 20 and Page 83.
S Press the DSS key.
^ Lift the handset.or
n Press the key and enter speakerphone mode.
Dialing a phone number from a listInformation on the features of the call log as well as a display example for an entry is provided on Page 28.
c Open the idle menu Page 24.
Select and confirm the option shown.
or
Select and confirm the option shown.
or
Select and confirm the option shown.
The latest entry in the relevant list is shown, see the ex-ample on Page 28.
For information on the meanings of the LED dis-plays of the DSS keys, see Page 20.
If your phone belongs to an ONS group (parallel call Page 129), please note the following:
A call log is maintained for all phones in an ONS group. The call log can be viewed by any internal member of the ONS group with a system tele-phone.
Unanswered calls? g
Incoming calls? g
Outgoing calls? g
55

Step by step
Enhanced phone functions
Dialing a phone number from a list
Select and confirm the option shown.
The relevant party is called.
Displaying additional calls in a list
Select and confirm the option shown.
Removing an entry from a list
Select and confirm the option shown.
Ending retrieval
Select and confirm the option shown.
orN Press the key shown.
Output?
Next call?
Delete?
Return?
56
Enhanced phone functions
Step by step
Using speed dialing
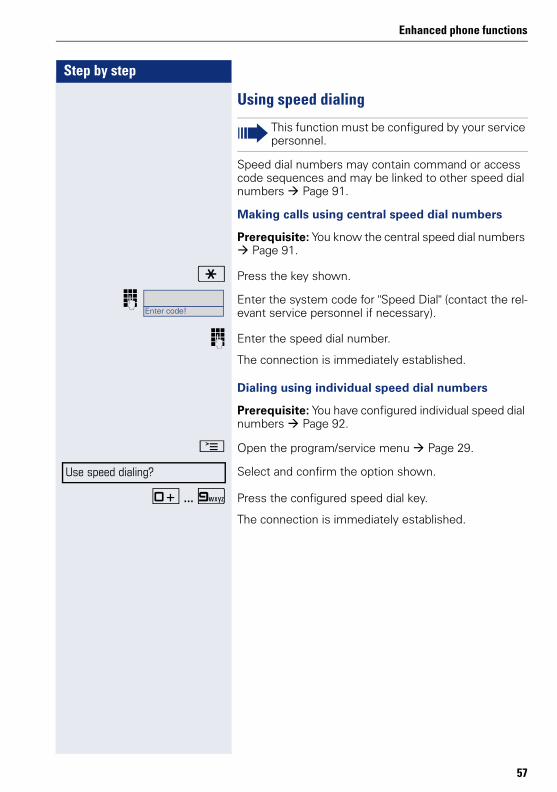
Speed dial numbers may contain command or access code sequences and may be linked to other speed dial numbers Page 91.
Making calls using central speed dial numbers
Prerequisite: You know the central speed dial numbers Page 91.
) Press the key shown.
j Enter the system code for "Speed Dial" (contact the rel-evant service personnel if necessary).
j Enter the speed dial number.
The connection is immediately established.
Dialing using individual speed dial numbers
Prerequisite: You have configured individual speed dial numbers Page 92.
N Open the program/service menu Page 29.
Select and confirm the option shown.
0 ... 9 Press the configured speed dial key.
The connection is immediately established.
This function must be configured by your service personnel.
Enter code!
Use speed dialing?
57
Step by step
Enhanced phone functions
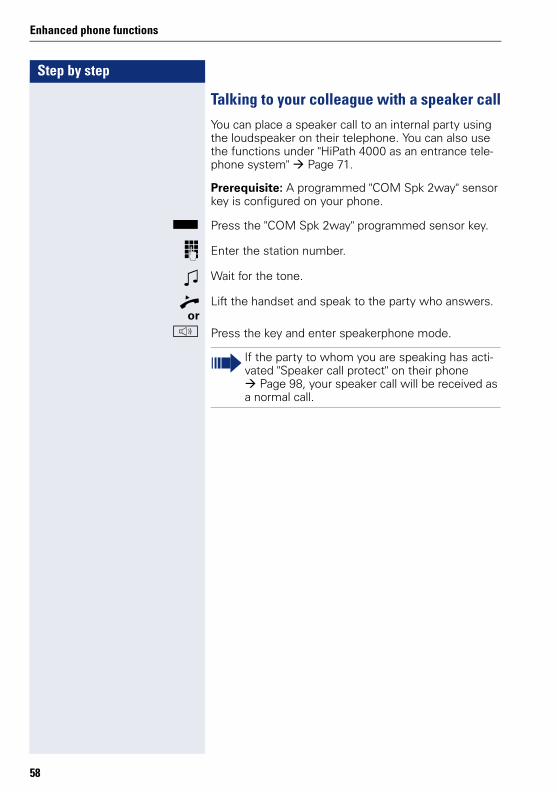
Talking to your colleague with a speaker callYou can place a speaker call to an internal party using the loudspeaker on their telephone. You can also use the functions under "HiPath 4000 as an entrance tele-phone system" Page 71.
Prerequisite: A programmed "COM Spk 2way" sensor key is configured on your phone.
S Press the "COM Spk 2way" programmed sensor key.
j Enter the station number.
Z Wait for the tone.
^ Lift the handset and speak to the party who answers.or
n Press the key and enter speakerphone mode.
If the party to whom you are speaking has acti-vated "Speaker call protect" on their phone
Page 98, your speaker call will be received as a normal call.
58
Enhanced phone functions
Step by step
During a call
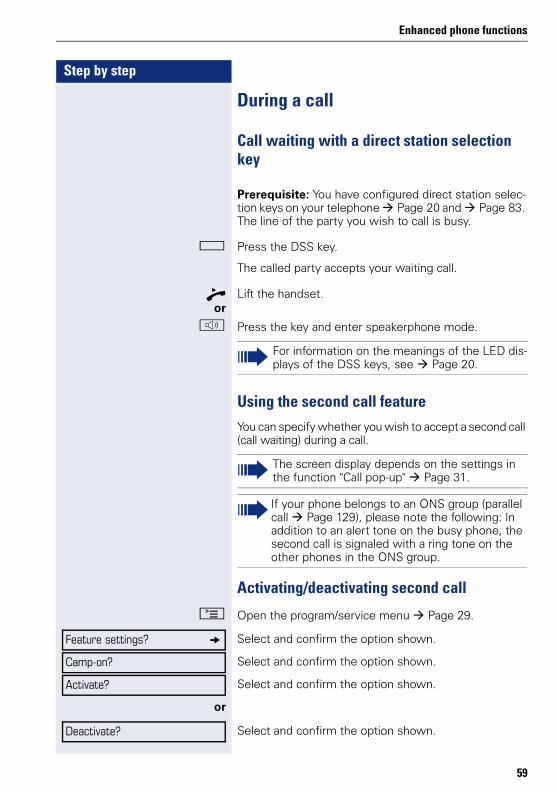
Call waiting with a direct station selection key
Prerequisite: You have configured direct station selec-tion keys on your telephone Page 20 and Page 83. The line of the party you wish to call is busy.
R Press the DSS key.
The called party accepts your waiting call.
^ Lift the handset.or
n Press the key and enter speakerphone mode.
Using the second call featureYou can specify whether you wish to accept a second call (call waiting) during a call.
Activating/deactivating second call
N Open the program/service menu Page 29.
Select and confirm the option shown.
Select and confirm the option shown.
Select and confirm the option shown.
or
Select and confirm the option shown.
For information on the meanings of the LED dis-plays of the DSS keys, see Page 20.
The screen display depends on the settings in the function "Call pop-up" Page 31.
If your phone belongs to an ONS group (parallel call Page 129), please note the following: In addition to an alert tone on the busy phone, the second call is signaled with a ring tone on the other phones in the ONS group.
Feature settings? g
Camp-on?
Activate?
Deactivate?
59
Step by step
Enhanced phone functions
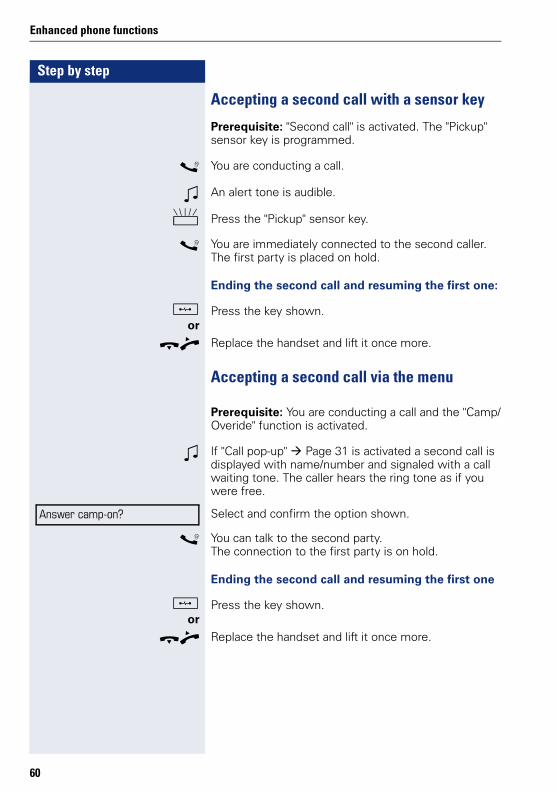
Accepting a second call with a sensor key
Prerequisite: "Second call" is activated. The "Pickup" sensor key is programmed.
[ You are conducting a call.
Z An alert tone is audible.
T Press the "Pickup" sensor key.
[ You are immediately connected to the second caller. The first party is placed on hold.
Ending the second call and resuming the first one:
s Press the key shown.or
\^ Replace the handset and lift it once more.
Accepting a second call via the menu
Prerequisite: You are conducting a call and the "Camp/Overide" function is activated.
Z If "Call pop-up" Page 31 is activated a second call is displayed with name/number and signaled with a call waiting tone. The caller hears the ring tone as if you were free.
Select and confirm the option shown.
[ You can talk to the second party.The connection to the first party is on hold.
Ending the second call and resuming the first one
s Press the key shown.or
\^ Replace the handset and lift it once more.
Answer camp-on?
60
Enhanced phone functions
Step by step
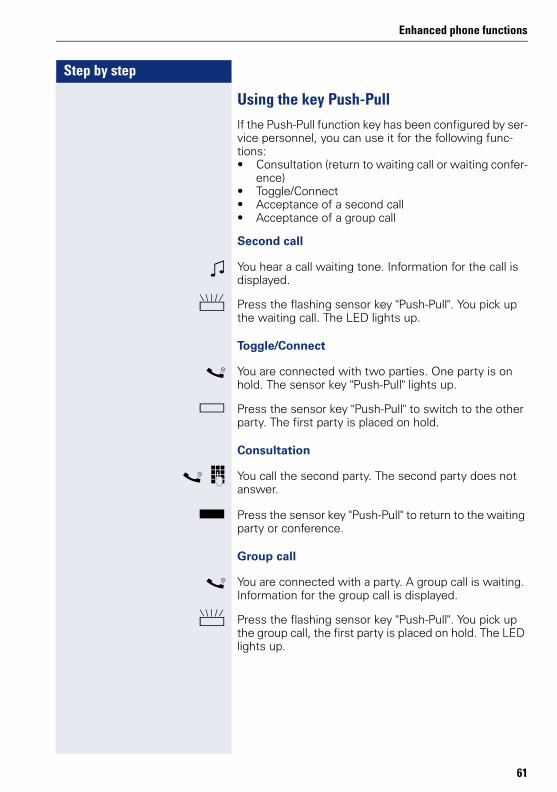
Using the key Push-Pull If the Push-Pull function key has been configured by ser-vice personnel, you can use it for the following func-tions:• Consultation (return to waiting call or waiting confer-
ence)• Toggle/Connect• Acceptance of a second call• Acceptance of a group call
Second call
Z You hear a call waiting tone. Information for the call is displayed.
T Press the flashing sensor key "Push-Pull". You pick up the waiting call. The LED lights up.
Toggle/Connect
[ You are connected with two parties. One party is on hold. The sensor key "Push-Pull" lights up.
R Press the sensor key "Push-Pull" to switch to the other party. The first party is placed on hold.
Consultation
[ j You call the second party. The second party does not answer.
S Press the sensor key "Push-Pull" to return to the waiting party or conference.
Group call
[ You are connected with a party. A group call is waiting. Information for the group call is displayed.
T Press the flashing sensor key "Push-Pull". You pick up the group call, the first party is placed on hold. The LED lights up.
61

Step by step
Enhanced phone functions
System-supported conferenceYou can include up to eight internal and external parties in a system-supported conference. Parties with system phones can perform/use all of the functions listed be-low at the same time. ISDN phones and external parties are passive participants – they can only be included in the current conference.
You can include parties and conferences from a remote system in your conference. The remote parties can es-tablish and extend their own conference. Parties in this conference are included in your current conference. However, they cannot perform/use the functions listed below.
The following functions are supported for all conference participants with system phones:
• Establishing a conference by calling a party, receiv-ing a call, conducting a consultation call or receiving a second call
• Accepting a second call and including the caller in the conference.
• Toggling between the conference and a consulta-tion call or second call
• Conducting a consultation call during a conference and connecting it to the conference
• Connecting conference participants from two inde-pendent conferences via a remote network.
• Putting the conference on hold, if line keys are con-figured.
• Obtaining an overview of all conference participants• Transferring a conference to a new party
The functions listed can be performed by all conference participants simultaneously.
62
Enhanced phone functions
Step by step
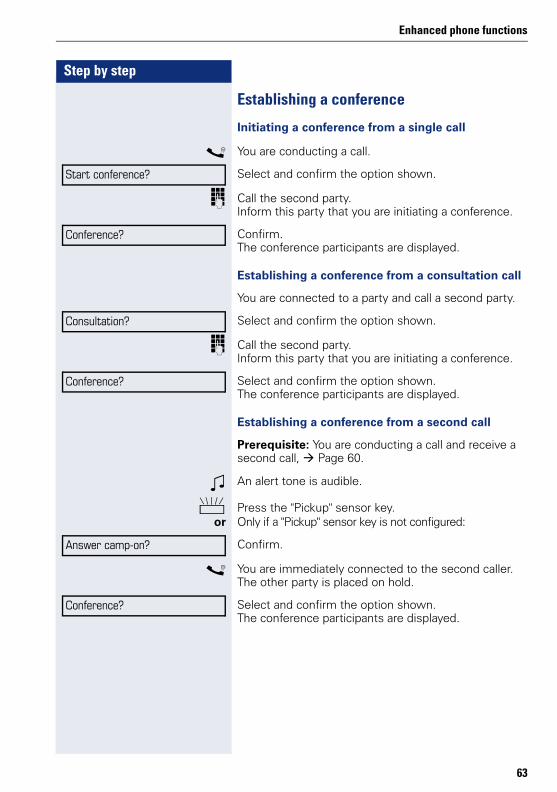
Establishing a conference
Initiating a conference from a single call
[ You are conducting a call.
Select and confirm the option shown.
j Call the second party.Inform this party that you are initiating a conference.
Confirm.The conference participants are displayed.
Establishing a conference from a consultation call
You are connected to a party and call a second party.
Select and confirm the option shown.
j Call the second party.Inform this party that you are initiating a conference.
Select and confirm the option shown.The conference participants are displayed.
Establishing a conference from a second call
Prerequisite: You are conducting a call and receive a second call, Page 60.
Z An alert tone is audible.
T Press the "Pickup" sensor key.or Only if a "Pickup" sensor key is not configured:
Confirm.
[ You are immediately connected to the second caller. The other party is placed on hold.
Select and confirm the option shown.The conference participants are displayed.
Start conference?
Conference?
Consultation?
Conference?
Answer camp-on?
Conference?
63
Step by step
Enhanced phone functions
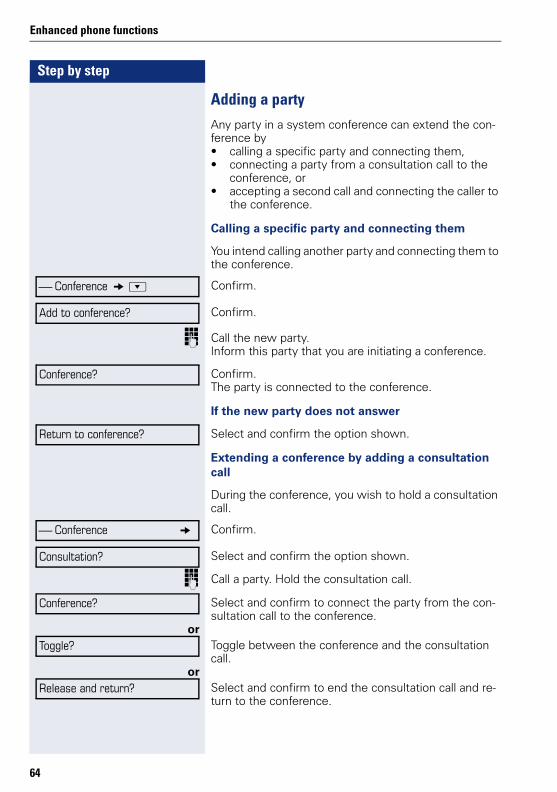
Adding a partyAny party in a system conference can extend the con-ference by • calling a specific party and connecting them,• connecting a party from a consultation call to the
conference, or• accepting a second call and connecting the caller to
the conference.
Calling a specific party and connecting them
You intend calling another party and connecting them to the conference.
Confirm.
Confirm.
j Call the new party. Inform this party that you are initiating a conference.
Confirm.The party is connected to the conference.
If the new party does not answer
Select and confirm the option shown.
Extending a conference by adding a consultation call
During the conference, you wish to hold a consultation call.
Confirm.
Select and confirm the option shown.
j Call a party. Hold the consultation call.
Select and confirm to connect the party from the con-sultation call to the conference.
orToggle between the conference and the consultation call.
orSelect and confirm to end the consultation call and re-turn to the conference.
Conference g :
Add to conference?
Conference?
Return to conference?
Conference g
Consultation?
Conference?
Toggle?
Release and return?
64

Enhanced phone functions
Step by step
Accepting a second call and connecting it to the conference
If you receive a second call during the conference Page 59, you can connect this party to the conference.
Prerequisite: You are conducting a call in a conference and receive a second call.
Z An alert tone is audible.
T Press the "Pickup" sensor key.
or Only if a "Pickup" sensor key is not configured:
Confirm.
[ You are immediately connected to the second caller. The conference participants are placed on hold.
Select and confirm to connect the second call to the conference.
Transferring a conferenceEach party can transfer the conference to a third party whom they have called via a consultation call or via the "Add to conference?" function. This party is not a partic-ipant in the conference at this point. The conference cannot be transferred to a second call.
Prerequisite: You are in a conference.
Confirm.
Select and confirm the option shown. The conference participants are placed on hold.
j Call a party.
or
Confirm.
Confirm.
j Call a party and announce the transfer.
Select and confirm the option shown.
You have left the conference.
\ Replace the handset.
Answer camp-on?
Conference?
Conference g
Consultation?
Conference g
Add to conference?
Transfer conference?
65
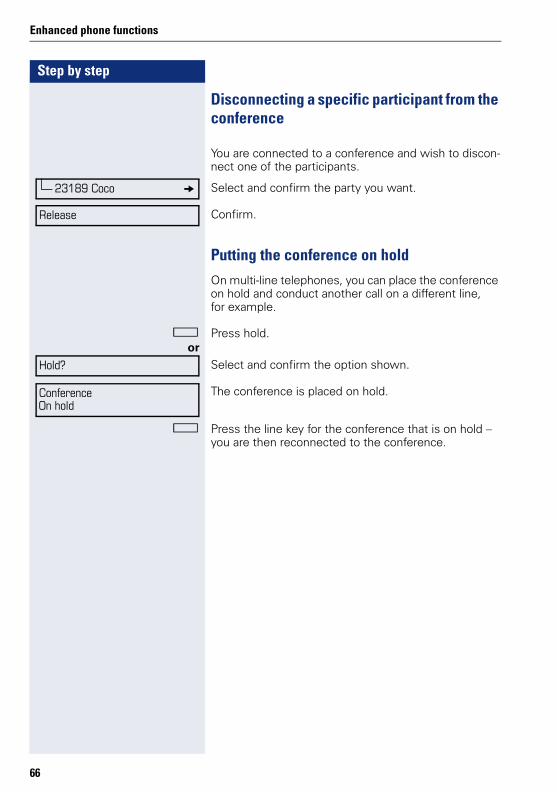
Step by step
Enhanced phone functions
Disconnecting a specific participant from the conference
You are connected to a conference and wish to discon-nect one of the participants.
Select and confirm the party you want.
Confirm.
Putting the conference on holdOn multi-line telephones, you can place the conference on hold and conduct another call on a different line, for example.
R Press hold.or
Select and confirm the option shown.
The conference is placed on hold.
R Press the line key for the conference that is on hold – you are then reconnected to the conference.
23189 Coco g
Release
Hold?
ConferenceOn hold
66
Enhanced phone functions
Step by step
Entering commands using tone dialing (DTMF suffix dialing)After dialing a phone number you can set tone dialing. This allows you to use command entries to control dual-tone multifrequency (DTMF) devices, such as answer-ing machines or attendant systems.
N Open the program/service menu Page 29.
Select and confirm the option shown.
Select and confirm the option shown.
You can now enter commands using the keys 0 - 9, the asterisk key, and the pound key.
More features? g
DTMF suffix dialing?
Ending the call also deactivates DTMF suffix dial-ing.
Depending on your system configuration, "DTMF suffix dialing?" may appear in the display once you have finished entering the number. You can then enter commands immediately after dialing the phone number.
67
Step by step
Enhanced phone functions
System-wide parkingOn HiPath 4000 systems, you can park up to ten internal and/or external calls and retrieve them on another phone.
There are two options for parking a call:• Automatic park• Manual park
You cannot park calls if:• All park positions are busy• The park position you wish to use is busy• The station is an attendant console• The call is a consultation call• The call is in a conference
Automatically parking a callYou can automatically park a call in a free park position from your phone, and retrieve it on your phone or anoth-er phone.
Call park
S Press the "System Park" programmed sensor key. The first free park slot is used and indicated on the display. The call is now parked.
\ Replace the handset.
Retrieving a parked call
S Press the "System Park" programmed sensor key.
0 ... 9 Enter the park slot number of the parked call and pro-ceed with the call.
You can also put the call on hold first by confirm-ing "Consultation?" and then parking the call.
68
Enhanced phone functions
Step by step
Manually parking a callYou can manually park a call in a free park position from your phone, and retrieve it on your phone or another phone.
Call park
Select and confirm the option shown.
j Enter the destination number.
The call is now parked.
\ Replace the handset.
If "Park" is not available, you will receive acoustic and also visual notification.
Confirm and continue the call.
or\ Replace the handset.
You will receive a recall for the call on hold.
Retrieving a parked call
^ Lift the handset.or
n Press the key and enter speakerphone mode.
Park to station?
Return to held call?
69
Step by step
Enhanced phone functions
If you cannot reach a destination ...
Call waiting (camp-on)
Prerequisite: An internal station is busy. You would still like to reach your colleague.
Select, confirm and briefly wait.
Z Your colleague hears a warning tone during the call. The programmed "Pickup" sensor key is flashing on the phone. If their phone has a display, your name and phone number is displayed.
Busy override – joining a call in progress
Prerequisite: An internal station is busy. It is important that you reach this colleague.
Select, confirm and briefly wait.
Z Your colleague and their call partner hear a warning tone.
You can now start talking.
Camp-on?
To camp on, you must have received the correct authorization.
Camp on is not possible if the called party has do-not-disturb activated.
Override?
To override a call, you must have received the cor-rect authorization.
Call override is not possible if the called party has station override security activated.
70
Enhanced phone functions
Step by step
HiPath 4000 as an entrance telephone system (two-way intercom)You can place a speaker call to an internal party on HiPath 4000 using the loudspeaker on their telephone to establish a connection. You can initiate a speaker call from a consultation call. The following functions are available:• System-wide speaker call
– to a variable destination– to a fixed destination
• Speaker call in a group– to a variable destination– to a fixed destination
• Two-way intercom in a group– to a variable destination– to a fixed destination
• Announcement to all members of a line trunk group
You can cancel the speaker call or the announcement by replacing the handset or, during a consultation call, by retrieving the call on hold.
Please ensure for all functions that "Speaker call protect" is deactivated on the relevant phones
Page 98.
If a speaker call is placed to a party and "Speaker call protect" is activated on their phone, the speaker call is ignored and a normal call is estab-lished.
71
Step by step
Enhanced phone functions
System-wide speaker callYou can place a speaker call from your phone to any in-ternal party with a telephone equipped with speaker-phone mode or a loudspeaker.
Speaker call to a variable destination
Prerequisite: You have programmed the function "Speaker call-one-way" on a key Page 82.
^ Lift the handset.or
n Press the key and enter speakerphone mode.
j Enter the system code for "Speaker call-one-way" (con-tact the relevant service personnel if necessary).
or
S Press the "Spkr. 1-way" programmed sensor key.
j Enter the internal number of the party.
A connection is immediately established to this destina-tion station’s loudspeaker if
• the station is not busy• the handset has not been lifted• "Speaker call protect" is not activated
Z The caller hears a confirmation tone when the connec-tion is established and they are free to start speaking.
^ The called party can accept the connection by lifting the handset.
n or S If the called party presses the speaker key or the line key (if configured), the connection is lost.
Speaker call to a fixed destination
The system code for "Speaker call-one-way" and the destination number are programmed on a repdial key
Page 85.
S Press the programmed repdial key. A connection to the destination loudspeaker is immediately established.
Enter code!
The same number of speaker calls and normal connections is possible.
72
Enhanced phone functions
Step by step
Speaker call in a groupYou can also establish a normal connection within a group or team (with team call = speed dial numbers 0-9 or 00-99 for team members) via a speaker call. The speaker call is then initiated by a group telephone.
Speaker call to a variable destination
^ Lift the handset.or
n Press the key and enter speakerphone mode.
j Enter the system code for "COM group speaker call" (contact the relevant service personnel if necessary).
or
S Press the "COM Group" programmed sensor key.
j Enter the speed dial number for the corresponding group member.
A connection is immediately established to this destina-tion station’s loudspeaker if• the station is not busy• the handset has not been lifted• "Do not disturb" is not activated
^ The called party accepts the DSS call by lifting the hand-set.
n or S If the called party presses the speaker key or the line key (if configured), the connection is lost.
Speaker call to a fixed destination
The system code for "COM group speaker call" and the speed dial number for the corresponding group mem-ber are programmed on a repdial key Page 85.
S Press the programmed repdial key. A connection to the destination loudspeaker is immediately established.
^ The called party can accept the connection by lifting the handset.
n or S If the called party presses the speaker key or the line key (if configured), the connection is lost.
The "COM group speaker call" function is line-in-dependent - all phones can call each other via a speaker call.
Enter code!
73
Step by step
Enhanced phone functions
Two-way intercom to a variable destination
When using the two-way intercom in a group, the loud-speaker and the microphone of the destination phone are automatically switched on.
^ Lift the handset.or
n Press the key and enter speakerphone mode.
j Enter the system code for "Speaker call-two-way" (con-tact the relevant service personnel if necessary).
or
S Press the "COM Spk 2way" programmed sensor key.
j Enter the speed dial number for the corresponding group member.
The loudspeaker and microphone of the destination phone are automatically switched on.
Two-way intercom to a fixed destination
The system code for "Speaker call-two-way" and the speed dial number for the corresponding group mem-ber are programmed on the repdial key Page 85.
S Press the programmed sensor key.
The loudspeaker and microphone of the destination phone are automatically switched on.
Enter code!
74
Enhanced phone functions
Step by step
Announcement (broadcast) to all members of a line trunk groupYou can use this function to send an announcement to all members (10 - 40) of a line trunk group.
Z Once you have activated the group call, you will hear a confirmation tone. You can then begin the announce-ment.
^ Lift the handset.or
n Press the key and enter speakerphone mode.
j Enter the system code for "Speaker call-1-way bcst" (contact the relevant service personnel if necessary).
or
S Press the "Broadcst Spk" programmed sensor key.
j Enter the internal phone number of a group member.
Z The loudspeakers on all group phones are automatically switched on and you will hear a confirmation tone. You can begin the announcement.
\ You end the announcement by replacing the handset.
^ If a group member lifts their handset, they are connect-ed to you and the announcement is ended.
n or S If a group member presses the speaker key or the rele-vant line key for the announcement, they are discon-nected from the announcement. If the last remaining member of the group presses the speaker key or line key, the announcement ends.
Enter code!
75
Step by step
Enhanced phone functions
Using call forwarding
Automatically forwarding callsThe relevant service personnel can configure different call forwarding settings in the system for internal and external calls and activate these settings for your sta-tion. The following calls may be forwarded• All calls without restriction• Calls on busy• Calls on no reply
Forwarding for all calls without restriction should only be configured if the station is only used for outgoing calls (e.g. in an elevator).
If you have configured fixed or variable forwarding and the manual forwarding destinations are not reachable (e.g. busy), calls are automatically forwarded to system forwarding destinations.
Delayed call forwardingThis forwarding type can be used for initial or second calls.
Initial call
Prerequisite: "Call forwarding no reply" is activated Page 43,
The caller hears the ring tone and is only forwarded to another station once a set time ( Page 47) has elapsed.
Second call
Prerequisite: Second call Page 59 and "Forwarding on busy/after timeout" or "Call forwarding no reply" are activated Page 43.
If a second call is incoming, you will automatically hear a call waiting tone and information about the caller. You then have the option of accepting this call before call forwarding is activated (e.g. if you are waiting for an ur-gent call).
Please note the description for programming call forwarding Page 43.
76
Enhanced phone functions
Step by step
Forwarding calls for other stationsYou can save, activate, display and deactivate call for-warding for another phone, fax or PC station from your own phone. You must have the PIN of the other station or have "Call forwarding for other stations" access rights. In both cases, the relevant service personnel for your system will provide assistance.
Saving a call forwarding destination for another phone and activating call forwarding
N Open the program/service menu Page 29.
Confirm.
Select and confirm the option shown.
Confirm.
j Enter the number of the other telephone.
Confirm.
j Enter the PIN(only applicable if your station does not have "Call for-warding for other stations" access rights).
Confirm.
j Enter the destination number.
Select and confirm the option shown.Call forwarding is now active.
Destinations? g
Forwarding station No.?
Variable call forw.?
Completed?
Completed?
Save?
77
Step by step
Enhanced phone functions
Saving a call forwarding destination for fax/PC/busy station and activating call forwarding
N Open the program/service menu Page 29.
Confirm.
Select and confirm the option shown.
j Enter the code for the call forwarding type you wish to set. Codes are assigned by the relevant service person-nel. You can enter the codes applicable to you in the ta-ble below:
j Enter the number of the other station.
Confirm.
j Enter the PIN(only applicable if your station does not have "Call for-warding for other stations" access rights).
Confirm.
j Enter the destination number.
Confirm.Call forwarding is now active.
Destinations? g
Forwarding station No.?
Call forwarding for fax
Call forwarding for PC
Call forwarding on busy
Completed?
Completed?
Save?
78
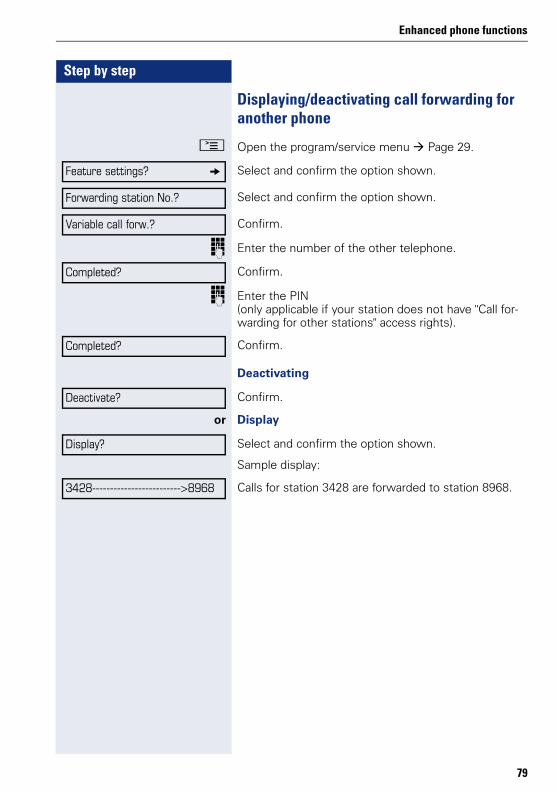
Enhanced phone functions
Step by step
Displaying/deactivating call forwarding for another phone
N Open the program/service menu Page 29.
Select and confirm the option shown.
Select and confirm the option shown.
Confirm.
j Enter the number of the other telephone.
Confirm.
j Enter the PIN(only applicable if your station does not have "Call for-warding for other stations" access rights).
Confirm.
Deactivating
Confirm.
or Display
Select and confirm the option shown.
Sample display:
Calls for station 3428 are forwarded to station 8968.
Feature settings? g
Forwarding station No.?
Variable call forw.?
Completed?
Completed?
Deactivate?
Display?
3428------------------------->8968
79
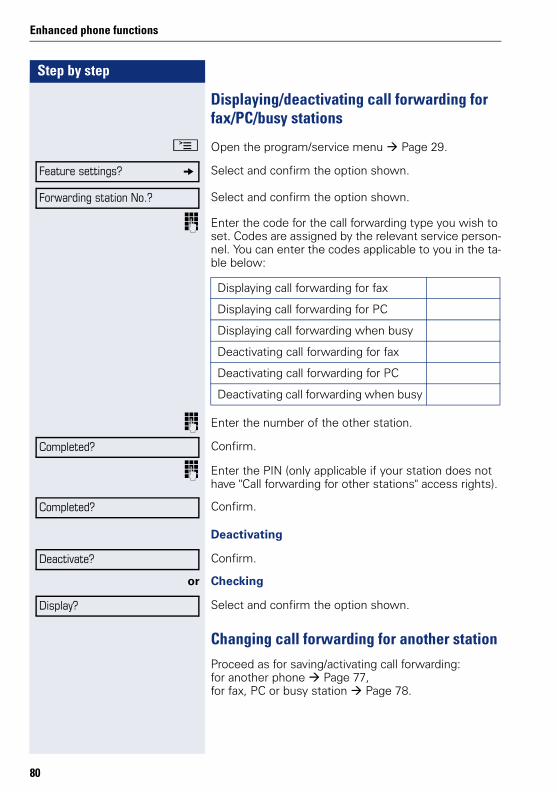
Step by step
Enhanced phone functions
Displaying/deactivating call forwarding for fax/PC/busy stations
N Open the program/service menu Page 29.
Select and confirm the option shown.
Select and confirm the option shown.
j Enter the code for the call forwarding type you wish to set. Codes are assigned by the relevant service person-nel. You can enter the codes applicable to you in the ta-ble below:
j Enter the number of the other station.
Confirm.
j Enter the PIN (only applicable if your station does not have "Call forwarding for other stations" access rights).
Confirm.
Deactivating
Confirm.
or Checking
Select and confirm the option shown.
Changing call forwarding for another stationProceed as for saving/activating call forwarding:for another phone Page 77,for fax, PC or busy station Page 78.
Feature settings? g
Forwarding station No.?
Displaying call forwarding for fax
Displaying call forwarding for PC
Displaying call forwarding when busy
Deactivating call forwarding for fax
Deactivating call forwarding for PC
Deactivating call forwarding when busy
Completed?
Completed?
Deactivate?
Display?
80
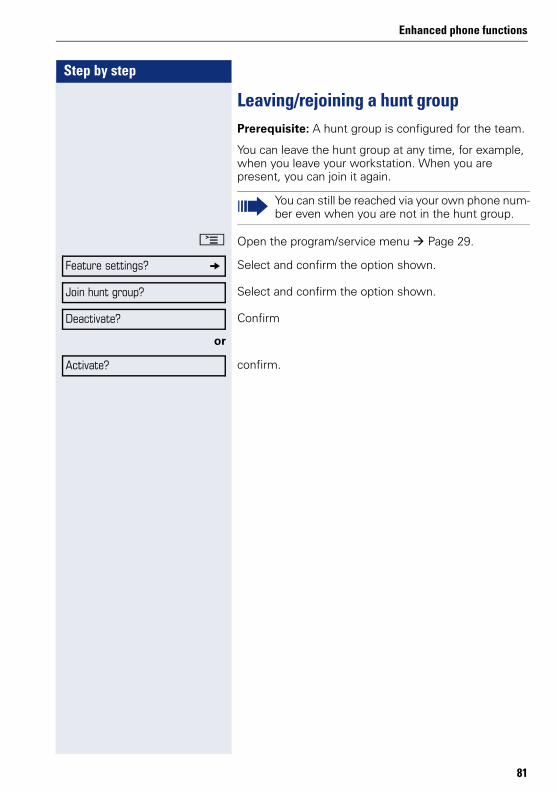
Enhanced phone functions
Step by step
Leaving/rejoining a hunt groupPrerequisite: A hunt group is configured for the team.
You can leave the hunt group at any time, for example, when you leave your workstation. When you are present, you can join it again.
N Open the program/service menu Page 29.
Select and confirm the option shown.
Select and confirm the option shown.
Confirm
or
confirm.
You can still be reached via your own phone num-ber even when you are not in the hunt group.
Feature settings? g
Join hunt group?
Deactivate?
Activate?
81
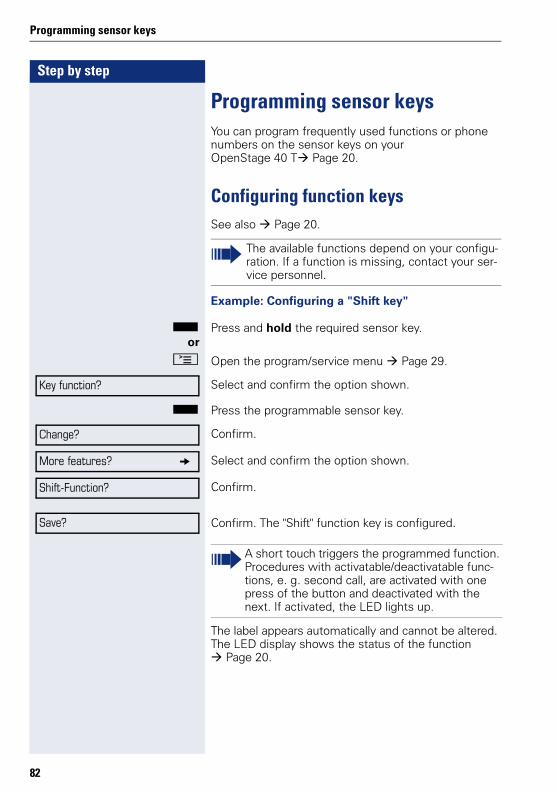
Step by step
Programming sensor keys
Programming sensor keysYou can program frequently used functions or phone numbers on the sensor keys on your OpenStage 40 T Page 20.
Configuring function keysSee also Page 20.
Example: Configuring a "Shift key"
S Press and hold the required sensor key. or
N Open the program/service menu Page 29.
Select and confirm the option shown.
S Press the programmable sensor key.
Confirm.
Select and confirm the option shown.
Confirm.
Confirm. The "Shift" function key is configured.
The label appears automatically and cannot be altered. The LED display shows the status of the function
Page 20.
The available functions depend on your configu-ration. If a function is missing, contact your ser-vice personnel.
Key function?
Change?
More features? g
Shift-Function?
Save?
A short touch triggers the programmed function. Procedures with activatable/deactivatable func-tions, e. g. second call, are activated with one press of the button and deactivated with the next. If activated, the LED lights up.
82
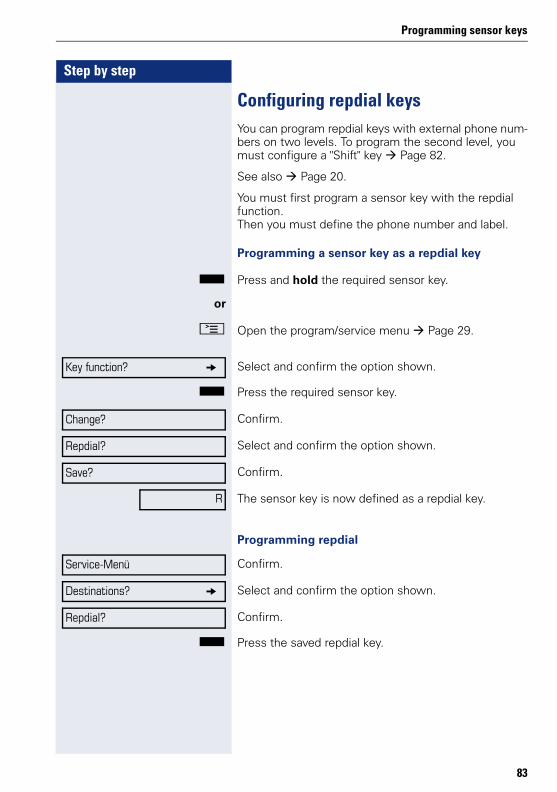
Programming sensor keys
Step by step
Configuring repdial keysYou can program repdial keys with external phone num-bers on two levels. To program the second level, you must configure a "Shift" key Page 82.
See also Page 20.
You must first program a sensor key with the repdial function. Then you must define the phone number and label.
Programming a sensor key as a repdial key
S Press and hold the required sensor key.
or
N Open the program/service menu Page 29.
Select and confirm the option shown.
S Press the required sensor key.
Confirm.
Select and confirm the option shown.
Confirm.
The sensor key is now defined as a repdial key.
Programming repdial
Confirm.
Select and confirm the option shown.
Confirm.
S Press the saved repdial key.
Key function? g
Change?
Repdial?
Save?
R
Service-Menü
Destinations? g
Repdial?
83
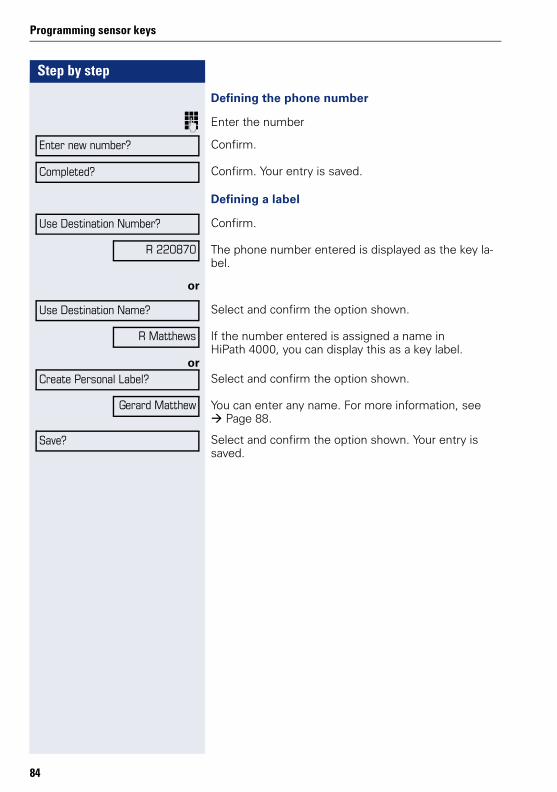
Step by step
Programming sensor keys
Defining the phone number
j Enter the number
Confirm.
Confirm. Your entry is saved.
Defining a label
Confirm.
The phone number entered is displayed as the key la-bel.
or
Select and confirm the option shown.
If the number entered is assigned a name in HiPath 4000, you can display this as a key label.
orSelect and confirm the option shown.
You can enter any name. For more information, see Page 88.
Select and confirm the option shown. Your entry is saved.
Enter new number?
Completed?
Use Destination Number?
R 220870
Use Destination Name?
R Matthews
Create Personal Label?
Gerard Matthew
Save?
84
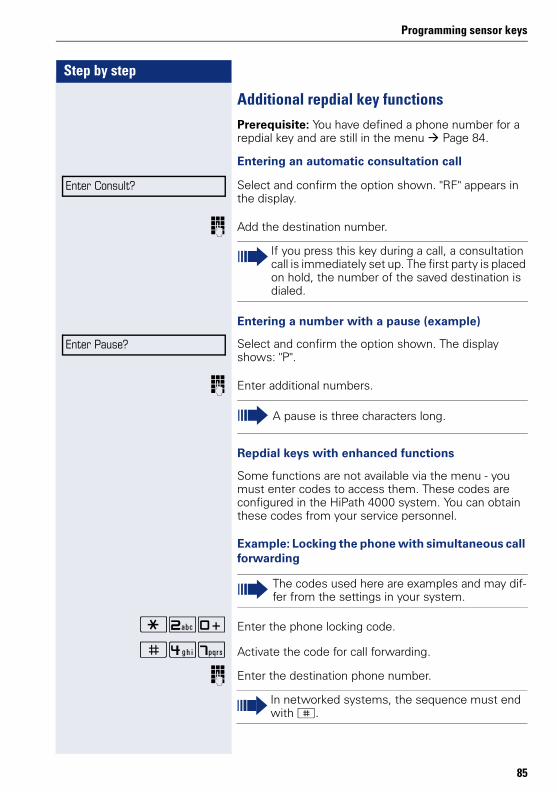
Programming sensor keys
Step by step
Additional repdial key functionsPrerequisite: You have defined a phone number for a repdial key and are still in the menu Page 84.
Entering an automatic consultation call
Select and confirm the option shown. "RF" appears in the display.
j Add the destination number.
Entering a number with a pause (example)
Select and confirm the option shown. The display shows: "P".
j Enter additional numbers.
Repdial keys with enhanced functions
Some functions are not available via the menu - you must enter codes to access them. These codes are configured in the HiPath 4000 system. You can obtain these codes from your service personnel.
Example: Locking the phone with simultaneous call forwarding
)20 Enter the phone locking code.
(47 Activate the code for call forwarding.
j Enter the destination phone number.
Enter Consult?
If you press this key during a call, a consultation call is immediately set up. The first party is placed on hold, the number of the saved destination is dialed.
Enter Pause?
A pause is three characters long.
The codes used here are examples and may dif-fer from the settings in your system.
In networked systems, the sequence must end with (.
85
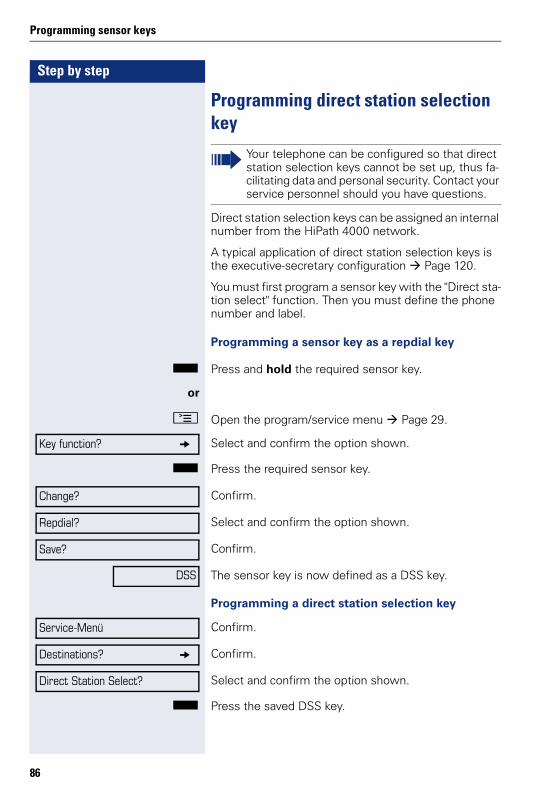
Step by step
Programming sensor keys
Programming direct station selection key
Direct station selection keys can be assigned an internal number from the HiPath 4000 network.
A typical application of direct station selection keys is the executive-secretary configuration Page 120.
You must first program a sensor key with the "Direct sta-tion select" function. Then you must define the phone number and label.
Programming a sensor key as a repdial key
S Press and hold the required sensor key.
or
N Open the program/service menu Page 29.
Select and confirm the option shown.
S Press the required sensor key.
Confirm.
Select and confirm the option shown.
Confirm.
The sensor key is now defined as a DSS key.
Programming a direct station selection key
Confirm.
Confirm.
Select and confirm the option shown.
S Press the saved DSS key.
Your telephone can be configured so that direct station selection keys cannot be set up, thus fa-cilitating data and personal security. Contact your service personnel should you have questions.
Key function? g
Change?
Repdial?
Save?
DSS
Service-Menü
Destinations? g
Direct Station Select?
86
Programming sensor keys
Step by step
Defining the phone number
j Enter the number
Confirm.
Confirm. Your entry is saved.
Defining a label
Confirm.
The phone number entered is displayed as the key la-bel.
or
Select and confirm the option shown.
If the number entered is assigned a name in HiPath 4000, you can display this as a key label.
orSelect and confirm the option shown.
You can enter any name. For more information, see Page 88.
Select and confirm the option shown. Your entry is saved.
Enter new number?
Completed?
Use Destination Number?
DSS 220870
Use Destination Name?
DSS Matthews
Create Personal Label?
Gerard Matthew
Save?
You can change the key label later Page 88.
87
Step by step
Programming sensor keys
Changing the labelYou can also subsequently change the label specified when programming a repdial/DSS key.
Changing the label
N Open the program/service menu Page 29.
Confirm.
Select and confirm the option shown.
or
Select and confirm the option shown.
S Press the required repdial/DSS key.
Select and confirm the option shown.
Select and confirm the option shown.
j Enter text via the keypad Page 21.
Confirm. Deletes characters to the left.
Select and confirm the option shown. Your entry is saved.Select and confirm the option shown. Deletes the label.
You cannot change the labels on function keys.
Destinations? g
Repdial?
Direct Station Select?
Edit Label?
Create Personal Label?
Backspace?
Save?
Delete?
Adapt the contrast of the key label to your sur-roundings Page 125.
88
Programming sensor keys
Step by step
Configuring the pickup key
You can configure your own pickup key for Pickup calls in the pickup group or for second calls.
S Press and hold the required sensor key.
Select and confirm the option shown.
or
N Open the program/service menu Page 29.
Select and confirm the option shown.
S Press the programmable sensor key.
Confirm.
Select and confirm the option shown.
Select and confirm the option shown.
Select and confirm the option shown.
The "Pickup" function key is configured.
Assigning telephony function
Key function?
Change?
More features? g
Call Pickup?
Save?
89
Step by step
Programming sensor keys
Deleting sensor key programming
Deleting a function/phone number/label
S Press and hold the required sensor key.
Select and confirm the option shown.
Deleting phone number/label
N Open the program/service menu Page 29.
Confirm.
Select and confirm the option shown.
or
Select and confirm the option shown.
S Press the required repdial/DSS key.
Select and confirm the option shown.
Delete?
Destinations? g
Repdial?
Direct Station Select?
Delete?
90
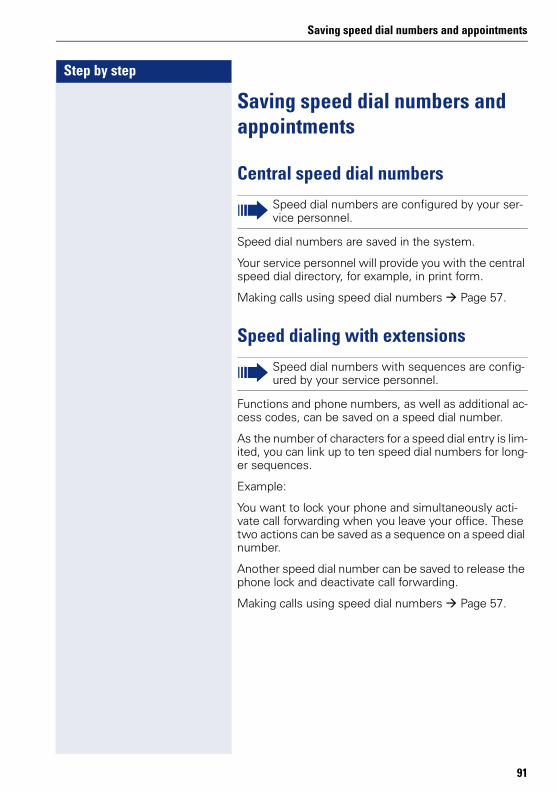
Saving speed dial numbers and appointments
Step by step
Saving speed dial numbers and appointments
Central speed dial numbers
Speed dial numbers are saved in the system.
Your service personnel will provide you with the central speed dial directory, for example, in print form.
Making calls using speed dial numbers Page 57.
Speed dialing with extensions
Functions and phone numbers, as well as additional ac-cess codes, can be saved on a speed dial number.
As the number of characters for a speed dial entry is lim-ited, you can link up to ten speed dial numbers for long-er sequences.
Example:
You want to lock your phone and simultaneously acti-vate call forwarding when you leave your office. These two actions can be saved as a sequence on a speed dial number.
Another speed dial number can be saved to release the phone lock and deactivate call forwarding.
Making calls using speed dial numbers Page 57.
Speed dial numbers are configured by your ser-vice personnel.
Speed dial numbers with sequences are config-ured by your service personnel.
91
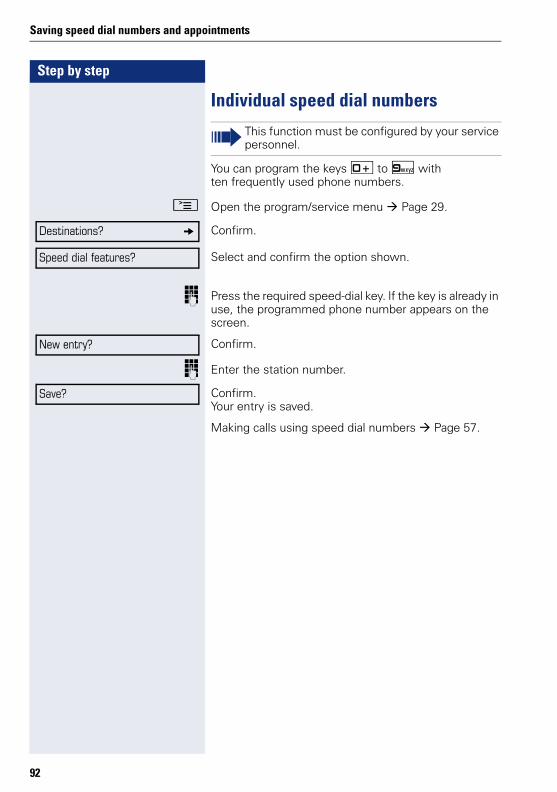
Step by step
Saving speed dial numbers and appointments
Individual speed dial numbers
You can program the keys 0 to 9 with ten frequently used phone numbers.
N Open the program/service menu Page 29.
Confirm.
Select and confirm the option shown.
j Press the required speed-dial key. If the key is already in use, the programmed phone number appears on the screen.
Confirm.
j Enter the station number.
Confirm.Your entry is saved.
Making calls using speed dial numbers Page 57.
This function must be configured by your service personnel.
Destinations? g
Speed dial features?
New entry?
Save?
92

Saving speed dial numbers and appointments
Step by step
Appointments functionYou can configure your phone to call you to remind you about appointments. You must save the required call times. You can do this for the next 24 hours.
Saving appointments
N Open the program/service menu Page 29.
Select and confirm the option shown.The display indicates whether a reminder has already been saved.
For the first appointment: Confirm.For additional appointments: Select and confirm the op-tion shown.
j Enter a 3-digit or 4-digit time, such as 845 (= 8.45 a.m.) or 1500 (= 3.00 p.m.).
Confirm.
Deleting saved reminders
N Open the program/service menu Page 29.
Select and confirm the option shown.A saved reminder is displayed.
Confirm, if you have multiple reminders saved.
Select and confirm the option shown.
N Press the key shown.
Using timed reminders
Prerequisite: You have saved a reminder. The saved time arrives.
The phone rings.
^ Lift the handset. The appointment time is displayed.
\ Replace the handset.
Reminder?
New reminder?
Save?
Reminder?
Next reminder?
Delete?
Reminder :
If you do not lift the handset, the phone rings sev-eral more times and "Reminder" is displayed be-fore the reminder is deleted.
93
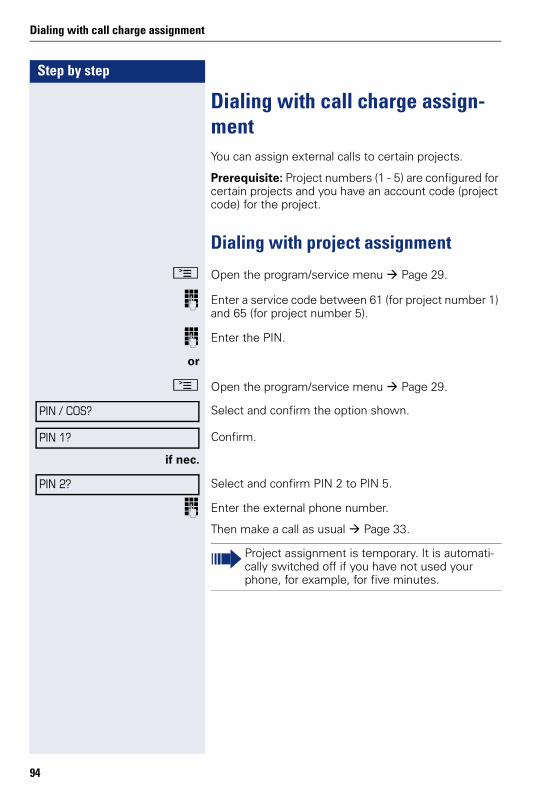
Step by step
Dialing with call charge assignment
Dialing with call charge assign-mentYou can assign external calls to certain projects.
Prerequisite: Project numbers (1 - 5) are configured for certain projects and you have an account code (project code) for the project.
Dialing with project assignment
N Open the program/service menu Page 29.
j Enter a service code between 61 (for project number 1) and 65 (for project number 5).
j Enter the PIN.
or
N Open the program/service menu Page 29.
Select and confirm the option shown.
Confirm.
if nec.
Select and confirm PIN 2 to PIN 5.
j Enter the external phone number.
Then make a call as usual Page 33.
PIN / COS?
PIN 1?
PIN 2?
Project assignment is temporary. It is automati-cally switched off if you have not used your phone, for example, for five minutes.
94
Dialing with call charge assignment
Step by step
Call duration displayCall duration display is configured by the relevant ser-vice personnel. The display can show either call dura-tion or call charges. It can also be switched off.
The call duration appears in the first line of the display on the right as HH:MM:SS and in 24-hour format. It is shown 10 seconds after the call starts.
The call charge display feature must be requested from the network operator and configured by the relevant service personnel.
95
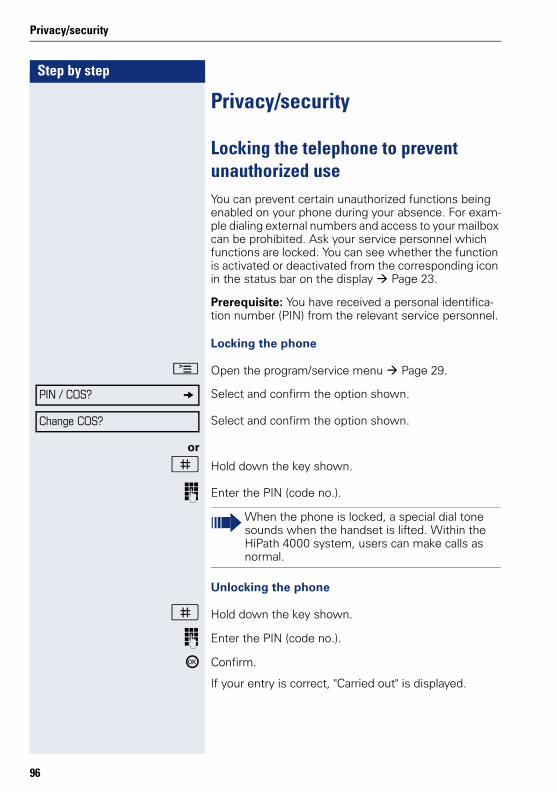
Step by step
Privacy/security
Privacy/security
Locking the telephone to prevent unauthorized useYou can prevent certain unauthorized functions being enabled on your phone during your absence. For exam-ple dialing external numbers and access to your mailbox can be prohibited. Ask your service personnel which functions are locked. You can see whether the function is activated or deactivated from the corresponding icon in the status bar on the display Page 23.
Prerequisite: You have received a personal identifica-tion number (PIN) from the relevant service personnel.
Locking the phone
N Open the program/service menu Page 29.
Select and confirm the option shown.
Select and confirm the option shown.
or
( Hold down the key shown.
j Enter the PIN (code no.).
Unlocking the phone
( Hold down the key shown.
j Enter the PIN (code no.).
i Confirm.
If your entry is correct, "Carried out" is displayed.
PIN / COS? g
Change COS?
When the phone is locked, a special dial tone sounds when the handset is lifted. Within the HiPath 4000 system, users can make calls as normal.
96
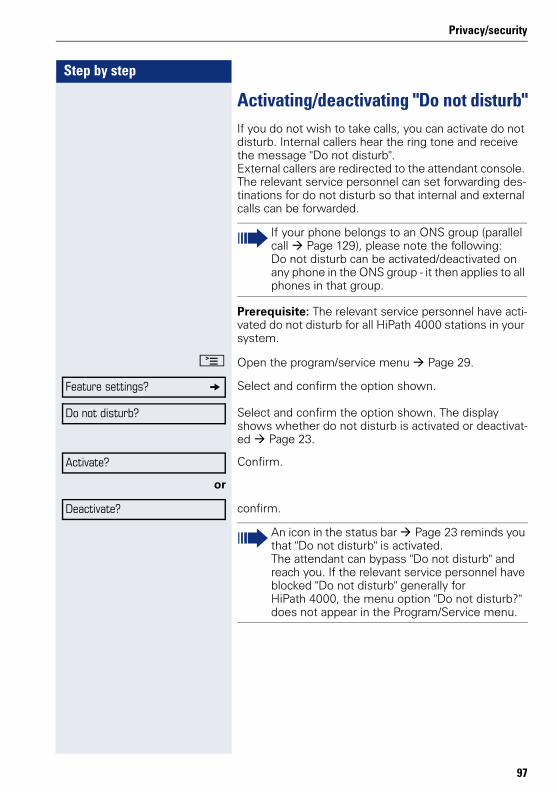
Privacy/security
Step by step
Activating/deactivating "Do not disturb"If you do not wish to take calls, you can activate do not disturb. Internal callers hear the ring tone and receive the message "Do not disturb". External callers are redirected to the attendant console. The relevant service personnel can set forwarding des-tinations for do not disturb so that internal and external calls can be forwarded.
Prerequisite: The relevant service personnel have acti-vated do not disturb for all HiPath 4000 stations in your system.
N Open the program/service menu Page 29.
Select and confirm the option shown.
Select and confirm the option shown. The display shows whether do not disturb is activated or deactivat-ed Page 23.
Confirm.
or
confirm.
If your phone belongs to an ONS group (parallel call Page 129), please note the following:Do not disturb can be activated/deactivated on any phone in the ONS group - it then applies to all phones in that group.
Feature settings? g
Do not disturb?
Activate?
Deactivate?
An icon in the status bar Page 23 reminds you that "Do not disturb" is activated.The attendant can bypass "Do not disturb" and reach you. If the relevant service personnel have blocked "Do not disturb" generally for HiPath 4000, the menu option "Do not disturb?" does not appear in the Program/Service menu.
97
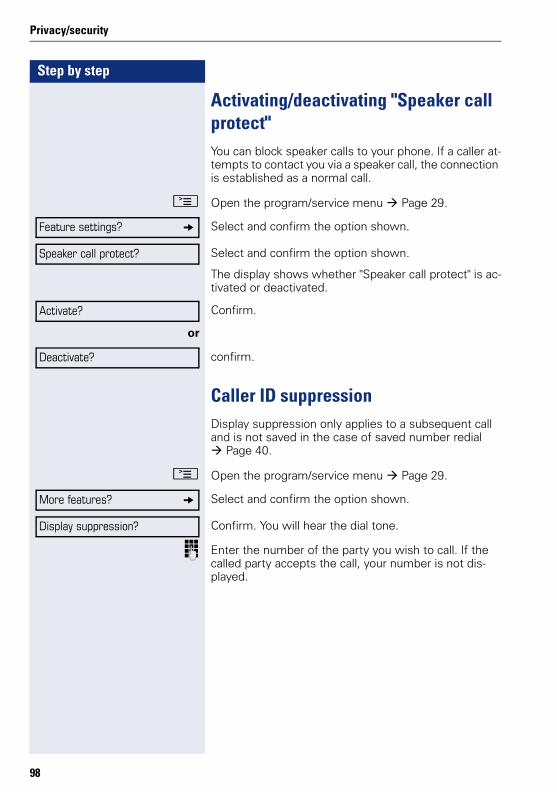
Step by step
Privacy/security
Activating/deactivating "Speaker call protect"You can block speaker calls to your phone. If a caller at-tempts to contact you via a speaker call, the connection is established as a normal call.
N Open the program/service menu Page 29.
Select and confirm the option shown.
Select and confirm the option shown.
The display shows whether "Speaker call protect" is ac-tivated or deactivated.
Confirm.
or
confirm.
Caller ID suppressionDisplay suppression only applies to a subsequent call and is not saved in the case of saved number redial
Page 40.
N Open the program/service menu Page 29.
Select and confirm the option shown.
Confirm. You will hear the dial tone.
j Enter the number of the party you wish to call. If the called party accepts the call, your number is not dis-played.
Feature settings? g
Speaker call protect?
Activate?
Deactivate?
More features? g
Display suppression?
98
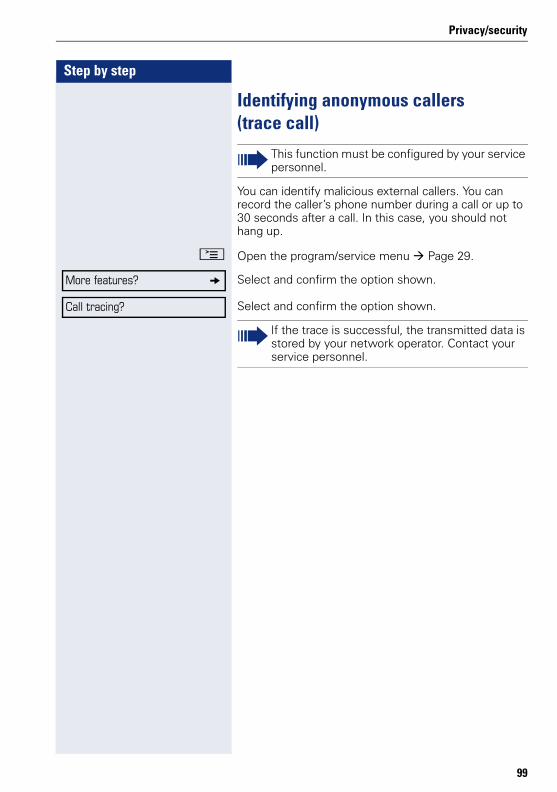
Privacy/security
Step by step
Identifying anonymous callers (trace call)
You can identify malicious external callers. You can record the caller’s phone number during a call or up to 30 seconds after a call. In this case, you should not hang up.
N Open the program/service menu Page 29.
Select and confirm the option shown.
Select and confirm the option shown.
This function must be configured by your service personnel.
More features? g
Call tracing?
If the trace is successful, the transmitted data is stored by your network operator. Contact your service personnel.
99
Step by step
More functions/services
More functions/services
Using another telephone in the same way as your ownYou can log on to another phone in the HiPath 4000 sys-tem using your personal identification number (PIN). This also applies to telephones in networked HiPath 4000 systems, for example, at other company sites). On another phone, you can• make calls using cost center assignment,• make calls using project assignment,• query your mailbox,• use your individual speed dial numbers and a num-
ber saved on your phone for redial• enter appointments
With an internal PIN you can forward calls for you to oth-er phones at your location ("follow me" call forwarding).
Logging on to another phone
Prerequisite: You have received a PIN from your ser-vice personnel. Within your own HiPath 4000 system, you will need an internal PIN. For other HiPath 4000 systems in the network, you will need a network-wide PIN.
N Open the program/service menu Page 29.
Select and confirm the option shown.
Select and confirm the option shown.If you have several PINs and wish to use a different one, select the other PIN.
j At the display "Enter station no:" or "Enter ID", you are prompted to enter your PIN.
PIN / COS? g
PIN 1?
100
More functions/services
Step by step
In your local HiPath 4000 system:
j Enter your internal PIN.
or In your local system and other HiPath 4000 systems in the network:
j Enter the two-digit node ID of your local HiPath 4000 system (ask the relevant service personnel).
j ( Enter your own phone number and press the pound key.
j ( Enter the network-wide PIN and press the pound key.
Making a call after successful logon
You will hear the dial tone."Please dial" appears in the display.
n Press the key shown.or
j Enter a phone number immediately.
Setting up "follow me" call forwarding following successful identification
Select and confirm the option shown.
Select and confirm the option shown.
Call forwarding is now active.
Logging off from another phone
N Open the program/service menu Page 29.
Select and confirm the option shown.
Select and confirm the option shown.
Enter code!
Call forw. - follow me?
Save?
PIN / COS? g
Deactivate PIN?
You are automatically logged off if the other phone remains unused for several minutes.
101
Step by step
Moving with the phone
Moving with the phoneCheck with your service personnel whether this is pos-sible in your system!
After talking to your service personnel, you can log your telephone off from the current port and log on again at the new port. Phone settings are then unchanged.
Logging the phone off from the current port
j Enter the logoff code. If necessary ask your service per-sonnel for this code.
j Enter the PIN.
Unplug the phone plug from the port socket.
Log the phone on at the new locationPut the phone plus in the port socket.
j Enter the logon code. If necessary ask your service per-sonnel for this code.
j Enter the PIN.
Enter code!
Enter code!
If you move with a first and second phone, e.g. in an executive-secretary configuration), the second phone must be logged off first and then the first phone. At the new port the first phone must be logged on first and then the second phone.
102
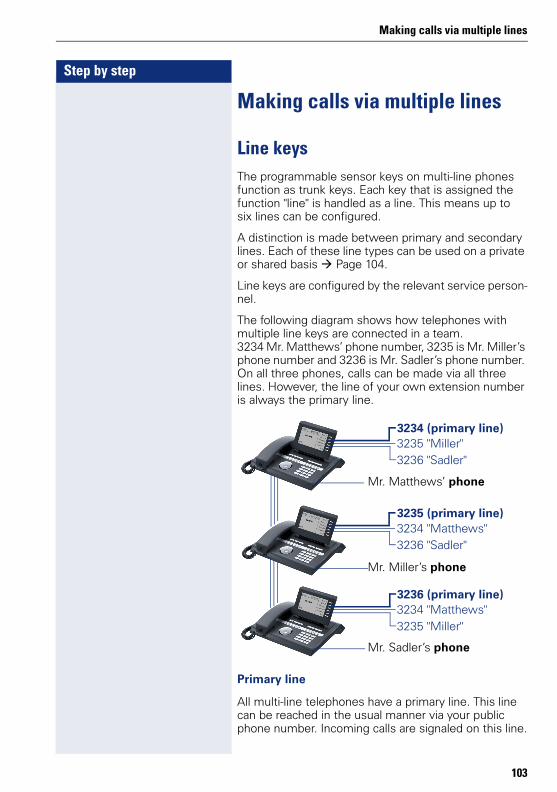
Making calls via multiple lines
Step by step
Making calls via multiple lines
Line keysThe programmable sensor keys on multi-line phones function as trunk keys. Each key that is assigned the function "line" is handled as a line. This means up to six lines can be configured.
A distinction is made between primary and secondary lines. Each of these line types can be used on a private or shared basis Page 104.
Line keys are configured by the relevant service person-nel.
The following diagram shows how telephones with multiple line keys are connected in a team.3234 Mr. Matthews’ phone number, 3235 is Mr. Miller’s phone number and 3236 is Mr. Sadler’s phone number. On all three phones, calls can be made via all three lines. However, the line of your own extension number is always the primary line.
Primary line
All multi-line telephones have a primary line. This line can be reached in the usual manner via your public phone number. Incoming calls are signaled on this line.
3234 (primary line)3235 "Miller"3236 "Sadler"
3235 (primary line)3234 "Matthews"3236 "Sadler"
3236 (primary line)3234 "Matthews"3235 "Miller"
Mr. Matthews’ phone
Mr. Miller’s phone
Mr. Sadler’s phone
103
Step by step
Making calls via multiple lines
Secondary line
The secondary line on your phone is used as a primary line by another subscriber in the system. Your primary line, which is configured on another telephone in the system, simultaneously functions as the secondary line on that telephone.
Line utilization
Private line
A line that is used by a single telephone. This line can-not be used as a secondary line by another telephone.
Shared line
A line that is configured on multiple telephones. The line status (if configured) is displayed for all telephones that share this line. If, for example, a shared line is being used by a telephone, a status message indicating that this line is busy is displayed on all other telephones.
Direct call line
A line with a direct connection to another telephone.
You can see the status of the line from the LED.
To avoid conflict between the individual multi-line phones, you can configure the functions "Do not disturb" and "Call forwarding" exclusively for the primary line.
104

Making calls via multiple lines
Step by step
LED displays on line keys
PreviewYou are making a call on a single line. The LED on anoth-er line key flashes quickly. The "Preview of Line" func-tion shows you who is calling on this line. This informa-tion appears in your display. You can also determine which caller is waiting on a line key, if you have placed them on "hold" or "exclusive hold". You can also display information about the caller on the active line.
Prerequisite: You have accepted a call on a line key. The line key LED flashes quickly and the "Preview" is config-ured.
Activating preliminary display
S Press the "Preview" programmed sensor key. The LED lights up.
T Press the required line key.
Information about the caller or the party on hold or parked is displayed.
Deactivating preliminary display
R Press the "Preview" programmed sensor key. The LED goes out.
The menu line and call duration are displayed again.
LED Explanation
S Off –The line is in idle mode.
T Flashing[1]
[1] In this manual, flashing sensor keys are identified by this icon, re-gardless of the flashing interval. The flashing interval represents different statuses, which are described in detail in the correspond-ing sections of the manual.
– Incoming call on the line.–Hold reminder is activated.–The line is on "Hold".
R On –The line is busy.
105

Step by step
Making calls via multiple lines
Answering calls with the line keysIf several calls arrive at the same time, you can answer calls as normal in the sequence in which they are of-fered. However, you can also answer calls preferentially.
Prerequisite: The relevant service personnel have de-fined the sequence in which incoming calls should be routed to line keys.
Answering calls in the sequence in which they are offered
Your telephone rings (call). The caller ID is displayed. The LED of the line key offered flashes quickly.
^ Lift the handset.or
n Press the key and enter speakerphone mode.
Answering calls preferentially
Your telephone rings (call). The caller ID is displayed. The LED of the line key offered flashes quickly. The LEDs of the other line keys also flash quickly.
T Press the preferred line key. The caller ID is briefly dis-played.
^ Lift the handset.or
n Press the key and enter speakerphone mode.
106
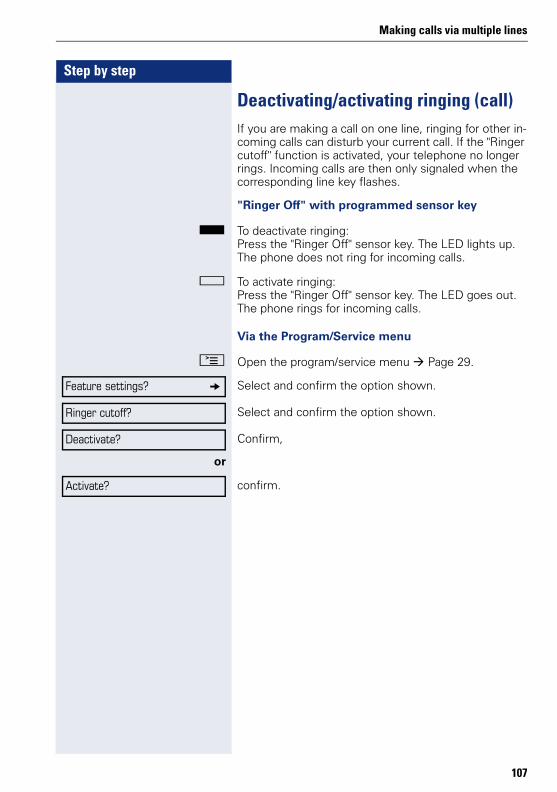
Making calls via multiple lines
Step by step
Deactivating/activating ringing (call)If you are making a call on one line, ringing for other in-coming calls can disturb your current call. If the "Ringer cutoff" function is activated, your telephone no longer rings. Incoming calls are then only signaled when the corresponding line key flashes.
"Ringer Off" with programmed sensor key
S To deactivate ringing:Press the "Ringer Off" sensor key. The LED lights up. The phone does not ring for incoming calls.
R To activate ringing:Press the "Ringer Off" sensor key. The LED goes out. The phone rings for incoming calls.
Via the Program/Service menu
N Open the program/service menu Page 29.
Select and confirm the option shown.
Select and confirm the option shown.
Confirm,
or
confirm.
Feature settings? g
Ringer cutoff?
Deactivate?
Activate?
107
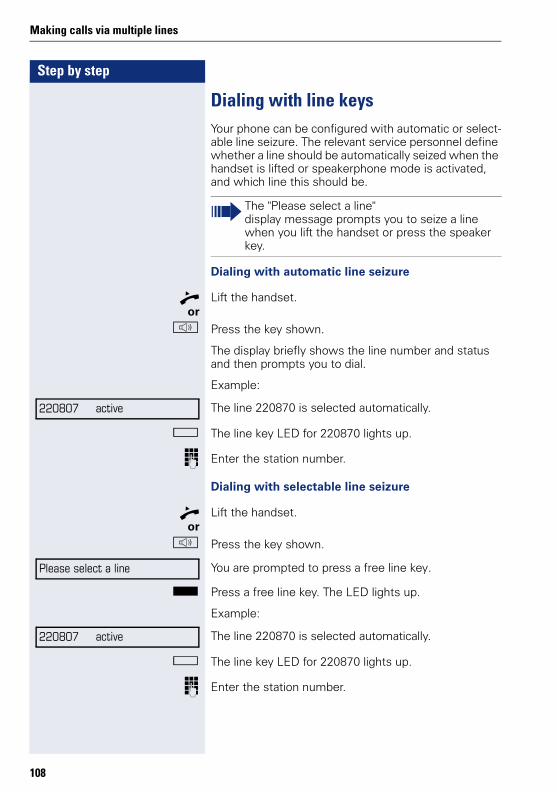
Step by step
Making calls via multiple lines
Dialing with line keysYour phone can be configured with automatic or select-able line seizure. The relevant service personnel define whether a line should be automatically seized when the handset is lifted or speakerphone mode is activated, and which line this should be.
Dialing with automatic line seizure
^ Lift the handset.or
n Press the key shown.
The display briefly shows the line number and status and then prompts you to dial.
Example:
The line 220870 is selected automatically.
R The line key LED for 220870 lights up.
j Enter the station number.
Dialing with selectable line seizure
^ Lift the handset.or
n Press the key shown.
You are prompted to press a free line key.
S Press a free line key. The LED lights up.
Example:
The line 220870 is selected automatically.
R The line key LED for 220870 lights up.
j Enter the station number.
The "Please select a line"display message prompts you to seize a line when you lift the handset or press the speaker key.
active220807
Please select a line
active220807
108
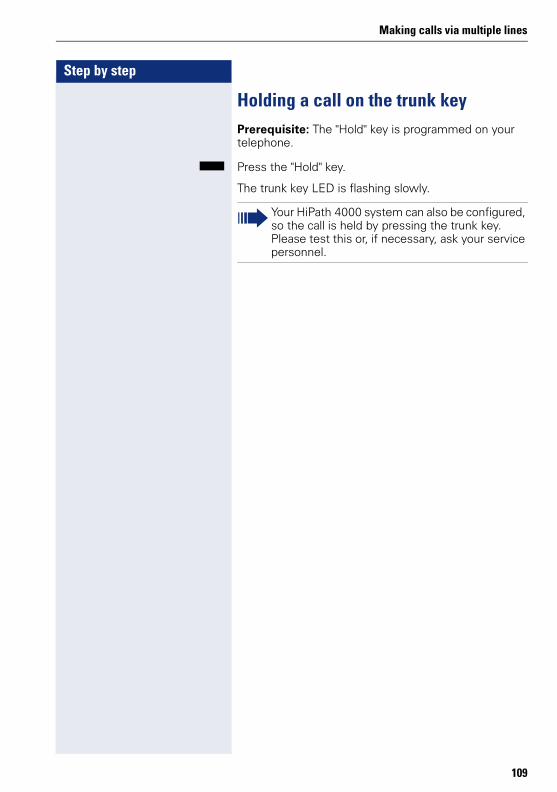
Making calls via multiple lines
Step by step
Holding a call on the trunk keyPrerequisite: The "Hold" key is programmed on your telephone.
S Press the "Hold" key.
The trunk key LED is flashing slowly.
Your HiPath 4000 system can also be configured, so the call is held by pressing the trunk key. Please test this or, if necessary, ask your service personnel.
109
Step by step
Making calls via multiple lines
Saved number redial for a specific lineIf this type of saved number redial is configured on your system, you can save a phone number for subsequent redial on a particular line Page 111. The saved phone number is dialed using the line key and the saved num-ber redial key.
^ Lift the handset.or
n Press the key shown.
Display.
S Press the applicable line key. The LED lights up.
, Press the key shown.
Last number dialed for a specific lineThe last phone number dialed via your primary line is saved.
If this type of saved number redial is configured on your system, every last number dialed for the current line is automatically saved for redial.
^ Lift the handset.or
n Press the key and enter speakerphone mode.
S Press the required line key. The LED lights up.
Confirm.
^ Lift the handset.or
n Press the key and enter speakerphone mode.
Please select a line
If you save a redial on a specific line, this can be overwritten by another team member.
Last number redial?
110
Making calls via multiple lines
Step by step
Saving phone numbers for "Redial on a line"
Prerequisite: "Saved number redial for a specific line" is configured and not "Saved number redial (last number dialed)".
Saving the dialed phone number or a caller’s phone number
You have called a party on a particular line and this call is still in progress. Or, you were called by another party whose phone number is displayed, and this call is still in progress.
, Press the key shown. The phone number is saved for the current line.
n Press the key shown. The LED goes out.or
\ Replace the handset.
Line mailboxCallers who wish to reach you when you are absent can leave a message on the mailbox for the relevant line.Both voice and fax messages can be stored in the mail-box (if so configured).
Prerequisite: A mailbox is configured for one or more lines.
Please note that only one user can edit one mailbox at any time.
If your phone belongs to an ONS group (parallel call Page 129), please note the following:
Signaling is available for the mailbox (MWI) on all phones in an ONS group.
111
Step by step
Making calls via multiple lines
Retrieving messagesIf new messages that have not yet been retrieved are in the mailbox and a programmable sensor key has been assigned the function "Mailbox", the LED of this key lights up.
Please refer to the information on Page 27.
R Press the "MBLN" sensor key.
Information regarding the caller is displayed Page 27.
Responding to a callback request
A callback request is displayed.
Select and confirm the option shown. The party is called on the relevant line.
Next entry
More than one entry is available.
Select and confirm the option shown. The next entry is displayed.
Deleting mailbox entries
The relevant entry is displayed.
Select and confirm the option shown.
Ending message retrieval
N Press the key shown.
or
Select and confirm the option shown.
Undeleted entries in the mailbox remain saved. If unan-swered callback requests are present, the programmed "MBLN" key remains lit.
Output?
Next entry?
Delete?
Cancel?
112
Making calls via multiple lines
Step by step
Identifying the line usedIf several lines are occupied at the same time, you can determine which one you are currently using for a call.
With a programmed sensor key
S Press the "Line in Use" programmed sensor key.
Via the menu
N Open the program/service menu Page 29.
Select and confirm the option shown.
Select and confirm the option shown.
The line number and status of the line currently in use are displayed Page 26.
Making calls on multiple lines alter-nately
Prerequisite 1: The relevant service personnel have specified that when you change lines, the lines are hold and can only be disconnected by replacing the handset or pressing the release key.
Prerequisite 2: You are connected to multiple parties via two or more lines. These may be callers ( Page 106) or called parties ( Page 108).
You are on a call e. g. on line 1. The trunk key of the par-ty on hold blinks slowly.
T Press the flashing line key 2. The first call party is on hold on line 1.
T Press the flashing line key 1. The second call party is on hold on line 2.
You can switch between lines as often as you wish.
More features? g
Show used line?
113
Step by step
Making calls via multiple lines
Ending the connection on a line key
n Press the key shown. The LED goes out.or
\ Replace the handset.
Entering a call on a line (three-party conference)
Prerequisite: A call is in progress on one of the lines. The line key LED lights up.
R Press the line key. You and the parties already connect-ed can hear the conference. All three parties can speak with one another. The LED remains lit.
Allowing or blocking a party from joining a call
Allowing a party to join a callYour primary line may be configured so that other par-ties may not join calls on that line when it is busy. In this case, you can allow other parties to join a call. This au-thorization applies to the current or the next call.
[ You are already conducting a call on one line.or
^ Lift the handset.
With a programmed sensor key
S Press the "Privacy" programmed sensor key.
You cannot enter a conference, if the function "Pri-vacy" is deactivated on your line.
If one of the three parties hangs up, the other two remain connected.
If a connection remains between you, as the en-tering party, and one of the other parties who pre-viously occupied the line, consultation is no long-er possible.
114
Making calls via multiple lines
Step by step
Via the menu
N Open the program/service menu Page 29.
Select and confirm the option shown.
Select and confirm the option shown.
Other parties can now join the call.
Blocking other parties from joining a callIf your phone is not already set to block other parties from joining, you can make this setting manually. This block applies to the current or the next call.
[ You are already conducting a call on one line.or
^ Lift the handset.
With a programmed sensor key
R Press the "Privacy" programmed sensor key.
Via the menu
N Open the program/service menu Page 29.
Select and confirm the option shown.
Select and confirm the option shown.
Other parties are now blocked from joining the call.
Ending the connection on a line key
n Press the key shown. The LED goes out.or
\ Replace the handset.
More features? g
Privacy off?
More features? g
Privacy on?
115
Step by step
Making calls via multiple lines
Third-party monitoringDuring a call, a predefined party can be prompted to join the call as a "witness" using the "Slnt Mon Req" pro-grammed sensor key. Your call partner is not informed that a "witness" is joining the call. The "witness" cannot participate in the call; they can only hear what is being said.
Prerequisite: Third-party monitoring is configured in your system and the programmed sensor key "Slnt Mon Req" is configured on your phone. You are conducting a call. "Privacy" must be deactivated.
S Briefly press the "Slnt Mon Req" programmed sensor key twice. The "witness" hears a special tone on their phone and the message "Connect witness or tape" ap-pears on their display.
^ The "witness" lifts the handset.
or
T The "witness" presses the line key for the line on which the call is being conducted.
The "witness" can now listen to the call without being noticed.
When configuring and using third-party monitor-ing, please note the applicable data protection regulations.
Only the "witness" may end silent monitoring, by hanging up or pressing the line key.
116
Making calls via multiple lines
Step by step
Holding and re-accepting a call on a trunk key
Prerequisite: You have accepted a call on a line key ( Page 106) or you are conducting a consultation call.
S Briefly press the line key you are currently using,
or
Select and confirm the option shown.
The line key where the call is on hold flashes slowly. The call can be continued on any phone in the team where the LED for this line key is flashing.
Retrieving the call
T Press the flashing line key. Proceed with your call.
Exclusively holding and re-accepting a call on a trunk key
Prerequisite: You have accepted a call on a line key or you are conducting a consultation call that only you can or wish to continue.
S Press the "Excl. Hold" programmed sensor key.or
Select and confirm the option shown.
The line key where the call is parked, flashes slowly. The call can be continued on your phone only and is not signaled on any other phone.
Retrieving the call
T Press the flashing line key. Proceed with your call.
Hold?
Private hold?
117
Step by step
Making calls via multiple lines
Accepting a specific held line
A colleague in an open-plan office has parked a call on a line key and requests that you accept the call. You do not have access to this line.
^ Lift the handset.
Select and confirm the option shown.
j Enter the phone number of the phone where the call is parked. In this way you can accept the call.
Forwarding calls on linesWhen you activate call forwarding for a shared line ( Page 104), the line is generally also forwarded to other phones.
The process for configuring call forwarding for a specific line is identical to the call forwarding process already described. You must simply ensure that the required line is already seized.
S Press the line key for the required line. The LED lights up.
Please read the additional notes on Page 43.
Direct call pickup?
118
Making calls via multiple lines
Step by step
Ring transferIf you temporarily leave your workstation or do not wish to be disturbed, you can transfer incoming calls to your line to another destination. A "RTRLN" (ring transfer/line) sensor key can be programmed for each line.
Activating
S Press the "RTRLN" programmed sensor key. The LEDs on your phone and on the destination phone light up. When you receive a call, the line key flashes but the phone does not ring. The call is signaled on all other team phones.
Deactivating
R Press the "RTRLN" programmed sensor key. The LED goes out. Calls are signaled on the phone once more.
119
Step by step
Making calls in an executive-secretary team
Making calls in an executive-secretary teamAn executive-secretary team is configured by the rele-vant service personnel and may include up to four executive and up to two secretary telephones.
Calling an executive or secretary phone
Calling an executive/secretary phoneOn the secretary phone, a DSS key is configured as "ex-ecutive" and on the executive phone, a DSS key is con-figured as "secretary".
Example: calling the secretary from the executive phone
The LED is not lit – the secretary is not on a call
S Press the "secretary" DSS key.
^ Lift the handset.or
n Press the key and enter speakerphone mode.
The LED is lit – the secretary is on a call
R Press the "secretary" DSS key.
Camp-on to the secretary phone. The called party hears a tone and the "Pickup" programmed sensor key flash-es.
^ Lift the handset.or
n Press the key and enter speakerphone mode.
For information on the meanings of the LED dis-plays of the DSS keys, see Page 20.
DSS from the secretary to the executive func-tions in the same way, using the "executive" DSS key.
120

Making calls in an executive-secretary team
Step by step
Accepting calls for the executive phone at the secretary phoneWhen a call is received for the executive phone, the secretary phone rings.
^ Lift the handset.or
n Press the key and enter speakerphone mode.
Accepting calls for the executive phone when already on a callYou are conducting a call.The executive phone receives a call.
[ Ask your call partner to wait.
T Press the "Pickup" programmed sensor key.
Ending the call and returning to the first call:
s Press the key shown.
Continue the call with your initial call partner.
Transferring a call to the executive phone
Prerequisite: You have accepted a call for the executive phone on the secretary phone.
S Press the "executive" DSS key. You are connected to the executive phone.
With announcement
[ Announce the call partner.
\ Replace the handset.
Without announcement
\ Replace the handset immediately.
121
Step by step
Making calls in an executive-secretary team
Transferring calls directly to the executive phoneWhen the secretary is out of the office, calls for the ex-ecutive can be transferred directly to the executive phone. This transfer can be made on the secretary phone or on the executive phone.
Activating
S Press the "RT Executive" programmed sensor key. The LED lights up.
Deactivating
R Press the "RT Executive" programmed sensor key. The LED goes out.
Accepting calls on the executive phoneThe secretary phone does not answer a call for the ex-ecutive. After 15 seconds (depending on the system) you hear an alert tone on the executive phone. The dis-play shows who is calling.
^ Lift the handset.
T Press the "Pickup" programmed sensor key.
Accepting a call for another executive-secretary teamIf multiple executive-secretary teams are configured, you can also accept calls for other teams.
^ Lift the handset.
T Press the programmed sensor key, for example, "Exec 3".
Calls for the secretary phone are not transferred, only calls for the executive phone.
Call pickup is also possible during a call. Ask your call partner to wait briefly and then press the flashing programmed sensor key.
122
Making calls in an executive-secretary team
Step by step
Using a second (executive) telephonePrerequisite: A second phone is configured for the ex-ecutive. A "Group Park" sensor key is programmed on the first and second executive phones.
Parking a call on the first phone:
S Press the "Group Park" programmed sensor key. The LED lights up.
Continuing a call on the second phone:
^ Lift the handset.
T Press the "Group Park" programmed sensor key.
Activating/deactivating a second executive callOn the executive phone, you can configure calls to go to the secretary phone when you are on a call. If you are on a call and are expecting another important call, it may be useful to activate the second call feature.
N Open the program/service menu Page 29.
Select and confirm the option shown.
Confirm.
Confirm
or
confirm.
Feature settings? g
Camp-on?
Activate?
Deactivate?
123
Step by step
Making calls in an executive-secretary team
Using signal callIf a "Buzz" programmed sensor key is configured on your executive phone, you can press a key to send a sig-nal call to a specific destination phone (e.g. to a secre-tary phone). On the destination phone, the phone num-ber of the transmitting phone is also briefly displayed for the signal call.
You can press the programmed sensor key in idle mode and while on a call (once or several times).
If a "Buzz" programmed sensor key is not configured, you can lift the handset and enter the "Signal call" code to send a signal call to the destination phone.
Placing a messenger callYou can place a messenger call by pressing a key, if this key is configured on the executive phone. Programming a sensor key with a function Page 82.
Defining a representative for the secretaryCalls for the executive that arrive at the secretary phone can be forwarded to another phone. To do this, you must configure a "Alt. Answer" programmed sensor key. The procedure for doing this is identical to the proce-dure described in chapter „Configuring function keys“
Seite 82 (in this case: Representative).
Activating the representative:
S Press the "Alt. Answer" programmed sensor key. The LED lights up.
Deactivating the representative:
R Press the "Alt. Answer" programmed sensor key. The LED goes out.
124

Individual phone configuration
Step by step
Individual phone configuration
Adjusting display settings
Adjusting the display to a comfortable read-ing angleYou can swivel the display unit. Adjust the display unit so that you can clearly read the screen.
Illuminated display During operation, the illuminated display activates auto-matically when you enter a number. The illumination is automatically deactivated a few seconds after you per-form a final action.
Setting contrastThe display has eight contrast levels that you can set ac-cording to your light conditions.
+ or - Press one of the keys shown in idle mode Page 24.
Select and confirm the option shown.
+ or - Change the display contrast. Keep pressing the key until the desired contrast is set.
i Save.
Adjusting displays on the OpenStage key moduleYou can adapt the contrast for a connected OpenStage key module to the lighting conditions in eight levels.
+ or - Press one of the keys shown in idle mode Page 23.
Select and confirm the option shown.
+ or - Keep pressing the key until the desired contrast is set.
i Save.
Display contrast?
Label contrast?
125
Step by step
Individual phone configuration
Adjusting audio settingsOptimize the audio settings on your OpenStage for your environment and according to your personal require-ments.
Adjusting the ring volume
+ or - Press one of the keys in idle mode Page 23 or while a call is in progress.
Confirm.
+ or - Raise or lower the volume. Keep pressing the key until the desired volume is set.
i Save.
Adjusting the ring tone
+ or - Press one of the keys shown in idle mode Page 23.
Select and confirm the option shown.
+ or - To adjust the ring tone: Keep pressing the keys until the desired tone is set.
i Save.
Room character for speakerphone mode
To help the other party understand you clearly while you are talking into the microphone, you can adjust the tele-phone to the acoustics in your environment using "Nor-mal room", "Room with echo" or "Quiet room".
+ or - Press one of the keys shown in idle mode Page 23.
Select and confirm the option shown.
+ or - Modify the room type. Keep pressing the key until the desired room type is set.
i Save.
Ringer volume?
Ringer pitch?
Speakerphone mode?
126
Individual phone configuration
Step by step
Setting the volume of the alert tone
The alert tone is output, for example when you receive a second call while a call is in progress.
+ or - Press one of the keys shown in idle mode Page 23.
Select and confirm the option shown.
+ or - Modify the volume. Keep pressing the key until the de-sired volume is set.
i Save.
Turn ringtone on/off
You can see whether the function is activated or deacti-vated from the corresponding icon in the status bar on the display Page 23.
) Hold down the key shown.
Warning tone?
127
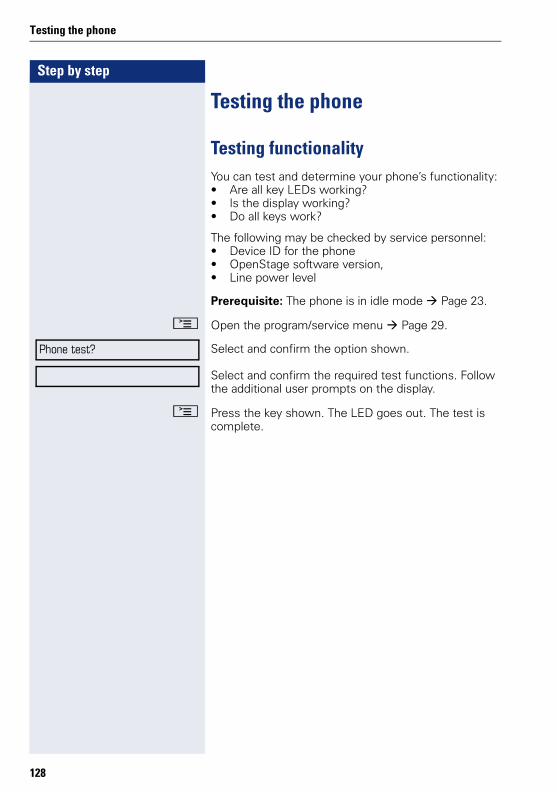
Step by step
Testing the phone
Testing the phone
Testing functionalityYou can test and determine your phone’s functionality:• Are all key LEDs working?• Is the display working?• Do all keys work?
The following may be checked by service personnel:• Device ID for the phone• OpenStage software version,• Line power level
Prerequisite: The phone is in idle mode Page 23.
N Open the program/service menu Page 29.
Select and confirm the option shown.
Select and confirm the required test functions. Follow the additional user prompts on the display.
N Press the key shown. The LED goes out. The test is complete.
Phone test?
128

Special parallel call (ONS) functions
Step by step
Special parallel call (ONS) functionsIf your phone is part of an ONS group (ONS = "One Number Service"), you can be reached on all other phones in this group as well as on your own phone. To set up an ONS group, contact your service personnel.
An ONS group may consist of up to three phones (phone numbers).
Up to one group member can be an external phone (such as a mobile phone). One phone in the group is the "master" (A) - the other ONS group members (B, C) re-ceive A’s number.
If A, B or C receive a call, all phones in the ONS group ring. If A, B or C is busy, all phones in the ONS group are busy (callers outside the ONS group receive a busy signal). Within the ONS group, phones can be reached on their original phone numbers.
The following functions also have an additional impact on internal member phones in an ONS group:• Call waiting Page 59• Call forwarding Page 43• Do not disturb Page 97• Mailbox (MWI) Page 27• Callback Page 49• Call log Page 55
If your ONS group contains a mobile phone, you must ensure that it is always available (switched on). Otherwise the mobile mailbox may pick up a call too early, leading to call signaling problems on the other ONS group member phones.
A (master) B C
ONS group
129
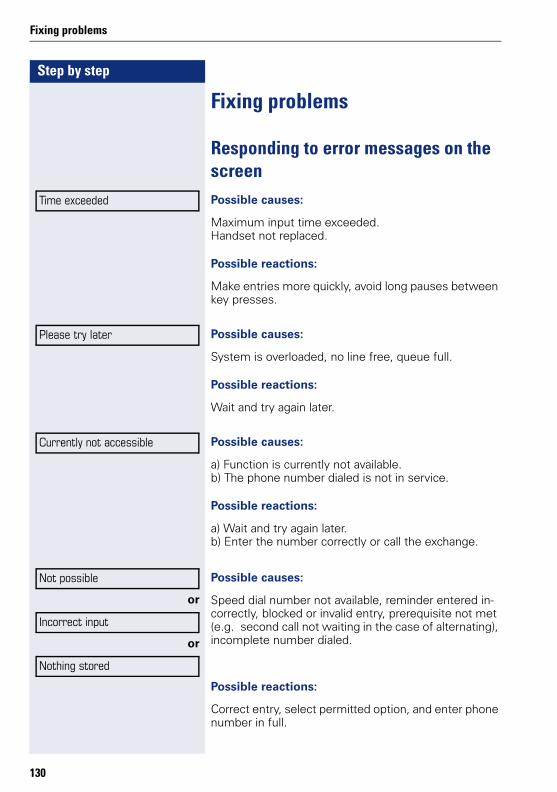
Step by step
Fixing problems
Fixing problems
Responding to error messages on the screenPossible causes:
Maximum input time exceeded.Handset not replaced.
Possible reactions:
Make entries more quickly, avoid long pauses between key presses.
Possible causes:
System is overloaded, no line free, queue full.
Possible reactions:
Wait and try again later.
Possible causes:
a) Function is currently not available.b) The phone number dialed is not in service.
Possible reactions:
a) Wait and try again later.b) Enter the number correctly or call the exchange.
or
or
Possible causes:
Speed dial number not available, reminder entered in-correctly, blocked or invalid entry, prerequisite not met (e.g. second call not waiting in the case of alternating), incomplete number dialed.
Possible reactions:
Correct entry, select permitted option, and enter phone number in full.
Time exceeded
Please try later
Currently not accessible
Not possible
Incorrect input
Nothing stored
130
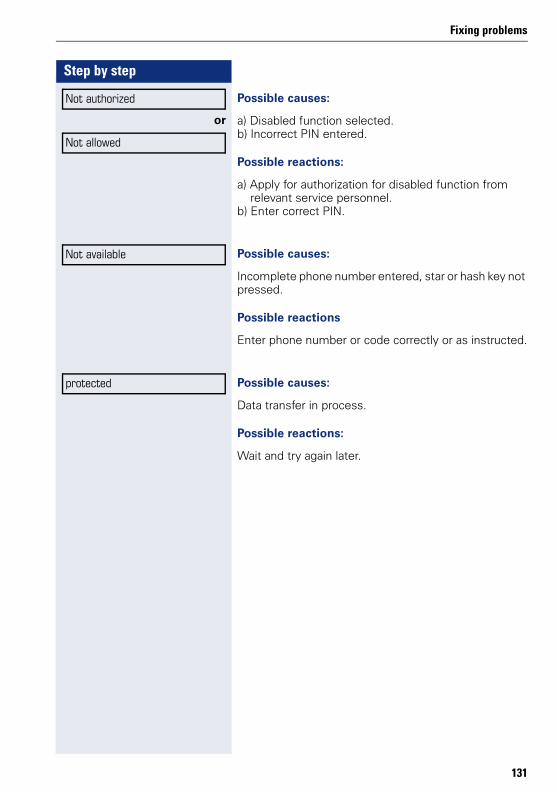
Fixing problems
Step by step
or
Possible causes:
a) Disabled function selected.b) Incorrect PIN entered.
Possible reactions:
a) Apply for authorization for disabled function from relevant service personnel.
b) Enter correct PIN.
Possible causes:
Incomplete phone number entered, star or hash key not pressed.
Possible reactions
Enter phone number or code correctly or as instructed.
Possible causes:
Data transfer in process.
Possible reactions:
Wait and try again later.
Not authorized
Not allowed
Not available
protected
131

Fixing problems
Contact partner in the case of problemsIn the case of faults that continue for more than 5 minutes, for example, con-tact your service personnel.
Troubleshooting
Pressed key does not respond:
Check if the key is stuck.
Telephone does not ring:
Check whether the "Do not disturb" function is activated on your telephone ( Page 97). If so, deactivate it.
You cannot dial an external number:
Check whether your telephone is locked.If the phone is locked, unlock it Page 96.
The displayed time is incorrect:
The time is corrected automatically over night after 24 hours at the latest.
To correct any other problems:
First contact the relevant service personnel. If the service personnel are unable to correct the problem, they must contact Customer Service.
Caring for your telephone• Never allow the telephone to come into contact with coloring, oily or
aggressive agents.• Always use a damp or antistatic cloth to clean the telephone. Never
use a dry cloth. • If the telephone is very dirty, clean it with a diluted neutral cleaner con-
taining surfactants, such as a dish detergent. Afterwards remove all traces of the cleaner with a damp cloth (using water only).
• Never use aggressive or alcohol-based cleansers on plastic parts. The use of scouring agents is also forbidden.
132
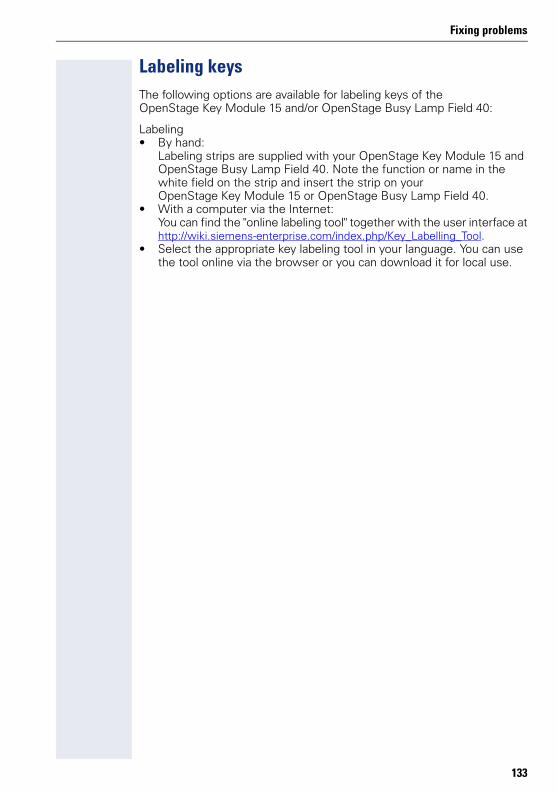
Fixing problems
Labeling keysThe following options are available for labeling keys of the OpenStage Key Module 15 and/or OpenStage Busy Lamp Field 40:
Labeling• By hand:
Labeling strips are supplied with your OpenStage Key Module 15 and OpenStage Busy Lamp Field 40. Note the function or name in the white field on the strip and insert the strip on your OpenStage Key Module 15 or OpenStage Busy Lamp Field 40.
• With a computer via the Internet:You can find the "online labeling tool" together with the user interface athttp://wiki.siemens-enterprise.com/index.php/Key_Labelling_Tool.
• Select the appropriate key labeling tool in your language. You can use the tool online via the browser or you can download it for local use.
133
Index
Index
Numerics5-way navigator .......................................... 19
AAccept call
(executive-secretary) ........................... 121Answering calls
with line keys ........................................ 106Audio controls ............................................ 18Audio keys ................................................... 18Automatic call forwarding ......................... 76Automatic consultation ............................. 85
BBlocking a party from joining a call ....... 114Busy override .............................................. 70
CCall
accepting ................................................. 33forwarding ............................................... 43incoming .................................................. 33parking ..................................................... 69quit ............................................................ 36
Call forward. no reply ................................ 47Call forwarding
fax or PC .................................................. 78on lines ................................................... 118
Call log ......................................................... 28Call park ......................................... 68, 69, 117Call pop up .................................................. 31Call transfer to the executive phone .... 122Call waiting .................................................. 70Callback ....................................................... 49Calling a second party ............................... 40Central speed dial numbers ..................... 91Conference ................................................. 62Connection options .................................... 14Consultation ................................................ 40Consultation hold ....................................... 40Consultation on a key ................................ 85Contact partner ........................................ 132
134
DDelayed call forwarding ............................ 76Dialing
with line keys ........................................ 108Display angle ............................................. 125Display icons ............................................. 137
connection status ................................... 26messages ................................................ 23status bar ................................................. 23
Do not disturb ............................................. 97DSS key
answering calls ....................................... 52DSS keys
call waiting ............................................... 59dialing ....................................................... 55
DTMF suffix dialing .................................... 67
EEntrance telephone ................................... 71Error messages ........................................ 130Exclusive park ........................................... 117Executive-secretary functions ................ 120
FFax messages ........................................... 111Fixed call forwarding ................................. 44Forwarding
for other stations .................................... 77Forwarding type ......................................... 43Forwarding types ....................................... 47Function keys ............................................. 18
GGeneral information ................................... 11Graphic display ........................................... 23
HHeadset ....................................................... 52Hold ............................................................ 109
Index
IIcons ........................................................... 137
connection status ................................... 26messages ................................................ 23status bar ................................................. 23
Identification on another phone ............. 100Important information ................................. 3Incoming calls ............................................. 28Intercom system ........................................ 71
KKey modules ......................................... 15, 17Keypad ......................................................... 21
LLED
line keys ................................................. 105LED display
direct station selection keys ................. 20function keys ........................................... 20
Line identification ..................................... 113Line keys ................................................... 103
allow/block party from joining call ..... 114answering calls ..................................... 106dialing ..................................................... 108making calls to multipleparties .................................................... 113three-party conference ........................ 114
Line utilization ........................................... 104Location of the telephone .......................... 3
MMaking calls ................................................ 37Messenger call ......................................... 124Microphone ................................................. 36Multi-line telephone ................................... 12
OOne Number Service
mailbox (MWI) ...................................... 111second call (call waiting) ....................... 60
Open listening ............................................ 35OpenStage Busy Lamp Field 40 .............. 17OpenStage Key Module 40 ...................... 15Operating instructions ................................. 2Outgoing calls ............................................. 28
PParking a call ............................................... 68Phone settings .......................................... 125Pickup call
(team) ....................................................... 53Primary line ............................................... 103Privacy .......................................................... 96Private line ................................................. 104Program/Service menu ............................. 29Programmable sensor keys ...................... 20
RRedialing a number
last dialed number .................................. 39saved number ......................................... 40
Repdial keys ................................................ 38Representative (secretary) ..................... 124
SSaving appointments ........................... 91, 93Second (executive) telephone ............... 123Second call .................................................. 59Second call (executive) ........................... 123Secondary line .......................................... 104Security ........................................................ 96Sensor key
programming ........................................... 82
135

Index
Settings ...................................................... 125Shared line ................................................ 104Shift key ....................................................... 61Signal call ................................................... 124Single-line telephone ................................. 12Speaker call ................................................. 72Speakerphone distance .............................. 3Speakerphone mode ........................... 33, 34Speed dialing
central ...................................................... 91dialing ....................................................... 57saving ....................................................... 91
System-wide speaker call ........................ 72
TTelephone maintenance ......................... 132Three-party conference ........................... 114Toggle/Connect .......................................... 41Tone dialing ................................................. 67Troubleshooting ....................................... 132Two-way intercom system ....................... 71
136
UUnanswered calls ....................................... 28User interface ............................................. 13User support ............................................... 11
VVariable call forwarding (all calls) ............. 46Voicemail ................................................... 111Volume
set ............................................................. 38
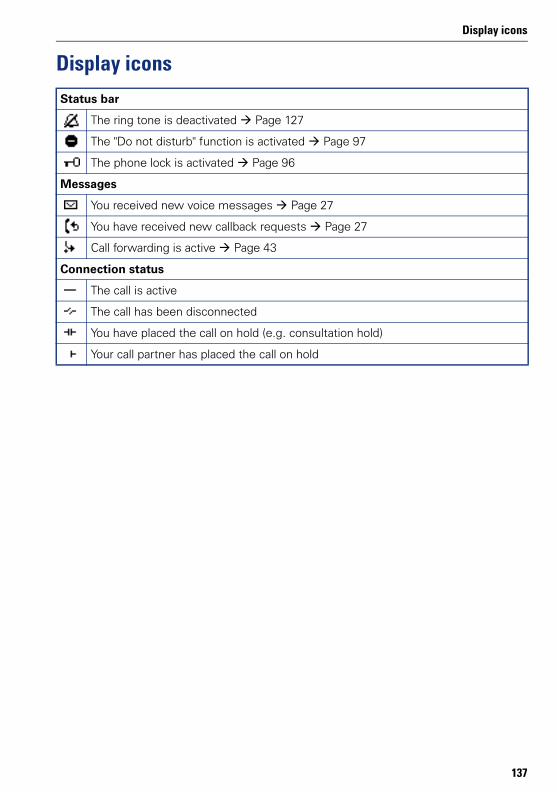
Display icons
137
Display icons
Status bar
The ring tone is deactivated Page 127
The "Do not disturb" function is activated Page 97
The phone lock is activated Page 96
Messages
You received new voice messages Page 27
You have received new callback requests Page 27
Call forwarding is active Page 43
Connection status
The call is active
The call has been disconnected
You have placed the call on hold (e.g. consultation hold)
Your call partner has placed the call on hold
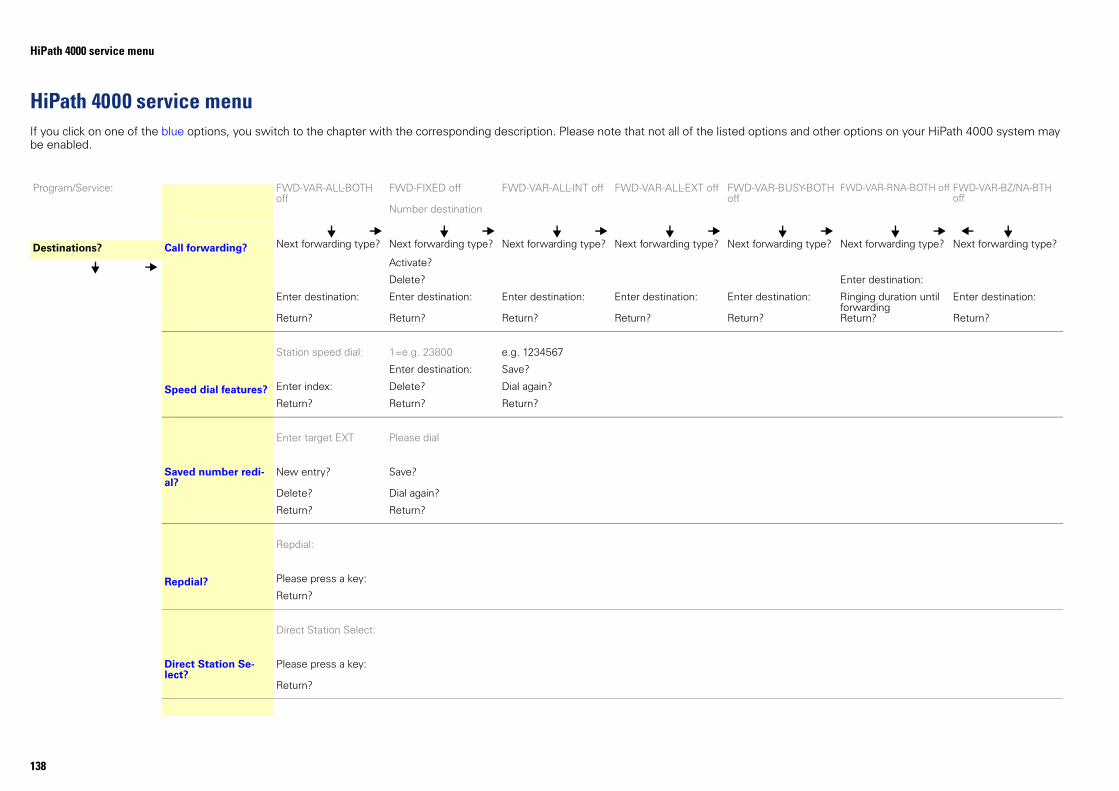
HiPath 4000
138
HiPathIf you click ons and other options on your HiPath 4000 system may be enabled
Program/Se R-BUSY-BOTH FWD-VAR-RNA-BOTH off FWD-VAR-BZ/NA-BTH off
Destinatio arding type? Next forwarding type? Next forwarding type?
Enter destination:
stination: Ringing duration until forwarding
Enter destination:
Return? Return?
service menu
4000 service menu on one of the blue options, you switch to the chapter with the corresponding description. Please note that not all of the listed opti.
rvice: FWD-VAR-ALL-BOTH off
FWD-FIXED off FWD-VAR-ALL-INT off FWD-VAR-ALL-EXT off FWD-VAoff
Number destination
ns? Call forwarding? Next forwarding type? Next forwarding type? Next forwarding type? Next forwarding type? Next forw
Activate?
Delete?
Enter destination: Enter destination: Enter destination: Enter destination: Enter de
Return? Return? Return? Return? Return?
Station speed dial: 1=e.g. 23800 e.g. 1234567
Enter destination: Save?
Speed dial features? Enter index: Delete? Dial again?
Return? Return? Return?
Enter target EXT Please dial
Saved number redi-al?
New entry? Save?
Delete? Dial again?
Return? Return?
Repdial:
Repdial? Please press a key:
Return?
Direct Station Select:
Direct Station Se-lect?
Please press a key:
Return?
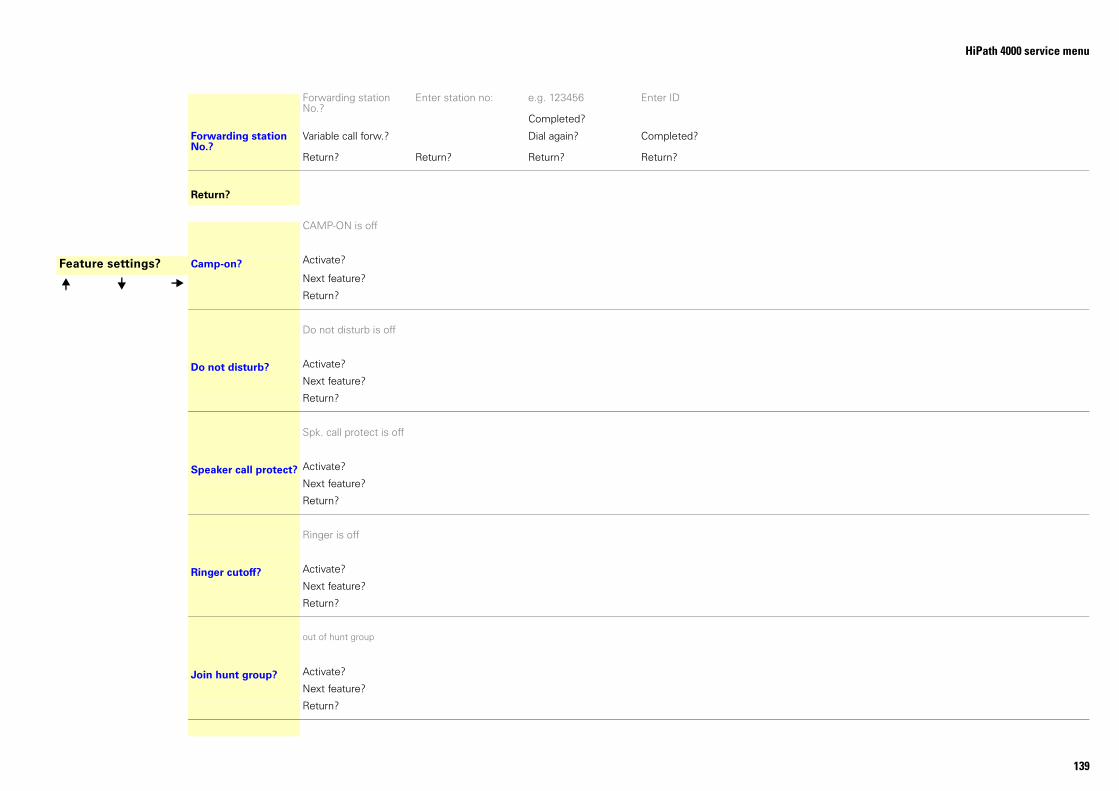
HiPath 4000 service menu
139
Feat
Forwarding station No.?
Enter station no: e.g. 123456 Enter ID
Completed?
Forwarding station No.?
Variable call forw.? Dial again? Completed?
Return? Return? Return? Return?
Return?
CAMP-ON is off
ure settings? Camp-on? Activate?
Next feature?
Return?
Do not disturb is off
Do not disturb? Activate?
Next feature?
Return?
Spk. call protect is off
Speaker call protect? Activate?
Next feature?
Return?
Ringer is off
Ringer cutoff? Activate?
Next feature?
Return?
out of hunt group
Join hunt group? Activate?
Next feature?
Return?
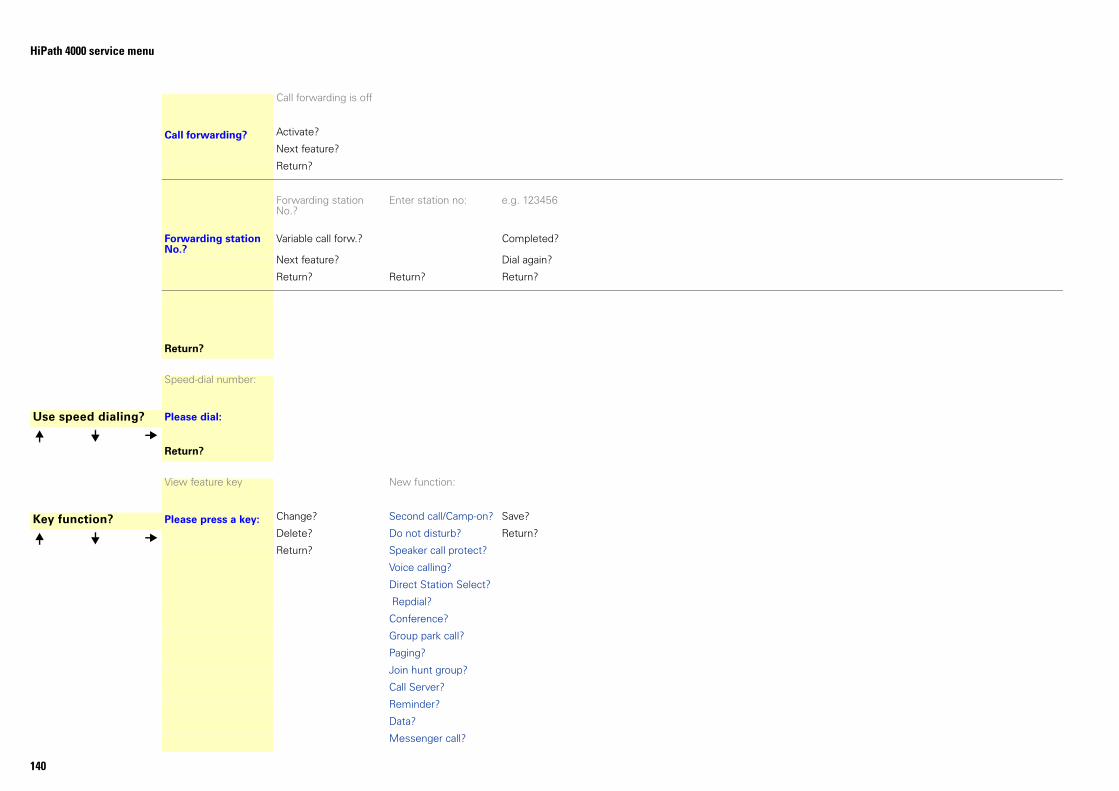
HiPath 4000
140
Use spee
Key func
service menu
Call forwarding is off
Call forwarding? Activate?
Next feature?
Return?
Forwarding station No.?
Enter station no: e.g. 123456
Forwarding station No.?
Variable call forw.? Completed?
Next feature? Dial again?
Return? Return? Return?
Return?
Speed-dial number:
d dialing? Please dial:
Return?
View feature key New function:
tion? Please press a key: Change? Second call/Camp-on? Save?
Delete? Do not disturb? Return?
Return? Speaker call protect?
Voice calling?
Direct Station Select?
Repdial?
Conference?
Group park call?
Paging?
Join hunt group?
Call Server?
Reminder?
Data?
Messenger call?
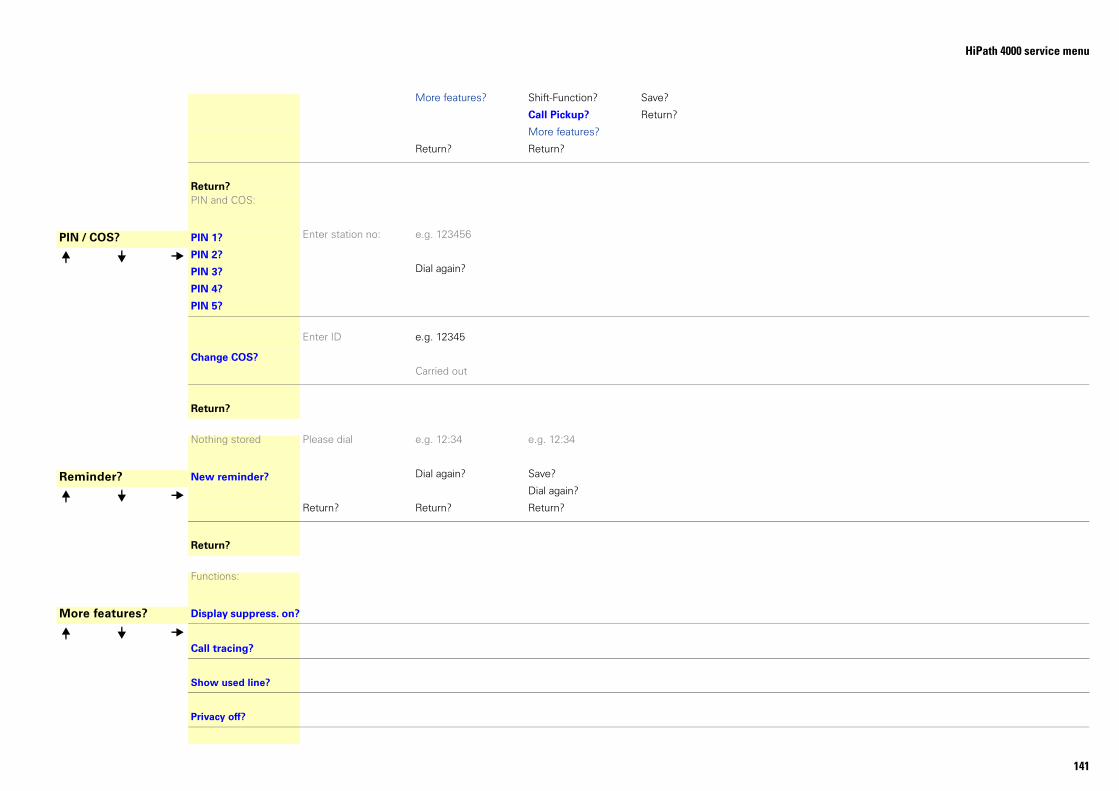
HiPath 4000 service menu
141
PIN
Rem
Mor
More features? Shift-Function? Save?
Call Pickup? Return?
More features?
Return? Return?
Return?PIN and COS:
/ COS? PIN 1? Enter station no: e.g. 123456
PIN 2?
PIN 3? Dial again?
PIN 4?
PIN 5?
Enter ID e.g. 12345
Change COS?Carried out
Return?
Nothing stored Please dial e.g. 12:34 e.g. 12:34
inder? New reminder? Dial again? Save?
Dial again?
Return? Return? Return?
Return?
Functions:
e features? Display suppress. on?
Call tracing?
Show used line?
Privacy off?
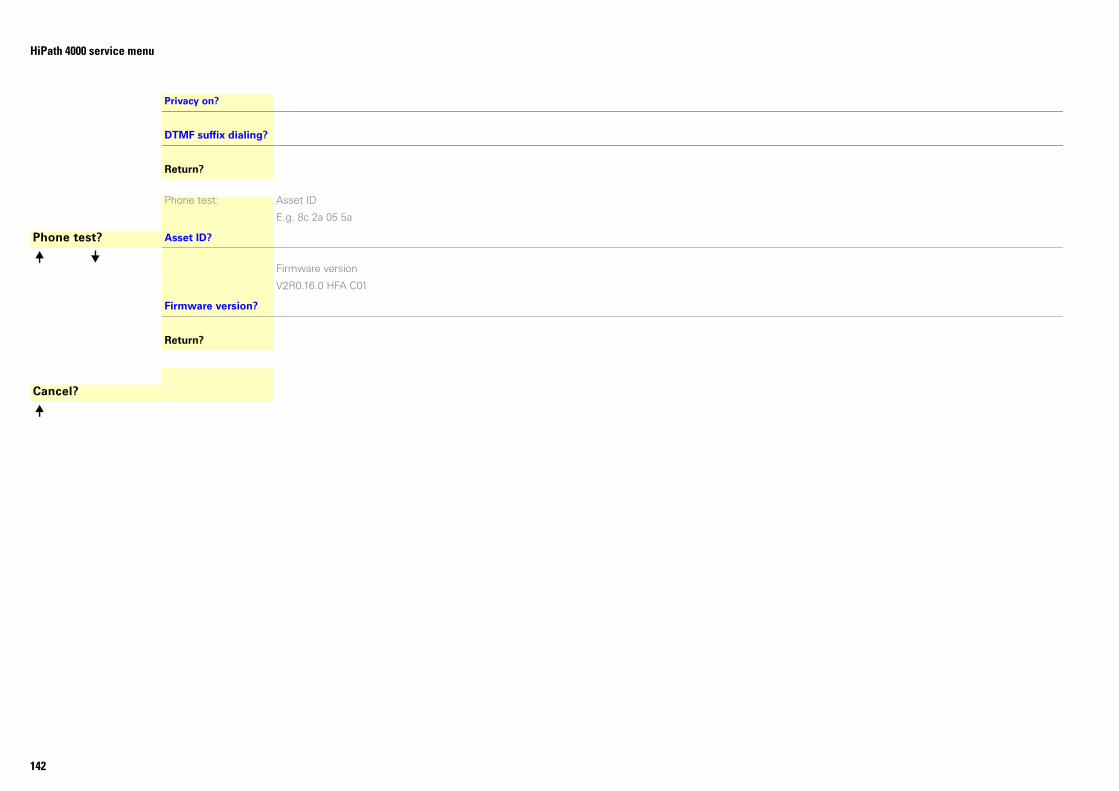
HiPath 4000
142
Phone te
Cancel?
service menu
Privacy on?
DTMF suffix dialing?
Return?
Phone test: Asset ID
E.g. 8c 2a 05 5a
st? Asset ID?
Firmware version
V2R0.16.0 HFA C01
Firmware version?
Return?
Copyright © Siemens Enterprise Communications GmbH & Co. KG 2011Hofmannstr. 51, D-80200 München
Siemens Enterprise Communications GmbH & Co. KG is a Trademark Licensee of Siemens AG
Reference No: A31003-S2000-U100-10-7619
The information provided in this document contains merely general descriptions or char-acteristics of performance which in case of actual use do not always apply as described or which may change as a result of further development of the products. An obligation to provide the respective char-acteristics shall only exist if expressly agreed in the terms of contract. Availability and technical specifications are subject to change without notice. OpenScape, OpenStage and HiPath are registered trade-marks of Siemens Enterprise Communications GmbH & Co. KG. All other company, brand, product and ser-vice names are trademarks or registered trademarks of their respective holders.
Siemens Enterprise Communicationswww.siemens-enterprise.com