Navis SPARCS N4 COMMUNITY ACCESS PORTAL Help · eMail Enter your email address. You can enter up to...
36
Navis SPARCS N4 COMMUNITY ACCESS PORTAL Help
Transcript of Navis SPARCS N4 COMMUNITY ACCESS PORTAL Help · eMail Enter your email address. You can enter up to...
Navis SPARCS N4
COMMUNITY ACCESS PORTAL Help
Οργανισμός Λιμένος Πειραιώς
1 File Menu
The File menu provides access to various options that allow you to:
o Manage user preferences for the current user
o Exit CAP
In This Section
Edit My User Preferences form ........................................................................ 5
Edit My User Preferences form
File User Preferences Edit My User Preferences form
The Edit My User Preferences form enables you to:
Update your contact details, such as first name, last name, country, and time zone, on the Contact
Details tab
Change your password on the Security tab
Contact Details tab
File User Preferences Edit My User Preferences form Contact Details tab
The Contact Details tab displays the contact details for the current user. You can add or edit the
information displayed on the Contact Details tab.
To update your contact details:
1 In the First Name field, add or edit the first name associated with your user account.
You can enter up to 20 characters.
2 In the Last Name field, add or edit the last name associated with your user account.
You can enter up to 20 characters.
3 Update any other optional information associated with your user account.
4 Click Save.
Οργανισμός Λιμένος Πειραιώς
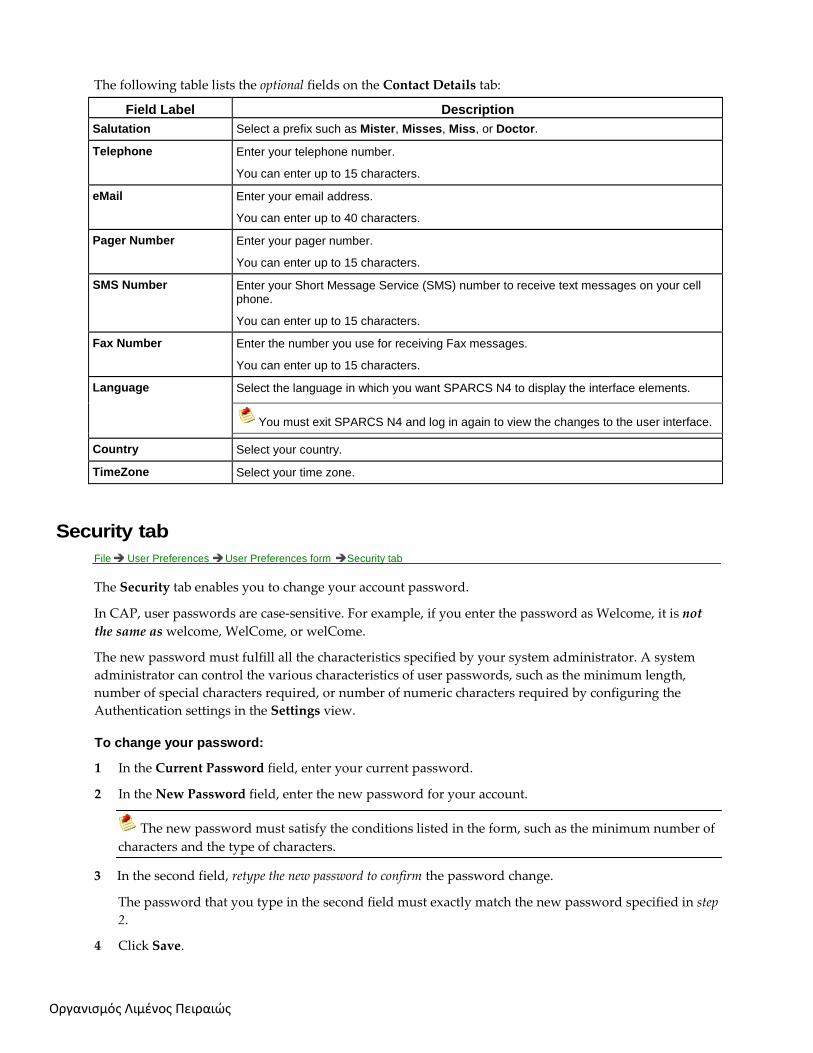
The following table lists the optional fields on the Contact Details tab:
Field Label Description
Salutation Select a prefix such as Mister, Misses, Miss, or Doctor.
Telephone Enter your telephone number.
You can enter up to 15 characters.
eMail Enter your email address.
You can enter up to 40 characters.
Pager Number Enter your pager number.
You can enter up to 15 characters.
SMS Number Enter your Short Message Service (SMS) number to receive text messages on your cell phone.
You can enter up to 15 characters.
Fax Number Enter the number you use for receiving Fax messages.
You can enter up to 15 characters.
Language Select the language in which you want SPARCS N4 to display the interface elements.
You must exit SPARCS N4 and log in again to view the changes to the user interface.
Country Select your country.
TimeZone Select your time zone.
Security tab
File User Preferences User Preferences form Security tab
The Security tab enables you to change your account password.
In CAP, user passwords are case‐sensitive. For example, if you enter the password as Welcome, it is not
the same as welcome, WelCome, or welCome.
The new password must fulfill all the characteristics specified by your system administrator. A system
administrator can control the various characteristics of user passwords, such as the minimum length,
number of special characters required, or number of numeric characters required by configuring the
Authentication settings in the Settings view.
To change your password:
1 In the Current Password field, enter your current password.
2 In the New Password field, enter the new password for your account.
The new password must satisfy the conditions listed in the form, such as the minimum number of
characters and the type of characters.
3 In the second field, retype the new password to confirm the password change.
The password that you type in the second field must exactly match the new password specified in step
2.
4 Click Save.
Οργανισμός Λιμένος Πειραιώς
When you log in to CAP the next time, you must use the new password that you specified using the above
steps.
2 Container Menu
The Container menu provides access to various views, tabs, and forms that enable you to perform
container‐related activities such as:
o Managing containers and equipment
o Setting up and managing bills of lading and import delivery orders
o Performing various actions on containers
o Updating container delivery requirements
In This Section
My Containers view .................................................................................................... 9
Containers view ......................................................................................................... 12
Container Notices view............................................................................................. 14
My Containers view
Operations Container Containers: My List Containers: My List view
The My Containers view displays a set of containers that you have selected. You can use the My
Containers view to keep track of the selected set of containers and to update its various properties.
You can add up to a maximum of 950 containers to the My Containers view.
When you log into CAP for the first time, the My Containers view does not display any records. After you
add
containers to the My Containers view, SPARCS N4 displays the containers in the My Containers view
until you remove them from this view.
If you change the sort order or the column layout in the My Containers view, SPARCS N4 does not
save the change after you close the tab.
Select a container in the list and right‐click to display following:
� Show Holds/Permissions
Select this option to view the holds/permissions that may or may not prevent an event for the chosen
container. For more information, see Holds and Permissions view. Hold/Permission Details form.
� Show History
The Event History view displays the events recorded for the selected entity such as container, container,
chassis, accessory, vessel visit, train visit, bill of lading, or an order (booking, EDO, or ELO).
� Query Charges
Οργανισμός Λιμένος Πειραιώς
The Query Charges form enables a Trouble Desk clerk or another CAP user to query and view
accumulated unpaid charges, such as storage charges or power charges, for a container. For
more information, see Query Charges form.
In addition, you can access the Containers commands from the Actions menu.
Holds and Permissions view
Container My Containers Show Holds/Permissions Holds and Permissions view
Container Containers Show Holds/Permissions Holds and Permissions view
The Holds and Permissions view displays the holds/permissions for a selected container.
SPARCS N4 keeps active holds/permissions applied to equipment while in use within a complex
until the hold/permission is released or granted, regardless of the number of visits the equipment
makes to a facility. For example, if a full container departs a facility with an active hold/permission,
when the container returns to the facility within the complex SPARCS N4 keeps the active
hold/permission applied to the container. This is not true for active holds/permissions applied to a
container.
You can view the following details in this form:
Status: The status of the hold/permission. A hold can either be in the ACTIVE, REQUIRED, or PRE‐
REQUISITE state.
Applied On: The date and time when the hold was applied on the selected container.
Hold/Perm: The name of the hold/permission or the prerequisite event applied on the selected container.
For example, you may require a bill of lading release before it is possible to deliver any of the containers
associated with the B/L via the gate. In this case, the bill of lading is the guardian entity for the associated
containers.
To view the details of the selected hold/permission and the list of events affected by it, double‐click the
event, or use the Action Show Details option.
Event History view
Container My Containers Show History Event History view
Container Containers Show History Event History view
The Event History view displays the events recorded for the selected entity such as container,
container, chassis, accessory, vessel visit, train visit, bill of lading, or an order (booking, EDO, or
ELO).You can record service events for the selected entity on this tab. For more information, see
Event Types view.
In addition,certain tasks performed in SPARCS N4 such as, discharging a container or editing the routing
information for a booking, records the associated built‐in events on the tab for the affected entity.
To view the details of an event, double‐click the event or use the Action Show Details option.
The Changes field displays the values that changed per event for a container, booking, EDO, or
ELO. For instance, the old and new container position for a container discharge event would be
displayed here.
Οργανισμός Λιμένος Πειραιώς
When a billable event is extracted to the Chargeable Container Events view, SPARCS N4 associates the
Batch
ID with the event. You can display the Extract Batch column to view the Batch ID associated with the
event. For more information on displaying a column, see Hiding and displaying columns.
Containers view
Container Containers Containers Queries view
The Containers view displays the containers that exist at the current scope level. You can determine
an import containerʹs availability for pick‐up based on the date, sorted by Last Move, in ascending
order. Alternatively, you can use the Sort key in the Last Move column to change the order
(Ascending/Descending) of display.
Select a container in the list and right‐click to display following:
� Show Holds/Permissions
Select this option to view the holds/permissions that may or may not prevent an event for the chosen
container. For more information, see Holds and Permissions view. Holds and Permissions form.
� Show History
The Event History view displays the events recorded for the selected entity such as container, container,
chassis, accessory, vessel visit, train visit, bill of lading, or an order (booking, EDO, or ELO).
� Query Charges
The Query Charges form enables a Trouble Desk clerk or another CAP user to query and view
accumulated unpaid charges, such as storage charges or power charges, for a container. For more
information, see Query Charges form.
In addition, you can access the Containers commands from the Actions menu.
CAP enables you to restrict the number of containers displayed in the Containers view. This allows you to open
the view and search specific records faster.
You can add upto a maximum of 950 containers to the Containers view.
When a user logs into CAP for the first time, the Containers view does not display any records. After you add
containers to the Containers view, SPARCS N4 displays the containers in the Containers view until you remove
them from this view.
If you change the sort order or the column layout in the Containers view, CAP does not save the change
after you close the tab.
Οργανισμός Λιμένος Πειραιώς
List Selected
Sometimes, you may want to view a smaller subset of containers listed in the Containers view. You can select
the containers that you want to view and select the Display List Selected option to create another view
that displays only the selected containers.
The Actions menu in this view provides the same options as the parent view, including custom actions that
you may have implemented.
CAP does not save the List Selected views. If you close the tab or quit CAP, you cannot access the
same list view again.
CAP does not display the RELEASED holds in the Containers view. To view the RELEASED holds, use the
Container Inspector Holds/Permissions tab.
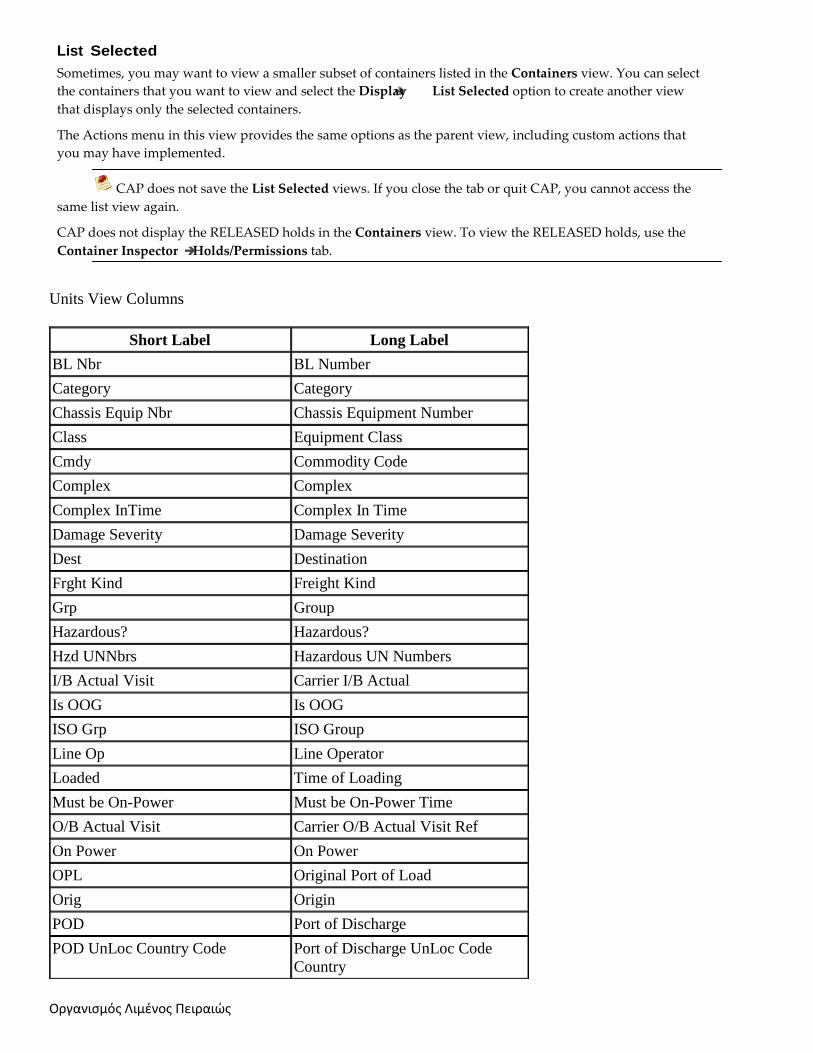
Units View Columns
Short Label Long Label
BL Nbr BL Number
Category Category
Chassis Equip Nbr Chassis Equipment Number
Class Equipment Class
Cmdy Commodity Code
Complex Complex
Complex InTime Complex In Time
Damage Severity Damage Severity
Dest Destination
Frght Kind Freight Kind
Grp Group
Hazardous? Hazardous?
Hzd UNNbrs Hazardous UN Numbers
I/B Actual Visit Carrier I/B Actual
Is OOG Is OOG
ISO Grp ISO Group
Line Op Line Operator
Loaded Time of Loading
Must be On-Power Must be On-Power Time
O/B Actual Visit Carrier O/B Actual Visit Ref
On Power On Power
OPL Original Port of Load
Orig Origin
POD Port of Discharge
POD UnLoc Country Code Port of Discharge UnLoc Code
Country
Οργανισμός Λιμένος Πειραιώς
POD-2 Second Port of Discharge
POL Port of Load
Reqs Power Requires Power
Restow Restow Type
Seal Nbr1 Seal Number 1
Seal Nbr2 Seal Number 2
Seal Nbr3 Seal Number 3
Seal Nbr4 Seal Number 4
State (Master) Visit State (Master)
Stop-Road Stop-Road
Stop-Vsl Stop-Vessel
T-State Transit State
Temp Req. in C Temp Req. in C
Temp Req. in F Temp Req. in F
Temp Required Temp. Required
Temp. Max Maximum Temperature
Temp. Min Minimum Temperature
Time Created Time Created
Time In Time Facility-In
Time Out Time Facility-Out
Unit Nbr Unit Nbr
Unit Notes Unit Notes
V-State Visit State
Weight Gross Weight
Container Notices view Container Container Notices Container Notices view
The Container Notices view displays the container notice requests. A container notice is a notification sent
when a service event is recorded for a specific container. You can add new container notices, and edit or
delete existing container notices from this view.
To add a new record:
Click .
To edit or delete a record:
1 In the list view, select the record(s) that you want to edit or delete.
2 Do one of the following:
Click to edit a selected record.
Click to delete the selected record(s).
Οργανισμός Λιμένος Πειραιώς
Depending on the list view, when you double‐click a record in the list view, SPARCS N4 displays
either an inspector that displays more details for the selected record or a form that enables you to edit
the record.
The Add, Edit, and Delete commands are also available on the shortcut menu for the list view. To access
the shortcut menu, right‐click the selected record.
<note > If the functionality is not available or you do not have a role with the associated privileges, the
, , or buttons are unavailable.
Οργανισμός Λιμένος Πειραιώς
3 Gate Menu
The Gate menu provides access to various options that allow you to:
Preadvise an export container
Preadvise a storage empty
Find a truck visit
View a gate transaction
Pre-advise Export Container form
Gate Pre-advise Export Pre-advise Export Container form
The Pre‐advise Export Container form enables you to pre‐advise export containers. To pre‐advise empty
containers, use the Pre‐adviseStorage Empty Container (on page 17) form.
To pre-advise an export container:
1 In the Basics area, in the Equipment Number field, enter the equipment number for the container
being pre‐advised.
� If the specified equipment exists, the Equipment Type and the Line Operator fields are pre‐
populated.
CAP only populates the line operator of the first equipment number you enter in the Pre‐
advise Export Container form. CAP does not auto‐populate the line operator for subsequent
equipment numbers that you enter after pre‐advising the first. To pre‐advise a subsequent
container for a different line operator, you must manually change the line operator.
� If the specified equipment exists and is already pre‐advised for the current facility, the existing
Οργανισμός Λιμένος Πειραιώς
container information is pre‐populated in the form fields.
� If the specified equipment does not exist in the system and the check digit calculation fails, the
Action form is displayed. In the Action form, re‐enter the equipment number and select the
equipment type.
You cannot pre‐advise equipment that is located in the yard for the current facility.
2 In the Equipment Type, Gross Weight, and Line Operator fields, enter or edit container information,
if missing or incorrect.
If you change the line operator for a subsequent pre‐advise, CAP clears the booking values from
the previous pre‐advise in the Pre‐advise Export Container form.
3 From the Carrier Mode drop‐down, select Train or Truck as the inbound carrier mode for the
container.
4 Specify or edit optional information such as the carrier ID for the selected inbound carrier mode, seal
numbers, notes, and a booking number if you want to pre‐advise against a specific booking.
5 In the Routing area, in the Vessel Visit, Port of Load, and Port of Discharge fields, specify or edit the
routing information for the selected container, if missing or incorrect.
You can restrict the vessel visits SPARCS N4 displays in the list of values for the Vessel Visit
field by their estimated time of arrival (ETA) date. For more information, see Vessel Visit configuration
settings.
6 Specify or edit optional information, such as Second Port of Discharge, Origin, and Destination for
the selected container.
7 On the Contents tab, from the Freight Kind drop‐down list, select or edit the freight kind for the
selected container, if missing or incorrect.
If you pre‐advise a container against a booking, the Freight Kind specified in this field must be
the same as the Freight Kind specified for the booking.
8 Use the Add Hazard button to add and edit hazards for the selected container.
If you specify hazards, the associated booking, if specified, will be updated to contain these
hazards.
9 Click Save.
CAP saves the record and removes the container number and gross weight data, but leaves the rest of
the data from the saved pre‐advise in the respective fields for the next pre‐advise.
Οργανισμός Λιμένος Πειραιώς
Pre-advised Containers view
Gate Pre-advised Containers Pre-advised Containers view
The Pre‐advised Containers view displays the pre‐advised containers that exist at the current
scope level. In addition, you can use the Actions menu to do the following:
Show Holds/Permissions
View the holds applied and the permissions granted for a selected container. For more
information, see
Hold/Permission Details
form.
Show History
View the events recorded for the selected entity such as container, container, chassis, accessory,
vessel visit, train visit, bill of lading, or an order (booking, EDO, or ELO). For more information see
Pre-advised Containers Columns
Short Label Long Label
Acry Eq Nbr Accessory Equipment Number
Arrival Booking Number Arrival Booking Number
Arrival Position Arrival Position
Bad Number Bad Number
BL Number BL Number
Booking Number Booking Number
Cargo Wt Cargo Weight
Category Category
Chassis Eq Damage Chassis Eq Damage
Chassis Eq GradeID Chassis Eq Grade
Chassis Eq Off-Hire
Chassis Eq Operator
Chassis Eq Owner
Chassis Eq Nbr Chassis Equipment Number
Class Equipment Class
Cmdy Commodity Code
Complex Complex
Complex Position Complex Position
Condition Condition
Consignee Consignee
Consignee Name
CSC Expiry CSC Expiry
CSI Country Calling CSI Country
Dest Destination
Οργανισμός Λιμένος Πειραιώς
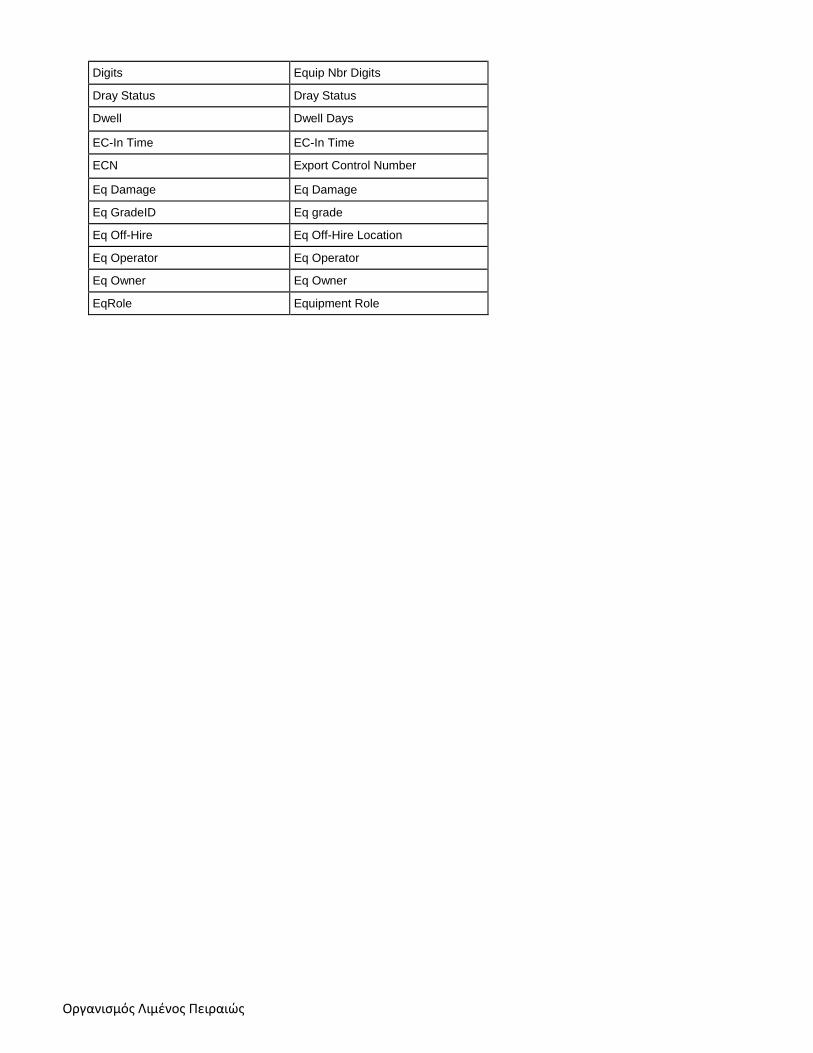
Digits Equip Nbr Digits
Dray Status Dray Status
Dwell Dwell Days
EC-In Time EC-In Time
ECN Export Control Number
Eq Damage Eq Damage
Eq GradeID Eq grade
Eq Off-Hire Eq Off-Hire Location
Eq Operator Eq Operator
Eq Owner Eq Owner
EqRole Equipment Role
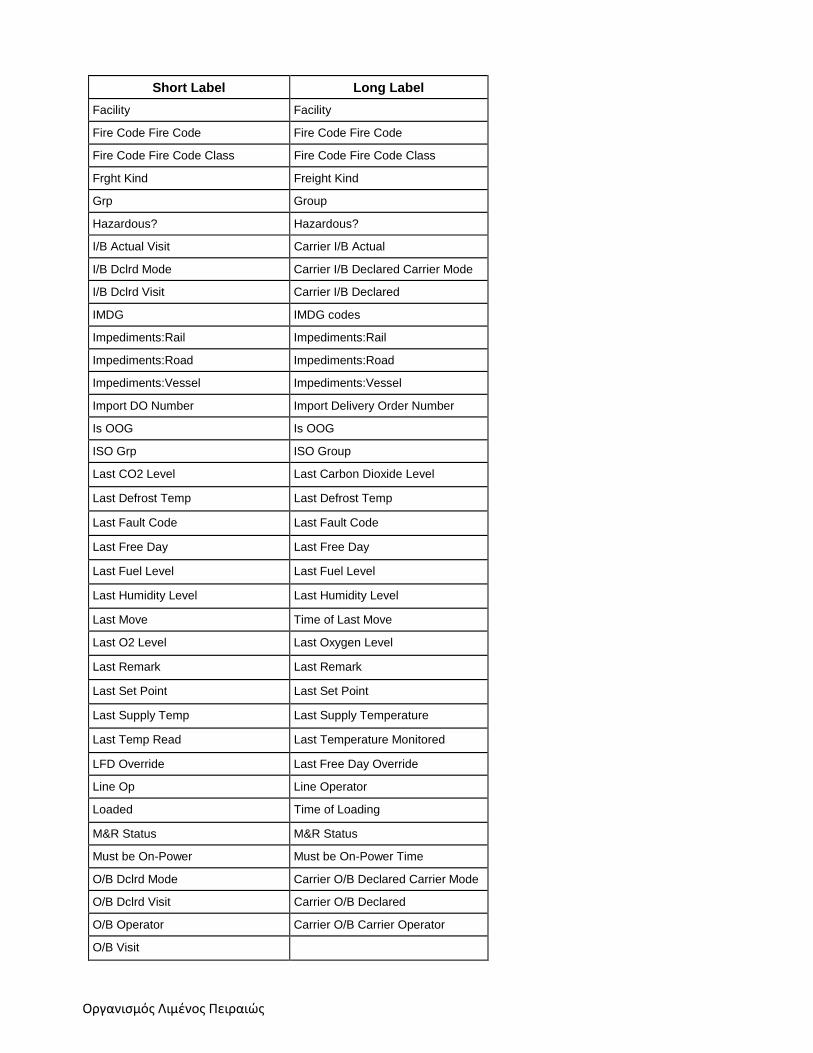
Οργανισμός Λιμένος Πειραιώς
Short Label Long Label
Facility Facility
Fire Code Fire Code Fire Code Fire Code
Fire Code Fire Code Class Fire Code Fire Code Class
Frght Kind Freight Kind
Grp Group
Hazardous? Hazardous?
I/B Actual Visit Carrier I/B Actual
I/B Dclrd Mode Carrier I/B Declared Carrier Mode
I/B Dclrd Visit Carrier I/B Declared
IMDG IMDG codes
Impediments:Rail Impediments:Rail
Impediments:Road Impediments:Road
Impediments:Vessel Impediments:Vessel
Import DO Number Import Delivery Order Number
Is OOG Is OOG
ISO Grp ISO Group
Last CO2 Level Last Carbon Dioxide Level
Last Defrost Temp Last Defrost Temp
Last Fault Code Last Fault Code
Last Free Day Last Free Day
Last Fuel Level Last Fuel Level
Last Humidity Level Last Humidity Level
Last Move Time of Last Move
Last O2 Level Last Oxygen Level
Last Remark Last Remark
Last Set Point Last Set Point
Last Supply Temp Last Supply Temperature
Last Temp Read Last Temperature Monitored
LFD Override Last Free Day Override
Line Op Line Operator
Loaded Time of Loading
M&R Status M&R Status
Must be On-Power Must be On-Power Time
O/B Dclrd Mode Carrier O/B Declared Carrier Mode
O/B Dclrd Visit Carrier O/B Declared
O/B Operator Carrier O/B Carrier Operator
O/B Visit
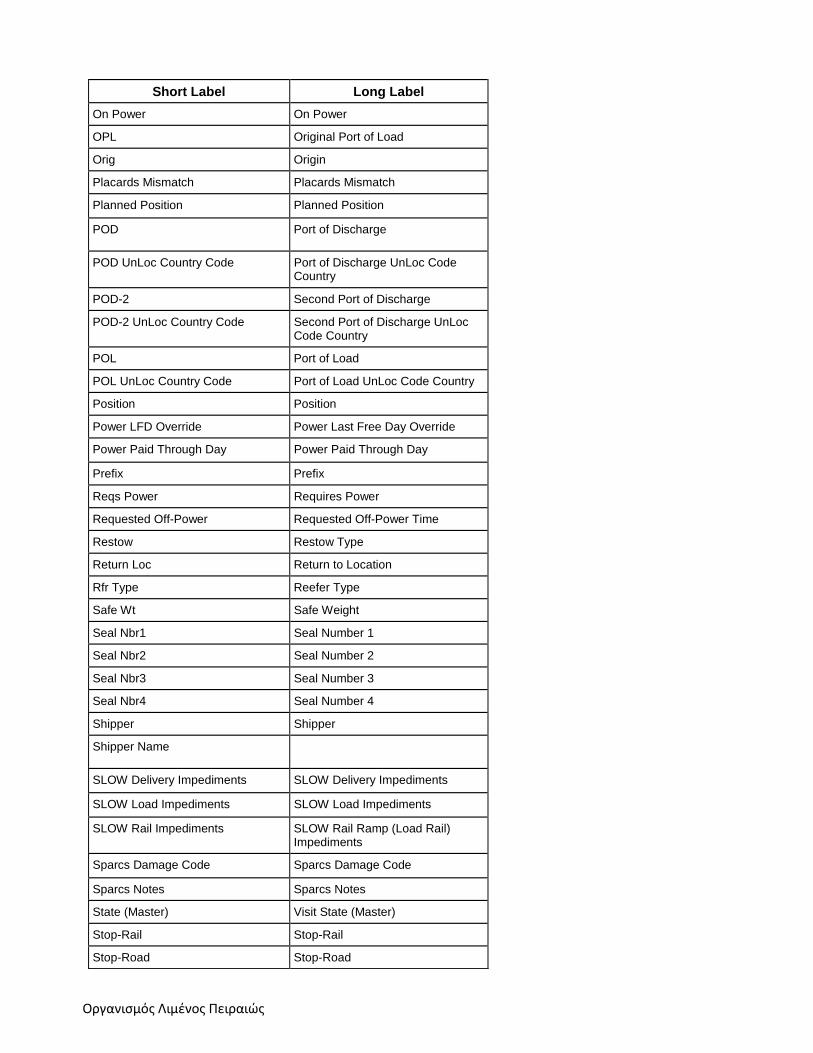
Οργανισμός Λιμένος Πειραιώς
Short Label Long Label
On Power On Power
OPL Original Port of Load
Orig Origin
Placards Mismatch Placards Mismatch
Planned Position Planned Position
POD Port of Discharge
POD UnLoc Country Code Port of Discharge UnLoc Code Country
POD-2 Second Port of Discharge
POD-2 UnLoc Country Code Second Port of Discharge UnLoc Code Country
POL Port of Load
POL UnLoc Country Code Port of Load UnLoc Code Country
Position Position
Power LFD Override Power Last Free Day Override
Power Paid Through Day Power Paid Through Day
Prefix Prefix
Reqs Power Requires Power
Requested Off-Power Requested Off-Power Time
Restow Restow Type
Return Loc Return to Location
Rfr Type Reefer Type
Safe Wt Safe Weight
Seal Nbr1 Seal Number 1
Seal Nbr2 Seal Number 2
Seal Nbr3 Seal Number 3
Seal Nbr4 Seal Number 4
Shipper Shipper
Shipper Name
SLOW Delivery Impediments SLOW Delivery Impediments
SLOW Load Impediments SLOW Load Impediments
SLOW Rail Impediments SLOW Rail Ramp (Load Rail) Impediments
Sparcs Damage Code Sparcs Damage Code
Sparcs Notes Sparcs Notes
State (Master) Visit State (Master)
Stop-Rail Stop-Rail
Stop-Road Stop-Road

Οργανισμός Λιμένος Πειραιώς
Short Label Long Label
Stop-Vsl Stop-Vsl
Storage Paid Through Day Storage Paid Through Day
Stow Special Stow
T-State Transit State
Tare Wt Tare Weight
Temp Req. in C Temp Req. in C
Temp Req. in F Temp Req. in F
Temp Required Temp. Required
Temp. Max Maximum Temperature
Temp. Min Minimum Temperature
Time Created Time Created
Time In Time Facility-In
Time Out Time Facility-Out
Time State Change Time Of Last State Change
Truck Cmpny Trucking Company
Type Arch ISO Equipment Type Archetype ISO
Type Height Equipment Type Nominal Height
Type ISO Equipment Type ISO
Type Length Equipment Type Nominal Length
Container Hold/Perm Container Applied Holds/Permissions
Container Impediments Container Impediments
Container Nbr Container Nbr
Container Notes Container Notes
V-State Visit State
Ver Yard Pos Verified Yard Position
Visible SPARCS Visible in SPARCS
Weight Gross Weight
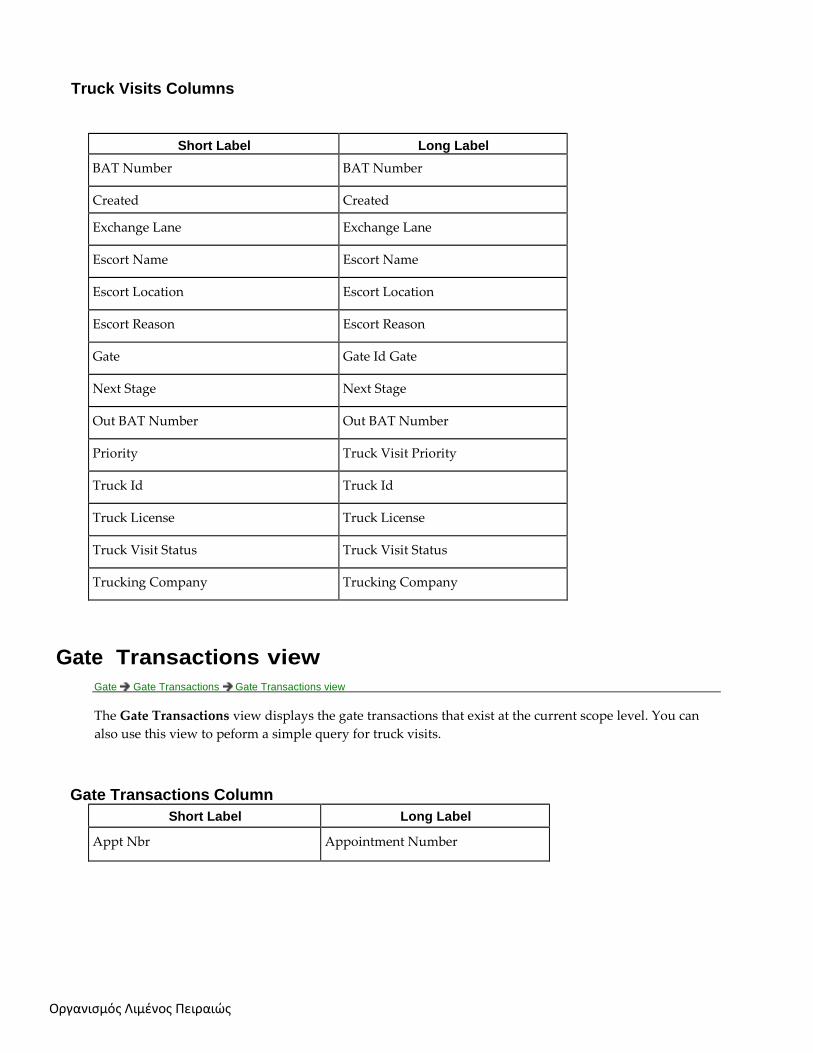
Truck Visits view
Gate Truck Visits Truck Visits view
A truck visit is a unique visit of a trailer to a dock door for the purpose of either loading or unloading.
The Truck Visits view displays the truck visits that exist at the current scope level. You can also use this
view to peform a simple query for truck visits.
Οργανισμός Λιμένος Πειραιώς
Truck Visits Columns
Short Label Long Label
BAT Number BAT Number
Created Created
Exchange Lane Exchange Lane
Escort Name Escort Name
Escort Location Escort Location
Escort Reason Escort Reason
Gate Gate Id Gate
Next Stage Next Stage
Out BAT Number Out BAT Number
Priority Truck Visit Priority
Truck Id Truck Id
Truck License Truck License
Truck Visit Status Truck Visit Status
Trucking Company Trucking Company
Gate Transactions view
Gate Gate Transactions Gate Transactions view
The Gate Transactions view displays the gate transactions that exist at the current scope level. You can
also use this view to peform a simple query for truck visits.
Gate Transactions Column
Short Label Long Label
Appt Nbr Appointment Number
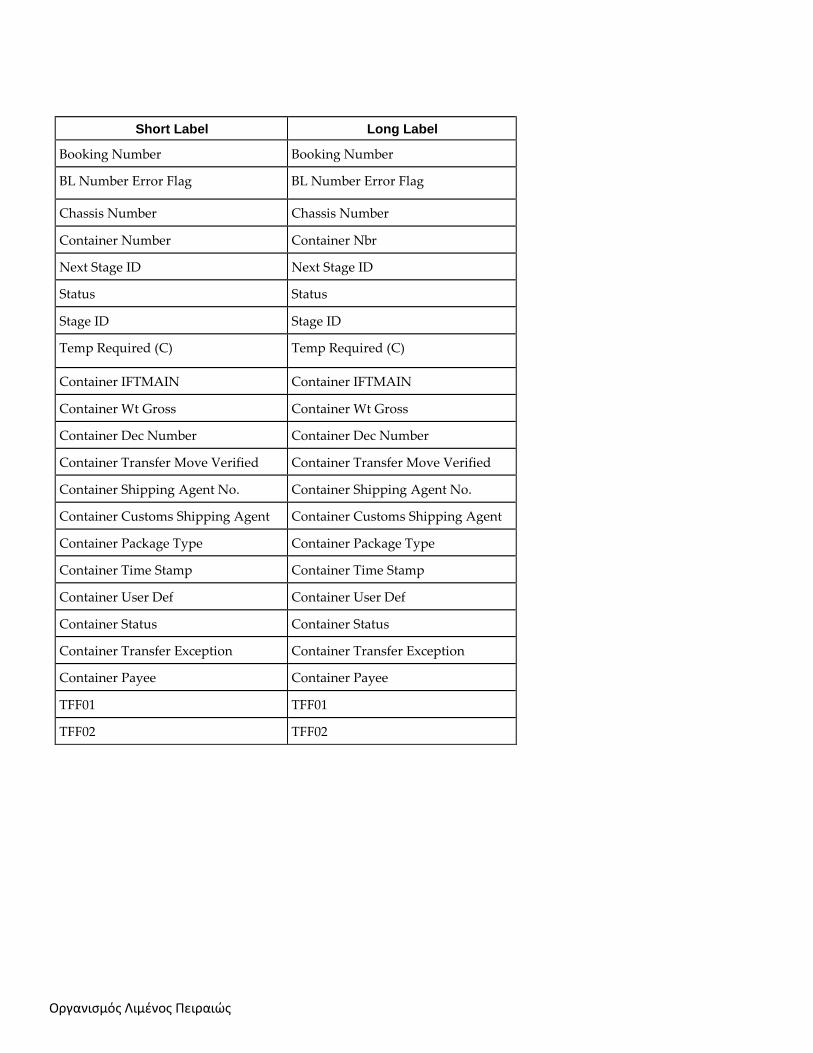
Οργανισμός Λιμένος Πειραιώς
Short Label Long Label
Booking Number Booking Number
BL Number Error Flag BL Number Error Flag
Chassis Number Chassis Number
Container Number Container Nbr
Next Stage ID Next Stage ID
Status Status
Stage ID Stage ID
Temp Required (C) Temp Required (C)
Container IFTMAIN Container IFTMAIN
Container Wt Gross Container Wt Gross
Container Dec Number Container Dec Number
Container Transfer Move Verified Container Transfer Move Verified
Container Shipping Agent No. Container Shipping Agent No.
Container Customs Shipping Agent
No.
Container Customs Shipping Agent
No. Container Package Type Container Package Type
Container Time Stamp Container Time Stamp
Container User Def Container User Def
Container Status Container Status
Container Transfer Exception Container Transfer Exception
Container Payee Container Payee
TFF01 TFF01
TFF02 TFF02
Οργανισμός Λιμένος Πειραιώς
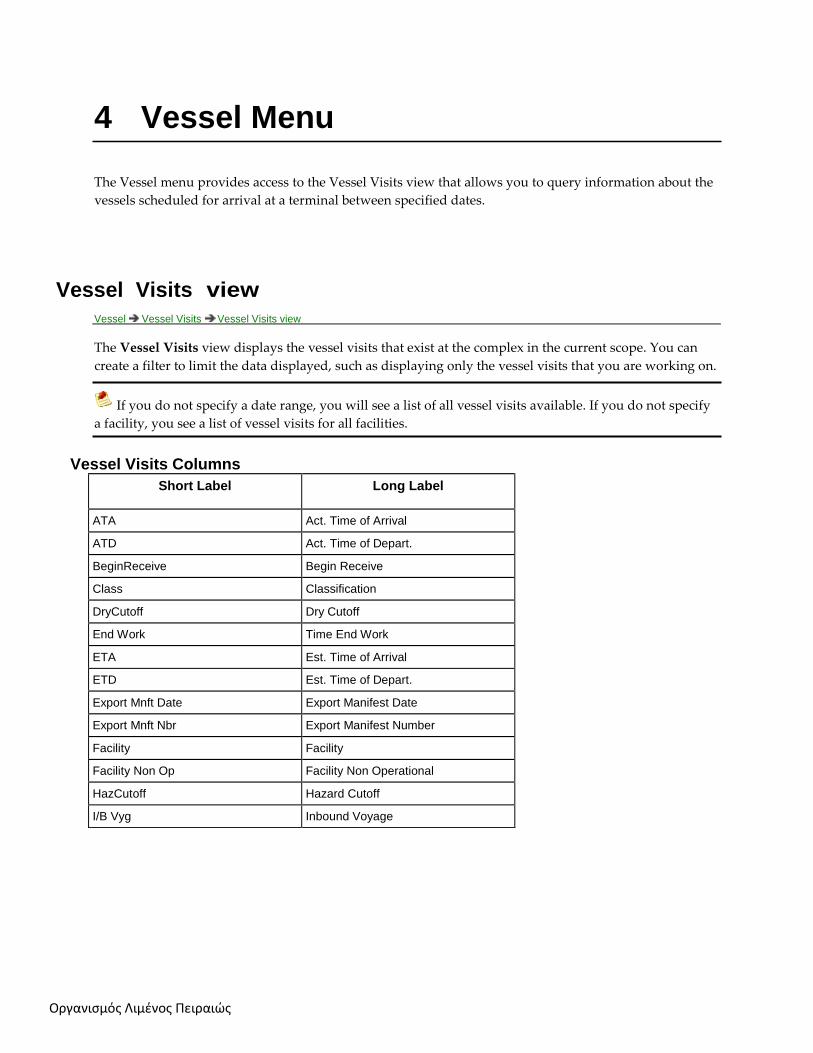
4 Vessel Menu
The Vessel menu provides access to the Vessel Visits view that allows you to query information about the
vessels scheduled for arrival at a terminal between specified dates.
Vessel Visits view
Vessel Vessel Visits Vessel Visits view
The Vessel Visits view displays the vessel visits that exist at the complex in the current scope. You can
create a filter to limit the data displayed, such as displaying only the vessel visits that you are working on.
If you do not specify a date range, you will see a list of all vessel visits available. If you do not specify
a facility, you see a list of vessel visits for all facilities.
Vessel Visits Columns
Short Label Long Label
ATA Act. Time of Arrival
ATD Act. Time of Depart.
BeginReceive Begin Receive
Class Classification
DryCutoff Dry Cutoff
End Work Time End Work
ETA Est. Time of Arrival
ETD Est. Time of Depart.
Export Mnft Date Export Manifest Date
Export Mnft Nbr Export Manifest Number
Facility Facility
Facility Non Op Facility Non Operational
HazCutoff Hazard Cutoff
I/B Vyg Inbound Voyage
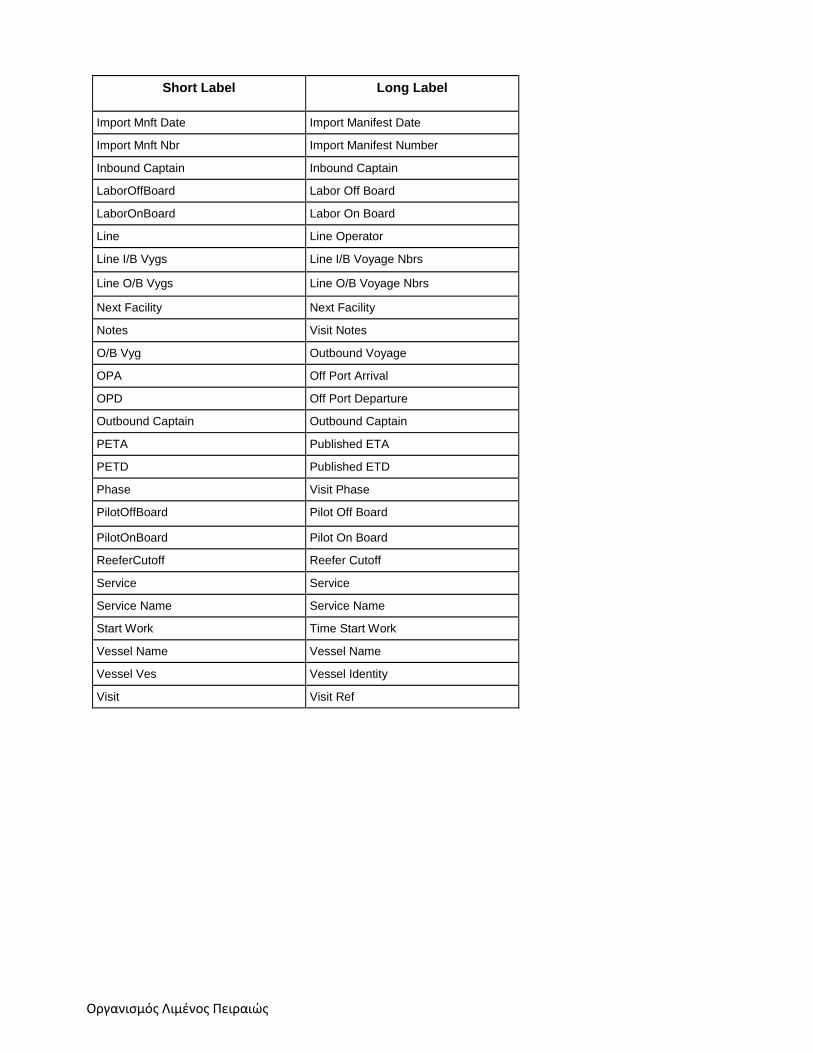
Οργανισμός Λιμένος Πειραιώς
Short Label Long Label
Import Mnft Date Import Manifest Date
Import Mnft Nbr Import Manifest Number
Inbound Captain Inbound Captain
LaborOffBoard Labor Off Board
LaborOnBoard Labor On Board
Line Line Operator
Line I/B Vygs Line I/B Voyage Nbrs
Line O/B Vygs Line O/B Voyage Nbrs
Next Facility Next Facility
Notes Visit Notes
O/B Vyg Outbound Voyage
OPA Off Port Arrival
OPD Off Port Departure
Outbound Captain Outbound Captain
PETA Published ETA
PETD Published ETD
Phase Visit Phase
PilotOffBoard Pilot Off Board
PilotOnBoard Pilot On Board
ReeferCutoff Reefer Cutoff
Service Service
Service Name Service Name
Start Work Time Start Work
Vessel Name Vessel Name
Vessel Ves Vessel Identity
Visit Visit Ref
Οργανισμός Λιμένος Πειραιώς
4 Working in Navis SPARCS N4
Using the Actions menu
You can perform various actions on the entities that are displayed in a list view. For example, in the Units
view, you can update hazardous cargo information, record a service event, or update holds/permissions
for a unit.
To perform an action:
1 Select one or more entities in the list view.
2 Click Actions.
3 From the menu, select the required option.
The actions that you can perform vary for each list view and depend on the privileges that are
assigned to your role.
When you select multiple entities in a list view and Navis SPARCS N4 disables an action, it
indicates that you cannot apply the selected action to multiple entities simultaneously.
Using the Display menu
You use the Display menu to export data that is displayed in a list view as a CSV (Comma Separated
Value) file, to get more information about the list view, and to specify what records Navis SPARCS N4
displays in the list view.
From the Display menu, select
Export: To export data displayed in a list view as a CSV file
Exporting Data
In Navis SPARCS N4, you can export data that is displayed in a list view to a CSV (Comma Separated
Value) file. You can use the following two configuration settings to control the number of rows that a
user can display in a list view or export from a list view at a time:
To export data displayed in a list view:
1 Select the data that you want to export.
If you do not select any rows, Navis SPARCS N4 tries to export all the rows in the list view.
2 Click <display>.
3 Select Export. 4 Click Selected to confirm your selection, or click All to export all rows.
5 In the Select Data Export Path dialog box, select the folder where you want to store the file.
You can save the file with the default name or specify a name in the File Name field.
If you change the name of the file, ensure that you specify the .csv extension for the new file name.
6 Click Export.
Οργανισμός Λιμένος Πειραιώς
Use an application such as Microsoft Excel to view, modify, or print the CSV file created.
Performing Quick Search
In Navis SPARCS N4, you can use the Quick Search field (on page 7) to narrow the list of entities that
are displayed in a list view. The Quick Search field enables you to search for an alphanumeric string or a
Boolean (true/false) value.
You can use quick search to search only the columns that are in the database. You cannot perform a
quick search on columns with derived values.
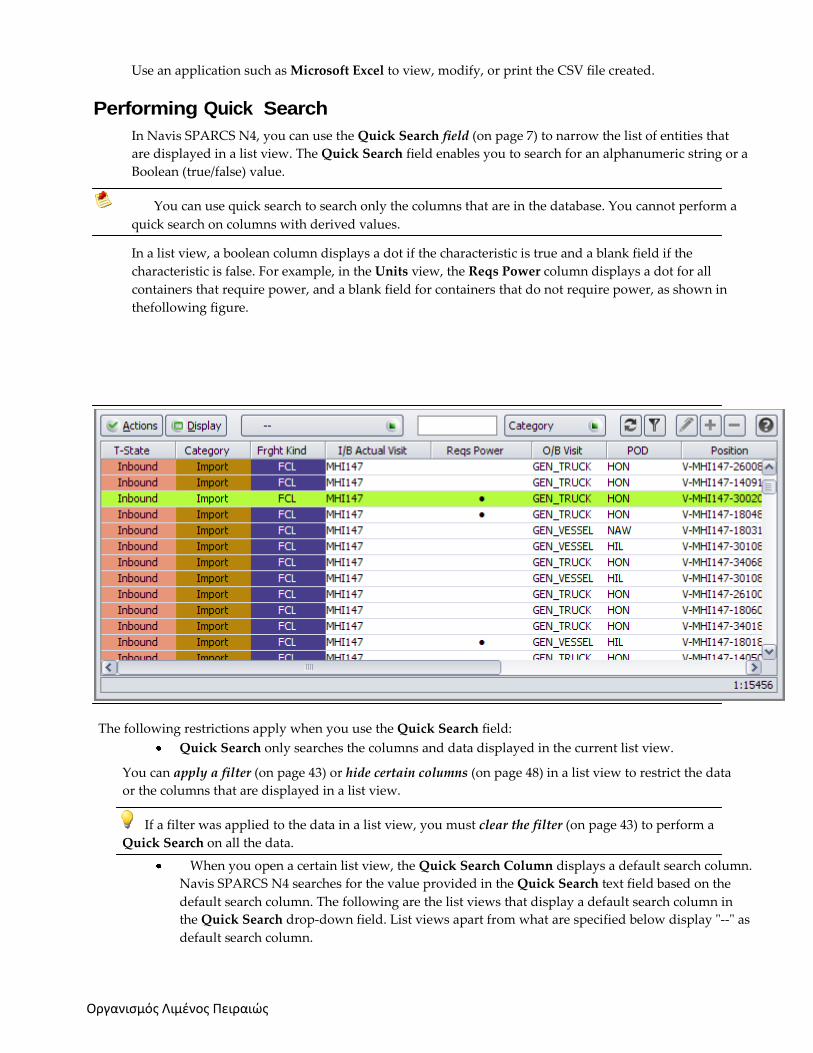
In a list view, a boolean column displays a dot if the characteristic is true and a blank field if the
characteristic is false. For example, in the Units view, the Reqs Power column displays a dot for all
containers that require power, and a blank field for containers that do not require power, as shown in
thefollowing figure.
The following restrictions apply when you use the Quick Search field:
Quick Search only searches the columns and data displayed in the current list view.
You can apply a filter (on page 43) or hide certain columns (on page 48) in a list view to restrict the data
or the columns that are displayed in a list view.
If a filter was applied to the data in a list view, you must clear the filter (on page 43) to perform a
Quick Search on all the data.
When you open a certain list view, the Quick Search Column displays a default search column.
Navis SPARCS N4 searches for the value provided in the Quick Search text field based on the
default search column. The following are the list views that display a default search column in
the Quick Search drop‐down field. List views apart from what are specified below display ʺ‐‐ʺ as
default search column.
Οργανισμός Λιμένος Πειραιώς
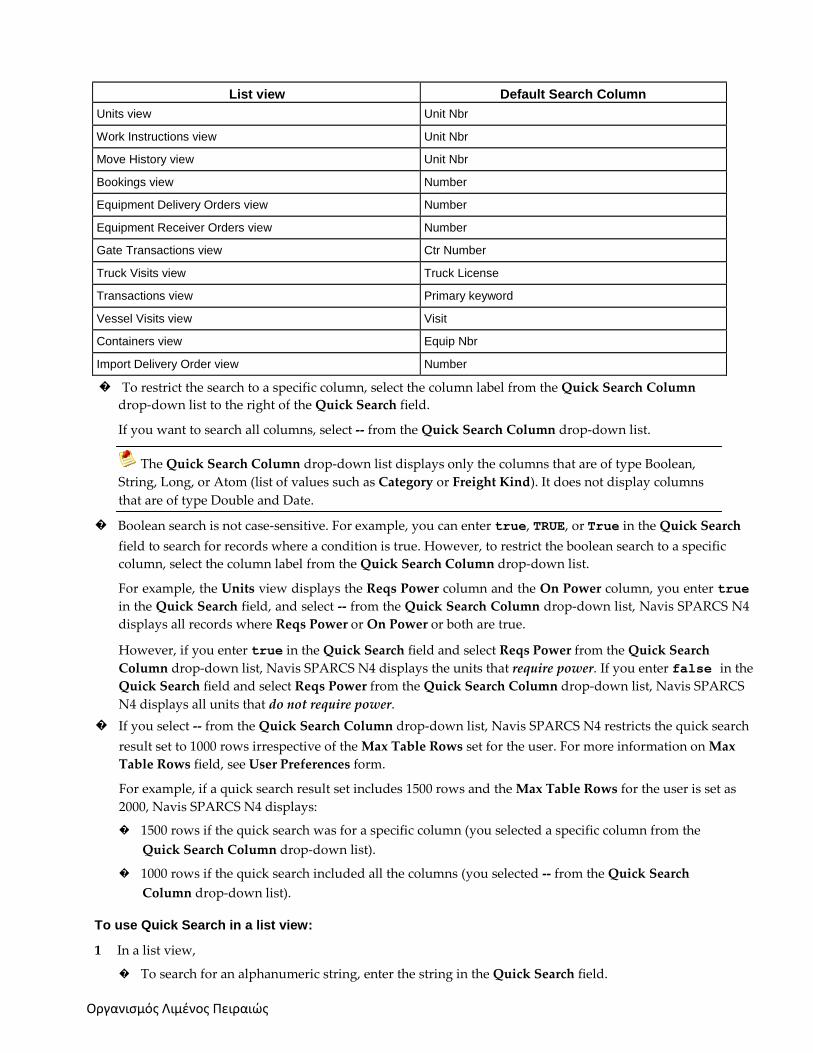
List view Default Search Column
Units view Unit Nbr
Work Instructions view Unit Nbr
Move History view Unit Nbr
Bookings view Number
Equipment Delivery Orders view Number
Equipment Receiver Orders view Number
Gate Transactions view Ctr Number
Truck Visits view Truck License
Transactions view Primary keyword
Vessel Visits view Visit
Containers view Equip Nbr
Import Delivery Order view Number
� To restrict the search to a specific column, select the column label from the Quick Search Column
drop‐down list to the right of the Quick Search field.
If you want to search all columns, select ‐‐ from the Quick Search Column drop‐down list.
The Quick Search Column drop‐down list displays only the columns that are of type Boolean,
String, Long, or Atom (list of values such as Category or Freight Kind). It does not display columns
that are of type Double and Date.
� Boolean search is not case‐sensitive. For example, you can enter true, TRUE, or True in the Quick Search
field to search for records where a condition is true. However, to restrict the boolean search to a specific
column, select the column label from the Quick Search Column drop‐down list.
For example, the Units view displays the Reqs Power column and the On Power column, you enter true
in the Quick Search field, and select ‐‐ from the Quick Search Column drop‐down list, Navis SPARCS N4
displays all records where Reqs Power or On Power or both are true.
However, if you enter true in the Quick Search field and select Reqs Power from the Quick Search
Column drop‐down list, Navis SPARCS N4 displays the units that require power. If you enter false in the
Quick Search field and select Reqs Power from the Quick Search Column drop‐down list, Navis SPARCS
N4 displays all units that do not require power.
� If you select ‐‐ from the Quick Search Column drop‐down list, Navis SPARCS N4 restricts the quick search
result set to 1000 rows irrespective of the Max Table Rows set for the user. For more information on Max
Table Rows field, see User Preferences form.
For example, if a quick search result set includes 1500 rows and the Max Table Rows for the user is set as
2000, Navis SPARCS N4 displays:
� 1500 rows if the quick search was for a specific column (you selected a specific column from the
Quick Search Column drop‐down list).
� 1000 rows if the quick search included all the columns (you selected ‐‐ from the Quick Search
Column drop‐down list).
To use Quick Search in a list view:
1 In a list view,
� To search for an alphanumeric string, enter the string in the Quick Search field.
Οργανισμός Λιμένος Πειραιώς
You can use wildcard characters (on page 19) in the alphanumeric string. For more information, see
Using wildcard characters in the Quick Search field.
� To search for a boolean value, enter true or false in the Quick Search field.
2 Optionally, select the column to search from the Quick Search Column drop down list.
3 Press Enter.
To clear a quick search and display all the records in a list view:
1 In the Quick Search field, delete all the text.
2 Press Enter.
Navis SPARCS N4 displays all the records in the list view.
Using wildcard characters in the Quick Search field
In an alphanumeric string, you can use wildcard characters (on page 19) (?, *, or %) to make the search as
general or as specific as you need. Wildcard characters help you search for a combination of characters that may or may not be preceded or followed by other characters.
The following examples illustrate some of the ways you can use wildcard characters in Navis SPARCS
N4:
If you enter MAT in the Quick Search field, Navis SPARCS N4 displays only the records
that have an exact match for MAT in the selected column(s).
If you enter MAT* in the Quick Search field, Navis SPARCS N4 displays the records where MAT
may
or may not be followed by other characters.
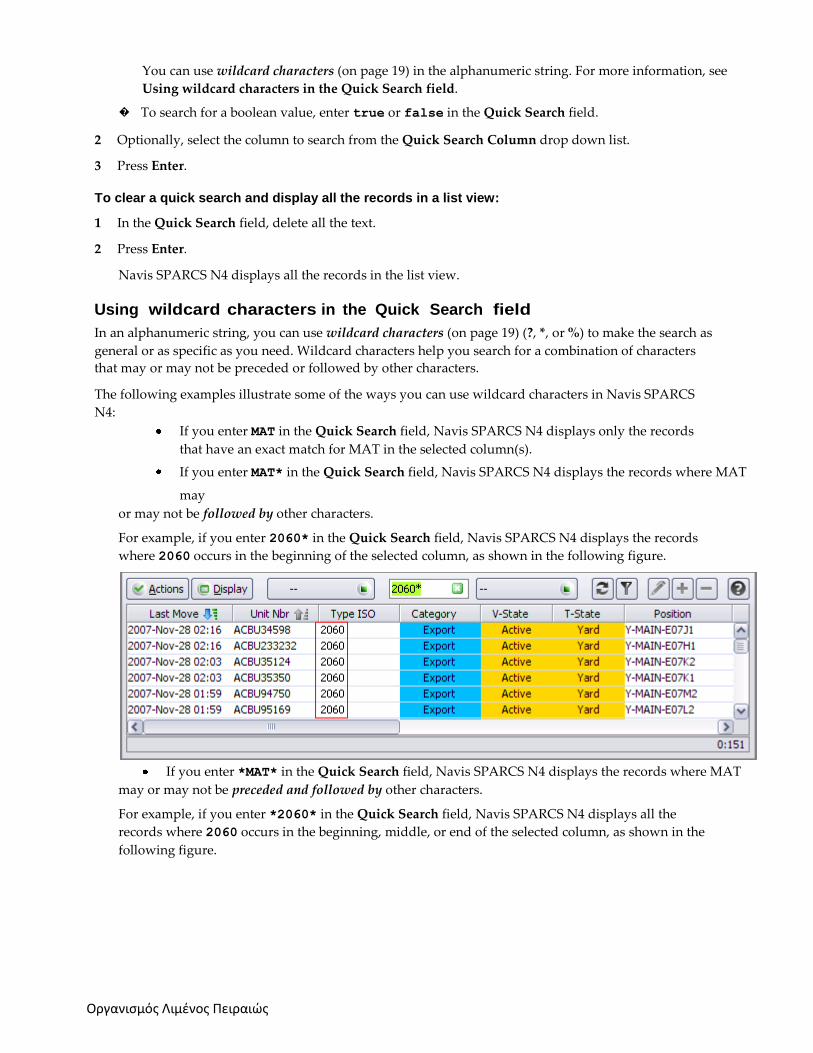
For example, if you enter 2060* in the Quick Search field, Navis SPARCS N4 displays the records
where 2060 occurs in the beginning of the selected column, as shown in the following figure.
If you enter *MAT* in the Quick Search field, Navis SPARCS N4 displays the records where MAT
may or may not be preceded and followed by other characters.
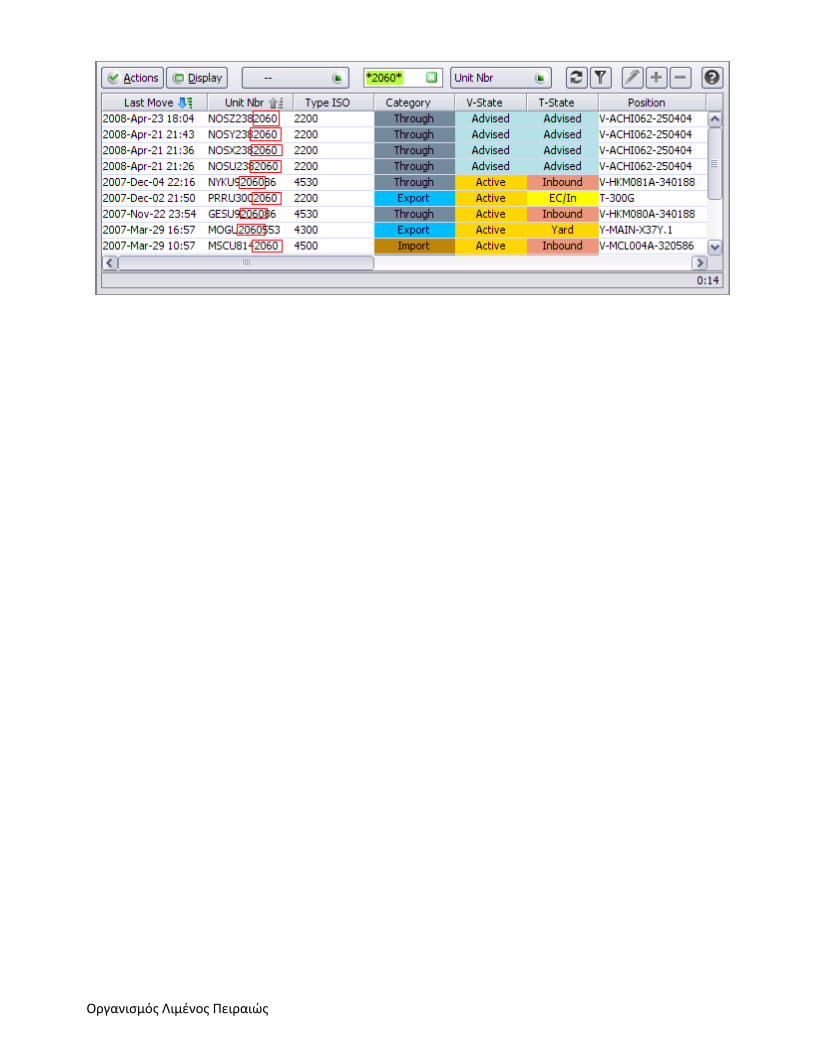
For example, if you enter *2060* in the Quick Search field, Navis SPARCS N4 displays all the
records where 2060 occurs in the beginning, middle, or end of the selected column, as shown in the
following figure.
Οργανισμός Λιμένος Πειραιώς
Οργανισμός Λιμένος Πειραιώς
4 Using filters
Using filters
A filter is a set of criteria that you define to limit the data displayed in a list view. For example, in the
Units view, you can create a filter to display only the import containers in the yard.
To define filter criteria, you must specify the following:
An attribute, such as Category, Actual Time of Arrival, Actual Time of Departure, or Freight Kind
The attributes that are available for creating filter criteria depend on the entity and are usually a
subset of the fields that are available in the list view.
A filter operator, such as a comparison operator is (=), is not (!=), matches (==), or is before (<)
The available operators depend on the attribute you select. For more information, see Using operators
(on page 28).
A value for the selected attribute that Navis SPARCS N4 uses to search
For example, in the Units view, if you select Category as the attribute, some of the possible values are
Import, Export, and Transship.
The values that are available depend on the attribute and the filter operator that you selected and may
be entered in a field or selected from a drop‐down list or lookup field. For more information, see
Using drop‐down lists (on page 59) and Using lookup fields (on page 58).
When creating a filter, you can add the following:
Multiple filter criteria at the same level
A set of filter criteria that are grouped together using ʺAndʺ Group or ʺOrʺ Group. For more
information, see Grouping filter criteria (on page 30).
Criteria that are nested within other filter criteria or groups
You can also negate filter criteria or filter criteria groups to create a negative filter that excludes the data
that is matching the values that are specified in the filter criteria. For more information, see Negating filter
criteria (on page 30).
Creating a filter
A filter is a set of criteria that you define to limit the data displayed in a list view. For example, in the
Units view, you can create a filter to display only the import containers.
To create and apply a filter in a list view:
1 Click .
The filter pane appears.
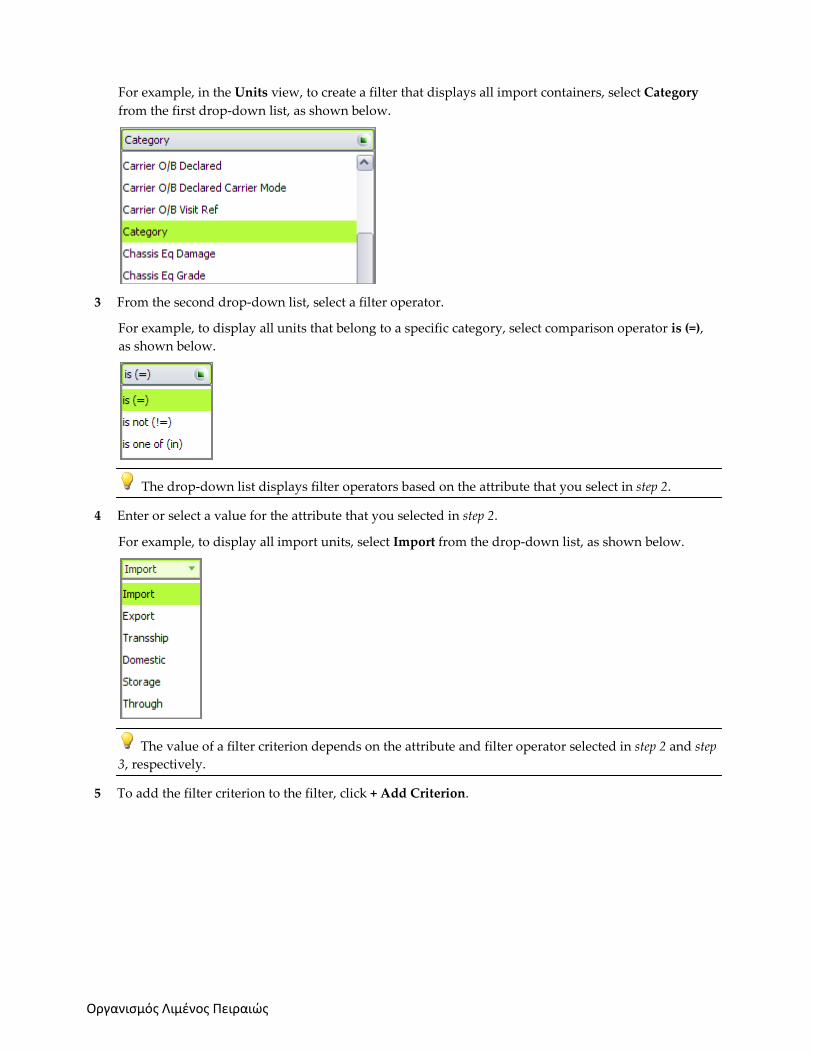
2 In the Filter Criteria block, from the first drop‐down list on the left, select an attribute.
Οργανισμός Λιμένος Πειραιώς
For example, in the Units view, to create a filter that displays all import containers, select Category
from the first drop‐down list, as shown below.
3 From the second drop‐down list, select a filter operator.
For example, to display all units that belong to a specific category, select comparison operator is (=),
as shown below.
The drop‐down list displays filter operators based on the attribute that you select in step 2.
4 Enter or select a value for the attribute that you selected in step 2.
For example, to display all import units, select Import from the drop‐down list, as shown below.
The value of a filter criterion depends on the attribute and filter operator selected in step 2 and step
3, respectively.
5 To add the filter criterion to the filter, click + Add Criterion.
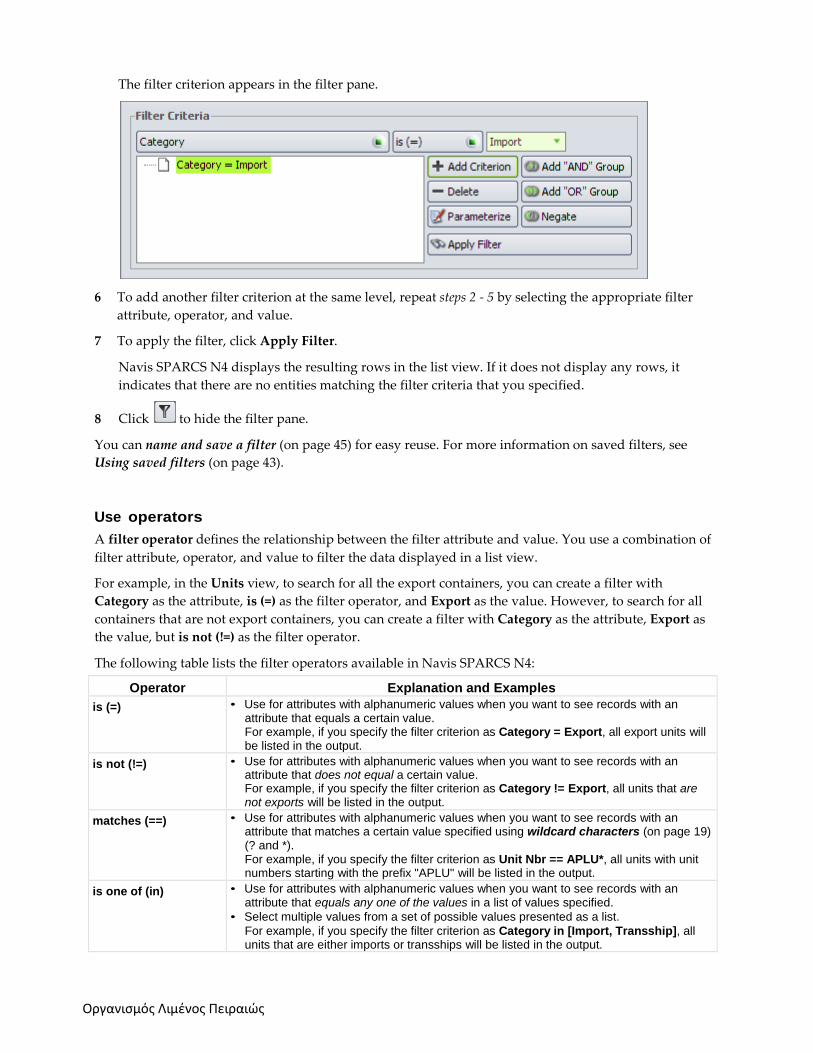
Οργανισμός Λιμένος Πειραιώς
The filter criterion appears in the filter pane.
6 To add another filter criterion at the same level, repeat steps 2 ‐ 5 by selecting the appropriate filter
attribute, operator, and value.
7 To apply the filter, click Apply Filter.
Navis SPARCS N4 displays the resulting rows in the list view. If it does not display any rows, it
indicates that there are no entities matching the filter criteria that you specified.
8 Click to hide the filter pane.
You can name and save a filter (on page 45) for easy reuse. For more information on saved filters, see
Using saved filters (on page 43).
Use operators
A filter operator defines the relationship between the filter attribute and value. You use a combination of
filter attribute, operator, and value to filter the data displayed in a list view.
For example, in the Units view, to search for all the export containers, you can create a filter with
Category as the attribute, is (=) as the filter operator, and Export as the value. However, to search for all
containers that are not export containers, you can create a filter with Category as the attribute, Export as
the value, but is not (!=) as the filter operator.
The following table lists the filter operators available in Navis SPARCS N4:
Operator Explanation and Examples
is (=) • Use for attributes with alphanumeric values when you want to see records with an attribute that equals a certain value. For example, if you specify the filter criterion as Category = Export, all export units will be listed in the output.
is not (!=) • Use for attributes with alphanumeric values when you want to see records with an attribute that does not equal a certain value. For example, if you specify the filter criterion as Category != Export, all units that are not exports will be listed in the output.
matches (==) • Use for attributes with alphanumeric values when you want to see records with an attribute that matches a certain value specified using wildcard characters (on page 19) (? and *). For example, if you specify the filter criterion as Unit Nbr == APLU*, all units with unit numbers starting with the prefix "APLU" will be listed in the output.
is one of (in) • Use for attributes with alphanumeric values when you want to see records with an attribute that equals any one of the values in a list of values specified.
• Select multiple values from a set of possible values presented as a list.
For example, if you specify the filter criterion as Category in [Import, Transship], all units that are either imports or transships will be listed in the output.
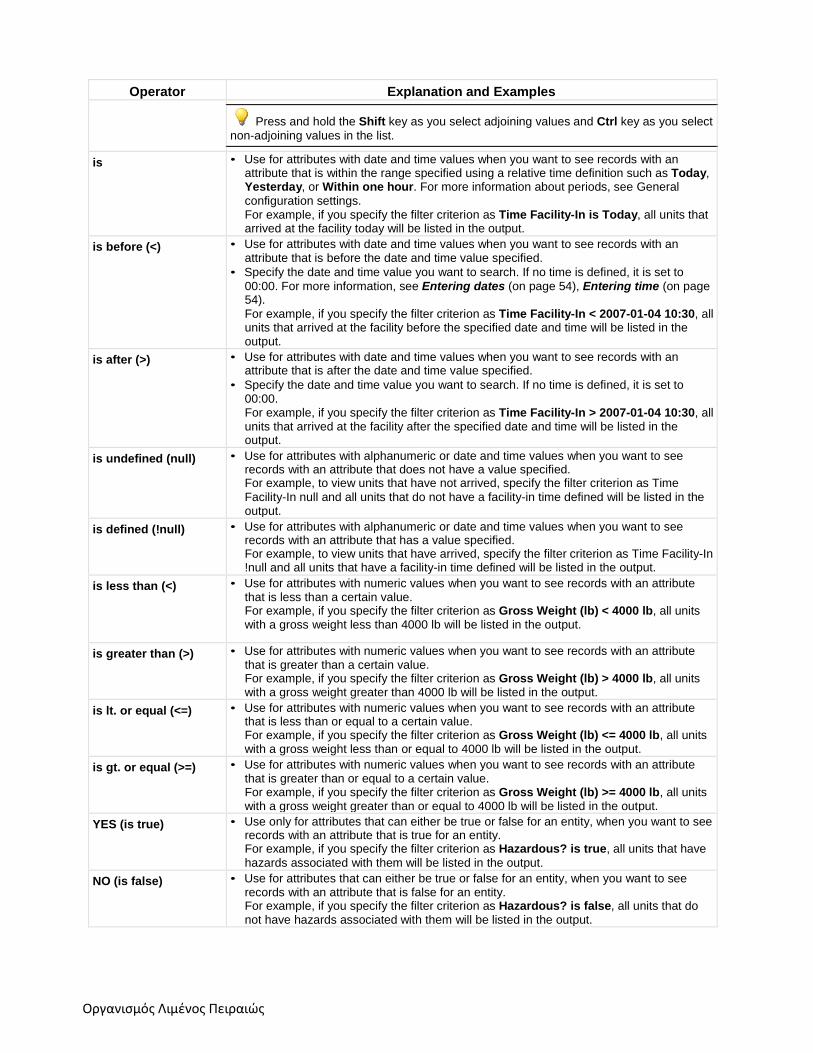
Οργανισμός Λιμένος Πειραιώς
Operator Explanation and Examples
Press and hold the Shift key as you select adjoining values and Ctrl key as you select
non-adjoining values in the list.
is • Use for attributes with date and time values when you want to see records with an
attribute that is within the range specified using a relative time definition such as Today, Yesterday, or Within one hour. For more information about periods, see General
configuration settings. For example, if you specify the filter criterion as Time Facility-In is Today, all units that arrived at the facility today will be listed in the output.
is before (<) • Use for attributes with date and time values when you want to see records with an attribute that is before the date and time value specified.
• Specify the date and time value you want to search. If no time is defined, it is set to
00:00. For more information, see Entering dates (on page 54), Entering time (on page 54).
For example, if you specify the filter criterion as Time Facility-In < 2007-01-04 10:30, all units that arrived at the facility before the specified date and time will be listed in the output.
is after (>) • Use for attributes with date and time values when you want to see records with an attribute that is after the date and time value specified.
• Specify the date and time value you want to search. If no time is defined, it is set to 00:00. For example, if you specify the filter criterion as Time Facility-In > 2007-01-04 10:30, all units that arrived at the facility after the specified date and time will be listed in the output.
is undefined (null) • Use for attributes with alphanumeric or date and time values when you want to see records with an attribute that does not have a value specified. For example, to view units that have not arrived, specify the filter criterion as Time
Facility-In null and all units that do not have a facility-in time defined will be listed in the output.
is defined (!null) • Use for attributes with alphanumeric or date and time values when you want to see records with an attribute that has a value specified. For example, to view units that have arrived, specify the filter criterion as Time Facility-In !null and all units that have a facility-in time defined will be listed in the output.
is less than (<) • Use for attributes with numeric values when you want to see records with an attribute that is less than a certain value. For example, if you specify the filter criterion as Gross Weight (lb) < 4000 lb, all units with a gross weight less than 4000 lb will be listed in the output.
is greater than (>) • Use for attributes with numeric values when you want to see records with an attribute that is greater than a certain value. For example, if you specify the filter criterion as Gross Weight (lb) > 4000 lb, all units with a gross weight greater than 4000 lb will be listed in the output.
is lt. or equal (<=) • Use for attributes with numeric values when you want to see records with an attribute that is less than or equal to a certain value. For example, if you specify the filter criterion as Gross Weight (lb) <= 4000 lb, all units with a gross weight less than or equal to 4000 lb will be listed in the output.
is gt. or equal (>=) • Use for attributes with numeric values when you want to see records with an attribute that is greater than or equal to a certain value. For example, if you specify the filter criterion as Gross Weight (lb) >= 4000 lb, all units with a gross weight greater than or equal to 4000 lb will be listed in the output.
YES (is true) • Use only for attributes that can either be true or false for an entity, when you want to see records with an attribute that is true for an entity. For example, if you specify the filter criterion as Hazardous? is true, all units that have
hazards associated with them will be listed in the output.
NO (is false) • Use for attributes that can either be true or false for an entity, when you want to see records with an attribute that is false for an entity. For example, if you specify the filter criterion as Hazardous? is false, all units that do not have hazards associated with them will be listed in the output.
Οργανισμός Λιμένος Πειραιώς
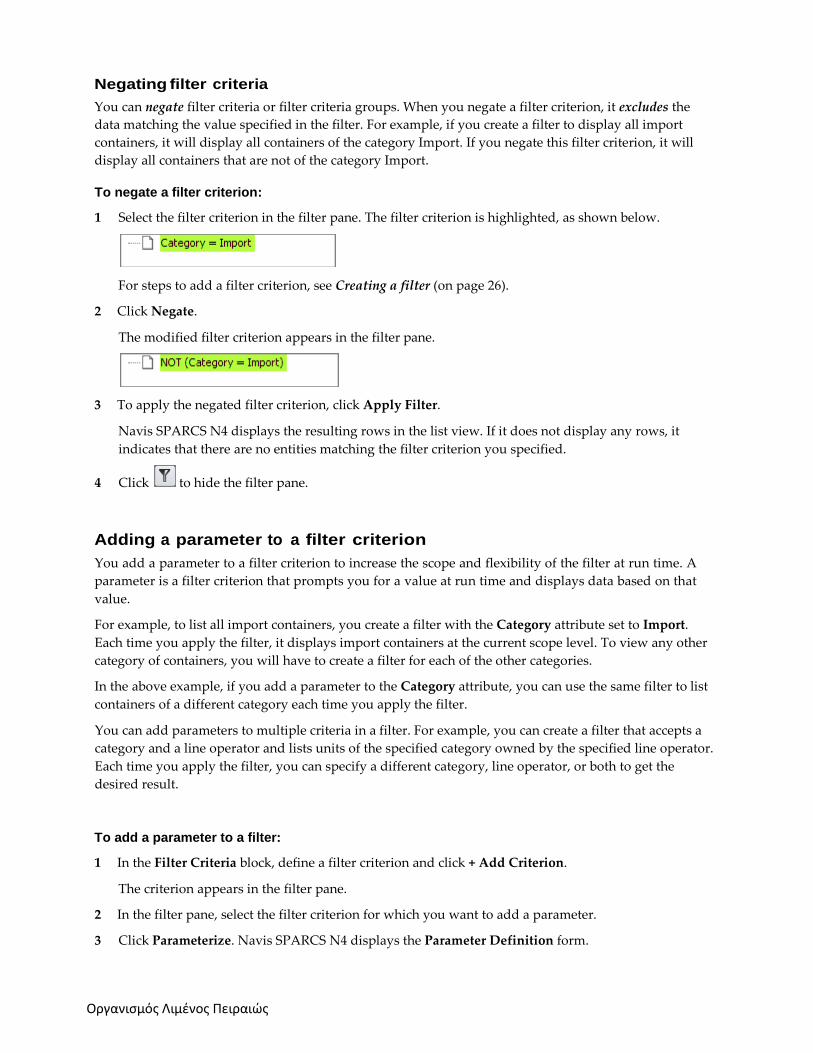
Negating filter criteria
You can negate filter criteria or filter criteria groups. When you negate a filter criterion, it excludes the
data matching the value specified in the filter. For example, if you create a filter to display all import
containers, it will display all containers of the category Import. If you negate this filter criterion, it will
display all containers that are not of the category Import.
To negate a filter criterion:
1 Select the filter criterion in the filter pane. The filter criterion is highlighted, as shown below.
For steps to add a filter criterion, see Creating a filter (on page 26).
2 Click Negate.
The modified filter criterion appears in the filter pane.
3 To apply the negated filter criterion, click Apply Filter.
Navis SPARCS N4 displays the resulting rows in the list view. If it does not display any rows, it
indicates that there are no entities matching the filter criterion you specified.
4 Click to hide the filter pane.
Adding a parameter to a filter criterion
You add a parameter to a filter criterion to increase the scope and flexibility of the filter at run time. A
parameter is a filter criterion that prompts you for a value at run time and displays data based on that
value.
For example, to list all import containers, you create a filter with the Category attribute set to Import.
Each time you apply the filter, it displays import containers at the current scope level. To view any other
category of containers, you will have to create a filter for each of the other categories.
In the above example, if you add a parameter to the Category attribute, you can use the same filter to list
containers of a different category each time you apply the filter.
You can add parameters to multiple criteria in a filter. For example, you can create a filter that accepts a
category and a line operator and lists units of the specified category owned by the specified line operator.
Each time you apply the filter, you can specify a different category, line operator, or both to get the
desired result.
To add a parameter to a filter:
1 In the Filter Criteria block, define a filter criterion and click + Add Criterion.
The criterion appears in the filter pane.
2 In the filter pane, select the filter criterion for which you want to add a parameter.
3 Click Parameterize. Navis SPARCS N4 displays the Parameter Definition form.
Οργανισμός Λιμένος Πειραιώς
4 In the Parameter Name field, enter a name for the parameter.
For example, if the parameter is for specifying the line operator, you might name it Line Operator.
5 To specify the value in the filter criterion as the default value for the parameter, select the Use Default
Value check box.
When you apply the filter, Navis SPARCS N4 defines the default value for this parameter. You can
still specify any value to replace the default value and get the desired result.
6 To make the parameter a required field, select the Value Required check box.
When you apply the filter, you will have to specify a value for the parameter or use the default value,
if any.
If you do not select the check box, Navis SPARCS N4 defines the parameter as not required, and you
have the option to not enter a value for the criterion when you apply the filter; in this case, Navis
SPARCS N4 does not consider this filter criterion when filtering data.
If you add a parameter to a True or False criterion, a value is always required. The prompt for the
True or False value is a check box. If you select the check box, Navis SPARCS N4 includes the records
where the value of the specified field is set to True. If you do not select the check box, Navis SPARCS
N4 includes the records where the value of the specified field is set to False.
7 Click OK.
Οργανισμός Λιμένος Πειραιώς
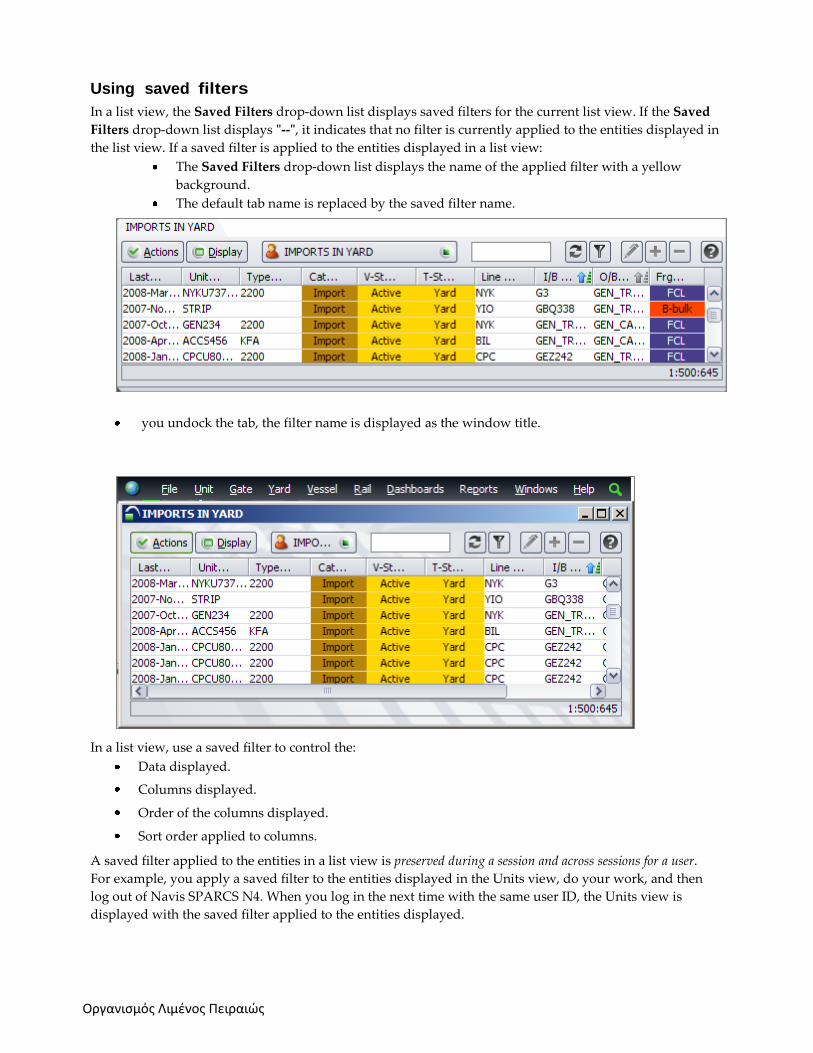
Using saved filters
In a list view, the Saved Filters drop‐down list displays saved filters for the current list view. If the Saved
Filters drop‐down list displays ʺ‐‐ʺ, it indicates that no filter is currently applied to the entities displayed in
the list view. If a saved filter is applied to the entities displayed in a list view:
The Saved Filters drop‐down list displays the name of the applied filter with a yellow
background.
The default tab name is replaced by the saved filter name.
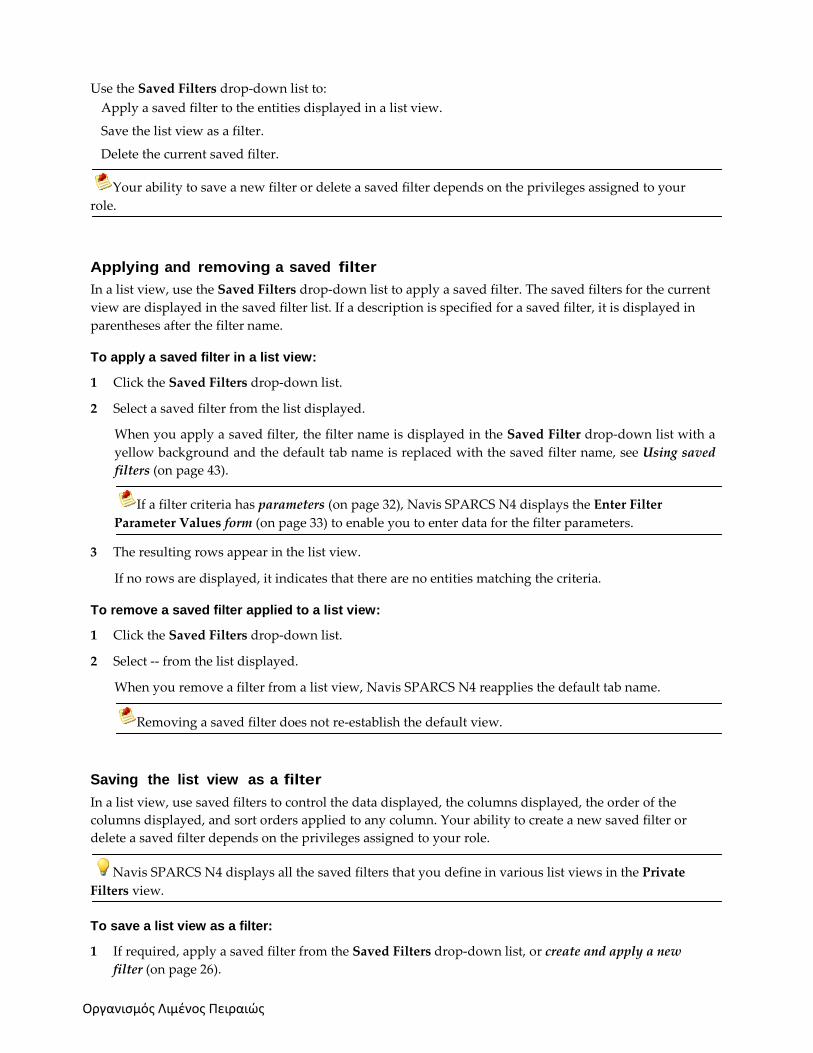
you undock the tab, the filter name is displayed as the window title.
In a list view, use a saved filter to control the:
Data displayed.
Columns displayed.
Order of the columns displayed.
Sort order applied to columns.
A saved filter applied to the entities in a list view is preserved during a session and across sessions for a user.
For example, you apply a saved filter to the entities displayed in the Units view, do your work, and then
log out of Navis SPARCS N4. When you log in the next time with the same user ID, the Units view is
displayed with the saved filter applied to the entities displayed.
Οργανισμός Λιμένος Πειραιώς
Use the Saved Filters drop‐down list to:
Apply a saved filter to the entities displayed in a list view.
Save the list view as a filter.
Delete the current saved filter.
Your ability to save a new filter or delete a saved filter depends on the privileges assigned to your
role.
Applying and removing a saved filter
In a list view, use the Saved Filters drop‐down list to apply a saved filter. The saved filters for the current
view are displayed in the saved filter list. If a description is specified for a saved filter, it is displayed in
parentheses after the filter name.
To apply a saved filter in a list view:
1 Click the Saved Filters drop‐down list.
2 Select a saved filter from the list displayed.
When you apply a saved filter, the filter name is displayed in the Saved Filter drop‐down list with a
yellow background and the default tab name is replaced with the saved filter name, see Using saved
filters (on page 43).
If a filter criteria has parameters (on page 32), Navis SPARCS N4 displays the Enter Filter
Parameter Values form (on page 33) to enable you to enter data for the filter parameters.
3 The resulting rows appear in the list view.
If no rows are displayed, it indicates that there are no entities matching the criteria.
To remove a saved filter applied to a list view:
1 Click the Saved Filters drop‐down list.
2 Select ‐‐ from the list displayed.
When you remove a filter from a list view, Navis SPARCS N4 reapplies the default tab name.
Removing a saved filter does not re‐establish the default view.
Saving the list view as a filter
In a list view, use saved filters to control the data displayed, the columns displayed, the order of the
columns displayed, and sort orders applied to any column. Your ability to create a new saved filter or
delete a saved filter depends on the privileges assigned to your role.
Navis SPARCS N4 displays all the saved filters that you define in various list views in the Private
Filters view.
To save a list view as a filter:
1 If required, apply a saved filter from the Saved Filters drop‐down list, or create and apply a new
filter (on page 26).
Οργανισμός Λιμένος Πειραιώς
2 Hide columns (on page 48) not required or select new columns to display.
3 If required, reorder the columns (on page 51) displayed in the list view.
4 If required, sort the columns (on page 50) displayed in the list view.
5 From the Saved Filters drop‐down list, select the Save table view as filter... option.
6 If you applied a saved filter to the list view, Navis SPARCS N4 displays the Save Table View as Filter
form.
If you did not select a saved filter in step 1 above, Navis SPARCS N4 does not display the Save
Table View as Filter form; instead, it displays the Filter form
7 In the Save Table View as Filter form, click Update to update the saved filter applied to the list view,
or click Add to add a new saved filter.
Navis SPARCS N4 displays the Filter form in the appropriate mode.
8 In the Filter Name field, enter a short name for the filter.
The specified name is displayed in the Saved Filter drop‐down list and also replaces the default tab
name when you apply a saved filter to a list view.
We recommend you use a short name for the filter as it becomes the tab name when you apply a
saved filter to a list view.
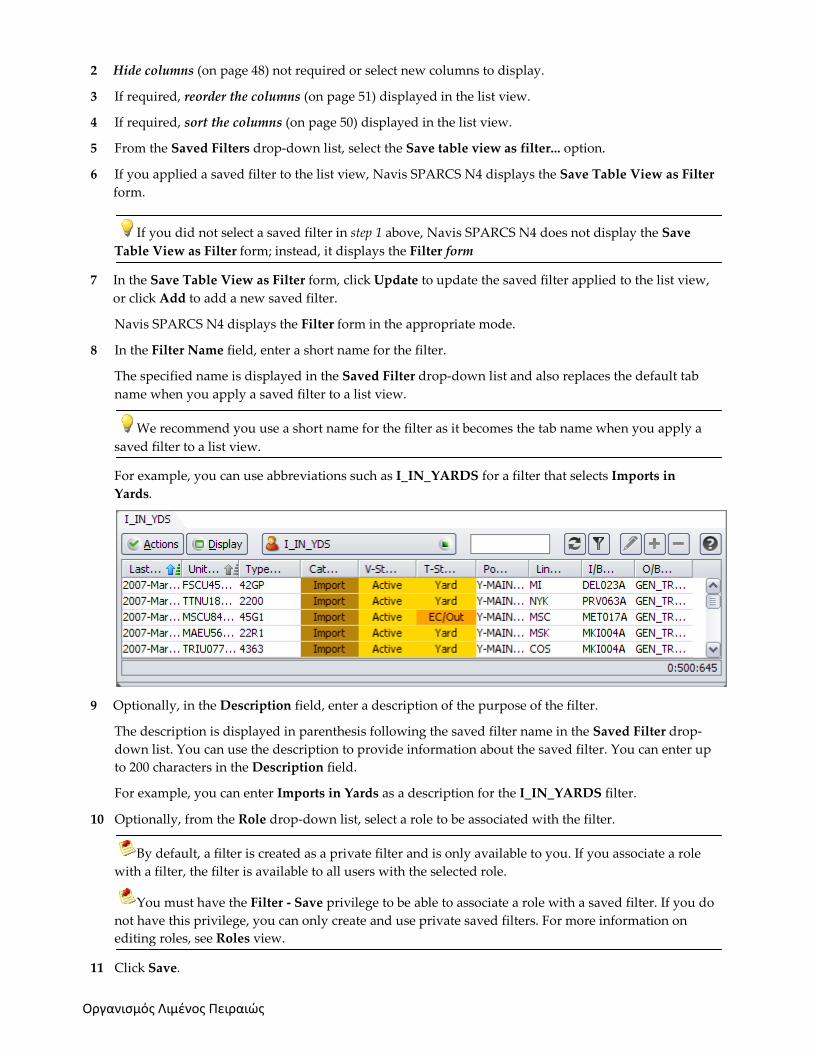
For example, you can use abbreviations such as I_IN_YARDS for a filter that selects Imports in
Yards.
9 Optionally, in the Description field, enter a description of the purpose of the filter.
The description is displayed in parenthesis following the saved filter name in the Saved Filter drop‐
down list. You can use the description to provide information about the saved filter. You can enter up
to 200 characters in the Description field.
For example, you can enter Imports in Yards as a description for the I_IN_YARDS filter.
10 Optionally, from the Role drop‐down list, select a role to be associated with the filter.
By default, a filter is created as a private filter and is only available to you. If you associate a role
with a filter, the filter is available to all users with the selected role.
You must have the Filter ‐ Save privilege to be able to associate a role with a saved filter. If you do
not have this privilege, you can only create and use private saved filters. For more information on
editing roles, see Roles view.
11 Click Save.
Οργανισμός Λιμένος Πειραιώς
A private filter is displayed with a user icon ( ). A filter associated with a role is displayed with a
group icon ( ). Filter form
The Filter form enables you to save a new filter or update a saved filter. Your ability to create a new saved
filter or delete a saved filter depends on the privileges assigned to your role.
To save/update a filter:
1 In the Filter Name field, enter a short name for the filter.
The specified name is displayed in the Saved Filter drop‐down list and also replaces the default tab
name when you apply a saved filter to a list view.
We recommend you use a short name for the filter as it becomes the tab name when you apply a
saved filter to a list view.
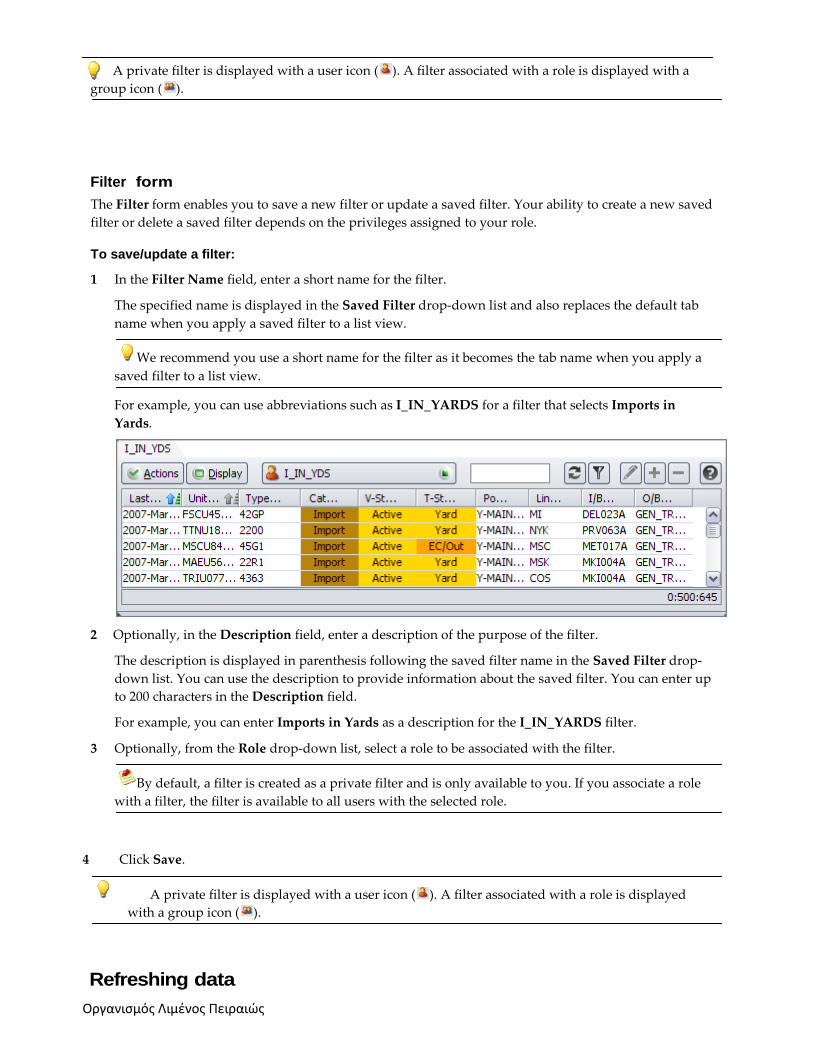
For example, you can use abbreviations such as I_IN_YARDS for a filter that selects Imports in
Yards.
2 Optionally, in the Description field, enter a description of the purpose of the filter.
The description is displayed in parenthesis following the saved filter name in the Saved Filter drop‐
down list. You can use the description to provide information about the saved filter. You can enter up
to 200 characters in the Description field.
For example, you can enter Imports in Yards as a description for the I_IN_YARDS filter.
3 Optionally, from the Role drop‐down list, select a role to be associated with the filter.
By default, a filter is created as a private filter and is only available to you. If you associate a role
with a filter, the filter is available to all users with the selected role.
4 Click Save.
A private filter is displayed with a user icon ( ). A filter associated with a role is displayed
with a group icon ( ).
Refreshing data
Οργανισμός Λιμένος Πειραιώς
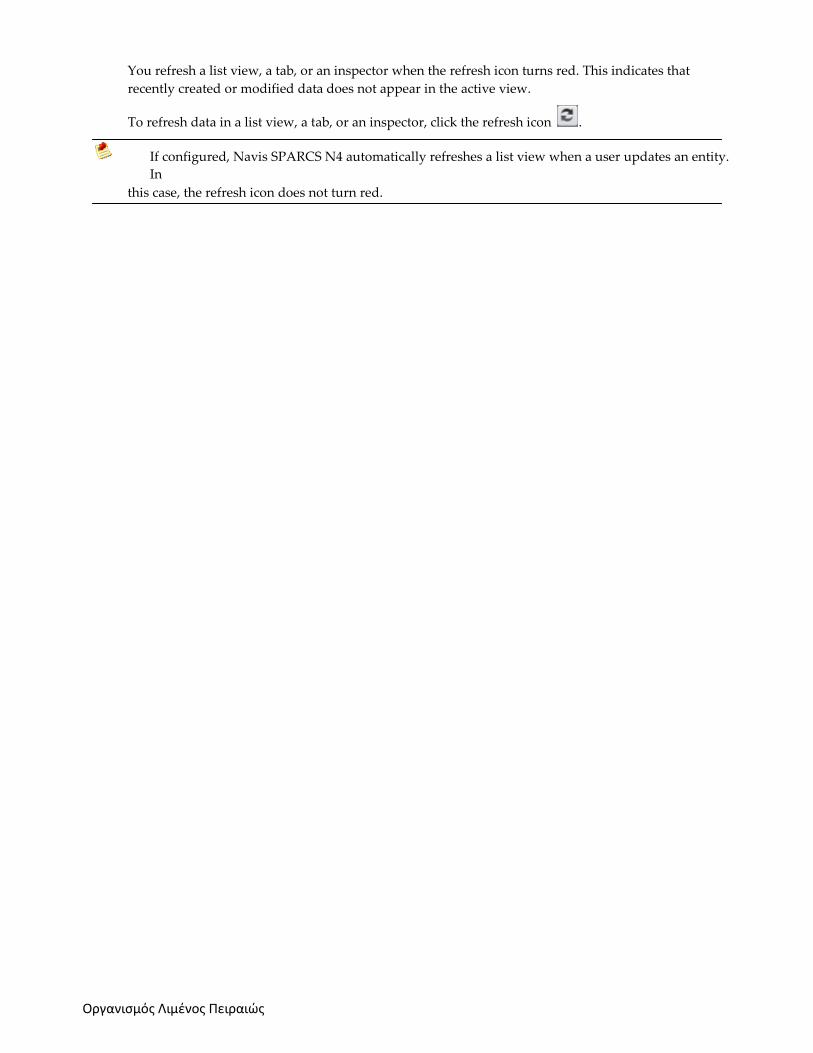
You refresh a list view, a tab, or an inspector when the refresh icon turns red. This indicates that
recently created or modified data does not appear in the active view.
To refresh data in a list view, a tab, or an inspector, click the refresh icon .
If configured, Navis SPARCS N4 automatically refreshes a list view when a user updates an entity.
In
this case, the refresh icon does not turn red.


![Conference Poster - [email protected]](https://static.fdocument.org/doc/165x107/6203b130da24ad121e4c5b7c/conference-poster-emailprotected.jpg)