MANUAL DO PROPRIETÁRIO PT Εγχειρίδιο χρήσης GR · shops, who are also pretty nice...
16
MANUAL DO PROPRIETÁRIO USER MANUAL EN Εγχειρίδιο χρήσης MANUALE D’USO PT IT GR
Transcript of MANUAL DO PROPRIETÁRIO PT Εγχειρίδιο χρήσης GR · shops, who are also pretty nice...

MANUAL DO PROPRIETÁRIO
USER MANUAL EN
Εγχειρίδιο χρήσης
MANUALE D’USO
PT
IT
GR
2
EN
IT
PT
GR
2
7
6
13
14
16
15
1
2
3 4 5
9 8 127
6
12
14
10
161
3 4 5
9 8 11
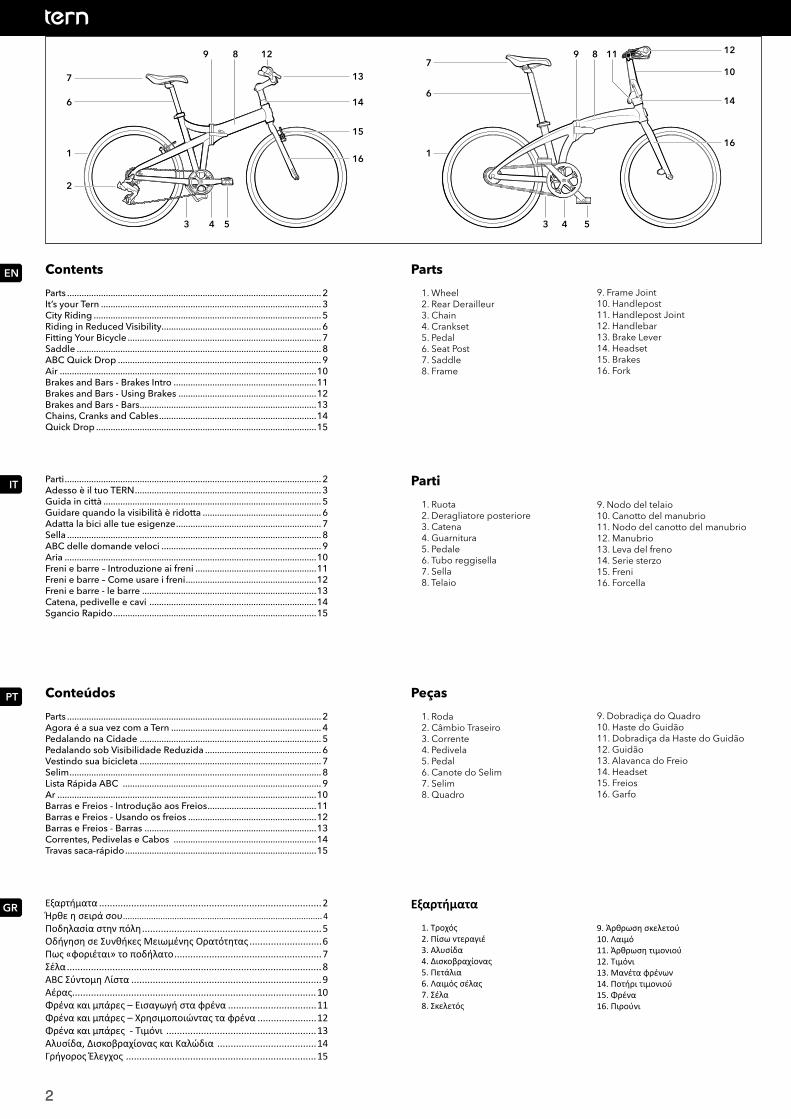
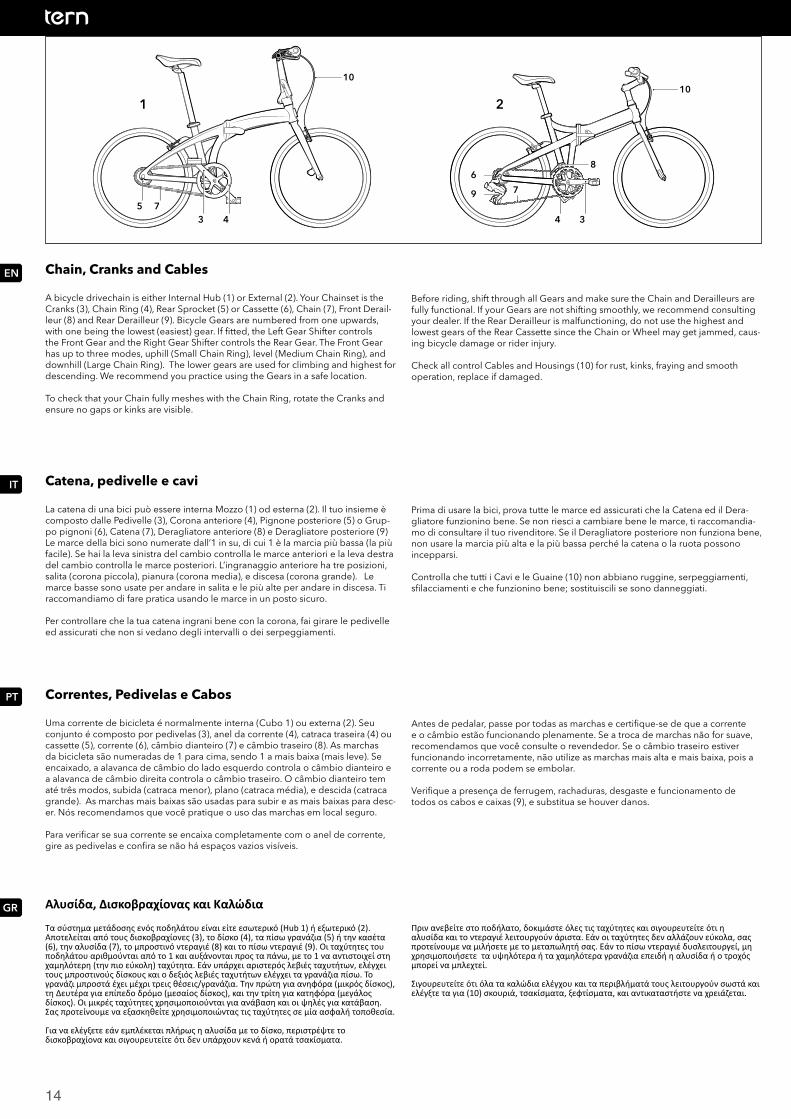
Parts
1. Wheel 2. Rear Derailleur 3. Chain4. Crankset5. Pedal6. Seat Post7. Saddle8. Frame
9. Frame Joint10. Handlepost11. Handlepost Joint12. Handlebar13. Brake Lever14. Headset15. Brakes16. Fork
Contents
Parts ......................................................................................................... 2It’s your Tern ........................................................................................... 3City Riding .............................................................................................. 5Riding in Reduced Visibility.................................................................. 6Fitting Your Bicycle ................................................................................ 7Saddle ..................................................................................................... 8ABC Quick Drop .................................................................................... 9Air ..........................................................................................................10Brakes and Bars - Brakes Intro ...........................................................11Brakes and Bars - Using Brakes .........................................................12Brakes and Bars - Bars .........................................................................13Chains, Cranks and Cables .................................................................14Quick Drop ...........................................................................................15
Peças
1. Roda 2. Câmbio Traseiro 3. Corrente4. Pedivela5. Pedal6. Canote do Selim7. Selim8. Quadro
9. Dobradiça do Quadro10. Haste do Guidão11. Dobradiça da Haste do Guidão12. Guidão13. Alavanca do Freio14. Headset15. Freios16. Garfo
Conteúdos
Parts ......................................................................................................... 2Agora é a sua vez com a Tern .............................................................. 4Pedalando na Cidade ........................................................................... 5Pedalando sob Visibilidade Reduzida ................................................ 6Vestindo sua bicicleta ........................................................................... 7Selim ........................................................................................................ 8Lista Rápida ABC .................................................................................. 9Ar ...........................................................................................................10Barras e Freios - Introdução aos Freios .............................................11Barras e Freios - Usando os freios .....................................................12Barras e Freios - Barras .......................................................................13Correntes, Pedivelas e Cabos ...........................................................14Travas saca-rápido ...............................................................................15
Εξαρτήματα
1. Τροχός 2. Πίσω ντεραγιέ3. Αλυσίδα4. Δισκοβραχίονας5. Πετάλια6. Λαιμός σέλας7. Σέλα8. Σκελετός
9. Άρθρωση σκελετού10. Λαιμό11. Άρθρωση τιμονιού12. Τιμόνι13. Μανέτα φρένων14. Ποτήρι τιμονιού15. Φρένα16. Πιρούνι
Εξαρτήματα ...................................................................................2Ήρθε η σειρά σου .....................................................................................4Ποδηλασία στην πόλη ...................................................................5Οδήγηση σε Συνθήκες Μειωμένης Ορατότητας ...........................6Πως «φοριέται» το ποδήλατο .......................................................7Σέλα ...............................................................................................8ABC Σύντομη Λίστα .......................................................................9Αέρας ...........................................................................................10Φρένα και μπάρες – Εισαγωγή στα φρένα .................................11Φρένα και μπάρες – Χρησιμοποιώντας τα φρένα ......................12Φρένα και μπάρες - Τιμόνι ........................................................13Αλυσίδα, Δισκοβραχίονας και Καλώδια .....................................14Γρήγορος Έλεγχος .......................................................................15
Parti
1. Ruota 2. Deragliatore posteriore 3. Catena4. Guarnitura5. Pedale6. Tubo reggisella7. Sella8. Telaio
9. Nodo del telaio10. Canotto del manubrio11. Nodo del canotto del manubrio12. Manubrio13. Leva del freno14. Serie sterzo15. Freni16. Forcella
Parti .......................................................................................................... 2Adesso è il tuo TERN ............................................................................. 3Guida in città .......................................................................................... 5Guidare quando la visibilità è ridotta ................................................. 6Adatta la bici alle tue esigenze ............................................................ 7Sella ......................................................................................................... 8ABC delle domande veloci .................................................................. 9Aria ........................................................................................................10Freni e barre – Introduzione ai freni ..................................................11Freni e barre – Come usare i freni ......................................................12Freni e barre - le barre ........................................................................13Catena, pedivelle e cavi .....................................................................14Sgancio Rapido ....................................................................................15

EN
IT
3
Now it’s your Tern
Tern the pageFolding bicycles have specially designed components so please read this manual carefully before riding.
Built for urban warriors, not stunt menTern bicycles are designed for use as a city bicycle on paved roads only. Other use, such as jumps or stunts may cause damage to the frame and risk rider injury.
Respect others on the roadIn a car accident the bike will always lose, but you can still hurt a pedestrian. Stay alert and show respect to other road users.
Use your head, or lose itA good, authorized bike helmet may prevent permanent injury in an accident. Wear one, it’s a no-brainer.
Hit the books before you rideThis is an introduction, not a definitive guide so before hitting the road, spend some time to understand how to operate and use your new bicycle or ask your dealer. There are also organizations and classes nationwide that can help you get up to speed.
Don’t be a tool, use them properly!Do not proceed with servicing or adjustments without sufficient knowledge or tools.
Adesso è il tuo TERN
La pagina di “Tern”Le biciclette pieghevoli hanno componenti appositamente progettati, perciò leggi attentamente questo manuale prima di usare la tua.
Costruita per guerrieri urbani, non per acrobatiLe biciclette Tern sono progettate per essere usate come bici da città solo su strade pavimentate. Un uso diverso, come per salti o acrobazie, potrebbe causare danni al telaio e rischi di lesioni al ciclista.
Rispetta gli altri utenti della stradaIn un incidente con un’auto la bici avrà sempre la peggio, però puoi far male ad un pedone. Stai all’erta e mostra rispetto agli altri utenti della strada.
Usa la testa, o la perderaiUn buon casco autorizzato per bici può impedire un danno permanente in un incidente. Indossane uno, è una soluzione semplice.
Leggi le istruzioni prima di montare in sellaQuesta è un’introduzione, non una guida definitiva, perciò prima di montare in sella prenditi del tempo per capire come far funzionare ed utilizzare la tua nuova bici o chiedi al tuo rivenditore. Vi sono anche organizzazioni ciclistiche e dei corsi su scala nazionale per mantenerti aggiornato.
Non essere un attrezzo, usali correttamente!Non fare manutenzione o regolazioni senza una sufficiente conoscenza o senza gli attrezzi giusti.
Tienili strettiGli sganci rapidi tengono al loro posto le ruote, il manubrio ed il tubo reggisella. Quando sono serrati, la parte interna si deforma leggermente ed impedisce la rotazione (delle barre, non delle ruote!). Se non sei sicuro, entra in un negozio di bici e chiedi ad un meccanico di farti vedere il modo giusto.
Keep it tightQuick releases keep your Wheels, Handlebar and Seat Post in place. When tight, the inner piece deforms slightly and prevents rotation (of the bars, not the wheels bro). If you’re unsure, drop into a bike shop and ask a technician to demo the proper way.
Ask the man (or woman)Check the manuals for bike/service tips and also consider a crash course in cycling and bike maintenance. If you’re still unsure, you can ask the Bike Techs in bike shops, who are also pretty nice people (normally – just be polite as you are asking an expert for their time – Ed.).
Check your wheels (frame and anything that moves – Ed.)Bicycles are subject to wear and high stresses. Different materials and components may be affected in different ways. If the design life of a component has been exceeded, it may suddenly fail, possibly causing injury. Any form of crack, scratch or change of coloring may indicate that a component requires replacing. “Stress release”Check steering and Frame for function and fatigue regularly.
Be careful of Coil Spring SaddlesIf a Child Seat is fitted, Coil Springs on the Saddle should be covered or replaced to avoid trapping your child’s fingers.
Big thanks to BikeLeague.orgWe especially want to thank the League of American Bicyclists for compiling the ABC Quick Check list. For more riding tips visit www.bikeleague.org .
Chiedi all’esperto (od esperta)Controlla i manuali per suggerimenti sull’uso e la manutenzione della bici e prendi in considerazione anche un corso accelerato sull’uso e la manutenzione della bici. Se ancora non sei sicuro, puoi chiedere ai meccanici dei negozi di bici, che sono anche delle persone molto carine (normalmente - sii gentile quando chiedi ad un esperto di dedicarti una parte del suo tempo - Ed)
Controlla le tue ruote (telaio e tutto ciò che si muove – Ed)Le biciclette sono soggette ad usura ed a forti sollecitazioni. Materiali e compo-nenti diversi possono essere influenzati in modi diversi. Se la vita di progettazione di un componente è stata superata, esso può cedere all’improvviso, e ciò potrebbe causare delle lesioni. Qualsiasi incrinatura, graffio o decolorazione potrebbe indi-care che un componente deve essere sostituito.
“Distensione”Controlla regolarmente il funzionamento dello sterzo e del telaio e per segni di fatica.
Non è uno scherzoSe è stato aggiunto un sellino per bambino, le sospensioni a molla del sellino dovrebbero essere coperte o sostituite per evitare che le dita del tuo bambino vi restino intrappolate.
Tante grazie alla BikeLeague.orgVogliamo ringraziare in modo particolare la Lega Americana dei Ciclisti per aver compilato la lista di controllo veloce ABC. Controlla il loro sito web per altri sug-gerimento di guida all’indirizzo www.bikeleague.org .
EN
4
PT
GR
Agora é a sua vez com a Tern
Vire a página com TernBicicletas dobráveis possuem componentes especiais, portanto, leia este manual cuidadosamente antes de utilizar a bicicleta.
Construída para guerreiros urbanos, não para acrobatasAs bicicletas Tern são projetadas para uso na cidade, somente em vias asfaltadas. Outros usos, tais como saltos ou acrobacias podem causar danos ao quadro e colocar o ciclista em risco.
Respeite os outros na estradaNum acidente com um carro, a bicicleta sempre irá perder, porém você ainda pode ferir um pedestre. Fique alerta e demonstre respeito pelos outros usuários da via.
Use sua cabeça, ou perca-aUm bom capacete ciclístico autorizado pode prevenir danos permanentes em um acidente. Use capacete, é fácil.
Leia o manual antes de pedalarEsta é uma introdução, e não um manual completo. Portanto, antes de pedalar dedique certo tempo à compreensão de como operar e utilizar sua nova bicicleta, ou pergunte ao revendedor. Há também organizações nacionais de ciclismo que podem ajudar você a pedalar melhor.
Não arrisque, use as ferramentas corretamente!Não execute manutenção ou ajustes sem conhecimento suficiente ou ferramentas adequadas.
Ήρθε η σειρά σου
Γύρισε σελίδαΤα σπαστά ποδήλατα φέρουν ειδικά σχεδιασμένα εξαρτήματα. Διαβάστε το εγχειρίδιο χρήσης προσεκτικά πριν ανεβείτε στο ποδήλατο.
Σχεδιασμένα για τους λάτρεις της περιπέτειας στην πόλη, όχι για κασκαντέρΤα ποδήλατα Tern είναι σχεδιασμένα για χρήση σαν ποδήλατα πόλης σε ασφαλτοστρωμένους δρόμους. Διαφορετική χρήση, όπως άλματα ή ακροβατικά μπορούν να προκαλέσουν ζημιά στο σκελετό και υπάρχει κίνδυνος τραυματισμός του αναβάτη.
Μοιραστείτε το δρόμο με ΣΕΒΑΣΜΟ Σε περίπτωση ατυχήματος με αυτοκίνητο, το ποδήλατο θα βγει πάντα χαμένο, αλλά το ίδιο ποδήλατο μπορεί να τραυματίσει έναν πεζό. Πρέπει να είστε συνέχεια σε επαγρύπνηση και να σέβεστε όσους είναι γύρω σας.
Σκέψου με το κεφάλι σου για να μην το χάσειςΈνα κατάλληλο, πιστοποιημένο κράνος ποδηλάτου μπορεί να αποτρέψει ένα μόνιμο τραυματισμό σε ένα ατύχημα. Φορέστε κράνος. Δε χρειάζεται δεύτερη σκέψη.
Πριν το καβαλήσετε, μελετήστεΑυτό το έντυπο αποτελεί εισαγωγή, και όχι τον απόλυτο οδηγό. Γι’ αυτό πριν βγείτε στο δρόμο, ξοδέψτε λίγο χρόνο και κατανοήστε πως λειτουργεί το καινούργιο σας ποδήλατο ή ρωτήστε τον πωλητή σας. Υπάρχουν επίσης αρκετοί ποδηλατικοί όμιλοι και αντίστοιχες τάξεις σε όλη την χώρα που μπορούν να σας βοηθήσουν να εξοικειωθείτε γρήγορα.
Χρησιμοποιήστε τα σωστά εργαλεία... σωστά!Μην επιχειρήσετε να κάνετε διορθώσεις ή ρυθμίσεις εάν δεν έχετε τις κατάλληλες γνώσεις ή τα εργαλεία.
Να είναι σφιχτάΤα μπλοκάζ, στους τροχούς, το τιμόνι και το λαιμό της σέλας κρατάνε αυτά τα εξαρτήματα στη θέση τους. Πρέπει τα μπλοκάζ να είναι σφιχτά ώστε όλα τα μέρη του ποδηλάτου να δουλεύουν σωστά. Εάν δεν είστε σίγουροι πως να τα ρυθμίσετε σωστά, σταματήστε σε ένα κατάστημα ποδηλάτων και ζητήστε από ένα τεχνικό να σας κάνει μία επίδειξη για να δείτε το σωστό τρόπο.
Mantenha tudo apertadoOs saca-rápido mantêm suas Rodas, Guidão e Selim no lugar. Quando apertadas, sua peça interna se deforma ligeiramente e impede a rotação (das barras, não das rodas). Se tiver dúvida, passe numa loja de bicicletas e peça a um técnico que demonstre a forma correta.
PergunteNo manual, você encontrará dicas de manutenção da sua bicicleta. Também considere fazer um curso rápido de ciclismo e manutenção. Se você ainda tiver dúvidas, pergunte aos técnicos nas lojas de bicicleta, que são pessoas experientes.
Verifique suas rodas (quadro e tudo que se move -- Ed)Bicicletas estão sujeitas a desgaste e estresse elevado. Materiais e componentes diversos podem ser afetados de modo diferente. Se a vida útil de um compo-nente for excedida, o mesmo poderá falhar repentinamente, com risco de causar ferimento. Qualquer tipo de rachadura, arranhão ou mudança de cor pode indicar que um componente precisa ser substituído.
“Alívio de Estresse”Verifique as funções e fadiga da direção e do quadro regularmente.
Não é brincadeiraSe um assento para crianças for colocado, as molas do selim devem ser cobertas ou substituídas para evitar que a criança prenda os dedos.
Nossos agradecimentos à BikeLeague.orgQueremos agradecer especialmente a Liga de Ciclistas Americanos (League of American Bicyclists) por compilar a Lista Rápida de Verificação ABC. Confira o website para mais dicas de ciclismo www.bikeleague.org.
Ρώτησε τον ειδικό (ή την ειδική)Μελετήστε τα εγχειρίδια για συμβουλές ποδηλασίας/σέρβις. Σκεφθείτε επίσης και το ενδεχόμενο να παρακολουθήσετε ένα σύντομο κύκλο μαθημάτων σχετικά με την ποδηλασία και τη συντήρηση του ποδηλάτου. Εάν εξακολουθείτε να έχετε αμφιβολίες, ρώτησε τους τεχνικούς ποδηλάτων στα καταστήματα. Συνήθως είναι ωραίοι τύποι (απλά ζητήστε ευγενικά να σας αφιερώσουν λίγο από το χρόνο τους – ).
Ελέγξτε τους τροχούς σας (το σκελετό και οτιδήποτε κινείται – )Τα ποδήλατα υπόκεινται σε υψηλές καταπονήσεις και φθορές. Διαφορετικά υλικά και εξαρτήματα μπορεί να επηρεάζονται με διαφορετικούς τρόπους. Εάν έχει γίνει υπέρβαση του προσδόκιμου ζωής ενός εξαρτήματος, μπορεί ξαφνικά να αστοχήσει, και πιθανότατα να προκαλέσει τραυματισμό. Οποιαδήποτε ορατή ένδειξη, όπως ρωγμή, γρατζουνιά, η αλλοιωμένο χρώμα μπορεί να αποτελεί ένδειξη ότι το συγκεκριμένο εξάρτημα χρειάζεται να αντικατασταθεί.
“Κόπωση”Ελέγξτε τη λειτουργικότητα του συστήματος διεύθυνσης και το σκελετό τακτικά για σημάδια κόπωσης (πχ ρωγμές) .
Δεν είναι παιχνίδιΕάν έχετε προσαρτήσει παιδικό κάθισμα, πρέπει να καλύψετε τα σπειροειδή ελατήρια στη σέλα ή να τα αντικαταστήσετε για να μην παγιδευτούν τα δάχτυλα του παιδιού ανάμεσά τους.
Εάν μεγάλο ευχαριστώ στο BikeLeague.orgΘέλουμε ιδιαίτερα να ευχαριστήσουμε το Σύλλογο Αμερικάνων Ποδηλατιστών για την ταχύτητα με την οποία συνέταξαν τη Γρήγορη Λίστα Ελέγχου ABC. Επισκεφθείτε τον ιστότοπό τους για περισσότερες ποδηλατικές συμβουλές στη διεύθυνση www.bikeleague.org .
EN
IT
PT
GR
5
City Riding
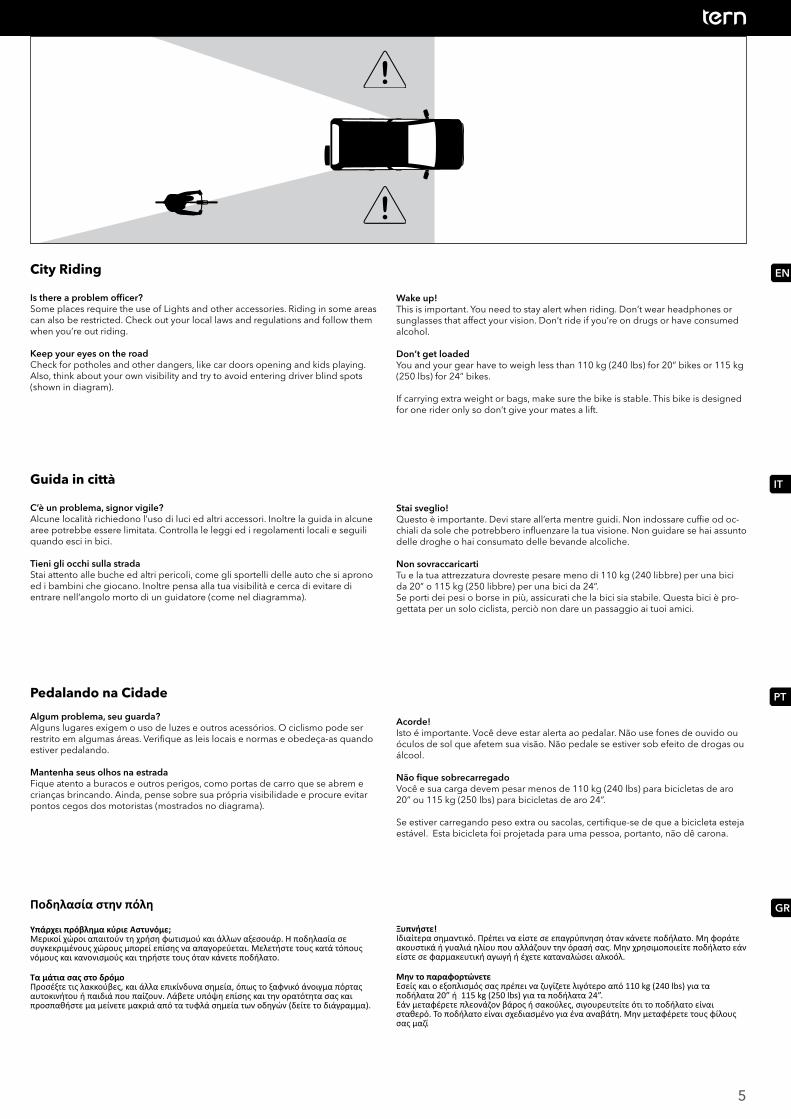
Is there a problem officer?Some places require the use of Lights and other accessories. Riding in some areas can also be restricted. Check out your local laws and regulations and follow them when you’re out riding.
Keep your eyes on the roadCheck for potholes and other dangers, like car doors opening and kids playing. Also, think about your own visibility and try to avoid entering driver blind spots (shown in diagram).
Ποδηλασία στην πόλη
Υπάρχει πρόβλημα κύριε Αστυνόμε;Μερικοί χώροι απαιτούν τη χρήση φωτισμού και άλλων αξεσουάρ. Η ποδηλασία σε συγκεκριμένους χώρους μπορεί επίσης να απαγορεύεται. Μελετήστε τους κατά τόπους νόμους και κανονισμούς και τηρήστε τους όταν κάνετε ποδήλατο.
Τα μάτια σας στο δρόμοΠροσέξτε τις λακκούβες, και άλλα επικίνδυνα σημεία, όπως το ξαφνικό άνοιγμα πόρτας αυτοκινήτου ή παιδιά που παίζουν. Λάβετε υπόψη επίσης και την ορατότητα σας και προσπαθήστε μα μείνετε μακριά από τα τυφλά σημεία των οδηγών (δείτε το διάγραμμα).
Guida in città
C’è un problema, signor vigile?Alcune località richiedono l’uso di luci ed altri accessori. Inoltre la guida in alcune aree potrebbe essere limitata. Controlla le leggi ed i regolamenti locali e seguili quando esci in bici.
Tieni gli occhi sulla stradaStai attento alle buche ed altri pericoli, come gli sportelli delle auto che si aprono ed i bambini che giocano. Inoltre pensa alla tua visibilità e cerca di evitare di entrare nell‘angolo morto di un guidatore (come nel diagramma).
Wake up!This is important. You need to stay alert when riding. Don’t wear headphones or sunglasses that affect your vision. Don’t ride if you’re on drugs or have consumed alcohol.
Don’t get loadedYou and your gear have to weigh less than 110 kg (240 lbs) for 20” bikes or 115 kg (250 lbs) for 24” bikes.
If carrying extra weight or bags, make sure the bike is stable. This bike is designed for one rider only so don’t give your mates a lift.
Ξυπνήστε!Ιδιαίτερα σημαντικό. Πρέπει να είστε σε επαγρύπνηση όταν κάνετε ποδήλατο. Μη φοράτε ακουστικά ή γυαλιά ηλίου που αλλάζουν την όρασή σας. Μην χρησιμοποιείτε ποδήλατο εάν είστε σε φαρμακευτική αγωγή ή έχετε καταναλώσει αλκοόλ.
Μην το παραφορτώνετεΕσείς και ο εξοπλισμός σας πρέπει να ζυγίζετε λιγότερο από 110 kg (240 lbs) για τα ποδήλατα 20” ή 115 kg (250 lbs) για τα ποδήλατα 24”.Εάν μεταφέρετε πλεονάζον βάρος ή σακούλες, σιγουρευτείτε ότι το ποδήλατο είναι σταθερό. Το ποδήλατο είναι σχεδιασμένο για ένα αναβάτη. Μην μεταφέρετε τους φίλους σας μαζί
Stai sveglio!Questo è importante. Devi stare all’erta mentre guidi. Non indossare cuffie od oc-chiali da sole che potrebbero influenzare la tua visione. Non guidare se hai assunto delle droghe o hai consumato delle bevande alcoliche.
Non sovraccaricartiTu e la tua attrezzatura dovreste pesare meno di 110 kg (240 libbre) per una bici da 20” o 115 kg (250 libbre) per una bici da 24”.Se porti dei pesi o borse in più, assicurati che la bici sia stabile. Questa bici è pro-gettata per un solo ciclista, perciò non dare un passaggio ai tuoi amici.
Pedalando na Cidade
Algum problema, seu guarda?Alguns lugares exigem o uso de luzes e outros acessórios. O ciclismo pode ser restrito em algumas áreas. Verifique as leis locais e normas e obedeça-as quando estiver pedalando.
Mantenha seus olhos na estradaFique atento a buracos e outros perigos, como portas de carro que se abrem e crianças brincando. Ainda, pense sobre sua própria visibilidade e procure evitar pontos cegos dos motoristas (mostrados no diagrama).
Acorde!Isto é importante. Você deve estar alerta ao pedalar. Não use fones de ouvido ou óculos de sol que afetem sua visão. Não pedale se estiver sob efeito de drogas ou álcool.
Não fique sobrecarregado Você e sua carga devem pesar menos de 110 kg (240 lbs) para bicicletas de aro 20” ou 115 kg (250 lbs) para bicicletas de aro 24”.
Se estiver carregando peso extra ou sacolas, certifique-se de que a bicicleta esteja estável. Esta bicicleta foi projetada para uma pessoa, portanto, não dê carona.
6
EN
IT
PT
GR
Riding in Reduced Visibility
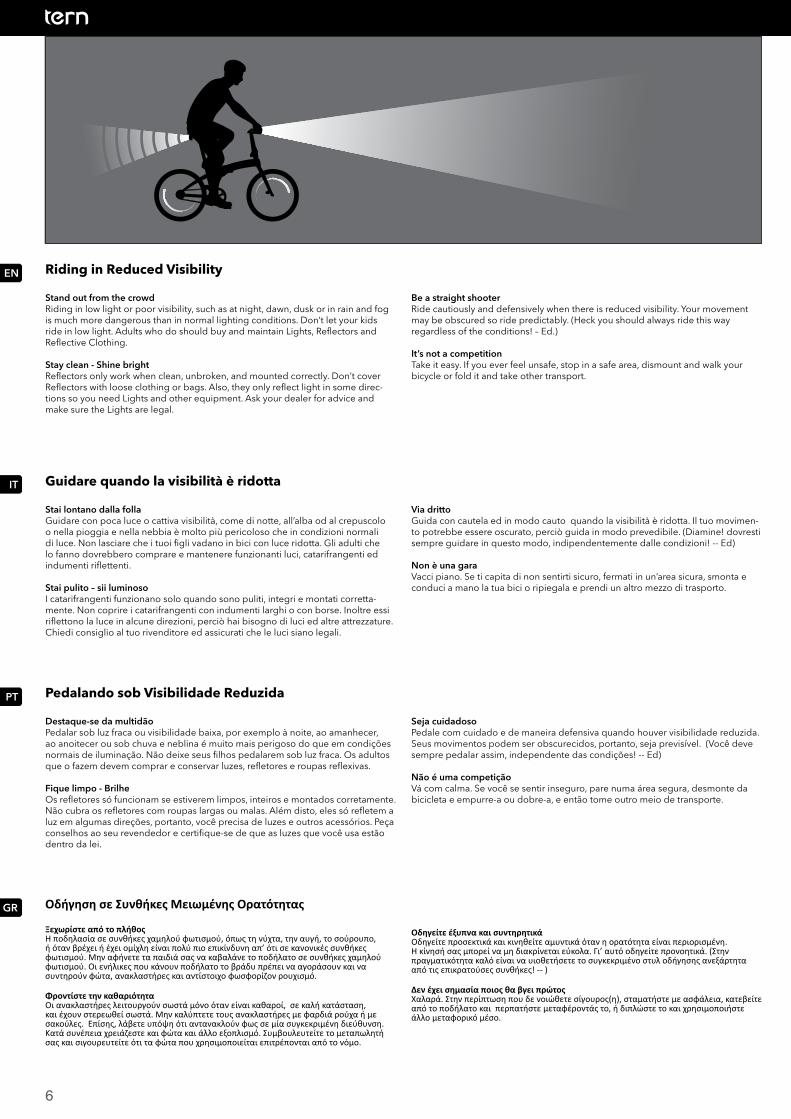
Stand out from the crowdRiding in low light or poor visibility, such as at night, dawn, dusk or in rain and fog is much more dangerous than in normal lighting conditions. Don’t let your kids ride in low light. Adults who do should buy and maintain Lights, Reflectors and Reflective Clothing.
Stay clean - Shine brightReflectors only work when clean, unbroken, and mounted correctly. Don’t cover Reflectors with loose clothing or bags. Also, they only reflect light in some direc-tions so you need Lights and other equipment. Ask your dealer for advice and make sure the Lights are legal.
Οδήγηση σε Συνθήκες Μειωμένης Ορατότητας
Ξεχωρίστε από το πλήθοςΗ ποδηλασία σε συνθήκες χαμηλού φωτισμού, όπως τη νύχτα, την αυγή, το σούρουπο, ή όταν βρέχει ή έχει ομίχλη είναι πολύ πιο επικίνδυνη απ’ ότι σε κανονικές συνθήκες φωτισμού. Μην αφήνετε τα παιδιά σας να καβαλάνε το ποδήλατο σε συνθήκες χαμηλού φωτισμού. Οι ενήλικες που κάνουν ποδήλατο το βράδυ πρέπει να αγοράσουν και να συντηρούν φώτα, ανακλαστήρες και αντίστοιχο φωσφορίζον ρουχισμό.
Φροντίστε την καθαριότηταΟι ανακλαστήρες λειτουργούν σωστά μόνο όταν είναι καθαροί, σε καλή κατάσταση, και έχουν στερεωθεί σωστά. Μην καλύπτετε τους ανακλαστήρες με φαρδιά ρούχα ή με σακούλες. Επίσης, λάβετε υπόψη ότι αντανακλούν φως σε μία συγκεκριμένη διεύθυνση. Κατά συνέπεια χρειάζεστε και φώτα και άλλο εξοπλισμό. Συμβουλευτείτε το μεταπωλητή σας και σιγουρευτείτε ότι τα φώτα που χρησιμοποιείται επιτρέπονται από το νόμο.
Guidare quando la visibilità è ridotta
Stai lontano dalla follaGuidare con poca luce o cattiva visibilità, come di notte, all’alba od al crepuscolo o nella pioggia e nella nebbia è molto più pericoloso che in condizioni normali di luce. Non lasciare che i tuoi figli vadano in bici con luce ridotta. Gli adulti che lo fanno dovrebbero comprare e mantenere funzionanti luci, catarifrangenti ed indumenti riflettenti.
Stai pulito – sii luminosoI catarifrangenti funzionano solo quando sono puliti, integri e montati corretta-mente. Non coprire i catarifrangenti con indumenti larghi o con borse. Inoltre essi riflettono la luce in alcune direzioni, perciò hai bisogno di luci ed altre attrezzature. Chiedi consiglio al tuo rivenditore ed assicurati che le luci siano legali.
Be a straight shooterRide cautiously and defensively when there is reduced visibility. Your movement may be obscured so ride predictably. (Heck you should always ride this way regardless of the conditions! – Ed.)
It’s not a competitionTake it easy. If you ever feel unsafe, stop in a safe area, dismount and walk your bicycle or fold it and take other transport.
Οδηγείτε έξυπνα και συντηρητικάΟδηγείτε προσεκτικά και κινηθείτε αμυντικά όταν η ορατότητα είναι περιορισμένη. Η κίνησή σας μπορεί να μη διακρίνεται εύκολα. Γι’ αυτό οδηγείτε προνοητικά. (Στην πραγματικότητα καλό είναι να υιοθετήσετε το συγκεκριμένο στυλ οδήγησης ανεξάρτητα από τις επικρατούσες συνθήκες! -- )
Δεν έχει σημασία ποιος θα βγει πρώτοςΧαλαρά. Στην περίπτωση που δε νοιώθετε σίγουρος(η), σταματήστε με ασφάλεια, κατεβείτε από το ποδήλατο και περπατήστε μεταφέροντάς το, ή διπλώστε το και χρησιμοποιήστε άλλο μεταφορικό μέσο.
Via drittoGuida con cautela ed in modo cauto quando la visibilità è ridotta. Il tuo movimen-to potrebbe essere oscurato, perciò guida in modo prevedibile. (Diamine! dovresti sempre guidare in questo modo, indipendentemente dalle condizioni! -- Ed)
Non è una garaVacci piano. Se ti capita di non sentirti sicuro, fermati in un’area sicura, smonta e conduci a mano la tua bici o ripiegala e prendi un altro mezzo di trasporto.
Pedalando sob Visibilidade Reduzida
Destaque-se da multidãoPedalar sob luz fraca ou visibilidade baixa, por exemplo à noite, ao amanhecer, ao anoitecer ou sob chuva e neblina é muito mais perigoso do que em condições normais de iluminação. Não deixe seus filhos pedalarem sob luz fraca. Os adultos que o fazem devem comprar e conservar luzes, refletores e roupas reflexivas.
Fique limpo - BrilheOs refletores só funcionam se estiverem limpos, inteiros e montados corretamente. Não cubra os refletores com roupas largas ou malas. Além disto, eles só refletem a luz em algumas direções, portanto, você precisa de luzes e outros acessórios. Peça conselhos ao seu revendedor e certifique-se de que as luzes que você usa estão dentro da lei.
Seja cuidadosoPedale com cuidado e de maneira defensiva quando houver visibilidade reduzida. Seus movimentos podem ser obscurecidos, portanto, seja previsível. (Você deve sempre pedalar assim, independente das condições! -- Ed)
Não é uma competiçãoVá com calma. Se você se sentir inseguro, pare numa área segura, desmonte da bicicleta e empurre-a ou dobre-a, e então tome outro meio de transporte.
7
EN
IT
PT
GR
B
12
3
Fitting your bicycle
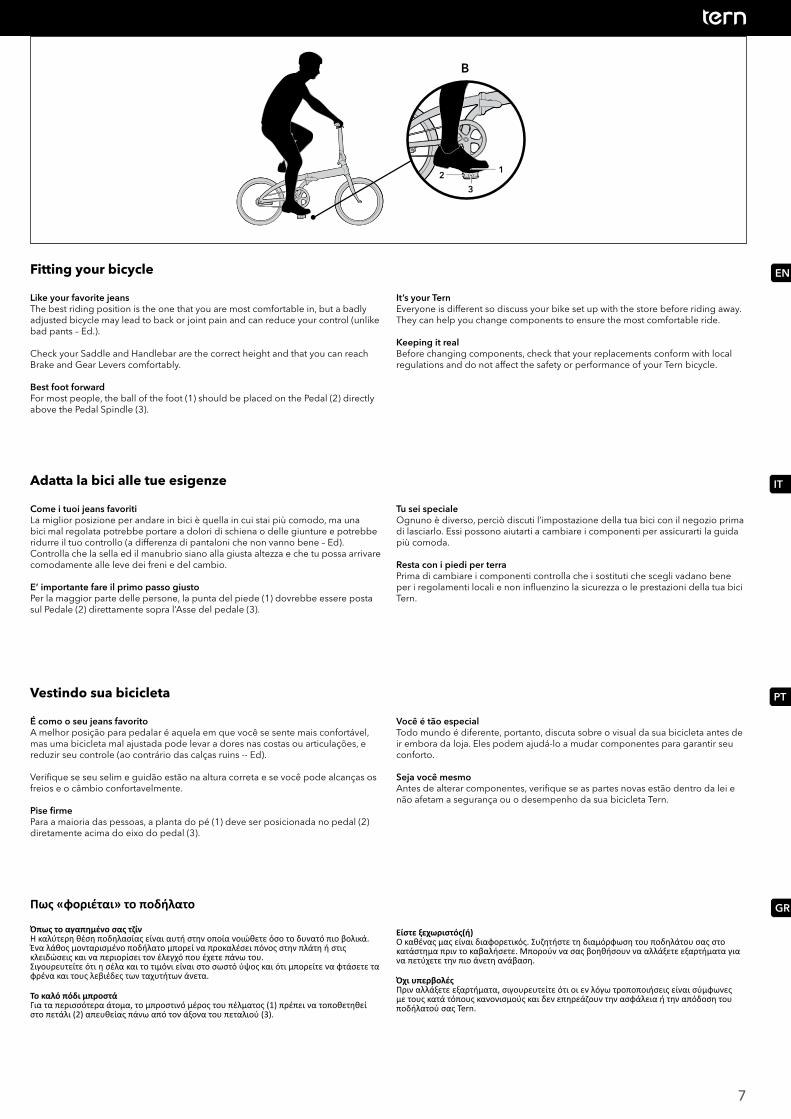
Like your favorite jeans The best riding position is the one that you are most comfortable in, but a badly adjusted bicycle may lead to back or joint pain and can reduce your control (unlike bad pants – Ed.).
Check your Saddle and Handlebar are the correct height and that you can reach Brake and Gear Levers comfortably.
Best foot forwardFor most people, the ball of the foot (1) should be placed on the Pedal (2) directly above the Pedal Spindle (3).
Πως «φοριέται» το ποδήλατο
Όπως το αγαπημένο σας τζίνΗ καλύτερη θέση ποδηλασίας είναι αυτή στην οποία νοιώθετε όσο το δυνατό πιο βολικά. Ένα λάθος μονταρισμένο ποδήλατο μπορεί να προκαλέσει πόνος στην πλάτη ή στις κλειδώσεις και να περιορίσει τον έλεγχό που έχετε πάνω του. Σιγουρευτείτε ότι η σέλα και το τιμόνι είναι στο σωστό ύψος και ότι μπορείτε να φτάσετε τα φρένα και τους λεβιέδες των ταχυτήτων άνετα.
Το καλό πόδι μπροστάΓια τα περισσότερα άτομα, το μπροστινό μέρος του πέλματος (1) πρέπει να τοποθετηθεί στο πετάλι (2) απευθείας πάνω από τον άξονα του πεταλιού (3).
Adatta la bici alle tue esigenze
Come i tuoi jeans favoriti La miglior posizione per andare in bici è quella in cui stai più comodo, ma una bici mal regolata potrebbe portare a dolori di schiena o delle giunture e potrebbe ridurre il tuo controllo (a differenza di pantaloni che non vanno bene – Ed). Controlla che la sella ed il manubrio siano alla giusta altezza e che tu possa arrivare comodamente alle leve dei freni e del cambio.
E’ importante fare il primo passo giustoPer la maggior parte delle persone, la punta del piede (1) dovrebbe essere posta sul Pedale (2) direttamente sopra l’Asse del pedale (3).
It’s your TernEveryone is different so discuss your bike set up with the store before riding away. They can help you change components to ensure the most comfortable ride.
Keeping it realBefore changing components, check that your replacements conform with local regulations and do not affect the safety or performance of your Tern bicycle.
Είστε ξεχωριστός(ή)Ο καθένας μας είναι διαφορετικός. Συζητήστε τη διαμόρφωση του ποδηλάτου σας στο κατάστημα πριν το καβαλήσετε. Μπορούν να σας βοηθήσουν να αλλάξετε εξαρτήματα για να πετύχετε την πιο άνετη ανάβαση.
Όχι υπερβολέςΠριν αλλάξετε εξαρτήματα, σιγουρευτείτε ότι οι εν λόγω τροποποιήσεις είναι σύμφωνες με τους κατά τόπους κανονισμούς και δεν επηρεάζουν την ασφάλεια ή την απόδοση του ποδήλατού σας Tern.
Tu sei specialeOgnuno è diverso, perciò discuti l’impostazione della tua bici con il negozio prima di lasciarlo. Essi possono aiutarti a cambiare i componenti per assicurarti la guida più comoda.
Resta con i piedi per terraPrima di cambiare i componenti controlla che i sostituti che scegli vadano bene per i regolamenti locali e non influenzino la sicurezza o le prestazioni della tua bici Tern.
Vestindo sua bicicleta
É como o seu jeans favorito A melhor posição para pedalar é aquela em que você se sente mais confortável, mas uma bicicleta mal ajustada pode levar a dores nas costas ou articulações, e reduzir seu controle (ao contrário das calças ruins -- Ed).
Verifique se seu selim e guidão estão na altura correta e se você pode alcanças os freios e o câmbio confortavelmente.
Pise firmePara a maioria das pessoas, a planta do pé (1) deve ser posicionada no pedal (2) diretamente acima do eixo do pedal (3).
Você é tão especialTodo mundo é diferente, portanto, discuta sobre o visual da sua bicicleta antes de ir embora da loja. Eles podem ajudá-lo a mudar componentes para garantir seu conforto.
Seja você mesmoAntes de alterar componentes, verifique se as partes novas estão dentro da lei e não afetam a segurança ou o desempenho da sua bicicleta Tern.
8
EN
IT
PT
GR
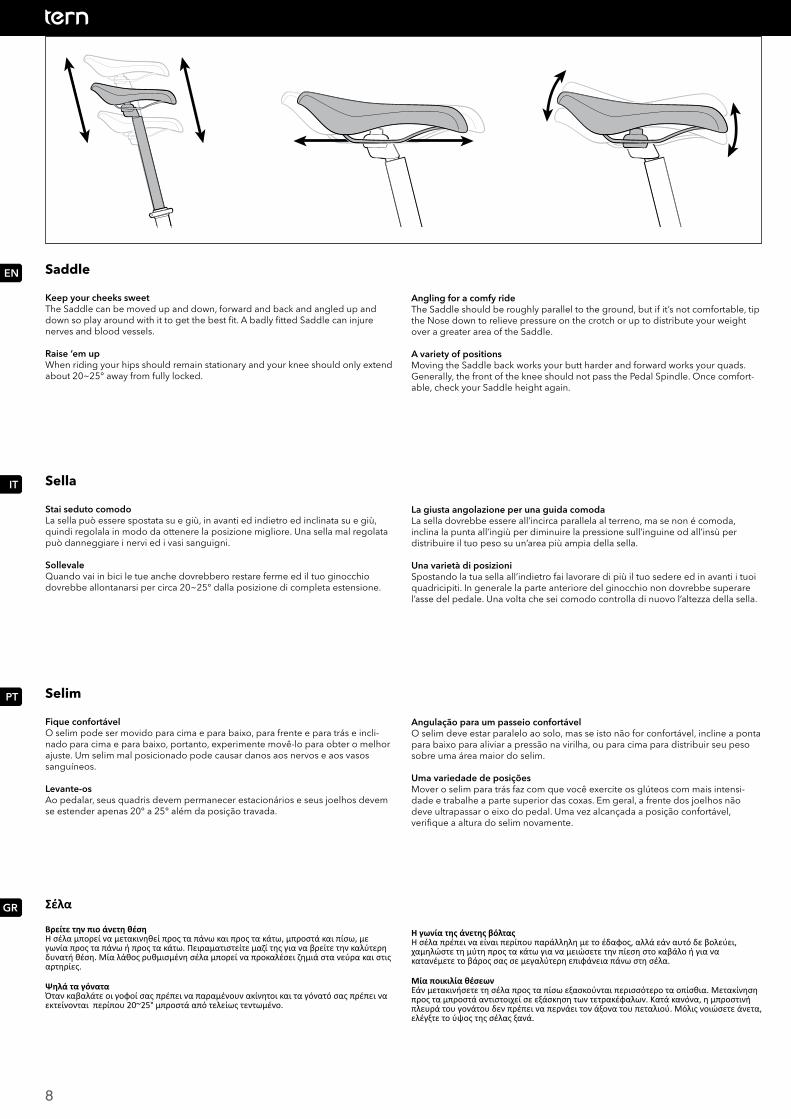
Saddle
Keep your cheeks sweetThe Saddle can be moved up and down, forward and back and angled up and down so play around with it to get the best fit. A badly fitted Saddle can injure nerves and blood vessels.
Raise ‘em upWhen riding your hips should remain stationary and your knee should only extend about 20~25° away from fully locked.
Σέλα
Βρείτε την πιο άνετη θέσηΗ σέλα μπορεί να μετακινηθεί προς τα πάνω και προς τα κάτω, μπροστά και πίσω, με γωνία προς τα πάνω ή προς τα κάτω. Πειραματιστείτε μαζί της για να βρείτε την καλύτερη δυνατή θέση. Μία λάθος ρυθμισμένη σέλα μπορεί να προκαλέσει ζημιά στα νεύρα και στις αρτηρίες.
Ψηλά τα γόναταΌταν καβαλάτε οι γοφοί σας πρέπει να παραμένουν ακίνητοι και τα γόνατό σας πρέπει να εκτείνονται περίπου 20~25° μπροστά από τελείως τεντωμένο.
Sella
Stai seduto comodoLa sella può essere spostata su e giù, in avanti ed indietro ed inclinata su e giù, quindi regolala in modo da ottenere la posizione migliore. Una sella mal regolata può danneggiare i nervi ed i vasi sanguigni. SollevaleQuando vai in bici le tue anche dovrebbero restare ferme ed il tuo ginocchio dovrebbe allontanarsi per circa 20~25° dalla posizione di completa estensione.
Angling for a comfy rideThe Saddle should be roughly parallel to the ground, but if it’s not comfortable, tip the Nose down to relieve pressure on the crotch or up to distribute your weight over a greater area of the Saddle.
A variety of positions Moving the Saddle back works your butt harder and forward works your quads. Generally, the front of the knee should not pass the Pedal Spindle. Once comfort-able, check your Saddle height again.
Η γωνία της άνετης βόλταςΗ σέλα πρέπει να είναι περίπου παράλληλη με το έδαφος, αλλά εάν αυτό δε βολεύει, χαμηλώστε τη μύτη προς τα κάτω για να μειώσετε την πίεση στο καβάλο ή για να κατανέμετε το βάρος σας σε μεγαλύτερη επιφάνεια πάνω στη σέλα.
Μία ποικιλία θέσεων Εάν μετακινήσετε τη σέλα προς τα πίσω εξασκούνται περισσότερο τα οπίσθια. Μετακίνηση προς τα μπροστά αντιστοιχεί σε εξάσκηση των τετρακέφαλων. Κατά κανόνα, η μπροστινή πλευρά του γονάτου δεν πρέπει να περνάει τον άξονα του πεταλιού. Μόλις νοιώσετε άνετα, ελέγξτε το ύψος της σέλας ξανά.
La giusta angolazione per una guida comodaLa sella dovrebbe essere all’incirca parallela al terreno, ma se non é comoda, inclina la punta all’ingiù per diminuire la pressione sull’inguine od all’insù per distribuire il tuo peso su un’area più ampia della sella.
Una varietà di posizioniSpostando la tua sella all’indietro fai lavorare di più il tuo sedere ed in avanti i tuoi quadricipiti. In generale la parte anteriore del ginocchio non dovrebbe superare l’asse del pedale. Una volta che sei comodo controlla di nuovo l’altezza della sella.
Selim
Fique confortávelO selim pode ser movido para cima e para baixo, para frente e para trás e incli-nado para cima e para baixo, portanto, experimente movê-lo para obter o melhor ajuste. Um selim mal posicionado pode causar danos aos nervos e aos vasos sanguíneos.
Levante-osAo pedalar, seus quadris devem permanecer estacionários e seus joelhos devem se estender apenas 20° a 25° além da posição travada.
Angulação para um passeio confortávelO selim deve estar paralelo ao solo, mas se isto não for confortável, incline a ponta para baixo para aliviar a pressão na virilha, ou para cima para distribuir seu peso sobre uma área maior do selim.
Uma variedade de posições Mover o selim para trás faz com que você exercite os glúteos com mais intensi-dade e trabalhe a parte superior das coxas. Em geral, a frente dos joelhos não deve ultrapassar o eixo do pedal. Uma vez alcançada a posição confortável, verifique a altura do selim novamente.
9
EN
IT
PT
GR
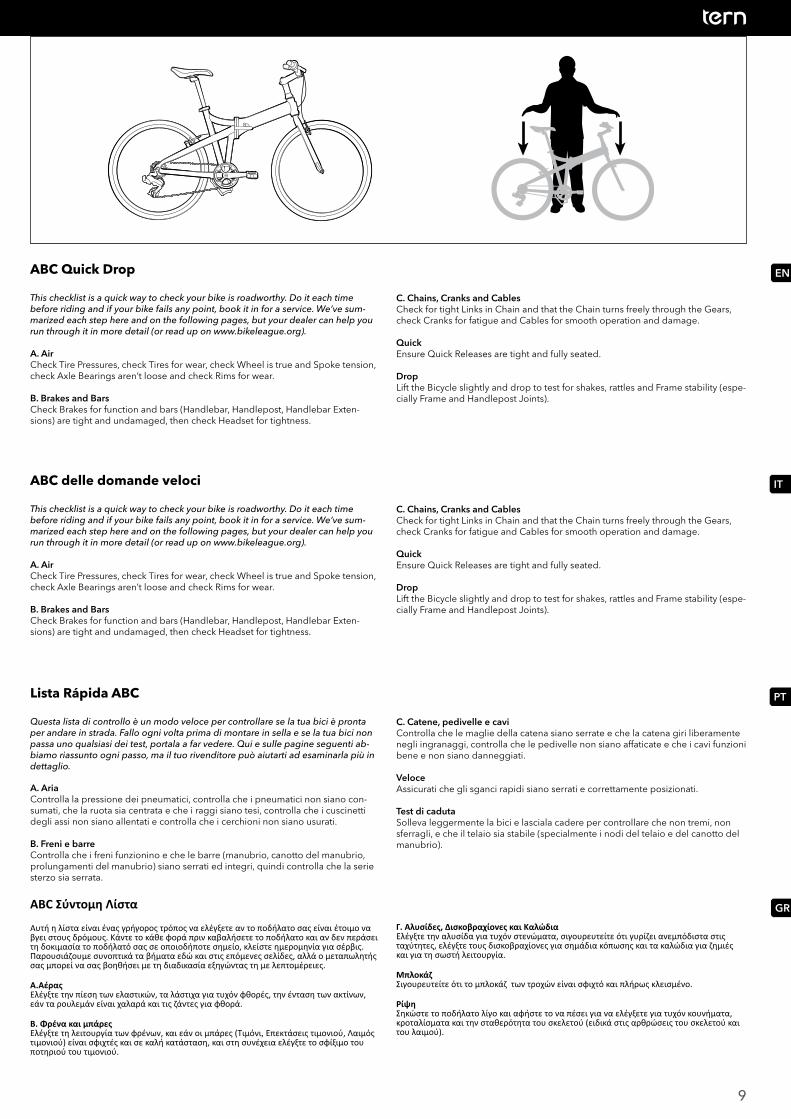
ABC Quick Drop
This checklist is a quick way to check your bike is roadworthy. Do it each time before riding and if your bike fails any point, book it in for a service. We’ve sum-marized each step here and on the following pages, but your dealer can help you run through it in more detail (or read up on www.bikeleague.org).
A. Air Check Tire Pressures, check Tires for wear, check Wheel is true and Spoke tension, check Axle Bearings aren’t loose and check Rims for wear.
B. Brakes and Bars Check Brakes for function and bars (Handlebar, Handlepost, Handlebar Exten-sions) are tight and undamaged, then check Headset for tightness.
ABC Σύντομη Λίστα
Αυτή η λίστα είναι ένας γρήγορος τρόπος να ελέγξετε αν το ποδήλατο σας είναι έτοιμο να βγει στους δρόμους. Κάντε το κάθε φορά πριν καβαλήσετε το ποδήλατο και αν δεν περάσει τη δοκιμασία το ποδήλατό σας σε οποιοδήποτε σημείο, κλείστε ημερομηνία για σέρβις. Παρουσιάζουμε συνοπτικά τα βήματα εδώ και στις επόμενες σελίδες, αλλά ο μεταπωλητής σας μπορεί να σας βοηθήσει με τη διαδικασία εξηγώντας τη με λεπτομέρειες.
A.ΑέραςΕλέγξτε την πίεση των ελαστικών, τα λάστιχα για τυχόν φθορές, την ένταση των ακτίνων, εάν τα ρουλεμάν είναι χαλαρά και τις ζάντες για φθορά.
B. Φρένα και μπάρεςΕλέγξτε τη λειτουργία των φρένων, και εάν οι μπάρες (Τιμόνι, Επεκτάσεις τιμονιού, Λαιμός τιμονιού) είναι σφιχτές και σε καλή κατάσταση, και στη συνέχεια ελέγξτε το σφίξιμο του ποτηριού του τιμονιού.
ABC delle domande veloci
This checklist is a quick way to check your bike is roadworthy. Do it each time before riding and if your bike fails any point, book it in for a service. We’ve sum-marized each step here and on the following pages, but your dealer can help you run through it in more detail (or read up on www.bikeleague.org).
A. Air Check Tire Pressures, check Tires for wear, check Wheel is true and Spoke tension, check Axle Bearings aren’t loose and check Rims for wear.
B. Brakes and Bars Check Brakes for function and bars (Handlebar, Handlepost, Handlebar Exten-sions) are tight and undamaged, then check Headset for tightness.
C. Chains, Cranks and Cables Check for tight Links in Chain and that the Chain turns freely through the Gears, check Cranks for fatigue and Cables for smooth operation and damage.
Quick Ensure Quick Releases are tight and fully seated.
Drop Lift the Bicycle slightly and drop to test for shakes, rattles and Frame stability (espe-cially Frame and Handlepost Joints).
Γ. Αλυσίδες, Δισκοβραχίονες και Καλώδια Ελέγξτε την αλυσίδα για τυχόν στενώματα, σιγουρευτείτε ότι γυρίζει ανεμπόδιστα στις ταχύτητες, ελέγξτε τους δισκοβραχίονες για σημάδια κόπωσης και τα καλώδια για ζημιές και για τη σωστή λειτουργία.
ΜπλοκάζΣιγουρευτείτε ότι το μπλοκάζ των τροχών είναι σφιχτό και πλήρως κλεισμένο.
ΡίψηΣηκώστε το ποδήλατο λίγο και αφήστε το να πέσει για να ελέγξετε για τυχόν κουνήματα, κροταλίσματα και την σταθερότητα του σκελετού (ειδικά στις αρθρώσεις του σκελετού και του λαιμού).
C. Chains, Cranks and Cables Check for tight Links in Chain and that the Chain turns freely through the Gears, check Cranks for fatigue and Cables for smooth operation and damage.
Quick Ensure Quick Releases are tight and fully seated.
Drop Lift the Bicycle slightly and drop to test for shakes, rattles and Frame stability (espe-cially Frame and Handlepost Joints).
Lista Rápida ABC
Questa lista di controllo è un modo veloce per controllare se la tua bici è pronta per andare in strada. Fallo ogni volta prima di montare in sella e se la tua bici non passa uno qualsiasi dei test, portala a far vedere. Qui e sulle pagine seguenti ab-biamo riassunto ogni passo, ma il tuo rivenditore può aiutarti ad esaminarla più in dettaglio.
A. Aria Controlla la pressione dei pneumatici, controlla che i pneumatici non siano con-sumati, che la ruota sia centrata e che i raggi siano tesi, controlla che i cuscinetti degli assi non siano allentati e controlla che i cerchioni non siano usurati.
B. Freni e barre Controlla che i freni funzionino e che le barre (manubrio, canotto del manubrio, prolungamenti del manubrio) siano serrati ed integri, quindi controlla che la serie sterzo sia serrata.
C. Catene, pedivelle e cavi Controlla che le maglie della catena siano serrate e che la catena giri liberamente negli ingranaggi, controlla che le pedivelle non siano affaticate e che i cavi funzioni bene e non siano danneggiati.
Veloce Assicurati che gli sganci rapidi siano serrati e correttamente posizionati.
Test di caduta Solleva leggermente la bici e lasciala cadere per controllare che non tremi, non sferragli, e che il telaio sia stabile (specialmente i nodi del telaio e del canotto del manubrio).
10
EN
IT
PT
GR
3
6 1
2
4
9
5
7 8
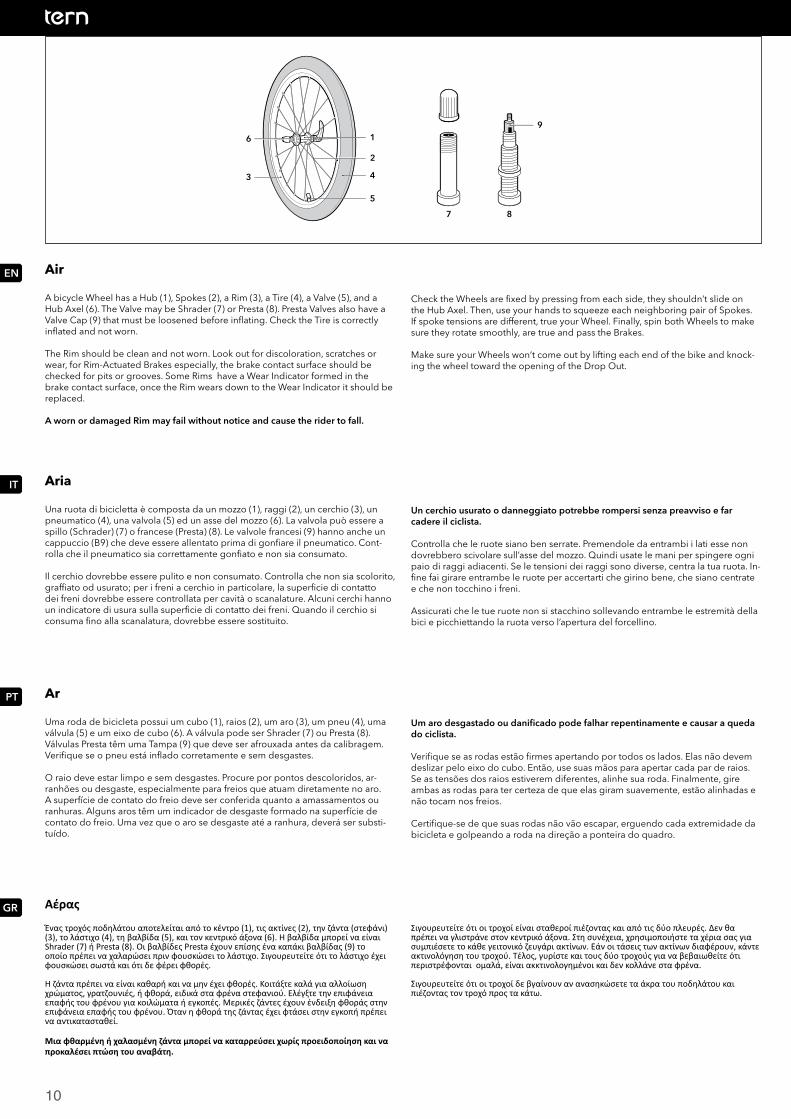
Air
A bicycle Wheel has a Hub (1), Spokes (2), a Rim (3), a Tire (4), a Valve (5), and a Hub Axel (6). The Valve may be Shrader (7) or Presta (8). Presta Valves also have a Valve Cap (9) that must be loosened before inflating. Check the Tire is correctly inflated and not worn.
The Rim should be clean and not worn. Look out for discoloration, scratches or wear, for Rim-Actuated Brakes especially, the brake contact surface should be checked for pits or grooves. Some Rims have a Wear Indicator formed in the brake contact surface, once the Rim wears down to the Wear Indicator it should be replaced.
A worn or damaged Rim may fail without notice and cause the rider to fall.
Αέρας
Ένας τροχός ποδηλάτου αποτελείται από το κέντρο (1), τις ακτίνες (2), την ζάντα (στεφάνι) (3), το λάστιχο (4), τη βαλβίδα (5), και τον κεντρικό άξονα (6). Η βαλβίδα μπορεί να είναι Shrader (7) ή Presta (8). Οι βαλβίδες Presta έχουν επίσης ένα καπάκι βαλβίδας (9) το οποίο πρέπει να χαλαρώσει πριν φουσκώσει το λάστιχο. Σιγουρευτείτε ότι το λάστιχο έχει φουσκώσει σωστά και ότι δε φέρει φθορές.
Η ζάντα πρέπει να είναι καθαρή και να μην έχει φθορές. Κοιτάξτε καλά για αλλοίωση χρώματος, γρατζουνιές, ή φθορά, ειδικά στα φρένα στεφανιού. Ελέγξτε την επιφάνεια επαφής του φρένου για κοιλώματα ή εγκοπές. Μερικές ζάντες έχουν ένδειξη φθοράς στην επιφάνεια επαφής του φρένου. Όταν η φθορά της ζάντας έχει φτάσει στην εγκοπή πρέπει να αντικατασταθεί.
Μια φθαρμένη ή χαλασμένη ζάντα μπορεί να καταρρεύσει χωρίς προειδοποίηση και να προκαλέσει πτώση του αναβάτη.
Aria
Una ruota di bicicletta è composta da un mozzo (1), raggi (2), un cerchio (3), un pneumatico (4), una valvola (5) ed un asse del mozzo (6). La valvola può essere a spillo (Schrader) (7) o francese (Presta) (8). Le valvole francesi (9) hanno anche un cappuccio (B9) che deve essere allentato prima di gonfiare il pneumatico. Cont-rolla che il pneumatico sia correttamente gonfiato e non sia consumato.
Il cerchio dovrebbe essere pulito e non consumato. Controlla che non sia scolorito, graffiato od usurato; per i freni a cerchio in particolare, la superficie di contatto dei freni dovrebbe essere controllata per cavità o scanalature. Alcuni cerchi hanno un indicatore di usura sulla superficie di contatto dei freni. Quando il cerchio si consuma fino alla scanalatura, dovrebbe essere sostituito.
Check the Wheels are fixed by pressing from each side, they shouldn’t slide on the Hub Axel. Then, use your hands to squeeze each neighboring pair of Spokes. If spoke tensions are different, true your Wheel. Finally, spin both Wheels to make sure they rotate smoothly, are true and pass the Brakes.
Make sure your Wheels won’t come out by lifting each end of the bike and knock-ing the wheel toward the opening of the Drop Out.
Σιγουρευτείτε ότι οι τροχοί είναι σταθεροί πιέζοντας και από τις δύο πλευρές. Δεν θα πρέπει να γλιστράνε στον κεντρικό άξονα. Στη συνέχεια, χρησιμοποιήστε τα χέρια σας για συμπιέσετε το κάθε γειτονικό ζευγάρι ακτίνων. Εάν οι τάσεις των ακτίνων διαφέρουν, κάντε ακτινολόγηση του τροχού. Τέλος, γυρίστε και τους δύο τροχούς για να βεβαιωθείτε ότι περιστρέφονται ομαλά, είναι ακκτινολογημένοι και δεν κολλάνε στα φρένα.
Σιγουρευτείτε ότι οι τροχοί δε βγαίνουν αν ανασηκώσετε τα άκρα του ποδηλάτου και πιέζοντας τον τροχό προς τα κάτω.
Un cerchio usurato o danneggiato potrebbe rompersi senza preavviso e far cadere il ciclista.
Controlla che le ruote siano ben serrate. Premendole da entrambi i lati esse non dovrebbero scivolare sull’asse del mozzo. Quindi usate le mani per spingere ogni paio di raggi adiacenti. Se le tensioni dei raggi sono diverse, centra la tua ruota. In-fine fai girare entrambe le ruote per accertarti che girino bene, che siano centrate e che non tocchino i freni.
Assicurati che le tue ruote non si stacchino sollevando entrambe le estremità della bici e picchiettando la ruota verso l’apertura del forcellino.
Ar
Uma roda de bicicleta possui um cubo (1), raios (2), um aro (3), um pneu (4), uma válvula (5) e um eixo de cubo (6). A válvula pode ser Shrader (7) ou Presta (8). Válvulas Presta têm uma Tampa (9) que deve ser afrouxada antes da calibragem. Verifique se o pneu está inflado corretamente e sem desgastes.
O raio deve estar limpo e sem desgastes. Procure por pontos descoloridos, ar-ranhões ou desgaste, especialmente para freios que atuam diretamente no aro. A superfície de contato do freio deve ser conferida quanto a amassamentos ou ranhuras. Alguns aros têm um indicador de desgaste formado na superfície de contato do freio. Uma vez que o aro se desgaste até a ranhura, deverá ser substi-tuído.
Um aro desgastado ou danificado pode falhar repentinamente e causar a queda do ciclista.
Verifique se as rodas estão firmes apertando por todos os lados. Elas não devem deslizar pelo eixo do cubo. Então, use suas mãos para apertar cada par de raios. Se as tensões dos raios estiverem diferentes, alinhe sua roda. Finalmente, gire ambas as rodas para ter certeza de que elas giram suavemente, estão alinhadas e não tocam nos freios.
Certifique-se de que suas rodas não vão escapar, erguendo cada extremidade da bicicleta e golpeando a roda na direção a ponteira do quadro.
11
EN
IT
PT
GR
CBA
3
42
1
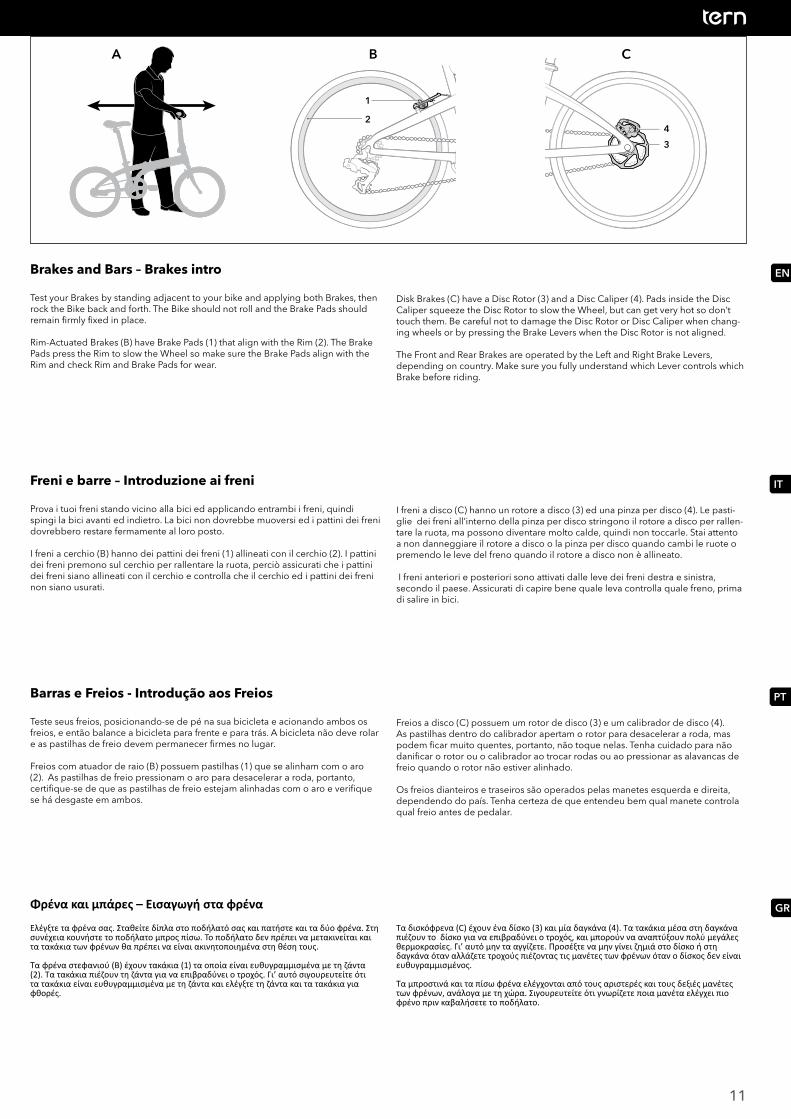
Brakes and Bars – Brakes intro
Test your Brakes by standing adjacent to your bike and applying both Brakes, then rock the Bike back and forth. The Bike should not roll and the Brake Pads should remain firmly fixed in place.
Rim-Actuated Brakes (B) have Brake Pads (1) that align with the Rim (2). The Brake Pads press the Rim to slow the Wheel so make sure the Brake Pads align with the Rim and check Rim and Brake Pads for wear.
Freni e barre – Introduzione ai freni
Prova i tuoi freni stando vicino alla bici ed applicando entrambi i freni, quindi spingi la bici avanti ed indietro. La bici non dovrebbe muoversi ed i pattini dei freni dovrebbero restare fermamente al loro posto.
I freni a cerchio (B) hanno dei pattini dei freni (1) allineati con il cerchio (2). I pattini dei freni premono sul cerchio per rallentare la ruota, perciò assicurati che i pattini dei freni siano allineati con il cerchio e controlla che il cerchio ed i pattini dei freni non siano usurati.
Φρένα και μπάρες – Εισαγωγή στα φρένα
Ελέγξτε τα φρένα σας. Σταθείτε δίπλα στο ποδήλατό σας και πατήστε και τα δύο φρένα. Στη συνέχεια κουνήστε το ποδήλατο μπρος πίσω. Το ποδήλατο δεν πρέπει να μετακινείται και τα τακάκια των φρένων θα πρέπει να είναι ακινητοποιημένα στη θέση τους.
Τα φρένα στεφανιού (B) έχουν τακάκια (1) τα οποία είναι ευθυγραμμισμένα με τη ζάντα (2). Τα τακάκια πιέζουν τη ζάντα για να επιβραδύνει ο τροχός. Γι’ αυτό σιγουρευτείτε ότι τα τακάκια είναι ευθυγραμμισμένα με τη ζάντα και ελέγξτε τη ζάντα και τα τακάκια για φθορές.
Disk Brakes (C) have a Disc Rotor (3) and a Disc Caliper (4). Pads inside the Disc Caliper squeeze the Disc Rotor to slow the Wheel, but can get very hot so don’t touch them. Be careful not to damage the Disc Rotor or Disc Caliper when chang-ing wheels or by pressing the Brake Levers when the Disc Rotor is not aligned.
The Front and Rear Brakes are operated by the Left and Right Brake Levers, depending on country. Make sure you fully understand which Lever controls which Brake before riding.
I freni a disco (C) hanno un rotore a disco (3) ed una pinza per disco (4). Le pasti-glie dei freni all’interno della pinza per disco stringono il rotore a disco per rallen-tare la ruota, ma possono diventare molto calde, quindi non toccarle. Stai attento a non danneggiare il rotore a disco o la pinza per disco quando cambi le ruote o premendo le leve del freno quando il rotore a disco non è allineato.
I freni anteriori e posteriori sono attivati dalle leve dei freni destra e sinistra, secondo il paese. Assicurati di capire bene quale leva controlla quale freno, prima di salire in bici.
Τα δισκόφρενα (C) έχουν ένα δίσκο (3) και μία δαγκάνα (4). Τα τακάκια μέσα στη δαγκάνα πιέζουν το δίσκο για να επιβραδύνει ο τροχός, και μπορούν να αναπτύξουν πολύ μεγάλες θερμοκρασίες. Γι’ αυτό μην τα αγγίζετε. Προσέξτε να μην γίνει ζημιά στο δίσκο ή στη δαγκάνα όταν αλλάζετε τροχούς πιέζοντας τις μανέτες των φρένων όταν ο δίσκος δεν είναι ευθυγραμμισμένος.
Τα μπροστινά και τα πίσω φρένα ελέγχονται από τους αριστερές και τους δεξιές μανέτες των φρένων, ανάλογα με τη χώρα. Σιγουρευτείτε ότι γνωρίζετε ποια μανέτα ελέγχει πιο φρένο πριν καβαλήσετε το ποδήλατο.
Barras e Freios - Introdução aos Freios
Teste seus freios, posicionando-se de pé na sua bicicleta e acionando ambos os freios, e então balance a bicicleta para frente e para trás. A bicicleta não deve rolar e as pastilhas de freio devem permanecer firmes no lugar.
Freios com atuador de raio (B) possuem pastilhas (1) que se alinham com o aro (2). As pastilhas de freio pressionam o aro para desacelerar a roda, portanto, certifique-se de que as pastilhas de freio estejam alinhadas com o aro e verifique se há desgaste em ambos.
Freios a disco (C) possuem um rotor de disco (3) e um calibrador de disco (4). As pastilhas dentro do calibrador apertam o rotor para desacelerar a roda, mas podem ficar muito quentes, portanto, não toque nelas. Tenha cuidado para não danificar o rotor ou o calibrador ao trocar rodas ou ao pressionar as alavancas de freio quando o rotor não estiver alinhado.
Os freios dianteiros e traseiros são operados pelas manetes esquerda e direita, dependendo do país. Tenha certeza de que entendeu bem qual manete controla qual freio antes de pedalar.
12
EN
IT
PT
GR
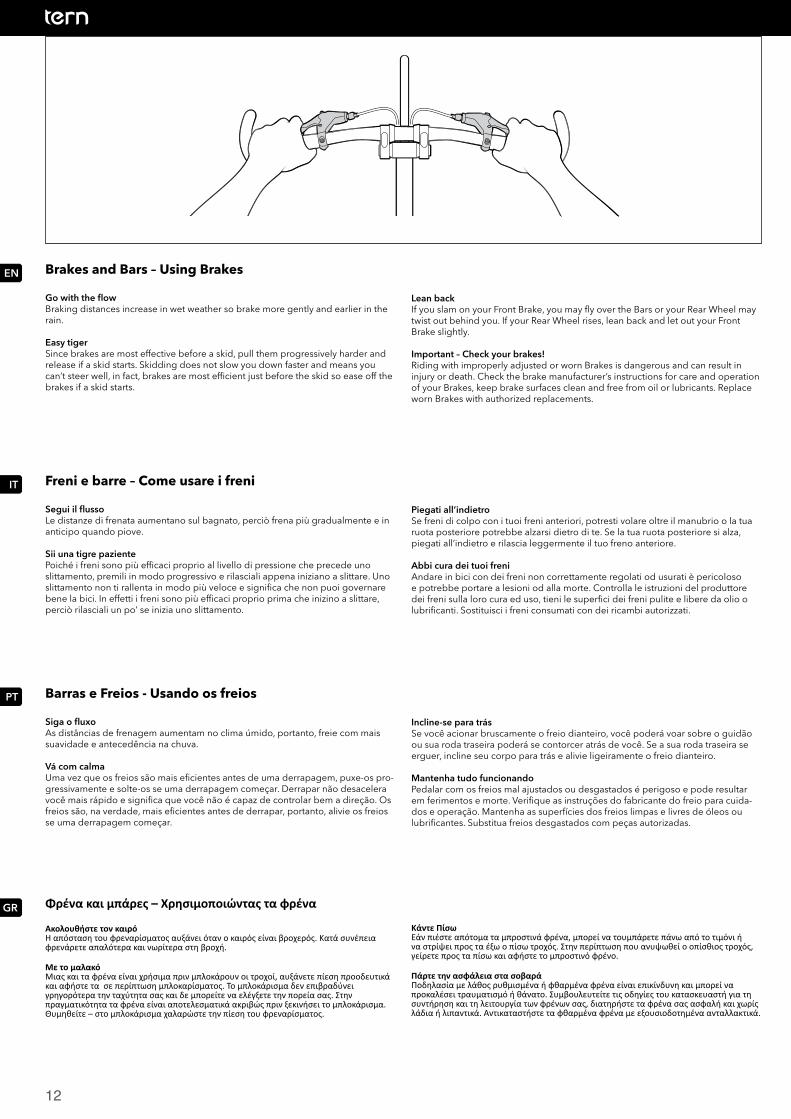
Brakes and Bars – Using Brakes
Go with the flowBraking distances increase in wet weather so brake more gently and earlier in the rain.
Easy tigerSince brakes are most effective before a skid, pull them progressively harder and release if a skid starts. Skidding does not slow you down faster and means you can’t steer well, in fact, brakes are most efficient just before the skid so ease off the brakes if a skid starts.
Freni e barre – Come usare i freni
Segui il flussoLe distanze di frenata aumentano sul bagnato, perciò frena più gradualmente e in anticipo quando piove.
Sii una tigre pazientePoiché i freni sono più efficaci proprio al livello di pressione che precede uno slittamento, premili in modo progressivo e rilasciali appena iniziano a slittare. Uno slittamento non ti rallenta in modo più veloce e significa che non puoi governare bene la bici. In effetti i freni sono più efficaci proprio prima che inizino a slittare, perciò rilasciali un po’ se inizia uno slittamento.
Lean backIf you slam on your Front Brake, you may fly over the Bars or your Rear Wheel may twist out behind you. If your Rear Wheel rises, lean back and let out your Front Brake slightly.
Important – Check your brakes!Riding with improperly adjusted or worn Brakes is dangerous and can result in injury or death. Check the brake manufacturer’s instructions for care and operation of your Brakes, keep brake surfaces clean and free from oil or lubricants. Replace worn Brakes with authorized replacements.
Piegati all’indietroSe freni di colpo con i tuoi freni anteriori, potresti volare oltre il manubrio o la tua ruota posteriore potrebbe alzarsi dietro di te. Se la tua ruota posteriore si alza, piegati all’indietro e rilascia leggermente il tuo freno anteriore.
Abbi cura dei tuoi freniAndare in bici con dei freni non correttamente regolati od usurati è pericoloso e potrebbe portare a lesioni od alla morte. Controlla le istruzioni del produttore dei freni sulla loro cura ed uso, tieni le superfici dei freni pulite e libere da olio o lubrificanti. Sostituisci i freni consumati con dei ricambi autorizzati.
Barras e Freios - Usando os freios
Siga o fluxoAs distâncias de frenagem aumentam no clima úmido, portanto, freie com mais suavidade e antecedência na chuva.
Vá com calmaUma vez que os freios são mais eficientes antes de uma derrapagem, puxe-os pro-gressivamente e solte-os se uma derrapagem começar. Derrapar não desacelera você mais rápido e significa que você não é capaz de controlar bem a direção. Os freios são, na verdade, mais eficientes antes de derrapar, portanto, alivie os freios se uma derrapagem começar.
Φρένα και μπάρες – Χρησιμοποιώντας τα φρένα
Ακολουθήστε τον καιρόΗ απόσταση του φρεναρίσματος αυξάνει όταν ο καιρός είναι βροχερός. Κατά συνέπεια φρενάρετε απαλότερα και νωρίτερα στη βροχή.
Με το μαλακόΜιας και τα φρένα είναι χρήσιμα πριν μπλοκάρουν οι τροχοί, αυξάνετε πίεση προοδευτικά και αφήστε τα σε περίπτωση μπλοκαρίσματος. Το μπλοκάρισμα δεν επιβραδύνει γρηγορότερα την ταχύτητα σας και δε μπορείτε να ελέγξετε την πορεία σας. Στην πραγματικότητα τα φρένα είναι αποτελεσματικά ακριβώς πριν ξεκινήσει το μπλοκάρισμα. Θυμηθείτε – στο μπλοκάρισμα χαλαρώστε την πίεση του φρεναρίσματος.
Incline-se para trásSe você acionar bruscamente o freio dianteiro, você poderá voar sobre o guidão ou sua roda traseira poderá se contorcer atrás de você. Se a sua roda traseira se erguer, incline seu corpo para trás e alivie ligeiramente o freio dianteiro.
Mantenha tudo funcionandoPedalar com os freios mal ajustados ou desgastados é perigoso e pode resultar em ferimentos e morte. Verifique as instruções do fabricante do freio para cuida-dos e operação. Mantenha as superfícies dos freios limpas e livres de óleos ou lubrificantes. Substitua freios desgastados com peças autorizadas.
Κάντε ΠίσωΕάν πιέστε απότομα τα μπροστινά φρένα, μπορεί να τουμπάρετε πάνω από το τιμόνι ή να στρίψει προς τα έξω ο πίσω τροχός. Στην περίπτωση που ανυψωθεί ο οπίσθιος τροχός, γείρετε προς τα πίσω και αφήστε το μπροστινό φρένο.
Πάρτε την ασφάλεια στα σοβαράΠοδηλασία με λάθος ρυθμισμένα ή φθαρμένα φρένα είναι επικίνδυνη και μπορεί να προκαλέσει τραυματισμό ή θάνατο. Συμβουλευτείτε τις οδηγίες του κατασκευαστή για τη συντήρηση και τη λειτουργία των φρένων σας, διατηρήστε τα φρένα σας ασφαλή και χωρίς λάδια ή λιπαντικά. Αντικαταστήστε τα φθαρμένα φρένα με εξουσιοδοτημένα ανταλλακτικά.
13
EN
IT
PT
GR
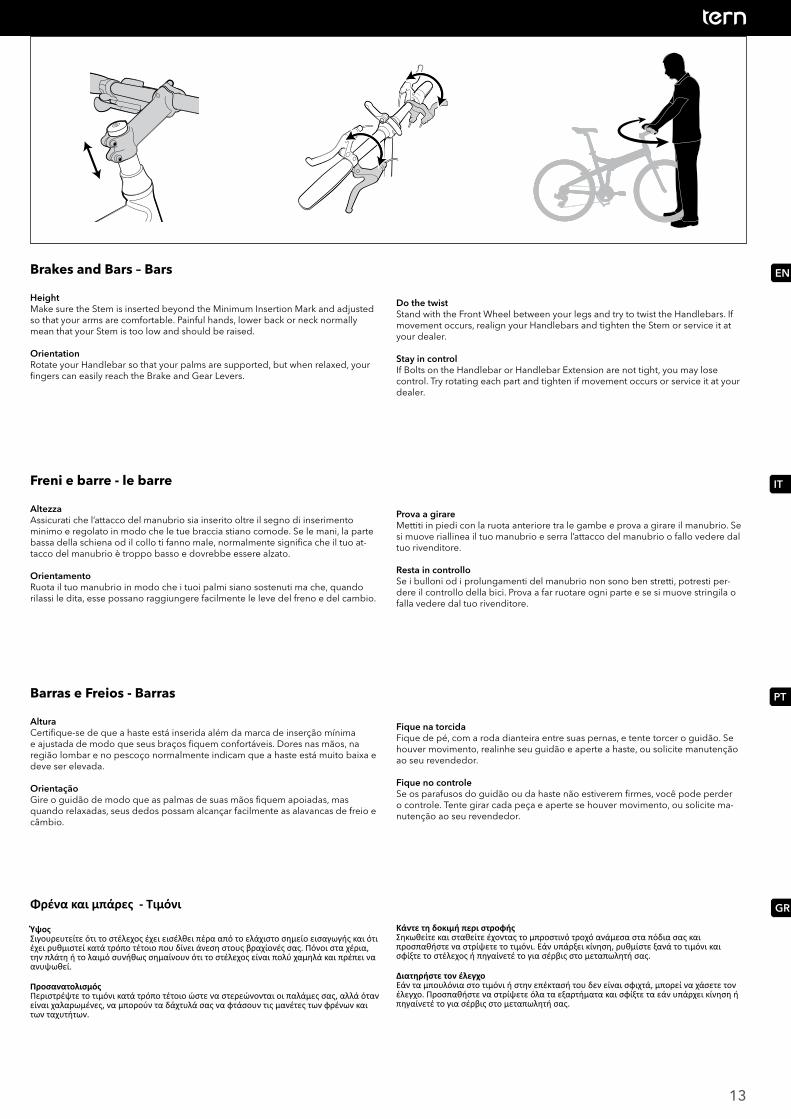
Brakes and Bars – Bars
HeightMake sure the Stem is inserted beyond the Minimum Insertion Mark and adjusted so that your arms are comfortable. Painful hands, lower back or neck normally mean that your Stem is too low and should be raised.
OrientationRotate your Handlebar so that your palms are supported, but when relaxed, your fingers can easily reach the Brake and Gear Levers.
Freni e barre - le barre
AltezzaAssicurati che l’attacco del manubrio sia inserito oltre il segno di inserimento minimo e regolato in modo che le tue braccia stiano comode. Se le mani, la parte bassa della schiena od il collo ti fanno male, normalmente significa che il tuo at-tacco del manubrio è troppo basso e dovrebbe essere alzato.
OrientamentoRuota il tuo manubrio in modo che i tuoi palmi siano sostenuti ma che, quando rilassi le dita, esse possano raggiungere facilmente le leve del freno e del cambio.
Do the twistStand with the Front Wheel between your legs and try to twist the Handlebars. If movement occurs, realign your Handlebars and tighten the Stem or service it at your dealer.
Stay in controlIf Bolts on the Handlebar or Handlebar Extension are not tight, you may lose control. Try rotating each part and tighten if movement occurs or service it at your dealer.
Prova a girareMettiti in piedi con la ruota anteriore tra le gambe e prova a girare il manubrio. Se si muove riallinea il tuo manubrio e serra l’attacco del manubrio o fallo vedere dal tuo rivenditore.
Resta in controlloSe i bulloni od i prolungamenti del manubrio non sono ben stretti, potresti per-dere il controllo della bici. Prova a far ruotare ogni parte e se si muove stringila o falla vedere dal tuo rivenditore.
Barras e Freios - Barras
AlturaCertifique-se de que a haste está inserida além da marca de inserção mínima e ajustada de modo que seus braços fiquem confortáveis. Dores nas mãos, na região lombar e no pescoço normalmente indicam que a haste está muito baixa e deve ser elevada.
OrientaçãoGire o guidão de modo que as palmas de suas mãos fiquem apoiadas, mas quando relaxadas, seus dedos possam alcançar facilmente as alavancas de freio e câmbio.
Φρένα και μπάρες - Τιμόνι
ΎψοςΣιγουρευτείτε ότι το στέλεχος έχει εισέλθει πέρα από το ελάχιστο σημείο εισαγωγής και ότι έχει ρυθμιστεί κατά τρόπο τέτοιο που δίνει άνεση στους βραχίονές σας. Πόνοι στα χέρια, την πλάτη ή το λαιμό συνήθως σημαίνουν ότι το στέλεχος είναι πολύ χαμηλά και πρέπει να ανυψωθεί. ΠροσανατολισμόςΠεριστρέψτε το τιμόνι κατά τρόπο τέτοιο ώστε να στερεώνονται οι παλάμες σας, αλλά όταν είναι χαλαρωμένες, να μπορούν τα δάχτυλά σας να φτάσουν τις μανέτες των φρένων και των ταχυτήτων.
Fique na torcidaFique de pé, com a roda dianteira entre suas pernas, e tente torcer o guidão. Se houver movimento, realinhe seu guidão e aperte a haste, ou solicite manutenção ao seu revendedor.
Fique no controleSe os parafusos do guidão ou da haste não estiverem firmes, você pode perder o controle. Tente girar cada peça e aperte se houver movimento, ou solicite ma-nutenção ao seu revendedor.
Κάντε τη δοκιμή περι στροφήςΣηκωθείτε και σταθείτε έχοντας το μπροστινό τροχό ανάμεσα στα πόδια σας και προσπαθήστε να στρίψετε το τιμόνι. Εάν υπάρξει κίνηση, ρυθμίστε ξανά το τιμόνι και σφίξτε το στέλεχος ή πηγαίνετέ το για σέρβις στο μεταπωλητή σας.
Διατηρήστε τον έλεγχοΕάν τα μπουλόνια στο τιμόνι ή στην επέκτασή του δεν είναι σφιχτά, μπορεί να χάσετε τον έλεγχο. Προσπαθήστε να στρίψετε όλα τα εξαρτήματα και σφίξτε τα εάν υπάρχει κίνηση ή πηγαίνετέ το για σέρβις στο μεταπωλητή σας.
14
EN
IT
PT
GR
6
35 7
7
4 4 3
9
1 2
8
1010
Chain, Cranks and Cables
A bicycle drivechain is either Internal Hub (1) or External (2). Your Chainset is the Cranks (3), Chain Ring (4), Rear Sprocket (5) or Cassette (6), Chain (7), Front Derail-leur (8) and Rear Derailleur (9). Bicycle Gears are numbered from one upwards, with one being the lowest (easiest) gear. If fitted, the Left Gear Shifter controls the Front Gear and the Right Gear Shifter controls the Rear Gear. The Front Gear has up to three modes, uphill (Small Chain Ring), level (Medium Chain Ring), and downhill (Large Chain Ring). The lower gears are used for climbing and highest for descending. We recommend you practice using the Gears in a safe location.
To check that your Chain fully meshes with the Chain Ring, rotate the Cranks and ensure no gaps or kinks are visible.
Catena, pedivelle e cavi
La catena di una bici può essere interna Mozzo (1) od esterna (2). Il tuo insieme è composto dalle Pedivelle (3), Corona anteriore (4), Pignone posteriore (5) o Grup-po pignoni (6), Catena (7), Deragliatore anteriore (8) e Deragliatore posteriore (9) Le marce della bici sono numerate dall’1 in su, di cui 1 è la marcia più bassa (la più facile). Se hai la leva sinistra del cambio controlla le marce anteriori e la leva destra del cambio controlla le marce posteriori. L’ingranaggio anteriore ha tre posizioni, salita (corona piccola), pianura (corona media), e discesa (corona grande). Le marce basse sono usate per andare in salita e le più alte per andare in discesa. Ti raccomandiamo di fare pratica usando le marce in un posto sicuro.
Per controllare che la tua catena ingrani bene con la corona, fai girare le pedivelle ed assicurati che non si vedano degli intervalli o dei serpeggiamenti.
Αλυσίδα, Δισκοβραχίονας και Καλώδια
Τα σύστημα μετάδοσης ενός ποδηλάτου είναι είτε εσωτερικό (Hub 1) ή εξωτερικό (2). Αποτελείται από τους δισκοβραχίονες (3), το δίσκο (4), τα πίσω γρανάζια (5) ή την κασέτα (6), την αλυσίδα (7), το μπροστινό ντεραγιέ (8) και το πίσω ντεραγιέ (9). Οι ταχύτητες του ποδηλάτου αριθμούνται από το 1 και αυξάνονται προς τα πάνω, με το 1 να αντιστοιχεί στη χαμηλότερη (την πιο εύκολη) ταχύτητα. Εάν υπάρχει αριστερός λεβιές ταχυτήτων, ελέγχει τους μπροστινούς δίσκους και ο δεξιός λεβιές ταχυτήτων ελέγχει τα γρανάζια πίσω. Το γρανάζι μπροστά έχει μέχρι τρεις θέσεις/γρανάζια. Την πρώτη για ανηφόρα (μικρός δίσκος), τη Δευτέρα για επίπεδο δρόμο (μεσαίος δίσκος), και την τρίτη για κατηφόρα (μεγάλος δίσκος). Οι μικρές ταχύτητες χρησιμοποιούνται για ανάβαση και οι ψηλές για κατάβαση. Σας προτείνουμε να εξασκηθείτε χρησιμοποιώντας τις ταχύτητες σε μία ασφαλή τοποθεσία.
Για να ελέγξετε εάν εμπλέκεται πλήρως η αλυσίδα με το δίσκο, περιστρέψτε το δισκοβραχίονα και σιγουρευτείτε ότι δεν υπάρχουν κενά ή ορατά τσακίσματα.
Before riding, shift through all Gears and make sure the Chain and Derailleurs are fully functional. If your Gears are not shifting smoothly, we recommend consulting your dealer. If the Rear Derailleur is malfunctioning, do not use the highest and lowest gears of the Rear Cassette since the Chain or Wheel may get jammed, caus-ing bicycle damage or rider injury.
Check all control Cables and Housings (10) for rust, kinks, fraying and smooth operation, replace if damaged.
Prima di usare la bici, prova tutte le marce ed assicurati che la Catena ed il Dera-gliatore funzionino bene. Se non riesci a cambiare bene le marce, ti raccomandia-mo di consultare il tuo rivenditore. Se il Deragliatore posteriore non funziona bene, non usare la marcia più alta e la più bassa perché la catena o la ruota possono incepparsi.
Controlla che tutti i Cavi e le Guaine (10) non abbiano ruggine, serpeggiamenti, sfilacciamenti e che funzionino bene; sostituiscili se sono danneggiati.
Πριν ανεβείτε στο ποδήλατο, δοκιμάστε όλες τις ταχύτητες και σιγουρευτείτε ότι η αλυσίδα και το ντεραγιέ λειτουργούν άριστα. Εάν οι ταχύτητες δεν αλλάζουν εύκολα, σας προτείνουμε να μιλήσετε με το μεταπωλητή σας. Εάν το πίσω ντεραγιέ δυσλειτουργεί, μη χρησιμοποιήσετε τα υψηλότερα ή τα χαμηλότερα γρανάζια επειδή η αλυσίδα ή ο τροχός μπορεί να μπλεχτεί.
Σιγουρευτείτε ότι όλα τα καλώδια ελέγχου και τα περιβλήματά τους λειτουργούν σωστά και ελέγξτε τα για (10) σκουριά, τσακίσματα, ξεφτίσματα, και αντικαταστήστε να χρειάζεται.
Correntes, Pedivelas e Cabos
Uma corrente de bicicleta é normalmente interna (Cubo 1) ou externa (2). Seu conjunto é composto por pedivelas (3), anel da corrente (4), catraca traseira (4) ou cassette (5), corrente (6), câmbio dianteiro (7) e câmbio traseiro (8). As marchas da bicicleta são numeradas de 1 para cima, sendo 1 a mais baixa (mais leve). Se encaixado, a alavanca de câmbio do lado esquerdo controla o câmbio dianteiro e a alavanca de câmbio direita controla o câmbio traseiro. O câmbio dianteiro tem até três modos, subida (catraca menor), plano (catraca média), e descida (catraca grande). As marchas mais baixas são usadas para subir e as mais baixas para desc-er. Nós recomendamos que você pratique o uso das marchas em local seguro.
Para verificar se sua corrente se encaixa completamente com o anel de corrente, gire as pedivelas e confira se não há espaços vazios visíveis.
Antes de pedalar, passe por todas as marchas e certifique-se de que a corrente e o câmbio estão funcionando plenamente. Se a troca de marchas não for suave, recomendamos que você consulte o revendedor. Se o câmbio traseiro estiver funcionando incorretamente, não utilize as marchas mais alta e mais baixa, pois a corrente ou a roda podem se embolar.
Verifique a presença de ferrugem, rachaduras, desgaste e funcionamento de todos os cabos e caixas (9), e substitua se houver danos.

15
EN
IT
PT
GR
1
23
Quick Drop
A Quick Release has a Clamp (1), an Acorn (2) and a Lever (3). The concave side closes inward.
Quick Releases hold the Wheels, Seat Post and Handlebar in place.
When tightened on the Wheels, the quick release should emboss the Fork Drop-outs.
When tightened on the Seat Post, the Seat Post won’t rotate.
When tightened on the Handlebar, the Handlebar won’t rotate.
Sgancio Rapido
Uno Sgancio Rapido è composto da un Morsetto (1), una Ghianda (2) ed una Leva (3). L’estremità concava si chiude verso l’interno.
Gli Sganci rapidi tengono al loro posto le Ruote, il tubo reggisella ed il Manubrio.
Quando serri le Ruote, lo sgancio rapido dovrebbe fare pressione sui forcellini della forcella.
Quando serri il tubo reggisella, esso non deve ruotare.
Quando serri il Manubrio, esso non deve ruotare.
Before riding, check all Quick Releases are secure.
Lift each Wheel and hit downward to check the Wheels are secured.
Try to rotate the Handlebar and Seat Post to check both are secured
Drop TestLift the bike slightly and drop to test for shakes, rattles and frame stability (espe-cially Frame and Handlepost Joints). Tighten accessories and check the Frame, Fork and Handlepost for metal fatigue.
Prima di andare in bici controlla che tutti gli Sganci Rapidi siano ben stretti. Solleva ogni Ruota e colpiscila verso il basso per controllare che le Ruote siano ben fisse.
Tenta di ruotare il Manubrio ed il tubo reggisella per controllare che entrambi siano ben stretti.
Prova di cadutaSolleva leggermente la bici e lasciala cadere per controllare che non tremi, non sferragli, e che il telaio sia stabile (specialmente i nodi del telaio e del canotto del manubrio). Serra bene gli accessori e controlla il Telaio, la Forcella ed il Canotto del Manubrio verificando che non ci siano segni di fatica delle parti metalliche.
Travas saca-rápido
Uma trava saca-rápido é composta por uma abraçadeira (1), uma porca (2) e uma alavanca (3). A extremidade côncava se fecha para dentro.
Estas abraçadeiras mantêm as rodas, haste do selim e guidão no lugar.
Quando ajustada nas rodas, o saca-rápido deve segurar as pontas do garfo.
Quando ajustadas no canote do selim, o canote não irá girar.
Quando ajustadas no guidão, o guidão não irá girar.
Γρήγορος Έλεγχος
Το μπλοκάζ περιλαμβάνει ένα σφιγκτήρα (1), ένα περικόχλιο (2) και ένα λεβιέ (3). Ο κοίλος λεβιές κλείνει προς τα μέσα.
Το μπλοκάζ συγκρατεί τους Τροχούς, το Λαιμό της σέλας και το Τιμόνι στη θέση τους.
Όταν σφίγγει στους τροχούς,, το μπλοκάζ θα πρέπει να κάνει σημάδι στα νύχια του πιρουνιού.
Όταν σφίγγει στο λαιμό της σέλας, ο λαιμός της σέλας δεν πρέπει περιστρέφεται.
Όταν σφίγγει στο τιμόνι, το τιμόνι δεν πρέπει περιστρέφεται.
Πριν ανεβείτε στο ποδήλατο, σιγουρευτείτε ότι όλα τα μπλοκάζ είναι ασφαλισμένα.
Antes de sair pedalando, verifique se todos os saca-rápido estão firmes.
Levante cada roda e deixe cair para verificar a firmeza.
Tente girar o guidão e a haste do selim para verificar a firmeza.
Teste de quedaErga ligeiramente a bicicleta e deixe cair para testar tremores, trepidações e a estabilidade do quadro (especialmente as dobradiças do quadro e a do guidão). Aperte bem os acessórios e verifique se há fadiga do metal no quadro, no garfo e na haste do guidão.
Σηκώστε τον κάθε τροχό και αφήστε τον να χτυπήσει στο έδαφος για να βεβαιωθείτε ότι είναι ασφαλισμένοι.
Προσπαθήστε να περιστρέψετε το Τιμόνι και το Λαιμό της Σέλας για να βεβαιωθείτε ότι είναι ασφαλισμένα
Δοκιμή ΡίψηςΣηκώστε το ποδήλατο λίγο και αφήστε το να πέσει για να ελέγξετε για τυχόν κουνήματα, κροταλίσματα και την σταθερότητα του σκελετού (ειδικά στις αρθρώσεις του σκελετού και του λαιμού). Σφίξτε τα αξεσουάρ και ελέγξτε το σκελετό, το πιρούνι και το λαιμό για σημάδια κόπωσης (πχ ρωγμές).

* Tern, tern (logotype), tern berd (device), used alone and in combination are trade names, trade devices or registered trademarks of Mobility Holdings, Ltd.
ternbicycles.com© 2011, Mobility Holdings, Ltd. | 2011-TN-UM