INSTRUCTION - Justfit
14
Ed : 09/17 Rev : 00 INSTRUCTION
Transcript of INSTRUCTION - Justfit
Ed : 09/17 Rev : 00
INSTRUCTION
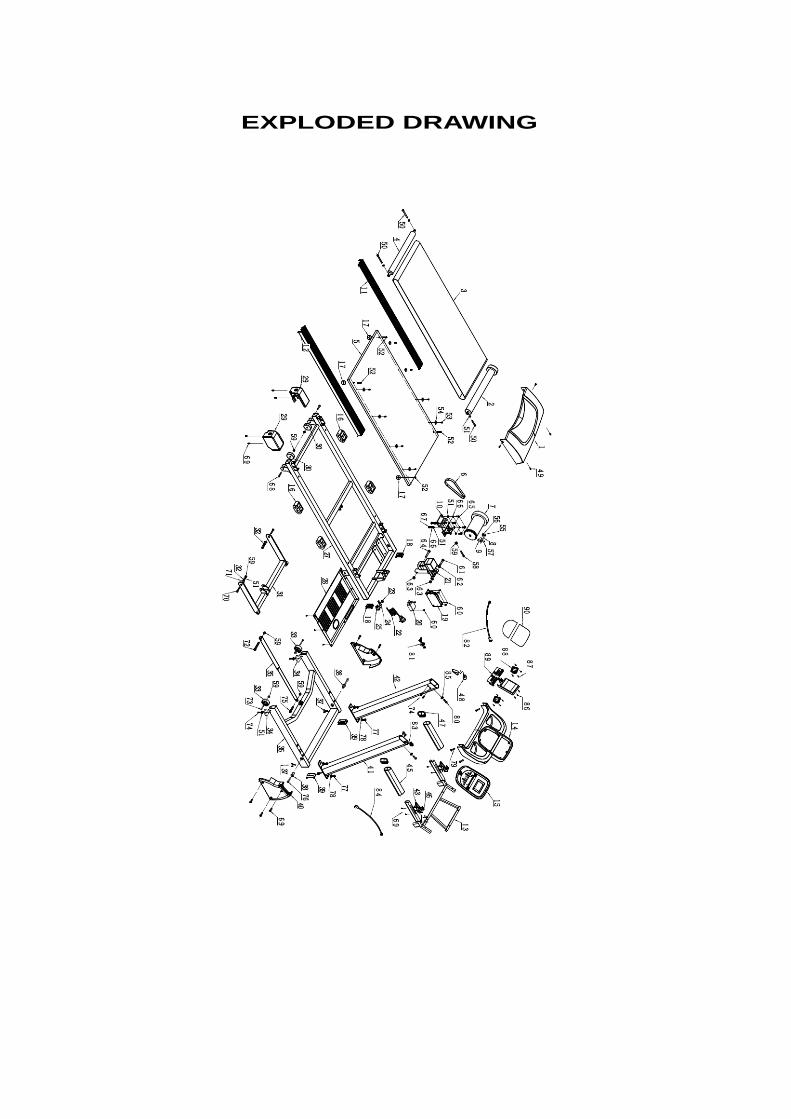
EXPLODED DRAWING
PARTS LIST
PART NO PART NAME Q'TY
1 MOTOR COVER 1
2 FRONT ROLLER 1
3 RUNNING BELT 1
4 REAR ROLLER 1
5 RUNNING DECK 1
6 MOTOR BELT 1
7 MOTOR 1
8 SPEED SENSOR FRAME 1
9 SPEED SENSOR 1
10 MOTOR FIXED FRAME 1
11 LEFT SIDE RAIL 1
12 RIGHT SIDE RAIL 1
13 CONSOLE FRAME 1
14 CONSOLE MAIN BODY 1
15 CONSOLE SMALL PANEL 1
16 SILICA GAS CUSHION 4
17 DECK FIX CUSHION 4
18 FRONT TUBE PLUG OF RUNNING PLATFORM 2
19 CONTROL BOARD 1
20 FILTER 1
21 INCLINE MOTOR 1
22 POWER WIRE 2
23 POWER WIRE CUSHION 1
24 FUSE 1
25 POWER SWITCH 1
26 MOVE WHEEL 2
27 RUNNING PLATFORM FRAME 1
28 MOTOR BELLY PAN 1
29 END CAP 2
30 MOVE WHEEL OF RUNNING PLATFORM 2
31 INCLINE FRAME 1
32 INCLINE FRAME CONNECT SHAFT SLEEVE 2
33 BASE FRAME MOVE WHEEL LEFT 2
34 RUBBER CUSHION 2
35 DAMPER 1
36 BASE FRAME 1
37 LEVEL FRAME 2
38 CONNECT SHEAT OF RUNNING PLATFORM 2
39 BADE FRAME FRONT TUBE PLUG 2
40 UPRIGHTS PROTECT COVER 2
41 RIGHT UPRIGHT 1
42 LEFT UPRIGHT 1
43 SHORTCUT KEY 2
44 SHROTCUT WIRE BOARD 2
45 FOAM 2
46 SHORT KEY PRESS 4
47 HANDLEBAR TUBE PLUG 2
48 SAFETY KEY 1
49 ST4.8*16 SCREW 11
50 M8*85 ALLEN HEAD BOLT 3
51 φ8 WASHER 15
52 M8*65 ALLEN HEAD BOLT 4
53 ST4.2*15 SCREW 8
54 SIDE RAIL CUSHION 8
55 5/32 BOLTS 2
56 5/32 NO-SLIP WASHER 2
57 ST2.9*8 SCREW 4
58 M8*70 ALLEN HEAD BOLT 1
59 M8 NYLON NUT 11
60 ST4.2*100 SCREW 6
61 M8*50 ALLEN HEAD BOLT 1
62 φ13 PLASTIC WASHER 2
63 M10 NYLON NUT 2
64 M10*60 ALLEN HEAD BOLT 1
65 M8*20 ALLEN HEAD BOLT 4
66 φ8 SPRING WASHER 6
67 M8*12 BOLT 2
68 M8*40 ALLEN HEAD BOLT 4
69 ST4.2*15 SCREW 12
70 M8*25 BOLTS 2
71 φ16 PLASTIC WASHER 2
72 M8*45 ALLEN HEAD BOLT 1
73 M8*50 ALLEN HEAD BOLT 2
74 M8*20 ALLEN HEAD BOLT 8
75 M8*35 ALLEN HEAD BOLT 1
76 M8*60 ALLEN HEAD BOLT 2
77 M10*20 ALLEN HEAD BOLT 4
78 φ10 WASHER 6
79 ST4.2*20 SCREW 4
80 M8*25 ALLEN HEAD BOLT 2
81 magnet ring 2
82 CONNECTION WIRE 3 1
83 CONNECTION WIRE 2 1
84 CONNECTION WIRE 1 1
85 φ8 ARC WASHER 2
HARDWARE COMPARISON CHART For your convenience, we have identified the hardware used in the assembly of this product. The chart below is
provided to help you to identify items that may be unfamiliar to you.
NO. DESCRIPTION Q'TY
69 ST4.2*15 SCREW 6
74 M8*20 ALLEN HEAD BOLT 4
77 M10*20 ALLEN HEAD BOLT 4
78 φ10 WASHER 4
80 M8*25 ALLEN HEAD BOLT 2
85 φ8 ARC WASHER 2
A 5mm SOCKET HEAD WRENCH 1
B 6mm SOCKET HEAD WRENCH 1
C LUBRICANT 1
D SCREWDRIVER 1
86 ST2.9*8 SCREW 9
87 ST2.9*12 SCREW 8
88 SPEAKER 2
89 CONSOLE CONTROL BOARD 1
90 OVERLAY 1

ASSEMBLY INSTRUCTIONS WARNING: Please put on all the screws, washers and bolts then tighten them.
STEP1:
First make to connect the
communication cable.
Then fix the uprights on the base
frame with M10*20 ALLEN HEAD
BOLT 77 and
Φ10 WASHER 78..
STEP2:
First make to connect the
communication cable.
Fix the computer on the uprights with
ST2.9*8 SCREW 57 、 φ8 ARC
WASHER 85 and M8*25 ALLEN
HEAD BOLT 80.
STEP3:
Fix the Upright protective cover on
the uprights with ST4.2*15 SCREW
69.
Folding illustration:
Folding illustration:
To drop down treadmill:
1. Strike the damper.
2. Hold on to the top end covers and
pull down the treadmill slowly on the
ground.
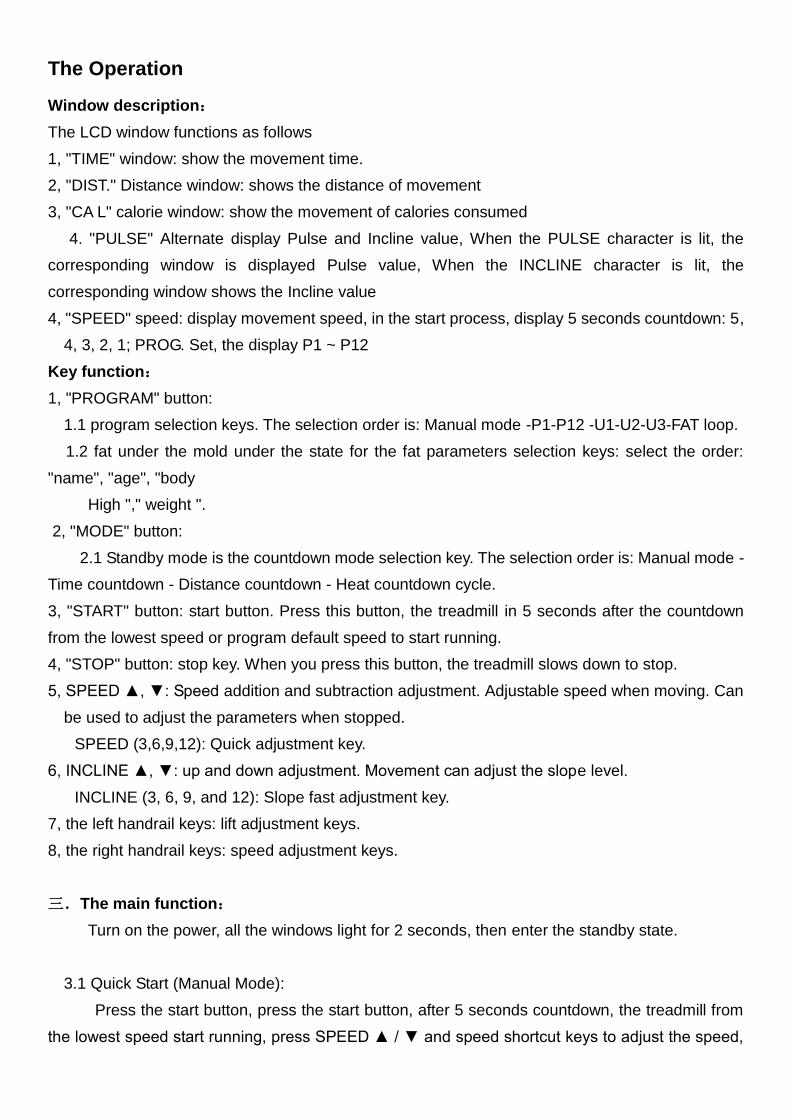
COMPUTER OPERATION
Panel layout
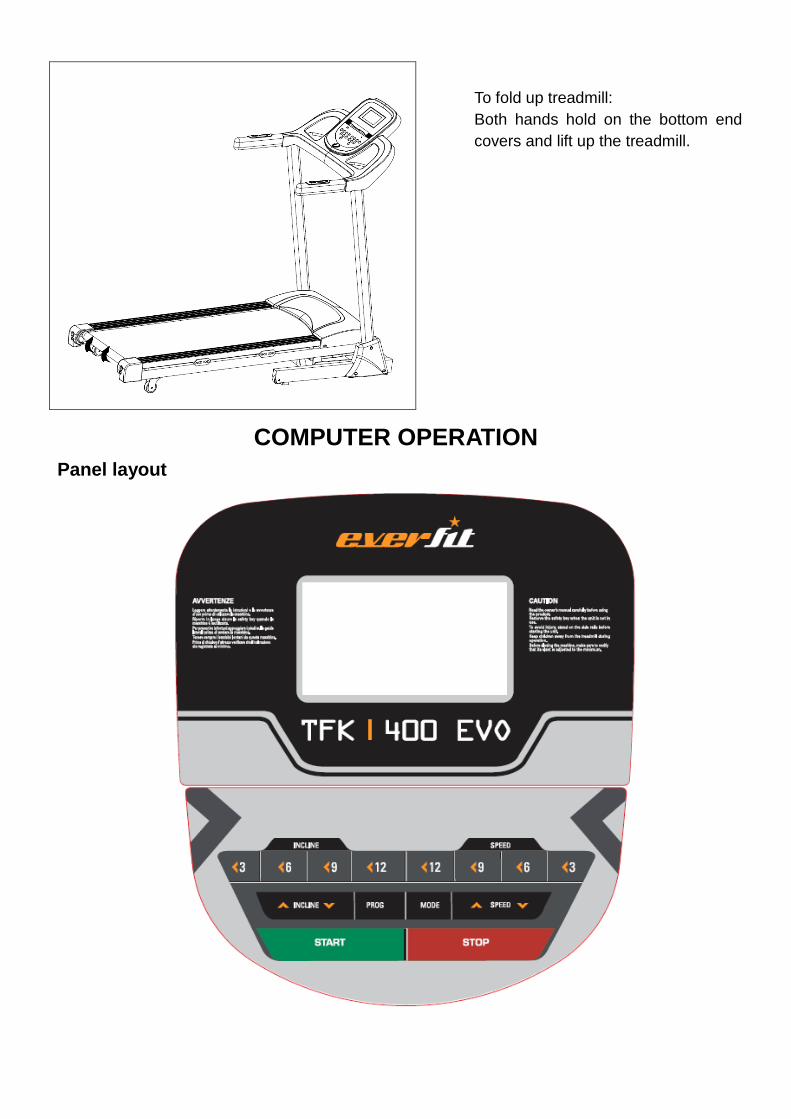
To fold up treadmill:
Both hands hold on the bottom end
covers and lift up the treadmill.
The Operation
Window description:
The LCD window functions as follows
1, "TIME" window: show the movement time.
2, "DIST." Distance window: shows the distance of movement
3, "CA L" calorie window: show the movement of calories consumed
4. "PULSE" Alternate display Pulse and Incline value, When the PULSE character is lit, the
corresponding window is displayed Pulse value, When the INCLINE character is lit, the
corresponding window shows the Incline value
4, "SPEED" speed: display movement speed, in the start process, display 5 seconds countdown: 5,
4, 3, 2, 1; PROG. Set, the display P1 ~ P12
Key function:
1, "PROGRAM" button:
1.1 program selection keys. The selection order is: Manual mode -P1-P12 -U1-U2-U3-FAT loop.
1.2 fat under the mold under the state for the fat parameters selection keys: select the order:
"name", "age", "body
High "," weight ".
2, "MODE" button:
2.1 Standby mode is the countdown mode selection key. The selection order is: Manual mode -
Time countdown - Distance countdown - Heat countdown cycle.
3, "START" button: start button. Press this button, the treadmill in 5 seconds after the countdown
from the lowest speed or program default speed to start running.
4, "STOP" button: stop key. When you press this button, the treadmill slows down to stop.
5, SPEED ▲, ▼: Speed addition and subtraction adjustment. Adjustable speed when moving. Can
be used to adjust the parameters when stopped.
SPEED (3,6,9,12): Quick adjustment key.
6, INCLINE ▲, ▼: up and down adjustment. Movement can adjust the slope level.
INCLINE (3, 6, 9, and 12): Slope fast adjustment key.
7, the left handrail keys: lift adjustment keys.
8, the right handrail keys: speed adjustment keys.
三.The main function:
Turn on the power, all the windows light for 2 seconds, then enter the standby state.
3.1 Quick Start (Manual Mode):
Press the start button, press the start button, after 5 seconds countdown, the treadmill from
the lowest speed start running, press SPEED ▲ / ▼ and speed shortcut keys to adjust the speed,
press INCLINE ▲, ▼ and the shortcut keys to adjust the slope , To stop the operation, press the
stop button or directly disconnect the security lock can be.
3.2 Countdown mode:
Press the "MODE" button, you can choose: time countdown, distance countdown, heat
down countdown. The corresponding window displays the default value and blinks. Press "SPEED
▲ / ▼" at this time to adjust to the desired value. Press the START key, after 5 seconds countdown,
the treadmill from the lowest speed start running, press SPEED ▲ / ▼ and speed shortcut keys to
adjust the speed, press INCLINE ▲, ▼ and the shortcut keys to adjust the slope, when the window
value down When the meter reaches 0, the treadmill slows down to stop. Of course, you can
directly press the "STOP" key or disconnect the security lock to stop running.
3.3 built-in programs:
Press the "PROGRAM" button, select P1 --- P12 which is a built-in program. The "TIME"
window displays the default value and blinks, and press the "SPEED ▲ / ▼" key to adjust to the
desired movement time. Built-in program is divided into 20 segments, each running time for the set
time of 1/20. Press the START key, the treadmill in 3 seconds after the countdown according to the
first paragraph of the speed of the number of steps to start running, when the end of a section of the
operation, automatically enter the next section of the operation, the speed automatically adjusted
for the value of the paragraph. After all the sections are finished, the treadmill slows down to stop.
Press the "SPEED ▲, ▼ and Speed Shortcuts" to adjust the speed. Press the INCLINE ▲, ▼ and
Lift shortcut keys to adjust the slope, but will automatically adjust to the program default when you
enter the next section. During operation, you can also press the "STOP" key or disconnect the
safety lock to stop the operation.
3.4 Custom Programming (U1-U3):
In addition to 12 system built-in program, there are three user-defined programs that allow the
user to set up according to personal circumstances: U1, U2, U3.
1, the user-defined program settings:
Press "PROGRAM" key in the standby mode until you want to set the user-defined program
(U1-U3), press "MODE" key to enter the setting, and then set the first time period, set "SPEED +
"SPEED -" key or speed shortcut key to set the speed, press "MODE" key to complete the first time
period setting and enter the second time period to set the state until all the 20 (distance window
display S1-S20) time Section of the settings; set up after the data will be permanently saved until
you next reset, this data will not be lost due to power failure.
2, the user-defined program start:
A, in the standby mode, press the "PROGRAM" key until you want to run the user-defined
program (U1-U3), and set the run time and press the start button to start.
B, in the user-defined program and run time set by pressing the start button can also be started
immediately.
3, user-defined program settings Description:
Each program will be divided into 20 time periods, set to complete all 20 time periods of speed
and slope and run time settings, in order to start the treadmill by start button.
4. In the course of the operation can be "SPEED +", "SPEED -" to adjust the speed, when the
end of a section of the operation, automatically enter the next section of the operation, the speed
automatically adjusted for the set value.
四、 Heartbeat measurement:
Hold the left and right handrails in both hands, about 5 seconds after the "PULSE" window will
show your heartbeat, in order to obtain a more accurate heartbeat, stand on the treadmill and stop
at the time of measurement, and holding time of not less than 30 second. Heartbeat data only for
the degree of exercise to the reference, not as medical data.
五. Fat mode:
Press "PROGRAM" key in the standby mode to display the "Fat" mode when the window
displays "FAT". Press the "MODE" key to select the parameter category ("name", "age", "height",
"weight"). The corresponding window will display "-1", "- 2 -", "- 3 -" "- 4-". For each parameter
category, press the "SPEED ▲, ▼" key to adjust the parameter value. When all parameters are
adjusted, press the "MODE" key again. The corresponding window will be displayed "- 5" and "---",
said into the state to be measured, then hold the left and right hand arm steel. After about 5
seconds, the corresponding window shows your body fat index.
5.1 Input parameter display and setting range
Parameter
Category
Default
Value Setting Range Remarks
Surname(-1-) 1(male) 1—2 1 = male 2 = female
Age(-2-) 25years old 10—99 years old
Height(-3-) 170 CM 100—220 CM
Weight(-4-) 70KG 20—150KG
5.2 Body fat index control
Body fat index
(BMI) Obesity level
<19 slim
20--25 normal
25--29 overweight
≥30 obese
六.Security lock function
Any time the security lock is disconnected, the treadmill stops quickly and all data is cleared. All
windows display "---". All normal operation and operation must be carried out with the safety lock
closed。
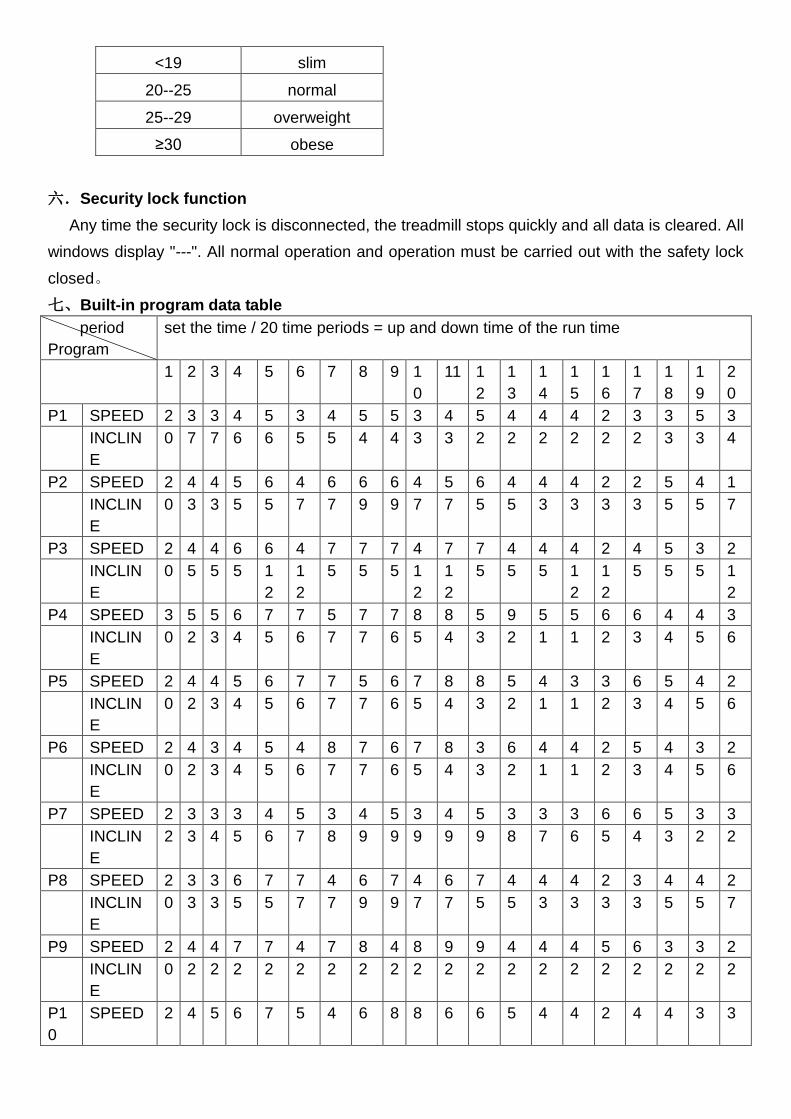
七、Built-in program data table
period
Program
set the time / 20 time periods = up and down time of the run time
1 2 3 4 5 6 7 8 9 1
0
11 1
2
1
3
1
4
1
5
1
6
1
7
1
8
1
9
2
0
P1 SPEED 2 3 3 4 5 3 4 5 5 3 4 5 4 4 4 2 3 3 5 3
INCLIN
E
0 7 7 6 6 5 5 4 4 3 3 2 2 2 2 2 2 3 3 4
P2 SPEED 2 4 4 5 6 4 6 6 6 4 5 6 4 4 4 2 2 5 4 1
INCLIN
E
0 3 3 5 5 7 7 9 9 7 7 5 5 3 3 3 3 5 5 7
P3 SPEED 2 4 4 6 6 4 7 7 7 4 7 7 4 4 4 2 4 5 3 2
INCLIN
E
0 5 5 5 1
2
1
2
5 5 5 1
2
1
2
5 5 5 1
2
1
2
5 5 5 1
2
P4 SPEED 3 5 5 6 7 7 5 7 7 8 8 5 9 5 5 6 6 4 4 3
INCLIN
E
0 2 3 4 5 6 7 7 6 5 4 3 2 1 1 2 3 4 5 6
P5 SPEED 2 4 4 5 6 7 7 5 6 7 8 8 5 4 3 3 6 5 4 2
INCLIN
E
0 2 3 4 5 6 7 7 6 5 4 3 2 1 1 2 3 4 5 6
P6 SPEED 2 4 3 4 5 4 8 7 6 7 8 3 6 4 4 2 5 4 3 2
INCLIN
E
0 2 3 4 5 6 7 7 6 5 4 3 2 1 1 2 3 4 5 6
P7 SPEED 2 3 3 3 4 5 3 4 5 3 4 5 3 3 3 6 6 5 3 3
INCLIN
E
2 3 4 5 6 7 8 9 9 9 9 9 8 7 6 5 4 3 2 2
P8 SPEED 2 3 3 6 7 7 4 6 7 4 6 7 4 4 4 2 3 4 4 2
INCLIN
E
0 3 3 5 5 7 7 9 9 7 7 5 5 3 3 3 3 5 5 7
P9 SPEED 2 4 4 7 7 4 7 8 4 8 9 9 4 4 4 5 6 3 3 2
INCLIN
E
0 2 2 2 2 2 2 2 2 2 2 2 2 2 2 2 2 2 2 2
P1
0
SPEED 2 4 5 6 7 5 4 6 8 8 6 6 5 4 4 2 4 4 3 3

INCLIN
E
9 8 7 6 5 4 3 3 4 5 6 7 8 9 9 8 7 6 5 4
P11 SPEED 3 4 5 9 5 9 5 5 5 9 5 5 5 5 9 9 8 7 6 3
INCLIN
E
9 8 7 6 5 4 3 3 4 5 6 7 8 9 9 8 7 6 5 4
P1
2
SPEED 2 5 8 1
0
7 7 1
0
1
0
7 7 1
0
1
0
6 6 9 9 5 5 4 3
INCLIN
E
2 2 2 2 2 2 2 2 3 3 3 3 3 3 3 4 4 4 4 4

GARLANDO SPAVia Regione Piemonte, 32 - Zona Industriale D1
15068 - Pozzolo Formigaro (AL) - Italywww.everfit.it - [email protected]