DocuSign for Microsoft Dynamics CRM Online ·...
55
221 Main Street, Suite 1000, San Francisco, CA 94105 Ι www.docusign.com Ι © DocuSign, Inc. DocuSign for Dynamics 365 CRM — 6.0 Published: October 2, 2017 Overview This guide provides information on installing, signing, and sending documents for signature with DocuSign for Dynamics 365 CRM. The primary audience for this guide is Microsoft Dynamics 365 CRM administrators. The installation and configuration tasks presented all require administrative rights. End users benefit from the topics Send with DocuSign , Sign Documents with DocuSign , and the general use FAQ items. Supported Versions DocuSign for Dynamics 365 CRM supports the following versions and browsers: l Microsoft Dynamics 365 CRM - v8.1 and later: Internet Explorer 11; Microsoft Edge; Chrome (latest version); Firefox (latest version) l DocuSign for Dynamics integration - v5.2 and v6.0 Note: This connector does not support any Microsoft Dynamics 365 CRM on premises instances. Release Notes For a synopsis of what's new or changed in DocuSign for Dynamics 365 CRM, see the Release Notes for each major version here . Early Access Notifications for Releases For major releases, customers can opt in to our Early Access list to receive notifications and pre- release versions before they are publicly available. To opt in, send an email request to [email protected] with the names and emails to receive Early Access notifications. Quick Start Guide
Transcript of DocuSign for Microsoft Dynamics CRM Online ·...
221 Main Street, Suite 1000, San Francisco, CA 94105 Ι www.docusign.com Ι © DocuSign, Inc.
DocuSign for Dynamics 365 CRM — 6.0Published: October 2, 2017
OverviewThis guide provides information on installing, signing, and sending documents for signature withDocuSign for Dynamics 365 CRM.
The primary audience for this guide is Microsoft Dynamics 365 CRM administrators. The installationand configuration tasks presented all require administrative rights. End users benefit from the topicsSend with DocuSign, Sign Documents with DocuSign, and the general use FAQ items.
Supported VersionsDocuSign for Dynamics 365 CRM supports the following versions and browsers:
l Microsoft Dynamics 365 CRM - v8.1 and later: Internet Explorer 11; Microsoft Edge; Chrome(latest version); Firefox (latest version)
l DocuSign for Dynamics integration - v5.2 and v6.0
Note: This connector does not support any Microsoft Dynamics 365 CRM on premisesinstances.
Release NotesFor a synopsis of what's new or changed in DocuSign for Dynamics 365 CRM, see the Release Notes foreach major version here.
Early Access Notifications for ReleasesFor major releases, customers can opt in to our Early Access list to receive notifications and pre-release versions before they are publicly available. To opt in, send an email request [email protected] with the names and emails to receive Early Access notifications.
Quick Start Guide
DocuSign for Dynamics 365 CRMQuick Start Guide
Table of Contents
Install DocuSign for Dynamics 365 CRM 3
Install or Upgrade DocuSign for Dynamics 365 CRM 3
Uninstall DocuSign for Dynamics 365 CRM 5
Configure DocuSign for Dynamics 365 CRM 7
Create a DocuSign Configuration 7
Manage User Access to DocuSign 14
SharePoint Files Integration 19
Get Signatures with DocuSign 21
Sign Documents with DocuSign 29
Send with DocuSign Custom Button 31
To get signatures 31
Track the Status of a Transaction 35
Customize DocuSign for Dynamics 36
DocuSign Custom Activities 36
Add custom activities to process steps 37
Create Custom Buttons 43
AutoPlace text 47
Set up merge fields 49
Set up merge field write backs 51
FAQ 53
For More Information or Assistance 55
221 Main Street, Suite 1000, San Francisco, CA 94105 Ι www.docusign.com Ι © DocuSign, Inc.
2

DocuSign for Dynamics 365 CRMQuick Start Guide
Install DocuSign for Dynamics 365 CRMDocuSign for Dynamics 365 CRM is a separately purchased integrated solution that includes DocuSignfor Dynamics 365 CRM and DocuSign for Dynamics Workflows.
This topic includes information on the following:
l Installing or upgrading the DocuSign application
l Uninstalling the DocuSign application
Important! You must be a Microsoft Dynamics 365 CRM administrator to install the DocuSignapplication.
Install or Upgrade DocuSign for Dynamics 365 CRMFollow these steps to install the application or upgrade from an older installed version:
Note: When upgrading to a new version of the solution, all DocuSign status data and the system-wide login credentials are retained in Dynamics 365 CRM.
1. (Optional) If you are upgrading, as a best practice, we recommend that you export yourMicrosoft Dynamics 365 CRM customizations. After you complete the upgrade, if necessary, youcan re-import your customizations.
2. Follow this link to go to Microsoft AppSource.
221 Main Street, Suite 1000, San Francisco, CA 94105 Ι www.docusign.com Ι © DocuSign, Inc.
3
DocuSign for Dynamics 365 CRMQuick Start Guide
3. On the left, click Free Trial.
4. Using your work account, sign in to your Microsoft AppSource account, or sign up for an accountif you don't already have one.
5. Read and accept the terms of use, and then click CONTINUE.
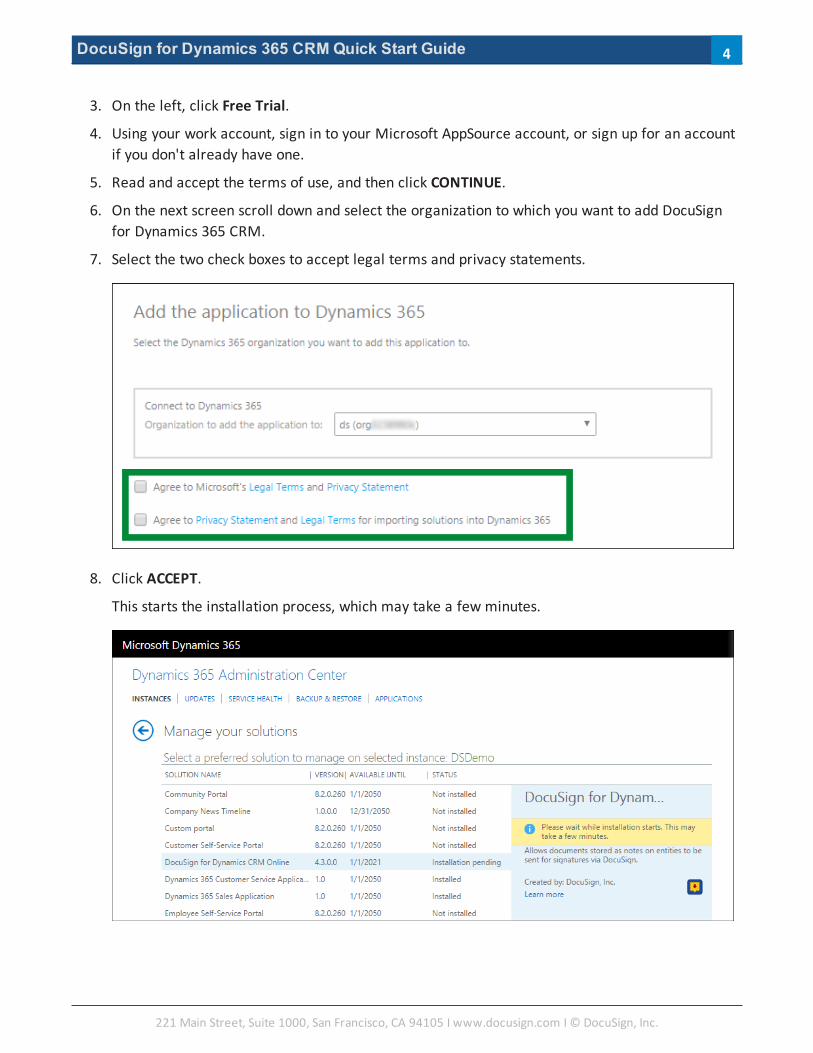
6. On the next screen scroll down and select the organization to which you want to add DocuSignfor Dynamics 365 CRM.
7. Select the two check boxes to accept legal terms and privacy statements.
8. Click ACCEPT.
This starts the installation process, which may take a few minutes.
221 Main Street, Suite 1000, San Francisco, CA 94105 Ι www.docusign.com Ι © DocuSign, Inc.
4
DocuSign for Dynamics 365 CRMQuick Start Guide
Uninstall DocuSign for Dynamics 365 CRMUninstalling the DocuSign application deletes the DocuSign for Dynamics 365 CRM solution from yourDynamics 365 CRM instance, as well as all DocuSign-related status data.
1. Before uninstalling the application, as an administrator, you must remove all dependencies toDocuSign from the Microsoft Dynamics 365 CRM instance:
a. Remove any steps that reference DocuSign-related fields from any custom businessprocess associated with the following entities: Accounts, Contacts, Leads, andOpportunities.
b. Remove the DocuSign user role for all users.
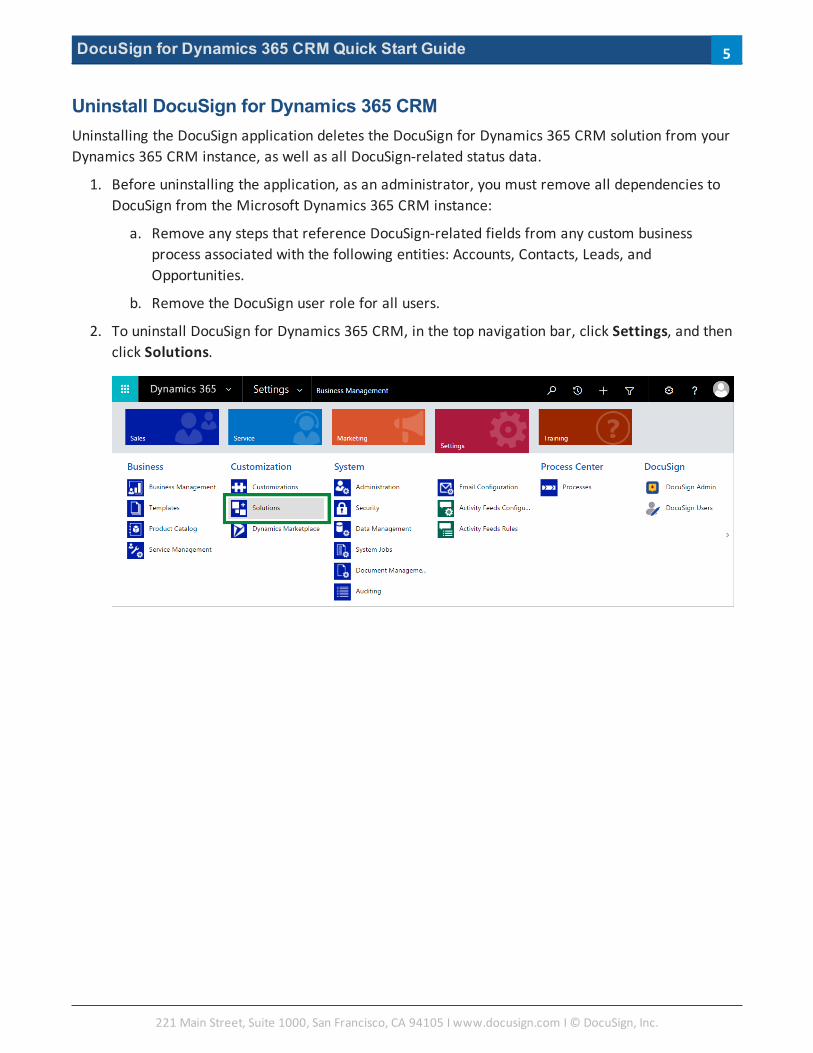
2. To uninstall DocuSign for Dynamics 365 CRM, in the top navigation bar, click Settings, and thenclick Solutions.
221 Main Street, Suite 1000, San Francisco, CA 94105 Ι www.docusign.com Ι © DocuSign, Inc.
5
DocuSign for Dynamics 365 CRMQuick Start Guide
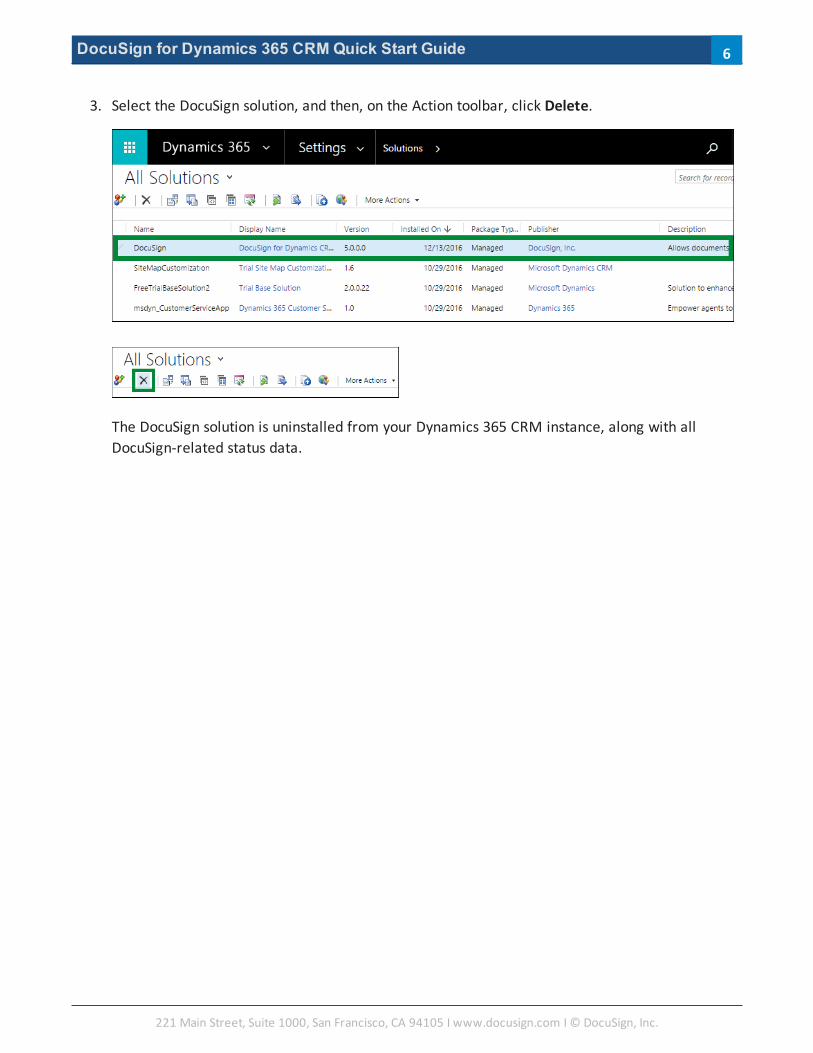
3. Select the DocuSign solution, and then, on the Action toolbar, click Delete.
The DocuSign solution is uninstalled from your Dynamics 365 CRM instance, along with allDocuSign-related status data.
221 Main Street, Suite 1000, San Francisco, CA 94105 Ι www.docusign.com Ι © DocuSign, Inc.
6
DocuSign for Dynamics 365 CRMQuick Start Guide
Configure DocuSign for Dynamics 365 CRMAfter you install the DocuSign for Dynamics 365 CRM application, there are a few basic configurationtasks necessary to set up the solution and enable your Dynamics 365 CRM users to sign or getsignatures using DocuSign.
This topic presents the following configuration tasks:
l Create a DocuSign Configuration
l Manage user access to DocuSign
You must be a Microsoft Dynamics 365 CRM administrator to perform the tasks in this topic.
Create a DocuSign ConfigurationTo complete the basic setup of DocuSign for Dynamics 365 CRM, you must create a DocuSignConfiguration to register your DocuSign account credentials, set your DocuSign environment, and allowDocuSign access to your Dynamics data. You can use an existing DocuSign account or create a freetrial.
After you create the DocuSign Configuration, you can adjust the account settings and enable DocuSignactions on your organization’s Dynamics 365 CRM entities.
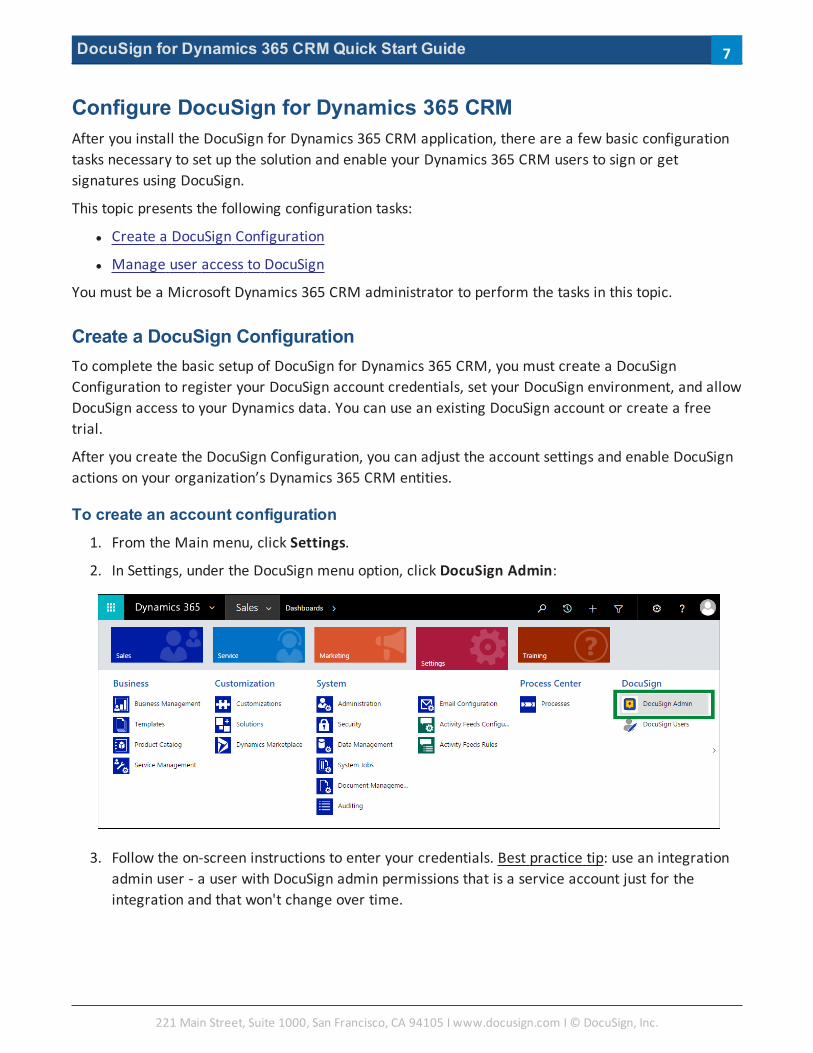
To create an account configuration1. From the Main menu, click Settings.
2. In Settings, under the DocuSign menu option, click DocuSign Admin:
3. Follow the on-screen instructions to enter your credentials. Best practice tip: use an integrationadmin user - a user with DocuSign admin permissions that is a service account just for theintegration and that won't change over time.
221 Main Street, Suite 1000, San Francisco, CA 94105 Ι www.docusign.com Ι © DocuSign, Inc.
7
DocuSign for Dynamics 365 CRMQuick Start Guide
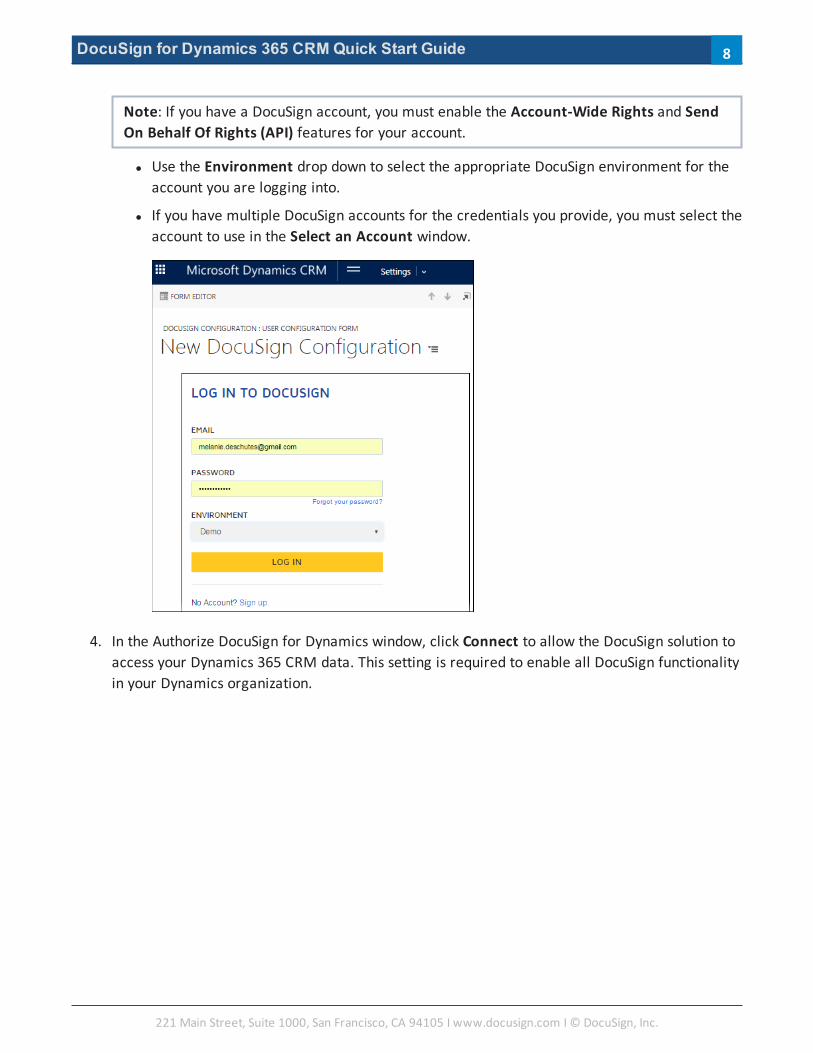
Note: If you have a DocuSign account, you must enable the Account-Wide Rights and SendOn Behalf Of Rights (API) features for your account.
l Use the Environment drop down to select the appropriate DocuSign environment for theaccount you are logging into.
l If you have multiple DocuSign accounts for the credentials you provide, you must select theaccount to use in the Select an Account window.
4. In the Authorize DocuSign for Dynamics window, click Connect to allow the DocuSign solution toaccess your Dynamics 365 CRM data. This setting is required to enable all DocuSign functionalityin your Dynamics organization.
221 Main Street, Suite 1000, San Francisco, CA 94105 Ι www.docusign.com Ι © DocuSign, Inc.
8

DocuSign for Dynamics 365 CRMQuick Start Guide
5. After you have successfully logged in to DocuSign or created a new account, the DocuSign AdminHome screen appears. Click ACCOUNT to see your account information.
221 Main Street, Suite 1000, San Francisco, CA 94105 Ι www.docusign.com Ι © DocuSign, Inc.
9
DocuSign for Dynamics 365 CRMQuick Start Guide
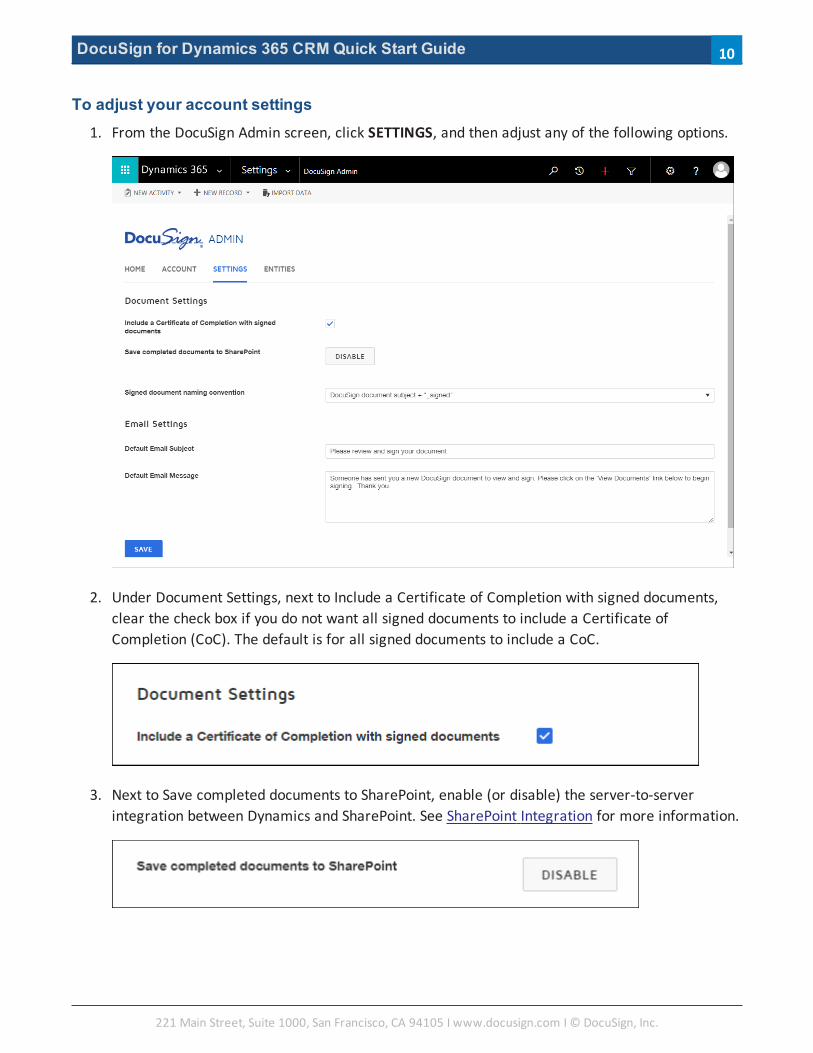
To adjust your account settings1. From the DocuSign Admin screen, click SETTINGS, and then adjust any of the following options.
2. Under Document Settings, next to Include a Certificate of Completion with signed documents,clear the check box if you do not want all signed documents to include a Certificate ofCompletion (CoC). The default is for all signed documents to include a CoC.
3. Next to Save completed documents to SharePoint, enable (or disable) the server-to-serverintegration between Dynamics and SharePoint. See SharePoint Integration for more information.
221 Main Street, Suite 1000, San Francisco, CA 94105 Ι www.docusign.com Ι © DocuSign, Inc.
10
DocuSign for Dynamics 365 CRMQuick Start Guide
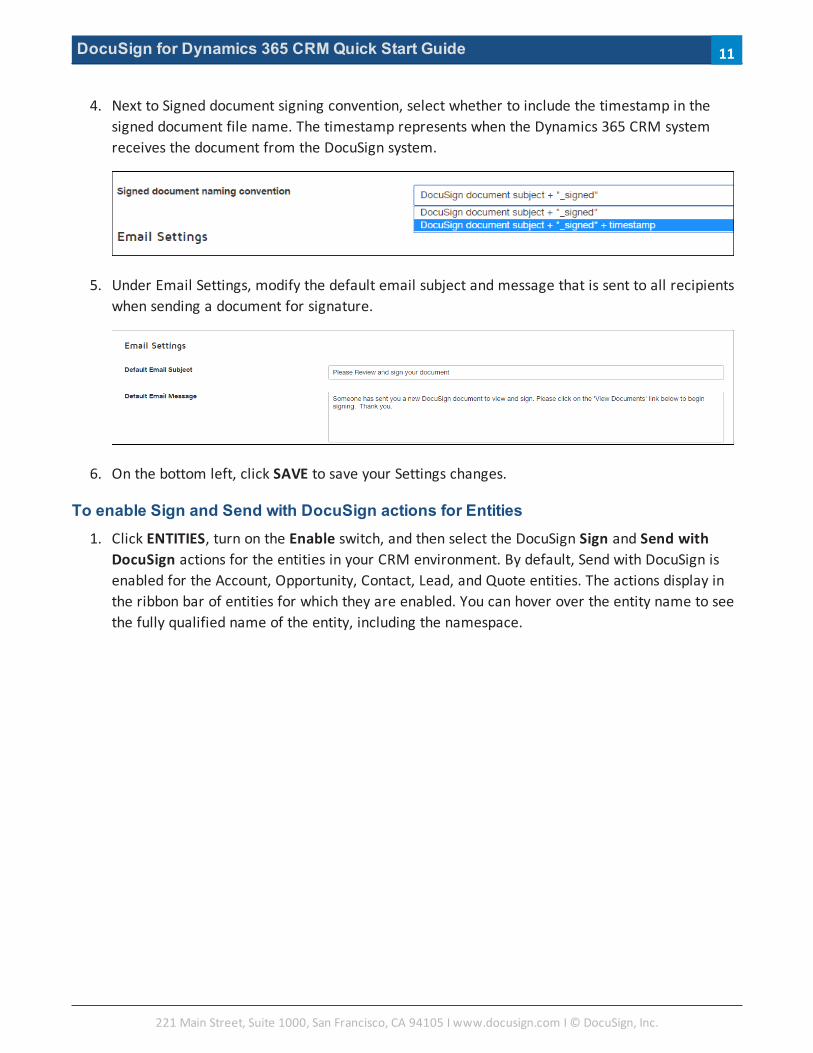
4. Next to Signed document signing convention, select whether to include the timestamp in thesigned document file name. The timestamp represents when the Dynamics 365 CRM systemreceives the document from the DocuSign system.
5. Under Email Settings, modify the default email subject and message that is sent to all recipientswhen sending a document for signature.
6. On the bottom left, click SAVE to save your Settings changes.
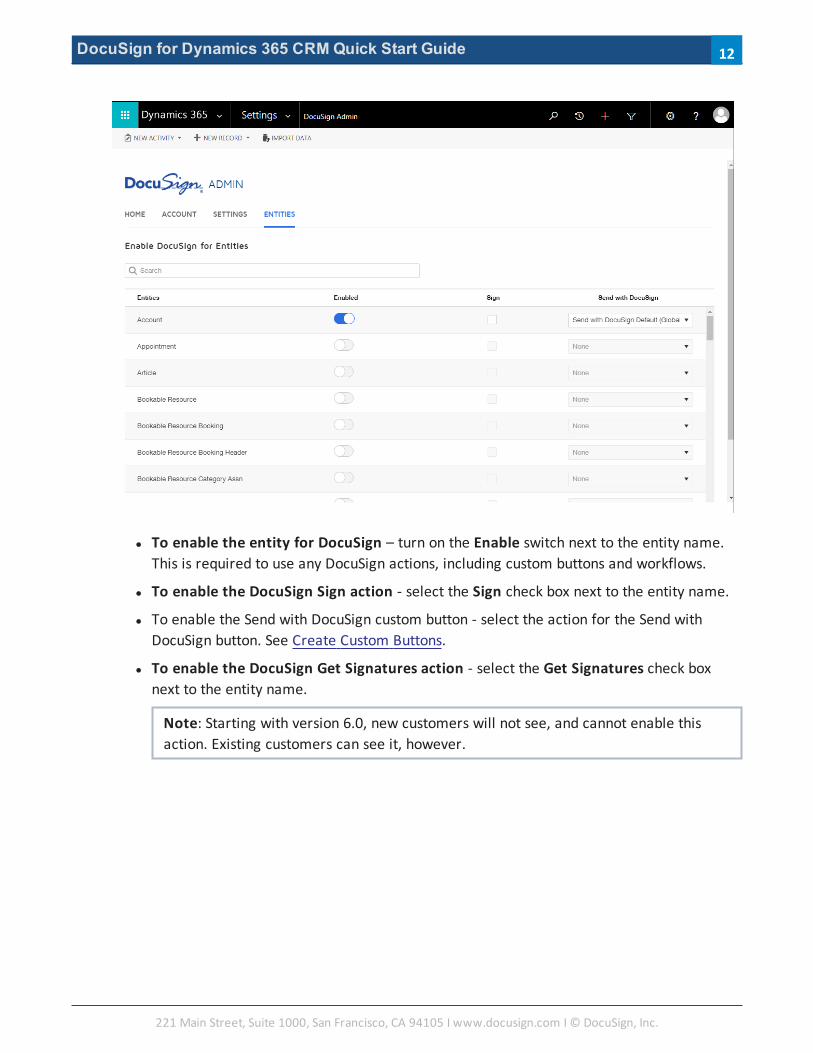
To enable Sign and Send with DocuSign actions for Entities1. Click ENTITIES, turn on the Enable switch, and then select the DocuSign Sign and Send with
DocuSign actions for the entities in your CRM environment. By default, Send with DocuSign isenabled for the Account, Opportunity, Contact, Lead, and Quote entities. The actions display inthe ribbon bar of entities for which they are enabled. You can hover over the entity name to seethe fully qualified name of the entity, including the namespace.
221 Main Street, Suite 1000, San Francisco, CA 94105 Ι www.docusign.com Ι © DocuSign, Inc.
11
DocuSign for Dynamics 365 CRMQuick Start Guide
l To enable the entity for DocuSign – turn on the Enable switch next to the entity name.This is required to use any DocuSign actions, including custom buttons and workflows.
l To enable the DocuSign Sign action - select the Sign check box next to the entity name.
l To enable the Send with DocuSign custom button - select the action for the Send withDocuSign button. See Create Custom Buttons.
l To enable the DocuSign Get Signatures action - select the Get Signatures check boxnext to the entity name.
Note: Starting with version 6.0, new customers will not see, and cannot enable thisaction. Existing customers can see it, however.
221 Main Street, Suite 1000, San Francisco, CA 94105 Ι www.docusign.com Ι © DocuSign, Inc.
12
DocuSign for Dynamics 365 CRMQuick Start Guide
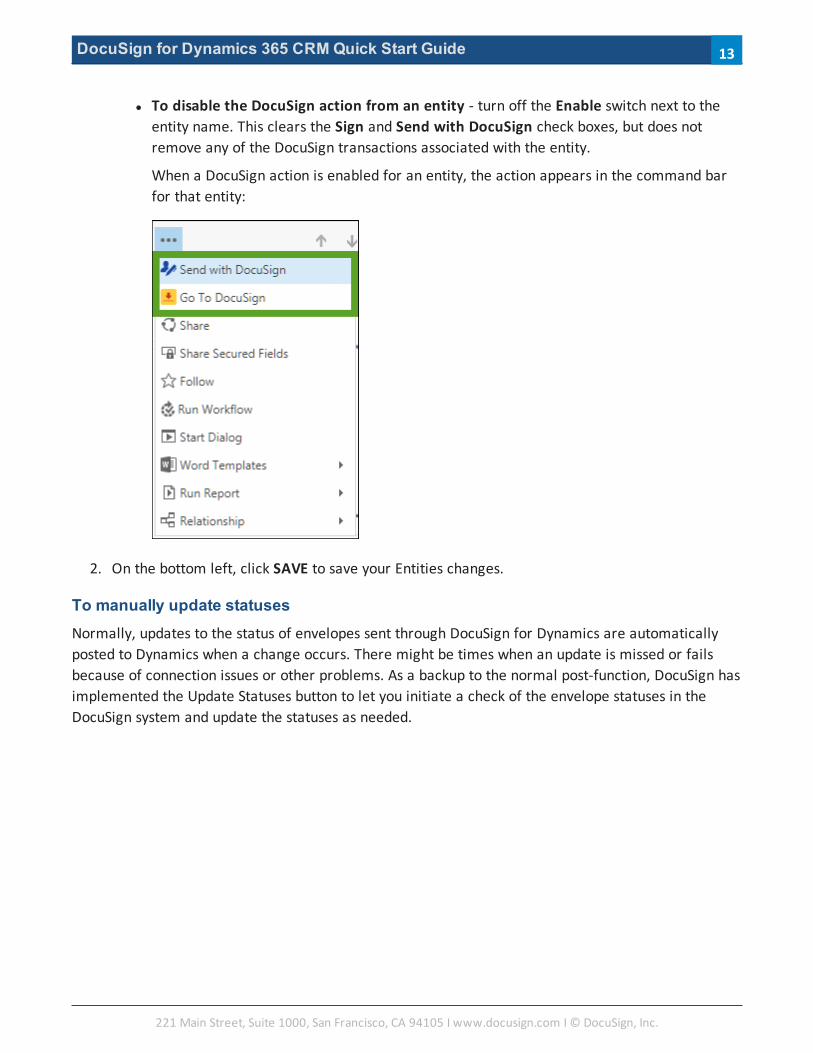
l To disable the DocuSign action from an entity - turn off the Enable switch next to theentity name. This clears the Sign and Send with DocuSign check boxes, but does notremove any of the DocuSign transactions associated with the entity.
When a DocuSign action is enabled for an entity, the action appears in the command barfor that entity:
2. On the bottom left, click SAVE to save your Entities changes.
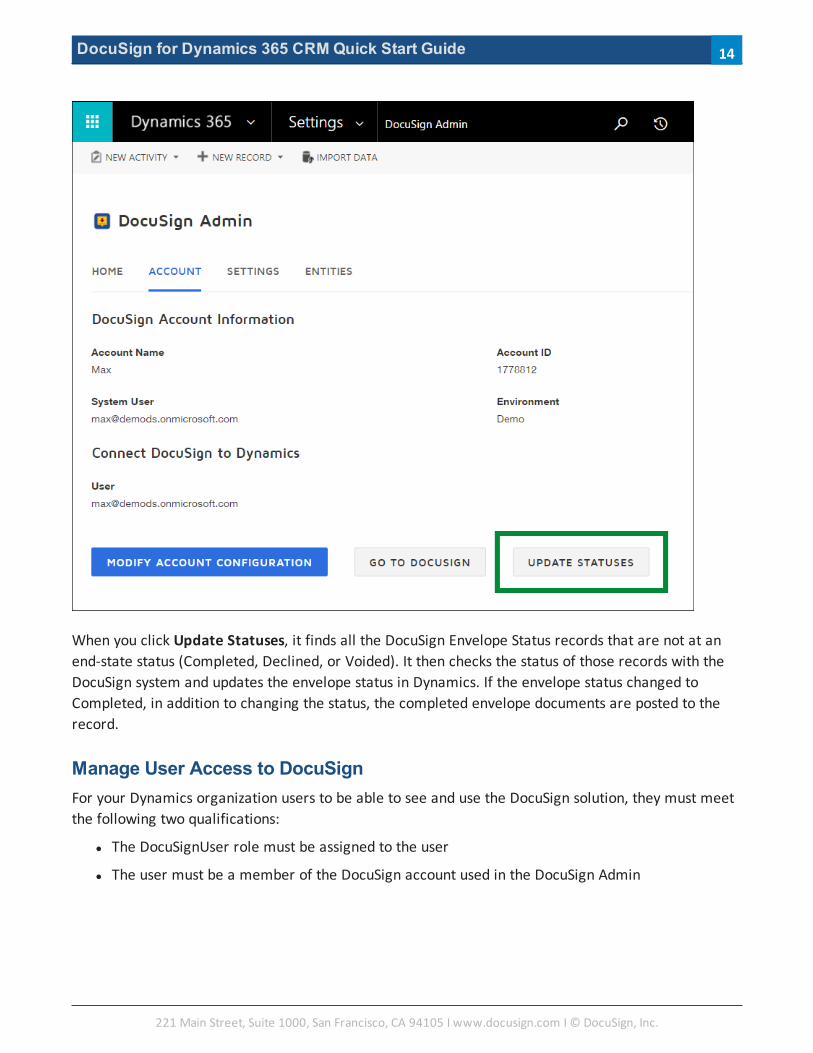
To manually update statusesNormally, updates to the status of envelopes sent through DocuSign for Dynamics are automaticallyposted to Dynamics when a change occurs. There might be times when an update is missed or failsbecause of connection issues or other problems. As a backup to the normal post-function, DocuSign hasimplemented the Update Statuses button to let you initiate a check of the envelope statuses in theDocuSign system and update the statuses as needed.
221 Main Street, Suite 1000, San Francisco, CA 94105 Ι www.docusign.com Ι © DocuSign, Inc.
13
DocuSign for Dynamics 365 CRMQuick Start Guide
When you click Update Statuses, it finds all the DocuSign Envelope Status records that are not at anend-state status (Completed, Declined, or Voided). It then checks the status of those records with theDocuSign system and updates the envelope status in Dynamics. If the envelope status changed toCompleted, in addition to changing the status, the completed envelope documents are posted to therecord.
Manage User Access to DocuSignFor your Dynamics organization users to be able to see and use the DocuSign solution, they must meetthe following two qualifications:
l The DocuSignUser role must be assigned to the user
l The user must be a member of the DocuSign account used in the DocuSign Admin
221 Main Street, Suite 1000, San Francisco, CA 94105 Ι www.docusign.com Ι © DocuSign, Inc.
14
DocuSign for Dynamics 365 CRMQuick Start Guide
To assign the DocuSignUser roleFor a non-administrative user of Dynamics 365 CRM to have access to DocuSign solution, as theDynamics 365 CRM administrator, you must edit the user's record to assign the DocuSignUser role.
1. Log in as a Dynamics 365 CRM administrator.
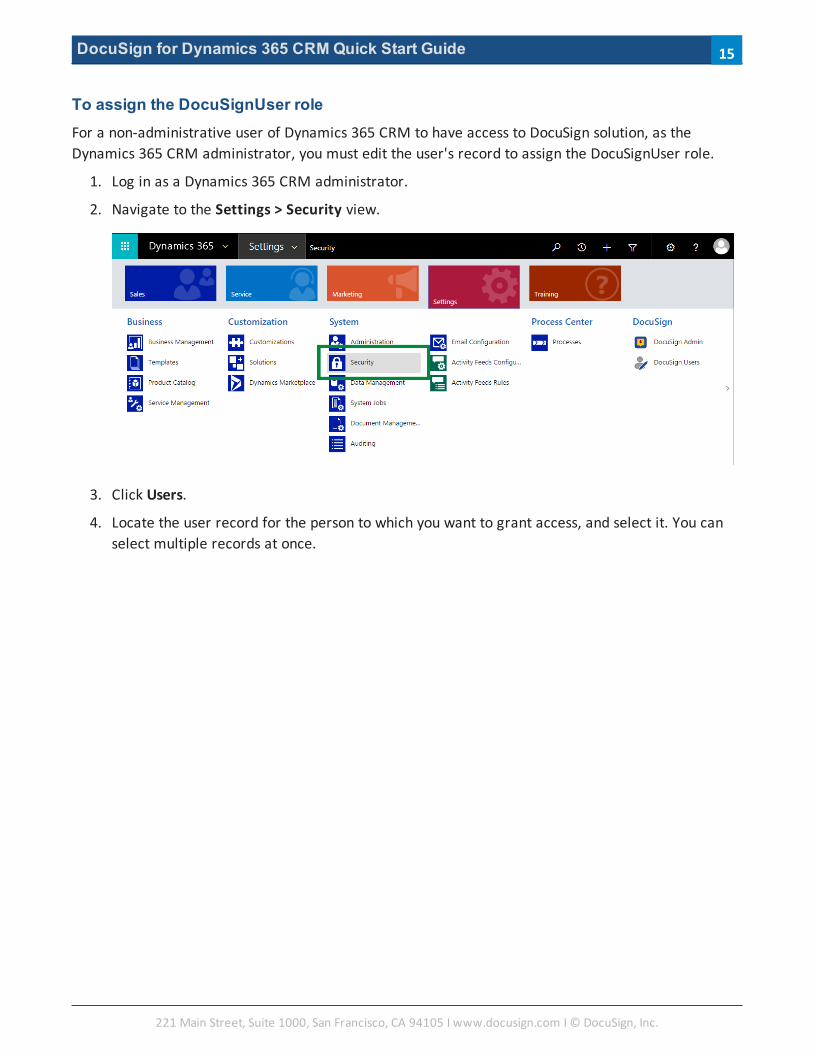
2. Navigate to the Settings > Security view.
3. Click Users.
4. Locate the user record for the person to which you want to grant access, and select it. You canselect multiple records at once.
221 Main Street, Suite 1000, San Francisco, CA 94105 Ι www.docusign.com Ι © DocuSign, Inc.
15

DocuSign for Dynamics 365 CRMQuick Start Guide
5. ClickManage Roles, and then select the DocuSignUser role.
Note: You may notice a DocuSign Trace role. This is a system role, used for debuggingpurposes only; do not assign users to this role.
6. Click OK.
The user is assigned the role and has access to DocuSign for Dynamics 365 CRM.
User access basicsTo use DocuSign to sign or get signatures, Dynamics users must be members of the DocuSign accountspecified in the DocuSign Admin. As long as Dynamics users are members in the DocuSign account,using the same email address as in the Dynamics organization, they will be able to seamlessly accessthe DocuSign functionality. If they use a different email address, or if they are not members in theDocuSign account, then as the DocuSign administrator, you'll need to provide assistance.
When a Dynamics 365 CRM user executes any DocuSign action, the system checks to see whether thatuser exists in DocuSign, using the Dynamics user's email address. There are two possible results of theaccount check:
l If the user is a member in the DocuSign account specified in the DocuSign Admin, they are added
221 Main Street, Suite 1000, San Francisco, CA 94105 Ι www.docusign.com Ι © DocuSign, Inc.
16
DocuSign for Dynamics 365 CRMQuick Start Guide
to the DocuSign Users table and they can proceed to use the solution.
l If the user is not a member in the DocuSign account, a message instructs the user to contact thesolution administrator for assistance. In this case, to provision the user, a DocuSign administratorfor the account must add the user manually, as described in this Help guide.
To edit the DocuSign Users tableAs the Dynamics 365 CRM administrator, you can edit the DocuSign Users table to correct or addentries. For example, if a Dynamics user has a different email address for the DocuSign membership,you can add them to the table manually.
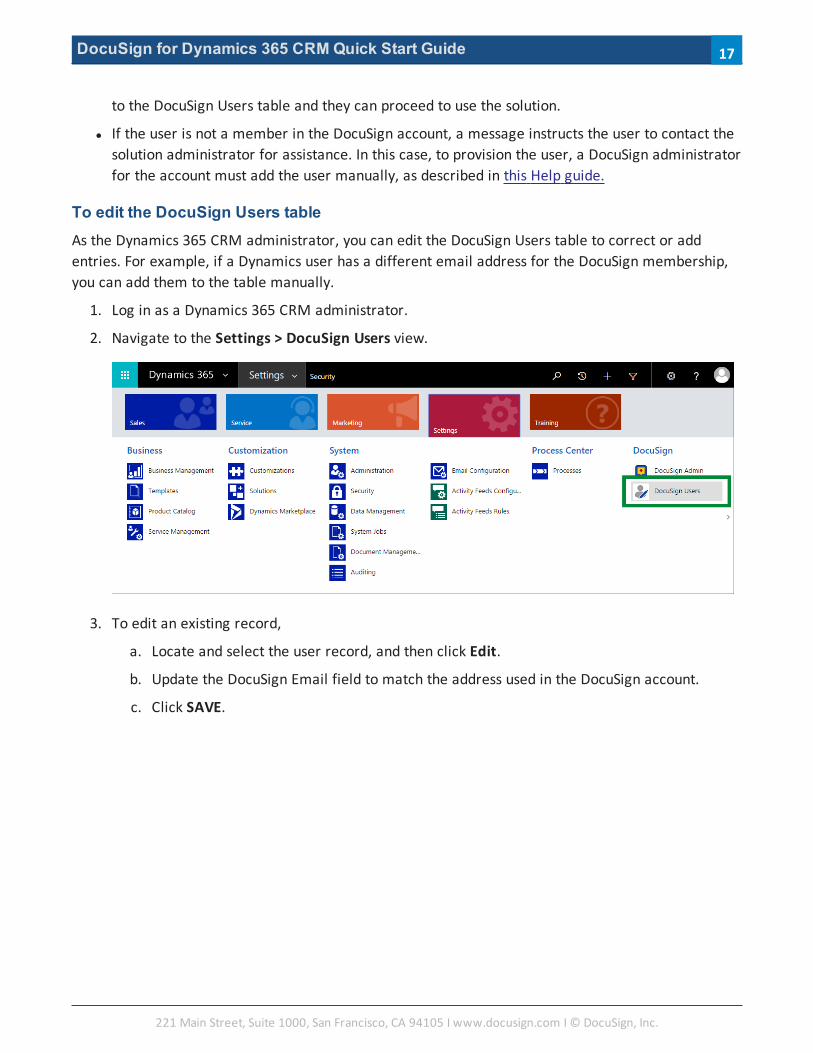
1. Log in as a Dynamics 365 CRM administrator.
2. Navigate to the Settings > DocuSign Users view.
3. To edit an existing record,
a. Locate and select the user record, and then click Edit.
b. Update the DocuSign Email field to match the address used in the DocuSign account.
c. Click SAVE.
221 Main Street, Suite 1000, San Francisco, CA 94105 Ι www.docusign.com Ι © DocuSign, Inc.
17
DocuSign for Dynamics 365 CRMQuick Start Guide
4. To add a record,
a. Click NEW.
b. In the System User field, enter or search for and select the user's name.
c. In the DocuSign Email field, type the user's DocuSign email address.
d. Click SAVE.
The next time the user attempts to use the DocuSign solution, the system checks to seewhether the user is a member of the DocuSign account, under the email address enteredin the DocuSign Users record. If you entered the correct email address, the user will beable to use the solution, and the record in the table will be updated with the remainingDocuSign information.
221 Main Street, Suite 1000, San Francisco, CA 94105 Ι www.docusign.com Ι © DocuSign, Inc.
18
DocuSign for Dynamics 365 CRMQuick Start Guide
SharePoint Files IntegrationIf you use SharePoint Online and want to access documents in SharePoint from Dynamics, you can doso after you enable SharePoint document management in Dynamics. When enabled, you can send adocument saved in SharePoint. Completed documents are saved back to SharePoint. The DocuSignSharePoint integration uses the default SharePoint site that is configured in Document Management. Inaddition, SharePoint files are automatically organized by folder and linked to the related Dynamicsopportunity, account, etc.
Requirements to access SharePoint documents from Dynamics:
l Only available with SharePoint Online sites in the same tenant as Dynamics
l Must use the Send with DocuSign button (does not work with Sign or Get Signatures)
l Configure document management in Dynamics with server-based authentication (see thisMicrosoft TechNet article)
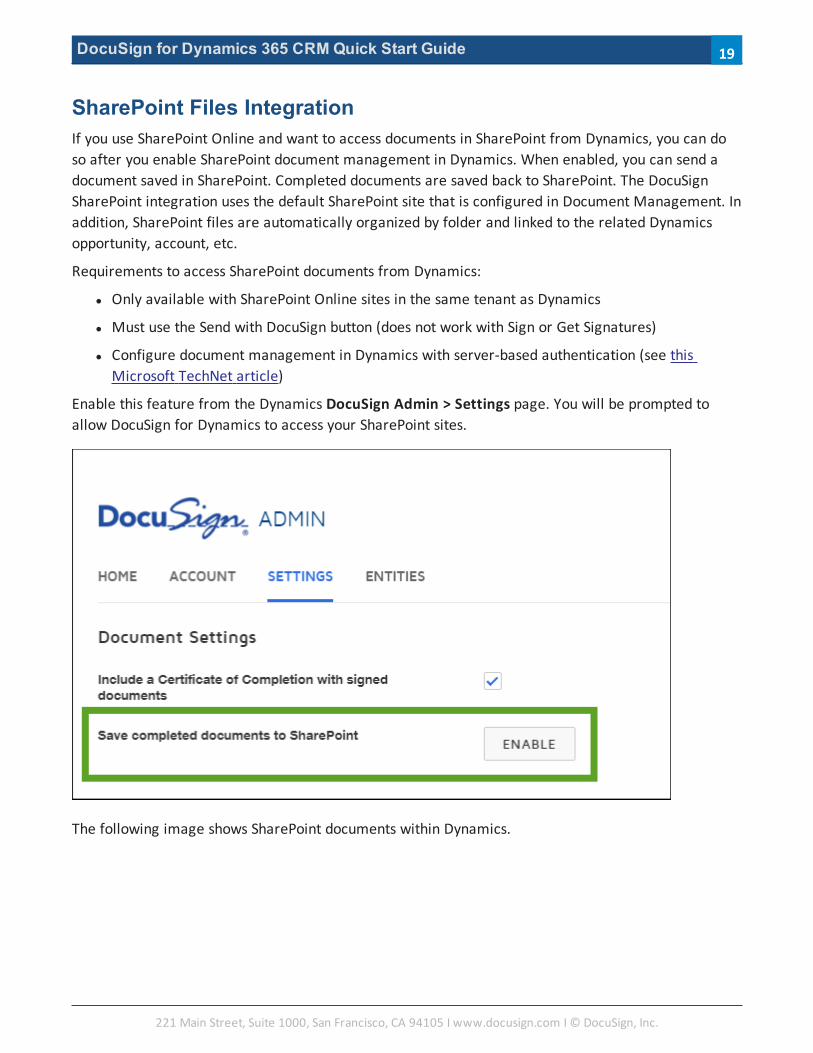
Enable this feature from the Dynamics DocuSign Admin > Settings page. You will be prompted toallow DocuSign for Dynamics to access your SharePoint sites.
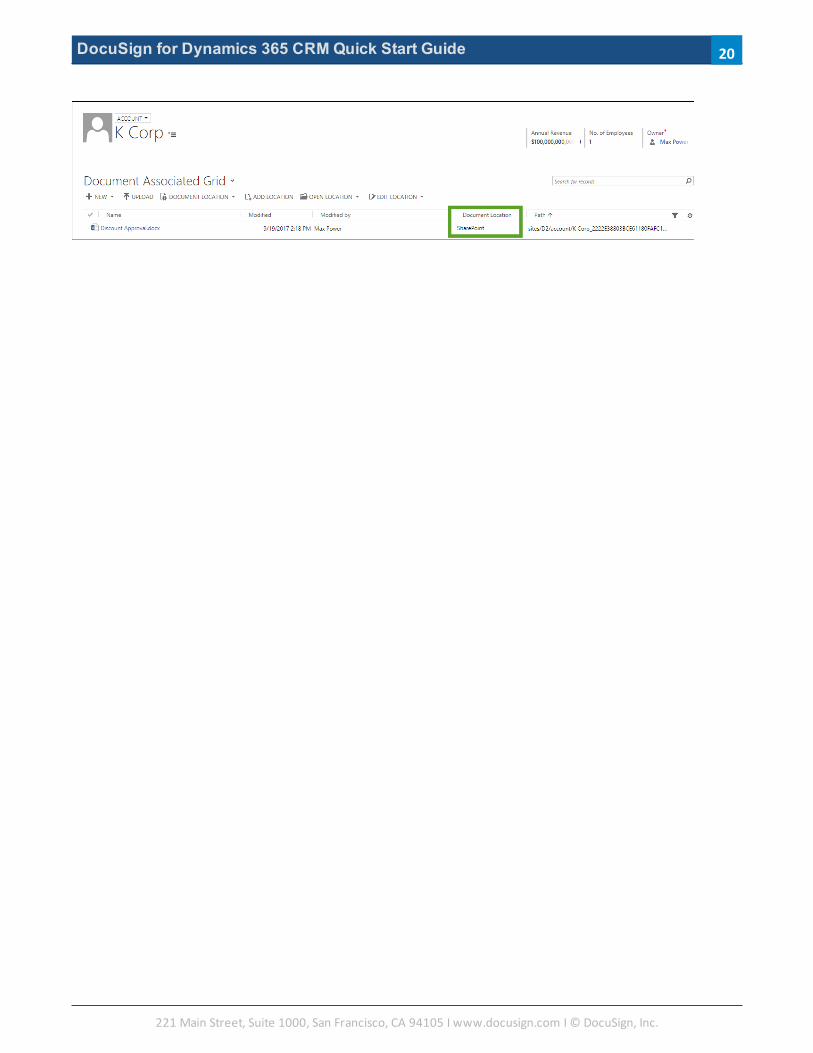
The following image shows SharePoint documents within Dynamics.
221 Main Street, Suite 1000, San Francisco, CA 94105 Ι www.docusign.com Ι © DocuSign, Inc.
19
DocuSign for Dynamics 365 CRMQuick Start Guide
221 Main Street, Suite 1000, San Francisco, CA 94105 Ι www.docusign.com Ι © DocuSign, Inc.
20
DocuSign for Dynamics 365 CRMQuick Start Guide
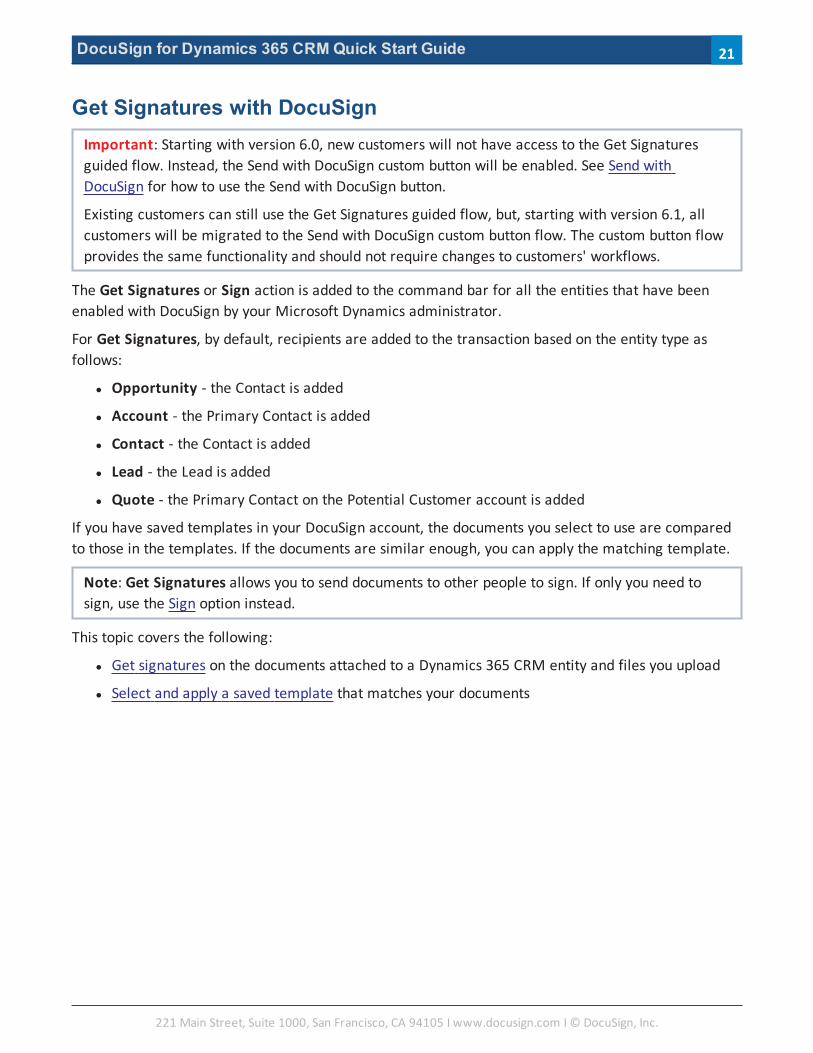
Get Signatures with DocuSignImportant: Starting with version 6.0, new customers will not have access to the Get Signaturesguided flow. Instead, the Send with DocuSign custom button will be enabled. See Send withDocuSign for how to use the Send with DocuSign button.
Existing customers can still use the Get Signatures guided flow, but, starting with version 6.1, allcustomers will be migrated to the Send with DocuSign custom button flow. The custom button flowprovides the same functionality and should not require changes to customers' workflows.
The Get Signatures or Sign action is added to the command bar for all the entities that have beenenabled with DocuSign by your Microsoft Dynamics administrator.
For Get Signatures, by default, recipients are added to the transaction based on the entity type asfollows:
l Opportunity - the Contact is added
l Account - the Primary Contact is added
l Contact - the Contact is added
l Lead - the Lead is added
l Quote - the Primary Contact on the Potential Customer account is added
If you have saved templates in your DocuSign account, the documents you select to use are comparedto those in the templates. If the documents are similar enough, you can apply the matching template.
Note: Get Signatures allows you to send documents to other people to sign. If only you need tosign, use the Sign option instead.
This topic covers the following:
l Get signatures on the documents attached to a Dynamics 365 CRM entity and files you upload
l Select and apply a saved template that matches your documents
221 Main Street, Suite 1000, San Francisco, CA 94105 Ι www.docusign.com Ι © DocuSign, Inc.
21
DocuSign for Dynamics 365 CRMQuick Start Guide
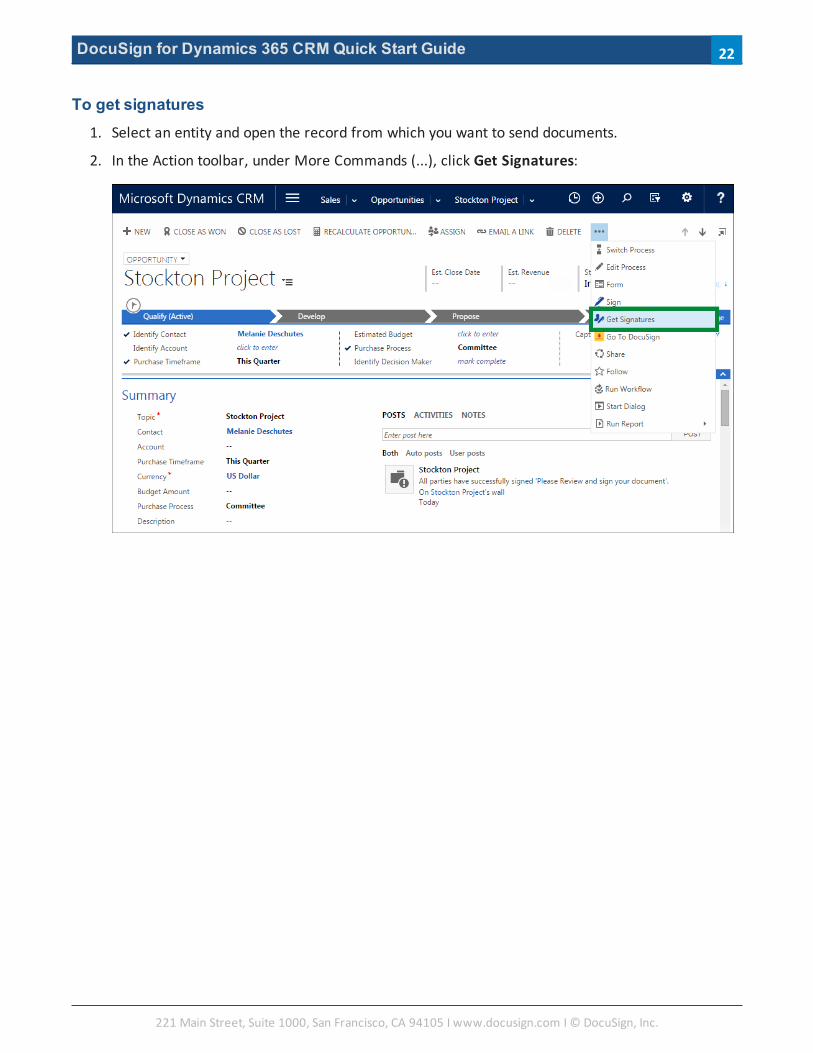
To get signatures1. Select an entity and open the record from which you want to send documents.
2. In the Action toolbar, under More Commands (...), click Get Signatures:
221 Main Street, Suite 1000, San Francisco, CA 94105 Ι www.docusign.com Ι © DocuSign, Inc.
22
DocuSign for Dynamics 365 CRMQuick Start Guide
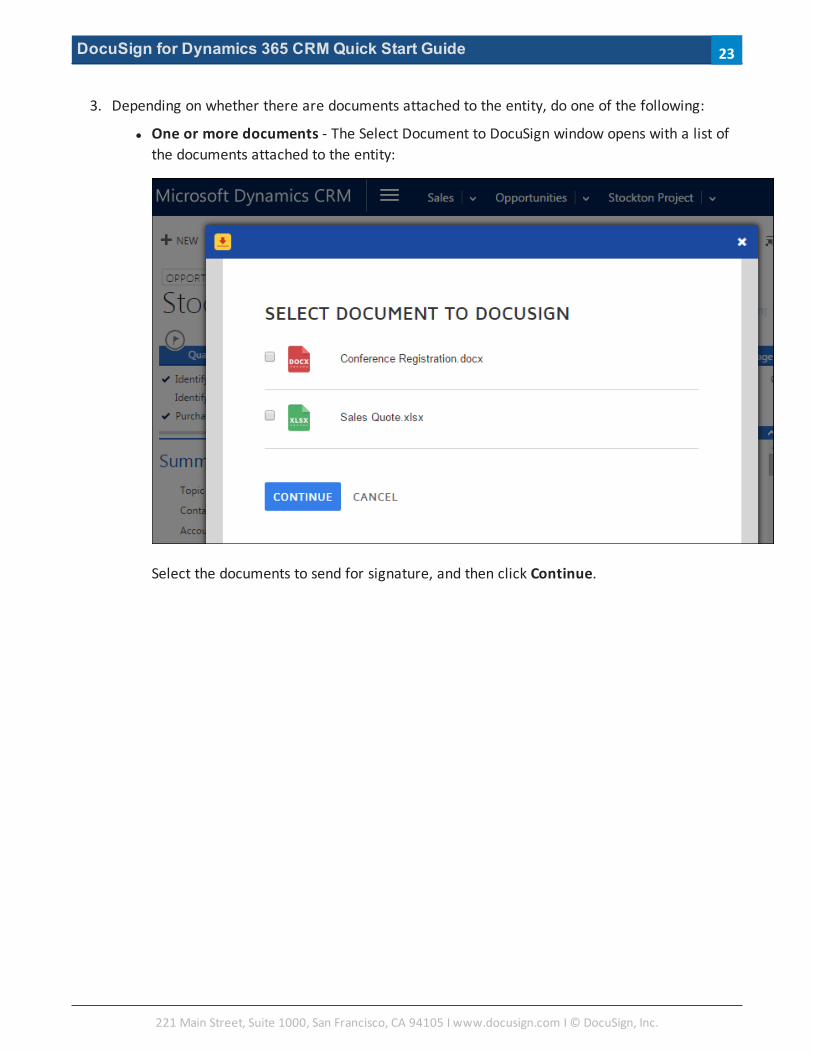
3. Depending on whether there are documents attached to the entity, do one of the following:
l One or more documents - The Select Document to DocuSign window opens with a list ofthe documents attached to the entity:
Select the documents to send for signature, and then click Continue.
221 Main Street, Suite 1000, San Francisco, CA 94105 Ι www.docusign.com Ι © DocuSign, Inc.
23
DocuSign for Dynamics 365 CRMQuick Start Guide
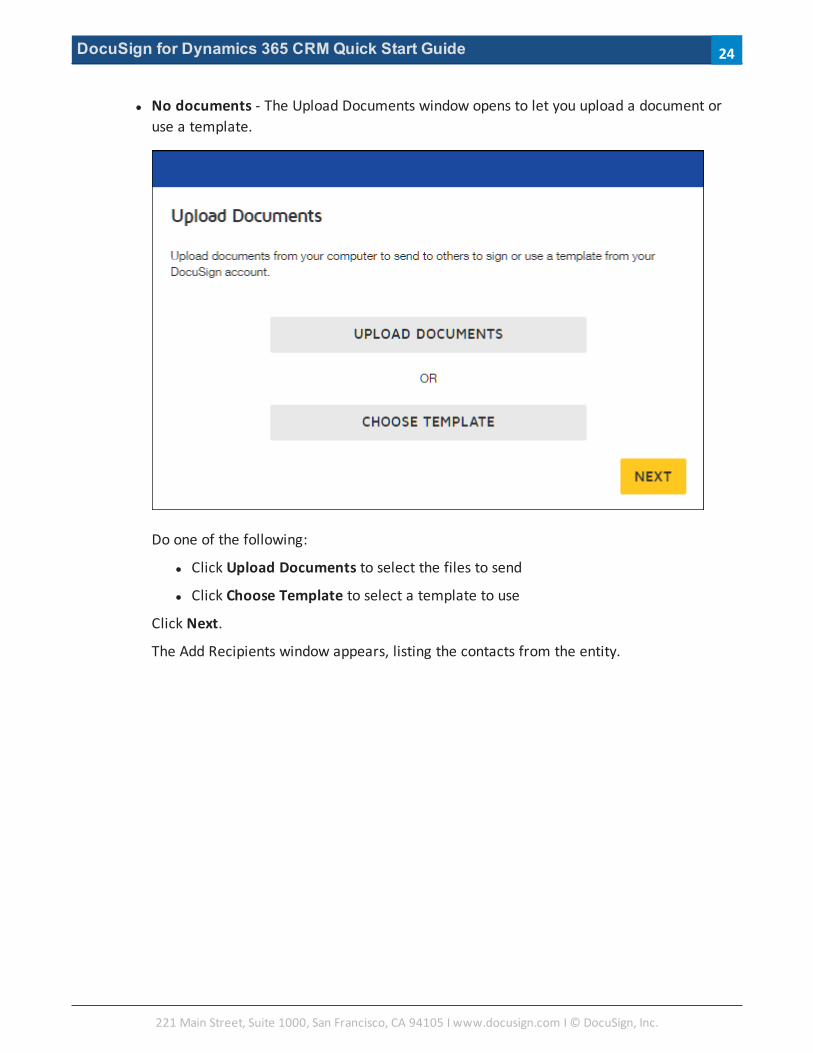
l No documents - The Upload Documents window opens to let you upload a document oruse a template.
Do one of the following:
l Click Upload Documents to select the files to send
l Click Choose Template to select a template to use
Click Next.
The Add Recipients window appears, listing the contacts from the entity.
221 Main Street, Suite 1000, San Francisco, CA 94105 Ι www.docusign.com Ι © DocuSign, Inc.
24
DocuSign for Dynamics 365 CRMQuick Start Guide
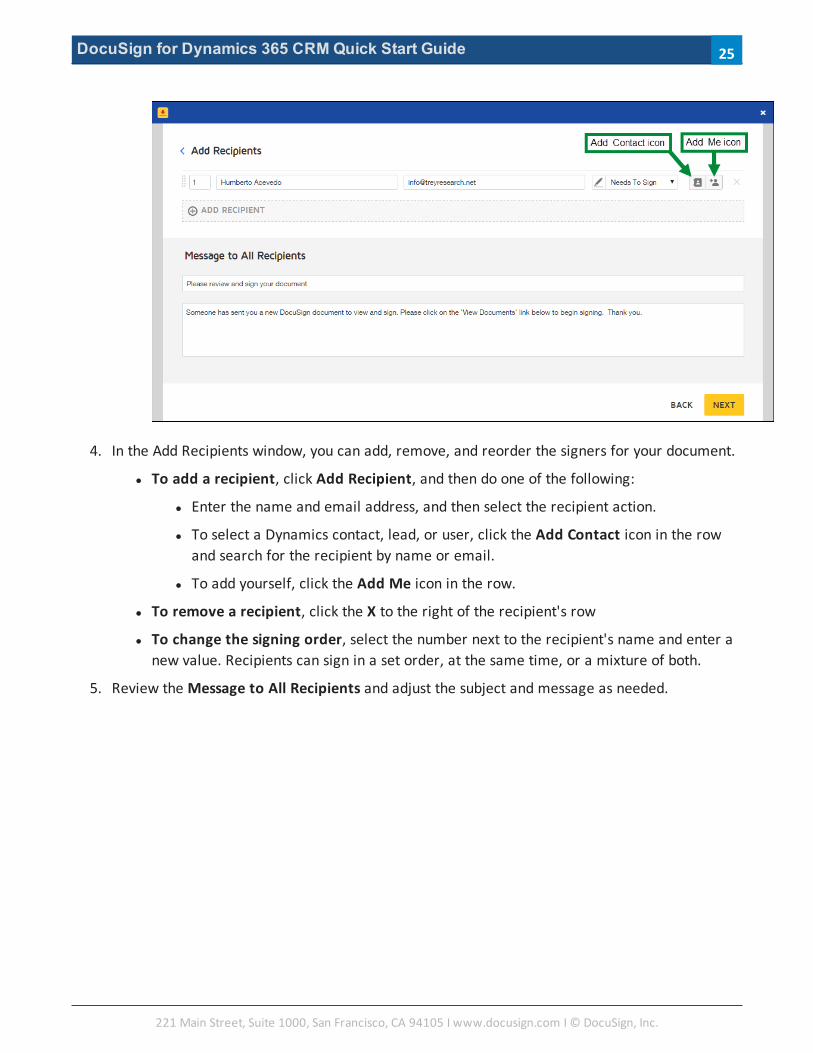
4. In the Add Recipients window, you can add, remove, and reorder the signers for your document.
l To add a recipient, click Add Recipient, and then do one of the following:
l Enter the name and email address, and then select the recipient action.
l To select a Dynamics contact, lead, or user, click the Add Contact icon in the rowand search for the recipient by name or email.
l To add yourself, click the Add Me icon in the row.
l To remove a recipient, click the X to the right of the recipient's row
l To change the signing order, select the number next to the recipient's name and enter anew value. Recipients can sign in a set order, at the same time, or a mixture of both.
5. Review the Message to All Recipients and adjust the subject and message as needed.
221 Main Street, Suite 1000, San Francisco, CA 94105 Ι www.docusign.com Ι © DocuSign, Inc.
25
DocuSign for Dynamics 365 CRMQuick Start Guide
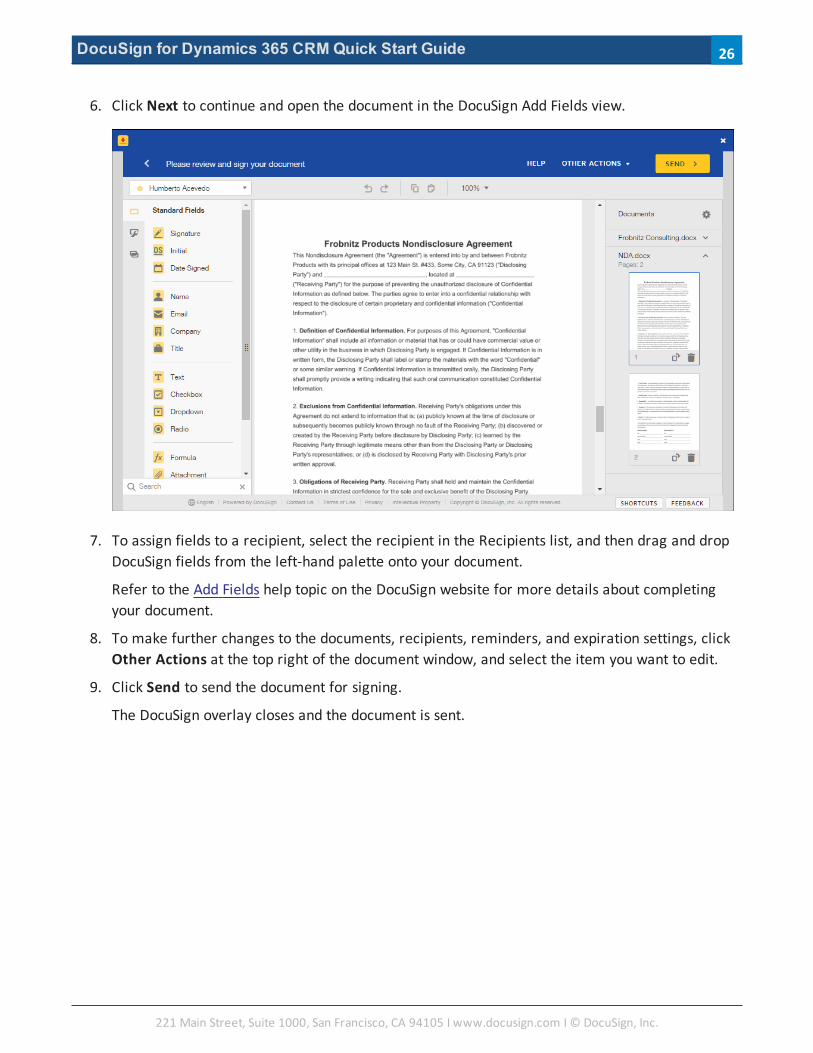
6. Click Next to continue and open the document in the DocuSign Add Fields view.
7. To assign fields to a recipient, select the recipient in the Recipients list, and then drag and dropDocuSign fields from the left-hand palette onto your document.
Refer to the Add Fields help topic on the DocuSign website for more details about completingyour document.
8. To make further changes to the documents, recipients, reminders, and expiration settings, clickOther Actions at the top right of the document window, and select the item you want to edit.
9. Click Send to send the document for signing.
The DocuSign overlay closes and the document is sent.
221 Main Street, Suite 1000, San Francisco, CA 94105 Ι www.docusign.com Ι © DocuSign, Inc.
26
DocuSign for Dynamics 365 CRMQuick Start Guide
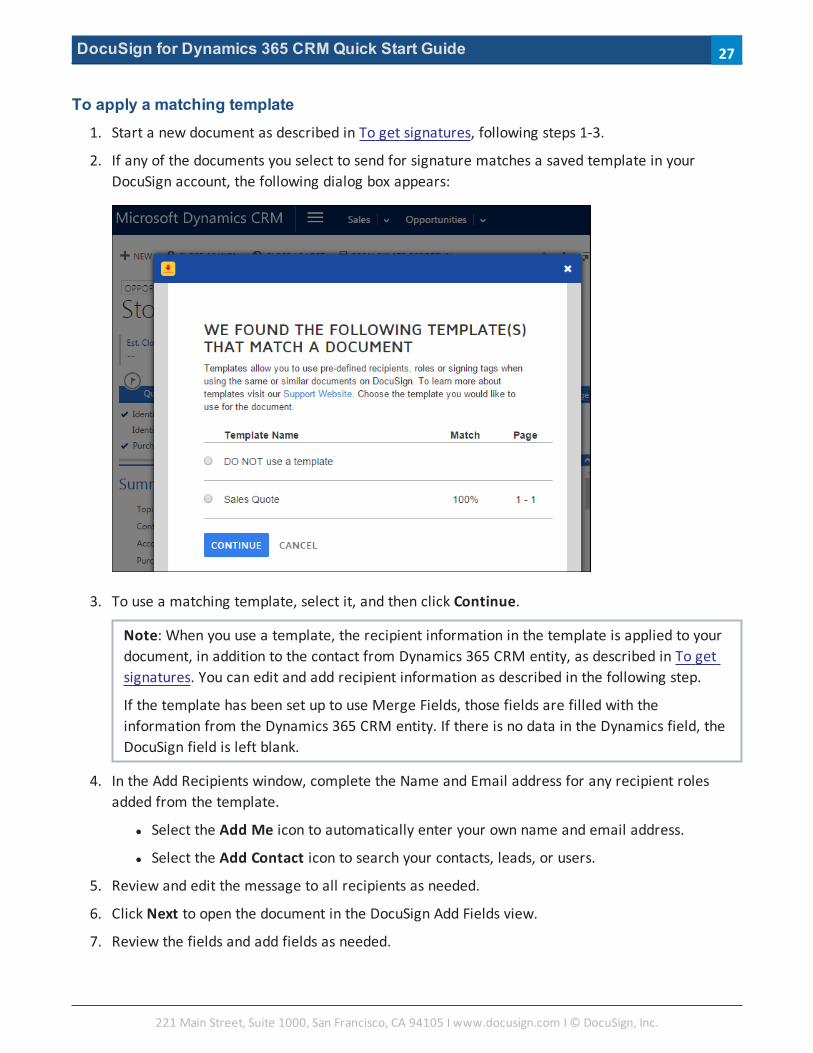
To apply a matching template1. Start a new document as described in To get signatures, following steps 1-3.
2. If any of the documents you select to send for signature matches a saved template in yourDocuSign account, the following dialog box appears:
3. To use a matching template, select it, and then click Continue.
Note: When you use a template, the recipient information in the template is applied to yourdocument, in addition to the contact from Dynamics 365 CRM entity, as described in To getsignatures. You can edit and add recipient information as described in the following step.
If the template has been set up to use Merge Fields, those fields are filled with theinformation from the Dynamics 365 CRM entity. If there is no data in the Dynamics field, theDocuSign field is left blank.
4. In the Add Recipients window, complete the Name and Email address for any recipient rolesadded from the template.
l Select the Add Me icon to automatically enter your own name and email address.
l Select the Add Contact icon to search your contacts, leads, or users.
5. Review and edit the message to all recipients as needed.
6. Click Next to open the document in the DocuSign Add Fields view.
7. Review the fields and add fields as needed.
221 Main Street, Suite 1000, San Francisco, CA 94105 Ι www.docusign.com Ι © DocuSign, Inc.
27
DocuSign for Dynamics 365 CRMQuick Start Guide
8. To send the document, click Send.
The DocuSign overlay closes and the document is sent.
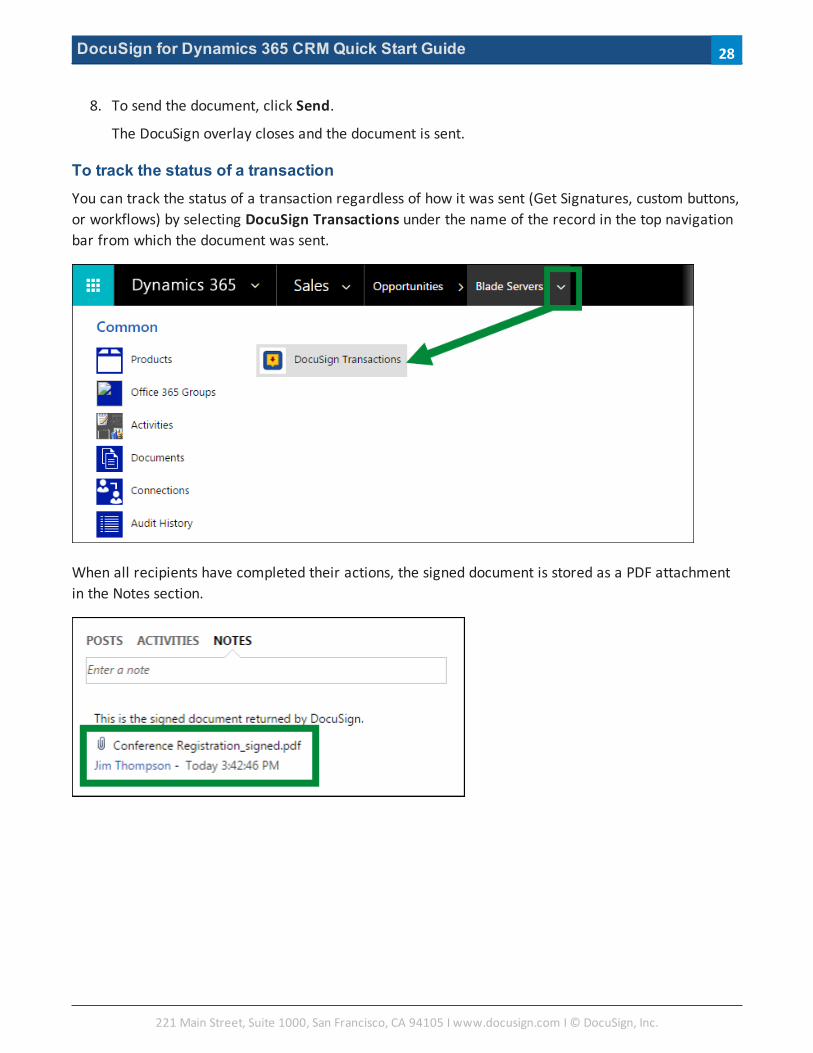
To track the status of a transactionYou can track the status of a transaction regardless of how it was sent (Get Signatures, custom buttons,or workflows) by selecting DocuSign Transactions under the name of the record in the top navigationbar from which the document was sent.
When all recipients have completed their actions, the signed document is stored as a PDF attachmentin the Notes section.
221 Main Street, Suite 1000, San Francisco, CA 94105 Ι www.docusign.com Ι © DocuSign, Inc.
28
DocuSign for Dynamics 365 CRMQuick Start Guide
Sign Documents with DocuSignImportant: Starting with version 6.0, new customers will not have access to the Get Signaturesguided flow. Instead, the Send with DocuSign custom button will be enabled. See Send withDocuSign for how to use the Send with DocuSign button.
Existing customers can still use the Get Signatures guided flow, but, starting with version 6.1, allcustomers will be migrated to the Send with DocuSign custom button flow. The custom button flowprovides the same functionality and should not require changes to customers' workflows.
With DocuSign for Dynamics Online, you can sign documents directly from records in Dynamics 365CRM.
The Sign action is added to the command bar for all the entities that have been enabled with DocuSignby your Microsoft Dynamics administrator.
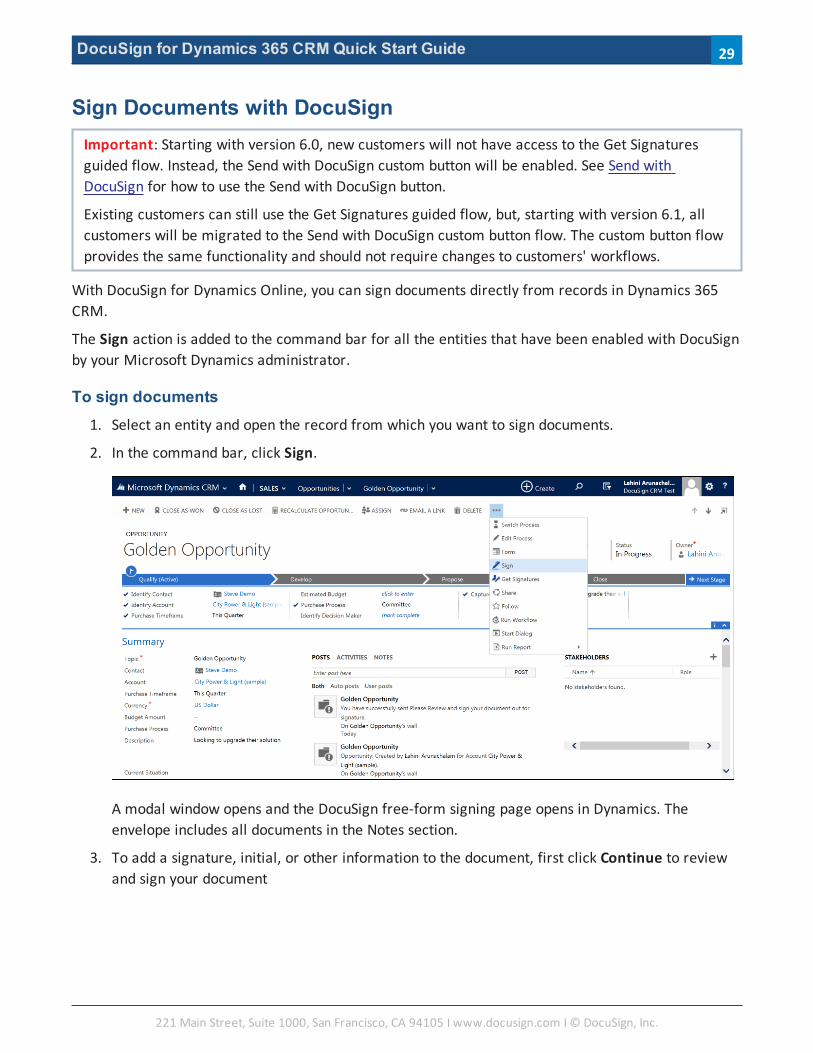
To sign documents1. Select an entity and open the record from which you want to sign documents.
2. In the command bar, click Sign.
A modal window opens and the DocuSign free-form signing page opens in Dynamics. Theenvelope includes all documents in the Notes section.
3. To add a signature, initial, or other information to the document, first click Continue to reviewand sign your document
221 Main Street, Suite 1000, San Francisco, CA 94105 Ι www.docusign.com Ι © DocuSign, Inc.
29
DocuSign for Dynamics 365 CRMQuick Start Guide
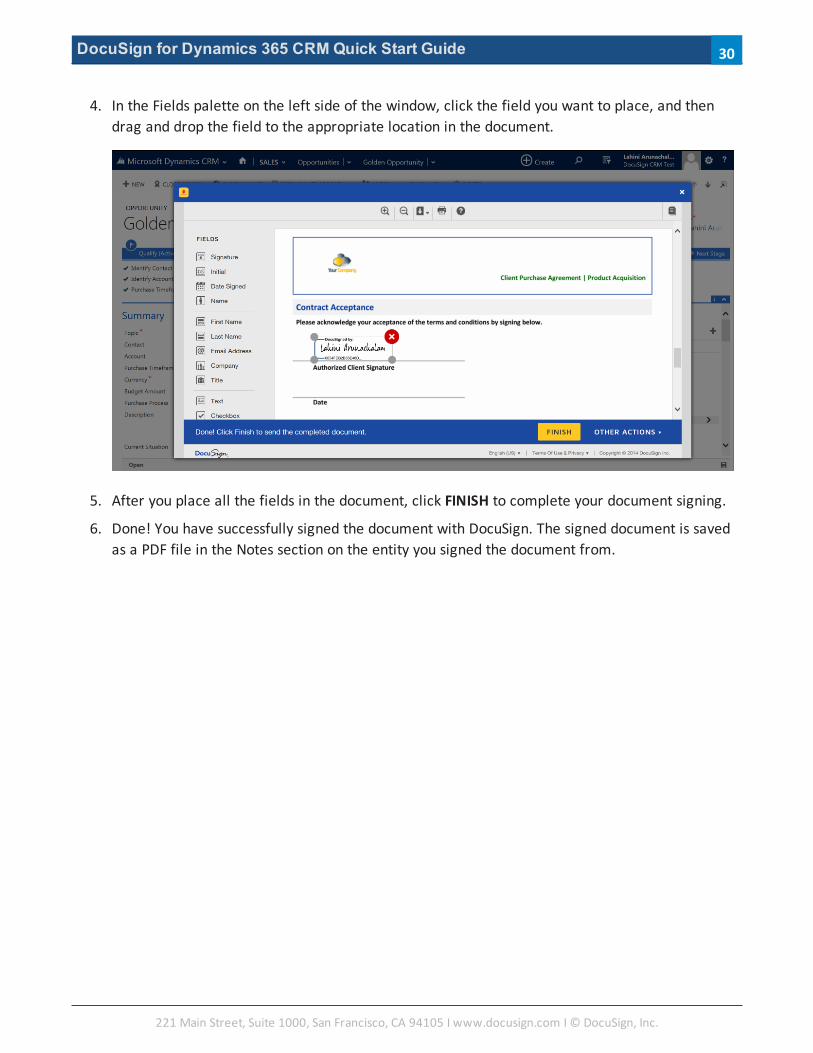
4. In the Fields palette on the left side of the window, click the field you want to place, and thendrag and drop the field to the appropriate location in the document.
5. After you place all the fields in the document, click FINISH to complete your document signing.
6. Done! You have successfully signed the document with DocuSign. The signed document is savedas a PDF file in the Notes section on the entity you signed the document from.
221 Main Street, Suite 1000, San Francisco, CA 94105 Ι www.docusign.com Ι © DocuSign, Inc.
30
DocuSign for Dynamics 365 CRMQuick Start Guide
Send with DocuSign Custom ButtonImportant: Starting with version 6.0, new customers will not have access to the Get Signaturesguided flow. Instead, the Send with DocuSign custom button will be enabled.
Existing customers can still use the Get Signatures guided flow, but, starting with version 6.1, allcustomers will be migrated to the Send with DocuSign custom button flow. The custom button flowprovides the same functionality and should not require changes to customers' workflows.
With DocuSign for Dynamics 365 CRM, you can send documents for signature directly from records inDynamics 365 CRM. The default entities enabled are Account, Contact, Opportunity, Lead, and Quote.Your Microsoft Dynamics administrator can enable additional entities with DocuSign actions, asdescribed in Configure DocuSign for Dynamics 365 CRM.
The Send with DocuSign custom button is added to the command bar for all the entities that havebeen enabled with DocuSign by your Microsoft Dynamics administrator.
By default, all documents in the Notes section are added to the envelope. All SharePoint documents arealso added if the SharePoint integration is enabled.
To customize the behavior of the Send with DocuSign button, see Create Custom Buttons.
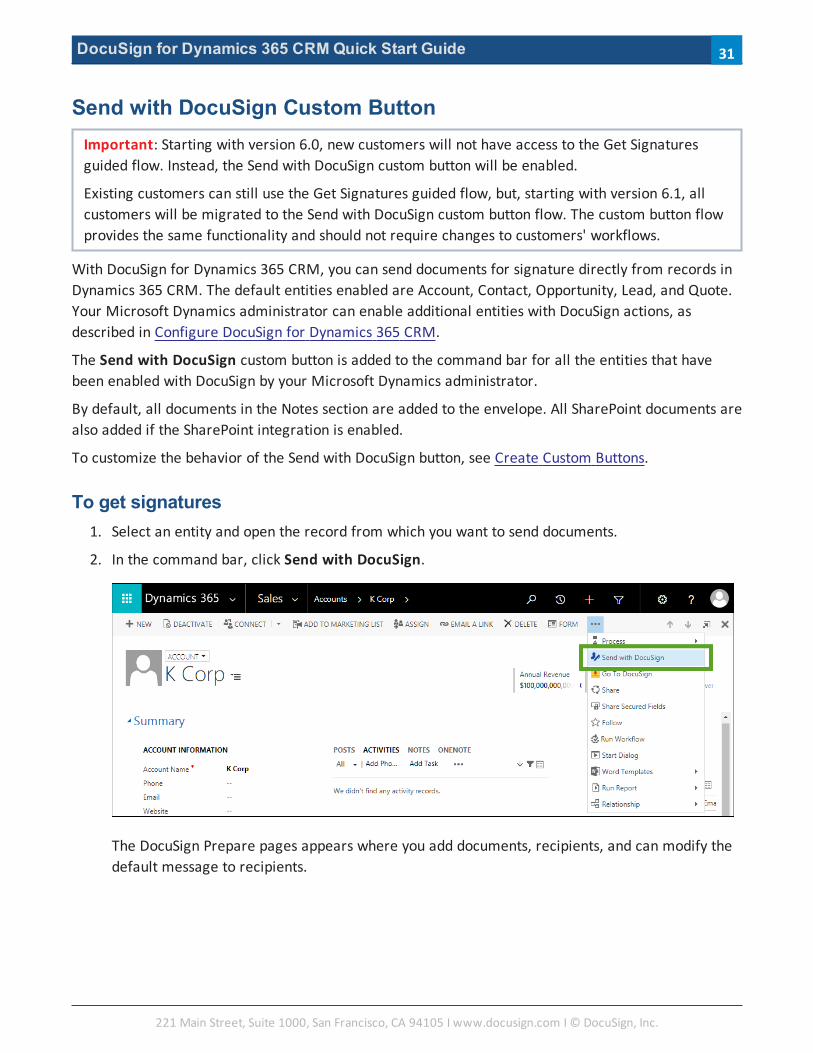
To get signatures1. Select an entity and open the record from which you want to send documents.
2. In the command bar, click Send with DocuSign.
The DocuSign Prepare pages appears where you add documents, recipients, and can modify thedefault message to recipients.
221 Main Street, Suite 1000, San Francisco, CA 94105 Ι www.docusign.com Ι © DocuSign, Inc.
31
DocuSign for Dynamics 365 CRMQuick Start Guide
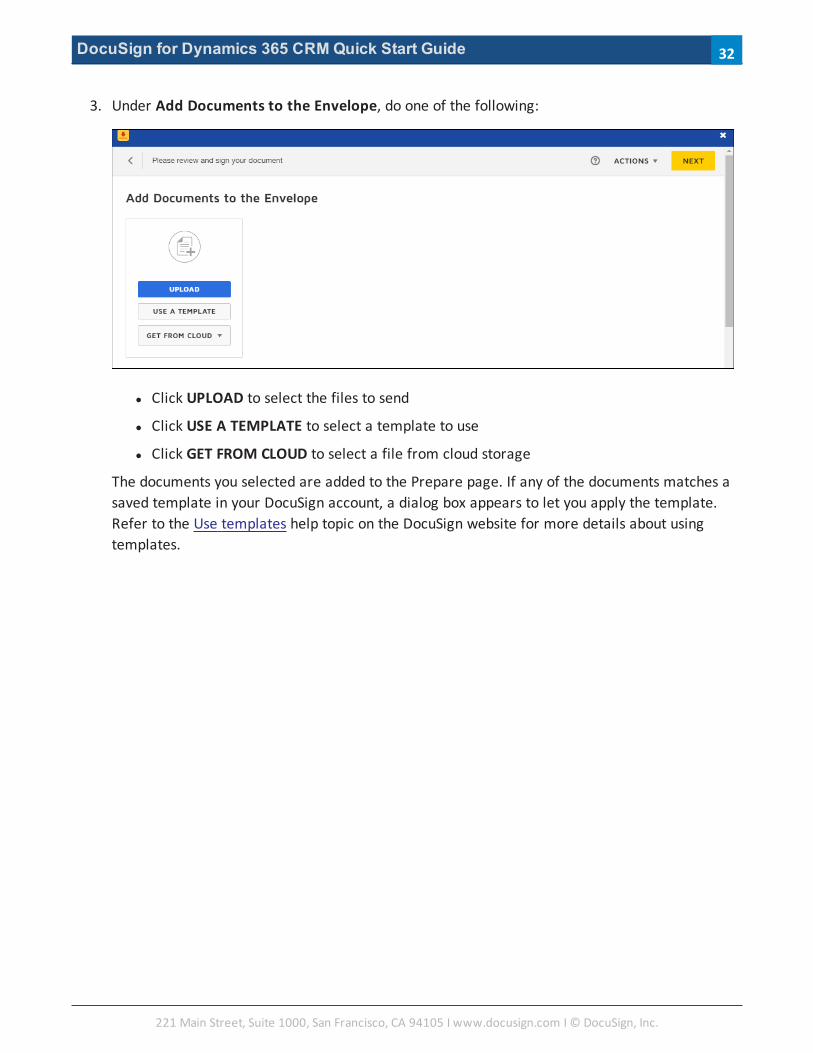
3. Under Add Documents to the Envelope, do one of the following:
l Click UPLOAD to select the files to send
l Click USE A TEMPLATE to select a template to use
l Click GET FROM CLOUD to select a file from cloud storage
The documents you selected are added to the Prepare page. If any of the documents matches asaved template in your DocuSign account, a dialog box appears to let you apply the template.Refer to the Use templates help topic on the DocuSign website for more details about usingtemplates.
221 Main Street, Suite 1000, San Francisco, CA 94105 Ι www.docusign.com Ι © DocuSign, Inc.
32
DocuSign for Dynamics 365 CRMQuick Start Guide
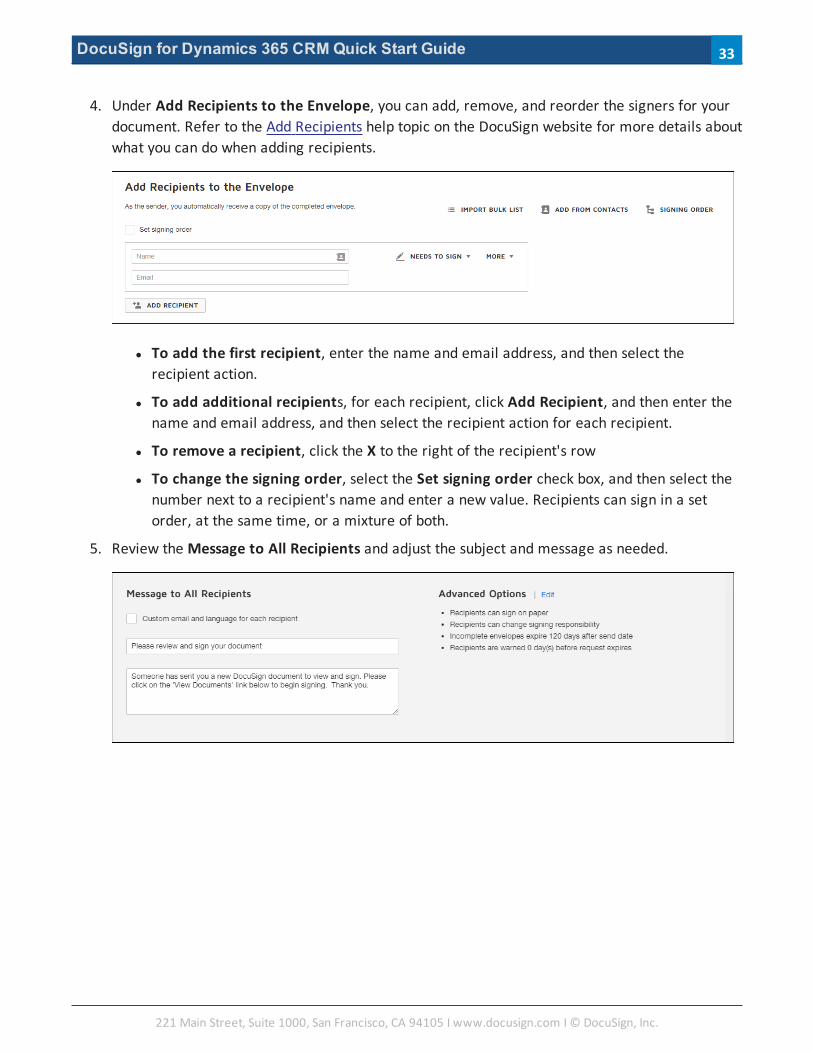
4. Under Add Recipients to the Envelope, you can add, remove, and reorder the signers for yourdocument. Refer to the Add Recipients help topic on the DocuSign website for more details aboutwhat you can do when adding recipients.
l To add the first recipient, enter the name and email address, and then select therecipient action.
l To add additional recipients, for each recipient, click Add Recipient, and then enter thename and email address, and then select the recipient action for each recipient.
l To remove a recipient, click the X to the right of the recipient's row
l To change the signing order, select the Set signing order check box, and then select thenumber next to a recipient's name and enter a new value. Recipients can sign in a setorder, at the same time, or a mixture of both.
5. Review the Message to All Recipients and adjust the subject and message as needed.
221 Main Street, Suite 1000, San Francisco, CA 94105 Ι www.docusign.com Ι © DocuSign, Inc.
33
DocuSign for Dynamics 365 CRMQuick Start Guide
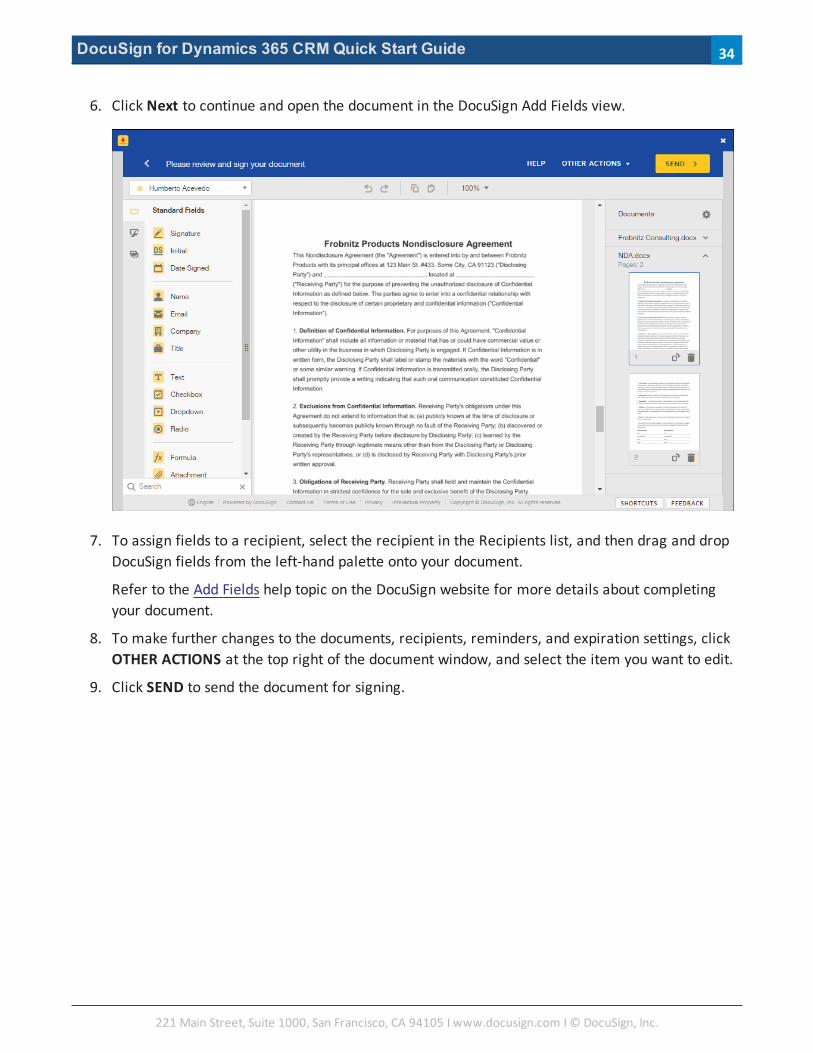
6. Click Next to continue and open the document in the DocuSign Add Fields view.
7. To assign fields to a recipient, select the recipient in the Recipients list, and then drag and dropDocuSign fields from the left-hand palette onto your document.
Refer to the Add Fields help topic on the DocuSign website for more details about completingyour document.
8. To make further changes to the documents, recipients, reminders, and expiration settings, clickOTHER ACTIONS at the top right of the document window, and select the item you want to edit.
9. Click SEND to send the document for signing.
221 Main Street, Suite 1000, San Francisco, CA 94105 Ι www.docusign.com Ι © DocuSign, Inc.
34
DocuSign for Dynamics 365 CRMQuick Start Guide
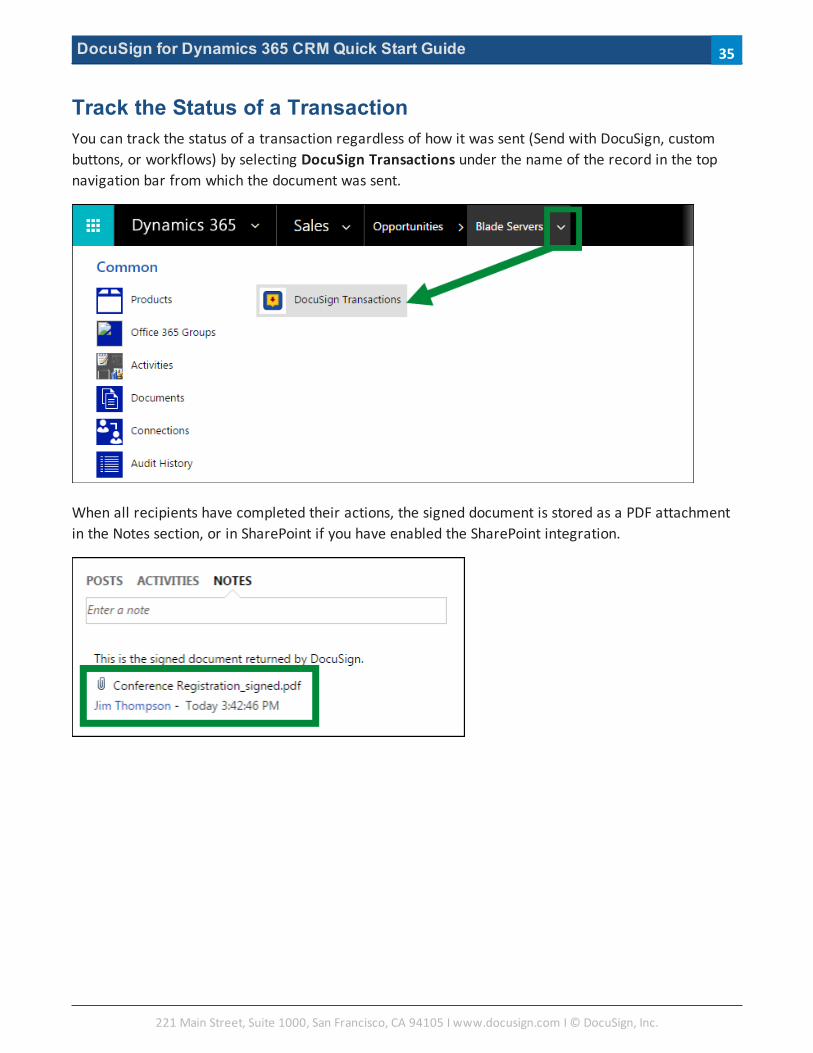
Track the Status of a TransactionYou can track the status of a transaction regardless of how it was sent (Send with DocuSign, custombuttons, or workflows) by selecting DocuSign Transactions under the name of the record in the topnavigation bar from which the document was sent.
When all recipients have completed their actions, the signed document is stored as a PDF attachmentin the Notes section, or in SharePoint if you have enabled the SharePoint integration.
221 Main Street, Suite 1000, San Francisco, CA 94105 Ι www.docusign.com Ι © DocuSign, Inc.
35
DocuSign for Dynamics 365 CRMQuick Start Guide
Customize DocuSign for DynamicsWith DocuSign for Dynamics Workflows, you can add DocuSign custom activities to your Dynamicsprocesses, such as workflows and actions. With these custom steps, you can specify and generate aDocuSign envelope automatically within a Dynamics process for any Dynamics standard or customentity. These steps can be part of a Dynamics workflow or part of a custom button.
You can define process steps to create the envelope either from the documents and contacts on anobject, or using a template from the DocuSign account used with your Dynamics application. You canalso define process steps that map DocuSign fields to Dynamics fields to create merge fields that pullDynamics data into your document (see this video for an example of how to set up a custom workflow).
DocuSign Custom ActivitiesDocuSign for Dynamics Workflows consists of six custom activities that are used to create a DocuSigntransaction:
l Create Envelope - This is the first step in creating a DocuSign transaction. You can also create anenvelope from a template by specifying a template ID.
l Add Recipient - Use this activity to add recipients to the DocuSign envelope. You can also use itto match recipients to template roles.
l Add InPerson Signer - Use this activity to add in-person signers to the DocuSign envelope. Youcan also use it to match recipients to template roles. The InPerson Signer will not receive anemail notification from DocuSign to sign the envelope.
l Add Document - Use this activity to add documents to the DocuSign envelope. Documents mustbe saved in the Notes of the record, or SharePoint, if enabled, on which the custom activity isoperating.
l Get Signatures - This activity is the final step in creating and sending a DocuSign transaction.You can send immediately, or choose to output the URL for the Add Fields view and not send thedocument. You can also choose which view opens: Add Fields or Prepare.
l Get Signing View - This activity generates a signing URL for use in an in-person signing session.
l Merge Field - Use this activity to map DocuSign fields on a document or template to Dynamicsfields.
l Get Field Value - Use this activity to access data from completed documents.
221 Main Street, Suite 1000, San Francisco, CA 94105 Ι www.docusign.com Ι © DocuSign, Inc.
36

DocuSign for Dynamics 365 CRMQuick Start Guide
Here is an example of configuring five of the custom activities as part of a Dynamics workflow:
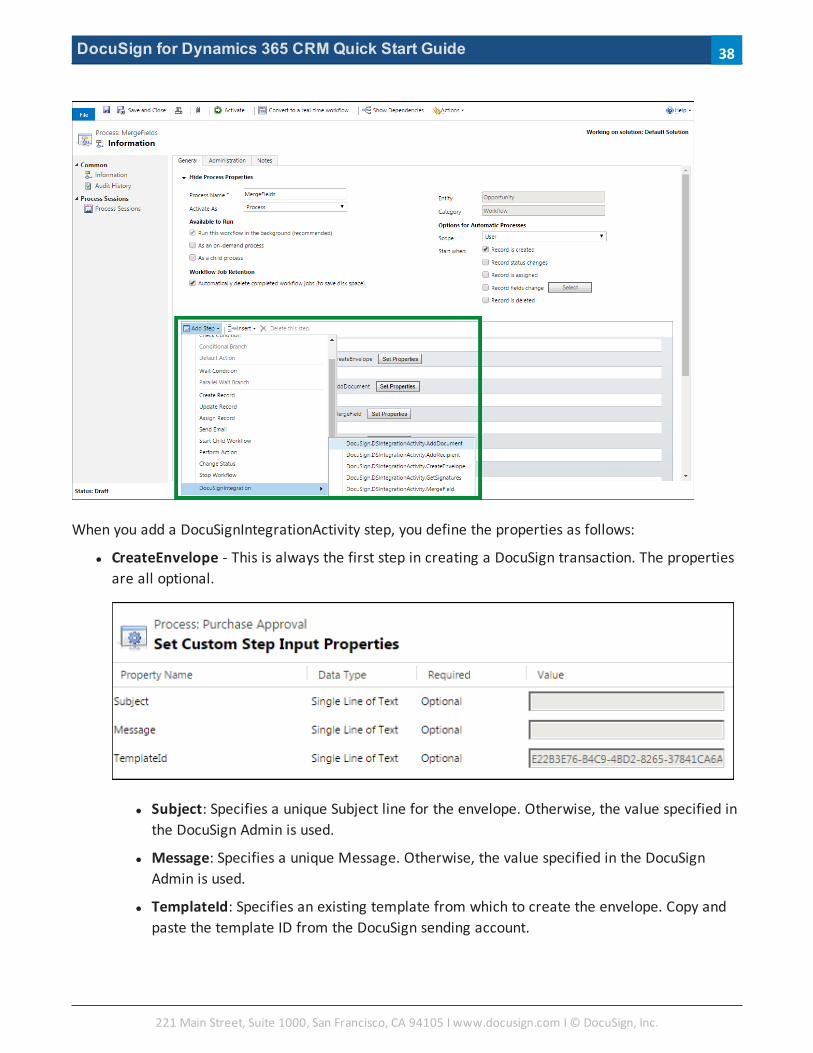
Add custom activities to process stepsTo include a DocuSign transaction as part of a Dynamics process, you add the custom activities as stepsand define their properties. The custom activities are listed in the Add Step menu, under theDocuSignIntegration selection:
221 Main Street, Suite 1000, San Francisco, CA 94105 Ι www.docusign.com Ι © DocuSign, Inc.
37
DocuSign for Dynamics 365 CRMQuick Start Guide
When you add a DocuSignIntegrationActivity step, you define the properties as follows:
l CreateEnvelope - This is always the first step in creating a DocuSign transaction. The propertiesare all optional.
l Subject: Specifies a unique Subject line for the envelope. Otherwise, the value specified inthe DocuSign Admin is used.
l Message: Specifies a unique Message. Otherwise, the value specified in the DocuSignAdmin is used.
l TemplateId: Specifies an existing template from which to create the envelope. Copy andpaste the template ID from the DocuSign sending account.
221 Main Street, Suite 1000, San Francisco, CA 94105 Ι www.docusign.com Ι © DocuSign, Inc.
38
DocuSign for Dynamics 365 CRMQuick Start Guide
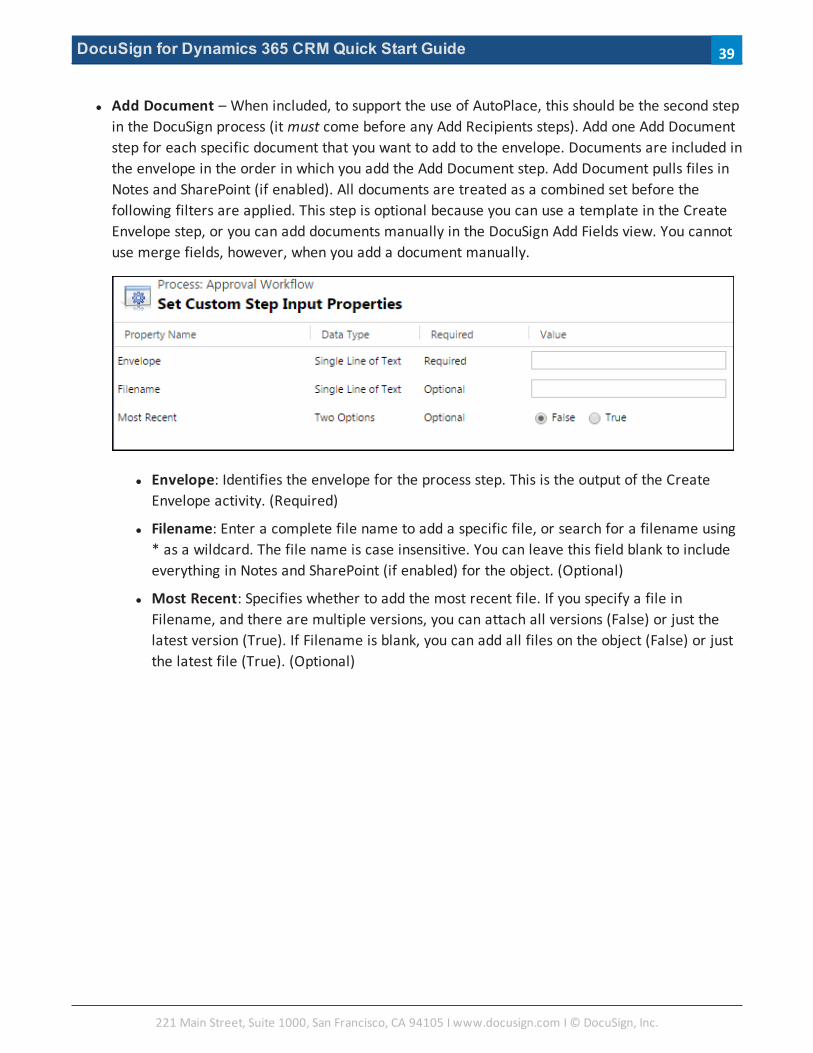
l Add Document – When included, to support the use of AutoPlace, this should be the second stepin the DocuSign process (itmust come before any Add Recipients steps). Add one Add Documentstep for each specific document that you want to add to the envelope. Documents are included inthe envelope in the order in which you add the Add Document step. Add Document pulls files inNotes and SharePoint (if enabled). All documents are treated as a combined set before thefollowing filters are applied. This step is optional because you can use a template in the CreateEnvelope step, or you can add documents manually in the DocuSign Add Fields view. You cannotuse merge fields, however, when you add a document manually.
l Envelope: Identifies the envelope for the process step. This is the output of the CreateEnvelope activity. (Required)
l Filename: Enter a complete file name to add a specific file, or search for a filename using* as a wildcard. The file name is case insensitive. You can leave this field blank to includeeverything in Notes and SharePoint (if enabled) for the object. (Optional)
l Most Recent: Specifies whether to add the most recent file. If you specify a file inFilename, and there are multiple versions, you can attach all versions (False) or just thelatest version (True). If Filename is blank, you can add all files on the object (False) or justthe latest file (True). (Optional)
221 Main Street, Suite 1000, San Francisco, CA 94105 Ι www.docusign.com Ι © DocuSign, Inc.
39
DocuSign for Dynamics 365 CRMQuick Start Guide
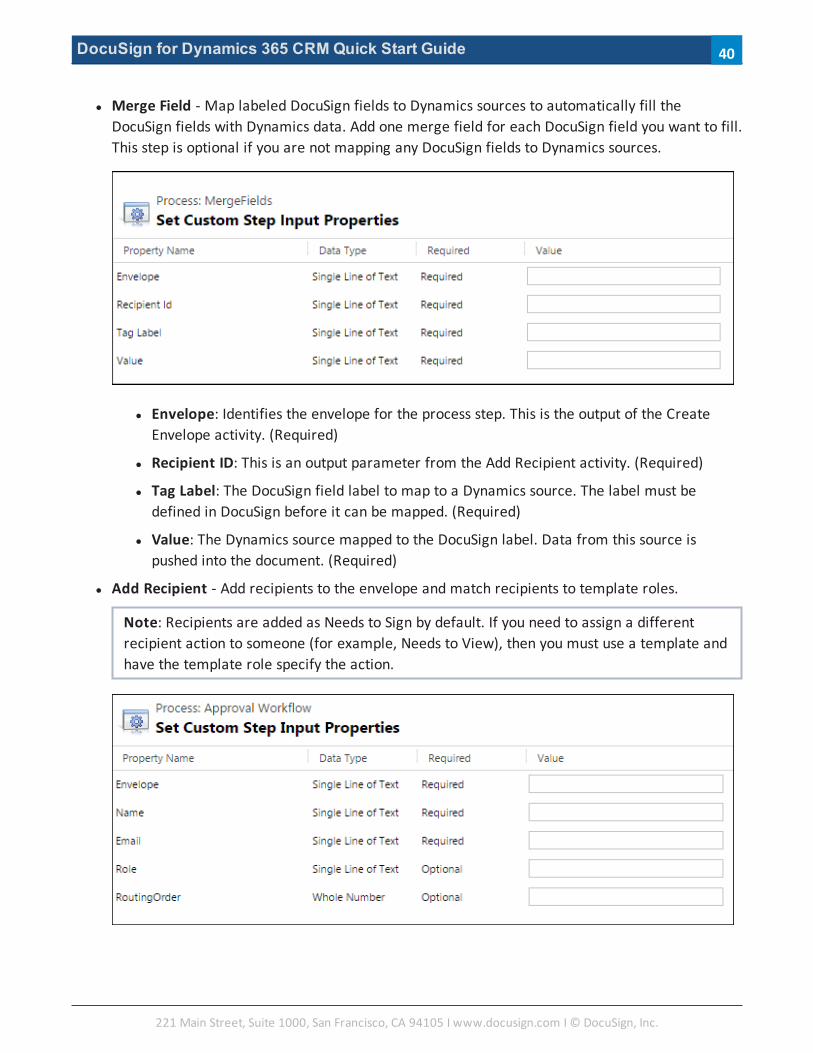
l Merge Field - Map labeled DocuSign fields to Dynamics sources to automatically fill theDocuSign fields with Dynamics data. Add one merge field for each DocuSign field you want to fill.This step is optional if you are not mapping any DocuSign fields to Dynamics sources.
l Envelope: Identifies the envelope for the process step. This is the output of the CreateEnvelope activity. (Required)
l Recipient ID: This is an output parameter from the Add Recipient activity. (Required)
l Tag Label: The DocuSign field label to map to a Dynamics source. The label must bedefined in DocuSign before it can be mapped. (Required)
l Value: The Dynamics source mapped to the DocuSign label. Data from this source ispushed into the document. (Required)
l Add Recipient - Add recipients to the envelope and match recipients to template roles.
Note: Recipients are added as Needs to Sign by default. If you need to assign a differentrecipient action to someone (for example, Needs to View), then you must use a template andhave the template role specify the action.
221 Main Street, Suite 1000, San Francisco, CA 94105 Ι www.docusign.com Ι © DocuSign, Inc.
40
DocuSign for Dynamics 365 CRMQuick Start Guide
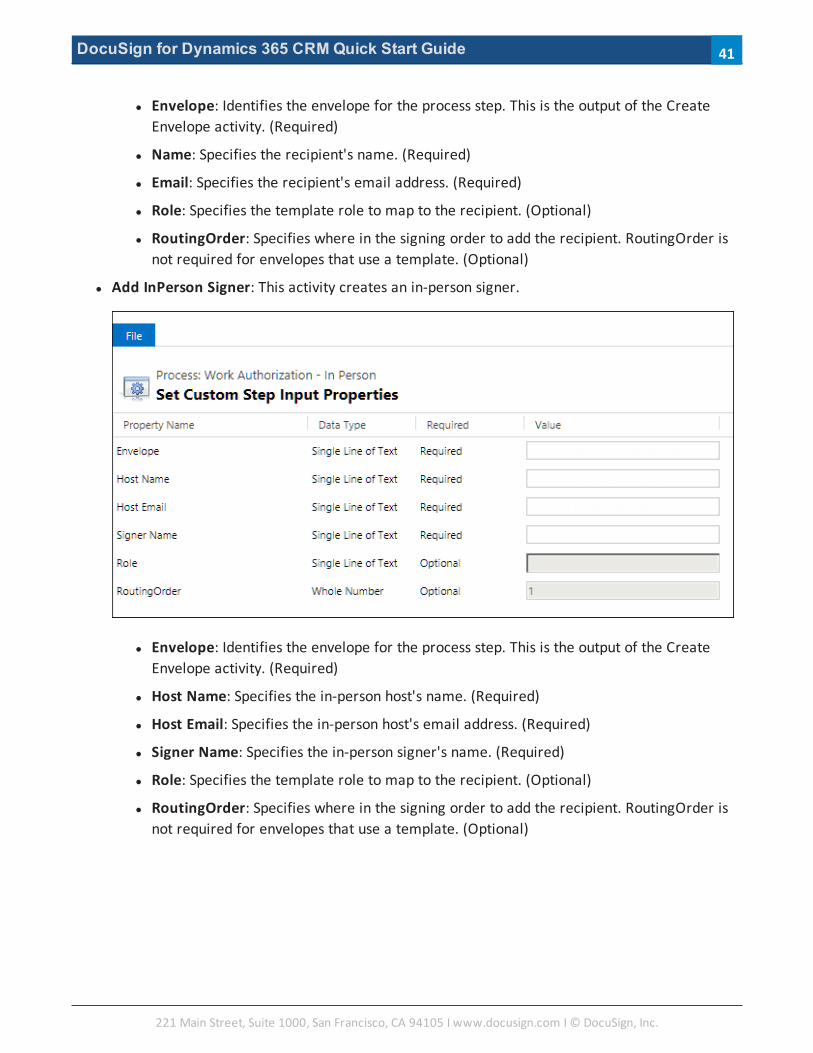
l Envelope: Identifies the envelope for the process step. This is the output of the CreateEnvelope activity. (Required)
l Name: Specifies the recipient's name. (Required)
l Email: Specifies the recipient's email address. (Required)
l Role: Specifies the template role to map to the recipient. (Optional)
l RoutingOrder: Specifies where in the signing order to add the recipient. RoutingOrder isnot required for envelopes that use a template. (Optional)
l Add InPerson Signer: This activity creates an in-person signer.
l Envelope: Identifies the envelope for the process step. This is the output of the CreateEnvelope activity. (Required)
l Host Name: Specifies the in-person host's name. (Required)
l Host Email: Specifies the in-person host's email address. (Required)
l Signer Name: Specifies the in-person signer's name. (Required)
l Role: Specifies the template role to map to the recipient. (Optional)
l RoutingOrder: Specifies where in the signing order to add the recipient. RoutingOrder isnot required for envelopes that use a template. (Optional)
221 Main Street, Suite 1000, San Francisco, CA 94105 Ι www.docusign.com Ι © DocuSign, Inc.
41
DocuSign for Dynamics 365 CRMQuick Start Guide
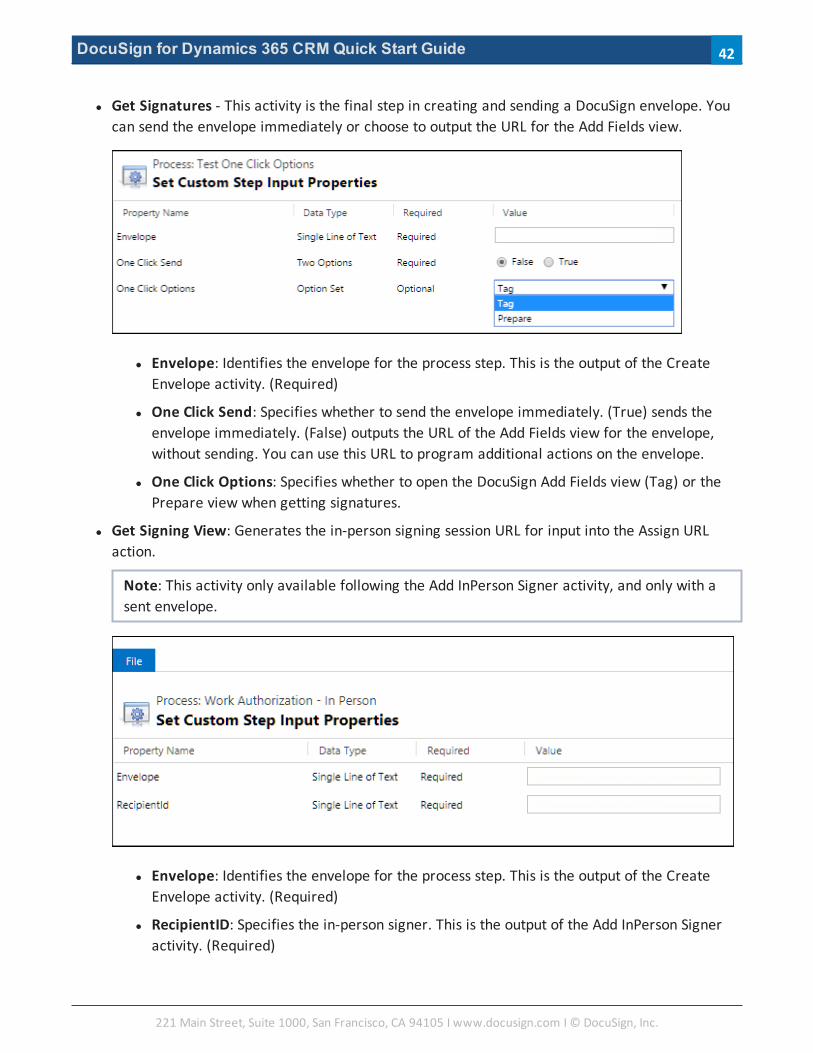
l Get Signatures - This activity is the final step in creating and sending a DocuSign envelope. Youcan send the envelope immediately or choose to output the URL for the Add Fields view.
l Envelope: Identifies the envelope for the process step. This is the output of the CreateEnvelope activity. (Required)
l One Click Send: Specifies whether to send the envelope immediately. (True) sends theenvelope immediately. (False) outputs the URL of the Add Fields view for the envelope,without sending. You can use this URL to program additional actions on the envelope.
l One Click Options: Specifies whether to open the DocuSign Add Fields view (Tag) or thePrepare view when getting signatures.
l Get Signing View: Generates the in-person signing session URL for input into the Assign URLaction.
Note: This activity only available following the Add InPerson Signer activity, and only with asent envelope.
l Envelope: Identifies the envelope for the process step. This is the output of the CreateEnvelope activity. (Required)
l RecipientID: Specifies the in-person signer. This is the output of the Add InPerson Signeractivity. (Required)
221 Main Street, Suite 1000, San Francisco, CA 94105 Ι www.docusign.com Ι © DocuSign, Inc.
42
DocuSign for Dynamics 365 CRMQuick Start Guide
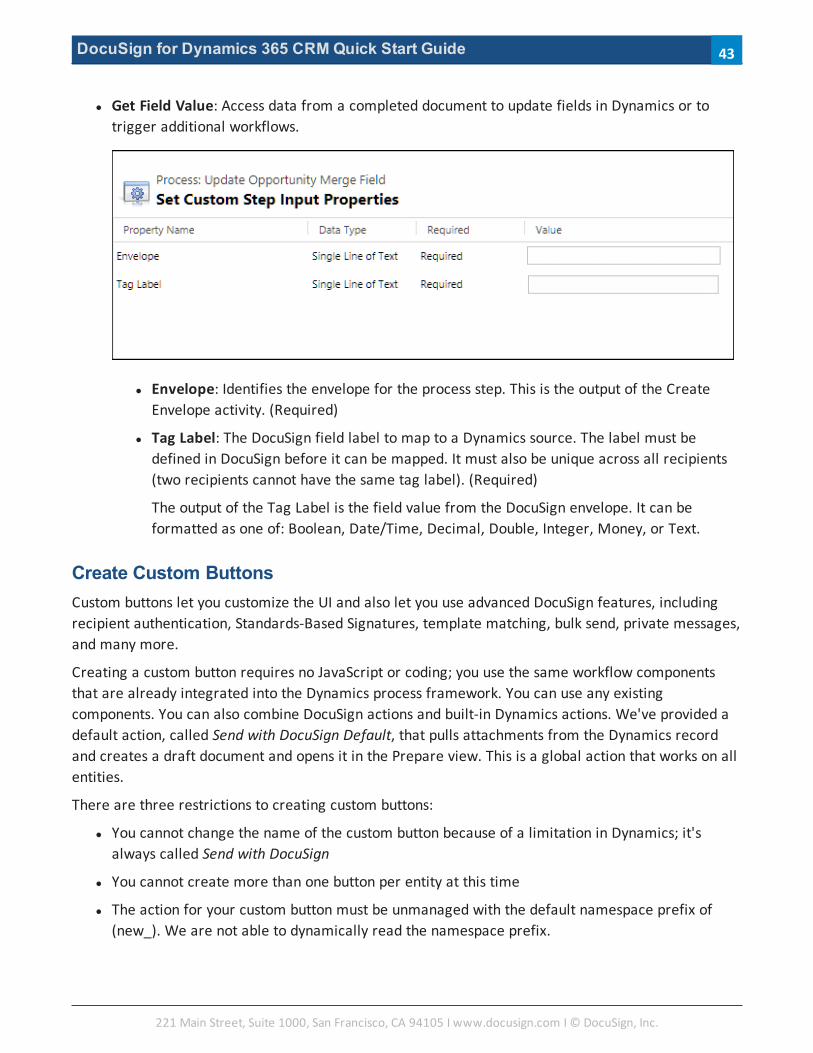
l Get Field Value: Access data from a completed document to update fields in Dynamics or totrigger additional workflows.
l Envelope: Identifies the envelope for the process step. This is the output of the CreateEnvelope activity. (Required)
l Tag Label: The DocuSign field label to map to a Dynamics source. The label must bedefined in DocuSign before it can be mapped. It must also be unique across all recipients(two recipients cannot have the same tag label). (Required)
The output of the Tag Label is the field value from the DocuSign envelope. It can beformatted as one of: Boolean, Date/Time, Decimal, Double, Integer, Money, or Text.
Create Custom ButtonsCustom buttons let you customize the UI and also let you use advanced DocuSign features, includingrecipient authentication, Standards-Based Signatures, template matching, bulk send, private messages,and many more.
Creating a custom button requires no JavaScript or coding; you use the same workflow componentsthat are already integrated into the Dynamics process framework. You can use any existingcomponents. You can also combine DocuSign actions and built-in Dynamics actions. We've provided adefault action, called Send with DocuSign Default, that pulls attachments from the Dynamics recordand creates a draft document and opens it in the Prepare view. This is a global action that works on allentities.
There are three restrictions to creating custom buttons:
l You cannot change the name of the custom button because of a limitation in Dynamics; it'salways called Send with DocuSign
l You cannot create more than one button per entity at this time
l The action for your custom button must be unmanaged with the default namespace prefix of(new_). We are not able to dynamically read the namespace prefix.
221 Main Street, Suite 1000, San Francisco, CA 94105 Ι www.docusign.com Ι © DocuSign, Inc.
43

DocuSign for Dynamics 365 CRMQuick Start Guide
Follow these steps to create a custom button:
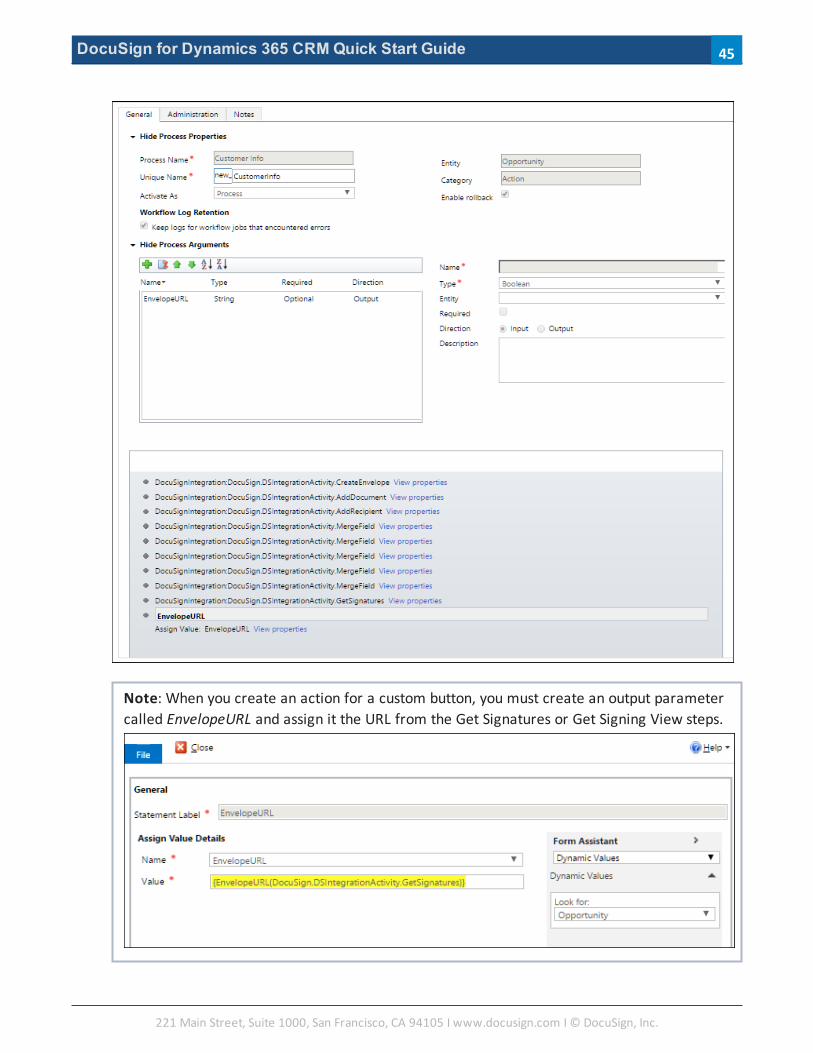
1. Go to the Dynamics Process Center to create an action for your button.
The following image shows an example of an action called Customer Info, which pulls data froman opportunity and creates a document.
221 Main Street, Suite 1000, San Francisco, CA 94105 Ι www.docusign.com Ι © DocuSign, Inc.
44
DocuSign for Dynamics 365 CRMQuick Start Guide
Note: When you create an action for a custom button, you must create an output parametercalled EnvelopeURL and assign it the URL from the Get Signatures or Get Signing View steps.
221 Main Street, Suite 1000, San Francisco, CA 94105 Ι www.docusign.com Ι © DocuSign, Inc.
45
DocuSign for Dynamics 365 CRMQuick Start Guide
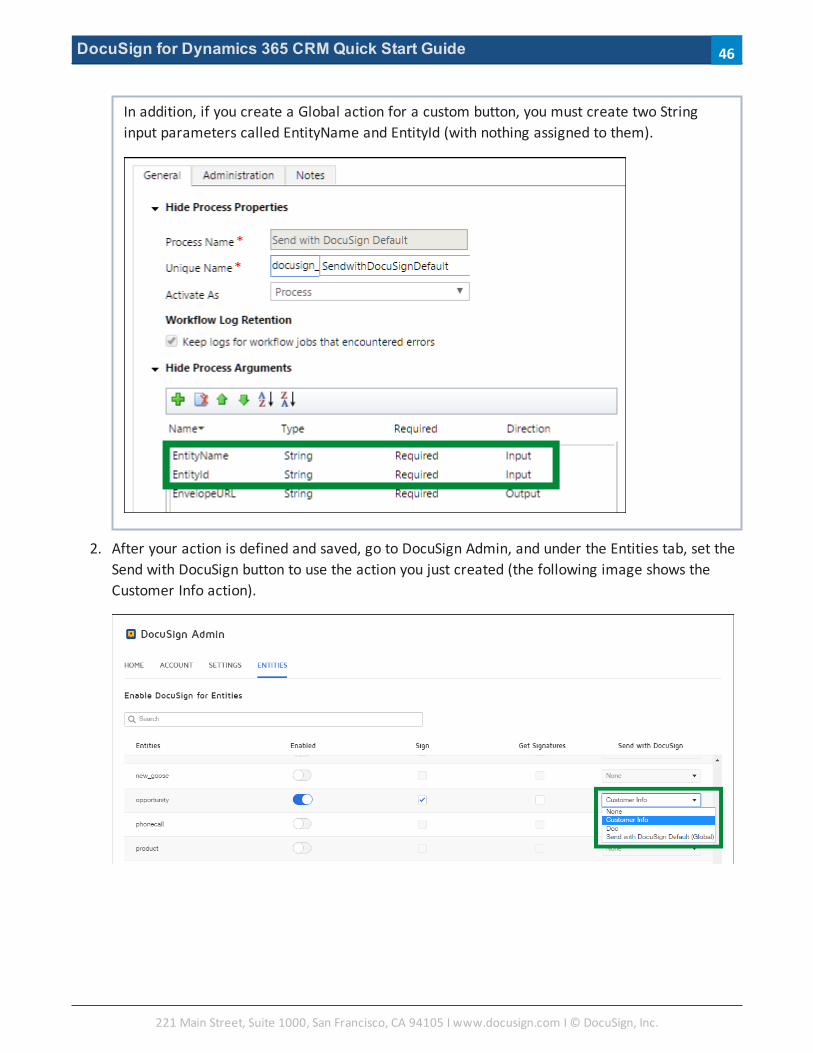
In addition, if you create a Global action for a custom button, you must create two Stringinput parameters called EntityName and EntityId (with nothing assigned to them).
2. After your action is defined and saved, go to DocuSign Admin, and under the Entities tab, set theSend with DocuSign button to use the action you just created (the following image shows theCustomer Info action).
221 Main Street, Suite 1000, San Francisco, CA 94105 Ι www.docusign.com Ι © DocuSign, Inc.
46
DocuSign for Dynamics 365 CRMQuick Start Guide
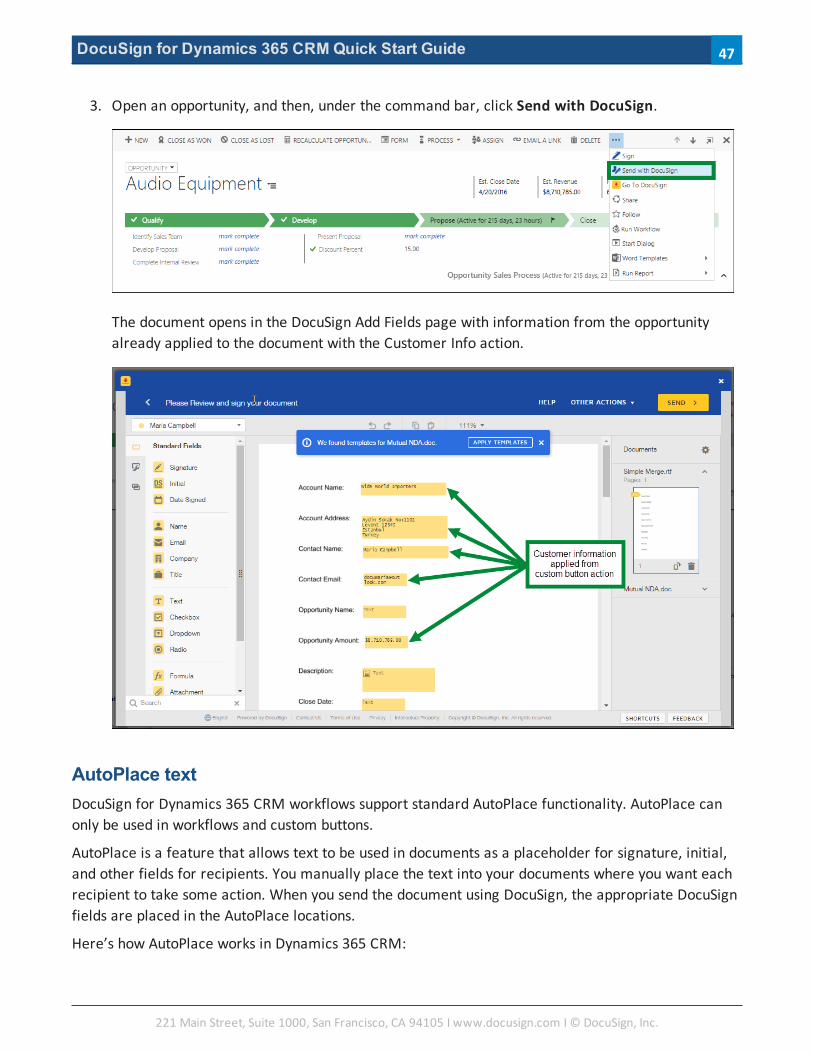
3. Open an opportunity, and then, under the command bar, click Send with DocuSign.
The document opens in the DocuSign Add Fields page with information from the opportunityalready applied to the document with the Customer Info action.
AutoPlace textDocuSign for Dynamics 365 CRM workflows support standard AutoPlace functionality. AutoPlace canonly be used in workflows and custom buttons.
AutoPlace is a feature that allows text to be used in documents as a placeholder for signature, initial,and other fields for recipients. You manually place the text into your documents where you want eachrecipient to take some action. When you send the document using DocuSign, the appropriate DocuSignfields are placed in the AutoPlace locations.
Here’s how AutoPlace works in Dynamics 365 CRM:
221 Main Street, Suite 1000, San Francisco, CA 94105 Ι www.docusign.com Ι © DocuSign, Inc.
47

DocuSign for Dynamics 365 CRMQuick Start Guide
1. Create a custom field with the AutoPlace text (see this topic for information about how to createa custom field). The AutoPlace text must end with {r}; for example, the AutoPlace text for asignature placeholder is \s{r}\.
The following table shows the AutoPlace text you should use in custom fields for different fieldtypes.
Field Type AutoPlace Text
Signature \s{r}\
Initial \i{r}\
Optional Initial \oi{r}\
Name \n{r}\
Company \co{r}\
Title \t{r}\
Date Signed \d{r}\
2. Create an envelope using workflows or a custom button.
3. Add recipients to the envelope with the Add Recipient activity. Each recipient you add is assignedan ID. The first recipient you add is assigned 1, the second is assigned 2, and so on. This hasnothing to do with signing order; it's simply the order in which you add recipients with the AddRecipient activity.
4. Type the AutoPlace text in the document with the recipient ID in place of {r} (based on the AddRecipient activity, not on signing order).
For example, to add:
l A Signature tag for the second recipient, you would type \s2\ in the document.
l A Company tag for the third recipient, you would type: \co3\ in the document.
l A Title tag for the first recipient, you would type: \t1\ in the document.
5. After typing the AutoPlace text, change the color of the AutoPlace text to white or to thebackground color of the document. This way, the AutoPlace text does not appear when thedocument is viewed, making the AutoPlace text invisible to recipients of the document.
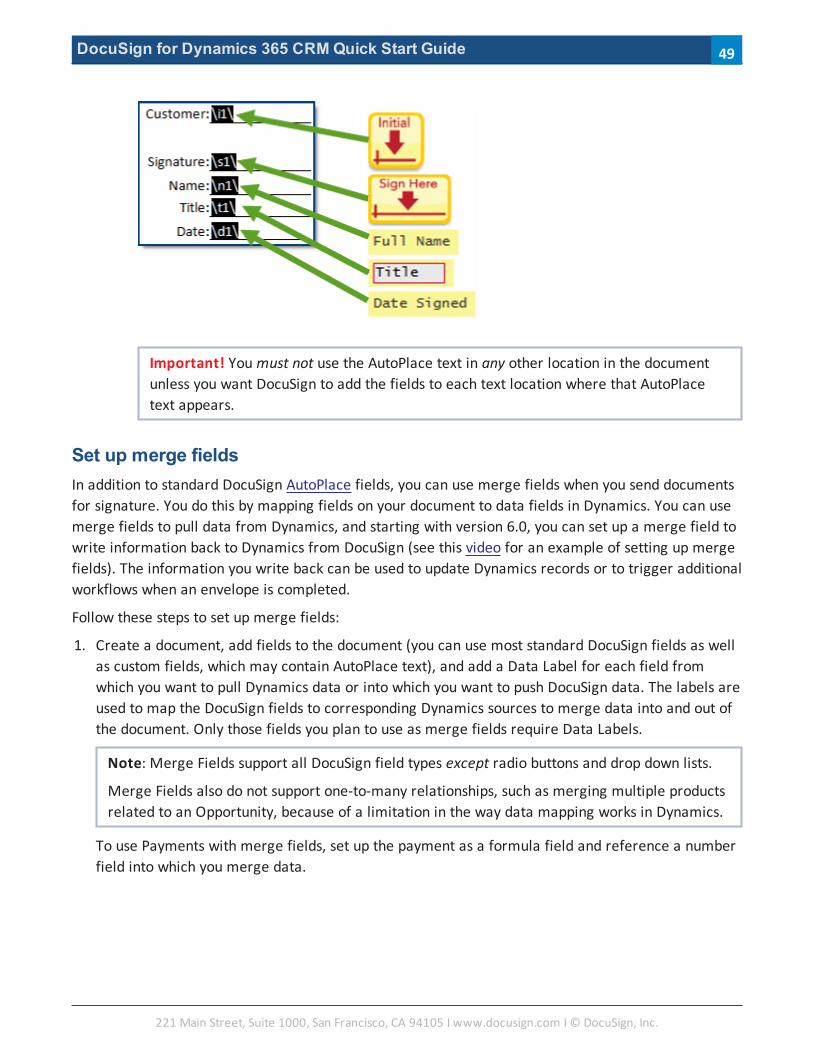
In the following example, AutoPlace text is added to place an initial, signature, name, title, anddate signed tags for recipient 1. The text has been highlighted so it can be viewed.
221 Main Street, Suite 1000, San Francisco, CA 94105 Ι www.docusign.com Ι © DocuSign, Inc.
48
DocuSign for Dynamics 365 CRMQuick Start Guide
Important! Youmust not use the AutoPlace text in any other location in the documentunless you want DocuSign to add the fields to each text location where that AutoPlacetext appears.
Set up merge fieldsIn addition to standard DocuSign AutoPlace fields, you can use merge fields when you send documentsfor signature. You do this by mapping fields on your document to data fields in Dynamics. You can usemerge fields to pull data from Dynamics, and starting with version 6.0, you can set up a merge field towrite information back to Dynamics from DocuSign (see this video for an example of setting up mergefields). The information you write back can be used to update Dynamics records or to trigger additionalworkflows when an envelope is completed.
Follow these steps to set up merge fields:
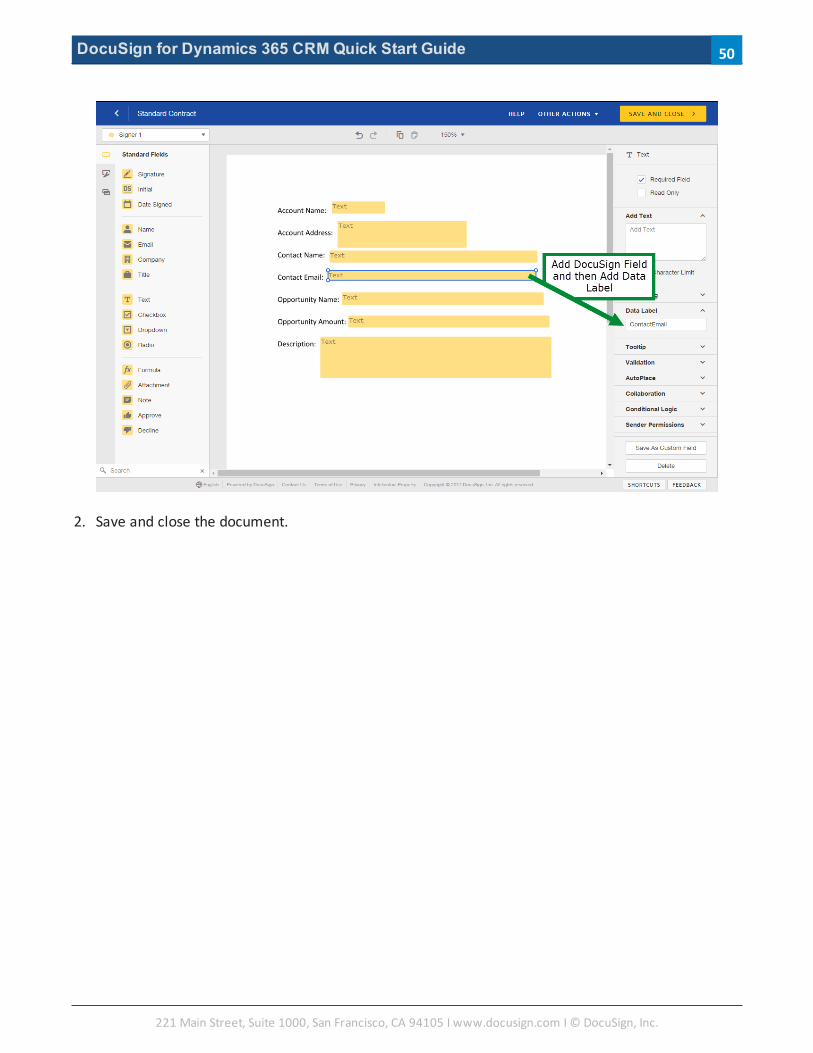
1. Create a document, add fields to the document (you can use most standard DocuSign fields as wellas custom fields, which may contain AutoPlace text), and add a Data Label for each field fromwhich you want to pull Dynamics data or into which you want to push DocuSign data. The labels areused to map the DocuSign fields to corresponding Dynamics sources to merge data into and out ofthe document. Only those fields you plan to use as merge fields require Data Labels.
Note: Merge Fields support all DocuSign field types except radio buttons and drop down lists.
Merge Fields also do not support one-to-many relationships, such as merging multiple productsrelated to an Opportunity, because of a limitation in the way data mapping works in Dynamics.
To use Payments with merge fields, set up the payment as a formula field and reference a numberfield into which you merge data.
221 Main Street, Suite 1000, San Francisco, CA 94105 Ι www.docusign.com Ι © DocuSign, Inc.
49
DocuSign for Dynamics 365 CRMQuick Start Guide
2. Save and close the document.
221 Main Street, Suite 1000, San Francisco, CA 94105 Ι www.docusign.com Ι © DocuSign, Inc.
50
DocuSign for Dynamics 365 CRMQuick Start Guide
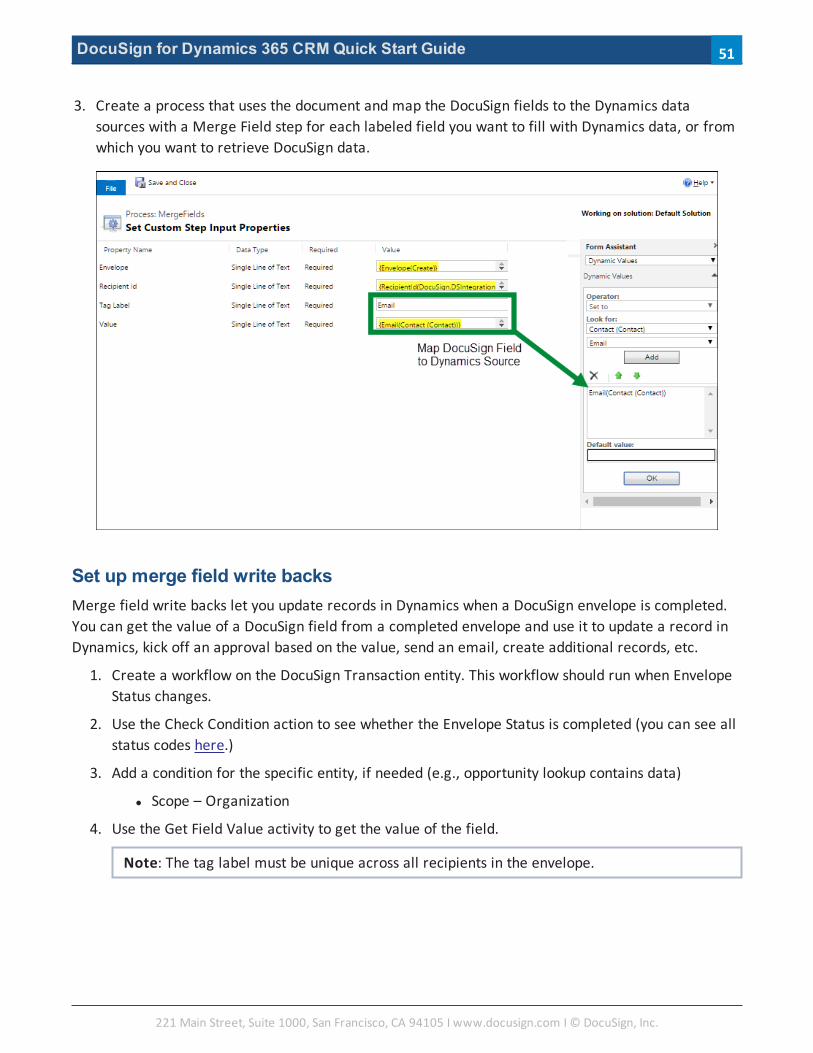
3. Create a process that uses the document and map the DocuSign fields to the Dynamics datasources with a Merge Field step for each labeled field you want to fill with Dynamics data, or fromwhich you want to retrieve DocuSign data.
Set up merge field write backsMerge field write backs let you update records in Dynamics when a DocuSign envelope is completed.You can get the value of a DocuSign field from a completed envelope and use it to update a record inDynamics, kick off an approval based on the value, send an email, create additional records, etc.
1. Create a workflow on the DocuSign Transaction entity. This workflow should run when EnvelopeStatus changes.
2. Use the Check Condition action to see whether the Envelope Status is completed (you can see allstatus codes here.)
3. Add a condition for the specific entity, if needed (e.g., opportunity lookup contains data)
l Scope – Organization
4. Use the Get Field Value activity to get the value of the field.
Note: The tag label must be unique across all recipients in the envelope.
221 Main Street, Suite 1000, San Francisco, CA 94105 Ι www.docusign.com Ι © DocuSign, Inc.
51
DocuSign for Dynamics 365 CRMQuick Start Guide
5. Use Update Record to update the record with the value from Get Field Value.
l The associated record is the relevant lookup, depending on the entity
l Use the appropriate output value based on the data type needed
221 Main Street, Suite 1000, San Francisco, CA 94105 Ι www.docusign.com Ι © DocuSign, Inc.
52
DocuSign for Dynamics 365 CRMQuick Start Guide
FAQAuthor's Note: this content is repeated in an article on Dynamics FAQshttps://support.docusign.com/en/articles/FAQs-related-to-DocuSign-for-Dynamics-CRM-Online. Whenthis content changes, that article should be updated to match.
How will I know when my free account is running low on document transactions?
l DocuSign provides a warning when your free account is running low on transactions.
How can I access my DocuSign account?
l From any entity, in the command bar, click the Go to DocuSign link. The DocuSign webapplication opens in a modal over your Dynamics 365 CRM window.
Why aren't my DocuSign status updates automatically updated in Microsoft Dynamics 365 CRM?
l If you aren't seeing real-time status updates on your DocuSign Transaction status records, openthe DocuSign Admin, and follow the onscreen instructions to authorize access.
Where are completed documents stored?
l By default, completed documents appear in the Notes section as a PDF. Completed documentsare saved in the associated SharePoint folder If the SharePoint integration is enabled.
What DocuSign-related updates are posted to my entity's activity feed?
l There are two different DocuSign transaction status changes that are captured on an entity'sactivity feed. The feed is updated when:
l A document is successfully sent using DocuSign
l When all parties complete signing a DocuSign document
What should I do if I see several login prompts when trying to access CRM records in the DynamicsOnline Outlook Connector?
l Ensure that you add the following sites to your Internet Explorer "Trusted Site" list:
l https://login.live.com
l https://signin.crm.dynamics.com
l https://*.crm.dynamics.com
Do I have to give the other Microsoft Dynamics 365 CRM account users my DocuSign credentialinformation so they can send with DocuSign?
l No. If you created a new account, it is automatically set up to allow other users in your accountto send with DocuSign. If you have a DocuSign account, enable the Account-Wide Rights andSend On Behalf Of Rights (API) features for your account. This allows the other users in youraccount to send with DocuSign.
221 Main Street, Suite 1000, San Francisco, CA 94105 Ι www.docusign.com Ι © DocuSign, Inc.
53
DocuSign for Dynamics 365 CRMQuick Start Guide
Not all my Microsoft Dynamics 365 CRM users have DocuSign accounts. Can they still useDocuSign for Dynamics 365 CRM?
l Your Dynamics 365 CRM users must be members of the DocuSign account specified in theDocuSign Config. When a Dynamics 365 CRM user uses a DocuSign action, the system checks tosee whether that user exists in the specified DocuSign account, using the user's Dynamics emailaddress. If the user does not exist in the DocuSign account, they are directed to the accountadministrator for assistance. See Manage User Access to DocuSign for more information.
It looks like importing DocuSign for Dynamics 365 CRM into my Dynamics 365 CRM instanceoverwrites my custom site map. What should I do?
l There is a known issue in Microsoft such that site map customizations included in a managedCRM solution overwrite the custom SiteMap in a CRM organization. You will have to recreatethe custom SiteMap entities by editing the SiteMap. Please see http://msdn.microsoft.com/en-us/library/gg334430(v=crm.7).aspx for more information.
Will DocuSign for Dynamics 365 CRM work with any display language?
l Yes. The DocuSign package supports all Dynamics display languages. The DocuSign package isEnglish only, but your Dynamics display language can be set to any language. However, aDynamics restriction requires that the Base Language for the Dynamics organization and thePersonal Option Languages setting for the user installing the solution must be set to the samelanguage. Otherwise, you may encounter issues installing DocuSign in your Dynamicsorganization.
Does DocuSign for Dynamics 365 CRM work within Dynamics Business Units?
l Yes. DocuSign for Dynamics supports Business Unit groups. Just be sure to install the solution atthe top of the organization hierarchy, rather than at the Business Unit level. This structureensures that the solution is accessible by all parts of your organization.
Will this solution package work in Microsoft Dynamics on-premise?
l DocuSign for Dynamics 365 CRM supports Microsoft Dynamics Online instances only.
221 Main Street, Suite 1000, San Francisco, CA 94105 Ι www.docusign.com Ι © DocuSign, Inc.
54
DocuSign for Dynamics 365 CRMQuick Start Guide
For More Information or AssistanceFor more information or assistance, visit DocuSign Support, the DocuSign Community, docusign.com, orcontact DocuSign Support.
221 Main Street, Suite 1000, San Francisco, CA 94105 Ι www.docusign.com Ι © DocuSign, Inc.
55