Digital Terrestrial HD Receiver · 2019-05-27 · 1.5 Usage of external USB devices It is...
25
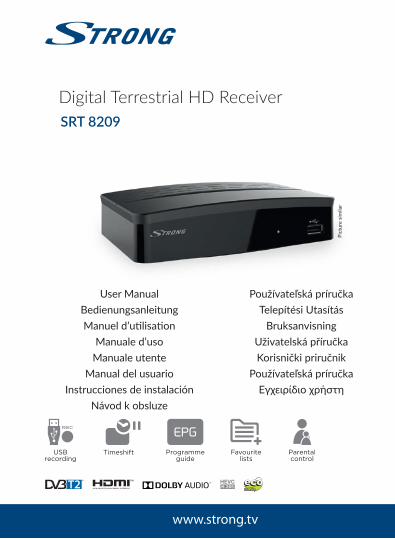
User Manual Bedienungsanleitung Manuel d’ulisaon Manuale d’uso Manuale utente Manual del usuario Instrucciones de instalación Návod k obsluze Používateľská príručka Telepítési Utasítás Bruksanvisning Uživatelská příručka Korisnički priručnik Používateľská príručka Εγχειρίδιο χρήστη Digital Terrestrial HD Receiver SRT 8209 Picture similar
Transcript of Digital Terrestrial HD Receiver · 2019-05-27 · 1.5 Usage of external USB devices It is...
User ManualBedienungsanleitungManuel d’utilisation
Manuale d’usoManuale utente
Manual del usuarioInstrucciones de instalación
Návod k obsluze
Používateľská príručkaTelepítési Utasítás
BruksanvisningUživatelská příručkaKorisnički priručnik
Používateľská príručkaΕγχειρίδιο χρήστη
Digital Terrestrial HD ReceiverSRT 8209
Pict
ure
simila
r
TV/R
FAV
V+V-
GOTO
OK
1 2 3
4 5 6
7 8 9 0
INFO SLEEP
PG-
MENU
P-
P+ EXIT
RECALL
TIMESHIFT
EPG
TEXTSUB
AUDIO
ZOOM ASPECT V.F. TIMER
5 6 7 8
PG+
1 2 3 4
TV/R
FAV
V+V-
GOTO
OK
1 2 3
4 5 6
7 8 9 0
INFO SLEEP
PG-
MENU
P-
P+ EXIT
RECALL
TIMESHIFT
EPG
TEXTSUB
AUDIO
ZOOM ASPECT V.F. TIMER
5 6 7 8
PG+
1 2 3 4
30 Jan 2019 15:03
Supplied by STRONG AustriaRepresented by
STRONG Ges.m.b.H.Franz-Josefs-Kai 1
1010 ViennaAustria
Email: [email protected]
HOTLINE
BG +359 32 [email protected]
AT 0820 400 [email protected]
€ 0,12/Min. österr. Festnetz
DE 0180 501 49 [email protected]
€ 0,14/Min. deutsches Festnetz€ 0,42/Min. max. Mobilfunknetze
+36 1 445 26 [email protected]
PL 801 702 [email protected]
UA +380(44)228 24 [email protected]
FR 0826 029 [email protected]
€ 0,15 par mn poste fixe en France
IT 199 404 [email protected]
Da rete fissa 24,8 cent. al min.12,5 cent. scatto alla rispostaDa rete mobile max 49 cent. al min.15,6 cent. scatto alla risposta
LicensesTHIS PRODUCT IS LICENSED UNDER THE AVC PATENT PORTFOLIO LICENSE FOR THE PERSONAL AND NONCOMMERCIAL USE OF A CONSUMER TO (i) ENCODE VIDEO IN COMPLIANCE WITH THE AVC STANDARD (“AVC VIDEO”) AND/OR (ii) DECODE AVC VIDEO THAT WAS ENCODED BY A CONSUMER ENGAGED IN A PERSONAL AND NON-COMMERCIAL ACTIVITY AND/OR WAS OBTAINED FROM A VIDEO PROVIDER LICENSED TO PROVIDE AVC VIDEO. NO LICENSE IS GRANTED OR SHALL BE IMPLIED FOR ANY OTHER USE. ADDITIONAL INFORMATION MAY BE OBTAINED FROM MPEG LA, L.L.C. SEE HTTP://WWW.MPEGLA.COM
This product contains one or more programs protected under international and U.S. copyright laws as unpublished works. They are confidential and proprietary to Dolby Laboratories. Their reproduction or disclosure, in whole or in part, or the production of derivative works therefrom without the express permission of Dolby Laboratories is prohibited. Copyright 2003-2009 by Dolby Laboratories. All rights reserved.
THIS PRODUCT IS SOLD WITH A LIMITED LICENSE AND IS AUTHORIZED TO BE USED ONLY IN CONNECTION WITH HEVC CONTENT THAT MEETS EACH OF THE THREE FOLLOWING QUALIFICATIONS: (1) HEVC CONTENT ONLY FOR PERSONAL USE; (2) HEVC CONTENT THAT IS NOT OFFERED FOR SALE; AND (3) HEVC CONTENT THAT IS CREATED BY THE OWNER OF THE PRODUCT. THIS PRODUCT MAY NOT BE USED IN CONNECTION WITH HEVC ENCODED CONTENT CREATED BY A THIRD PARTY, WHICH THE USER HAS ORDERED OR PURCHASED FROM A THIRD PARTY, UNLESS THE USER IS SEPARATELY GRANTED RIGHTS TO USE THE PRODUCT WITH SUCH CONTENT BY A LICENSED SELLER OF THE CONTENT. YOUR USE OF THIS PRODUCT IN CONNECTION WITH HEVC ENCODED CONTENT IS DEEMED ACCEPTANCE OF THE LIMITED AUTHORITY TO USE AS NOTED ABOVE.
18 F
eb 2
019
13:3
2
1
TABLE OF CONTENTS1.0 INTRODUCTION 3
1.1 Safety Instructions 31.2 Storage 41.3 Equipment Set-up 41.4 Accessories 41.5 Usage of external USB devices 5
2.0 YOUR RECEIVER 52.1 PIN-CODE DEFAULT: 1234 52.2 Front Panel 52.3 Rear Panel 52.4 Remote Control 62.5 Installing the batteries 62.6 Using the remote control 7
3.0 CONNECTION 73.1 Connecting to a terrestrial antenna 73.2 Connecting to TV with HDMI cable 73.3 Connecting to TV with SCART cable 73.4 Connecting to a Digital Audio Amplifier with S/PDIF 73.5 Connecting to a Digital Audio Amplifier and TV using HDMI 73.6 Connecting to Ethernet 83.7 Connecting a USB storage device 8
4.0 STARTING UP FOR THE FIRST TIME 8
5.0 QUICK GUIDE TO USING YOUR RECEIVER 96.0 OPERATION 9
6.1 Changing channels 96.2 Info Banner 106.3 Selection of audio language 106.4 Teletext 106.5 Subtitles 106.6 Timeshift 106.7 EPG (Electronic Programme Guide) 116.8 Instant Recording 116.9 Sleep 11
7.0 MAIN MENU 117.1 Programme 117.2 EPG (Electronic Programme Guide) 137.3 LCN (Logical Channel Numbering) 137.4 Picture 137.5 Channel Search 147.6 Time 147.7 Option 157.8 System 157.9 USB 16
8.0 TROUBLESHOOTING 179.0 TECHNICAL SPECIFICATIONS 21
SIMPLIFIED EU DECLARATION OF CONFORMITY
Hereby, STRONG declares that the radio equipment type DVB-T2 receiver is in compliance with Directive 2014/53/EU.
The full text of the EU declaration of conformity is available at the following internet address: https://www.strong.tv/en/doc
Subject to alterations. In consequence of continuous research and development technical specifications, design and appearance of products may change. The terms HDMI and HDMI High-Definition Multimedia Interface, and the HDMI logo are trademarks or registered trademarks of HDMI Licensing Administrator, Inc in the United States and other countries. Manufactured under license from Dolby Laboratories. Dolby Audio and the double-D symbol are registered trademarks of Dolby Laboratories. All product names are trademarks or registered trademarks of their respective owners.
© STRONG 2019. All rights reserved.
2
1.0 INTRODUCTION1.1 Safety InstructionsRead all of the instructions before operating the device. Keep these instructions well for later use.�� Only use attachments/accessories specified or provided by the manufacturer (such as the
exclusive supply adapter, battery etc.).�� Please refer to the information on the product enclosure for electrical and safety information
before installing or operating the apparatus.�� To reduce the risk of fire or electric shock, do not expose this apparatus to rain or moisture.�� The ventilation should not be impeded by covering the ventilation openings with items, such as
newspaper, table-cloths, curtains, etc.�� The apparatus shall not be exposed to dripping or splashing and no objects filled with liquids,
such as vases, shall be placed on the apparatus.
�� This mark indicates a risk of electric shock.�� To prevent injury, this apparatus must be securely attached to the floor/wall in accordance with
the installation instructions.�� Danger of explosion if the battery is incorrectly replaced. Replace only with the same or equivalent
types.�� The battery (battery or batteries or battery pack) shall not be exposed to excessive heat such as
sunshine, fire or the like.�� Excessive sound pressure from earphones and headphones can cause hearing loss.
Listening to music at high volume levels and for extended durations can damage one's hearing.�� In order to reduce the risk of damage to hearing, one should lower the volume to a safe,
comfortable level, and reduce the amount of time listening at high levels.�� The mains plug or appliance coupler is used as disconnect device, it shall remain readily operable.
When not in use and during movement, please take care of the power cord set, e.g. tie up the power cord set with cable tie or something like that. It shall be free from sharp edges or similar which can cause abrasion of the power cord set. When put into use again, please make sure the power cord is not damaged. The absence of a light indication on the apparatus does not mean that it is fully disconnected from the mains. To disconnect the apparatus completely, the mains plug must be pulled out.�� Attention should be drawn to environmental aspects of battery disposal.�� No naked flame sources, such as lighted candles, should be placed on the apparatus.
�� To prevent the spread of fire, keep candles or other open flames away from this product at all times.�� Equipment with this symbol is a Class II or double insulated electrical appliance. It has been
designed in such a way that it does not require a safety connection to electrical earth.
Precautions�� Never try to open the device. It is dangerous to touch the inside of the device due to high voltages
and possible electrical hazards. Opening the device will void the warranty of the product. Refer all maintenance or servicing to suitably qualified personnel.�� When you are connecting cables, be sure that the device is disconnected from the mains
supply voltage. Wait a few seconds after switching off the device before you move the device or disconnect any equipment.
3

�� It is a necessity that you only use an approved extension and compatible wiring that is suitable for the electrical power consumption of the installed equipment. Please ensure that the electrical power supply corresponds with the voltage on the electrical identification plate at the back of the device.
Operating Environment�� Do not install this equipment in a confined space such as a bookcase or similar unit.�� Do not use the set near damp, and cold areas, protect the set from overheating.�� Keep away from direct sunlight.�� Do not use the set near dust place.�� Do not place candles near the opening area, to avoid flammable foreign material from entering
the device.,
WEEE DirectiveCorrect Disposal of this product. This marking indicates that this product should not be disposed with other household wastes throughout the EU. To prevent possible harm to the environment or human health from uncontrolled waste disposal, recycle it responsibly to promote the sustainable reuse of material resources. To return your used device, please use the return and collection systems or contact the retailer where the
product was purchased. They can take this product for environmentally safe recycling.
1.2 StorageYour device has been carefully checked and packed before shipping. When unpacking it, make sure that all the parts are included and keep the packaging away from children. We recommend that you keep the carton during the warranty period, to keep your device perfectly protected in the event of repair or warranty.
1.3 Equipment Set-upWe recommend you to consult a professional installer to set up your equipment. Otherwise, please follow the instructions below:�� Refer to the user manual of your TV and your antenna.�� Make sure that the HDMI cable and outdoor components are in a good condition and the HDMI
connections are well shielded and from good quality.This user manual provides complete instructions for installing and using this receiver. The symbols serve as follows.WARNING Indicates warning information.NOTE Indicates any other additional important or helpful information.MENU Represents a button on the remote control or the receiver.
(BOLD CHARACTERS)Move to Represents a menu item within a screen. (Italic characters)
1.4 Accessories�� 1x installation instructions�� 1x remote control�� 2x AAA batteries
4
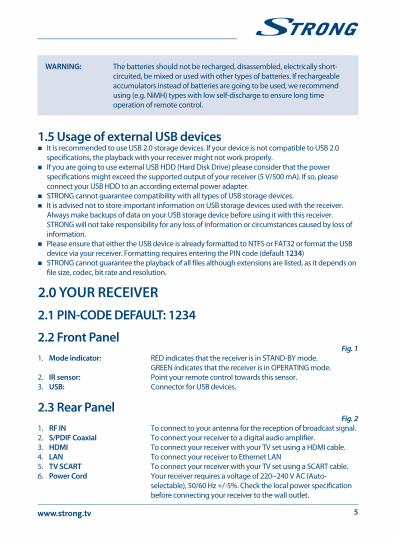
WARNING: The batteries should not be recharged, disassembled, electrically short-circuited, be mixed or used with other types of batteries. If rechargeable accumulators instead of batteries are going to be used, we recommend using (e.g. NiMH) types with low self-discharge to ensure long time operation of remote control.
1.5 Usage of external USB devices�� It is recommended to use USB 2.0 storage devices. If your device is not compatible to USB 2.0
specifications, the playback with your receiver might not work properly.�� If you are going to use external USB HDD (Hard Disk Drive) please consider that the power
specifications might exceed the supported output of your receiver (5 V/500 mA). If so, please connect your USB HDD to an according external power adapter.�� STRONG cannot guarantee compatibility with all types of USB storage devices.�� It is advised not to store important information on USB storage devices used with the receiver.
Always make backups of data on your USB storage device before using it with this receiver. STRONG will not take responsibility for any loss of information or circumstances caused by loss of information.�� Please ensure that either the USB device is already formatted to NTFS or FAT32 or format the USB
device via your receiver. Formatting requires entering the PIN code (default 1234)�� STRONG cannot guarantee the playback of all files although extensions are listed, as it depends on
file size, codec, bit rate and resolution.
2.0 YOUR RECEIVER2.1 PIN-CODE DEFAULT: 1234
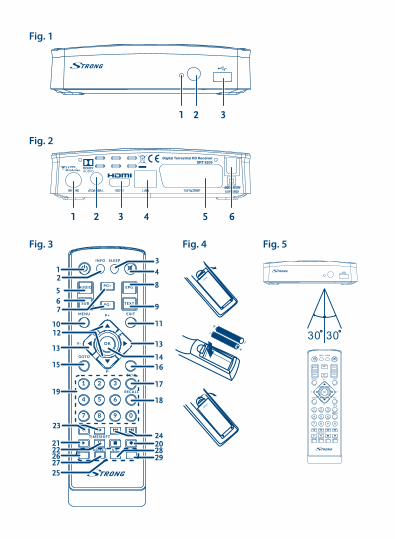
2.2 Front PanelFig. 1
1. Mode indicator: RED indicates that the receiver is in STAND-BY mode. GREEN indicates that the receiver is in OPERATING mode.
2. IR sensor: Point your remote control towards this sensor.3. USB: Connector for USB devices.
2.3 Rear PanelFig. 2
1. RF IN To connect to your antenna for the reception of broadcast signal.2. S/PDIF Coaxial To connect your receiver to a digital audio amplifier.3. HDMI To connect your receiver with your TV set using a HDMI cable.4. LAN To connect your receiver to Ethernet LAN5. TV SCART To connect your receiver with your TV set using a SCART cable.6. Power Cord Your receiver requires a voltage of 220~240 V AC (Auto-
selectable), 50/60 Hz +/-5%. Check the local power specification before connecting your receiver to the wall outlet.
5
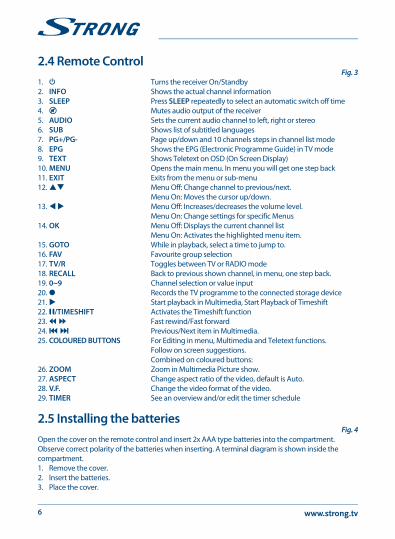
2.4 Remote ControlFig. 3
1. q Turns the receiver On/Standby2. INFO Shows the actual channel information3. SLEEP Press SLEEP repeatedly to select an automatic switch off time4. ! Mutes audio output of the receiver5. AUDIO Sets the current audio channel to left, right or stereo6. SUB Shows list of subtitled languages7. PG+/PG- Page up/down and 10 channels steps in channel list mode8. EPG Shows the EPG (Electronic Programme Guide) in TV mode9. TEXT Shows Teletext on OSD (On Screen Display)10. MENU Opens the main menu. In menu you will get one step back11. EXIT Exits from the menu or sub-menu12. pq Menu Off: Change channel to previous/next.
Menu On: Moves the cursor up/down.13. t u Menu Off: Increases/decreases the volume level.
Menu On: Change settings for specific Menus14. OK Menu Off: Displays the current channel list
Menu On: Activates the highlighted menu item.15. GOTO While in playback, select a time to jump to.16. FAV Favourite group selection17. TV/R Toggles between TV or RADIO mode18. RECALL Back to previous shown channel, in menu, one step back.19. 0~9 Channel selection or value input20. 4 Records the TV programme to the connected storage device21. u Start playback in Multimedia, Start Playback of Timeshift22. 2/TIMESHIFT Activates the Timeshift function23. 5 6 Fast rewind/Fast forward24. 7 8 Previous/Next item in Multimedia.25. COLOURED BUTTONS For Editing in menu, Multimedia and Teletext functions.
Follow on screen suggestions. Combined on coloured buttons:
26. ZOOM Zoom in Multimedia Picture show.27. ASPECT Change aspect ratio of the video, default is Auto.28. V.F. Change the video format of the video.29. TIMER See an overview and/or edit the timer schedule
2.5 Installing the batteriesFig. 4
Open the cover on the remote control and insert 2x AAA type batteries into the compartment. Observe correct polarity of the batteries when inserting. A terminal diagram is shown inside the compartment.1. Remove the cover.2. Insert the batteries.3. Place the cover.
6
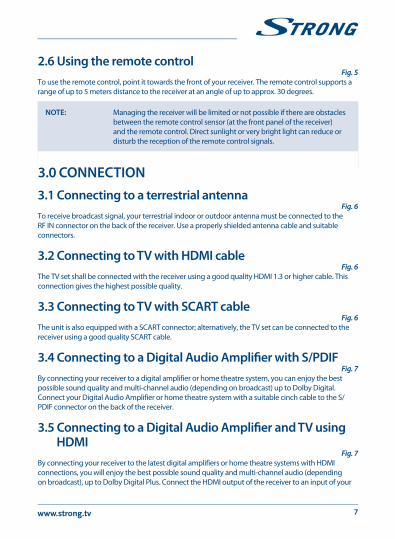
2.6 Using the remote controlFig. 5
To use the remote control, point it towards the front of your receiver. The remote control supports a range of up to 5 meters distance to the receiver at an angle of up to approx. 30 degrees.
NOTE: Managing the receiver will be limited or not possible if there are obstacles between the remote control sensor (at the front panel of the receiver) and the remote control. Direct sunlight or very bright light can reduce or disturb the reception of the remote control signals.
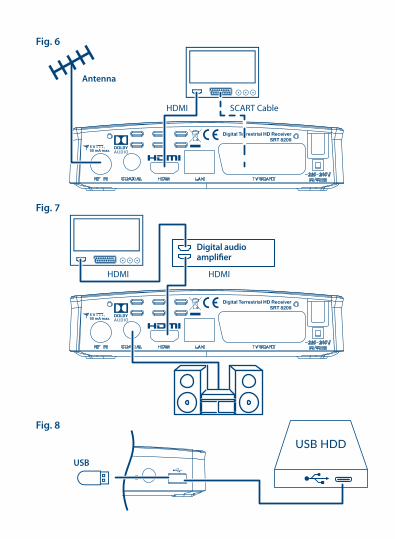
3.0 CONNECTION3.1 Connecting to a terrestrial antenna
Fig. 6To receive broadcast signal, your terrestrial indoor or outdoor antenna must be connected to the RF IN connector on the back of the receiver. Use a properly shielded antenna cable and suitable connectors.
3.2 Connecting to TV with HDMI cableFig. 6
The TV set shall be connected with the receiver using a good quality HDMI 1.3 or higher cable. This connection gives the highest possible quality.
3.3 Connecting to TV with SCART cableFig. 6
The unit is also equipped with a SCART connector; alternatively, the TV set can be connected to the receiver using a good quality SCART cable.
3.4 Connecting to a Digital Audio Amplifier with S/PDIFFig. 7
By connecting your receiver to a digital amplifier or home theatre system, you can enjoy the best possible sound quality and multi-channel audio (depending on broadcast) up to Dolby Digital. Connect your Digital Audio Amplifier or home theatre system with a suitable cinch cable to the S/PDIF connector on the back of the receiver.
3.5 Connecting to a Digital Audio Amplifier and TV using HDMI
Fig. 7By connecting your receiver to the latest digital amplifiers or home theatre systems with HDMI connections, you will enjoy the best possible sound quality and multi-channel audio (depending on broadcast), up to Dolby Digital Plus. Connect the HDMI output of the receiver to an input of your
7
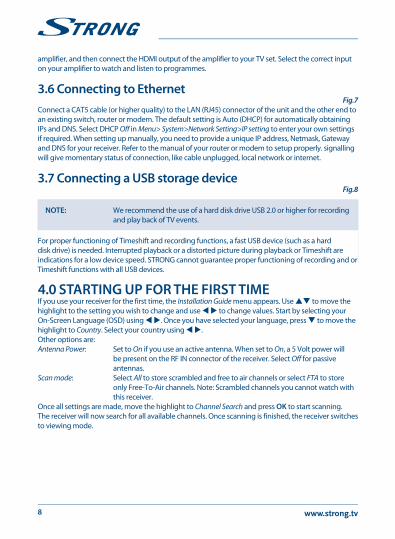
amplifier, and then connect the HDMI output of the amplifier to your TV set. Select the correct input on your amplifier to watch and listen to programmes.
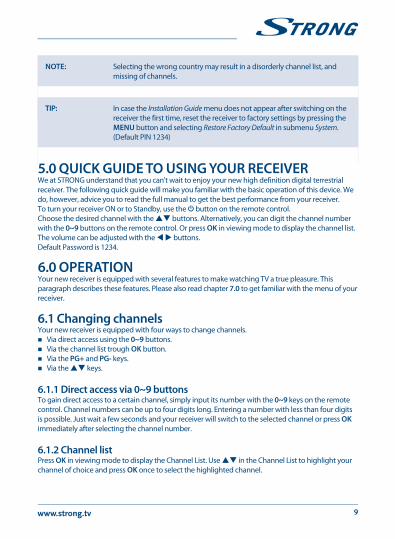
3.6 Connecting to EthernetFig.7
Connect a CAT5 cable (or higher quality) to the LAN (RJ45) connector of the unit and the other end to an existing switch, router or modem. The default setting is Auto (DHCP) for automatically obtaining IPs and DNS. Select DHCP Off in Menu> System>Network Setting>IP setting to enter your own settings if required. When setting up manually, you need to provide a unique IP address, Netmask, Gateway and DNS for your receiver. Refer to the manual of your router or modem to setup properly. signalling will give momentary status of connection, like cable unplugged, local network or internet.
3.7 Connecting a USB storage deviceFig.8
NOTE: We recommend the use of a hard disk drive USB 2.0 or higher for recording and play back of TV events.
For proper functioning of Timeshift and recording functions, a fast USB device (such as a hard disk drive) is needed. Interrupted playback or a distorted picture during playback or Timeshift are indications for a low device speed. STRONG cannot guarantee proper functioning of recording and or Timeshift functions with all USB devices.
4.0 STARTING UP FOR THE FIRST TIMEIf you use your receiver for the first time, the Installation Guide menu appears. Use pq to move the highlight to the setting you wish to change and use t u to change values. Start by selecting your On-Screen Language (OSD) using t u. Once you have selected your language, press q to move the highlight to Country. Select your country using t u.Other options are:Antenna Power: Set to On if you use an active antenna. When set to On, a 5 Volt power will
be present on the RF IN connector of the receiver. Select Off for passive antennas.
Scan mode: Select All to store scrambled and free to air channels or select FTA to store only Free-To-Air channels. Note: Scrambled channels you cannot watch with this receiver.
Once all settings are made, move the highlight to Channel Search and press OK to start scanning.The receiver will now search for all available channels. Once scanning is finished, the receiver switches to viewing mode.
8
NOTE: Selecting the wrong country may result in a disorderly channel list, and missing of channels.
TIP: In case the Installation Guide menu does not appear after switching on the receiver the first time, reset the receiver to factory settings by pressing the MENU button and selecting Restore Factory Default in submenu System. (Default PIN 1234)
5.0 QUICK GUIDE TO USING YOUR RECEIVERWe at STRONG understand that you can't wait to enjoy your new high definition digital terrestrial receiver. The following quick guide will make you familiar with the basic operation of this device. We do, however, advice you to read the full manual to get the best performance from your receiver.To turn your receiver ON or to Standby, use the q button on the remote control.Choose the desired channel with the pq buttons. Alternatively, you can digit the channel number with the 0~9 buttons on the remote control. Or press OK in viewing mode to display the channel list. The volume can be adjusted with the t u buttons.Default Password is 1234.
6.0 OPERATIONYour new receiver is equipped with several features to make watching TV a true pleasure. This paragraph describes these features. Please also read chapter 7.0 to get familiar with the menu of your receiver.
6.1 Changing channelsYour new receiver is equipped with four ways to change channels.�� Via direct access using the 0~9 buttons.�� Via the channel list trough OK button.�� Via the PG+ and PG- keys.�� Via the pq keys.
6.1.1 Direct access via 0~9 buttonsTo gain direct access to a certain channel, simply input its number with the 0~9 keys on the remote control. Channel numbers can be up to four digits long. Entering a number with less than four digits is possible. Just wait a few seconds and your receiver will switch to the selected channel or press OK immediately after selecting the channel number.
6.1.2 Channel listPress OK in viewing mode to display the Channel List. Use pq in the Channel List to highlight your channel of choice and press OK once to select the highlighted channel.
9
TIP: Use t u to toggle between the TV List and Radio List, press FAV for a list of available favourite lists, toggle between them, also with t u.
6.1.3 Using the pq or PG+/PG- keysp switches to the next channel.q switches to the previous channel.PG+ switches to the next 10 channels.PG- switches to the previous 10 channels.
6.2 Info BannerWhile watching TV you can press the INFO button any time to get information about the current channel and event*. Press INFO twice for programme information and some technical details about the current channel.* Event information is displayed when available. Availability depends on broadcast.
6.3 Selection of audio languageSome channels support a choice of audio formats and/or languages. To select another audio stream, press AUDIO in viewing mode. A list with available audio streams will now be displayed. Use pq to select the desired stream and confirm with OK.
6.4 TeletextYour receiver includes a fully featured Teletext. To access Teletext, press the TEXT button in viewing mode and use the 0~9 buttons to input the number of the page you wish to see. The coloured buttons of the remote control allow you to jump to selected pages immediately, as indicated on the bottom of the teletext screen. Use the pq buttons to select one page up or down, use t u buttons to select subpages, if indicated at the bottom of the screen. Press EXIT or TEXT to get back to viewing mode.
6.5 SubtitlesSome channels support a choice of subtitle languages. Press SUB in viewing mode to display a list of available subtitle languages. Select your subtitle of choice with pq and press OK to confirm. Press EXIT to leave without making changes.
6.6 TimeshiftTime Shift allows you to pause live broadcasts and resume playback later. Press 2/TIMESHIFT in viewing mode to activate this mode. On screen will appear a message {Entering Timeshift and picture will pause. Press u to resume Time shifted playback. A time banner will show, to indicate the time offset from live TV. Press EXIT to remove the banner. Use 5 FF] for Fast rewind/Fast forwards. Press 3 to return to live TV.
10

NOTE: Timeshift needs a connected USB storage device with sufficient free space and sufficient speed in order to work properly.
6.7 EPG (Electronic Programme Guide)The Electronic Programme Guide is a very useful function that allows you to view event schedules and information and to mark programmes for recording. To access the EPG, press the EPG button in viewing mode. Use t u to select the desired channel and pq to select the desired event. Use EXIT to quit the detailed information screen. Press OK to book a desired event automatically. It is possible to change the options manually. Make sure to have an HDD device connected, and select Record at the Mode option. Confirm with OK. Use the COLOUR BUTTONS to add, edit or delete an entry manually.See chapter 7.2 for more detailed information.
NOTE: Availability of EPG data depends on broadcast.
6.8 Instant RecordingYour new receiver allows you to make an instant recording of the programme you are watching. Simply press 4 to start the recording.During the recording a recording sign will be shown on the upper left of your TV screen. To stop the recording, press 3. Select Yes and press OK again to stop the recording.* Please connect a USB storage device with sufficient free space before you start a recording.
6.9 SleepPress SLEEP repeatedly to select an automatic switch off time, at which the unit will go to standby. Default is OFF.
7.0 MAIN MENUThe main menu gives you access to settings and multimedia functions. To access the main menu, press MENU in viewing mode. The main menu consists of the following sub menus: Programme, Picture, Channel Search, Time, Option, System and USB. Throughout the main menu, MENU or EXIT can be used to get back to the previous screen. Use t u and OK to select or to change settings. Use the button suggestions at the bottom of the screen available for certain functions. For some menu items a valid Password it is necessary to access the item. Default Password is 1234.
7.1 ProgrammeProgramme EditTo access this menu, you must enter a valid Password. The procedures are equal for the DVBT TV List and DVBT Radio List. Use t u to change between the TV and Radio lists.
11
NOTE: For successful editing of channel list, switch Off LCN function. See ch. 7.3
Moving channelsUse pq to select a channel and press RED to select it to be moved. Now you can move the selected channel up or down inside the channel list by using pq. When the channel is on the position of your choice, press OK again. The channel is now fixed on its new position. When all changes have been made, press EXIT. A saving banner will pop up.
Skipping channelsChannels marked with Skip will be skipped when zapping channels with the pq buttons. The channels will still be available from the channel list.Use pq to select a channel and press GREEN to mark or unmark it for skipping. Channels set for skipping will be marked with the 9 symbol. When all changes have been made, press EXIT. A Saving banner will pop up.
Locking channelsLocked channels can only be watched after entering the password. (DEFAULT PASSWORD: 1234)Press pq to select a channel and press YELLOW to lock or unlock it. You are asked to enter the PIN code. Locked channels will be marked with the symbol. Locking/unlocking multiple channels in one session is possible. When all changes have been made, press EXIT. A Saving banner will pop up.
DeleteUse pq to highlight a channel and press BLUE to mark it for deletion. When you have marked the channel you wish to delete, a confirmation banner will be displayed. Select OK to delete the marked channel or Exit to cancel. Press EXIT after finishing.
NOTE: Deleted channels can only be retrieved if you do a frequency scan in the Channel Search menu again.
Adding channels to favourite listsChannels from the can be added to up to 4 different favourite groups. Press FAV in Programme Edit to access the function. Use pq to select a channel you wish to add to a favourite group. When the highlight is on the channel of your choice, press FAV. A Favourite Type can be selected from the pop-up list. Use pq to select the favourite list you wish to add the channel to and press OK, press EXIT to finalize the process. Favourite channels will be marked with a star symbol. When all changes have been made, press EXIT. A Saving banner will pop up.To de-select a channel from a Favourite list, repeat the above procedure, but select Disable from the pop-up list.
RenameUse pq to select a channel you wish to rename. Then press Recall. A pop-up keyboard will show on screen. Use t u pq to select characters/functions and enter them with OK. When you have finished editing, select OK to enter the changes. When all changes have been made, press EXIT.
12
7.2 EPG (Electronic Programme Guide)The Electronic Programme Guide is a very useful function that allows you to view event schedules and programme information and to mark events/movies for recording. To access the EPG, press the EPG button in viewing mode or select it from the Main menu in the Programme section. Use t u to select a channel and pq to select an event. Detailed information of the selected event will show in the right-hand window. If more than one information page is available, use YELLOW and/or BLUE to access it. To mark the event for recording, press OK. A pop-up entry field will appear. Check if the entry is as you wished, all items can be changed if needed. For recording it is important to change the Mode from View to Record, otherwise, the unit will only wake up at the selected time. Press OK to confirm the timer for a selected event. The Schedule overview will show. Use the suggested buttons at the bottom of the screen to Add manually, Edit, or Delete a timer.
NOTE: Availability of EPG data depends on broadcast.
NOTE: An event can only be recorded if a suitable USB device is connected.
7.3 LCN (Logical Channel Numbering)If LCN (Logical Channel Numbering) is activated and an LCN signal is provided by the broadcaster, channels will be stored in a broadcaster defined order. Set LCN to On to activate broadcaster defined channel numbering or Off to store channels in found order. This function only applies when a new channel search is performed.
NOTE: For successful editing of channel list (see ch 7.1), switch Off LCN function.
7.4 PictureUse this menu to match your receiver to your TV set.The following settings are available:Aspect Ratio: Select the aspect ratio that matches your TV. This There is either a 4:3 or a 16:9
possibility. Select in combination the preferred conversion method how to show a 16:9 programme on a 4:3 TV, or a 4:3 programme on a 16:9 TV. The options are:
Auto In most cases this default setting should suffice, but it can be changed to cope with broadcast errors or personal taste.
4:3 Letterbox The full 16:9 programme will be displayed on your 4:3 TV set with black bars above and below the picture
4:3 Pan&Scan A centre cut-out of the 16:9 programme will be displayed full-screen on your 4:3 TV, missing content to the left and right.
4:3 Full A 16:9 programme will be compressed sideways on a 4:3 TV, to show a full picture without any black bars
16:9 widescreen A 4:3 programme will be show full screen, with sideways stretched content.
13
16:9 Pillarbox A 4:3 programme will be shown normally, but with black bars to the left and right.
16:9 Pan&Scan A 4:3 programme will be shown as a centre blow up to fill the whole screen, missing content to the left, right, top and bottom of the programme.
16:9 Pillarbox 16:9 Pan&Scan broadcasts in full screen on a 4:3 TV. Letterbox: black bars on top and bottom
of the picture on a 4:3 TV. Combined: shows a mix in-between. Ignore: shows as it is.
Resolution If the video quality does not appear correctly, change the setting. These settings match the most common settings for HDMI.
576i: For analogue TVs (on Scart connection).576p: For digital SD TVs (some digital TVs do not support this mode).720p: For digital HD TVs (on HDMI connection).1080i: For digital HD TVs (on HDMI connection).1080p(50Hz): For digital HD TVs (on HDMI connection).Auto: The best possible resolution available will be auto negotiated by between
TV and receiver (‘handshake') when using a modern digital HD TV when connected with an HDMI cable.
TV Format Options are PAL and NTSC. For European broadcasts, the TV format is PAL (Default). The setting is most important for TVs connected via Scart cable. Using NTSC might deliver black& white pictures.
7.5 Channel SearchAuto Search This menu allows you to search for channels from all available frequencies
for your selected region automatically. Be aware that all previous installed channels and favourite list(s) will be deleted. The new-found channels will be installed in the channel list and afterwards you can create a new favourite list if you like. Press OK to start the scan.
Manual Search Select a particular channel to do a search on just one (known) frequency. Press OK to start the scan. The signal quality bar might be useful to check if the frequency is indeed in use.
Country Select the correct country where this receiver is used. If failing to do so, may result in that channels appear randomly in the channel list, instead of a more logical order.
Antenna Power Set to On if you use an active antenna. When set to On, 5 V will be present at the RF in connector of the receiver. Select Off for passive antennas.
Scan Mode Select between FTA (Free-To-Air), which will only install Free-to-Air channels or All, which will install all found channels, even if they are scrambled. Then select Auto Search or Manual Search and press OK to start scanning.
7.6 TimeSet up your time zone for clock/time in your menu and system.Time Offset The GMT time can automatically be determined from the incoming TV
broadcast if set to Auto. The time zone is determined from the Country setting in the Channel Search menu. If set to Manual, you can change the Time zone yourself in the Time Zone option. Default is Auto.
14

Time Zone If the correct time cannot be obtained from the incoming TV broadcast, change the Time Zone setting yourself.
Example: in case of Daylight Saving Time.Auto Standby As a power saving feature, the unit will switch to Standby automatically, if no
command from the remote control is received for the set time. Options are 1 Hour, 2 Hour, 3 Hour, Off. Default is 3 hours.
Power On/Off You can set a time to automatically switch On and/or Off the unit every day. The unit will start on the last watched channel.
NOTE: Set Auto Standby function to Off.
Power On Set to Enable if you want to use the automatically switch On function.Power On Time Enter the switch On time with the numeric buttons on the remote control.Power Off Set to Enable if you want to use the automatically switch Off function.Power Off Time Enter the switch Off time with the numeric buttons on the remote control.
7.7 OptionSet up the options for languages.OSD Language Use t u to select the language for the On-Screen Display.Subtitle Language Set your preference for the subtitle language priority, if available in broadcast.Audio Language Set your preference for the audio language priority, if available in broadcast.Digital Audio Options are: Off, PCM, RAW HDMI On, RAW HDMI Off PCM: All audio will be down mixed to a Stereo format on HDMI and S/PDIF
outputs. RAW HDMI On: Raw audio information will be passed on to the HDMI
output, without down mixing to PCM Stereo, to be passed on to and processed by a digital amplifier or home-theatre set to produce multi-channel audio.
RAW HDMI Off No audio will be forwarded to the outputs.Audio Description AD. Useful for the visual impaired. If you like to have support of an audio track
that describes the content on screen, select the volume from the AD audio track. Default is Off.
NOTE: Audio Description depends on the broadcaster inserting such an accompanying audio track.
7.8 SystemSetup some system own features for maintenance, network and protection.Parental Guidance Programmes with a Parental Guidance Rating can be blocked from viewing
and opened only with a Password. To setup this feature, enter your password first. Then select an age, above which the channel must be protected. Options are: Off, 1 to 18. Default is Off.
Set password To set another password than the default one, enter the old 4-digit password first, then enter a new password and confirm it, by entering it again.
15
Restore Factory Default Reset your receiver to the default factory settings. Sometimes useful if the unit suddenly behaves in an unexpected manner, e.g. after a power failure.
Select System then Restore Factory Default in the main menu and press OK to select. Enter your password or the DEFAULT password: 1234 and press OK to confirm. Note: This option will delete all your channels, Favourite lists and settings. The receiver will reboot and start with the initial Installation menu.
Information This submenu shows receiver specific information such as hardware and software version. Please have the Information screen on hand when you call our hotline. The person who answers your call might ask for the information given in this screen.
Software Update This feature allows you to update the receiver software via the USB port. When a new software is available for your receiver, it can be downloaded from our website. Place the software file (unzipped) in the root directory of your USB storage device (HDD, memory stick etc.) and connect the device to the USB port of the receiver. First a message box will appear that a USB device is found. Then go to the System menu and select the Software Update option. Select the correct file in the list. Press OK to start update. When ready, the unit will reboot automatically.
Recall List If set to On, a list of last watched channels will be displayed in viewing mode, when the RECALL button on the remote control is pressed. Choose the channel to go back to and press OK. If set to Off, the RECALL button will instantly return to the previous watched channel.
Network Setting Setup your Network connection to use the Network Apps. Link Type is LAN, for use with a wired network to a router/modem on the RJ45
Ethernet port. IP Setting Press OK to open the submenu. DHCP If DHCP is set to On, the unit will auto-negotiate with the router/
modem for the correct IP settings, assuming the router/modem also being set to DHCP On. This is the common default. If you like to use different IP settings, switch DHCP to Off and to Edit, press GREEN and enter the required numbers. However, some technical knowledge about TCP/IP protocols is required.
MAC Address Information about the unit's unique identification to the LAN port.Status Information about the current status of your Ethernet connection.
7.9 USBMultimediaThis function allows playback of different kind of files from the connected USB storage device.Select Music and press OK to playback MP3 files from your folders. Select Photo and press OK to view your favourite pictures in JPG format. Select Movie and press OK to enter to play a number of video formats. Select PVR and press OK, and select the HBPVR folder to show the recordings you've made. The unit supports USB HDD devices with FAT32 format. However, it is possible to use already on a PC formatted NTFS HDD device. Make sure your USB device is formatted correctly. Use the On-Screen button suggestions and the multimedia buttons like RECALL (Return), u, 3 and 2 on the remote control to work inside the multi media player.
16
Photo Configure Setup your preferences for Photo viewing. Press u and photos will be shown in an automatic slide mode.
Slide Time Time between advancing to the next photo.Slide Mode Many different modes can be used, for dissolving to the next photo, defined
by a number. Also, it is possible to select Random order to view the photos.Movie Configure For Subtitle use in the movie player, setup the features here.Subtitle Specific Select either normal, big or small for Subtitle size.Subtitle BG Select the preferred colour of the Subtitle Background.Subtitle FontColor Select the preferred colour of the Subtitle characters.PVR Configure For this option to work, you must have a USB device connected.Record Device If your USB device should have more than 1 partition, select the one to use.Timeshift Size Select the amount of free space, to be assigned to the Timeshift function. Default is 1GB, which would account for around 1 hour of video, depending
on the video format and resolution.
NOTE: Below this setting information is shown about the current partition or device.
Format The use of a USB Hard Disk Drive, already formatted in a PC with FAT32 or NTFS is recommended.
WARNING: The format function will delete all data and information from your USB device or selected partition. Manufacturer will not take any responsibility for damaged or lost data on the USB device.
If you have multiple partitions on your storage device, select the partition you would like to format and press OK to continue. A confirmation banner will now be displayed. Press OK to start formatting (or EXIT to cancel it). The format procedure will take some time, depending on the size of the used storage device. At the end of the process, the “Formatting is complete” message will appear. Press EXIT twice to exit the menu.Network Apps Note: These simple network applications will only work if you have set up the
Network Setting in the System menu and have a working connection to the internet. (Status: Internet)
Follow the On-Screen button suggestions to navigate through and edit the Apps.
8.0 TROUBLESHOOTINGThere may be various reasons for abnormal operation of the receiver. Check the receiver according to the procedures shown below. If the receiver does not work properly after checking it, please contact your dealer or the local Service Hotline or send email to our Support via www.strong.tv. Do NOT try to open or disassemble the receiver. It may cause a dangerous situation and warranty will be void.
17

Problem Possible cause What to do
The LED/standby indicator and LED display (if available on your receiver) are not switching on.
The power cable or power adapter is unplugged.
Check that the power cable or power adapter is plugged to the wall outlet.
If your receiver has a main power switch: The main power switch on the rear panel is set to OFF.
Switch the main power on.
The electrical outlet may be damaged.
Check with another device if the electrical outlet is supplied.
No signal.
The receiver is not connected to the signal source (DVB-C) or to the antenna (terrestrial or satellite antenna).
Check the lead of the antenna or cable.
Check that the coaxial cable is correctly fitted to the antenna input on the receiver.
Damaged or defective connectors (IEC-connectors (DVB-T2).
Check connectors for visible damage.
The antenna (terrestrial or satellite) is damaged.
Check the antenna for visible damage.
Out of digital signal area.Check with your dealer or contact your local Service.
An active antenna requires that the antenna power/external power is switched ON.
Switch the antenna power of the receiver ON/connect an external power source.
Wrong direction of the antenna.
Check the signal strength and quality and adjust your antenna correctly, or contact your local Service.
Multiswitch is defective or power cable or power adapter of Multiswitch is unplugged.
Check that the power cable or power adapter of Multiswitch is plugged to the wall outlet. Contact your local Service.
The picture and sound remain frozen, or macro blocks or similar distortion are visible on the screen.
The transmission signals are too weak or have reflections/interference.The antenna is not properly adjusted.
Press the INFO key on the remote control 3x to call up signal bars to visually assess signal strength and signal quality (both parameters should be visible in the last third of the infobars). Contact your local Service.
18
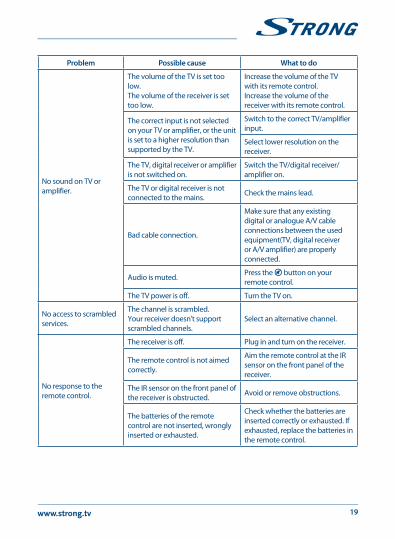
Problem Possible cause What to do
No sound on TV or amplifier.
The volume of the TV is set too low.The volume of the receiver is set too low.
Increase the volume of the TV with its remote control.Increase the volume of the receiver with its remote control.
The correct input is not selected on your TV or amplifier, or the unit is set to a higher resolution than supported by the TV.
Switch to the correct TV/amplifier input.
Select lower resolution on the receiver.
The TV, digital receiver or amplifier is not switched on.
Switch the TV/digital receiver/amplifier on.
The TV or digital receiver is not connected to the mains.
Check the mains lead.
Bad cable connection.
Make sure that any existing digital or analogue A/V cable connections between the used equipment(TV, digital receiver or A/V amplifier) are properly connected.
Audio is muted.Press the ! button on your remote control.
The TV power is off. Turn the TV on.
No access to scrambled services.
The channel is scrambled. Your receiver doesn't support scrambled channels.
Select an alternative channel.
No response to the remote control.
The receiver is off. Plug in and turn on the receiver.
The remote control is not aimed correctly.
Aim the remote control at the IR sensor on the front panel of the receiver.
The IR sensor on the front panel of the receiver is obstructed.
Avoid or remove obstructions.
The batteries of the remote control are not inserted, wrongly inserted or exhausted.
Check whether the batteries are inserted correctly or exhausted. If exhausted, replace the batteries in the remote control.
19
20
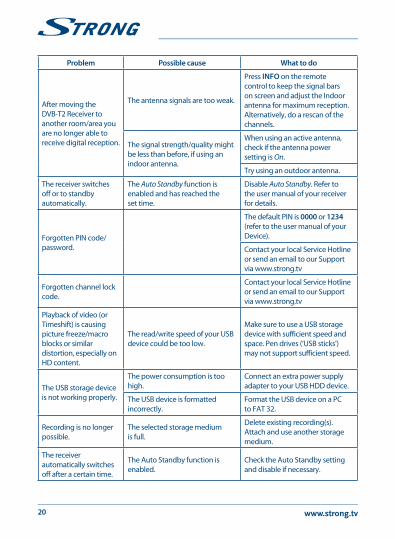
Problem Possible cause What to do
After moving the DVB-T2 Receiver to another room/area you are no longer able to receive digital reception.
The antenna signals are too weak.
Press INFO on the remote control to keep the signal bars on screen and adjust the Indoor antenna for maximum reception. Alternatively, do a rescan of the channels.
The signal strength/quality might be less than before, if using an indoor antenna.
When using an active antenna, check if the antenna power setting is On.
Try using an outdoor antenna.
The receiver switches off or to standby automatically.
The Auto Standby function is enabled and has reached the set time.
Disable Auto Standby. Refer to the user manual of your receiver for details.
Forgotten PIN code/password.
The default PIN is 0000 or 1234 (refer to the user manual of your Device).
Contact your local Service Hotline or send an email to our Support via www.strong.tv
Forgotten channel lock code.
Contact your local Service Hotline or send an email to our Support via www.strong.tv
Playback of video (or Timeshift) is causing picture freeze/macro blocks or similar distortion, especially on HD content.
The read/write speed of your USB device could be too low.
Make sure to use a USB storage device with sufficient speed and space. Pen drives (‘USB sticks') may not support sufficient speed.
The USB storage device is not working properly.
The power consumption is too high.
Connect an extra power supply adapter to your USB HDD device.
The USB device is formatted incorrectly.
Format the USB device on a PC to FAT 32.
Recording is no longer possible.
The selected storage medium is full.
Delete existing recording(s).Attach and use another storage medium.
The receiver automatically switches off after a certain time.
The Auto Standby function is enabled.
Check the Auto Standby setting and disable if necessary.
21
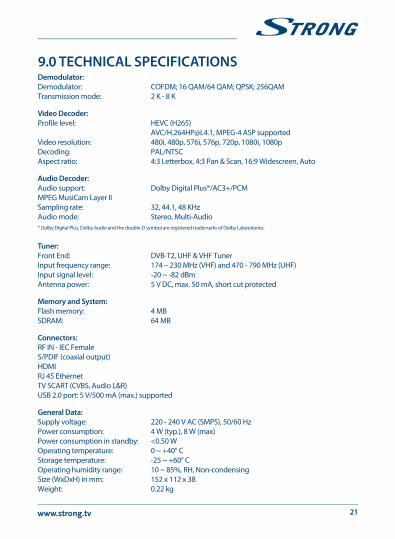
9.0 TECHNICAL SPECIFICATIONSDemodulator:Demodulator: COFDM; 16 QAM/64 QAM; QPSK; 256QAMTransmission mode: 2 K - 8 K
Video Decoder:Profile level: HEVC (H265) AVC/[email protected], MPEG-4 ASP supportedVideo resolution: 480i, 480p, 576i, 576p, 720p, 1080i, 1080pDecoding: PAL/NTSCAspect ratio: 4:3 Letterbox, 4:3 Pan & Scan, 16:9 Widescreen, Auto
Audio Decoder:Audio support: Dolby Digital Plus*/AC3+/PCMMPEG MusiCam Layer IISampling rate: 32, 44.1, 48 KHzAudio mode: Stereo, Multi-Audio* Dolby Digital Plus, Dolby Audio and the double-D symbol are registered trademarks of Dolby Laboratories.
Tuner:Front End: DVB-T2, UHF & VHF TunerInput frequency range: 174 – 230 MHz (VHF) and 470 - 790 MHz (UHF)Input signal level: -20 ~ -82 dBmAntenna power: 5 V DC, max. 50 mA, short cut protected
Memory and System:Flash memory: 4 MBSDRAM: 64 MB
Connectors:RF IN - IEC FemaleS/PDIF (coaxial output)HDMIRJ 45 EthernetTV SCART (CVBS, Audio L&R)USB 2.0 port: 5 V/500 mA (max.) supported
General Data:Supply voltage: 220 - 240 V AC (SMPS), 50/60 HzPower consumption: 4 W (typ.), 8 W (max)Power consumption in standby: <0.50 WOperating temperature: 0 ~ +40° CStorage temperature: -25 ~ +60° COperating humidity range: 10 ~ 85%, RH, Non-condensingSize (WxDxH) in mm: 152 x 112 x 38Weight: 0.22 kg