
Academic Project Report Open source - ΤΕΙ...
66
Academic Project Report Open source Subject : Establishment of a secured network Podhajski Pawel Tinti Vinicius Vauvarin Charles Aiginitis Nikolaos-Stylianos Altaher Ahmed Broi Julien Fernandez Gonzalez Pedro
Transcript of Academic Project Report Open source - ΤΕΙ...
Academic Project Report
Open source
Subject : Establishment of a secured network
Podhajski Pawel
Tinti Vinicius
Vauvarin Charles
Aiginitis Nikolaos-Stylianos
Altaher Ahmed
Broi Julien
Fernandez Gonzalez Pedro
Open Source Project
Wireless Network and Security Project Report - 2 -
Summary Presentation and organisation ....................................................................................................... - 6 -
Project definition ................................................................................................................... - 6 -
Objectives and constraints ..................................................................................................... - 6 -
Team Organization ................................................................................................................. - 7 -
Global Planning .......................................................................................................................... - 7 -
Validation meeting ..................................................................................................................... - 8 -
Architecture (Charles) .................................................................................................................... - 9 -
Topology .................................................................................................................................... - 9 -
Vlans and Zones ......................................................................................................................... - 9 -
Policies ...................................................................................................................................... - 9 -
Firewall .................................................................................................................................... - 12 -
Definition ............................................................................................................................. - 12 -
Pfsense ................................................................................................................................ - 12 -
How does it work? ............................................................................................................... - 12 -
Stateful Firewall ................................................................................................................... - 12 -
Network Rules ...................................................................................................................... - 13 -
NAT and Routing .................................................................................................................. - 14 -
DHCP Relay .............................................................................................................................. - 16 -
DNS.......................................................................................................................................... - 16 -
Project Management ............................................................................................................... - 17 -
Risk analysis ......................................................................................................................... - 17 -
Schedule and delays ............................................................................................................. - 17 -
LDAP, Samba, GroupWare (Pedro and Julien) ............................................................................... - 19 -
Presentation of the technologies ............................................................................................. - 19 -
LDAP .................................................................................................................................... - 19 -
Samba .................................................................................................................................. - 19 -
GroupWare .......................................................................................................................... - 19 -
Software chosen .................................................................................................................. - 19 -
Software finally used ............................................................................................................ - 19 -
Project management ................................................................................................................ - 20 -
Risk analysis ......................................................................................................................... - 20 -
Scheduling ........................................................................................................................... - 21 -
Problems .............................................................................................................................. - 22 -

Open Source Project
Wireless Network and Security Project Report - 3 -
Technical information about SME ............................................................................................ - 23 -
Introduction ......................................................................................................................... - 23 -
Installation ........................................................................................................................... - 23 -
Configuration screen ............................................................................................................ - 24 -
Global configuration ............................................................................................................. - 25 -
Configuration and population of LDAP under SME ................................................................ - 25 -
Configuration of Samba under SME ...................................................................................... - 27 -
Configuration of Horde (mail) under SME ............................................................................. - 28 -
Configuration of FTP under SME ........................................................................................... - 29 -
Configuration of I-bays ......................................................................................................... - 30 -
Our configuration ..................................................................................................................... - 31 -
Conclusion ............................................................................................................................... - 33 -
Proxy and Monitoring (Vinicius) ................................................................................................... - 34 -
Proxy ....................................................................................................................................... - 34 -
Introduction ......................................................................................................................... - 34 -
Technology and requirements .............................................................................................. - 34 -
Technical study .................................................................................................................... - 34 -
Configuration and explanation ............................................................................................. - 35 -
Problems and delays ............................................................................................................ - 35 -
Modifications ....................................................................................................................... - 36 -
Conclusions .......................................................................................................................... - 36 -
Monitoring ............................................................................................................................... - 36 -
Introduction ......................................................................................................................... - 36 -
Technology and requirements .............................................................................................. - 36 -
Technical study .................................................................................................................... - 37 -
Problems and delays ............................................................................................................ - 37 -
Modifications ....................................................................................................................... - 37 -
Conclusions .......................................................................................................................... - 37 -
General schedule ..................................................................................................................... - 38 -
Original schedule.................................................................................................................. - 38 -
Final Schedule ...................................................................................................................... - 38 -
Wifi And Radius (Ahmed and Nikolaos - Stylianos) ....................................................................... - 39 -
Introduction ............................................................................................................................. - 39 -
Objectives ................................................................................................................................ - 39 -
Open Source Project
Wireless Network and Security Project Report - 4 -
Wifi Part (Ahmed) .................................................................................................................... - 40 -
Networking diagram ............................................................................................................. - 40 -
Executing the task: ............................................................................................................... - 40 -
Wireless site survey: ............................................................................................................. - 40 -
Radius (Nikolaos - Stylianos) ........................................................................................................ - 41 -
Introduction ............................................................................................................................. - 41 -
Basic Requirements.................................................................................................................. - 41 -
What is RADIUS Server ? .......................................................................................................... - 41 -
Scope ....................................................................................................................................... - 41 -
Risk Analysis ............................................................................................................................. - 42 -
Why FreeRadius ? .................................................................................................................... - 43 -
Technical Approach .................................................................................................................. - 44 -
Why AES ? ................................................................................................................................ - 47 -
Why OpenSSL? ......................................................................................................................... - 47 -
X.509 .................................................................................................................................... - 47 -
Technical study ........................................................................................................................ - 48 -
Step By Step Configuration ....................................................................................................... - 48 -
RADIUS................................................................................................................................. - 48 -
Problems - Project management- Delays .............................................................................. - 52 -
Modifications-Conclusion ..................................................................................................... - 52 -
IPBX and VPN ............................................................................................................................... - 53 -
Presentation of technologies.................................................................................................... - 53 -
VoIP ..................................................................................................................................... - 53 -
VPN ...................................................................................................................................... - 53 -
Software chosen ...................................................................................................................... - 54 -
Project management ................................................................................................................ - 54 -
Project description ................................................................................................................... - 55 -
IPBX ..................................................................................................................................... - 55 -
VPN ...................................................................................................................................... - 56 -
Connecting VPN clients with IPBX ......................................................................................... - 56 -
Summary ................................................................................................................................. - 57 -
Radius (Nikolaos - Stylianos) ........................................................................................................ - 58 -
Appendix ................................................................................................................................. - 58 -
References ............................................................................................................................... - 66 -

Open Source Project
Wireless Network and Security Project Report - 5 -
Sites ..................................................................................................................................... - 66 -
Books ................................................................................................................................... - 66 -
Open Source Project
Wireless Network and Security Project Report - 6 -
Presentation and organisation
Project definition
The main goal of this project is the design and realise a complete and secured enterprise Network. It
will organized in four main parts:
- Part 1 : Design of the network, research, feasibility - Part 2 : Implementation, Configuration, Testing - Part 3 : Audit by an other team (Architecture, security…) - Part 4 : Final defence
This report is about the first part, you can find there the objectives of the project, the organization,
the planning and the design of our network with the justification of the choice we have made.
Objectives and constraints
The complete design and architecture has to be made by the team, but we have some global
requirements to ensure. First of all, the main concept is to use only open source software and
operating system.
What does open source mean? It’s a free software which has its entire source code available for
everybody and anybody can redistribute it.
Of course this kind of applications has the main advantage of being free and you don’t have to pay a
licence. But, the configuration is usually not so simple and when a problem occur you have to count
on the community, no official support is available.
Also, we will only use open source operating system, mainly GNU/Linux but FreeBSD, it means that it
require some knowledge un UNIX system. Some of us has started to learn that this year, it can be a
constraint. We didn’t define the same system for everybody, so that each one can choose the one
that he thinks is the simplest for him.
One of the main difficulty will be to work together, because we are nine and we have to separate
properly the work. The communication between each pairs is a key point. The complete planning can
be find at the end of the document.
Concerning the objectives we want to achieve, here is the list of the technologies we want to install :
Architecture :
NAT
VLans
Firewall
802.1x
Wifi :
WLan Controller
Radius Authentication
Open Source Project
Wireless Network and Security Project Report - 7 -
Services :
Web server
Mail, Groupware
User management :
LDAP
SAMBA
Administration, Security :
Proxies
DNS
DHCP
Monitoring and logging tools
VoIP Architecture
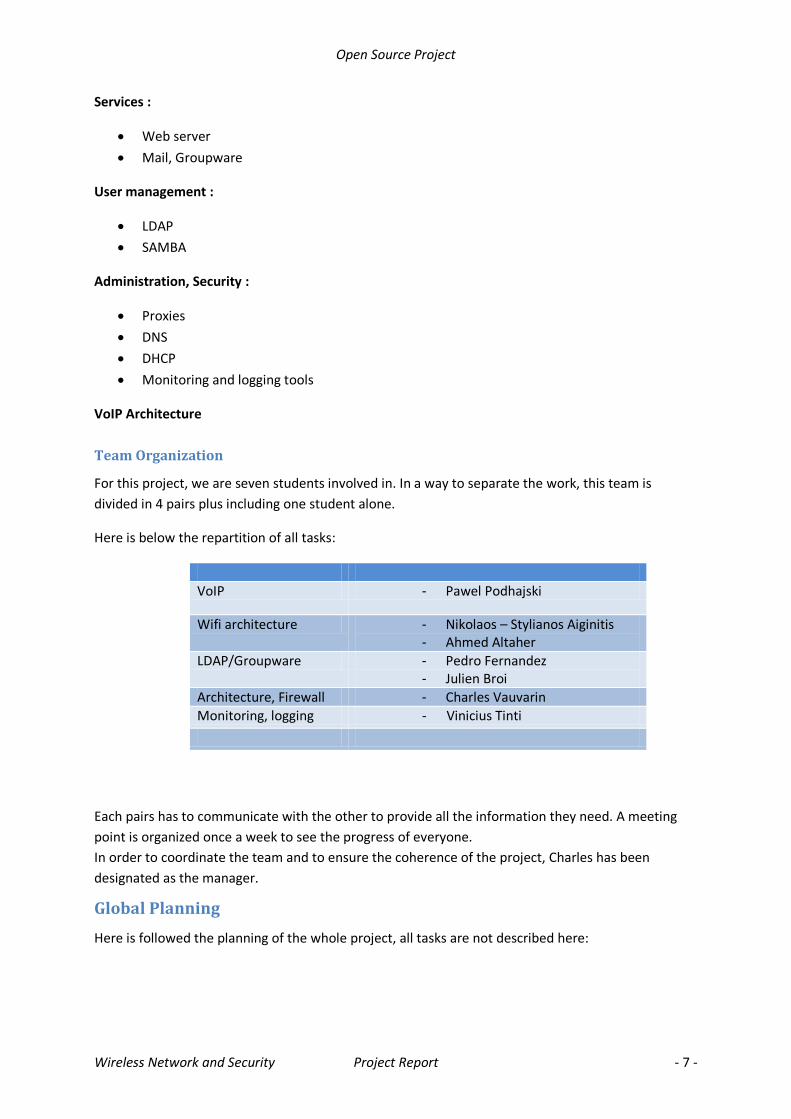
Team Organization
For this project, we are seven students involved in. In a way to separate the work, this team is
divided in 4 pairs plus including one student alone.
Here is below the repartition of all tasks:
Each pairs has to communicate with the other to provide all the information they need. A meeting
point is organized once a week to see the progress of everyone.
In order to coordinate the team and to ensure the coherence of the project, Charles has been
designated as the manager.
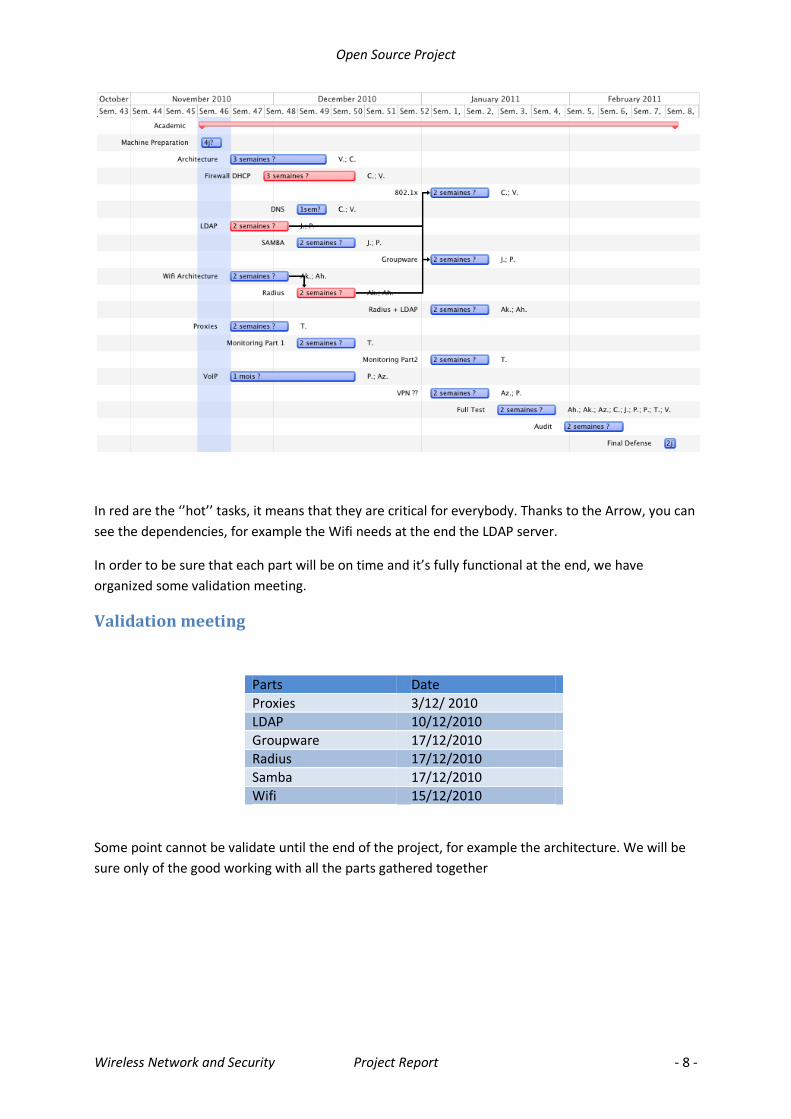
Global Planning Here is followed the planning of the whole project, all tasks are not described here:
VoIP - Pawel Podhajski
Wifi architecture - Nikolaos – Stylianos Aiginitis - Ahmed Altaher
LDAP/Groupware - Pedro Fernandez - Julien Broi
Architecture, Firewall - Charles Vauvarin
Monitoring, logging - Vinicius Tinti
Open Source Project
Wireless Network and Security Project Report - 8 -
In red are the ‘’hot’’ tasks, it means that they are critical for everybody. Thanks to the Arrow, you can
see the dependencies, for example the Wifi needs at the end the LDAP server.
In order to be sure that each part will be on time and it’s fully functional at the end, we have
organized some validation meeting.
Validation meeting
Parts Date
Proxies 3/12/ 2010
LDAP 10/12/2010
Groupware 17/12/2010
Radius 17/12/2010
Samba 17/12/2010
Wifi 15/12/2010
Some point cannot be validate until the end of the project, for example the architecture. We will be
sure only of the good working with all the parts gathered together
Open Source Project
Wireless Network and Security Project Report - 9 -
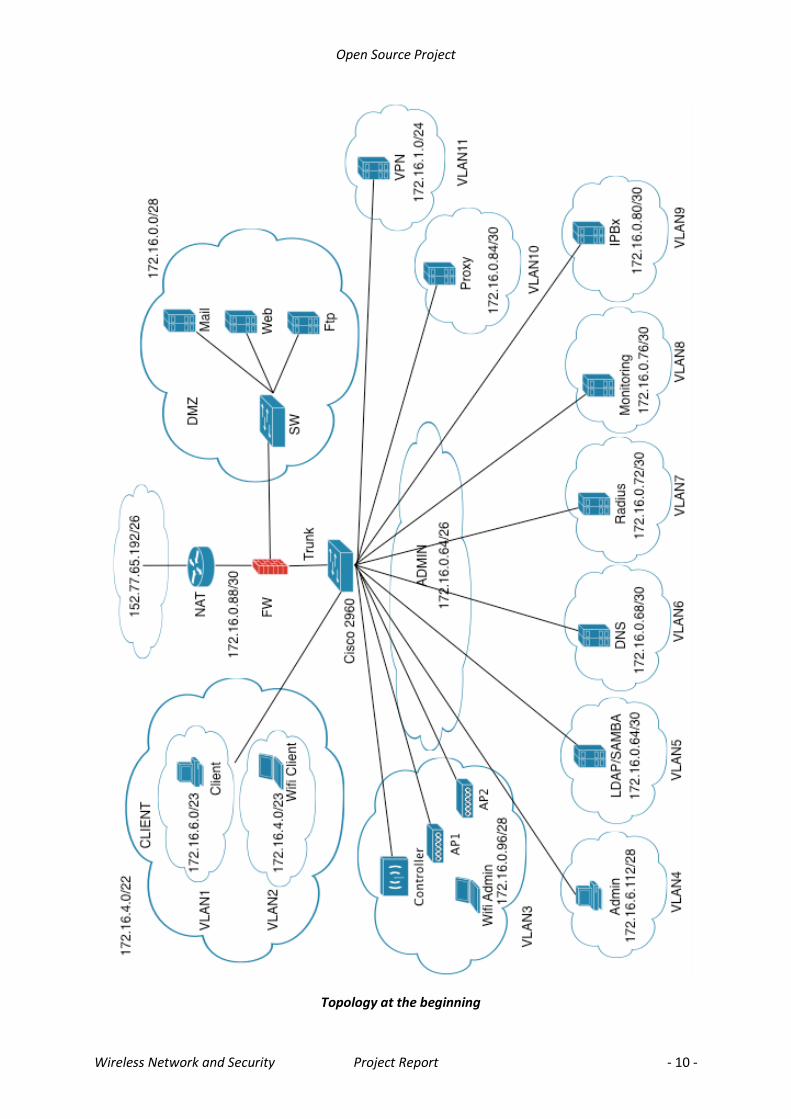
Architecture (Charles) The architecture that is implemented now is the one below. Since the beginning of the project,
several modifications have been done. Some major like the modification of the whole addressing
map to simplify it and the suppression of the DMZ for technical reason on the firewall.
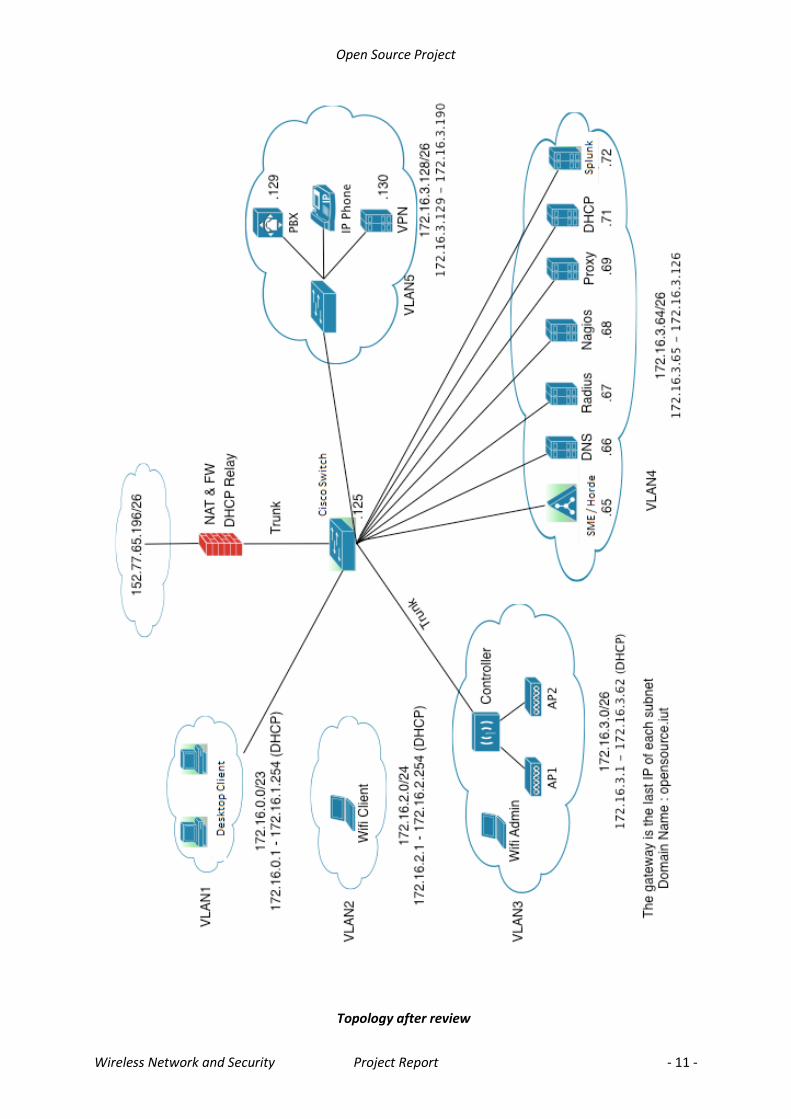
Topology
The needed was to build an enterprise network, we decided to implement a simple architecture with
one firewall, different vlan and a DMZ to store services (Mail, Web server and etc).
During the project, the global architecture are been changed two times, the first we planned to do
was the one below. The idea was to have a separate vlan per server in order to increase the security
and to separate as much as possible broadcast domains. The addressing map was completely
optimized. After started to work, we saw that these kinds of topology provide some problems such
as:
- Difficulty to add a new server (necessity to a new vlan for example)
- Configuration of the firewall difficult to maintain
We decided so to simplify this map and to redesign the complete addressing and the vlan repartition
with something much simpler. Due to technical problem with a driver for a network interface card on
the firewall and some other issue we will see after, the DMZ was removed also.
The new topology can be found below and the vlan’s descriptions are in the next part.
Vlans and Zones
Virtual Local Area Network are use to separate different network on a same switch. There are logical
network. In order to separate different types of users and also to separate users from the servers,
five vlans has been defined. The routing between each Vlans is done thanks to the trunk link
between the firewall and the switch.
Here is the list of the Vlans :
- VLAN1 : Zone for desktop Client
- VLAN 2 : Zone for Wifi Client
- VLAN 3 : Zone the administration of the Wifi (Controller and access point)
- VLAN 4 : Administration zone with all the servers
- VLAN 5 : Zone for VoIP services (IPBX and phones) and also VPN
Rules between each vlans are defined after in the firewall part.
Policies
In order to define the security on our network, we had to define some basic policies for the users and
to be apply on the firewall.
To reach the internet, each machine of the network has to pass through the Local proxy
server and the local DNS.
Each client (Desktop) has to authenticate on a Domain Controller.
Each wifi client has to authenticate on the Radius server.
Open Source Project
Wireless Network and Security Project Report - 10 -
Topology at the beginning
Open Source Project
Wireless Network and Security Project Report - 11 -
Topology after review
Open Source Project
Wireless Network and Security Project Report - 12 -
Firewall
Definition
This equipment is the network’s heart, most of the security rely on it. The firewall will define the
filtering rules for input, output connection and also between each local network. It acts on the layer
three (network) and four (transport) of the OSI model. There are several types of devices, you can
install this software on a basic machine (UNIX/Windows), as an example we can list: pfsense,
netfilter, monowall. Such choice must be applied only in personal environment or very small
organization. Otherwise, there are built-in and appliance solutions with specific hardware and
software. Here, as we work only with open source product, I have chosen to use pfsense.
As I said, the main goal here is to control and rule connectivity between what we called trust zone
(the internal network) or un-trust zone (internet). To control this, the firewall allows us to apply
some security policies on the data flow (filtering rules).
Pfsense
Pfsense is an open source firewall distribution based on FreeBSD which is well known for its stability
and the security it can provide. This project is a customized distribution of FreeBSD and offer lots of
functionality, the two main ones are, of course, firewalling and routing. The install is very light and
very fast. One interesting advantage is that the configuration can be made through a web interface.
Here are the functionalities we used for our configuration:
- Firewalling
- Routing between vlans
- NAT / PAT
- DHCP Relay
Some others are very interesting such as internal proxy or a VPN server. Our choice was to separate
theses two services.
How does it work?
The first rule is that “Everything that is not clearly defined is forbidden”. These filtering rules are
based on many criteria, usually source and destination address and port and are applied in a certain
order, mainly from the top to the bottom. Example: if a packet arrive we will test the compliance
with the first rule, if it doesn’t match we will test with the second and so one.
Stateful Firewall
There are two different types of firewall, Stateful or Stateless, the one we use there is stateful. It
means that it analyses and keeps tracks of connection (TCP or UDP) initiated towards. For example, if
a packet goes outside, you don’t need to add rules for the replied packets. It can check for instance if
a TCP packet is really the result of the previous packet and the response to a package in the other
direction.
Open Source Project
Wireless Network and Security Project Report - 13 -
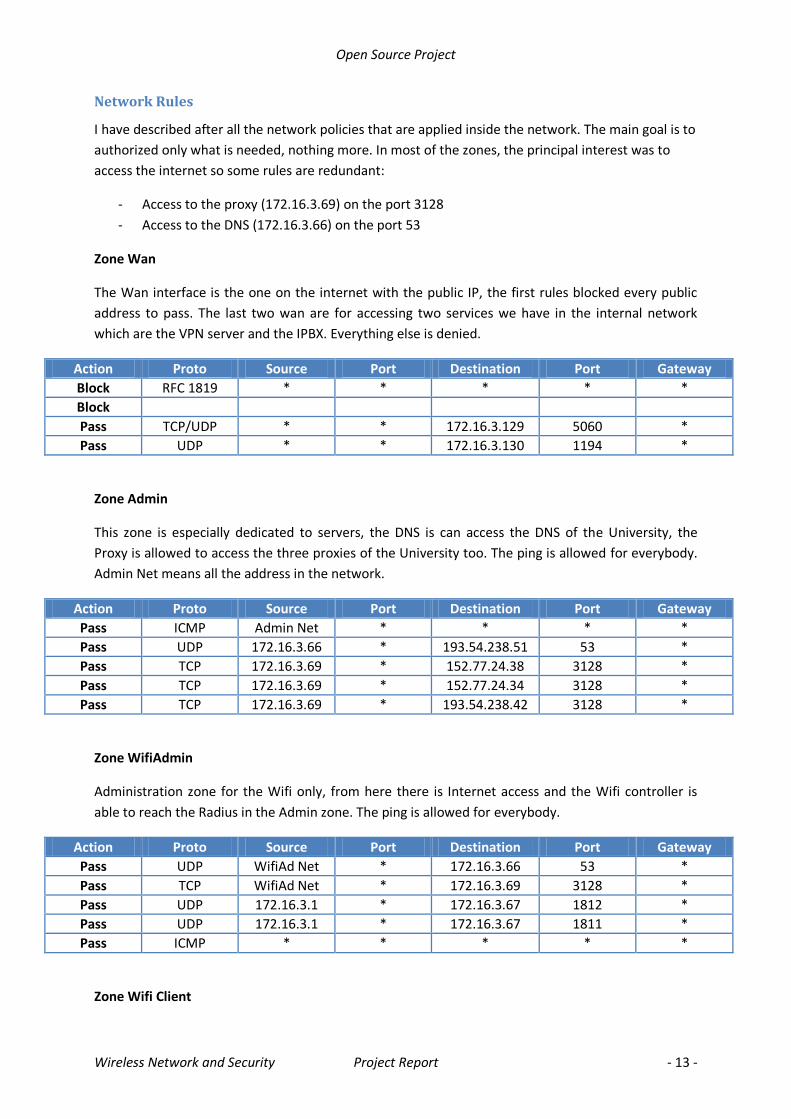
Network Rules
I have described after all the network policies that are applied inside the network. The main goal is to
authorized only what is needed, nothing more. In most of the zones, the principal interest was to
access the internet so some rules are redundant:
- Access to the proxy (172.16.3.69) on the port 3128
- Access to the DNS (172.16.3.66) on the port 53
Zone Wan
The Wan interface is the one on the internet with the public IP, the first rules blocked every public
address to pass. The last two wan are for accessing two services we have in the internal network
which are the VPN server and the IPBX. Everything else is denied.
Action Proto Source Port Destination Port Gateway
Block RFC 1819 * * * * *
Block
Pass TCP/UDP * * 172.16.3.129 5060 *
Pass UDP * * 172.16.3.130 1194 *
Zone Admin
This zone is especially dedicated to servers, the DNS is can access the DNS of the University, the
Proxy is allowed to access the three proxies of the University too. The ping is allowed for everybody.
Admin Net means all the address in the network.
Action Proto Source Port Destination Port Gateway
Pass ICMP Admin Net * * * *
Pass UDP 172.16.3.66 * 193.54.238.51 53 *
Pass TCP 172.16.3.69 * 152.77.24.38 3128 *
Pass TCP 172.16.3.69 * 152.77.24.34 3128 *
Pass TCP 172.16.3.69 * 193.54.238.42 3128 *
Zone WifiAdmin
Administration zone for the Wifi only, from here there is Internet access and the Wifi controller is
able to reach the Radius in the Admin zone. The ping is allowed for everybody.
Action Proto Source Port Destination Port Gateway
Pass UDP WifiAd Net * 172.16.3.66 53 *
Pass TCP WifiAd Net * 172.16.3.69 3128 *
Pass UDP 172.16.3.1 * 172.16.3.67 1812 *
Pass UDP 172.16.3.1 * 172.16.3.67 1811 *
Pass ICMP * * * * *
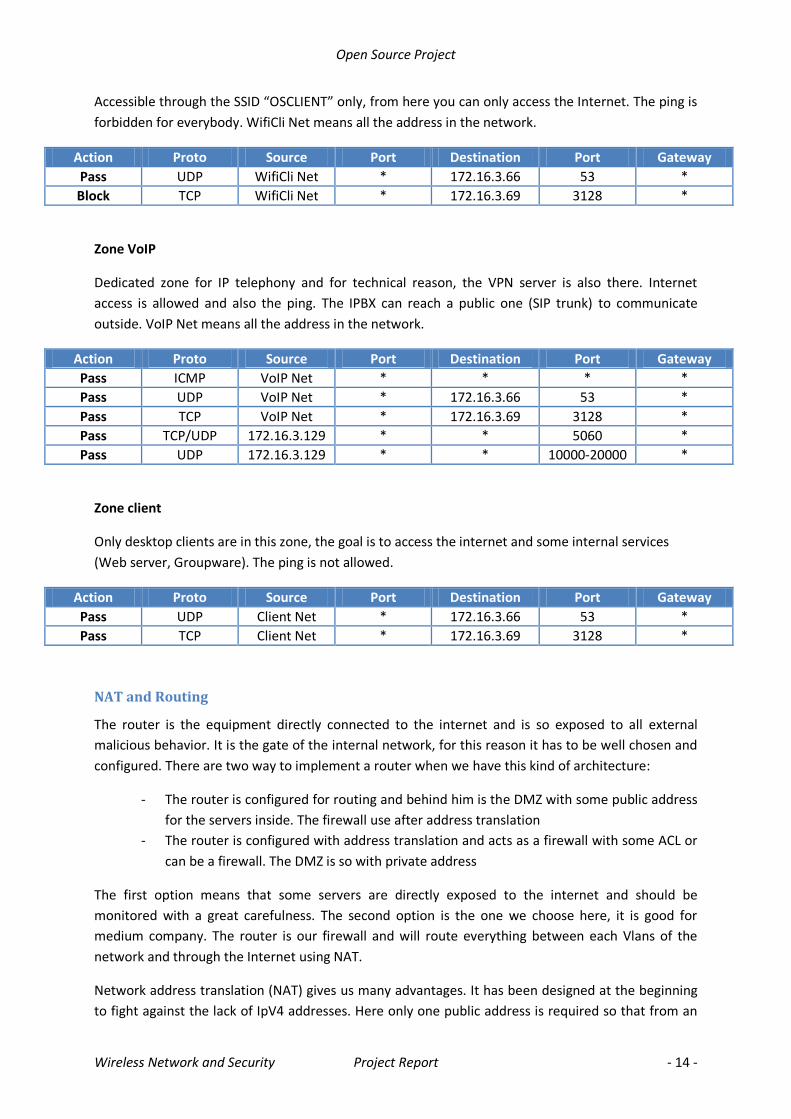
Zone Wifi Client
Open Source Project
Wireless Network and Security Project Report - 14 -
Accessible through the SSID “OSCLIENT” only, from here you can only access the Internet. The ping is
forbidden for everybody. WifiCli Net means all the address in the network.
Action Proto Source Port Destination Port Gateway
Pass UDP WifiCli Net * 172.16.3.66 53 *
Block TCP WifiCli Net * 172.16.3.69 3128 *
Zone VoIP
Dedicated zone for IP telephony and for technical reason, the VPN server is also there. Internet
access is allowed and also the ping. The IPBX can reach a public one (SIP trunk) to communicate
outside. VoIP Net means all the address in the network.
Action Proto Source Port Destination Port Gateway
Pass ICMP VoIP Net * * * *
Pass UDP VoIP Net * 172.16.3.66 53 *
Pass TCP VoIP Net * 172.16.3.69 3128 *
Pass TCP/UDP 172.16.3.129 * * 5060 *
Pass UDP 172.16.3.129 * * 10000-20000 *
Zone client
Only desktop clients are in this zone, the goal is to access the internet and some internal services
(Web server, Groupware). The ping is not allowed.
Action Proto Source Port Destination Port Gateway
Pass UDP Client Net * 172.16.3.66 53 *
Pass TCP Client Net * 172.16.3.69 3128 *
NAT and Routing
The router is the equipment directly connected to the internet and is so exposed to all external
malicious behavior. It is the gate of the internal network, for this reason it has to be well chosen and
configured. There are two way to implement a router when we have this kind of architecture:
- The router is configured for routing and behind him is the DMZ with some public address
for the servers inside. The firewall use after address translation
- The router is configured with address translation and acts as a firewall with some ACL or
can be a firewall. The DMZ is so with private address
The first option means that some servers are directly exposed to the internet and should be
monitored with a great carefulness. The second option is the one we choose here, it is good for
medium company. The router is our firewall and will route everything between each Vlans of the
network and through the Internet using NAT.
Network address translation (NAT) gives us many advantages. It has been designed at the beginning
to fight against the lack of IpV4 addresses. Here only one public address is required so that from an
Open Source Project
Wireless Network and Security Project Report - 15 -
external point of view, the company is seen as one unique IP. Every client who wants to reach the
internet will have his private address translated into this one. We can have thousands of machines
inside, everything is completely hidden. Concerning the input connection, by default everything is
closed so that nobody can “enter”.
If we have some services that have to be reachable from outside (VPN and SIP server here from
example), we use a complementary protocol which is the Port Address Translation.
When a connection is initiated on the public address on a defined port, all the packets will be
transmitted to a machine in the DMZ.
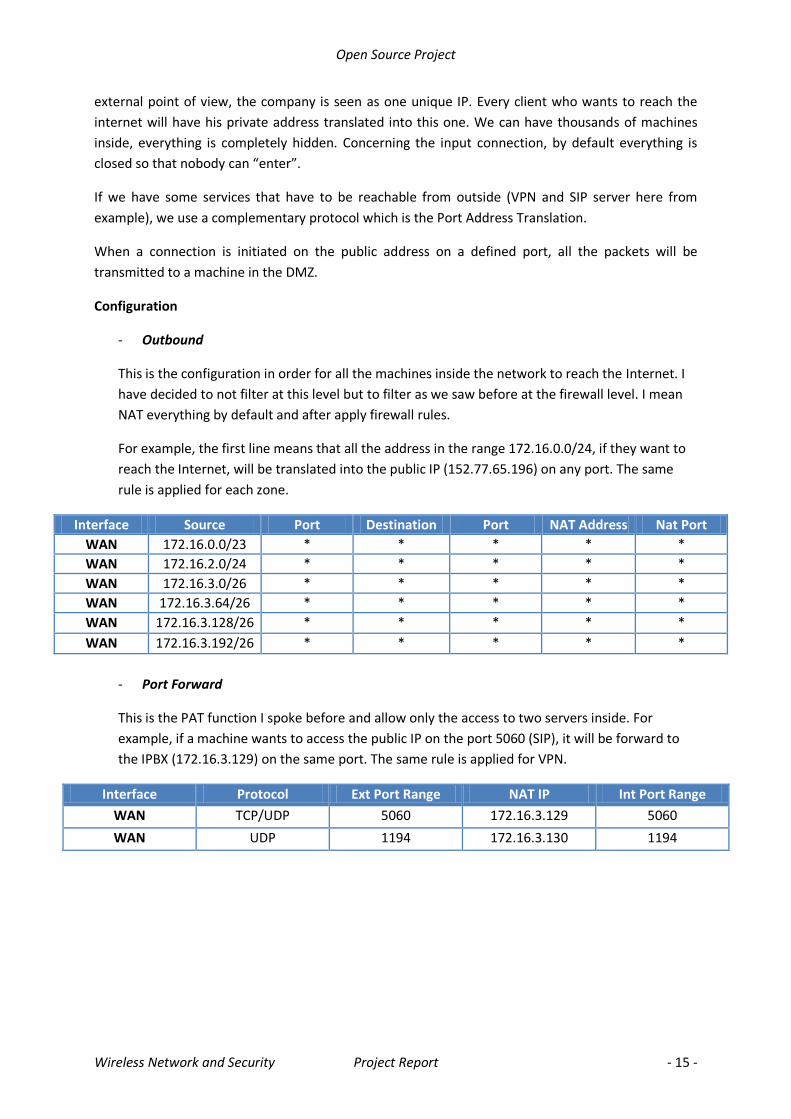
Configuration
- Outbound
This is the configuration in order for all the machines inside the network to reach the Internet. I
have decided to not filter at this level but to filter as we saw before at the firewall level. I mean
NAT everything by default and after apply firewall rules.
For example, the first line means that all the address in the range 172.16.0.0/24, if they want to
reach the Internet, will be translated into the public IP (152.77.65.196) on any port. The same
rule is applied for each zone.
Interface Source Port Destination Port NAT Address Nat Port
WAN 172.16.0.0/23 * * * * *
WAN 172.16.2.0/24 * * * * *
WAN 172.16.3.0/26 * * * * *
WAN 172.16.3.64/26 * * * * *
WAN 172.16.3.128/26 * * * * *
WAN 172.16.3.192/26 * * * * *
- Port Forward
This is the PAT function I spoke before and allow only the access to two servers inside. For
example, if a machine wants to access the public IP on the port 5060 (SIP), it will be forward to
the IPBX (172.16.3.129) on the same port. The same rule is applied for VPN.
Interface Protocol Ext Port Range NAT IP Int Port Range
WAN TCP/UDP 5060 172.16.3.129 5060
WAN UDP 1194 172.16.3.130 1194
Open Source Project
Wireless Network and Security Project Report - 16 -
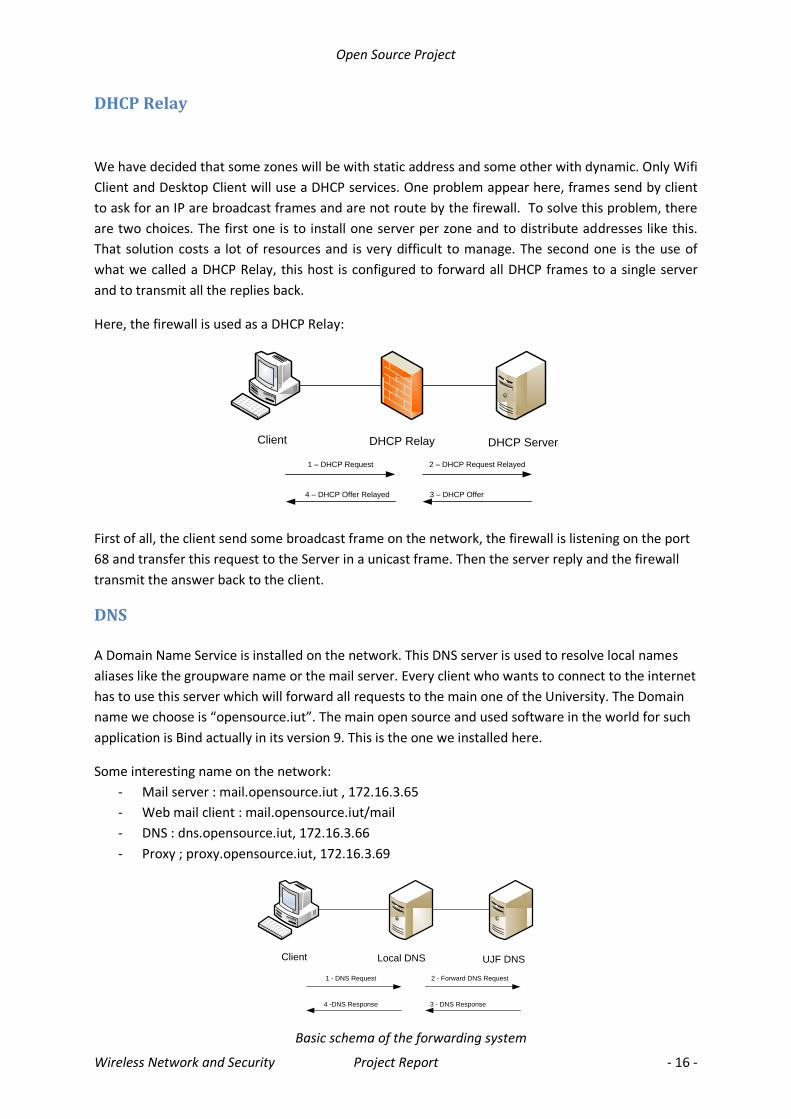
DHCP Relay
We have decided that some zones will be with static address and some other with dynamic. Only Wifi
Client and Desktop Client will use a DHCP services. One problem appear here, frames send by client
to ask for an IP are broadcast frames and are not route by the firewall. To solve this problem, there
are two choices. The first one is to install one server per zone and to distribute addresses like this.
That solution costs a lot of resources and is very difficult to manage. The second one is the use of
what we called a DHCP Relay, this host is configured to forward all DHCP frames to a single server
and to transmit all the replies back.
Here, the firewall is used as a DHCP Relay:
Client DHCP Relay DHCP Server
1 – DHCP Request 2 – DHCP Request Relayed
3 – DHCP Offer4 – DHCP Offer Relayed
First of all, the client send some broadcast frame on the network, the firewall is listening on the port
68 and transfer this request to the Server in a unicast frame. Then the server reply and the firewall
transmit the answer back to the client.
DNS
A Domain Name Service is installed on the network. This DNS server is used to resolve local names
aliases like the groupware name or the mail server. Every client who wants to connect to the internet
has to use this server which will forward all requests to the main one of the University. The Domain
name we choose is “opensource.iut”. The main open source and used software in the world for such
application is Bind actually in its version 9. This is the one we installed here.
Some interesting name on the network:
- Mail server : mail.opensource.iut , 172.16.3.65
- Web mail client : mail.opensource.iut/mail
- DNS : dns.opensource.iut, 172.16.3.66
- Proxy ; proxy.opensource.iut, 172.16.3.69
Client Local DNS UJF DNS
1 - DNS Request 2 - Forward DNS Request
3 - DNS Response4 -DNS Response
Basic schema of the forwarding system
Open Source Project
Wireless Network and Security Project Report - 17 -
Project Management
Risk analysis
This part was made during the previous study before starting the project. For my part, the main risk
was to use a free product which is not always really friendly to use and sometimes there is not
enough documentation. Hopefully for this part, pfsense is really good with a huge and precise
documentation. The other risk was to interconnect everything together because we have to test part
by part each configuration.
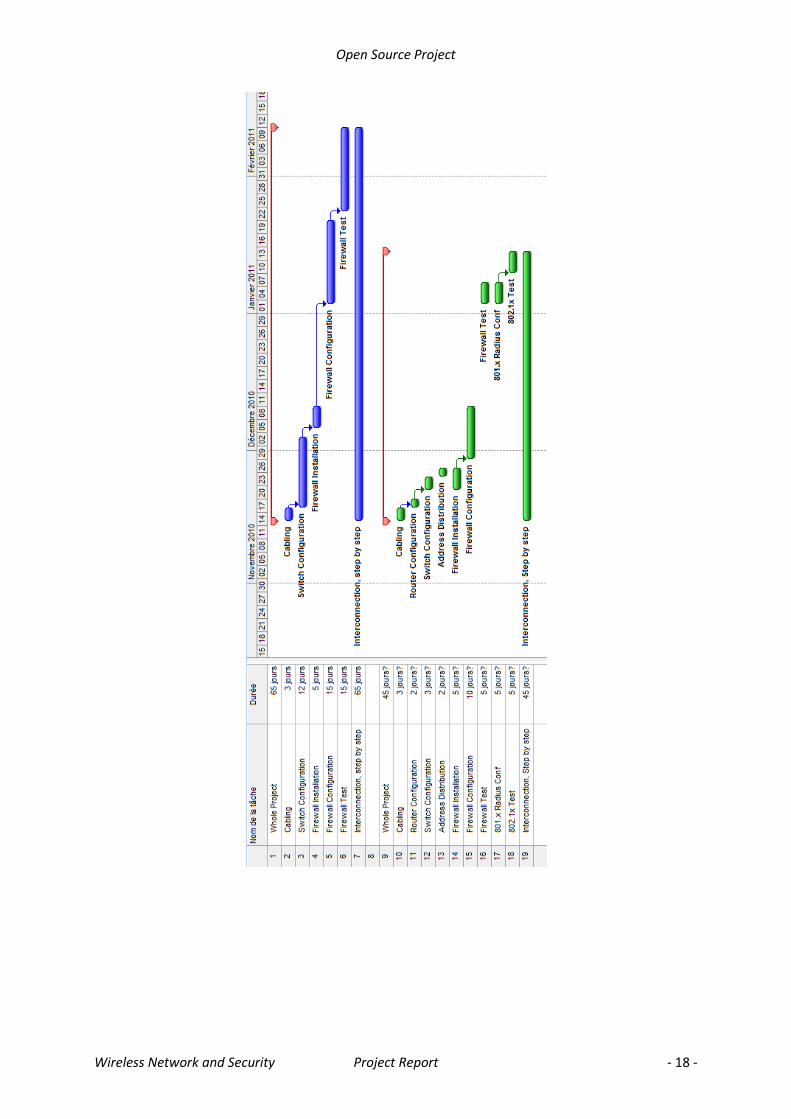
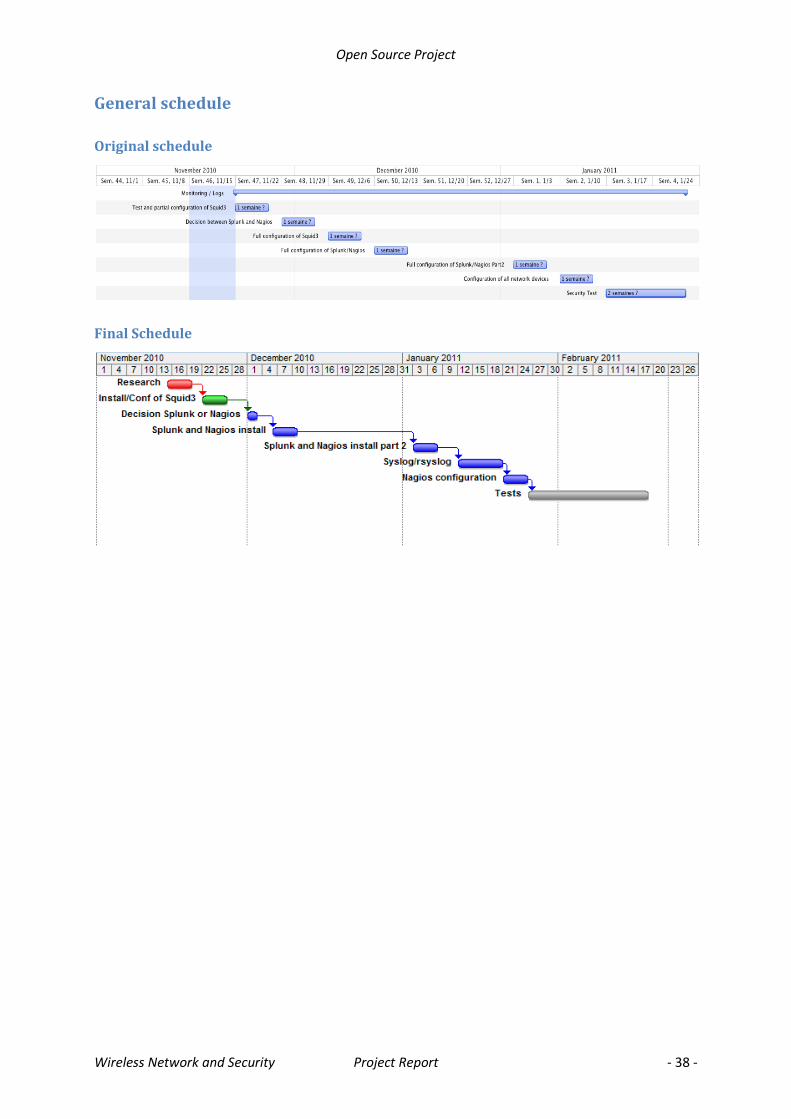
Schedule and delays
You can find on the next page, the first schedule (in green) that I made before starting the project
and the final one (in blue). It has change for several reasons, the first one is due to the difficulty to
find a good firewall system. Most of the open source products are not really made for production
environment but more for little office use or personal use. The second one is that instead of working
by pair, I worked alone. Therefore every parallel work that I planned to do could not be done. Also
due to this, I did not have time to implement the 802.1x technology.
Another difficulty that I encounter is the fact that I had to interconnect everybody and to solve each
problem that appends in this case. I have decided to be responsible of the architecture because I was
also team leader. It was so easier for the organization of the group to do like this.
Open Source Project
Wireless Network and Security Project Report - 18 -
Open Source Project
Wireless Network and Security Project Report - 19 -
LDAP, Samba, GroupWare (Pedro and Julien)
Presentation of the technologies
LDAP
Lightweight Directory Access Protocol is a protocol that permits to interrogate and modify some
directories databases.
In our network, we use this technology for centralizing all the users’ information (passwords, email
and etc). It provides thus users and passwords for the Samba server, mail addresses for the
GroupWare server.
Samba
Samba is an open source server that permits to emulate an active directory server.
In our network, we use this technology in the way that a user can connect on his account and
retrieve his personal files from every machine of the network.
GroupWare
Groupware or collaborative software refers to a set of software that integrates all the work in only
one project with a lot of users connected through the network. There are different types of
groupware like collaboration/communication tools, conferencing tools and collaborative
management tools.
In our network we use the collaboration/communication tool which includes the mail services, web
and other services like calendar.
Software chosen
- For LDAP technology, we choose to use OpenLDAP because it is the most documented one;
- For Samba, it is a software in himself so there is no other choice;
- For GroupWare we choose to use Zimbra because it offers many features and is user friendly.
The main objective of groupware is to use the mail services integrated in this software.
We wanted to install LDAP and SAMBA on a FreeBSD distribution (both on the same machine) and
Zimbra on a Debian distribution.
Finally, we decided to do not take a risk and install everything on a Debian distribution because there
were not so much documents about LDAP and Samba on FreeBSD.
Software finally used
We found a distribution in which all our needs were included. Its name is SME.
Open Source Project
Wireless Network and Security Project Report - 20 -
Project management
Risk analysis
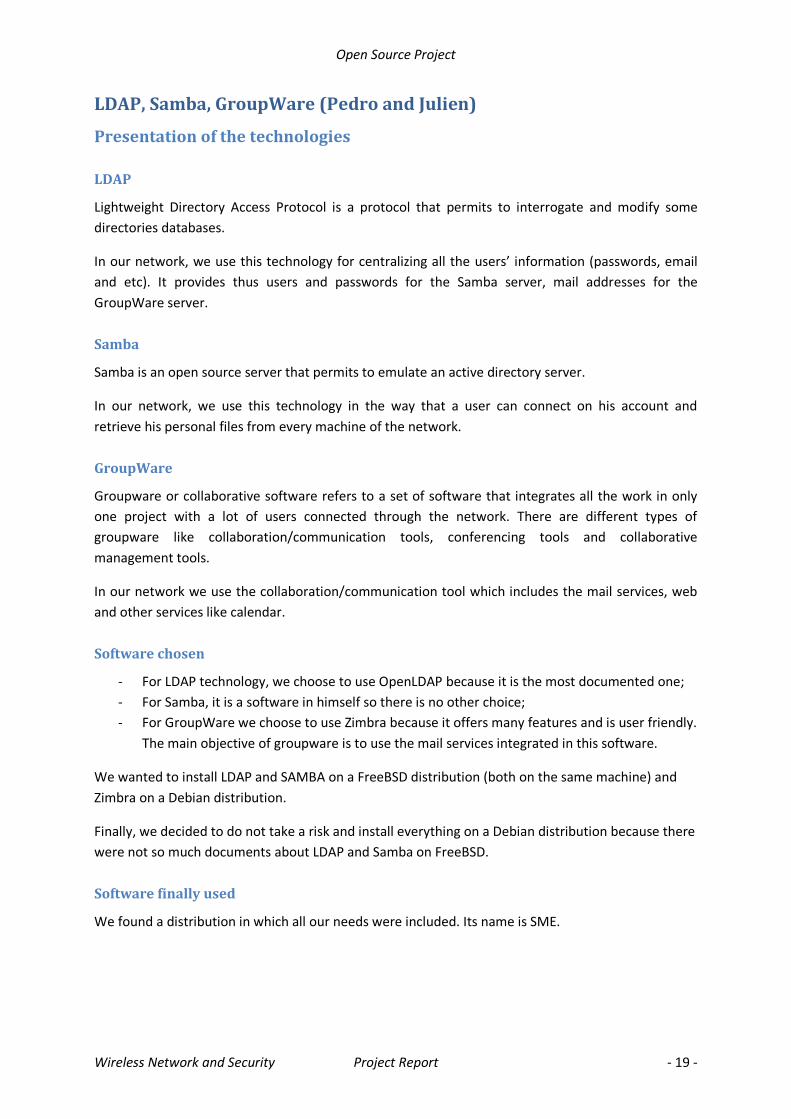
Here is the first risk analysis we made:
Phases (in order of
complexity)
Risks Gravity (1-4)
Probability (1-4)
Solution Priority (1-3)
LDAP Not configuring or installing it well
4 4 The members of the team have knowledge in this technologies thus they can help us
1
The software doesn’t exist for the current OS
3 2 Choose a OS on which the software exists
2
SAMBA Not configuring or installing it well
4 3 The Install another OS. of the team have knowledge in this technologies thus they can help us
1
The software doesn’t exist for the current OS
3 2 Choose a OS on which the software exists
2
Debian Not configuring or installing it well
4 2 None 2
Hardware incompatibility
4 1 Check if the hardware is compatible, change for another bsd or linux distribution.
2
GroupWare Not configuring or installing it well
4 1 The members of the team have knowledge in this technologies thus they can help us
2
The software doesn’t exist for the current OS
3 2 Choose a OS on which the software exists
2
Open Source Project
Wireless Network and Security Project Report - 21 -
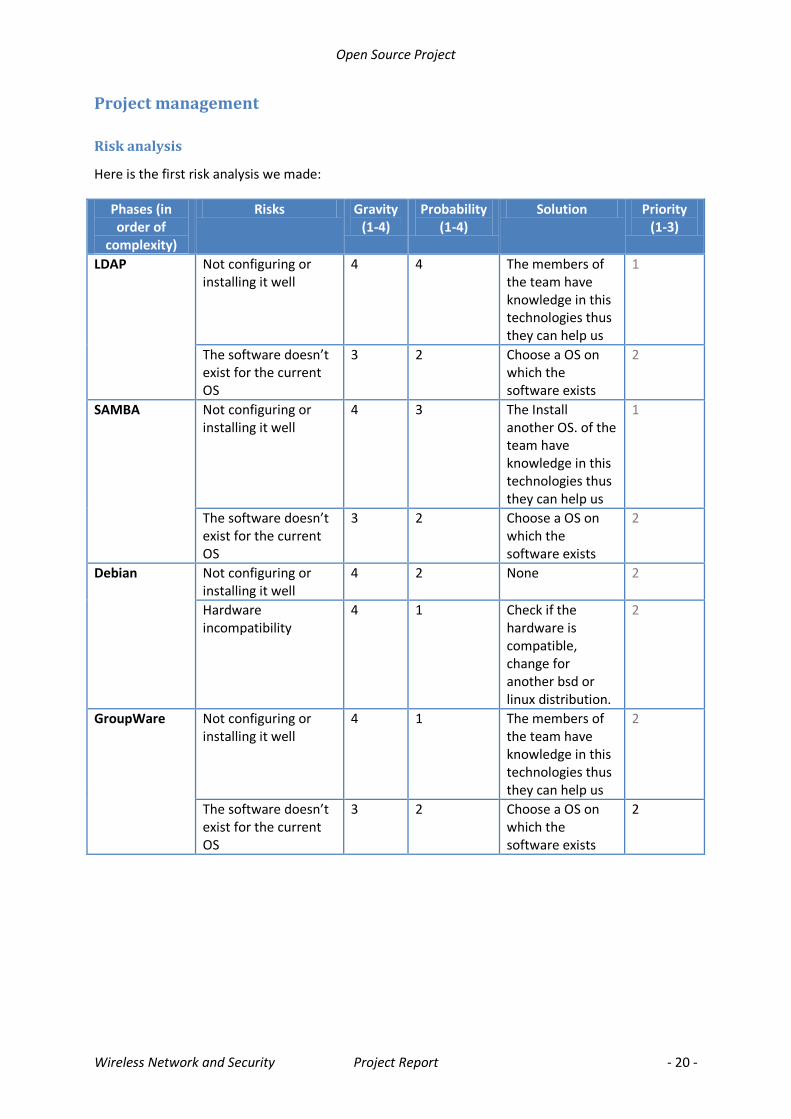
Scheduling
Here is the original scheduling that we previewed for the deployment of the project:
Open Source Project
Wireless Network and Security Project Report - 22 -
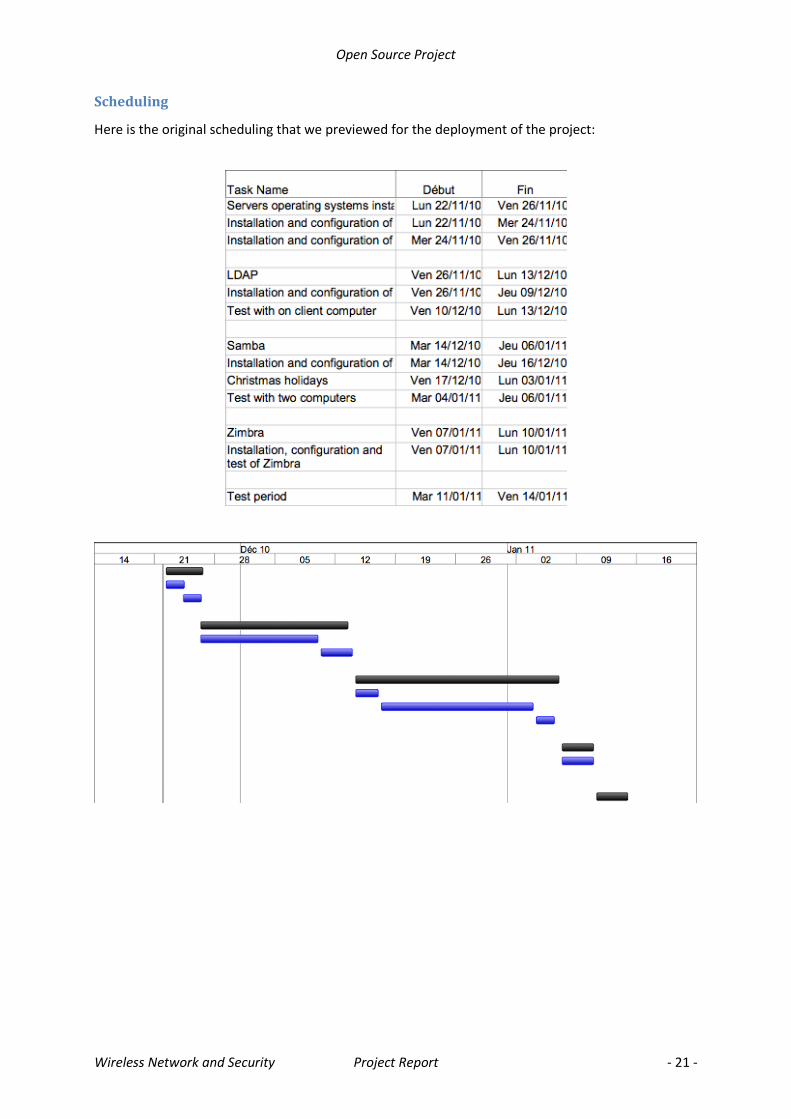
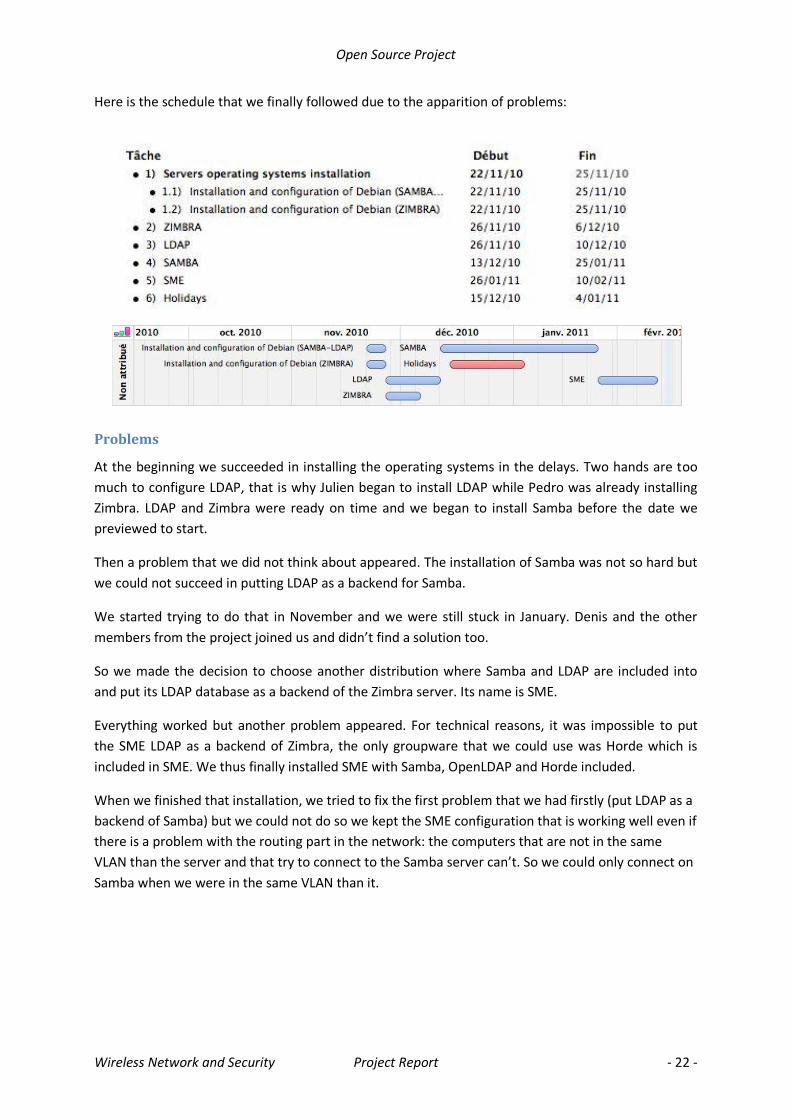
Here is the schedule that we finally followed due to the apparition of problems:
Problems
At the beginning we succeeded in installing the operating systems in the delays. Two hands are too
much to configure LDAP, that is why Julien began to install LDAP while Pedro was already installing
Zimbra. LDAP and Zimbra were ready on time and we began to install Samba before the date we
previewed to start.
Then a problem that we did not think about appeared. The installation of Samba was not so hard but
we could not succeed in putting LDAP as a backend for Samba.
We started trying to do that in November and we were still stuck in January. Denis and the other
members from the project joined us and didn’t find a solution too.
So we made the decision to choose another distribution where Samba and LDAP are included into
and put its LDAP database as a backend of the Zimbra server. Its name is SME.
Everything worked but another problem appeared. For technical reasons, it was impossible to put
the SME LDAP as a backend of Zimbra, the only groupware that we could use was Horde which is
included in SME. We thus finally installed SME with Samba, OpenLDAP and Horde included.
When we finished that installation, we tried to fix the first problem that we had firstly (put LDAP as a
backend of Samba) but we could not do so we kept the SME configuration that is working well even if
there is a problem with the routing part in the network: the computers that are not in the same
VLAN than the server and that try to connect to the Samba server can’t. So we could only connect on
Samba when we were in the same VLAN than it.
Open Source Project
Wireless Network and Security Project Report - 23 -
Technical information about SME
Introduction
SME Server is build on CentOS using the Red Hat Entreprise Linux source. It has advantages including:
Simple to set up and use
Secure and stable to operate
Cross platform and extendible to meet future needs
Open source an Free to use
This distribution that include many services:
File and print sharing
NAT
Mail server (Horde)
FTP
Firewall
VPN
Samba (multi-platform)
LDAP
Backup
And much more
We decided to use a few of these: LDAP, Samba, FTP, Horde and File Sharing (E-BAYS).
Installation
The installation is really simple, you just to download the current stable version on this website:
http://wiki.contribs.org/SME_Server:Download
After the installation, your system will restart and will ask you several question about the
configuration you want to apply:
- The system password; - Your system name and domain name; - Operation mode (Your server can act as a gateway or a simple server); - The type of ethernet adapters that will be used by your server to communicate with the
internal network and the Internet. (Typically, the server software will detect this information automatically) ;
- Configuration of your local network; - Configuration of your external network (Only if the server acts as a gateway); - Optional information.
Our server operational mode is just a simple server. The system name is sme and domain name is
opensource.iut.
Here is the local network configuration:
- IP:172.16.3.65 - MASK: 255.255.255.192
Open Source Project
Wireless Network and Security Project Report - 24 -
Configuration screen
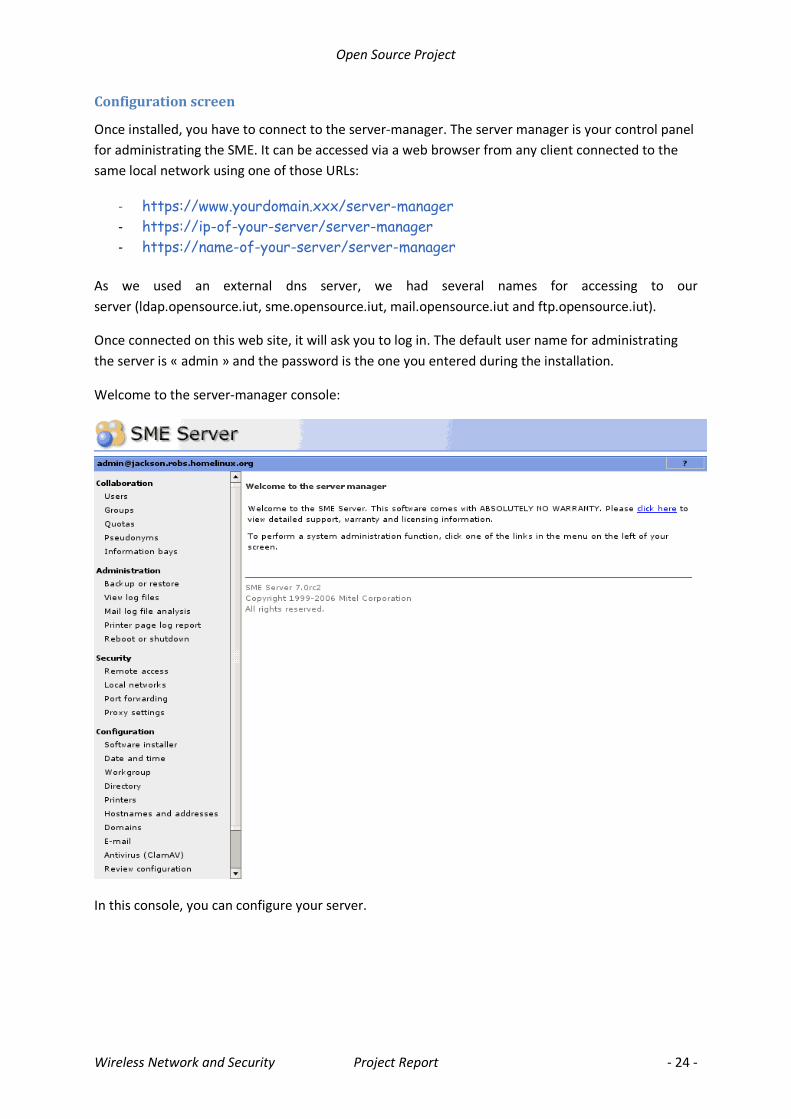
Once installed, you have to connect to the server-manager. The server manager is your control panel
for administrating the SME. It can be accessed via a web browser from any client connected to the
same local network using one of those URLs:
- https://www.yourdomain.xxx/server-manager
- https://ip-of-your-server/server-manager
- https://name-of-your-server/server-manager
As we used an external dns server, we had several names for accessing to our
server (ldap.opensource.iut, sme.opensource.iut, mail.opensource.iut and ftp.opensource.iut).
Once connected on this web site, it will ask you to log in. The default user name for administrating
the server is « admin » and the password is the one you entered during the installation.
Welcome to the server-manager console:
In this console, you can configure your server.
Open Source Project
Wireless Network and Security Project Report - 25 -
Global configuration
In the configuration panel of SME, you should firstly configure the Date, time, hostnames and
addresses of the server and decides of who can access to the services proposed by the server.
All this stuff can be configured in:
- Configuration – Date and Time; - Configuration – Hostnames and addresses; - Security – Local networks.
You can also configure SSH access to your server and other optional stuff in Security – Remote
Access.
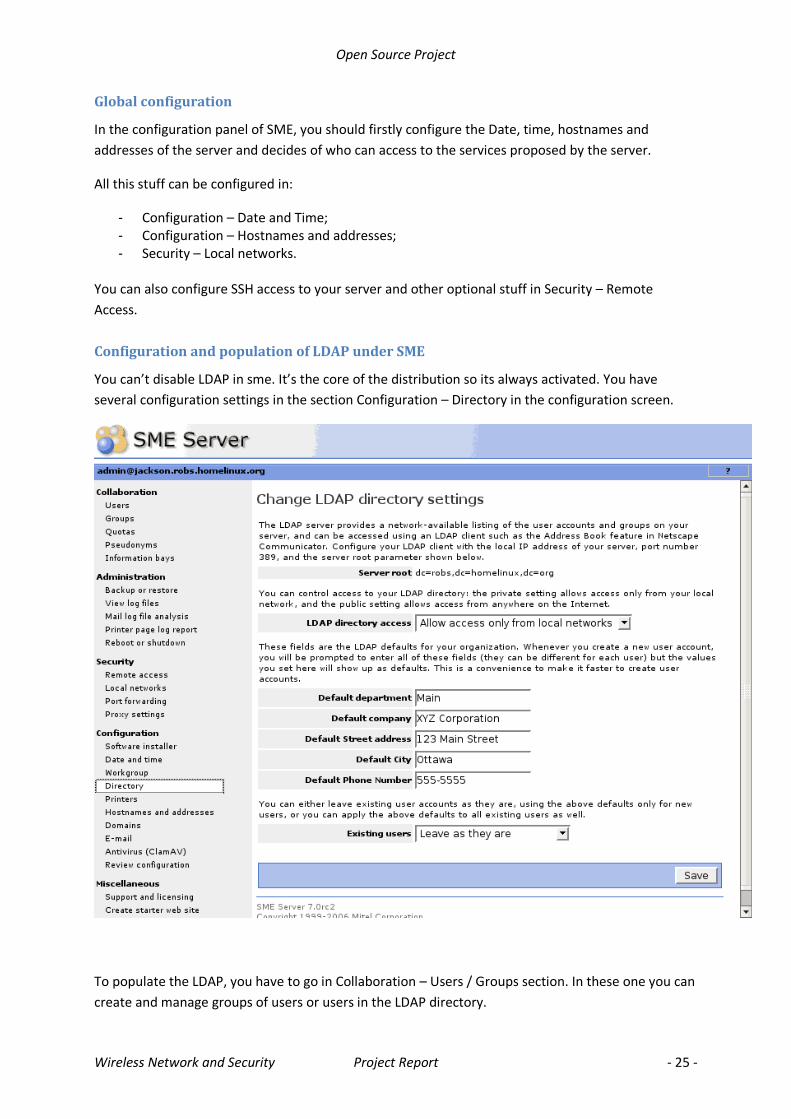
Configuration and population of LDAP under SME
You can’t disable LDAP in sme. It’s the core of the distribution so its always activated. You have
several configuration settings in the section Configuration – Directory in the configuration screen.
To populate the LDAP, you have to go in Collaboration – Users / Groups section. In these one you can
create and manage groups of users or users in the LDAP directory.
Open Source Project
Wireless Network and Security Project Report - 26 -
For each group created, the sme distribution automatically creates one mail address that forwards
received mails to all the members of this group. The format of this mail address is
“groupname”@”mycompany.xxx”.
For each account created, the SME distribution automatically creates three pseudonyms linked to
this account. For example if I add an user “Julien Broi”, three pseudonym are created:
- jbroi; - julien.broi; - julien_broi.
The three pseudonyms are linked to the same user account so it shares the same data. Also, one mail
address corresponding to each pseudo is created and they all end to the same mailbox.
Once the accounts are created, you have to set their own password for them to be activated.
There’s a big problem with passwords storage. All the users information are stored in the LDAP
while the passwords are stored in Samba. That’s why we couldn’t integrate the LDAP directory
with Zimbra and other external servers where could use it.
Open Source Project
Wireless Network and Security Project Report - 27 -
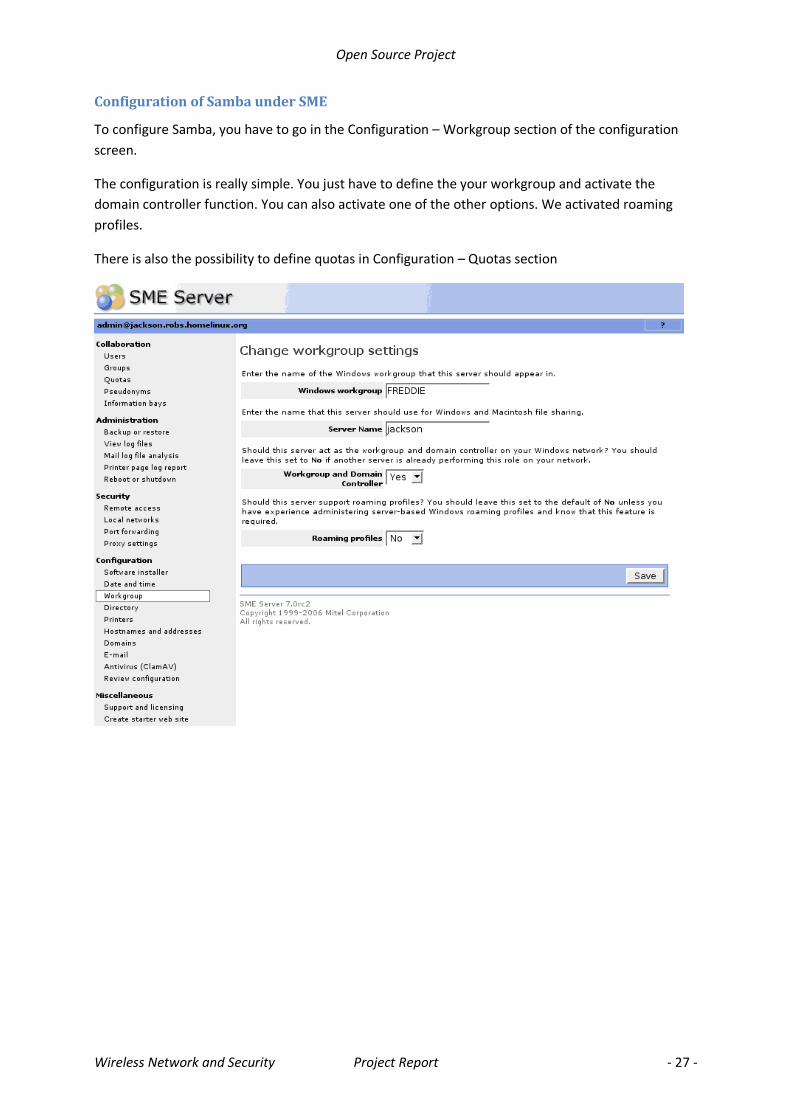
Configuration of Samba under SME
To configure Samba, you have to go in the Configuration – Workgroup section of the configuration
screen.
The configuration is really simple. You just have to define the your workgroup and activate the
domain controller function. You can also activate one of the other options. We activated roaming
profiles.
There is also the possibility to define quotas in Configuration – Quotas section
Open Source Project
Wireless Network and Security Project Report - 28 -
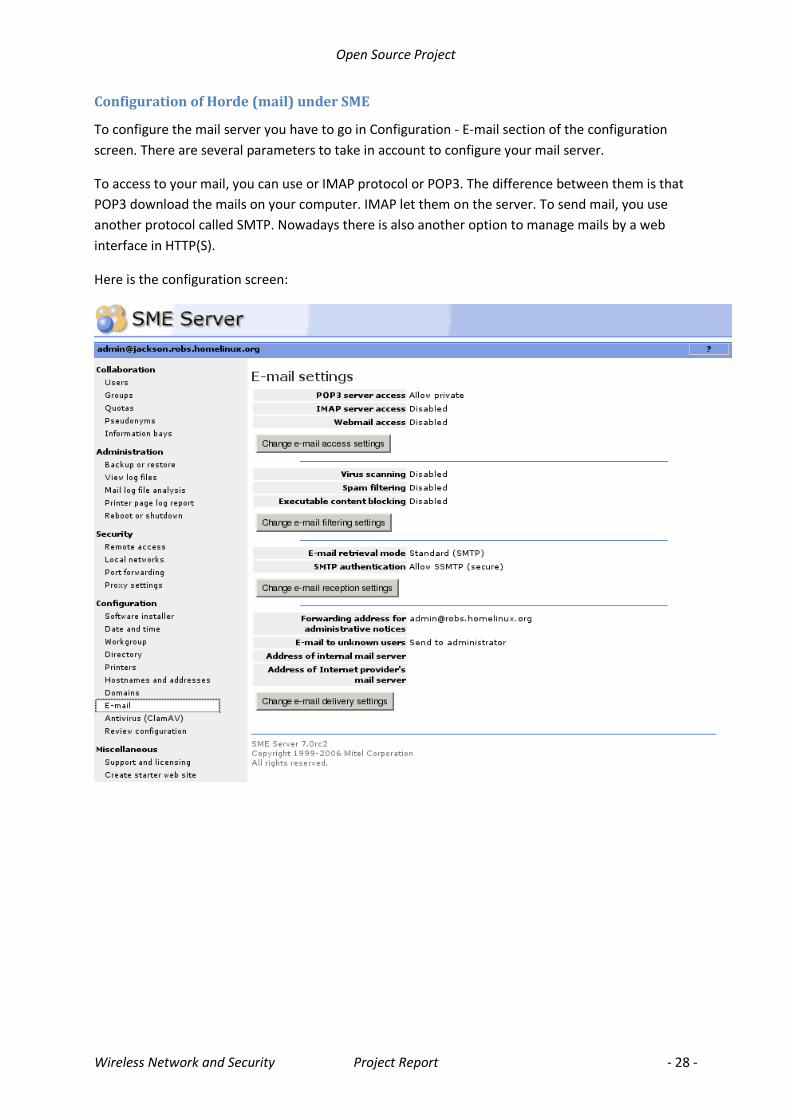
Configuration of Horde (mail) under SME
To configure the mail server you have to go in Configuration - E-mail section of the configuration
screen. There are several parameters to take in account to configure your mail server.
To access to your mail, you can use or IMAP protocol or POP3. The difference between them is that
POP3 download the mails on your computer. IMAP let them on the server. To send mail, you use
another protocol called SMTP. Nowadays there is also another option to manage mails by a web
interface in HTTP(S).
Here is the configuration screen:
Open Source Project
Wireless Network and Security Project Report - 29 -
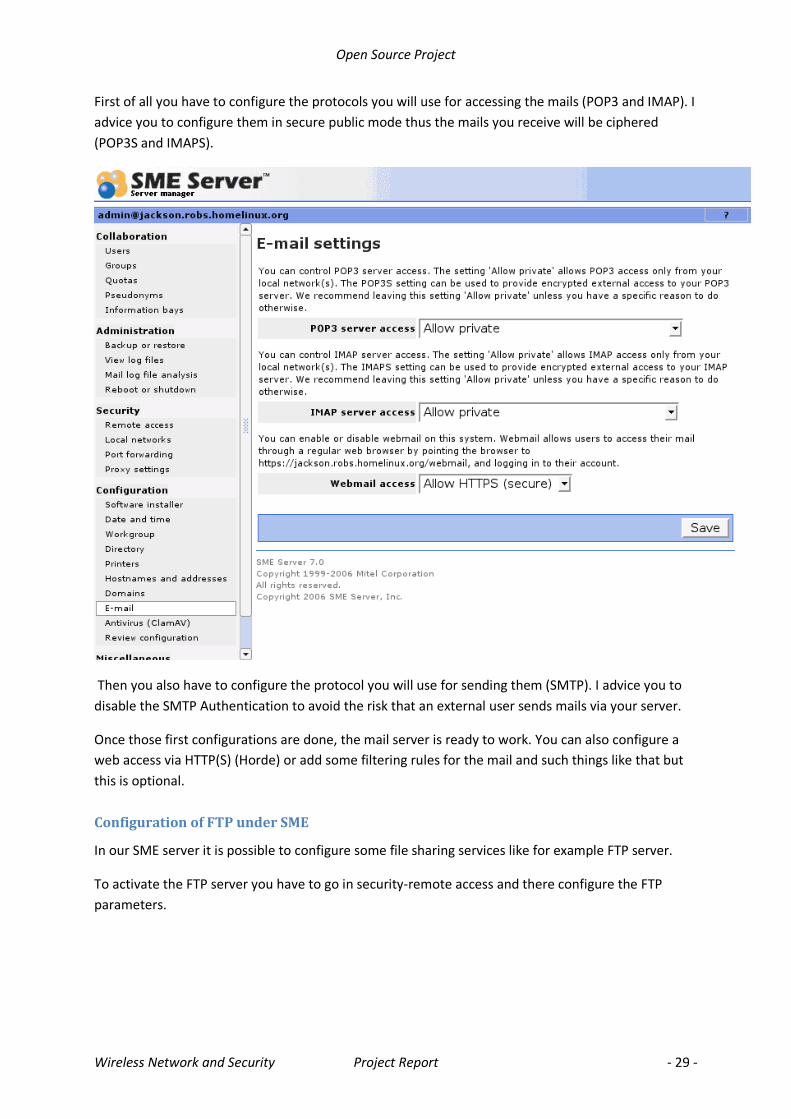
First of all you have to configure the protocols you will use for accessing the mails (POP3 and IMAP). I
advice you to configure them in secure public mode thus the mails you receive will be ciphered
(POP3S and IMAPS).
Then you also have to configure the protocol you will use for sending them (SMTP). I advice you to
disable the SMTP Authentication to avoid the risk that an external user sends mails via your server.
Once those first configurations are done, the mail server is ready to work. You can also configure a
web access via HTTP(S) (Horde) or add some filtering rules for the mail and such things like that but
this is optional.
Configuration of FTP under SME
In our SME server it is possible to configure some file sharing services like for example FTP server.
To activate the FTP server you have to go in security-remote access and there configure the FTP
parameters.

Open Source Project
Wireless Network and Security Project Report - 30 -
Configuration of I-bays
Information bays or also called I-bays is a powerful, easy and flexible mechanism that allow us to
create information sharing sites.
It consist on folders shared on the network that can be reached with different technologies like FTP,
SAMBA, etc … This is a really attracting technology that developed for SME distribution.
For these I-bays is possible to configure several characteristics like the owner, permissions to access,
the rights to write and read files and can configure passwords to access to these sites.
To configure this, you have to go in Collaboration – Information bays.
Open Source Project
Wireless Network and Security Project Report - 31 -
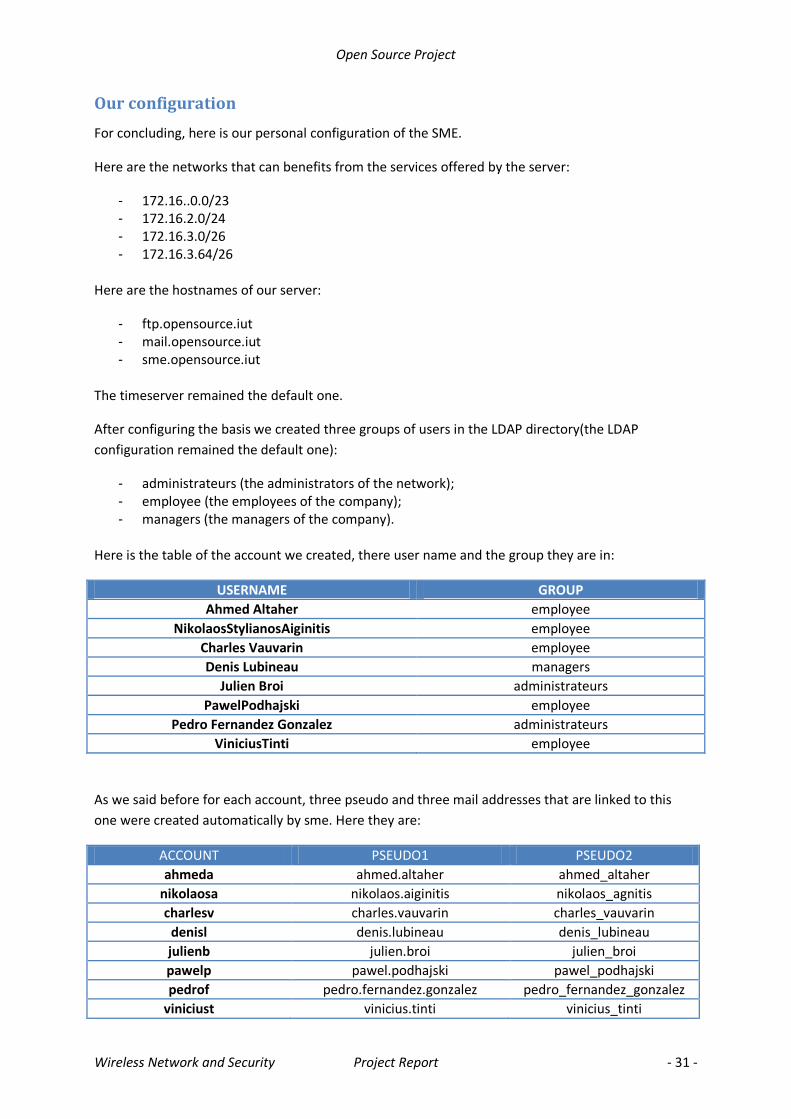
Our configuration
For concluding, here is our personal configuration of the SME.
Here are the networks that can benefits from the services offered by the server:
- 172.16..0.0/23 - 172.16.2.0/24 - 172.16.3.0/26 - 172.16.3.64/26
Here are the hostnames of our server:
- ftp.opensource.iut - mail.opensource.iut - sme.opensource.iut
The timeserver remained the default one.
After configuring the basis we created three groups of users in the LDAP directory(the LDAP
configuration remained the default one):
- administrateurs (the administrators of the network); - employee (the employees of the company); - managers (the managers of the company).
Here is the table of the account we created, there user name and the group they are in:
USERNAME GROUP
Ahmed Altaher employee
NikolaosStylianosAiginitis employee
Charles Vauvarin employee
Denis Lubineau managers
Julien Broi administrateurs
PawelPodhajski employee
Pedro Fernandez Gonzalez administrateurs
ViniciusTinti employee
As we said before for each account, three pseudo and three mail addresses that are linked to this
one were created automatically by sme. Here they are:
ACCOUNT PSEUDO1 PSEUDO2
ahmeda ahmed.altaher ahmed_altaher
nikolaosa nikolaos.aiginitis nikolaos_agnitis
charlesv charles.vauvarin charles_vauvarin
denisl denis.lubineau denis_lubineau
julienb julien.broi julien_broi
pawelp pawel.podhajski pawel_podhajski
pedrof pedro.fernandez.gonzalez pedro_fernandez_gonzalez
viniciust vinicius.tinti vinicius_tinti
Open Source Project
Wireless Network and Security Project Report - 32 -
The mail addresses correspond to these pseudos (“[email protected]”).
You have to notice also that for each group, one global mail address for referring to all the users of
this one was automatically created by sme. There is also default users and pseudonyms like
“admin”,..
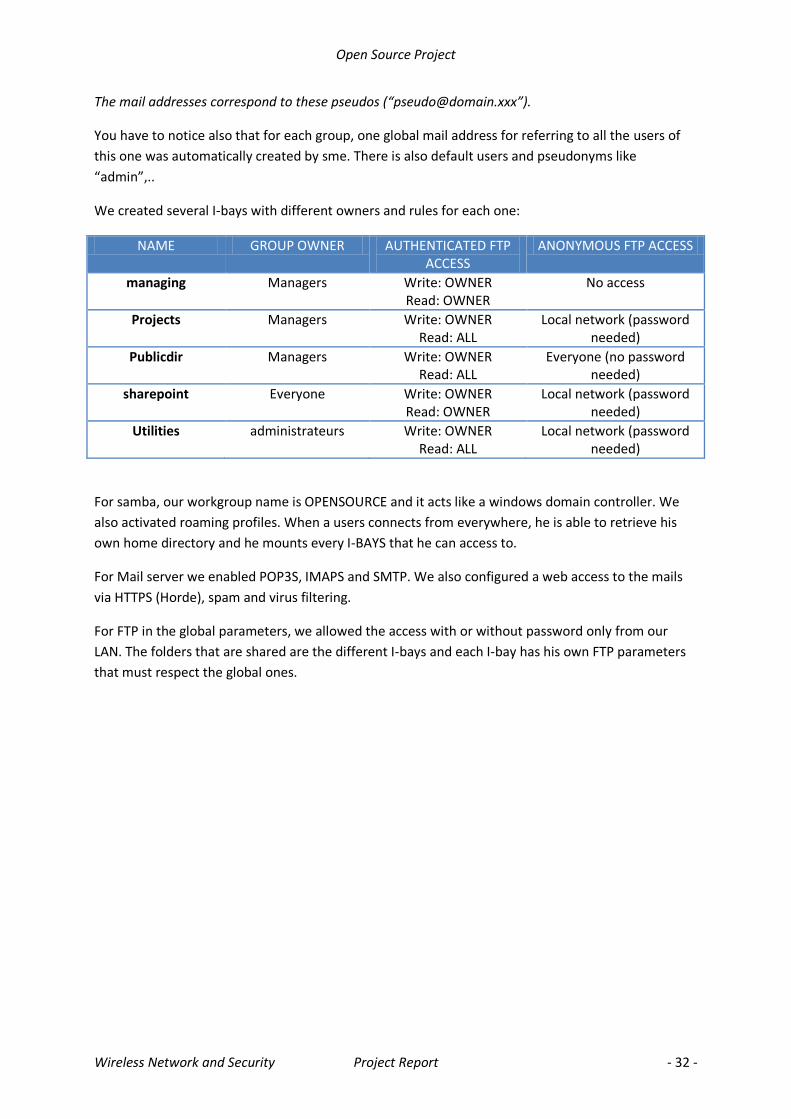
We created several I-bays with different owners and rules for each one:
NAME GROUP OWNER AUTHENTICATED FTP ACCESS
ANONYMOUS FTP ACCESS
managing Managers Write: OWNER Read: OWNER
No access
Projects Managers Write: OWNER Read: ALL
Local network (password needed)
Publicdir Managers Write: OWNER Read: ALL
Everyone (no password needed)
sharepoint Everyone Write: OWNER Read: OWNER
Local network (password needed)
Utilities administrateurs Write: OWNER Read: ALL
Local network (password needed)
For samba, our workgroup name is OPENSOURCE and it acts like a windows domain controller. We
also activated roaming profiles. When a users connects from everywhere, he is able to retrieve his
own home directory and he mounts every I-BAYS that he can access to.
For Mail server we enabled POP3S, IMAPS and SMTP. We also configured a web access to the mails
via HTTPS (Horde), spam and virus filtering.
For FTP in the global parameters, we allowed the access with or without password only from our
LAN. The folders that are shared are the different I-bays and each I-bay has his own FTP parameters
that must respect the global ones.

Open Source Project
Wireless Network and Security Project Report - 33 -
Conclusion
Finally all the services that we wanted are not organized or setup as we planned but they are present
in our network and most of them are working perfectly.
As conclusion we can say that in future projects we have to include in our risk analysis some solution
for any eventual problem of collaboration between the technologies. We just thought separately
about each technology but we forgot to think about their integration and the possible problems due
to this.
Open Source Project
Wireless Network and Security Project Report - 34 -
Proxy and Monitoring (Vinicius)
Proxy
Introduction
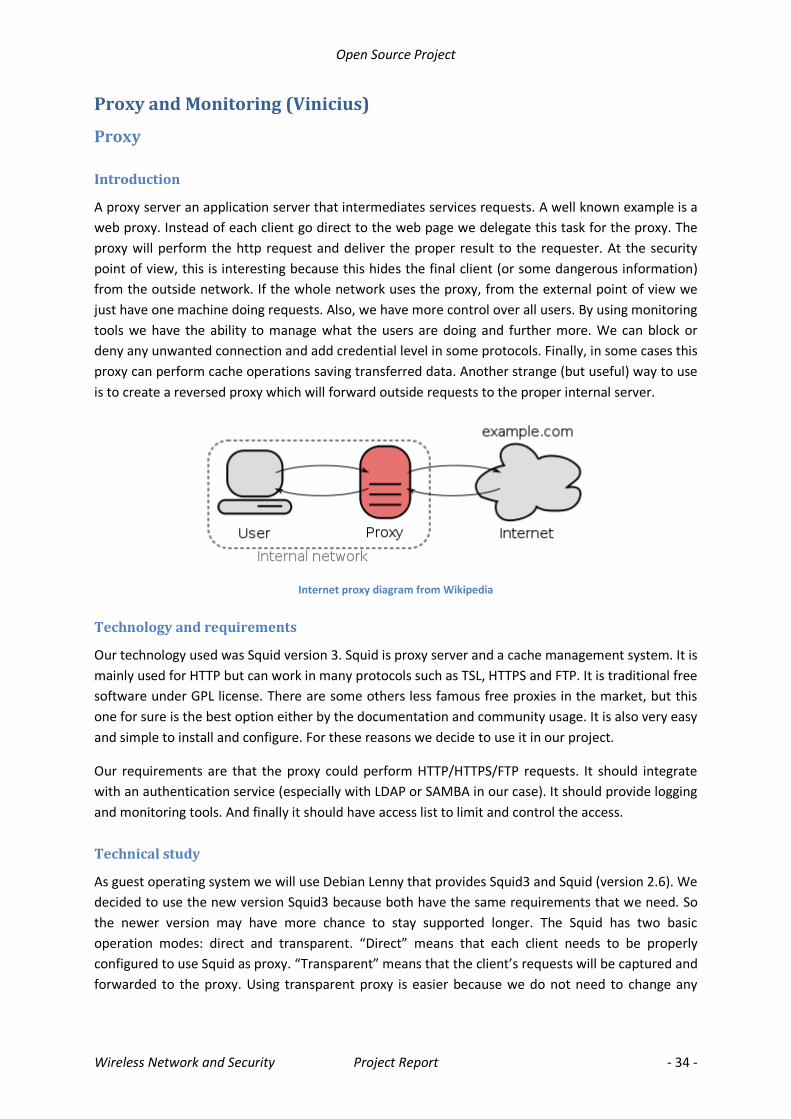
A proxy server an application server that intermediates services requests. A well known example is a
web proxy. Instead of each client go direct to the web page we delegate this task for the proxy. The
proxy will perform the http request and deliver the proper result to the requester. At the security
point of view, this is interesting because this hides the final client (or some dangerous information)
from the outside network. If the whole network uses the proxy, from the external point of view we
just have one machine doing requests. Also, we have more control over all users. By using monitoring
tools we have the ability to manage what the users are doing and further more. We can block or
deny any unwanted connection and add credential level in some protocols. Finally, in some cases this
proxy can perform cache operations saving transferred data. Another strange (but useful) way to use
is to create a reversed proxy which will forward outside requests to the proper internal server.
Internet proxy diagram from Wikipedia
Technology and requirements
Our technology used was Squid version 3. Squid is proxy server and a cache management system. It is
mainly used for HTTP but can work in many protocols such as TSL, HTTPS and FTP. It is traditional free
software under GPL license. There are some others less famous free proxies in the market, but this
one for sure is the best option either by the documentation and community usage. It is also very easy
and simple to install and configure. For these reasons we decide to use it in our project.
Our requirements are that the proxy could perform HTTP/HTTPS/FTP requests. It should integrate
with an authentication service (especially with LDAP or SAMBA in our case). It should provide logging
and monitoring tools. And finally it should have access list to limit and control the access.
Technical study
As guest operating system we will use Debian Lenny that provides Squid3 and Squid (version 2.6). We
decided to use the new version Squid3 because both have the same requirements that we need. So
the newer version may have more chance to stay supported longer. The Squid has two basic
operation modes: direct and transparent. “Direct” means that each client needs to be properly
configured to use Squid as proxy. “Transparent” means that the client’s requests will be captured and
forwarded to the proxy. Using transparent proxy is easier because we do not need to change any
Open Source Project
Wireless Network and Security Project Report - 35 -
configuration in the clients, however it may lead to many protocol level errors. So to avoid these
errors and also increase the security and stability we prefer to use the direct mode.
By default Squid enables a proxy cache which is the reason to run Squid in a dedicated machine. In
some cases it requires a lot of IO operations that may make the machine slower. In general is difficult
to reach this point with Squid but is a point to be taken in consideration. The rule is: if you have
services that requires IO operations avoid to put them together with Squid (if it does have the cache
enable).
For the ACLs we define very simple ones. One of them is that only the internal network is accepted
by the proxy. This avoids external users from using the proxy as a reflector for an attack. Another ACL
that we implemented in the beginning was the login over text file and after over LDAP. Therefore,
proxy users must be in the internal network and also provide their credentials to access it. There are
some programs in Squid that increase the security level of Squid and also provide standard templates
and blacklists like DansGuardian and SquidGuard. They are interesting to be installed. As interesting
as iCAP a content filtering protocol that is supported by Squid3.
For monitoring Squid can provide verbose logs. But they are a hard to understand and my take time
to infer something from it. A well know front end to these logs is Sarg. Sarg is basically a logger
organizer for Squid. We want also to install it.
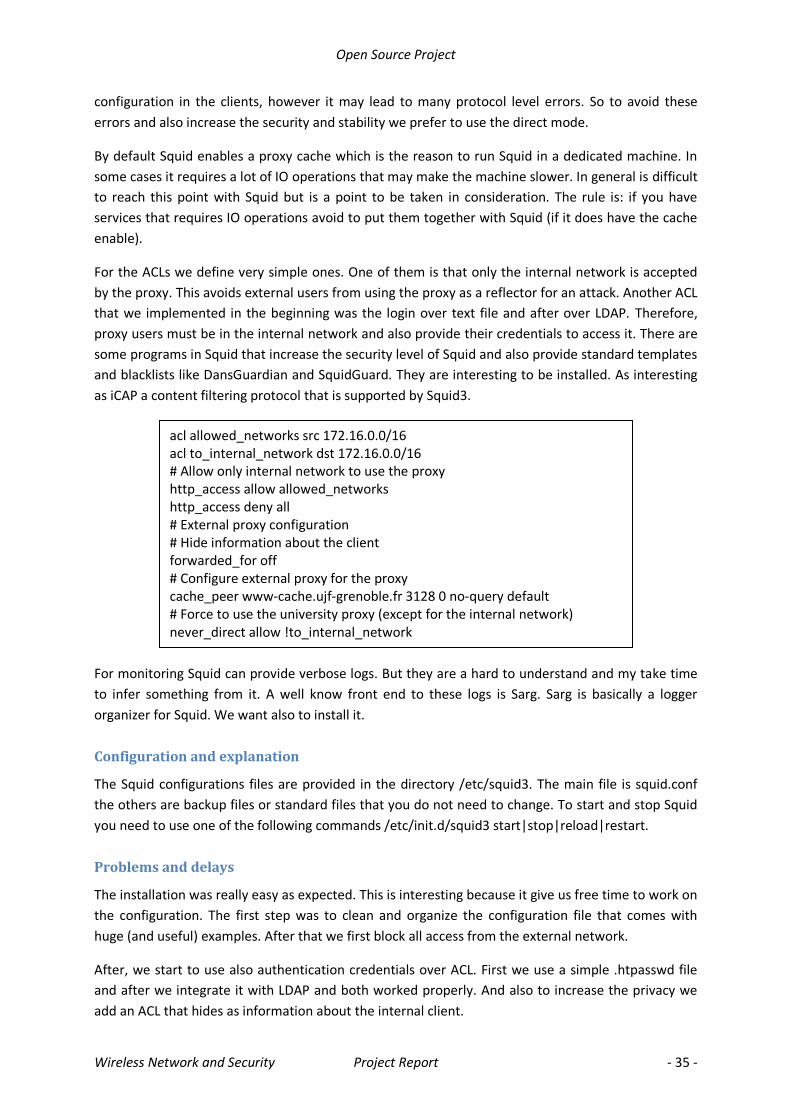
Configuration and explanation
The Squid configurations files are provided in the directory /etc/squid3. The main file is squid.conf
the others are backup files or standard files that you do not need to change. To start and stop Squid
you need to use one of the following commands /etc/init.d/squid3 start|stop|reload|restart.
Problems and delays
The installation was really easy as expected. This is interesting because it give us free time to work on
the configuration. The first step was to clean and organize the configuration file that comes with
huge (and useful) examples. After that we first block all access from the external network.
After, we start to use also authentication credentials over ACL. First we use a simple .htpasswd file
and after we integrate it with LDAP and both worked properly. And also to increase the privacy we
add an ACL that hides as information about the internal client.
acl allowed_networks src 172.16.0.0/16 acl to_internal_network dst 172.16.0.0/16 # Allow only internal network to use the proxy http_access allow allowed_networks http_access deny all # External proxy configuration # Hide information about the client forwarded_for off # Configure external proxy for the proxy cache_peer www-cache.ujf-grenoble.fr 3128 0 no-query default # Force to use the university proxy (except for the internal network) never_direct allow !to_internal_network
Open Source Project
Wireless Network and Security Project Report - 36 -
Everything was good before we move to the 152.77.65.192/26 network which is behind the
university proxy. For that reason we need to add ACLs to Squid to saying to never try to perform
requests by it. Instead of that, it should forward the requests for the proxy server. This makes our
external network works but a problem arrive after. Squid was unable to perform HTTP requests for
the inside network. The problem was solved by add an exception in Squid. If the destination address
is the internal network you can perform by yourself the request.
Unfortunately, we did not have time to configure more important services like DansGuardian,
SquidGuard, Sarg and iCAP.
Modifications
We can say that the progress was good but still missing important parts. The only modifications that
we did were to remove DansGuardian, SquidGuard, Sarg and iCAP.
Conclusions
We can say that we archived many of our primary proposes but we did not have time for the
secondary ones.
Monitoring
Introduction
For providing a good quality once a service is established we need monitoring and logging tools. The
main goal is to be proactive and have more knowledge about the problem. If the logging systems is
working properly we can make a view from the exact moment of the problem and once detected we
can start to study it. Instead of wait a problem happen again to start to debug is much better and fast
to have a proper logging and monitoring system. For example with Nagios you can create monitoring
tasks. From time to time Nagios will try to reach one service and perform tasks that will measure the
service availability. You can cascade services and detect the impact that may arrive if this service is
down. You can also be more proactive with Monit. Once the service is down Monit will try to restart
it.
Technology and requirements
In our network, we want a system that could verify our server's availability and concentrate all this
information. This will be useful to detect any problems inside our network and also measure the
down and up time. This system need to work with as many devices as possible including: servers,
desktops and network devices. Would be interesting having SNMP support. This protocol is found in
many devices and it can be installed in standard machines. It is a simple way to gather and
concentrate all information.
Would be interesting also if this monitoring tool could be active. As soon as a service go down it
should try to turn it on again. Sometimes a service just goes down for a completely unknown reason
or maybe we cannot avoid it. So if we have a proactive monitoring tool we can save time and
increase the up time. Some of these monitoring tools can be very smart and even try more than one
way to restart the service (always reporting their actions which will be studied after).
Open Source Project
Wireless Network and Security Project Report - 37 -
Finally, many services provide their own logging system. But all this logs are distributed among our
devices. Would be much more interesting having a single point that concentrates all this information.
This tool must connect or receive all logs information and store it. This will prevent problems with
data loses and can also work as a backup log.
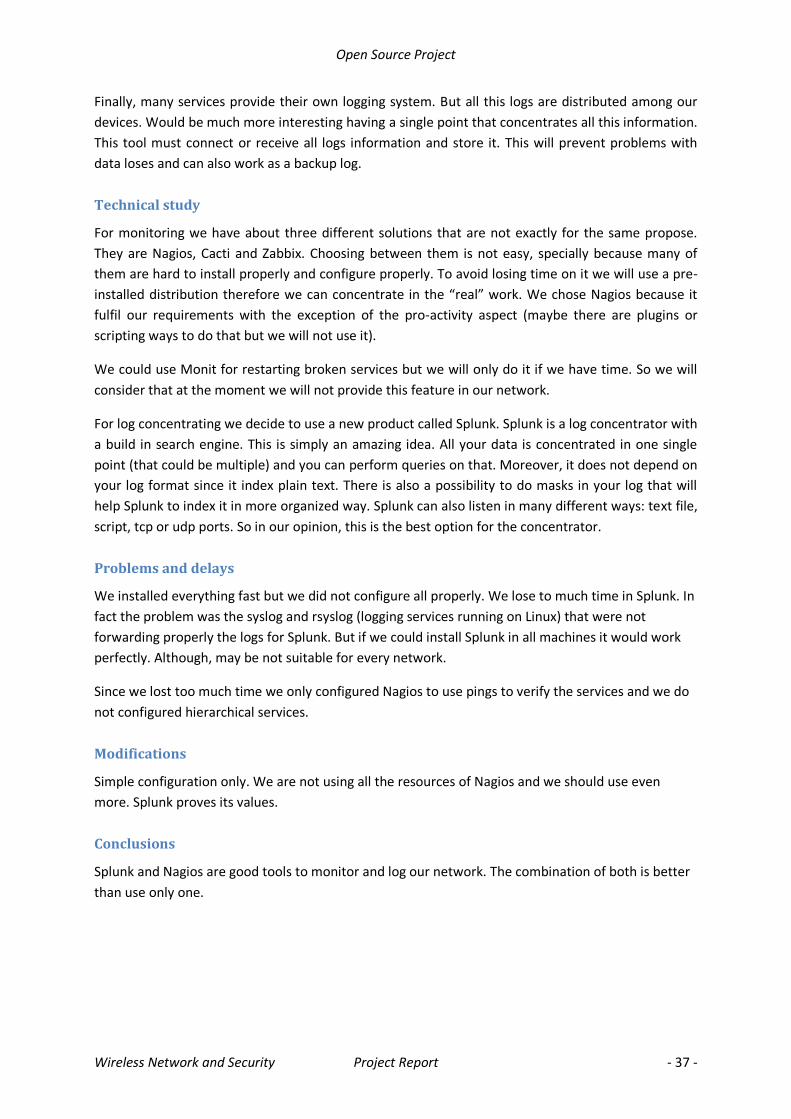
Technical study
For monitoring we have about three different solutions that are not exactly for the same propose.
They are Nagios, Cacti and Zabbix. Choosing between them is not easy, specially because many of
them are hard to install properly and configure properly. To avoid losing time on it we will use a pre-
installed distribution therefore we can concentrate in the “real” work. We chose Nagios because it
fulfil our requirements with the exception of the pro-activity aspect (maybe there are plugins or
scripting ways to do that but we will not use it).
We could use Monit for restarting broken services but we will only do it if we have time. So we will
consider that at the moment we will not provide this feature in our network.
For log concentrating we decide to use a new product called Splunk. Splunk is a log concentrator with
a build in search engine. This is simply an amazing idea. All your data is concentrated in one single
point (that could be multiple) and you can perform queries on that. Moreover, it does not depend on
your log format since it index plain text. There is also a possibility to do masks in your log that will
help Splunk to index it in more organized way. Splunk can also listen in many different ways: text file,
script, tcp or udp ports. So in our opinion, this is the best option for the concentrator.
Problems and delays
We installed everything fast but we did not configure all properly. We lose to much time in Splunk. In
fact the problem was the syslog and rsyslog (logging services running on Linux) that were not
forwarding properly the logs for Splunk. But if we could install Splunk in all machines it would work
perfectly. Although, may be not suitable for every network.
Since we lost too much time we only configured Nagios to use pings to verify the services and we do
not configured hierarchical services.
Modifications
Simple configuration only. We are not using all the resources of Nagios and we should use even
more. Splunk proves its values.
Conclusions
Splunk and Nagios are good tools to monitor and log our network. The combination of both is better
than use only one.
Open Source Project
Wireless Network and Security Project Report - 38 -
General schedule
Original schedule
Final Schedule
Open Source Project
Wireless Network and Security Project Report - 39 -
Wifi And Radius (Ahmed and Nikolaos - Stylianos)
Introduction
Our tasks include both of WLAN and RADIUS technologies deployment and testing, hence that we
use wireless fidelity (Wi-Fi 802.11) standards especially mobility options to give users free work
space taking in mind security constraints and procedures .
For security reasons RADIUS authentication will be the best choice to authorize users depending on
login database, rights and permissions which is AAA mechanism. Technically 1645 and 1646 UDP
ports used to communicate between authenticator and authentication server in Cisco networks, so
it's feasible to achieve our security task with this technique.
In this document we prepare the initiation phase regarding our subtasks that depend on other
subtasks as subgroups, as a result integration will require compatibility constraints such us hardware
configuration or software settings. We set our objectives towards the project requirements and
specifications which are very important to reach the security target within available components.
Objectives
Design and deploy a wireless LAN access infrastructure.
Allow mobility of users in specified area.
Secure WLAN by using AAA methodology.
Using database authentication such as LDAP to increase security.
Quantity Model description Component
2 Cisco Aironet 1242AG /1200AG Wireless Access Point
1 Cisco 2106 Wireless Access Controller
1 Cisco 2960 Switch
1 Computer configured to run Free RADIUS RADIUS Server
1 Preconfigured LDAP Server LDAP Access
Feasibility:
The project (subtasks) is feasible from economic and technical dimensions. In this phase we consider
the availability of solutions and their costs according to our requirements and time.
Constraints:
Hardware limited options.
Time milestones.
Open source technologies.
Security considerations.
Risks:
Lake of knowledge.
Other dependent tasks delay.
Software compatibility problems.
Hardware configuration problems.
Open Source Project
Wireless Network and Security Project Report - 40 -
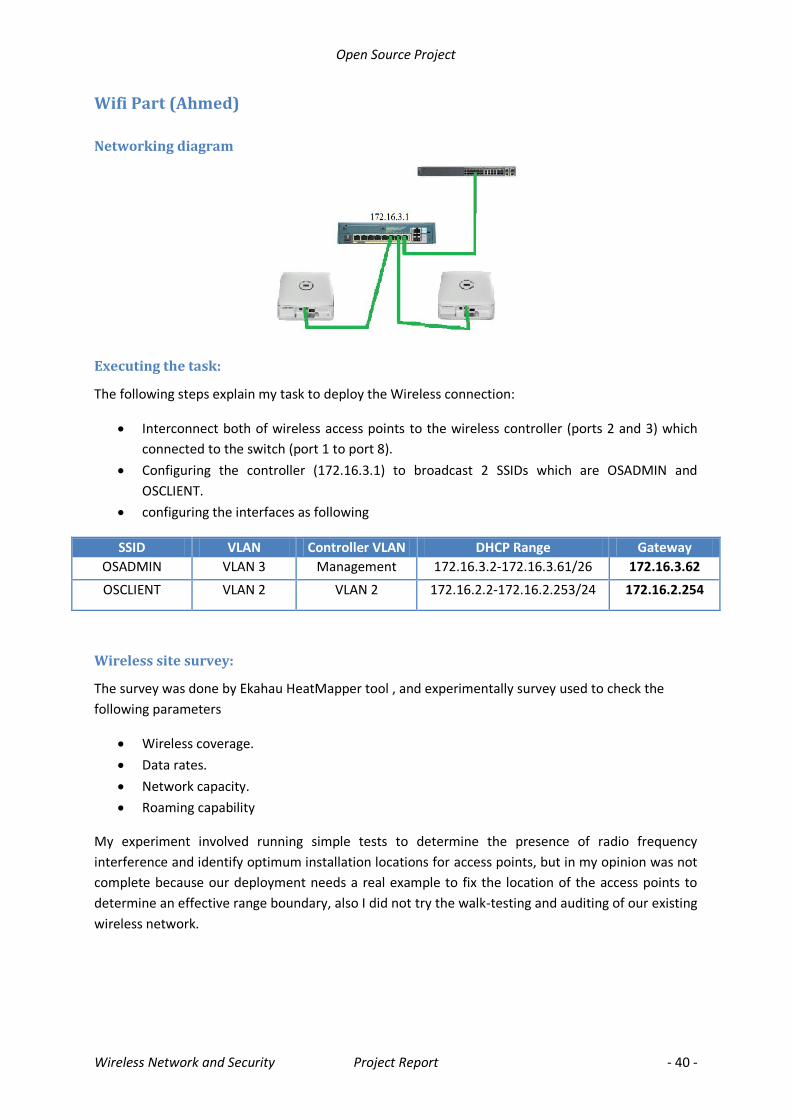
Wifi Part (Ahmed)
Networking diagram
Executing the task:
The following steps explain my task to deploy the Wireless connection:
Interconnect both of wireless access points to the wireless controller (ports 2 and 3) which
connected to the switch (port 1 to port 8).
Configuring the controller (172.16.3.1) to broadcast 2 SSIDs which are OSADMIN and
OSCLIENT.
configuring the interfaces as following
Gateway DHCP Range Controller VLAN VLAN SSID
172.16.3.62 172.16.3.2-172.16.3.61/26 Management VLAN 3 OSADMIN
172.16.2.254 172.16.2.2-172.16.2.253/24 VLAN 2 VLAN 2 OSCLIENT
Wireless site survey:
The survey was done by Ekahau HeatMapper tool , and experimentally survey used to check the
following parameters
Wireless coverage.
Data rates.
Network capacity.
Roaming capability
My experiment involved running simple tests to determine the presence of radio frequency
interference and identify optimum installation locations for access points, but in my opinion was not
complete because our deployment needs a real example to fix the location of the access points to
determine an effective range boundary, also I did not try the walk-testing and auditing of our existing
wireless network.

Open Source Project
Wireless Network and Security Project Report - 41 -
Radius (Nikolaos - Stylianos)
Introduction
In the following pages we will discover the world of wireless security by implementing a network
with one CISCO controller, two lightweight Access Points and a RADIUS server.
Specifically we will provide all the required information in order to configure the RADIUS server in
RedHat distribution. The authentication method we will use EAP-TLS with AES data encryption.
Basic Requirements
Hardware and Software needed:
PC with at least 256MB RAM and one NIC, we use Intel (suggested)
This PC will be used to install CentOS 5.5 and will be the PC with the RADIUS server.
Two configured CISCO Access Points (Reference WiFi part)
PC with at least 256MB RAM and installed CentOS that will be used for our Certificate
Authority. (optional)
Windows XP Client with wireless network card.(optional)
Linux client with wireless network card. (optional)
MAC client with wireless network card .(optional)
Wireshark (optional)
What is RADIUS Server ?
Remote Authentication Dial In User Service (RADIUS) is a networking protocol that provides
centralized Authentication, Authorization, and Accounting (AAA) management for computers to
connect and use a network service. The main functions of a RADIUS server is to authenticate users or
devices before granting them access to a network, to authorize those users or devices for certain
network services and to account for usage of those services.
Scope
Our main goal is to implement a secure-flexible way to authenticate the users in our wireless
network. In the beginning our planning was to have a database to store user names and passwords
which would communicate with the RADIUS server so we could authenticate the users. This database
was planned to be an LDAP database.
As its show to the first figure we would start with the configuration of the controller and the access
points(Reference WiFi part).Then we would configure the FreeRadius server for two weeks (28th
November until 12th December ) and after the Christmas holidays we would adapt the LDAP server
that our colleagues configured for one week (1st to 9th January).Finally we have the testing period for
one week (10th to 17th of January).
Open Source Project
Wireless Network and Security Project Report - 42 -
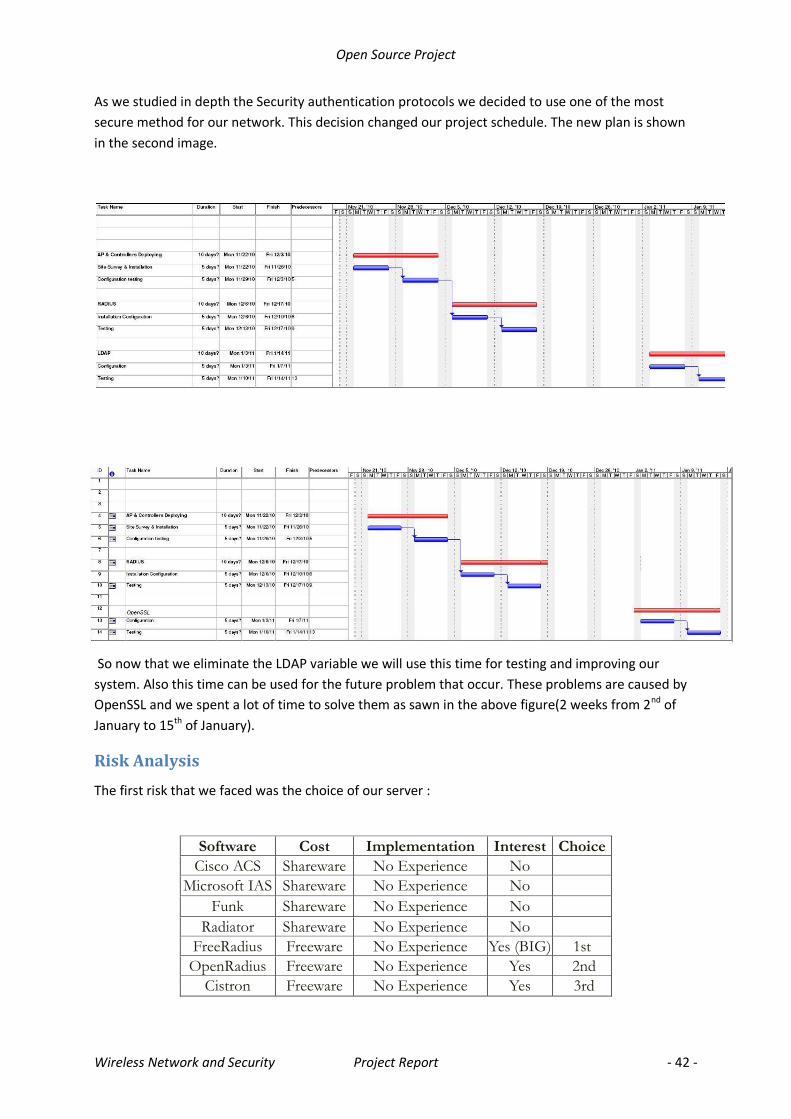
As we studied in depth the Security authentication protocols we decided to use one of the most
secure method for our network. This decision changed our project schedule. The new plan is shown
in the second image.
So now that we eliminate the LDAP variable we will use this time for testing and improving our
system. Also this time can be used for the future problem that occur. These problems are caused by
OpenSSL and we spent a lot of time to solve them as sawn in the above figure(2 weeks from 2nd of
January to 15th of January).
Risk Analysis
The first risk that we faced was the choice of our server :
Software Cost Implementation Interest Choice
Cisco ACS Shareware No Experience No
Microsoft IAS Shareware No Experience No
Funk Shareware No Experience No
Radiator Shareware No Experience No
FreeRadius Freeware No Experience Yes (BIG) 1st
OpenRadius Freeware No Experience Yes 2nd
Cistron Freeware No Experience Yes 3rd
Open Source Project
Wireless Network and Security Project Report - 43 -
Why FreeRadius ?
Before choosing FreeRadius we took in consideration reliable sources of information basically on the
internet (big sites with many positive feedbacks like Wikipedia, LinuxForums etc) and we realized
that FreeRadius meets all the requirements for our project.
Some other big competitors in the field are :
Cistron RADIUS: Mature, Stable, Works well, not modular, has a client (no library through).
OpenRADIUS: offers more flexibility than Cistron in the dictionary and policies, has a
language-independent FastCGI-like module interface. Has no client library either, supports
large numbers of concurrent requests, redundant target servers, and on the fly PAP and
CHAP password encoding.
FreeRadius: Supports a huge number of modules, is the new standard, widely used, comes
with client (no library AFAIK).Supports OpenLDAP that we could use in our project and
because of the fact that is widely used we can find support on the internet for the problems
what will occur during its installation. We can test the server without having a client with the
radclient and the radtest commands. Specially the Radclient can send arbitrary RADIUS
packets to a RADIUS server, then shows the reply. It can be used to test changes we made in
the configuration of the radius server, or it can be used to monitor if a radius server is up.
Remarkable the Radtest provides a simple but interesting tool for testing the FreeRADIUS
server by querying it directly with requests.
Last reason to choose this software is that we use it also in our Institute so we can have
support from experienced people in this field.
The second risk was the choice of the Authentication method:
Extensible Authentication Protocol (EAP) is a universal authentication framework frequently used in
wireless networks and point to point connections. The EAP protocol is most often used in wireless
LAN networks but it can be used for wired LAN authentication also. The EAP have many sub-types,
such as: EAP-MD5 EAP-PEAP,EAP-SIM,EAP-TLS,EAP-TTLS,EAP-AKA,EAP-IKEv2,EAP-FAST, etc. The EAP
protocol that we will use in our project is EAP-TLS. It is one of the most reliable types of EAP. EAP-TLS
is the original standard wireless LAN EAP authentication protocol. It is considered one of the most
secure EAP standards available and is universally supported by all manufacturers of wireless LAN
hardware and software including Microsoft. The requirement for a client-side certificate gives EAP-
TLS its authentication strength. This client-side certificate can be in a smart card or in another
physical data storage, this is very safe cause the attacker will need this certificate also and not only
the username and the password of the victim. And if the attacker steal the victims smart card then
he will notice it (cause its something physical) and will ask for different certificate.
Bellow we can see a table with more details of all the authentication methods compare to the
implementation risk (Deployment Difficulty).

Open Source Project
Wireless Network and Security Project Report - 44 -
“Source: Interopnet Labs, Spectrum Security Initiative May 2005 ”
Regardless the high risk, we needed to keep to our scope which is strong security to our network, so
we started working on EAP-TLS method.
Technical Approach
We needed to understand the co-operation between the Controller and the radius server itself. In
order to succeed this, we used first a simple Access Point to connect our users.
“Source: http://www.google.gr/imgres?imgurl=http://www.interlinknetworks.com”
The first authentication method we used was EAP-MD5.It is the simplest method for connecting
users because it only provides authentication of the EAP peer to the EAP server but not mutual
authentication. So its vulnerable to man the middle attacks.
The second step was to configure the Radius server using EAP-PEAP. In this method a user name and
a password is required which is provided from a database. In our case the database is a simple text
file, but as an extension can be an SQL server or an LDAP.
Open Source Project
Wireless Network and Security Project Report - 45 -
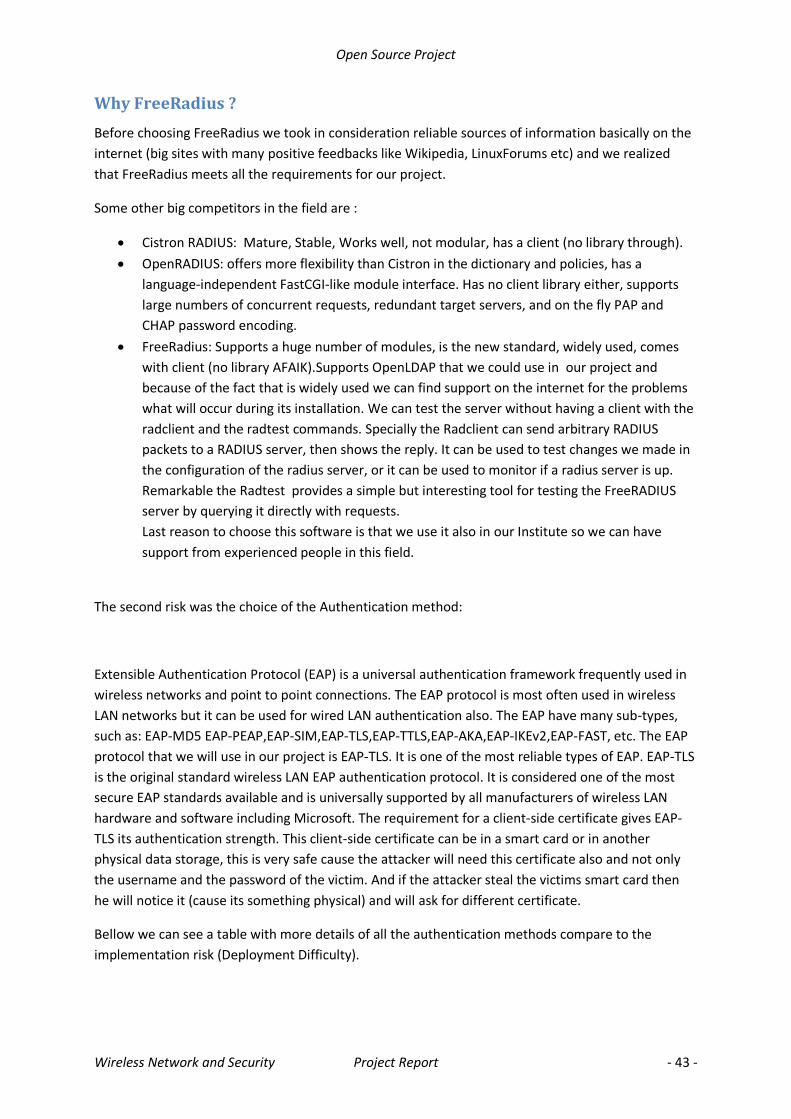
We can see below in details the negotiation between the server and the Access Point for this method
“Source: http://www.h3c.com/portal/Technical_Support___Documents/Technical_Documents”
After succeeding it we tried our main goal, which is EAP-TLS. In this method clients are authenticated
only with certificates. The certificates are created and distributed by a Certificate Authority (CA).Each
user has its own unique certificate. No need of database is required and this is the reason that we did
not implement the LDAP server in our infrastructure. The last method was working but under certain
circumstances which are explained in details at chapter, problems.

Open Source Project
Wireless Network and Security Project Report - 46 -
Below we can see the negotiation between the access point and the server.
“Source : http://www.cisco.com/en/US/products/sw/secursw”
So after the preparation it was easier to combine the controller with the Radius Server
because we had clear view of all the authentication methods from a simple network.
We used the CISCO controller. The controller is now the only client of the server and the
users are the supplicants. So, when the users (supplicants) are trying to connect to our
wireless networks the controller sends a request to the server and the server takes the
decision if the user is holding the right certificate or not. If the certificate matches with the
same CA of the certificate of the server and the controller then the user is authenticated and
he is moved to the VLAN that he is permitted to go, if not, his requests are being rejected.
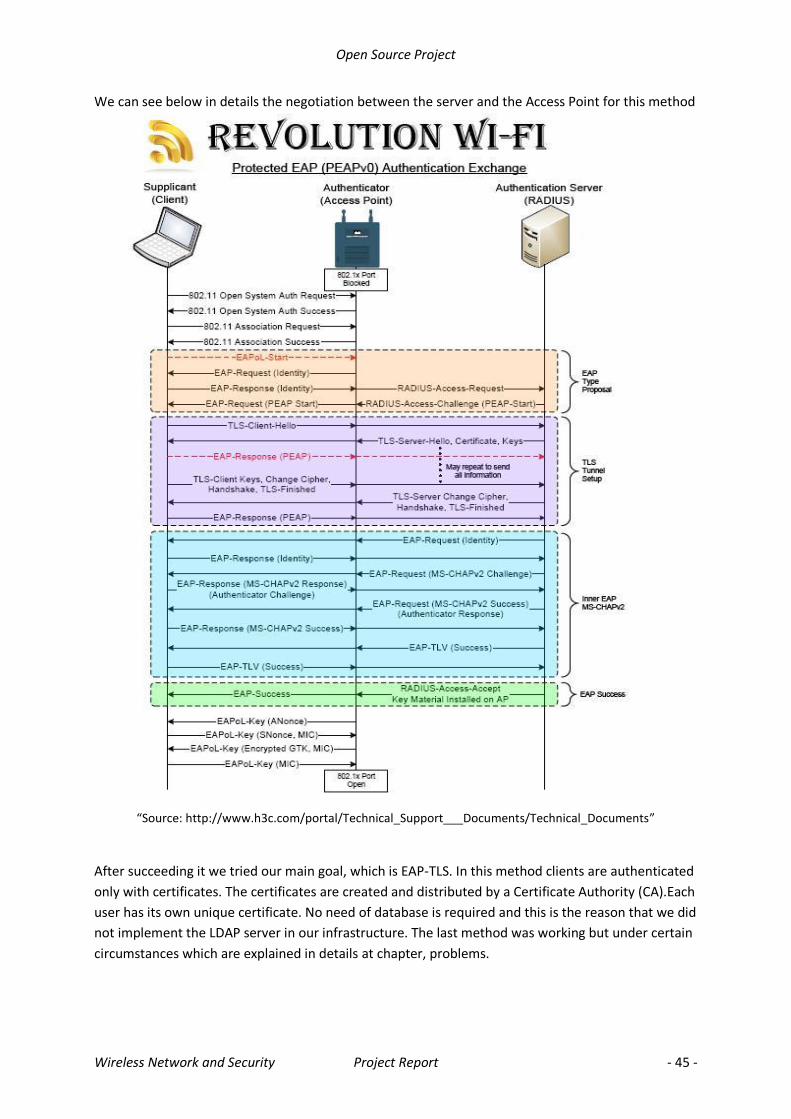
Once the users are authenticated the data can be encrypted with different methods such as
TKIP and AES, we have chose to use AES.
Below is our topology with one Access Point :
Open Source Project
Wireless Network and Security Project Report - 47 -
“Source : http://www.howtoforge.com/wifi-authentication-accounting-with-freeradius-on-centos5”
Why AES ?
The two main methods to cipher the data after the authentication of the users in a wireless network
is TKIP (Temporal Key Integrity Protocol) and AES (Advanced Encryption Standard).The TKIP method
is vulnerable to many similar attacks as the WEP key. As it is known a WEP key can be easily obtained
with simple programs (Aircrack, AirSnot , etc) in a rather short period of time. So its not secure for
our network.
On the other hand AES is a more advanced method that is nearly impossible to be hacked. The strong
point of the encryption is the way that the algorithm is build. There are several mathematic
functions (shift-mix rows, round key, etc ) between different blocks of numbers.This makes it very
hard for decrypting the messages and specially when we use 128,192 or 256 bits for each block size.
Its not a coincidence that the USA army uses this algorithm for exchanging top secret data.
Why OpenSSL?
OpenSSL is an open source solution of using SSL and TLS protocols. It supports many different
cryptographic algorithms DES, Blowfish, Camellia, SEED, AES and many other.
This is the reason that we use this tool to Create our Certificate authority. The type of the certificates
is X.509
X.509
X.509 is a certificate format that the valuator is always a Certificate Authority but in PGP format
anyone can be the valuator accept in some cases(hieratical structure supported certificates)
The data that these certificates contain are:
The version of X.509
The certificate owner public key
The certificate owner unique identifier
The serial number of the certificate
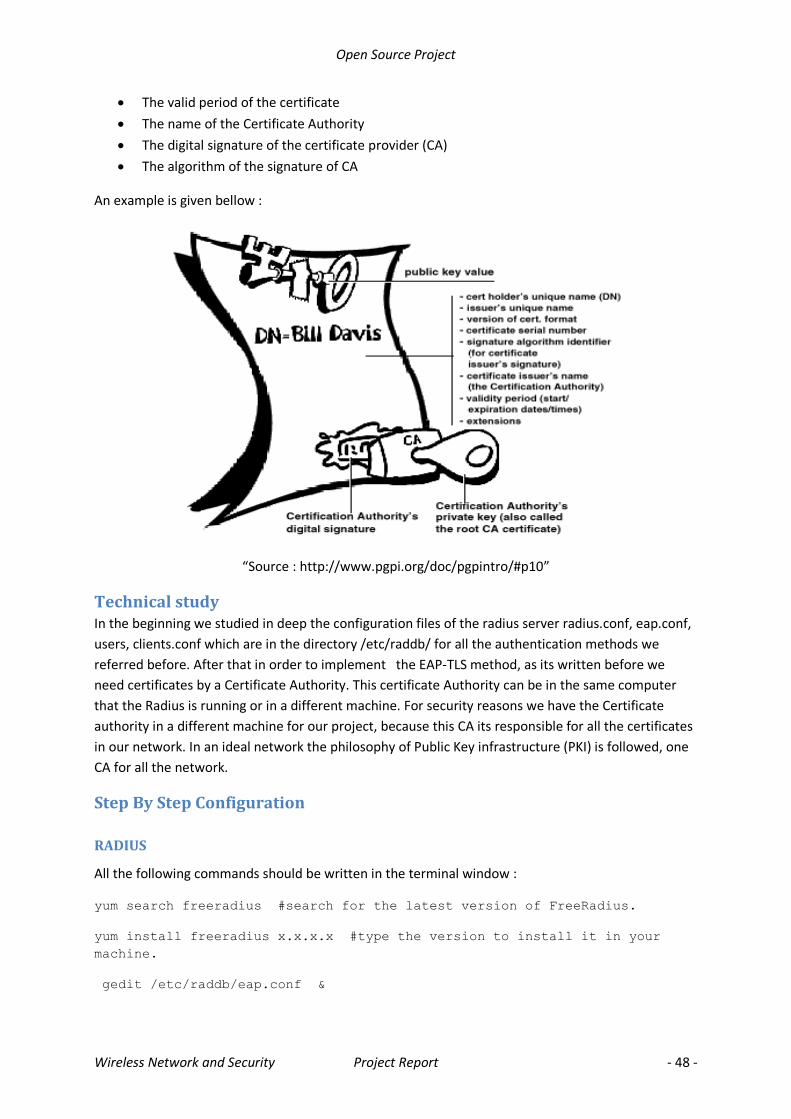
Open Source Project
Wireless Network and Security Project Report - 48 -
The valid period of the certificate
The name of the Certificate Authority
The digital signature of the certificate provider (CA)
The algorithm of the signature of CA
An example is given bellow :
“Source : http://www.pgpi.org/doc/pgpintro/#p10”
Technical study In the beginning we studied in deep the configuration files of the radius server radius.conf, eap.conf,
users, clients.conf which are in the directory /etc/raddb/ for all the authentication methods we
referred before. After that in order to implement the EAP-TLS method, as its written before we
need certificates by a Certificate Authority. This certificate Authority can be in the same computer
that the Radius is running or in a different machine. For security reasons we have the Certificate
authority in a different machine for our project, because this CA its responsible for all the certificates
in our network. In an ideal network the philosophy of Public Key infrastructure (PKI) is followed, one
CA for all the network.
Step By Step Configuration
RADIUS
All the following commands should be written in the terminal window :
yum search freeradius #search for the latest version of FreeRadius.
yum install freeradius x.x.x.x #type the version to install it in your
machine.
gedit /etc/raddb/eap.conf &
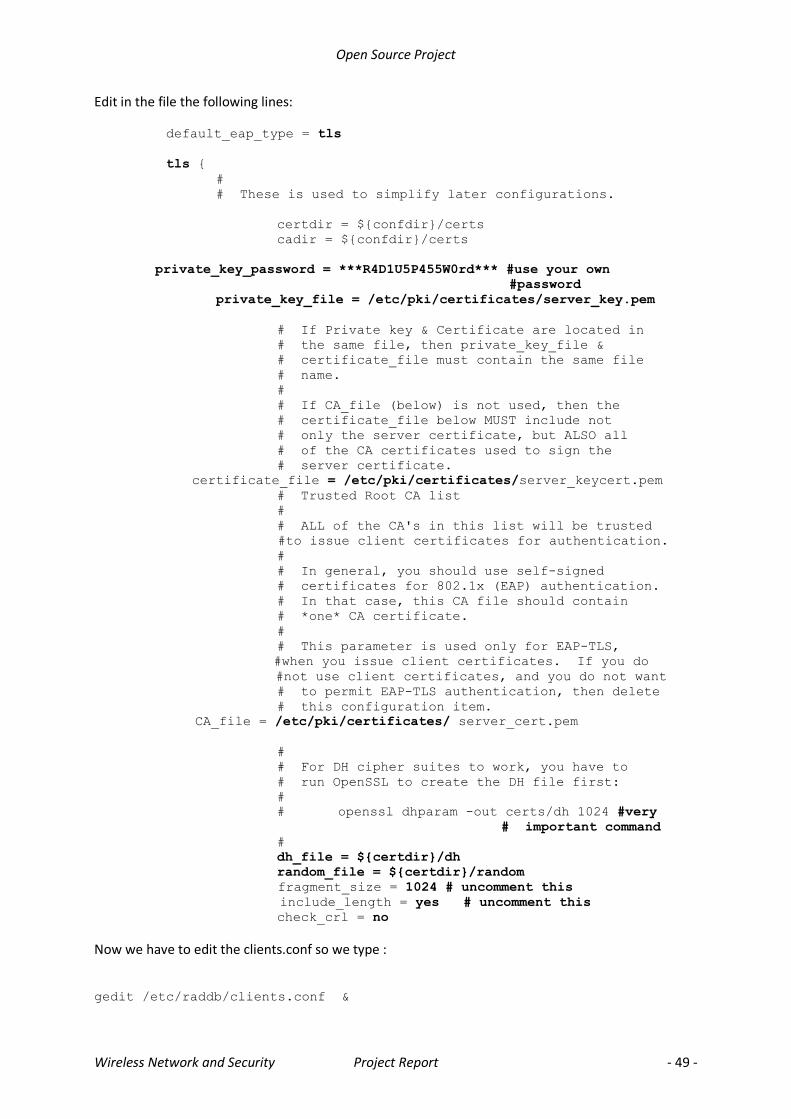
Open Source Project
Wireless Network and Security Project Report - 49 -
Edit in the file the following lines:
default_eap_type = tls
tls {
#
# These is used to simplify later configurations.
certdir = ${confdir}/certs
cadir = ${confdir}/certs
private_key_password = ***R4D1U5P455W0rd*** #use your own
#password
private_key_file = /etc/pki/certificates/server_key.pem
# If Private key & Certificate are located in
# the same file, then private_key_file &
# certificate_file must contain the same file
# name.
#
# If CA_file (below) is not used, then the
# certificate_file below MUST include not
# only the server certificate, but ALSO all
# of the CA certificates used to sign the
# server certificate.
certificate_file = /etc/pki/certificates/server_keycert.pem
# Trusted Root CA list
#
# ALL of the CA's in this list will be trusted
#to issue client certificates for authentication.
#
# In general, you should use self-signed
# certificates for 802.1x (EAP) authentication.
# In that case, this CA file should contain
# *one* CA certificate.
#
# This parameter is used only for EAP-TLS,
#when you issue client certificates. If you do
#not use client certificates, and you do not want
# to permit EAP-TLS authentication, then delete
# this configuration item.
CA_file = /etc/pki/certificates/ server_cert.pem
#
# For DH cipher suites to work, you have to
# run OpenSSL to create the DH file first:
#
# openssl dhparam -out certs/dh 1024 #very
# important command
#
dh_file = ${certdir}/dh
random_file = ${certdir}/random
fragment_size = 1024 # uncomment this
include_length = yes # uncomment this
check_crl = no
Now we have to edit the clients.conf so we type :
gedit /etc/raddb/clients.conf &
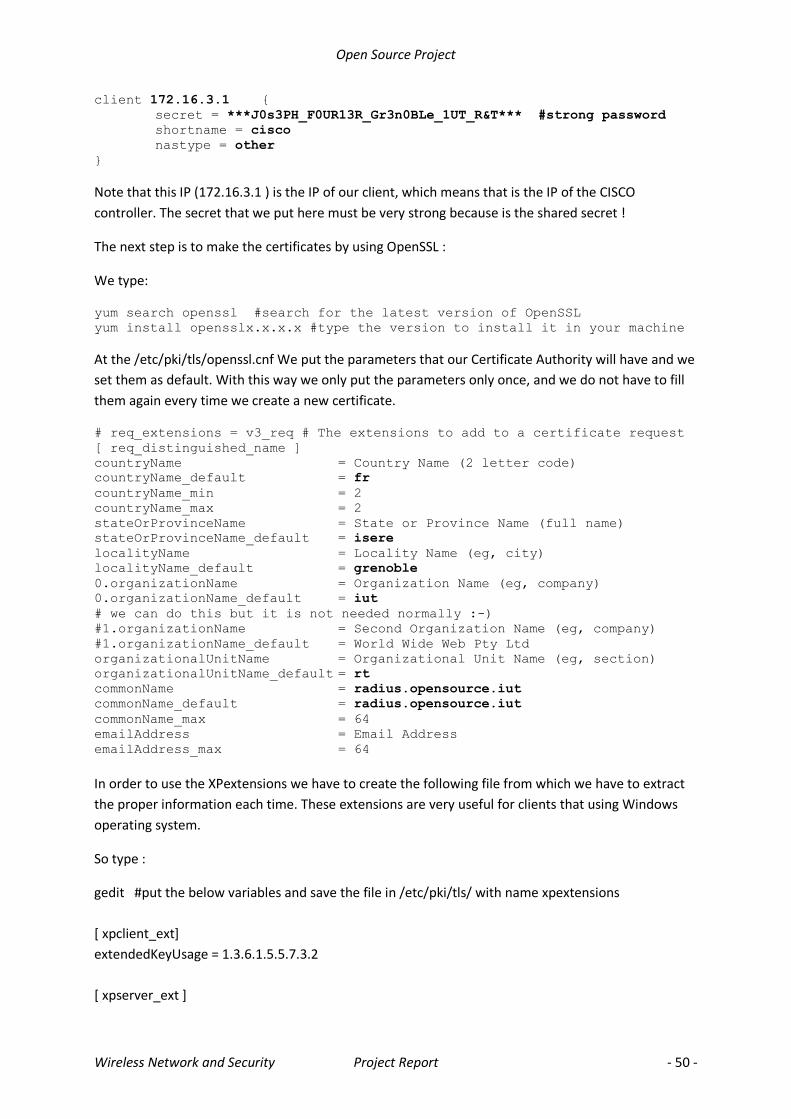
Open Source Project
Wireless Network and Security Project Report - 50 -
client 172.16.3.1 {
secret = ***J0s3PH_F0UR13R_Gr3n0BLe_1UT_R&T*** #strong password
shortname = cisco
nastype = other
}
Note that this IP (172.16.3.1 ) is the IP of our client, which means that is the IP of the CISCO
controller. The secret that we put here must be very strong because is the shared secret !
The next step is to make the certificates by using OpenSSL :
We type:
yum search openssl #search for the latest version of OpenSSL
yum install opensslx.x.x.x #type the version to install it in your machine
At the /etc/pki/tls/openssl.cnf We put the parameters that our Certificate Authority will have and we
set them as default. With this way we only put the parameters only once, and we do not have to fill
them again every time we create a new certificate.
# req_extensions = v3_req # The extensions to add to a certificate request
[ req_distinguished_name ]
countryName = Country Name (2 letter code)
countryName_default = fr
countryName_min = 2
countryName_max = 2
stateOrProvinceName = State or Province Name (full name)
stateOrProvinceName_default = isere
localityName = Locality Name (eg, city)
localityName_default = grenoble
0.organizationName = Organization Name (eg, company)
0.organizationName_default = iut
# we can do this but it is not needed normally :-)
#1.organizationName = Second Organization Name (eg, company)
#1.organizationName_default = World Wide Web Pty Ltd
organizationalUnitName = Organizational Unit Name (eg, section)
organizationalUnitName_default = rt
commonName = radius.opensource.iut
commonName_default = radius.opensource.iut
commonName_max = 64
emailAddress = Email Address
emailAddress_max = 64
In order to use the XPextensions we have to create the following file from which we have to extract
the proper information each time. These extensions are very useful for clients that using Windows
operating system.
So type :
gedit #put the below variables and save the file in /etc/pki/tls/ with name xpextensions
[ xpclient_ext]
extendedKeyUsage = 1.3.6.1.5.5.7.3.2
[ xpserver_ext ]
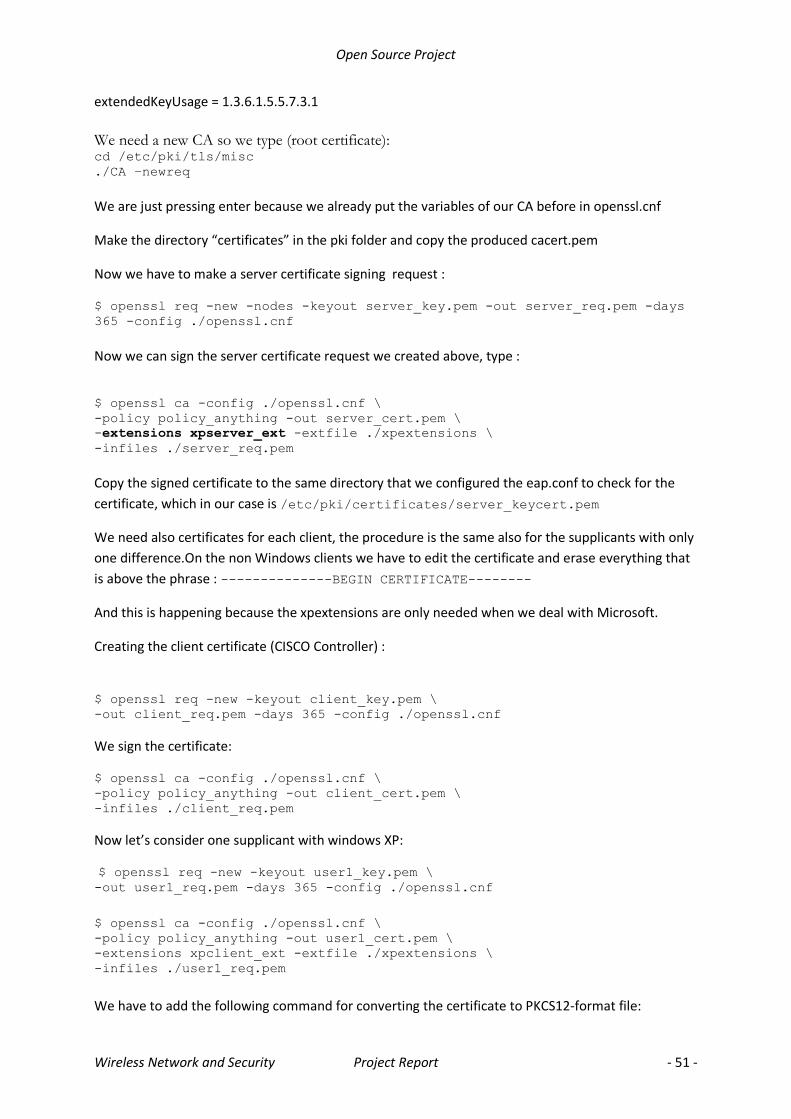
Open Source Project
Wireless Network and Security Project Report - 51 -
extendedKeyUsage = 1.3.6.1.5.5.7.3.1
We need a new CA so we type (root certificate): cd /etc/pki/tls/misc
./CA –newreq
We are just pressing enter because we already put the variables of our CA before in openssl.cnf
Make the directory “certificates” in the pki folder and copy the produced cacert.pem
Now we have to make a server certificate signing request :
$ openssl req -new -nodes -keyout server_key.pem -out server_req.pem -days
365 -config ./openssl.cnf
Now we can sign the server certificate request we created above, type :
$ openssl ca -config ./openssl.cnf \
-policy policy_anything -out server_cert.pem \
-extensions xpserver_ext -extfile ./xpextensions \
-infiles ./server_req.pem
Copy the signed certificate to the same directory that we configured the eap.conf to check for the
certificate, which in our case is /etc/pki/certificates/server_keycert.pem
We need also certificates for each client, the procedure is the same also for the supplicants with only
one difference.On the non Windows clients we have to edit the certificate and erase everything that
is above the phrase : --------------BEGIN CERTIFICATE--------
And this is happening because the xpextensions are only needed when we deal with Microsoft.
Creating the client certificate (CISCO Controller) :
$ openssl req -new -keyout client_key.pem \
-out client_req.pem -days 365 -config ./openssl.cnf
We sign the certificate:
$ openssl ca -config ./openssl.cnf \
-policy policy_anything -out client_cert.pem \
-infiles ./client_req.pem
Now let’s consider one supplicant with windows XP:
$ openssl req -new -keyout user1_key.pem \ -out user1_req.pem -days 365 -config ./openssl.cnf
$ openssl ca -config ./openssl.cnf \
-policy policy_anything -out user1_cert.pem \
-extensions xpclient_ext -extfile ./xpextensions \
-infiles ./user1_req.pem
We have to add the following command for converting the certificate to PKCS12-format file:
Open Source Project
Wireless Network and Security Project Report - 52 -
openssl pkcs12 -export -in user1_cert.pem \
-inkey user1_key.pem -out user1_cert.p12 –clcerts
Finally we are ready to distribute our certificates to the supplicants. The safest way to do it is with a
physical method such at USB flash drives or smartcards.
Problems - Project management- Delays The problems we encountered were many. The most important are the following :
Transforming the radius configuration files for each method separately. Specially when using the
EAP-TLS method. The compatibility of the certificates for the users. The structure of the certificates
changes for different operating systems. For example if we have a users that wants to connect to our
network with windows (XP,Vista,7) we need to provide him different certificate than the one that
uses Linux. This certificate as we saw above will include some additional information which called “XP
Extensions”. These extensions referred to Microsoft are in order to be sure of the identity-purpose of
the certificate. So if the certificate is maiden for a server will have a sequence of numbers and if it is
maiden to be client will have different number sequence in addition of course of the main structure
of the certificate. The other hard thing is the configuration of the supplicants (WPA enterprise)
in order to connect to the RADIUS. The current status of the project is that we can authenticate the
clients through our server but there is a unidentified problem with the DHCP relay in order for the
client to get IP address. Although we can add a static IP in the client so he can connect to the
internet. It is interesting to see the negotiation using Wireshark which can be found in Appendixes.
In the beginning of the project we had a general plan-diagram, which we change it at the duration of
the project because our needs changed while we were gaining knowledge about the subject. We had
the general structure and deadlines but we adapted it to increase our performance. Hopefully there
were no delays in the project.
Modifications-Conclusion
The first planning of our project was to use an LDAP sever to for storing user names and passwords.
But after studying the EAP methods we realized what we do not need to store user data so we
abandon this idea. The main goal of the project achieved except the problem with the DHCP server
that is mention before.
Open Source Project
Wireless Network and Security Project Report - 53 -
IPBX and VPN
Presentation of technologies
VoIP
Voice over Internet Protocol is a relatively new technology1 which transports voice over Internet
Protocol. It works in a different manner than Public Switched Telephone Network (PSTN). Classical
telephony is based on a circuit switching technology, i.e. between two sides of communication there
is created a path, which is whole reserved for communication and no other communication
is possible over the link. VoIP is based on packet-switching technology and can be used over
IP networks, for example Internet. It is an example of convergence; convergence of user’s data and
voice on the same physical link. VoIP is said to replace PSTN, thanks to several advantages like lower
cost and less centralized infrastructure. Nevertheless it will take many years, as there are several
aspects in VoIP which should be improved and standardized (Quality of service and security)
We can assume that the communication process in VoIP is carried out onto two different levels.
In order to establish a connection a signaling protocol is used. Initially it was H.323 (with several sub-
standards), still existing in many solution. Nowadays we can observe a growing popularity of SIP
protocol (Session Initiation Protocol), which is said to replace H.323 in the world of VoIP. To
transport voice we use RTP protocol, sent over UDP.
With VoIP technology we can build an Internet Protocol Private Branch Exchange (IPBX) using a
hardware less expensive than classical PBX and in the same time having a lot of additional features.
VPN
Virtual Private Network is a technology used to build a “tunnel” providing access to remote users
or other units to their company’s or organization’s network (point-to-point connections). The
network is virtual as it is built logically over a public network (like Internet). In VPN the traffic is
usually ciphered, which enhances the security. The traffic can be also compressed, which makes the
technology effective also using slower internet connection. There are several types of protocols and
technologies which are linked with VPN: IPsec, PPTP or SSL/TLS.
1 We can assume that the beginning of VoIP technology was in the mid of 1990’s, when the first softphone
(software phone) was released by VocalTec under the name of “Internet Phone”.
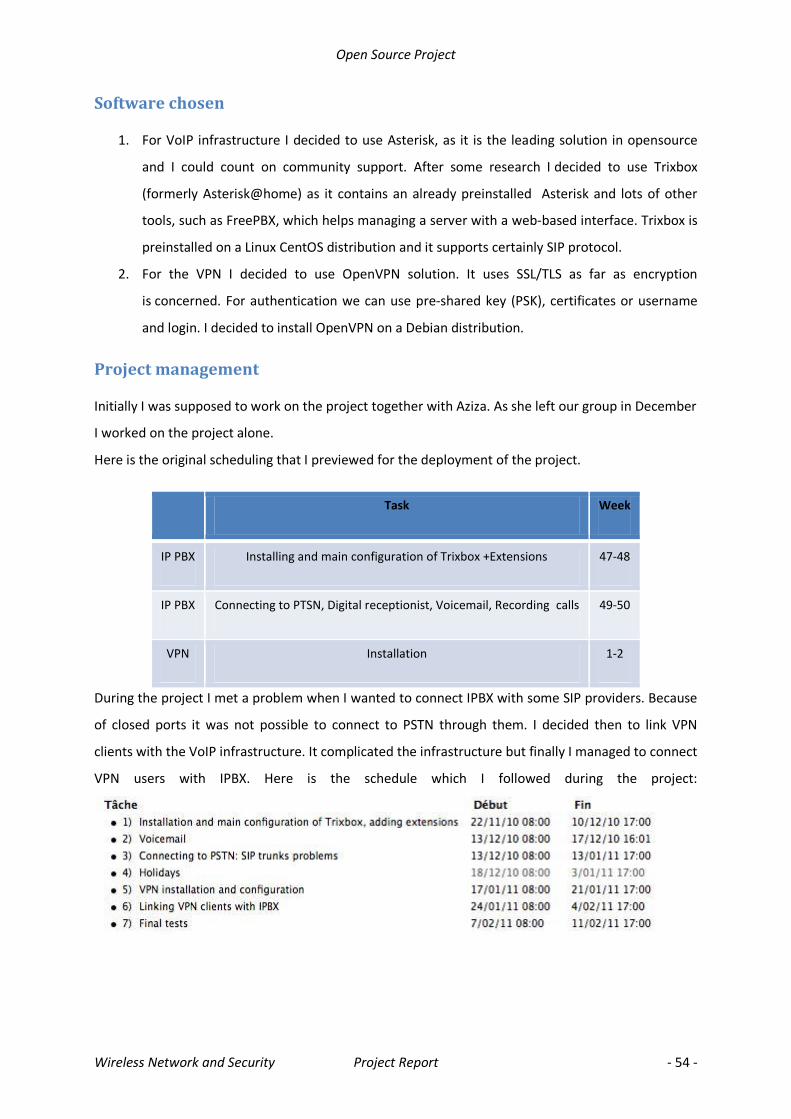
Open Source Project
Wireless Network and Security Project Report - 54 -
Software chosen
1. For VoIP infrastructure I decided to use Asterisk, as it is the leading solution in opensource
and I could count on community support. After some research I decided to use Trixbox
(formerly Asterisk@home) as it contains an already preinstalled Asterisk and lots of other
tools, such as FreePBX, which helps managing a server with a web-based interface. Trixbox is
preinstalled on a Linux CentOS distribution and it supports certainly SIP protocol.
2. For the VPN I decided to use OpenVPN solution. It uses SSL/TLS as far as encryption
is concerned. For authentication we can use pre-shared key (PSK), certificates or username
and login. I decided to install OpenVPN on a Debian distribution.
Project management
Initially I was supposed to work on the project together with Aziza. As she left our group in December
I worked on the project alone.
Here is the original scheduling that I previewed for the deployment of the project.
Task Week
IP PBX Installing and main configuration of Trixbox +Extensions 47-48
IP PBX Connecting to PTSN, Digital receptionist, Voicemail, Recording calls 49-50
VPN Installation 1-2
During the project I met a problem when I wanted to connect IPBX with some SIP providers. Because
of closed ports it was not possible to connect to PSTN through them. I decided then to link VPN
clients with the VoIP infrastructure. It complicated the infrastructure but finally I managed to connect
VPN users with IPBX. Here is the schedule which I followed during the project:
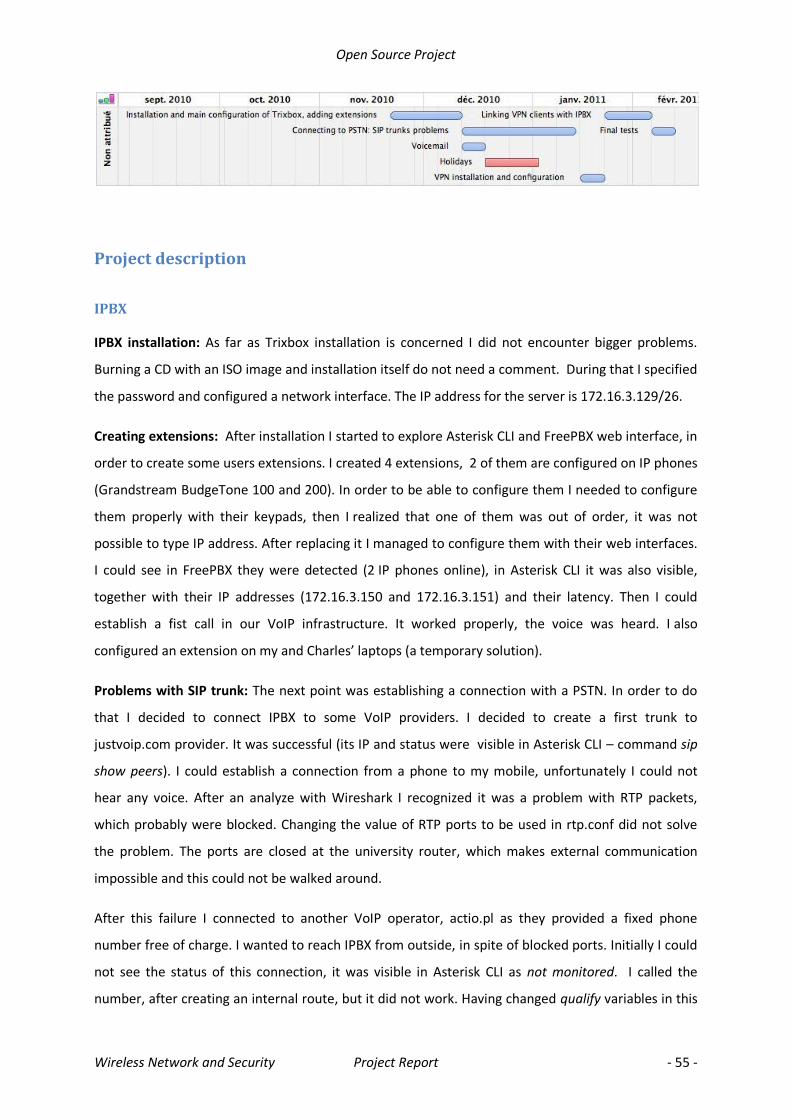
Open Source Project
Wireless Network and Security Project Report - 55 -
Project description
IPBX
IPBX installation: As far as Trixbox installation is concerned I did not encounter bigger problems.
Burning a CD with an ISO image and installation itself do not need a comment. During that I specified
the password and configured a network interface. The IP address for the server is 172.16.3.129/26.
Creating extensions: After installation I started to explore Asterisk CLI and FreePBX web interface, in
order to create some users extensions. I created 4 extensions, 2 of them are configured on IP phones
(Grandstream BudgeTone 100 and 200). In order to be able to configure them I needed to configure
them properly with their keypads, then I realized that one of them was out of order, it was not
possible to type IP address. After replacing it I managed to configure them with their web interfaces.
I could see in FreePBX they were detected (2 IP phones online), in Asterisk CLI it was also visible,
together with their IP addresses (172.16.3.150 and 172.16.3.151) and their latency. Then I could
establish a fist call in our VoIP infrastructure. It worked properly, the voice was heard. I also
configured an extension on my and Charles’ laptops (a temporary solution).
Problems with SIP trunk: The next point was establishing a connection with a PSTN. In order to do
that I decided to connect IPBX to some VoIP providers. I decided to create a first trunk to
justvoip.com provider. It was successful (its IP and status were visible in Asterisk CLI – command sip
show peers). I could establish a connection from a phone to my mobile, unfortunately I could not
hear any voice. After an analyze with Wireshark I recognized it was a problem with RTP packets,
which probably were blocked. Changing the value of RTP ports to be used in rtp.conf did not solve
the problem. The ports are closed at the university router, which makes external communication
impossible and this could not be walked around.
After this failure I connected to another VoIP operator, actio.pl as they provided a fixed phone
number free of charge. I wanted to reach IPBX from outside, in spite of blocked ports. Initially I could
not see the status of this connection, it was visible in Asterisk CLI as not monitored. I called the
number, after creating an internal route, but it did not work. Having changed qualify variables in this
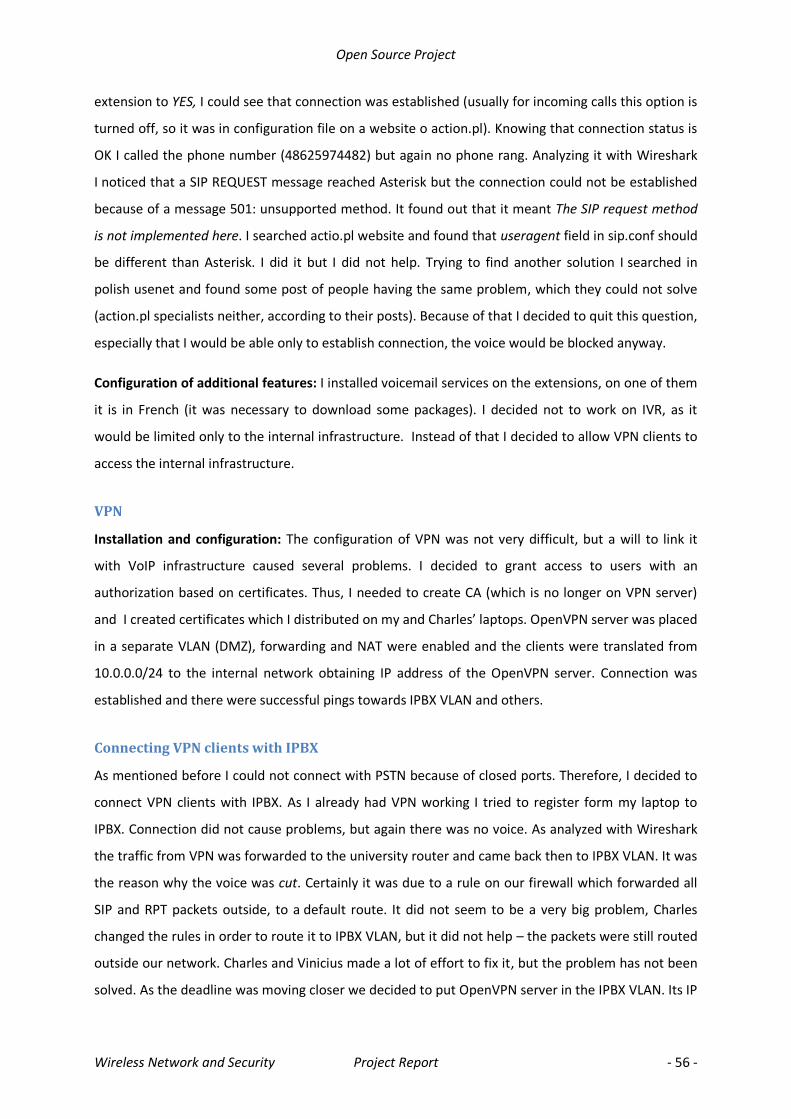
Open Source Project
Wireless Network and Security Project Report - 56 -
extension to YES, I could see that connection was established (usually for incoming calls this option is
turned off, so it was in configuration file on a website o action.pl). Knowing that connection status is
OK I called the phone number (48625974482) but again no phone rang. Analyzing it with Wireshark
I noticed that a SIP REQUEST message reached Asterisk but the connection could not be established
because of a message 501: unsupported method. It found out that it meant The SIP request method
is not implemented here. I searched actio.pl website and found that useragent field in sip.conf should
be different than Asterisk. I did it but I did not help. Trying to find another solution I searched in
polish usenet and found some post of people having the same problem, which they could not solve
(action.pl specialists neither, according to their posts). Because of that I decided to quit this question,
especially that I would be able only to establish connection, the voice would be blocked anyway.
Configuration of additional features: I installed voicemail services on the extensions, on one of them
it is in French (it was necessary to download some packages). I decided not to work on IVR, as it
would be limited only to the internal infrastructure. Instead of that I decided to allow VPN clients to
access the internal infrastructure.
VPN
Installation and configuration: The configuration of VPN was not very difficult, but a will to link it
with VoIP infrastructure caused several problems. I decided to grant access to users with an
authorization based on certificates. Thus, I needed to create CA (which is no longer on VPN server)
and I created certificates which I distributed on my and Charles’ laptops. OpenVPN server was placed
in a separate VLAN (DMZ), forwarding and NAT were enabled and the clients were translated from
10.0.0.0/24 to the internal network obtaining IP address of the OpenVPN server. Connection was
established and there were successful pings towards IPBX VLAN and others.
Connecting VPN clients with IPBX
As mentioned before I could not connect with PSTN because of closed ports. Therefore, I decided to
connect VPN clients with IPBX. As I already had VPN working I tried to register form my laptop to
IPBX. Connection did not cause problems, but again there was no voice. As analyzed with Wireshark
the traffic from VPN was forwarded to the university router and came back then to IPBX VLAN. It was
the reason why the voice was cut. Certainly it was due to a rule on our firewall which forwarded all
SIP and RPT packets outside, to a default route. It did not seem to be a very big problem, Charles
changed the rules in order to route it to IPBX VLAN, but it did not help – the packets were still routed
outside our network. Charles and Vinicius made a lot of effort to fix it, but the problem has not been
solved. As the deadline was moving closer we decided to put OpenVPN server in the IPBX VLAN. Its IP
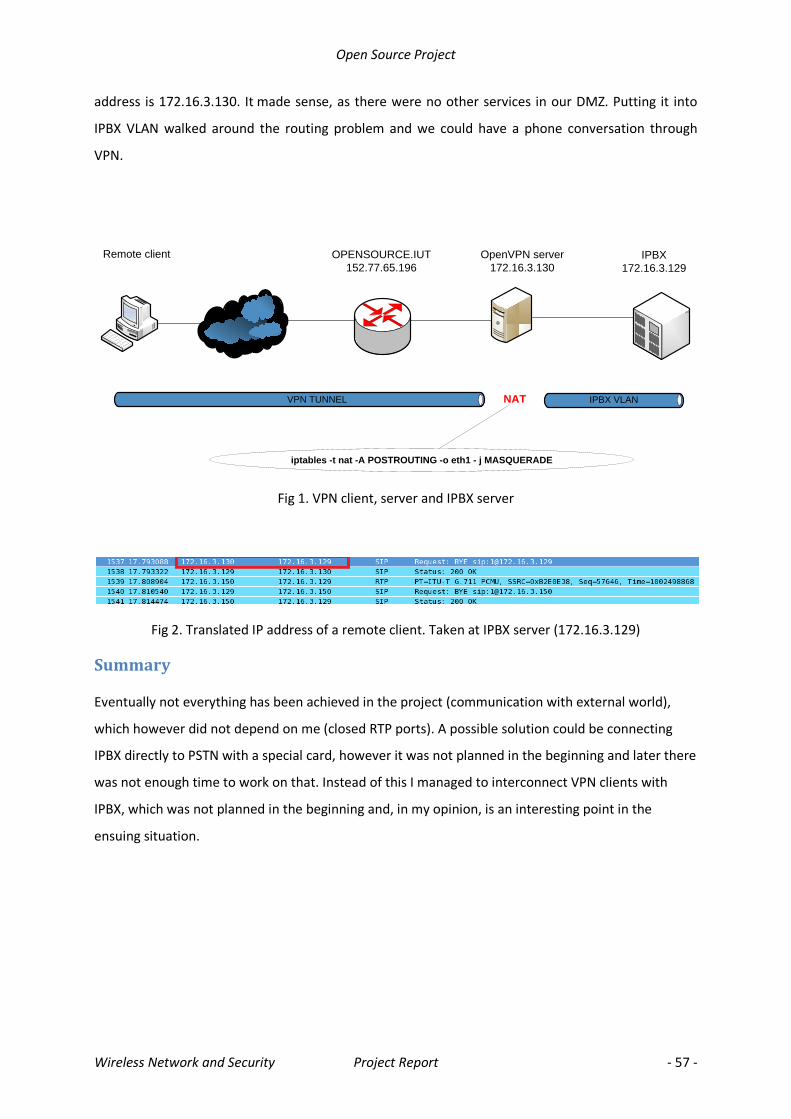
Open Source Project
Wireless Network and Security Project Report - 57 -
address is 172.16.3.130. It made sense, as there were no other services in our DMZ. Putting it into
IPBX VLAN walked around the routing problem and we could have a phone conversation through
VPN.
VPN TUNNEL IPBX VLAN
Remote client OPENSOURCE.IUT
152.77.65.196
OpenVPN server
172.16.3.130IPBX
172.16.3.129
NAT
iptables -t nat -A POSTROUTING -o eth1 - j MASQUERADE
Fig 1. VPN client, server and IPBX server
Fig 2. Translated IP address of a remote client. Taken at IPBX server (172.16.3.129)
Summary
Eventually not everything has been achieved in the project (communication with external world),
which however did not depend on me (closed RTP ports). A possible solution could be connecting
IPBX directly to PSTN with a special card, however it was not planned in the beginning and later there
was not enough time to work on that. Instead of this I managed to interconnect VPN clients with
IPBX, which was not planned in the beginning and, in my opinion, is an interesting point in the
ensuing situation.
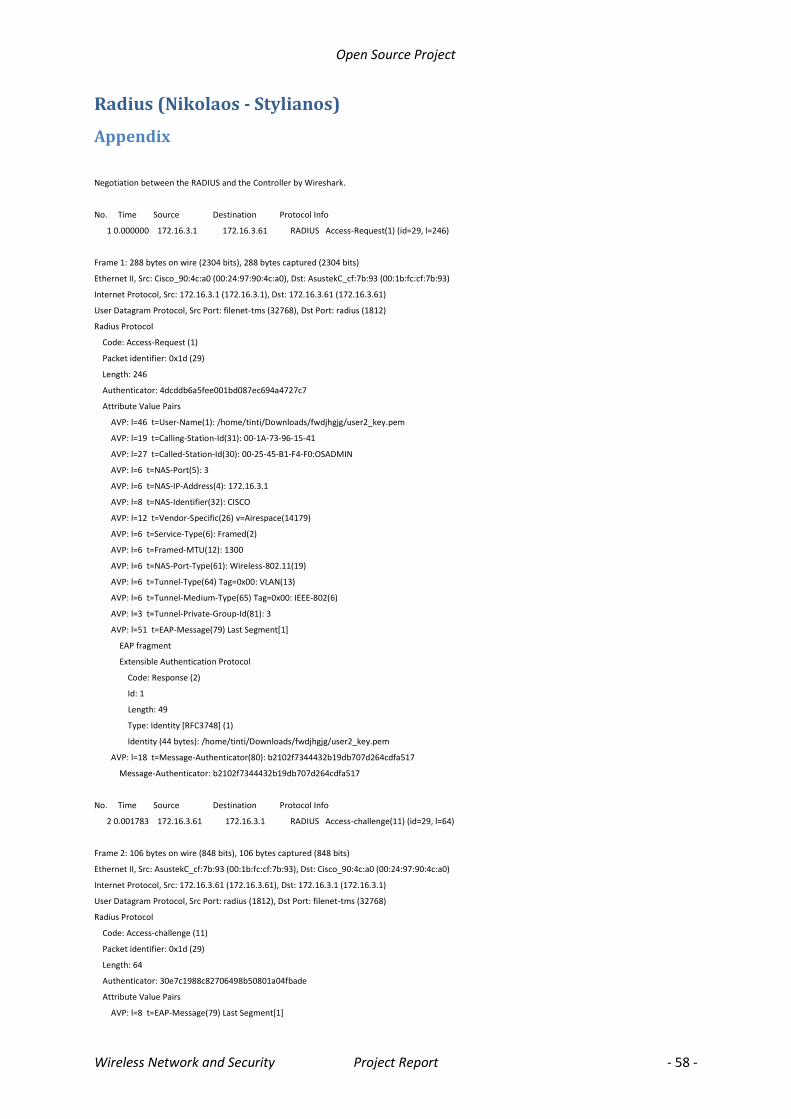
Open Source Project
Wireless Network and Security Project Report - 58 -
Radius (Nikolaos - Stylianos)
Appendix
Negotiation between the RADIUS and the Controller by Wireshark.
No. Time Source Destination Protocol Info
1 0.000000 172.16.3.1 172.16.3.61 RADIUS Access-Request(1) (id=29, l=246)
Frame 1: 288 bytes on wire (2304 bits), 288 bytes captured (2304 bits)
Ethernet II, Src: Cisco_90:4c:a0 (00:24:97:90:4c:a0), Dst: AsustekC_cf:7b:93 (00:1b:fc:cf:7b:93)
Internet Protocol, Src: 172.16.3.1 (172.16.3.1), Dst: 172.16.3.61 (172.16.3.61)
User Datagram Protocol, Src Port: filenet-tms (32768), Dst Port: radius (1812)
Radius Protocol
Code: Access-Request (1)
Packet identifier: 0x1d (29)
Length: 246
Authenticator: 4dcddb6a5fee001bd087ec694a4727c7
Attribute Value Pairs
AVP: l=46 t=User-Name(1): /home/tinti/Downloads/fwdjhgjg/user2_key.pem
AVP: l=19 t=Calling-Station-Id(31): 00-1A-73-96-15-41
AVP: l=27 t=Called-Station-Id(30): 00-25-45-B1-F4-F0:OSADMIN
AVP: l=6 t=NAS-Port(5): 3
AVP: l=6 t=NAS-IP-Address(4): 172.16.3.1
AVP: l=8 t=NAS-Identifier(32): CISCO
AVP: l=12 t=Vendor-Specific(26) v=Airespace(14179)
AVP: l=6 t=Service-Type(6): Framed(2)
AVP: l=6 t=Framed-MTU(12): 1300
AVP: l=6 t=NAS-Port-Type(61): Wireless-802.11(19)
AVP: l=6 t=Tunnel-Type(64) Tag=0x00: VLAN(13)
AVP: l=6 t=Tunnel-Medium-Type(65) Tag=0x00: IEEE-802(6)
AVP: l=3 t=Tunnel-Private-Group-Id(81): 3
AVP: l=51 t=EAP-Message(79) Last Segment[1]
EAP fragment
Extensible Authentication Protocol
Code: Response (2)
Id: 1
Length: 49
Type: Identity [RFC3748] (1)
Identity (44 bytes): /home/tinti/Downloads/fwdjhgjg/user2_key.pem
AVP: l=18 t=Message-Authenticator(80): b2102f7344432b19db707d264cdfa517
Message-Authenticator: b2102f7344432b19db707d264cdfa517
No. Time Source Destination Protocol Info
2 0.001783 172.16.3.61 172.16.3.1 RADIUS Access-challenge(11) (id=29, l=64)
Frame 2: 106 bytes on wire (848 bits), 106 bytes captured (848 bits)
Ethernet II, Src: AsustekC_cf:7b:93 (00:1b:fc:cf:7b:93), Dst: Cisco_90:4c:a0 (00:24:97:90:4c:a0)
Internet Protocol, Src: 172.16.3.61 (172.16.3.61), Dst: 172.16.3.1 (172.16.3.1)
User Datagram Protocol, Src Port: radius (1812), Dst Port: filenet-tms (32768)
Radius Protocol
Code: Access-challenge (11)
Packet identifier: 0x1d (29)
Length: 64
Authenticator: 30e7c1988c82706498b50801a04fbade
Attribute Value Pairs
AVP: l=8 t=EAP-Message(79) Last Segment[1]
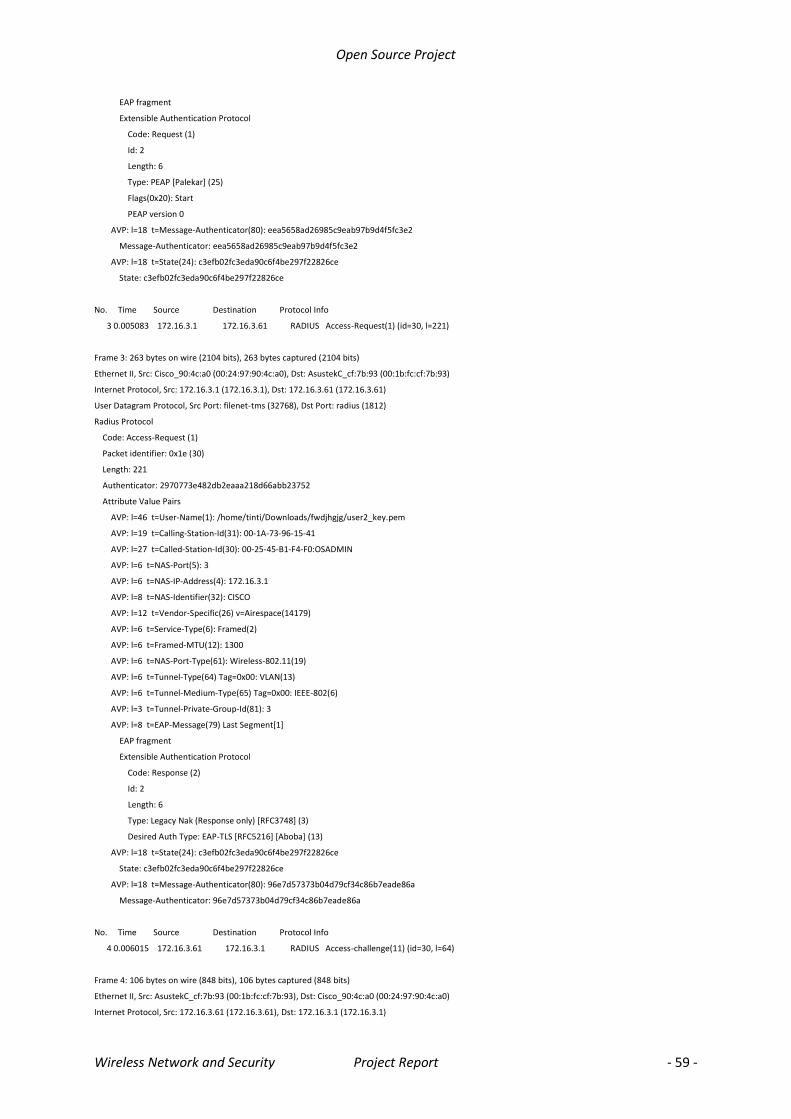
Open Source Project
Wireless Network and Security Project Report - 59 -
EAP fragment
Extensible Authentication Protocol
Code: Request (1)
Id: 2
Length: 6
Type: PEAP [Palekar] (25)
Flags(0x20): Start
PEAP version 0
AVP: l=18 t=Message-Authenticator(80): eea5658ad26985c9eab97b9d4f5fc3e2
Message-Authenticator: eea5658ad26985c9eab97b9d4f5fc3e2
AVP: l=18 t=State(24): c3efb02fc3eda90c6f4be297f22826ce
State: c3efb02fc3eda90c6f4be297f22826ce
No. Time Source Destination Protocol Info
3 0.005083 172.16.3.1 172.16.3.61 RADIUS Access-Request(1) (id=30, l=221)
Frame 3: 263 bytes on wire (2104 bits), 263 bytes captured (2104 bits)
Ethernet II, Src: Cisco_90:4c:a0 (00:24:97:90:4c:a0), Dst: AsustekC_cf:7b:93 (00:1b:fc:cf:7b:93)
Internet Protocol, Src: 172.16.3.1 (172.16.3.1), Dst: 172.16.3.61 (172.16.3.61)
User Datagram Protocol, Src Port: filenet-tms (32768), Dst Port: radius (1812)
Radius Protocol
Code: Access-Request (1)
Packet identifier: 0x1e (30)
Length: 221
Authenticator: 2970773e482db2eaaa218d66abb23752
Attribute Value Pairs
AVP: l=46 t=User-Name(1): /home/tinti/Downloads/fwdjhgjg/user2_key.pem
AVP: l=19 t=Calling-Station-Id(31): 00-1A-73-96-15-41
AVP: l=27 t=Called-Station-Id(30): 00-25-45-B1-F4-F0:OSADMIN
AVP: l=6 t=NAS-Port(5): 3
AVP: l=6 t=NAS-IP-Address(4): 172.16.3.1
AVP: l=8 t=NAS-Identifier(32): CISCO
AVP: l=12 t=Vendor-Specific(26) v=Airespace(14179)
AVP: l=6 t=Service-Type(6): Framed(2)
AVP: l=6 t=Framed-MTU(12): 1300
AVP: l=6 t=NAS-Port-Type(61): Wireless-802.11(19)
AVP: l=6 t=Tunnel-Type(64) Tag=0x00: VLAN(13)
AVP: l=6 t=Tunnel-Medium-Type(65) Tag=0x00: IEEE-802(6)
AVP: l=3 t=Tunnel-Private-Group-Id(81): 3
AVP: l=8 t=EAP-Message(79) Last Segment[1]
EAP fragment
Extensible Authentication Protocol
Code: Response (2)
Id: 2
Length: 6
Type: Legacy Nak (Response only) [RFC3748] (3)
Desired Auth Type: EAP-TLS [RFC5216] [Aboba] (13)
AVP: l=18 t=State(24): c3efb02fc3eda90c6f4be297f22826ce
State: c3efb02fc3eda90c6f4be297f22826ce
AVP: l=18 t=Message-Authenticator(80): 96e7d57373b04d79cf34c86b7eade86a
Message-Authenticator: 96e7d57373b04d79cf34c86b7eade86a
No. Time Source Destination Protocol Info
4 0.006015 172.16.3.61 172.16.3.1 RADIUS Access-challenge(11) (id=30, l=64)
Frame 4: 106 bytes on wire (848 bits), 106 bytes captured (848 bits)
Ethernet II, Src: AsustekC_cf:7b:93 (00:1b:fc:cf:7b:93), Dst: Cisco_90:4c:a0 (00:24:97:90:4c:a0)
Internet Protocol, Src: 172.16.3.61 (172.16.3.61), Dst: 172.16.3.1 (172.16.3.1)
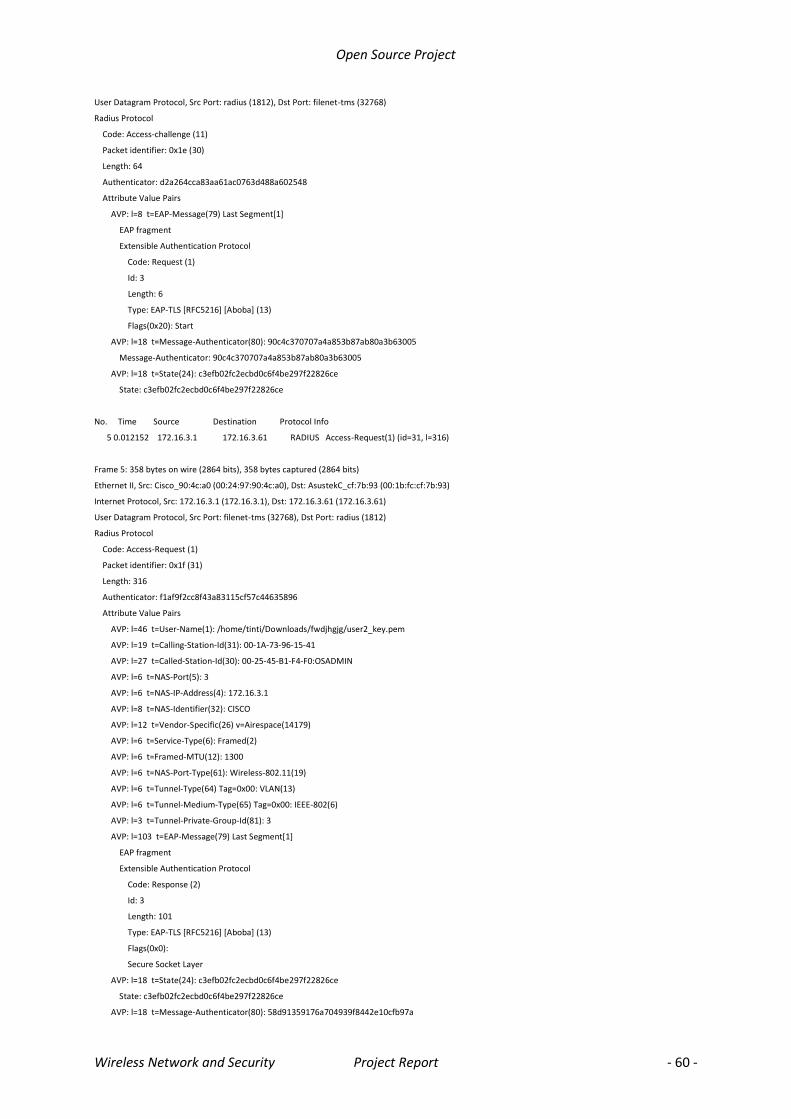
Open Source Project
Wireless Network and Security Project Report - 60 -
User Datagram Protocol, Src Port: radius (1812), Dst Port: filenet-tms (32768)
Radius Protocol
Code: Access-challenge (11)
Packet identifier: 0x1e (30)
Length: 64
Authenticator: d2a264cca83aa61ac0763d488a602548
Attribute Value Pairs
AVP: l=8 t=EAP-Message(79) Last Segment[1]
EAP fragment
Extensible Authentication Protocol
Code: Request (1)
Id: 3
Length: 6
Type: EAP-TLS [RFC5216] [Aboba] (13)
Flags(0x20): Start
AVP: l=18 t=Message-Authenticator(80): 90c4c370707a4a853b87ab80a3b63005
Message-Authenticator: 90c4c370707a4a853b87ab80a3b63005
AVP: l=18 t=State(24): c3efb02fc2ecbd0c6f4be297f22826ce
State: c3efb02fc2ecbd0c6f4be297f22826ce
No. Time Source Destination Protocol Info
5 0.012152 172.16.3.1 172.16.3.61 RADIUS Access-Request(1) (id=31, l=316)
Frame 5: 358 bytes on wire (2864 bits), 358 bytes captured (2864 bits)
Ethernet II, Src: Cisco_90:4c:a0 (00:24:97:90:4c:a0), Dst: AsustekC_cf:7b:93 (00:1b:fc:cf:7b:93)
Internet Protocol, Src: 172.16.3.1 (172.16.3.1), Dst: 172.16.3.61 (172.16.3.61)
User Datagram Protocol, Src Port: filenet-tms (32768), Dst Port: radius (1812)
Radius Protocol
Code: Access-Request (1)
Packet identifier: 0x1f (31)
Length: 316
Authenticator: f1af9f2cc8f43a83115cf57c44635896
Attribute Value Pairs
AVP: l=46 t=User-Name(1): /home/tinti/Downloads/fwdjhgjg/user2_key.pem
AVP: l=19 t=Calling-Station-Id(31): 00-1A-73-96-15-41
AVP: l=27 t=Called-Station-Id(30): 00-25-45-B1-F4-F0:OSADMIN
AVP: l=6 t=NAS-Port(5): 3
AVP: l=6 t=NAS-IP-Address(4): 172.16.3.1
AVP: l=8 t=NAS-Identifier(32): CISCO
AVP: l=12 t=Vendor-Specific(26) v=Airespace(14179)
AVP: l=6 t=Service-Type(6): Framed(2)
AVP: l=6 t=Framed-MTU(12): 1300
AVP: l=6 t=NAS-Port-Type(61): Wireless-802.11(19)
AVP: l=6 t=Tunnel-Type(64) Tag=0x00: VLAN(13)
AVP: l=6 t=Tunnel-Medium-Type(65) Tag=0x00: IEEE-802(6)
AVP: l=3 t=Tunnel-Private-Group-Id(81): 3
AVP: l=103 t=EAP-Message(79) Last Segment[1]
EAP fragment
Extensible Authentication Protocol
Code: Response (2)
Id: 3
Length: 101
Type: EAP-TLS [RFC5216] [Aboba] (13)
Flags(0x0):
Secure Socket Layer
AVP: l=18 t=State(24): c3efb02fc2ecbd0c6f4be297f22826ce
State: c3efb02fc2ecbd0c6f4be297f22826ce
AVP: l=18 t=Message-Authenticator(80): 58d91359176a704939f8442e10cfb97a

Open Source Project
Wireless Network and Security Project Report - 61 -
Message-Authenticator: 58d91359176a704939f8442e10cfb97a
No. Time Source Destination Protocol Info
6 0.026830 172.16.3.61 172.16.3.1 RADIUS Access-challenge(11) (id=31, l=1090)
Frame 6: 1132 bytes on wire (9056 bits), 1132 bytes captured (9056 bits)
Ethernet II, Src: AsustekC_cf:7b:93 (00:1b:fc:cf:7b:93), Dst: Cisco_90:4c:a0 (00:24:97:90:4c:a0)
Internet Protocol, Src: 172.16.3.61 (172.16.3.61), Dst: 172.16.3.1 (172.16.3.1)
User Datagram Protocol, Src Port: radius (1812), Dst Port: filenet-tms (32768)
Radius Protocol
Code: Access-challenge (11)
Packet identifier: 0x1f (31)
Length: 1090
Authenticator: 162ff64f0c2bed3ad82beaaf4c7ce893
Attribute Value Pairs
AVP: l=255 t=EAP-Message(79) Segment[1]
AVP: l=255 t=EAP-Message(79) Segment[2]
AVP: l=255 t=EAP-Message(79) Segment[3]
AVP: l=255 t=EAP-Message(79) Segment[4]
AVP: l=14 t=EAP-Message(79) Last Segment[5]
EAP fragment
Extensible Authentication Protocol
Code: Request (1)
Id: 4
Length: 1024
Type: EAP-TLS [RFC5216] [Aboba] (13)
Flags(0xC0): Length More
Length: 1859
Secure Socket Layer
[Malformed Packet: SSL]
No. Time Source Destination Protocol Info
7 0.040604 172.16.3.1 172.16.3.61 RADIUS Access-Request(1) (id=32, l=221)
Frame 7: 263 bytes on wire (2104 bits), 263 bytes captured (2104 bits)
Ethernet II, Src: Cisco_90:4c:a0 (00:24:97:90:4c:a0), Dst: AsustekC_cf:7b:93 (00:1b:fc:cf:7b:93)
Internet Protocol, Src: 172.16.3.1 (172.16.3.1), Dst: 172.16.3.61 (172.16.3.61)
User Datagram Protocol, Src Port: filenet-tms (32768), Dst Port: radius (1812)
Radius Protocol
Code: Access-Request (1)
Packet identifier: 0x20 (32)
Length: 221
Authenticator: f27f080377a3576d49c4f8c3cf23e897
Attribute Value Pairs
AVP: l=46 t=User-Name(1): /home/tinti/Downloads/fwdjhgjg/user2_key.pem
AVP: l=19 t=Calling-Station-Id(31): 00-1A-73-96-15-41
AVP: l=27 t=Called-Station-Id(30): 00-25-45-B1-F4-F0:OSADMIN
AVP: l=6 t=NAS-Port(5): 3
AVP: l=6 t=NAS-IP-Address(4): 172.16.3.1
AVP: l=8 t=NAS-Identifier(32): CISCO
AVP: l=12 t=Vendor-Specific(26) v=Airespace(14179)
AVP: l=6 t=Service-Type(6): Framed(2)
AVP: l=6 t=Framed-MTU(12): 1300
AVP: l=6 t=NAS-Port-Type(61): Wireless-802.11(19)
AVP: l=6 t=Tunnel-Type(64) Tag=0x00: VLAN(13)
AVP: l=6 t=Tunnel-Medium-Type(65) Tag=0x00: IEEE-802(6)
AVP: l=3 t=Tunnel-Private-Group-Id(81): 3
AVP: l=8 t=EAP-Message(79) Last Segment[1]
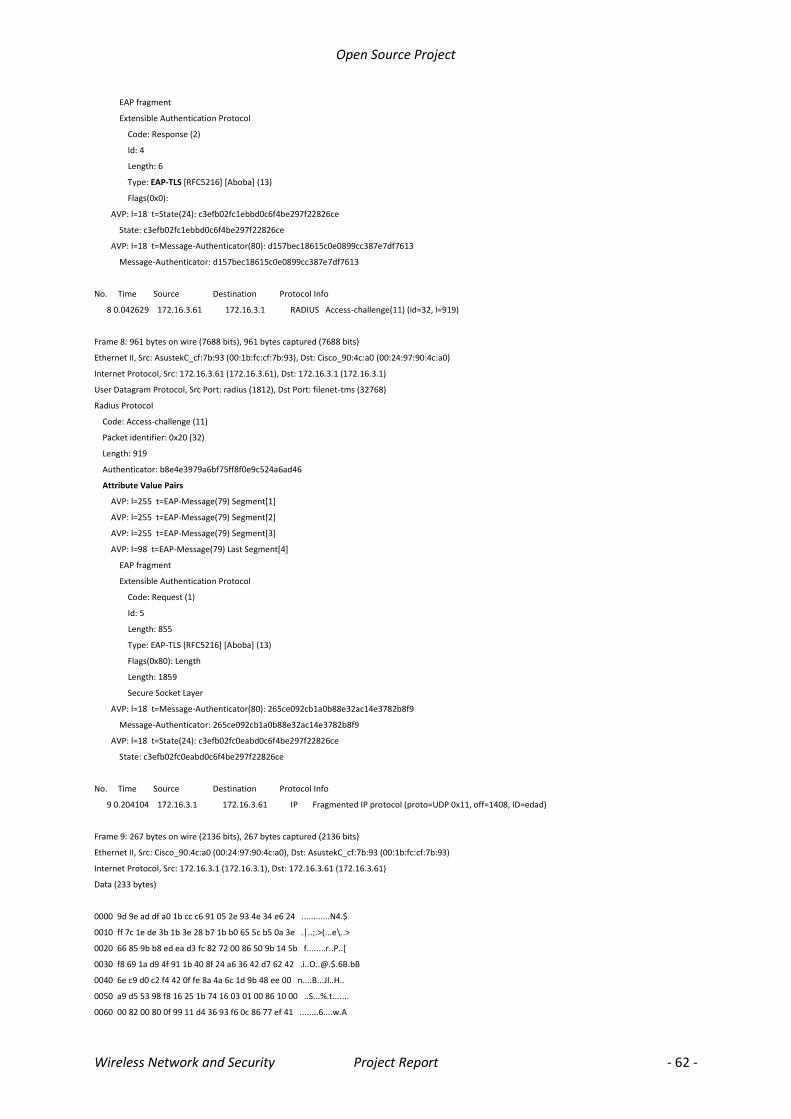
Open Source Project
Wireless Network and Security Project Report - 62 -
EAP fragment
Extensible Authentication Protocol
Code: Response (2)
Id: 4
Length: 6
Type: EAP-TLS [RFC5216] [Aboba] (13)
Flags(0x0):
AVP: l=18 t=State(24): c3efb02fc1ebbd0c6f4be297f22826ce
State: c3efb02fc1ebbd0c6f4be297f22826ce
AVP: l=18 t=Message-Authenticator(80): d157bec18615c0e0899cc387e7df7613
Message-Authenticator: d157bec18615c0e0899cc387e7df7613
No. Time Source Destination Protocol Info
8 0.042629 172.16.3.61 172.16.3.1 RADIUS Access-challenge(11) (id=32, l=919)
Frame 8: 961 bytes on wire (7688 bits), 961 bytes captured (7688 bits)
Ethernet II, Src: AsustekC_cf:7b:93 (00:1b:fc:cf:7b:93), Dst: Cisco_90:4c:a0 (00:24:97:90:4c:a0)
Internet Protocol, Src: 172.16.3.61 (172.16.3.61), Dst: 172.16.3.1 (172.16.3.1)
User Datagram Protocol, Src Port: radius (1812), Dst Port: filenet-tms (32768)
Radius Protocol
Code: Access-challenge (11)
Packet identifier: 0x20 (32)
Length: 919
Authenticator: b8e4e3979a6bf75ff8f0e9c524a6ad46
Attribute Value Pairs
AVP: l=255 t=EAP-Message(79) Segment[1]
AVP: l=255 t=EAP-Message(79) Segment[2]
AVP: l=255 t=EAP-Message(79) Segment[3]
AVP: l=98 t=EAP-Message(79) Last Segment[4]
EAP fragment
Extensible Authentication Protocol
Code: Request (1)
Id: 5
Length: 855
Type: EAP-TLS [RFC5216] [Aboba] (13)
Flags(0x80): Length
Length: 1859
Secure Socket Layer
AVP: l=18 t=Message-Authenticator(80): 265ce092cb1a0b88e32ac14e3782b8f9
Message-Authenticator: 265ce092cb1a0b88e32ac14e3782b8f9
AVP: l=18 t=State(24): c3efb02fc0eabd0c6f4be297f22826ce
State: c3efb02fc0eabd0c6f4be297f22826ce
No. Time Source Destination Protocol Info
9 0.204104 172.16.3.1 172.16.3.61 IP Fragmented IP protocol (proto=UDP 0x11, off=1408, ID=edad)
Frame 9: 267 bytes on wire (2136 bits), 267 bytes captured (2136 bits)
Ethernet II, Src: Cisco_90:4c:a0 (00:24:97:90:4c:a0), Dst: AsustekC_cf:7b:93 (00:1b:fc:cf:7b:93)
Internet Protocol, Src: 172.16.3.1 (172.16.3.1), Dst: 172.16.3.61 (172.16.3.61)
Data (233 bytes)
0000 9d 9e ad df a0 1b cc c6 91 05 2e 93 4e 34 e6 24 ............N4.$
0010 ff 7c 1e de 3b 1b 3e 28 b7 1b b0 65 5c b5 0a 3e .|..;.>(...e\..>
0020 66 85 9b b8 ed ea d3 fc 82 72 00 86 50 9b 14 5b f........r..P..[
0030 f8 69 1a d9 4f 91 1b 40 8f 24 a6 36 42 d7 62 42 .i..O..@.$.6B.bB
0040 6e c9 d0 c2 f4 42 0f fe 8a 4a 6c 1d 9b 48 ee 00 n....B...Jl..H..
0050 a9 d5 53 98 f8 16 25 1b 74 16 03 01 00 86 10 00 ..S...%.t.......
0060 00 82 00 80 0f 99 11 d4 36 93 f6 0c 86 77 ef 41 ........6....w.A
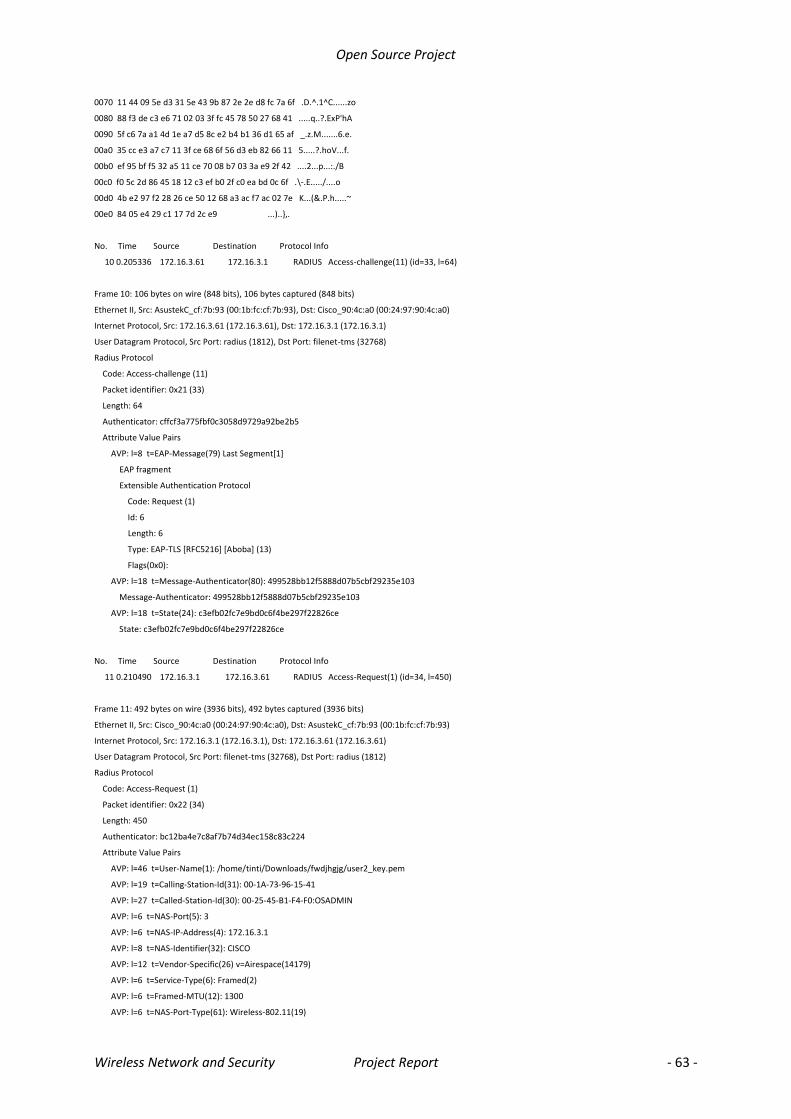
Open Source Project
Wireless Network and Security Project Report - 63 -
0070 11 44 09 5e d3 31 5e 43 9b 87 2e 2e d8 fc 7a 6f .D.^.1^C......zo
0080 88 f3 de c3 e6 71 02 03 3f fc 45 78 50 27 68 41 .....q..?.ExP'hA
0090 5f c6 7a a1 4d 1e a7 d5 8c e2 b4 b1 36 d1 65 af _.z.M.......6.e.
00a0 35 cc e3 a7 c7 11 3f ce 68 6f 56 d3 eb 82 66 11 5.....?.hoV...f.
00b0 ef 95 bf f5 32 a5 11 ce 70 08 b7 03 3a e9 2f 42 ....2...p...:./B
00c0 f0 5c 2d 86 45 18 12 c3 ef b0 2f c0 ea bd 0c 6f .\-.E...../....o
00d0 4b e2 97 f2 28 26 ce 50 12 68 a3 ac f7 ac 02 7e K...(&.P.h.....~
00e0 84 05 e4 29 c1 17 7d 2c e9 ...)..},.
No. Time Source Destination Protocol Info
10 0.205336 172.16.3.61 172.16.3.1 RADIUS Access-challenge(11) (id=33, l=64)
Frame 10: 106 bytes on wire (848 bits), 106 bytes captured (848 bits)
Ethernet II, Src: AsustekC_cf:7b:93 (00:1b:fc:cf:7b:93), Dst: Cisco_90:4c:a0 (00:24:97:90:4c:a0)
Internet Protocol, Src: 172.16.3.61 (172.16.3.61), Dst: 172.16.3.1 (172.16.3.1)
User Datagram Protocol, Src Port: radius (1812), Dst Port: filenet-tms (32768)
Radius Protocol
Code: Access-challenge (11)
Packet identifier: 0x21 (33)
Length: 64
Authenticator: cffcf3a775fbf0c3058d9729a92be2b5
Attribute Value Pairs
AVP: l=8 t=EAP-Message(79) Last Segment[1]
EAP fragment
Extensible Authentication Protocol
Code: Request (1)
Id: 6
Length: 6
Type: EAP-TLS [RFC5216] [Aboba] (13)
Flags(0x0):
AVP: l=18 t=Message-Authenticator(80): 499528bb12f5888d07b5cbf29235e103
Message-Authenticator: 499528bb12f5888d07b5cbf29235e103
AVP: l=18 t=State(24): c3efb02fc7e9bd0c6f4be297f22826ce
State: c3efb02fc7e9bd0c6f4be297f22826ce
No. Time Source Destination Protocol Info
11 0.210490 172.16.3.1 172.16.3.61 RADIUS Access-Request(1) (id=34, l=450)
Frame 11: 492 bytes on wire (3936 bits), 492 bytes captured (3936 bits)
Ethernet II, Src: Cisco_90:4c:a0 (00:24:97:90:4c:a0), Dst: AsustekC_cf:7b:93 (00:1b:fc:cf:7b:93)
Internet Protocol, Src: 172.16.3.1 (172.16.3.1), Dst: 172.16.3.61 (172.16.3.61)
User Datagram Protocol, Src Port: filenet-tms (32768), Dst Port: radius (1812)
Radius Protocol
Code: Access-Request (1)
Packet identifier: 0x22 (34)
Length: 450
Authenticator: bc12ba4e7c8af7b74d34ec158c83c224
Attribute Value Pairs
AVP: l=46 t=User-Name(1): /home/tinti/Downloads/fwdjhgjg/user2_key.pem
AVP: l=19 t=Calling-Station-Id(31): 00-1A-73-96-15-41
AVP: l=27 t=Called-Station-Id(30): 00-25-45-B1-F4-F0:OSADMIN
AVP: l=6 t=NAS-Port(5): 3
AVP: l=6 t=NAS-IP-Address(4): 172.16.3.1
AVP: l=8 t=NAS-Identifier(32): CISCO
AVP: l=12 t=Vendor-Specific(26) v=Airespace(14179)
AVP: l=6 t=Service-Type(6): Framed(2)
AVP: l=6 t=Framed-MTU(12): 1300
AVP: l=6 t=NAS-Port-Type(61): Wireless-802.11(19)
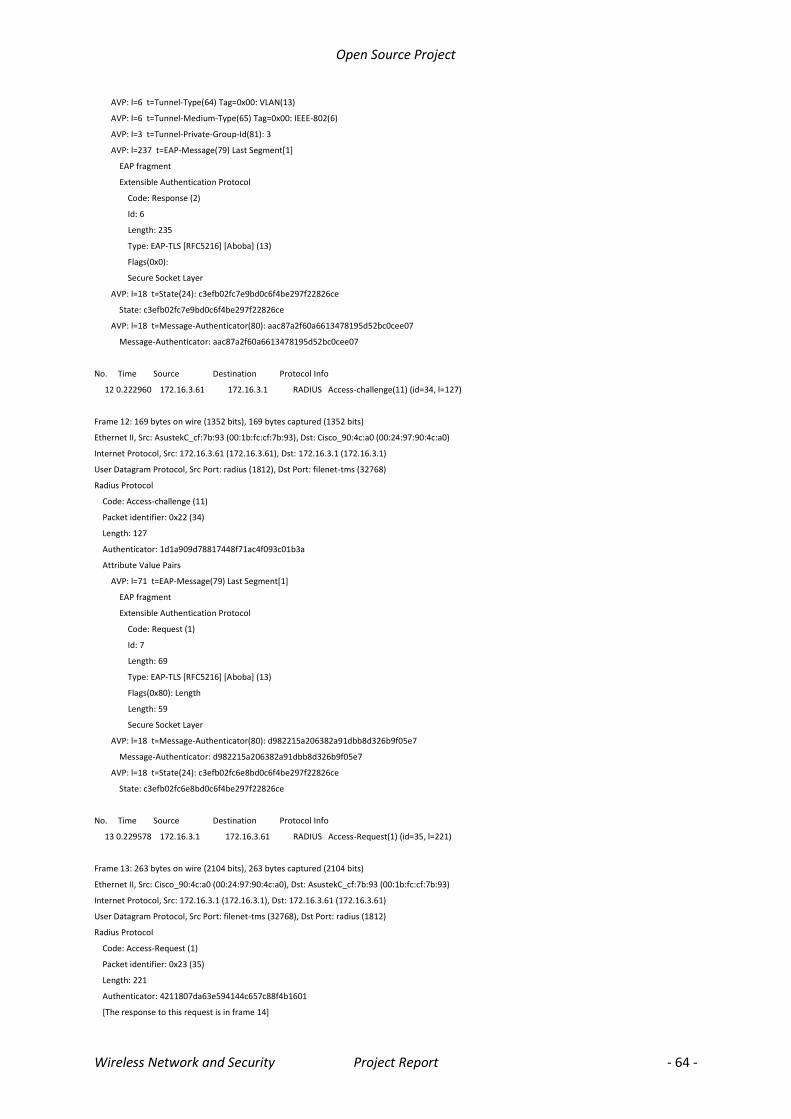
Open Source Project
Wireless Network and Security Project Report - 64 -
AVP: l=6 t=Tunnel-Type(64) Tag=0x00: VLAN(13)
AVP: l=6 t=Tunnel-Medium-Type(65) Tag=0x00: IEEE-802(6)
AVP: l=3 t=Tunnel-Private-Group-Id(81): 3
AVP: l=237 t=EAP-Message(79) Last Segment[1]
EAP fragment
Extensible Authentication Protocol
Code: Response (2)
Id: 6
Length: 235
Type: EAP-TLS [RFC5216] [Aboba] (13)
Flags(0x0):
Secure Socket Layer
AVP: l=18 t=State(24): c3efb02fc7e9bd0c6f4be297f22826ce
State: c3efb02fc7e9bd0c6f4be297f22826ce
AVP: l=18 t=Message-Authenticator(80): aac87a2f60a6613478195d52bc0cee07
Message-Authenticator: aac87a2f60a6613478195d52bc0cee07
No. Time Source Destination Protocol Info
12 0.222960 172.16.3.61 172.16.3.1 RADIUS Access-challenge(11) (id=34, l=127)
Frame 12: 169 bytes on wire (1352 bits), 169 bytes captured (1352 bits)
Ethernet II, Src: AsustekC_cf:7b:93 (00:1b:fc:cf:7b:93), Dst: Cisco_90:4c:a0 (00:24:97:90:4c:a0)
Internet Protocol, Src: 172.16.3.61 (172.16.3.61), Dst: 172.16.3.1 (172.16.3.1)
User Datagram Protocol, Src Port: radius (1812), Dst Port: filenet-tms (32768)
Radius Protocol
Code: Access-challenge (11)
Packet identifier: 0x22 (34)
Length: 127
Authenticator: 1d1a909d78817448f71ac4f093c01b3a
Attribute Value Pairs
AVP: l=71 t=EAP-Message(79) Last Segment[1]
EAP fragment
Extensible Authentication Protocol
Code: Request (1)
Id: 7
Length: 69
Type: EAP-TLS [RFC5216] [Aboba] (13)
Flags(0x80): Length
Length: 59
Secure Socket Layer
AVP: l=18 t=Message-Authenticator(80): d982215a206382a91dbb8d326b9f05e7
Message-Authenticator: d982215a206382a91dbb8d326b9f05e7
AVP: l=18 t=State(24): c3efb02fc6e8bd0c6f4be297f22826ce
State: c3efb02fc6e8bd0c6f4be297f22826ce
No. Time Source Destination Protocol Info
13 0.229578 172.16.3.1 172.16.3.61 RADIUS Access-Request(1) (id=35, l=221)
Frame 13: 263 bytes on wire (2104 bits), 263 bytes captured (2104 bits)
Ethernet II, Src: Cisco_90:4c:a0 (00:24:97:90:4c:a0), Dst: AsustekC_cf:7b:93 (00:1b:fc:cf:7b:93)
Internet Protocol, Src: 172.16.3.1 (172.16.3.1), Dst: 172.16.3.61 (172.16.3.61)
User Datagram Protocol, Src Port: filenet-tms (32768), Dst Port: radius (1812)
Radius Protocol
Code: Access-Request (1)
Packet identifier: 0x23 (35)
Length: 221
Authenticator: 4211807da63e594144c657c88f4b1601
[The response to this request is in frame 14]
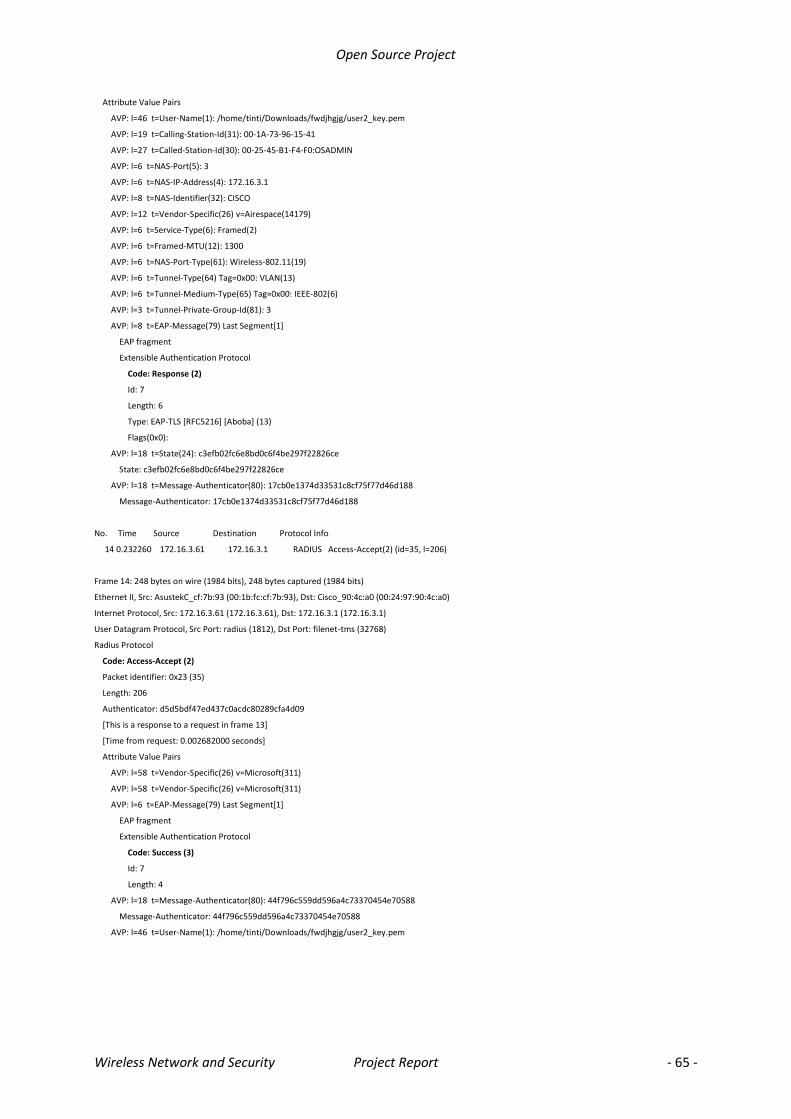
Open Source Project
Wireless Network and Security Project Report - 65 -
Attribute Value Pairs
AVP: l=46 t=User-Name(1): /home/tinti/Downloads/fwdjhgjg/user2_key.pem
AVP: l=19 t=Calling-Station-Id(31): 00-1A-73-96-15-41
AVP: l=27 t=Called-Station-Id(30): 00-25-45-B1-F4-F0:OSADMIN
AVP: l=6 t=NAS-Port(5): 3
AVP: l=6 t=NAS-IP-Address(4): 172.16.3.1
AVP: l=8 t=NAS-Identifier(32): CISCO
AVP: l=12 t=Vendor-Specific(26) v=Airespace(14179)
AVP: l=6 t=Service-Type(6): Framed(2)
AVP: l=6 t=Framed-MTU(12): 1300
AVP: l=6 t=NAS-Port-Type(61): Wireless-802.11(19)
AVP: l=6 t=Tunnel-Type(64) Tag=0x00: VLAN(13)
AVP: l=6 t=Tunnel-Medium-Type(65) Tag=0x00: IEEE-802(6)
AVP: l=3 t=Tunnel-Private-Group-Id(81): 3
AVP: l=8 t=EAP-Message(79) Last Segment[1]
EAP fragment
Extensible Authentication Protocol
Code: Response (2)
Id: 7
Length: 6
Type: EAP-TLS [RFC5216] [Aboba] (13)
Flags(0x0):
AVP: l=18 t=State(24): c3efb02fc6e8bd0c6f4be297f22826ce
State: c3efb02fc6e8bd0c6f4be297f22826ce
AVP: l=18 t=Message-Authenticator(80): 17cb0e1374d33531c8cf75f77d46d188
Message-Authenticator: 17cb0e1374d33531c8cf75f77d46d188
No. Time Source Destination Protocol Info
14 0.232260 172.16.3.61 172.16.3.1 RADIUS Access-Accept(2) (id=35, l=206)
Frame 14: 248 bytes on wire (1984 bits), 248 bytes captured (1984 bits)
Ethernet II, Src: AsustekC_cf:7b:93 (00:1b:fc:cf:7b:93), Dst: Cisco_90:4c:a0 (00:24:97:90:4c:a0)
Internet Protocol, Src: 172.16.3.61 (172.16.3.61), Dst: 172.16.3.1 (172.16.3.1)
User Datagram Protocol, Src Port: radius (1812), Dst Port: filenet-tms (32768)
Radius Protocol
Code: Access-Accept (2)
Packet identifier: 0x23 (35)
Length: 206
Authenticator: d5d5bdf47ed437c0acdc80289cfa4d09
[This is a response to a request in frame 13]
[Time from request: 0.002682000 seconds]
Attribute Value Pairs
AVP: l=58 t=Vendor-Specific(26) v=Microsoft(311)
AVP: l=58 t=Vendor-Specific(26) v=Microsoft(311)
AVP: l=6 t=EAP-Message(79) Last Segment[1]
EAP fragment
Extensible Authentication Protocol
Code: Success (3)
Id: 7
Length: 4
AVP: l=18 t=Message-Authenticator(80): 44f796c559dd596a4c73370454e70588
Message-Authenticator: 44f796c559dd596a4c73370454e70588
AVP: l=46 t=User-Name(1): /home/tinti/Downloads/fwdjhgjg/user2_key.pem
Open Source Project
Wireless Network and Security Project Report - 66 -
References
Sites
http://www.cisco.com/en/US/products/sw/secursw/ps2086/products_white_paper09186a008009256b.shtml#wp39068
http://www.mkssoftware.com/docs/man1/openssl_dhparam.1.asp
http://en.wikipedia.org/wiki/OpenSSL http://support.microsoft.com/kb/814394/en-us http://forums.devshed.com/security-and-cryptography-17/openssl-certificate-generation-problem-
71188.html http://www.howtoforge.com/wifi-authentication-accounting-with-freeradius-on-centos5 http://www.faqs.org/rfcs/rfc5924.html http://technet.microsoft.com/en-us/library/cc735363%28WS.10%29.aspx
Books
CCITT (Consultative Committee on International Telegraphy and Telephony) G. Brassard. Modern Cryptology. Volume 325 of Lecture Notes in Computer Science, Springer-Verlag, Berlin, 1988


![Τ.Ε.Ι. ΚΡΗΤΗΣ – ΠΑΡΑΡΤΗΜΑ ΧΑΝΙΩΝ ΤΜΗΜΑ ...nefeli.lib.teicrete.gr/browse/sefe/hlk/2014/StoupisKon...[9] Εκπαιδευτική Ελληνική Εγκυκλοπαίδεια,](https://static.fdocument.org/doc/165x107/5e4b09eb160d497fc877eef3/-a-oe-oeoe-9.jpg)